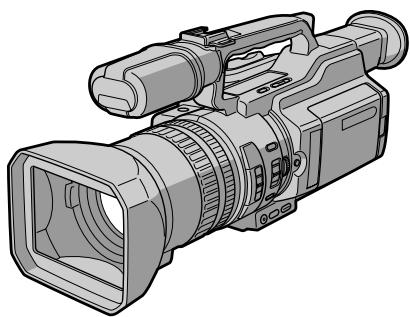
DCR-VX2000E - Camcorder SONY - Free user manual and instructions
Find the device manual for free DCR-VX2000E SONY in PDF.
User questions about DCR-VX2000E SONY
0 question about this device. Answer the ones you know or ask your own.
Ask a new question about this device
Download the instructions for your Camcorder in PDF format for free! Find your manual DCR-VX2000E - SONY and take your electronic device back in hand. On this page are published all the documents necessary for the use of your device. DCR-VX2000E by SONY.
USER MANUAL DCR-VX2000E SONY
Digital Video Camera Recorder Mini DV Digital Video Cassette
Operating Instructions
Before operating the unit, please read this manual thoroughly, and retain it for future reference.
HnctpyKuI N O 3KcnJyataaun
Ipepe3Kcnnyaataauei annapaTa BnHMaTeBbHO npOHTNe daHHoe pykoBOdCTBO n COxpaHnte ero IJn DaJIbHeuix CnpaBOK.
Digital Handycam

InfoLITHIUM
TM
SERIES

Cassette
Memory


MEMORY STICK TM
DCR-VX2000E
English
Welcome!
Congratulations on your purchase of this Sony Digital Handycam camcorder. With your Digital Handycam, you can capture life's precious moments with superior picture and sound quality. Your Digital Handycam is loaded with advanced features, but at the same time it is very easy to use. You will soon be producing home video that you can enjoy for years to come.
WARNING
To prevent fire or shock hazard, do not expose the unit to rain or moisture.
To avoid electrical shock, do not open the cabinet.
Refer servicing to qualified personnel only.
NOTICE ON THE SUPPLIED AC POWER ADAPTOR FOR CUSTOMERS IN THE UNITED KINGDOM
A moulded plug complying with BS1363 is fitted to this equipment for your safety and convenience.
Should the fuse in the plug supplied need to be replaced, a 5 AMP fuse approved by ASTA or BSI to BS 1362 (i.e., marked with or mark) must be used.
If the plug supplied with this equipment has a detachable fuse cover, be sure to attach the fuse cover after you change the fuse. Never use the plug without the fuse cover. If you should lose the fuse cover, please contact your nearest Sony service station.
For the customers in Europe ATTENTION
The electromagnetic fields at the specific frequencies may influence the picture and sound of this digital camcorder.
For the Customers in Germany
Directive: EMC Directive 89/336/EEC. 92/31/EEC
This equipment complies with the EMC regulations when used under the following circumstances:
Residential area
Business district
Light-industry district
(This equipment complies with the EMC standard regulations EN55022 Class B.)
"Memory Stick"
Pysckii
Добpo пожаловать!
I03dpaBnem BAc c npno6peTeHnem
BnuDeokamepbl Digital Handycam dpmbbl
Sony.C nmooubO BnuDeokamepbl Digital
Handycam moKHO 3aneuATneTb DOpornE Bam
MROBEHNA Xn3HN C npeBOCXoNDbIM
KaueCTBOM N3obpaKeHnN 3Byka.
BnuDeokamepa Digital Handycam ochauneHa
ycOBepueHCTBOBaHHbIMn FyHKUaMMN, HO B TO
Xe BpMa ee OChb IerKo IcNoJIb3OBA Tb.
Bckope Bbl 6ydeTe CO3DaBaTb CeMeHbIe
BnuDeonpoPpAMMbI, KOTOpbIMn CMOKeTe
HacnaJkDaTbCBA NocJeDuOuine RoDbI.
PNEyPPEKDEHNE
Checking supplied accessories 5
Quick Start Guide 6
Getting started
Using this manual. 10
Step 1 Preparing the power supply 13
Step 2 Inserting a cassette 20
Recording - Basics
Recording a picture 22
Shooting backlit subjects (BACK LIGHT) 32
Using the spot light function 33
Self-timer recording 34
Checking the recording - END SEARCH / EDITSEARCH / Rec Review 36
Playback - Basics
Playing back a tape 38
Viewing the recording on TV 44
Advanced Recording Operations
Recording a still image on a tape
-Tape Photo recording 46
Shooting with all the pixels -PROG.SCAN 50
Using the guide frame 52
Using the wide mode 53
Using the fader function 54
Using special effects - Picture effect 56
Using special effects - Digital effect 58
Shooting with manual adjustment 61
Adjusting the white balance 70
Adjusting recording level manually -Sound recording level 73
Preseting the adjustment for picture quality - Custom preset 75
Using the PROGRAM AE function 77
Focusing manually 81
Interval recording 83
Frame by frame recording
- Cut recording 87
Marking an Index 89
AdvancedPlaybackOperations
Quickly locating a scene using the zero set memory function 91
Searching for a recording by index -Index search 93
Searching the boundaries of recorded tape by title - Title search. 95
Searching a recording by date -Date search. 97
Searching for a photo - Photo search/Photoscan 99
Playing back a tape with picture effects..... 102
Playing back a tape with digital effects... 103
Editing
Dubbing a tape 105
Dubbing only desired scenes - Digital program editing 108
Using with an analog video unit and a PC - Signal convert function 126
Recording video or TV programs 128
Inserting a scene from a VCR - Insert editing 132
Audio dubbing 135
Superimposing a title 141
Making your own titles. 147
Labeling a cassette 149
Erasing the cassette memory data 151
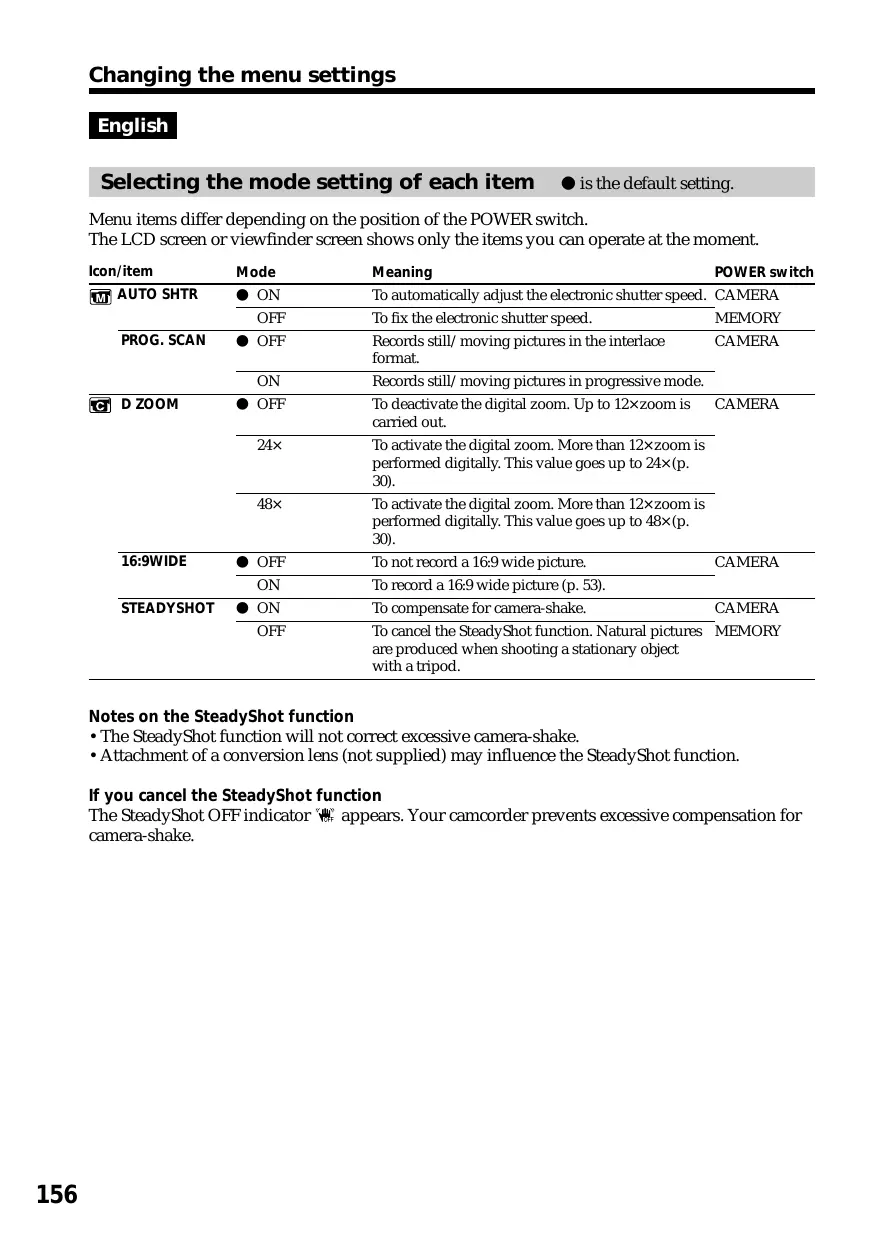
Customizing Your Camcorder Changing the menu settings 154
Resetting the date and time 168
"Memory Stick" Operations Using a "Memory Stick" - introduction..... 170
Recording still images on a "Memory Stick" - Memory Photo recording 177
Superimposing a still image in a "Memory Stick" on a moving picture - MEMORY MIX 182
Recording an image from a mini DV tape as a still image 187
Copying still images from a mini DV tape - Photo save 191
Viewing a still picture - Memory Photo playback 193
Copying an image recorded on a "Memory Stick" to mini DV tapes 198
Playing back images continuously -SLIDE SHOW 200
Preventing accidental erasure -Image protection 202
Deleting images 204
Writing a print mark - Print mark 208
Additional Information Usable cassettes 210
About i.LINK 214
Troubleshooting 216
Self-diagnosis display 222
Warning indicators and messages 230
Using your camcorder abroad 233
Maintenance information and precautions 234
Specifications 241
Quick Reference
Identifying the parts and controls. 243
Quick Function Guide 256
Index 258
PpOBepKa npnilaraembIX
PpHaJaJIeXHoCTeI 5
PykoBoCTBO no 6bICTpOmy 3anycky 8
Bocnpoun3BeJeHne JeHTbI 38
IpocMToP 3aIncn Ha 3KpaHe TeLeBn3opa .44
YcoBepueHCTBOBaHHbIe Oepaunm CbeMKn
3aIncb HnODbNkHOro I3O6paXeHnHaJIeHTy -3aIncb fOToTporpaΦn HaJIeHTy ...46
CbeMa cNIOJIb3OBAHHeM BCEX NIKCEJIOB -PROG.SCAN 50
IcnoJb3ObaHne KOHTpoJbHOpaMKn 52
IcnoIb3OBAHnE IINpOKo3KpaHHOrOpexkMa 53
IcnoJb3OBAHne cyHKcun feiepa 54
IcnoB3OBAHnE CneMaJIbHbIX 3ΦΦeKToB -3ΦΦeKr n3o6paXeHnI. 56
IcnoIb3OBAHnE CneUmaIbHbIX 3ΦΦeKTOB -LIOPOBOI 3ΦΦeKT. 58
CbeMa c nCnoJIb3OBAHnEm pyHNoI peryInpOBKn 61
Perynipovka 6anaHca 6eIoro uBeTa .70
PerynipoBka ypOBH 3aIncn BpyHyU -YpOBeHb 3aIncn 3ByKa 73
KpaTKoe pyKOBOCTBO NO yHKUNM ....257
AnpaBnThb yka3aTeIb 259
Make sure that the following accessories are supplied with your camcorder.
Y6eDNTecb, YTO B KOMNJIeKT NOCtABKN BVNeOKeKampebl XoJdT CneJeIyoUePnInaJIeXHKnCTNo.
| 1 | 2 | 3 |
| 4 | 5 | 6 |
| 7 | 8 | 9 |
| 11 | 12 | 13 |
1 Wireless Remote Commander (1) (p. 252)
AC-L10A/L10B/L10C AC power adaptor (1), Mains lead (1) (p. 14)
3 NP-F330 battery pack (1) (p. 13, 14)
R6 (size AA) battery for Remote Commander (2) (p. 253)
Memory Stick Reader/Writer (1), Stand (1), Specified extension cable (1), Driver software (CD-ROM) (1) You cannot use the "PIXELA ImageMixer" software to copy images from your camcorder to your computer.
[6] "Memory Stick" (1) (p. 170)
7 A/V connecting cable (1) (p. 44, 105)
Hood cap (1) (p. 22)
9 Shoulder strap (1) (p. 249)
10 Application software: PictureGear 4.1Lite (CD-ROM) (1) (p. 197)
Lens hood (1) (p. 247)
12 Eyecup (large) (1) (p. 28)
13 21-pin adaptor (1) (p. 45)
1 BeçncpoBɔODhbl nyIbT nIcTaHcNHOHHOrO ynpaBJIeHn (1) (ctp. 252)
2 CeTeBoi aadantep nepemEnHoro ToKa AC-L10A/L10B/L10C AC (1), npoBoI 3JIeKTPoPntaHnI (1) (cTp. 14)
3 BaTapeiHbI 6JIOK NP-F330 (1) (cTp. 13, 14)
4 BaTapeiKa R6 (pa3Mepa AA) nIyNbTa DnCTaHcNoHHOrO ynpAbeHn (2) (ctp. 253)
5 UcpoCTBO YeHn/3aHncn "Memory Stick" (1), PoDctabKa (1), Yka3aHHbI Ka6eJIy-udInHtEn, (1), IprpamMHOe o6ecneHne dpaBepa (CD-ROM) (1) IprpamMy "PIXELA ImageMixer" HeIb3I NcNoIb3OBaTb IJr KOnIpoBaHnI N3O6paXeHn C KaMepebHa KOMblOTep.
6 "Memory Stick" (1) (cTp. 170)
7 CoeHnTeIbHbI Ka6eIb aydno/Bndeo (1) (ctp.44,105)
8 Kpbioka (1) (ctp.22)
9ПлесуьpeMeHb(1)(cTp.249)
10Прикладhoe nporpamMHOoe obecneueHne: PictureGear 4.1Lite (CD-ROM) (1) (cTp. 197)
11БileHda oBbektuBa (1) (cTp. 247)
12 OkyIrp (60lbwoi) (1) (cTp. 28)
13 21-wTbipbKobBiaaanTep (1) (cTp. 45)

This guide introduces you to the basic way of recording/ playback. See the pages in parentheses "() for more information.
1
Connecting the mains lead (p. 18)
Use the battery pack when using your camcorder outdoors (p. 13).
Connect the plug with its
mark facing toward the
LCD panel side.

AC power adaptor (supplied)
Open the DC IN jack cover.
2
Inserting a cassette (p. 20)
1
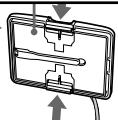
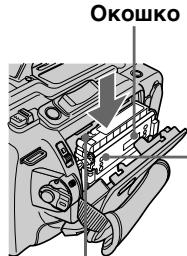
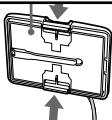
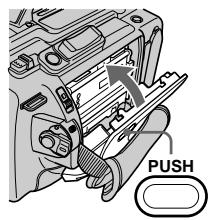
While pressing the small blue button on the EJECT switch, slide it in the direction of the arrow.

2
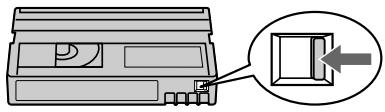
Push the middle portion of the back of the cassette to insert it. Insert the cassette into the cassette compartment with the window facing out and the write-protect tab facing upward.
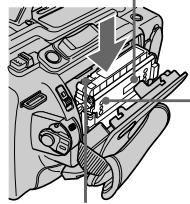
Window
3
Close the cassette compartment by pressing the PUSH mark on it.
4
Close the cassette lid by pressing the PUSH button on the cassette lid.

Write-protect tab
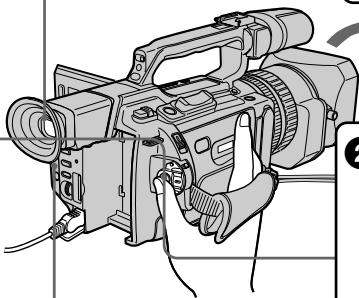
Viewfinder
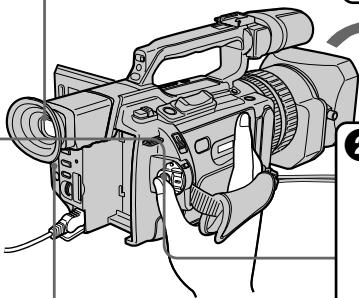
When the LCD panel is closed, use the viewfinder placing your eye against its eyecup.

Press START/ STOP. Your camcorder starts recording. To stop recording, press START/STOP again.


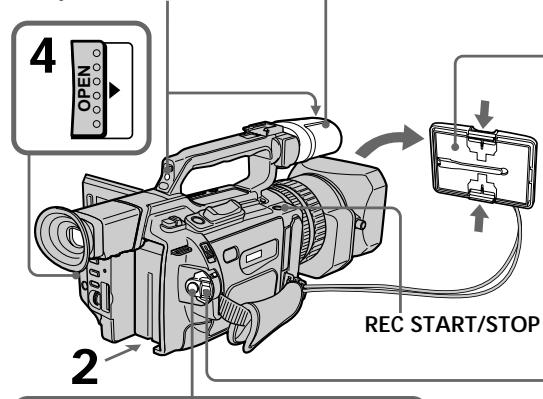
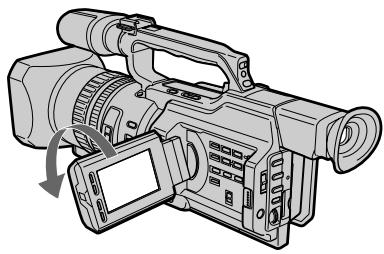
Slide OPEN back in the mark direction to open the LCD panel.


Remove the hood cap.

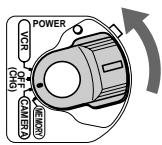
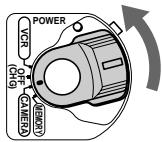
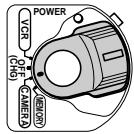
Set the POWER switch to CAMERA while pressing the small green button. The date and time is indicated for five seconds.
If the ND1 or ND2 indicator flashes, see page 65.
4
Monitoring the playback picture on the LCD screen (p. 38)

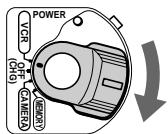
Set the POWER switch to VCR while pressing the small green button.

Press to rewind the tape.

Press to start playback.


NOTE
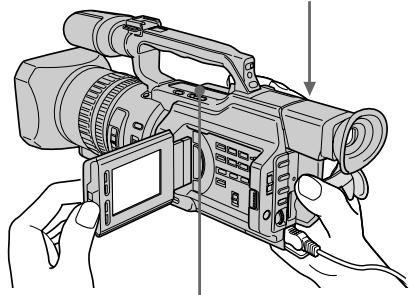
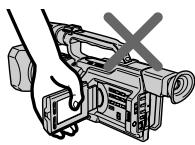
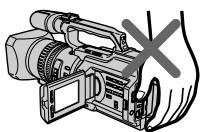
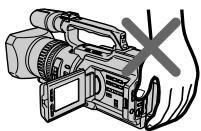
Do not pick up your camcorder by holding the viewfinder, the LCD panel, the battery pack, or the microphone.


PykoBoDcTBo nO 6bICTpOMy 3aIpycky

B 3TOM pykoBOJCTBE ONICbIbAOTcA OCHOBHbE yHKUIN 3aIncn/BOcnpOn3BeDeHn. Cm. cTpaHnCbl B KpyrJIbIX cKo6kax “()”ДЯ NOJUChEN I NOJpO6hIX CBeDEHn.
1 ПодсоeДинeHne npOBoJa эЛeКТрОПИТаHЯ (cTp. 18)
JIenctOK 3aunTbI OT 3aUNC

BudonckaTeIb
Ecnn naneHb JKKd 3aKpbIta, BocnoIb3yntecb BINOINCKaTeJeM, TJIJaB OOKyJAp.
4 Haxmnte KhONky START/STOP. Bndeokamepa hauHET 3anncb. IJra ocTaHOBKn 3anncu Haxmnte KhoNky START/ STOP eue pa3.

3 PeneBnHbTe nepeKIOuateIb OPEN Ha3aD B HaprabHeHn CTpeKNK, YTO6bI OTKpbITb NaHeJIb KKD.

1 CHINMITEKpbiHKY.
Haxab MaJIeHbKyU 3eJIeHyU KHOIky, yCTaHOBNTe nepeKJIIOuTaTeNb POWER B nOIOXeHne CAMERA. Ha nIaTb CeKYHd NOBtCnHnDnKaun DaTbI N BpemeHi.
EcnmMnraetHnDnkaTOpND1 nnND2,cm.ctp.65.
4
He noDnHMaIe BnDeoKamepy, depJa ee 3a BnDoNcKaTeB, naHb KKd, 6aTapeHbI bJOK nIN MKNpOfoH.


As you read through this manual, buttons and settings on your camcorder are shown in capital letters.
e.g. Set the POWER switch to CAMERA.
When you carry out an operation, you can hear a beep or a melody sound to indicate that the operation is being carried out.
Note on cassette memory
Your camcorder is based on the DV format.
You can only use mini DV cassettes with your camcorder. We recommend that you use a tape with cassette memory CIII.
The functions which require different operations depending on whether or not the tape has cassette memory are:
- Searching the end point of the recording - end search (p. 36, 43)
- Searching a recording by index - index search (p. 93)
- Searching a recording by date - date search (p. 97)
- Searching for a photo - photo search (p. 99). The functions you can operate only with cassette memory are:
- Searching the boundaries of recorded tape by title - title search (p. 95)
Superimposing a title (p. 141) - Making your own titles (p. 147)
- Labeling a cassette (p. 149).
For details, see page 210.

You see this mark in the introduction of the features that are operated only with cassette memory.
Tapes with cassette memory are marked with Clll (Cassette Memory).
JIeHTbIC KaCCTeHoi NaMaTbIO MapKnpyOTcC NOMOuBIO 3HaKa CII (KACCtHra NaMaTb).
Note on TV colour systems
TV colour systems differ from country to country. To view your recordings on a TV, you need a PAL system-based TV.
Copyright precautions
Television programs, films, video tapes, and other materials may be copyrighted. Unauthorized recording of such materials may be contrary to the provision of the copyright laws.
Precautions on camcorder care
- The LCD screen and the viewfinder are manufactured using high-precision technology. However, there may be some tiny black points and/or bright points (red, blue, green or white) that constantly appear on the LCD screen and in the viewfinder. These points occur normally in the manufacturing process and do not affect the recorded picture in any way. Effective ratio of pixels and/or screen is 99.99% or more.
- Do not let your camcorder get wet. Keep your camcorder away from rain and sea water. Letting your camcorder get wet may cause your camcorder to malfunction. Sometimes this malfunction cannot be repaired [a].
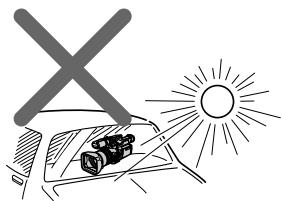
- Never leave your camcorder exposed to temperatures above 60^ (140^) , such as in a car parked in the sun or under direct sunlight [b].
- Do not place your camcorder so as to point the viewfinder or the LCD screen or lens toward the sun. The inside of the viewfinder, LCD screen, or lens may be damaged [c].
IcnoJb3ObaHne daHHoro pyKOBOdCTBa
- He donyckaite noBHeHn BnaI chApykn BHytpn BInDeOkampeI. IpeDoXpaHnTe BInDeOkampeY OT DoJn MOpCKoB ODbI. Blara MoKet npBeCTN K HenoJaKam B pa6ote BInDeOkampeI. NHorda HeNCnPabHOCTb yCTpaHnTb HeBO3MOxHO [a].
- Hikorda He octabJrte Bndeokamepy B MeCTax, rIe TempepaTpa NOnHmaeTcB CbIiE 60 ^ C , HApimep, B aBTOMoBnIe, PnpnapKOBaHHom B COJIHeHOM McTe, INIOI IOIINPIMbIM COJIHeHbIM CBETOM [b].
- He donyckaIte nonaHaHn npAByx coNHeuHbIX lyeH Ha BnOOnCKaTeIb nII IN 3KpaH KKД nII ObEKeTnB. INaHe MOrYt BO3HNKHyTB NOBpeXdEHn BHyTpEhReTO yCToiCTBa BnOOnCKaTeJI, 3KpaHa KKД nII ObEKeTnBA [c].

[a]
[b]

[c]
Contents of the recording cannot be compensated if recording or playback is not made due to a malfunction of the camcorder, video tape, etc.
Coepxmoe 3aHncaHHoro MaTePnana HeBO3MOXHO BOCCTaHOBNTb,ecJIN 3aNcB nJIN BOCpOIN3BeJeHHe NOnyUHInCb NpIpyHHe HncPiBaHocTn BNdeOKaMepbI, BNdeOJIeHTbI N.T.I.
Step 1 Preparing the power supply
Installing the battery pack
Install the battery pack to use your camcorder outdoors.
(1) Lift up the viewfinder.
(2) Insert the battery pack in the direction of the mark on the battery pack. Slide the battery pack until it is locked.
To remove the battery pack
Lift up the viewfinder.
Slide the battery pack out in the direction of the arrow while pressing BATT RELEASE down.
ДлСНТИЗБАТЕЙНОВ6ЛOKA
IOnHMMTe BUNOINCKaTeJIb.
IpeeBnHbTe 6aTapeiHbI 6IOK B HnpaBHeHn CTpEkn, Haxab KhoNky BATT RELEASE BHN3.
Charging the battery pack
Use the battery pack after charging it. Your camcorder operates only with the "InfoLITHIUM" battery pack (L series).
(1) Open the DC IN jack cover and connect the AC power adaptor supplied with your camcorder to the DC IN jack with the plug's mark facing toward the LCD panel side.
(2) Connect the mains lead to the AC power adaptor.
(3) Connect the mains lead to the mains.
(4) Set the POWER switch to OFF (CHG). Charging begins.
The remaining battery time is indicated in minutes on the display window.
When the remaining battery indicator changes to , normal charge is completed. To fully charge the battery (full charge), leave the battery pack attached for about one hour after normal charge is completed until FULL appears on the display window. Fully charging the battery allows you to use the battery longer than usual.
3apka 6aTaapeHoro 6loka
IcnoJb3yTe 6aTapeHbI 6Jok nocJe erO 3apJkN.
Ba7a BnDEOKamepa pa6oTaet TOnbKO C 6aTapeHbIM 6JIOKOM "InfoLITHIUM" (cepN L).
(1)OTkpoIe KpbIshky rHe3da DC IN n noDcoEHHTe cTeBOaAanTpep nepemEHnOToKa, npinaraembIK BnJeokamepe, K rHe3dy DC IN, TaK yTo6bl 3NaK ▲Ha wTeKepe 6bl o6paueH B CTOpOHy naHEn JKKD.
(2)ПодсоeДинHTe npOBOD эЛeКТрОпТанИΚ cTeBOMy aДaNTepу nepemeHOrO TOKa.
(3)ПодсоeДинHTe npOBOD эЛeКТрОпТаHЯ K cTeBOI po3eTke.
(4)Установпейреклочатуь POWER в положене OFF (CHG).Нayнетсу Зардka.
B OKoUke dinCnpe 6yJeT OTo6paKaTbcra Bpemr ocTabWeroC3apraD a MmHyTax. EcInn HndkaTop ocTabweroC3apraDa n3MeHHTcra Ha ,3TO 3HaunT, YTO HOpMaIbHna 3apAdka 3abepweHa.ДлЯ NOIHOH 3apAdkn 6bATEHNO 6loka (NoHna 3apAdka) ocTaBbTe 6bATEHbIi 6LOK POKJIIOUeHHbIM PnIbIINTEJbHO Ha ODNH cAC NocLe 3aBePeHnHOPMaIbHOJ 3apAdkn DoTex NOP, NOKA B OKOuKe dinCnpe He NoBHTcra INDkaucJa FULL. POnHAR 3apAdka 6bATapeHoro 6loka N03BOJAEt Bam IcNpONb3OBaTb 6bATapeHbI b6LOK DOnIbSe, Yem OblyHNO.
Step 1 Preparing the power supply
After charging the battery pack Disconnect the AC power adaptor from the DC IN jack on your camcorder.
Note on the remaining battery time indicator
The remaining battery time indicator on the LCD screen/display window or in the viewfinder indicates the recording time using the viewfinder. The indicator may not be correct, depending on the conditions in which you are recording. When you close the LCD panel and open it again, it takes about one minute for the correct remaining battery time to be displayed.
Notes
- Prevent metallic objects from coming into contact with the metal parts of the DC plug of the AC power adaptor. This may cause a short-circuit, damaging the AC power adaptor.
- Keep the battery pack dry.
- When the battery pack is not to be used for a long time, charge the battery pack once fully, and then use it until it fully discharges again. Keep the battery pack in a cool place.
Until your camcorder calculates the actual remaining battery time
"---min" appears in the display window.
While charging the battery pack, no indicator appears or the indicator flashes in the display window in the following cases:
- The battery pack is not installed correctly.
- The AC power adaptor is disconnected.
- Something is wrong with the battery pack.
IyHKT 1 IIOJROTOBka NCTOCHKA nHTAHN
IocJe 3apRKn 6aTapeHoro 6loka
OTcoeHnTe cTeB0aJaTep nepemEnHOrToKa OT rHe3da DC IN Ha BaueBnDeokamepe.
HnkaTop octabweroocBpeMeHN paobtbi 6aTapen
INHdkaTop ocTabweoC BpeMeHN pa60tbl 6batapeHa 3kpaHe KKDbOkHe DnCnIe NnB BVIOOMCKaTeNe NOKa3bIbaeT BpeMra3aNcN C nOMOuB IOUOnCKaTeJI. INHdkaJIM MOKET 6bITb HE COBCEM TOHOr, B 3aBNCmOCTN OT yCNOBNI, B KOTOpbIX pPON3BOJNTCR 3aNcB. EcIn 3akpblb naHeB XKdN OTKpbITb ee CHOBa,TO pPi6bn3ntbHo Uepe3 MHHTy NOBnTc INHdkaJIN, OTo6paKaHOJau TOnHoe OCTabWeecr BpeMpa60tbl 6batapei.
PpimueaHn
- He donnyckaanTe KOHTaKTa MeTaalnuecknx npedMeTOB C MeTaalnueCKMn YacTAMn WTekepa NocToHnHO TOKa CeTeBOr o aanTepa. 3To MoKeT PnVBecTu K KOPOTKOMy 3ambIkaHNIO N IOBpeXdeHNIO BaWe BnDeokamepbl.
-ДерхитебатеиньблOKВ cyxOM COCTOHAHIN.
Korda 6aTaapeHbI 6nOK He nCnOJIb3yETcB B TeueHne dInTeJbHO npomExkyTka BpeMeHN, pONHOCTbIO 3aprAnTe erO, a 3aTEM nCnOJIb3yIte, nOKa OH He pa3pIITcR OKOHuaTeJbHo. XpaHnte 6aTaapeHbI 6nOK B IpoxlaHOM MeCTe.
Do tex nop, noka Bawa Bndeokamepa He onpeJeIIT DeIcTBIneBHeBpeM oCTabWeOc8 3apJa 6aTapeHoro 6loKa B OkoKe IncIe8 6yDet OTo6paKaTbcra INDnKaUra "-- - - min".
Bo Bpem 3apAdkn 6atapeHoro 6IokaB OKoUke DncJIpeH He 6yDet OTo6paKaTbcn HndKATop Nn OH 6yDet MrraTb B cJeDyUOxN Cnyuax:
-Батapestеньшблok yctahOBJIeH He npaBnblHo.
-OTcoeDInHeN cTeBoB aJaTep nepemehHoro TOKa.
-HeinpaBHOCTb 6aTapeHoro 6Joka.
Charging time/Bpem3apdKn
| Battery pack/Батарейный 6лok | Full charge (Normal charge)/Полная заряда (Нормальна заряда) |
| NP-F330 (supplied/Вхочи в КOMпелков) | 150 (90) |
| NP-F530/F550 | 210 (150) |
| NP-F730/F750 | 300 (240) |
| NP-F930/F950 | 390 (330) |
| NP-F960 | 420 (360) |
Approximate minutes to charge an empty battery pack
Approximate minutes of recording time when you use a fully charged battery
Numbers in parentheses " ( ) " indicate the time using a normally charged battery.
You cannot use the NP-500/510/710 battery pack on your camcorder.
PnIbI3nteIbHoe Bpem 3aIncB MHytax
PpNcIOJIb3OBAHmI POJIHOCTbIO 3apJXeHHORo
6batapeHoro 6Ioka
LüΦpbl B cKo6kax (“) yKa3bIbaIOT BpeMa npi nCIOJIb3OBAHm6BaTapeHOrO 6Joka C HopMaJIbHOI 3aPdIKoI.
B3TOB BnDeOkaMepe HeIb3a IcNoIb3OBaTb 6aTaPeHbIb6loK NP-500/510/710.
Step 1 Preparing the power supply
- Approximate continuous recording time at 25^ C( 77^ F) . The battery life will be shorter if you use your camcorder in a cold environment.
** Approximate minutes when recording while you repeat recording start/stop, zooming and turning the power on/off. The actual battery life may be shorter.
IyHKT 1 IIOJROTOBka NCTOCHNkA nHTAHN
* PnIbI3IteJIbHOe BpEm HeIpepbIBHOJ 3aIncI pI rTeMepaType 25^ .Ppi IcNoJIb3OBAHm BNDeOKaMepeB I XoIoNDbIX ycIOBnIX cPoK ClyXbI 6aTapeHOrO 6loKa cokpaauetca.
**PnIbI3nteIbHoeBpeMBA MmHyTax npn 3aIncn C HeoDHOKpaTHbIM PyCKOM/ ocTaHOBko, yBeJIuYeHHeM N3O6paJxehn I BKIOUcHHeM/BbIKIOUcHHeM PNTaHn. KaTtueckn cpoK cnLxkbI bAtapeHoro 6loka MoKet 6bITb Kopoye.
Playing time/BpemBAocnpon3BedeHn
| Battery pack/ Батарейн的品牌 | Playing time on LCD screen/ Верma Воспponзve徳ны на захра themselves | Playing time with LCD closed/ Верma Воспponзve徳ны с захры themselves |
| NP-F330 (supplied/) Вхордь в komлесу | 90 (80) | 110 (95) |
| NP-F530 | 150 (135) | 190 (165) |
| NP-F550 | 185 (165) | 225 (195) |
| NP-F730 | 305 (275) | 385 (345) |
| NP-F750 | 375 (335) | 460 (415) |
| NP-F930 | 475 (430) | 605 (540) |
| NP-F950 | 570 (510) | 705 (630) |
| NP-F960 | 680 (610) | 830 (745) |
Approximate minutes of playing time when you use a fully charged battery
Numbers in parentheses (·) indicate the time using a normally charged battery. The battery life will be shorter if you use your camcorder in a cold environment. You cannot use the NP-500/510/710 battery pack on your camcorder.
Notes
- The supplied battery pack is charged a little.
- Some types of the battery packs may not be sold in your region or country.
PnI6JIIN3NTeJIbHOE BpEMA BOCIpON3BeDEHnB MmHyTAX PpN IcNOJIb3OBAHNIOJHOCTbO3apXKeHHOro 6aTapeHOro 6loka
LcΦbB CkO6Kax()yKa3bIBAHOT BpEM npn nCNoJIb3OBAHm 6aTapeHoro 6Ioka C HopMaJIbHO 3apJIKoI.
PnNcNoJIb3OBAHm BVJeOKaMepbl B xOIOhBIX yCNOBHX cPOK cIyX6bl 6aTapeHoro 6Ioka cokpaUaETcR.
B3ToB VInDeOkampe Helb3r nCNoJIb3OBAt b 6aTapeHbI 6Iok NP-500/510/710.
Приимейчения
- Пилагаемь 6атapeйнь 6лOK чатуноЗapяжен.
Bo3MOxHOBaSeObnactnIINCTpaHeB npOdaKe HET HeKOTOpbIX TUNOB 6bTaapeHbIX 6JIOKOB.
Step 1 Preparing the power supply
What is "InfoLITHIUM?"
The "InfoLITHIUM" is a lithium ion battery pack which can exchange data such as battery consumption with compatible video equipment. This unit is compatible with the "InfoLITHIUM" battery pack (L series). Your camcorder operates only with the "InfoLITHIUM" battery. "InfoLITHIUM" battery packs (L series) have the ① InfoLITHIUM ① mark.
"InfoLITHIUM" is a trademark of Sony Corporation.
If the camcorder is immediately turned off Even if the remaining battery time is enough to operate, charge the battery pack fully again. The correct remaining time is displayed.
Connecting to the mains
When you use your camcorder for a long time, we recommend that you power it from the mains using the AC power adaptor.
(1) Open the DC IN jack cover and connect the AC power adaptor to the DC IN jack on your camcorder with the plug's mark facing toward the LCD panel side.
(2) Connect the mains lead to the AC power adaptor.
(3) Connect the mains lead to the mains.
IyHKT 1 PNOrTOBka NCTOuHnKa IHTAHN
Step 1 Preparing the power supply
Precaution
The set is not disconnected from the AC power source (mains) as long as it is connected to the mains, even if the set itself has been turned off.
Notes
- The mains lead must only be changed at an authorized service shop.
- AC power adaptor can supply power even if the battery pack is attached to your camcorder.
- The DC IN jack has source priority. This means that the battery pack cannot supply any power if the mains lead is connected to the DC IN jack, even when the mains lead is not plugged into the mains.
Using a car battery
Use the Sony DC Adaptor/Charger (not supplied).
IyHKT 1 IIOrTOBka NCTOuHnKa IHTaHnA
MepbI npedocTopoXHoctn
Annapat He OTKIHOaETcO NTocHnKa nepemHHoro TOKa Do Tex nop, NOKa OH nOIOCoEINHeK 3JIeKTPnuecko CeTn, DaJKe ecn Cam annapat BbIKHoueh.
Приимechанин.
-Пювов Зелковпатань следует 3амени<TOTьКВTOМ MacTepeckо,у KOTOPО IMeETca pa3peшен.
Питане OT ceTeBOrO aДaNTepa nepeMeHHORo TOkAMoKET NOdaBaTbcJджЕВ TOM Cnyuae, KOrJa 6bTaapeHbI 6bLOK npICoeDmHEn K BnDEOKaMepe.
- THe3do DC IN oblaaet npOpntetom nTochnka. 3To 03Haayet, YTO nTaHne OT 6bataeHoro 6Ioka He nOdaetcna, noka npoBOD 3NeKtpoNTaHn IOnCoEINHeN K THe3dy DC IN, daJe ecnn npoBoD 3NeKtpoNTaHn He BkInoueH B CeTeByIO pO3eTky.
UcnoJIb3OBAHne aBTOMo6nIbHOrO aKKymyIaTopa
IcnoJIb3yIte aIaIaTeP/3apIaHoe yCTpoIcTBO nOCToAHHOTo Toka Sony (He BXoIIT B KOMJIeKT).
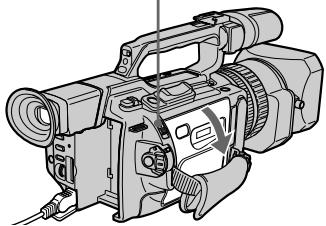
Step 2 Inserting a cassette
(1) Install the power source.
(2) While pressing the small blue button on the EJECT switch, slide it in the direction of the arrow. After the cassette lid is opened, the cassette compartment automatically opens.
(3) Push the middle portion of the back of the cassette to insert it. Insert the cassette in a straight line deeply into the cassette compartment with the window facing out and the write-protect tab facing upward.
(4) Close the cassette compartment by pressing the PUSH mark on it.
(5) Close the cassette lid until it clicks by pressing the PUSH button on the lid.
Пун=kT 2Установka kaccetbl
(1)YctaHOBNTe NCTOCHNK NITAHNA.
(2)Haxab He6oBbUyIO CnHIO KHOIky Ha nepeKluoyateE EJECT,nepeDbInbTe erO B HappaBJIeHN CTpeKN. PocJe OTkpbltna KpbIuKN KaccETHOOTcKa KaccETbIOTcEK OTkPoETc ABTomaTHeCKN.
(3)Haxmnte nocpeDnHe 3aDnei CTopoHbI Kaccetbl dIe ee yCTaHOBKn. BcTaBte Kaccety no npMoi B Kaccetbl OTCEK Do ynopa, TaK YTO6b OkoWko 6bIIO o6paueHo Hapxky, a JeNEcTOK 3aunTbI OT 3aNcN - BBepx.
(4)3aKpOte KaccetHbI OtceK, HaxKaB Ha HEM MeTky PUSH.
(5)3aKpOTe Do ueNkA KpbIuKy KacceTHoro OTCeKa, HauKaB Ha Hei KhoNky PUSH.
5
To eject a cassette
Follow the procedure above, and take out the cassette in step 3.
Note
The cassette lid will not be closed when you press any part of the lid other than the PUSH button.
IIN3BLeeHnKaccetbI
BbIOnHnTe yka3aHnyo BblSe npOeDpyu N BblbTe Kaccety B nyHKTe 3.
PpmeaHne
KpbIuKa KacceTHOro OTeCeKa He 3aKpoeTcA,ecnnaHaxaTb Ha KaKyIO-Ni6O DpyrHyO YacTbHa KpbIuKe,aHeHa PUSH.
Step 2 Inserting a cassette
When you use mini DV cassettes with cassette memory
Read the instruction about cassette memory to use this function properly (p. 210).
To prevent accidental erasure
Slide the write-protect tab on the cassette to the protect position.
NyHKT 2 YcTaHOBKa KacceTbI
Пи ИСЮЛБЗОВАн NACCEТ MИН DV C KACCETHОД ПAMTьIO
IpoHTte HNCTpyKUIO O KACCETHOI naMRTn IaI npabInbHOrO NcNoJIb3OBaHnA 3ToI ΦyHKUIN (CTp.210).
ДлпгдгбсчногoctnpaHn
IpeeBnHbTe IeneCTOK 3aunTbI OT 3aNcN Ha KaCCTe B 3aunTHoe NIOXKeHne.
If the grip strap prevents the cassette lid from opening fully
Adjust the length of the grip strap (p. 249).
If flashes even if the cassette has been inserted
Press the PUSH button again to close the cover firmly.
Ecni peMeHb Ia 3axBaTa He no3BOJnE T OJIHOCTbO OTKpbITb KpbIiKy KACCETHOOTCEka
OtperyunpyTe dInHy pemHn dIn 3axBaTa (cTp.249).
Korda mraet nHdkauny, daJe ecnBCTabIeHa Kacceta
HaKMMTe KhoNkPy PUSH eue pa3, yTo6bl NIOTHO 3aKpbItb KpbIuKy.
Recording a picture
Your camcorder automatically focuses for you.
(1) Remove the hood cap and pull the hood cap string to fix it.
(2) Install the power source and insert a cassette. See "Step 1" and "Step 2" for more information (p. 13 to 21).
(3) Set the POWER switch to CAMERA while pressing the small green button. Your camcorder is set to the standby mode.
(4) Slide OPEN in the direction of the mark to open the LCD panel.
The picture now being shot is displayed on the LCD screen, and it disappears from the viewfinder screen.
(5) Press START/STOP. Your camcorder starts recording. The "REC" indicator appears.
The camera recording lamps located on the front and rear of your camcorder light up. To stop recording, press START/STOP again.
You can use REC START/STOP located on the front instead of START/STOP on the rear.
Camera recording lamps/ lamnoquk 3anncn kamepbI
Microphone/ Minkpopon
5
40min REC 0:00:01
3aannscb n3o6paXeHnA
If the ND1 or ND2 indicator flashes on the LCD screen or in the viewfinder The ND filter is necessary. Set the ND FILTER selector to 1 or 2. However, if you change the position during recording, the brightness of the picture may change or audio noise may occur. This is not a malfunction. We recommend that you check the position of the ND FILTER selector before shooting. See "Using the ND filter" on page 65.
Notes
- Fasten the grip strap firmly.
- Do not touch the microphone during recording.
Note on the recording mode
Your camcorder records and plays back in SP (standard play) mode and in LP (long play) mode. Select SP or LP in the menu settings. In LP mode, you can record 1.5 times as long as in SP mode.
When you record a tape on your camcorder in LP mode, we recommend playing the tape on your camcorder.
Note on the LOCK switch
When you slide the LOCK switch to the left, the POWER switch can no longer be set to MEMORY accidentally. The LOCK switch is set to the right as a default setting. We recommend that you set the LOCK switch to the left when you record on a mini DV cassette.
Note on the progressive mode
If you intend to use the images on your PC or play the images back as still images, we recommend that you set PROG. SCAN to ON in the menu settings before shooting (p. 50). The picture quality may improve in this mode, but if you shoot a moving subject, the image may shake when it is played back.
3aHcB n3o6paXeHnA
KordaHa 3kpaHe KKД uInu B BuDOnsKaTeIe Miraet uHdNkaTOp ND1 uINu ND2
Tpe6yeTcAФиNbTp ND.YctaHOBnTe nepeKIOuOATEnb ND FILTER B nIoXeHne 1 nIi2.Iprn I3MeHEnn IIOxoEHHo BO BpEmr 3aIINCS MOxET I3MEHNbCra RPKOCTb I3O6paKeHHeN IIN IOBnTBcYWM.OdHaKO 3To He ABJIeTCa HEICnPpABHOCTbIO. IIOxoEHe nepeKIOUOATeNB ND FILTER peKOMeHdyETcPnpOBepTaBpeed cBeMKo. CM."UcNoIb3OBAHneФиNbtpaND"Ha cTp. 65.
Приимechаня
HaJeXHo npKpeHnTe peMeHb dIa 3aXBaTa.
- Bo Bpemr 3a\Pncn He npKacaiTecb K mKpOfoHy.
PpimmeaHne no pexkmy 3aHncn
Baissa Bndeokamepa BbIOpHnHET 3aIncb N Bocpnon3BedeHne B pexime SP (CTaHdapTHe Bocpnon3BedeHne) N B pexime LP (DolromprauOe Bocpnon3BedeHne). BbI6epnte pexime SP nLI LP B yctahOBkax MeHIO. B pexime LP Bbl moKeTe BblOpHnTb 3aIncb B 1,5 pa3a dOJIbSe NO BpeMeHN, Yem B pexime SP. EcNI JeHTa 6bla 3aIncsHa Ha 3Toi BnDEokamepe B pexime LP, ee peKOMeHdyETcB OBCpnON3BOJNTb Ha 3Toi Xe BnDEokamepe.
IpekeIouaTeIb LOCK
Ecni nepeBnHyb nepeKluOaTeIb LOCK BJIeBO, nepeKluOaTeIb POWER yxe HEB03MOxHO CnyauHObYo cystaHOBuTb B noLoJoxHe MEMORY. IpeKluOaTeIb LOCK Ha npEepnAeTmN-n3rOToBtTeNe ycTaHaBnBaTaC T npaBoe noLoJoxHe (ycTaHOBKaNo ymonuHaHIO).Ppi 3aHcN ha KaccETy MmN DV peKoMeHdyETc yCTaHOBTuB nepeKluOaTeIb LOCK B JLeBOe noLoJoxHe.
Ppimmeahne no nporpeccnBHomy pekmy EcnI Tpe6yeTcN cnoJIb3ObaT bN3o6paXeHnHa NK nIIN BocpnOn3BODInTB IN KAK HeNoDBNXHbIE N3o6paXeHn, peKOMeHNyTeC yCTaHOBNTB PROG. SCAN B noJIOXeHn ON bYCTAHOBkA MeHIO nepeI hauJAlom CbEMKn (ctp. 50). A bTOM peKIMe MOKeT yUynuHTbCR KaueCTBO N3o6paXeHn, OdHaKO, eCNI CHmJAC DnIXKyUncs OBekT, pRn BOCpnON3BeDeHn N3o6paXeHn MocKeT dPoXaTb.
To enable smooth transition
Transition between the last scene you recorded and the next scene is smooth as long as you do not eject the cassette even if you turn off your camcorder. When you use a tape with cassette memory, however, you can make the transition smooth even after ejecting the cassette if you use the end search function (p. 36).
However, check the following:
- When you change the battery pack, set the POWER switch to OFF (CHG).
- Do not mix recordings in the SP mode and ones in the LP mode on one tape.
Note on tape transition
The playback picture may be distorted or the time code may not be written properly between scenes when:
- You change the recording mode (SP/LP).
- You record in LP mode.
If you leave your camcorder in standby mode for five minutes while the cassette is inserted
Your camcorder automatically turns off. This is to prevent tape wear and save battery power. To resume the standby mode, set the POWER switch to OFF (CHG), and to CAMERA again. When a cassette is not inserted, your camcorder does not turn off.
Длобесоченплав Horopepexoda
IpeexoM mExdy nocLeHnM 3aNcAHbIM 3n30DOM n CneDyUOUM 3n30DOM 6yDet PJIaHBiM, NOKa He 6yDet N3BneHa KaccTeA, daxe npOTKIOHeHN BundeOKaMepbI.
OndaKo npn nCnoB3ObaHm IeHTbIC KaccTeHOn nAmrTbIO MOxHO CO3aBaTb PnaBHyI nepeXoJ, daKe IocNe I3BLeueHn KaCCeTbI, ecnn nCnoJIb3yETcF yHKuIra "Ponck KOHa" (CTp. 36).
OndaKHeo6xOdmoOTMeTntbCneIyUoee:
-Пизаменбатейногор6лoka yctановпесерклочаель POWER b noLOжени OFF (CHG).
- He cneyuET ha oDhoN IeHTe DeIaTb 3aIncB peKIme SP n LP.
PpmeuHne no nepexOdy
Bocnpn3BOdMoe n3o6paKHeNe MoKeT 6bITb NcKaJeHo, IIN Jx Ke KOd BpeMeHn MoKeT 6bITb 3aIncah HnepaBnIbHO MeJy CueHaMn, ecJI:
-Измениразжим заим(SP/LP).
- Μινειτ 3aπικόν B pεχμηme LP.
EcIn BnDeokamepa Co BCTabJIeHHoKacCEToI OCTaJIReTcBpeXmMeOxNdaHnHa NtB MnHyT
BaSha BnDeOkamepa BbIKNoCHTcABTOMaTneCKN.3To IpeIOTBpaAaETn3HOCJIeHTbI n pacxOJ 3apraJa 6aTaapei.DIaBO3BpTaB pexIM OxuDaHn yCTaHOBtNEpeKIOUaTeIb POWER B noIoXKeHne OFF(CHG), a 3aTeM cHOBa B noIoXKeHneCAMERA.Ecn KaccTeHa He BCTabNeHa,BnDeOkamepa He OTKIOUHTcJ.
Adjusting the LCD screen
The LCD panel is opened up to 90 degrees and it rotates about 90 degrees to the viewfinder side and about 180 degrees to the lens side. If you turn the LCD panel over so that it faces the other way in standby or recording mode, the indicator appears on the LCD screen and in the viewfinder (Mirror mode).
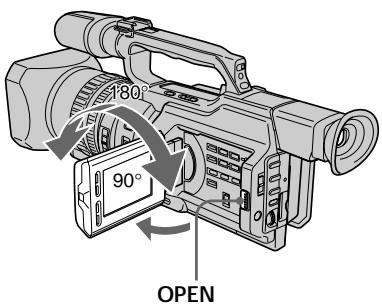
To close the LCD panel, set it vertically and swing it into the camcorder body until it clicks.
Note
When opening the LCD panel, the viewfinder is automatically turned off, however, it is not turned off when the LCD panel is turned over or the camcorder is in mirror mode.
When you use the LCD screen outdoors in direct sunlight
The LCD screen may be difficult to see. If this happens, we recommend that you use the viewfinder.
When you adjust the angle of the LCD panel Make sure that the LCD panel is opened up to 90 degrees.
3ainncb n3o6paXeHnA
PerynipoBka 3KpaHa KKД
PanaJIb XXKД packpbIbAeTcH Ha 90 rpaIycob n Bpauaetc np6n3nteJbHO Ha 90 rpaIycOB B CTOpOHy BnOuCKaTeJn np6n3nteJbHO Ha 180 rpaIycOB CTOpOHy oBeKTINBa. EcIn Bbl NOBepHeTe NaHeJIb XXKД TaK, YTO OHa 6yJeT HnPaBLeHa B DpyrYIO CTOpOHy B pexIMe OxNdaHn IIN 3aIncn, Ha 3kpaHe XXKД n B VnOuCKaTeJIe NOnBNTcH INDnKaTOp (3epkaJIbHbI pexIM).
YtO6b 3aKpbTb naHene JKKJ, yCTaHOBnTe ee BepTKaJIbHO, a 3aTEM npICoEduHnTe ee K KopnyCy BnDEOKaMepbI Do ueJIyKa.
PpmeuHne
PnO tKpbTtn naneiXKД BUNoNcKaTeIb aBTOMaTnueeCKn OTKnIOUaETc, Ondako OH He oTKNoUaETc, ecnn naHelen KKJ nepeBepHyTa IIN BnDeOKaMepa HaxoDntcB 3epKaJIbHOM pexIme.
EcIn BbI nCnoJb3yeTe 3KpaH XKD BHe NOMeueHnI NOI pRMBIM COJIHeuHbIM CBETOM
Bo3MOxH0,6yTe Tpydno pa3rIaTeb yTOIIN6o Ha 3KpaHe KKД. B 3TOM cIyae peKOMeHdyETcNcIOnb3OBA Tb BUNOuCKaTeJb.
Ppi peryunpoBKe yrgna naHelen KKD
Y6eIITecb, YTO naneJIb XXKД OTKpbIta Ha 90 rpaIycob.
When using both the LCD screen and the viewfinder during shooting The usable time of the battery pack when using both the LCD screen and the viewfind will be shorter a little than when using the viewfinder only.
Pictures in the mirror mode The picture on the LCD screen is a mirrorimage. However, the recording picture will be normal.
During recording in mirror mode ZERO SET MEMORY on the Remote Commander does not work.
Indicators in the mirror mode
The STBY indicator appears as and REC as . Some of the other indicators appear mirrorreversed and others are not displayed. However, if you close the LCD panel with the LCD screen turned over, indicators appear normally.
Adjusting the brightness of the LCD screen
To adjust the brightness of the LCD screen, press LCD BRIGHT + or -. The battery life is longer when the LCD panel is closed. Use the viewfinder instead of the LCD screen to save the battery power.
Прии IncnoIb3OBAHIM 3KpaHa JKKДиВИДОNUCKaTeJIЯ BO BpeM CbEmKINВpeM pa6bIb 6aTapeHoro 6Ioka priNcNoIb3OBAHIM 3KpaHa JKKДиВИДОNUCKaTeJIЯ 6yJET HEMHORO MeHbIe, YEMPRI INCNOJIb3OBAHIM ODHORO BIVIONUCKaTeJIЯ.
N3o6paXeHnB 3epKaIbHOM pexHmE N3o6paXeHne Ha 3kpaHe KKd 6yDet OTo6paXaTbcra 3epKaIbHo. OHaKo 3aINcblBaemoe N3o6paXeHne 6yDet HOpMaJIbHbIM.
Bo Bpem 3aHncn B 3epKaJbHom pexHme KhoNka ZERO SET MEMORY Ha npJIbTe DInCTaHIOHnHO ynpaBJeHn He pa6oTaE.
HdkaTopbIB3epKaJbHom pexnme HndkaTop STBY NOBtCB B Vnde , a HndkaTop REC B Vnde . HeKoTObie DpyrHe INdkaTopbIOBtCB B 3epKaJbHO OTo6paKeHHOM Bnde, a HEKoTObie N3 HxN He 6yDyT OTo6paXaTcB cOBcEM. OHaKO, eCIn 3aKpbIb PAnHe JKKd C nepeBepHyTbIM 3KpaHOM KKД, INdkaTopbIb 6yDyT OTo6paXaTcB BObUHOM Bnde.
Perylnpobka npKoctn 3KpaHa KKd
On the LCD screen backlight
You can change the brightness of the backlight.
Select LCD B.L. in the menu settings (p. 154).
Even if you do the LCD screen adjustment using the LCD BRIGHT + / - buttons, or using LCD B.L. and LCD COLOUR items in the menu settings
The recorded picture will not be affected.
Recording in a low position
You can record in a low position to get an interesting recording angle. Lift up the viewfinder or rotate the LCD panel with the screen facing up to record from a low position. In this case, it is useful to use the REC START/ STOP button located on the front or the camcorder.
3aHcB n3o6paXeHnA
3aHnnoDcBtka 3KpaHa KKJ
BbMOKeTe N3MeHrTb RPKoCTb 3aDHei NOcBeTKn. BbIbePnte KOMaHny LCD B.L. ByctaHOBkax MeHIO (Ctp. 154).
3To He NoBJIureT Ha 3aIncaHHeu3o6paXeHne.
3aHnCb n3 Hn3KOro NOLOXeHnA
Moxho BbIOnHrTb 3aINcB n3 Hn3KOro
noJooKeHH, YTO6bI NOyUHTb INTEpeChbI
paKypc. PoHNmITe BNIOuNcKaTeJI bnn
NoBepHnTe NaHeJIb KKKD BBepx dJa 3aIncN
n3 Hn3KOrO noJooKeHH. B 3TOM cnyae
yo6bHO nCpONb3OBaTb KhoNkY REC START/
STOP, paCnoJooKeHHyU ha nepeDnei naHenn
BnuDeokaMepbl.

After recording
(1) Set the POWER switch to OFF (CHG).
(2) Close the LCD panel.
(3)Eject the cassette.
(4) Remove the battery pack.
Pocje 3aipncn
(1)Установпейразковая无力 POWER в положене OFF (CHG).
(2)3aKpoITe nHaJIb XKД.
(3)Изгькпту касу.
(4)ОтwoeДиНTe 6aTapeHbI bJok.
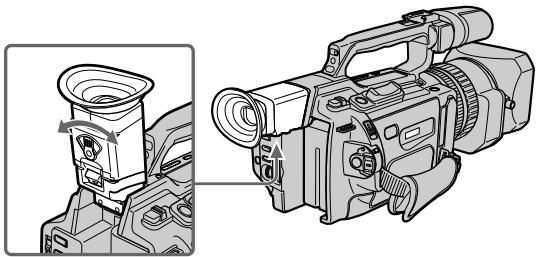
Adjusting the viewfinder
If you record pictures with the LCD panel closed, check the picture with the viewfinder. Adjust the viewfinder lens to your eyesight so that the indicators in the viewfinder come into sharp focus.
Lift up the viewfinder and move the viewfinder adjustment lever.
Perynnpovka BuidonckaTeJIa
EcIn Bb6yTe 3aNcBbTa bN3o6paKeHn np3akpItTo naneJIN XKJ, KOHTpOIpuyTe N3o6paKeHne C NOMOJIbU BINOCKaTeJIa. OtperyIuPyTe oBeKtNB BINOCKaTeJI B COOTBeTCTBm CO CBOIM 3peHnEM, YTObl INHdkaTopbIB B NIOCKaTeJIe 6bln YeTKO cfoKycnpoBaHbl.
IopHnIMTe BnuOuCKaTeNb npbYarpeRyInpOBKn BnuOuCKaTeJIa.
To adjust the brightness of the viewfinder screen, use the VF B.L. item in the menu settings (p. 154).
Even if you adjust the viewfinder screen backlight
The recorded picture will not be affected.
When the shooting conditions are too bright
Use the supplied large eyecup. Fit it onto the camcorder by stretching the corners a little.
You can attach it with the large part of it located on both left and right.
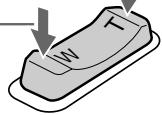
Using the zoom feature
To zoom using the zoom lever
Press the power zoom lever a little for a slower zoom. Press it deeper for a faster zoom.
Using the zoom function sparingly results in better-looking recordings.
"T" side: for telephoto (subject appears closer)
"W" side: for wide-angle (subject appears farther away)
IcnoJb3ObaHne yHKcuu TpaHcfoKaun
ДлгТрансфокаци nnomоьюpbчara TpaHcФOKaTopa
Cnerka haxmnte Ha pbyur npBODa
TpaHcfoKaTopa DnA MeJeHHoN
TpaHcΦOKaU. HaxMnte Ha Hero cnIbHee dIy yCKOpEHHO TpaHCΦOKaU.
UmepeHHoe nCnOJIb3OBAHneФyHKcHn
TpaHcpoKaaunObeCneuBaetHaunyUwnepe3yJbTaTbI.
CTopoha "T": nIa TeIeIeIeIoo (O6bEKeT npIbIInKaeTeC)
CTopoHa "W":ДЯ nIoJoxeHn
"UmpokoyroIbHbI" (O6bekT ydaIaTeC)


When you shoot close to a subject
If you cannot get a sharp focus, press the "W" side of the power zoom lever until the focus is sharp. You can shoot a subject that is at least about 80~cm (about 2 feet 5 / 8 inch) away from the lens surface in the telephoto position, or about 1cm (about 1 / 2 inch) away in the wide-angle position.
PnCbemKe oBekTa C 6JIn3KOro NOJIOXeHn
EcIn Bbl He moKete nOlyuHTb YeTkyIO
φokycinpobky, haxmnte Ha cTOpHy "V
pbuapa npBoTa TpaHcfoKaTopa do noyueny cheKo foKucnpOBKn. B
NIOJXeHn "TeJeΦoTo" MOXHO BbIOnJIrTa CbeMky OBeKtA, KOTOpB HaxOJITcHa paacCToHn He Mehee 80 cm OT ObBeKTBa NIN OKOJO 1 CM B NIOJXeHn
"shinpokoyroIbHbN".
To zoom using the zoom ring
Using the zoom ring, you can control the zoom by your desired speed and you can make fine adjustments.
During recording, turn the zoom ring to the desired speed.
If you turn the zoom ring quickly, the zoom may not respond to the zoom ring.
Rotate the zoom ring with appropriate speed.
Using the digital zoom - Zoom greater than 12 ×
Zoom greater than 12× is performed digitally, if you set D ZOOM to 24× or 48× in the menu settings. The digital zoom function is set to OFF as a default setting (p. 154). If you use the digital zoom function, the picture quality deteriorates.
Ppimcayane
Приб icром NOBOPTe KOJIbca TpaHcfoKaTopa, ckopoctb TpaHcfoKaUIM MOKET He MeHrTbCra.
BpaaTe KOJIbO TpAnCfoKaTopa C COOTBeTCTByIOUeI CKOPoCTbIO.
IcnoJb3ObaHneФyHKcHnUΦpOBTo TpaHcΦokaun - TpaHcΦokaun6oJee 12×
TpaHcfoKaUma 6olee 12× BbINOJnHReTcA ufoBIM MeToOM pnp yCTaHOBKe Inp npamEtpa D ZOOM 3NaueHnra 24x nIIN 48x BVyCTaHOBkax MeHIO. FUnKuua NFOPOBOI TpaHCfoKaUm Ha npEaPnAeTNn-3rOToBHTeJe yCTaHaBJIBaETcBA NOLOXeHne OFF (BbIK), ABJIIOUeecr yCTaHOBkO IO yMOJUaHNIO (Ctp. 154). Pnp NCNoIb3OBAHnn FUnKUuu cfoPoBOI TpaHCfoKaUm yXduaTeC kauEcTBO n3o6paxeHn.
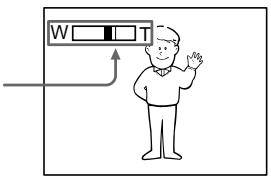
The right-ended portion of the bar shows the digital zooming zone.
The digital zooming zone appears when you set D ZOOM to 24× or 48× .
IpaBaJCTOpOHa IonoCbI Ha 3KpaHe NOKa3bIbaET 3Ony UnpoBoW TpaHcPokaun.
30ha znpoBOn TpaHcfoKaun noRbIeTcN, KOrda B npaMeTpE D ZOOM yCTaHaBnBaETcN 3HaueHeNe 24x nIn 48x.
You cannot use the digital zoom:
- When you set PROG. SCAN to ON in the menu settings (p. 154).
- When the POWER switch is set to MEMORY.
Indicators displayed during recording
The indicators are not recorded on the tapes.
LcΦpOBA TpaHcΦokaIa He 6ydet pa6oTaTb:
- Ecni napameTp PROG. SCAN yctaHOBJIeH bnoJoxHeNe ON B yctaHOBkax MeHIO (CTp. 154).
-Еслпескюать POWER yctahOBJIeB NOJIOKHeHcE MEMORY.
ИнданаТоры, оTOбрахаemье BO Времапсин
INdkaToptbI He 3aIncbBaIOTcHa KacceTbl.

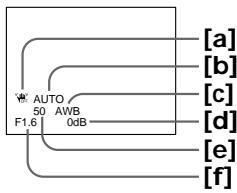
[a]Remaining battery time indicator
This appears after you turn on the power and wait for a while.
[b]Cassette memory indicator
This appears when using a tape with cassette memory.
[c] Recording mode indicator
[d]STBY/REC indicator
[e] Time code indicator/Tape counter
[f] Remaining tape indicator
This appears after you insert a cassette.
[g]Guide frame
[h]ND filter indicator
This flashes when the ND FILTER selector should be set. After you have set the ND FILTER selector, the ND FILTER position selected is indicated. (When the ND OFF position is selected, the indication disappears.)
[i] Time indicator
The time is displayed about five seconds after the POWER switch is set to CAMERA or MEMORY.
[j] Date indicator
The date is displayed about five seconds after the POWER switch is set to CAMERA or MEMORY.
[a]Индикатор octabшerooc 3apya6batapeHoro 6loka
3TOT INDINKATOP NOBBLAETC NOCLBEKNIOHENI PINTAHNIO PPOSECTBNEHEKOTOPORO BPEMEHI.
[b]ИнданkaTop KaccetHоиnamATN
3TOT INHdNkATOp NOBJIaTeC pnp INcOJIb3OBAHm KACCETHOI nAMrTI.
[c]Инданкатор рекима записс.
[d]ИнданkaTop STBY/REC
[e]Инданкатор Кoda Времен/CчетунК leHTbl
[f]Инданкатор octabшениян'tы]
3TOT INDINKAtop NOBBLAETCn PocneYCTaHOBKN KACCEtbl.
[g]KoHTpOJIbHaR paMka
[h]ИнданkaTOp ФильТра ND
Oh Mmraet, KOrJa Heo6xOdmo
yctahOBuTb nepeKlIOUaTeIb ND FILTER.
Iocne yctahOBKn nepeKlIOUaTeIa ND FILTER B noLoXeHne ND FILTER
otobpaKaetc COOTBeTCTBvIo7a
nDnikoZna. (Ppi yctahOBKe
nepeKlIOUaTeIa B noLoXeHne ND OFF
nHDoNkaZna NcYe3HeT.)
[i]ИнданkaTopВрemeMu
Iocne yctaHOBKn nepeKlIoUaTeTn POWER B noLoXeHne CAMERA nIM MEMORY B TeueHn PAn TcKeYnd OTo6paKaTaCtca HdNkaZuBvPeMeHn.
[j]Инданкатордаты
Iocne yctaHOBNIpeKIOUOATEJIa POWER B IOnoJXeHHe CAMERA nIM MEMORY B TeUeHnPiTn CeYnD OTo6paKaETcN HdNkauZn DaTbI.
Time code
The time code indicates the recording or playback time, "0:00:00" (hours : minutes : seconds) in CAMERA mode and "0:00:00:00" (hours : minutes : seconds : frames) in VCR mode. You cannot rewrite only the time code.
Remaining tape indicator
The indicator may not be displayed accurately depending on the tape.
Note on recording date/time
Recording date/time is not displayed during shooting, however, it is automatically recorded on the tape. You can check the recording date/ time during playback by pressing DATA CODE.
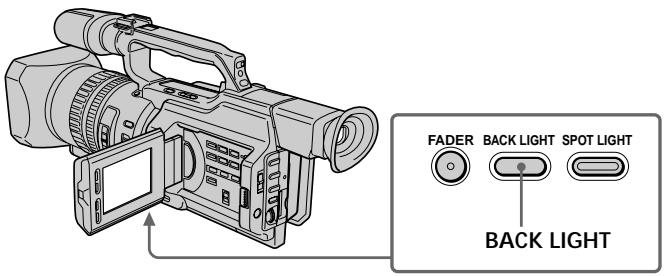
Shooting backlit subjects (BACK LIGHT)
When you shoot a subject with the light source behind the subject or a subject with a light background, use the backlight function.
Press BACK LIGHT in standby, recording, or memory mode.
The indicator appears on the LCD screen or in the viewfinder.
To cancel, press BACK LIGHT again.
KoB BpeMeHH
KoI BpeMeHn yKa3bIBaet BpeM 3aIncn IINBocnpOn3BeDeHn,“0:00:00”(uacbl:MnHyTbI:cekyndbl)BpeXmE CAMERA n“0:00:00"(uacbl:MnHyTbI:cekyndbl:KaIpbI)BpeXmE VCR.Bbl He MoXeTe nepe3anicaTb TolkbkoKoI BpeMeHn.
INHnKaTOpOCTaBWeCnJeHTbI
Ioka3aHnIHdNkAtopaMOryt 6bItb HToCHbIMN B3aBcImOcTn OT JeHTbl.
PpmeHnno daTe/BpeMeHH 3aHnc
ДаТВрЕМЯЗАПИСН He OTOБРAPKAJOТСВ BO BpeMЯ CbeMKN,ОДHAKO OнA aBTOMaTNUeCKN 3aПSCbIbAJOТСЯ HaJIeHTy.ДaTy/BpeMЯ 3aПИСN MOXHNO ПpoBepNTb B pexIMe BOCpPOn3BeDEHn,HaJxAB KhONKy DATA CODE.
CbeMa o6BeKToB c 3aHneIpoDCBcTeKoB (BACK LIGHT)
EcIn BbI BbIOJIHReTe CbEMKy oBbeKta c nCTOHHKOM CBeTa N03aDi Hero NnN JKe oBbeKTA CO CBETNbIM fOHOM, INCIOJIb3yIte fYHKUIO 3aDHe NIOcBETKn.
BpeXmme OxuandaHna,3aIncn uIn naMaTn haxmnte KhoNky BACK LIGHT.
HndkaTop nOBuTcHa 3KpaHe KKД nIN B BVOnCKaTeNe.
Дя OTmeны НжмITE KhoIGNky BACK LIGHT eue pa3.
If you press one of the following buttons when using the backlight function
The backlight function will be cancelled.
-
SPOT LIGHT
-
EXPOSURE
When you manually adjust the exposure
You cannot use the backlight function.
Using the spot light function
This function prevents people's faces, for example, from appearing excessively white when shooting subjects lit by strong light, such as in the theater.
Press SPOT LIGHT in standby, recording, or memory mode.
The indicator appears on the LCD screen or in the viewfinder.
To cancel, press SPOT LIGHT again.
3aHcB n3o6paXeHnA
EcIn HaxKaTb Ondy n3 cIeMyOuXn KHOPOK npn IcNoB3OBAHmN FyHKcNn 3aDHei NOCDBeTKn
Функцязадней посвettingи buyet OKЛюquee.
- SPOT LIGHT
-EXPOSURE
Ppnyo peryunpoBke 3Kcno3n
HeIb3a IcNoIb3OBaTb 0yHKnUIO 3aDHe NODCBETKn.
IcnoJb3ObaHne peXmMa npoxKeTOpHoro ocBeueHnA
Данная Функци NOЗBOЛЯТВБИОПНАТСбему.TakIMOBpa3OM,УTOБылпcaIHOДЕHБВьглделсINSKOM6JIeHNbIMHANpIMeP,прCBemkeObbeKToBВTeaTpe,ГдчAcTo ПпмehЯETcЯрКоOSCBESeHHe.
B pexmme oKuandaHn, 3aIncn nIi naTn hakmnte KhoNky SPOT LIGHT.
Ha 3kpaHe XXKД nII IN B VnDOnsKaTeNe NOBNTcN INdNkaTOp
Длг OTменин Нжмп Te Khoиky SPOT LIGHT etc pe pa3.
If you press one of the following buttons when using the spot light function
The spot light function will be cancelled.
-BACK LIGHT
- EXPOSURE
When you manually adjust the exposure You cannot use the spot light function.
You cannot use the spot light mode while in the following settings:
- Shutter speed value of 1/25 or smaller
Old movie - Low lux mode of the PROGRAM AE function
EcIn HaxKaTb Ondy n3 cIeMyOuXn KHOJOK npn IcNoJIb3OBoAHm ΦyHKUIN npOxKeTOpHOrO ocBeueHn
Функци npoxekTopHOrO ocbeueHn6 byet OTKIIOUeHa.
Self-timer recording
You can make a recording with the self-timer. This recording is useful when you want to record yourself. You can also use the Remote Commander.
(1) Press (self-timer) in standby mode. The (self-timer) indicator appears on the LCD screen or in the viewfinder.
(2) Press START/STOP. Self-timer starts counting down from 10 seconds with a beep sound. In the last two seconds of the countdown, the beep sound gets faster, then recording starts automatically.
3aHcB no TaMepy camo3anycka
BbMOKTe BbINOJIHnTb 3aIINcNo TaMepy
camo3anycka.3Ta 3aIINc b MOKET
PnroDnTbCnB Tom Cnyae, KOrda
Heo6xOJIMo 3aIINcaTb Ce6. IInr 3TOrO
MOXHO TaKKe INCNOJB3OBaTb NylbT
dNCTaHUNHOHOrO ynpabJeHHa.
(1)BpeXmme OxNdaHnHaXMMTe KHOJky (TaIMep camo3anycka).Ha 3kpaHe XKД nIN BnuOncKaTeNe NOBNTcN HNDNKaTOP (TaIMep camo3anycka).
(2)Haxmnte KhoNky START/STOP. TaMep cmo3ayncKa haNuHTe 6paTHbI OTCuET C10 cekynd C3ymMePbIM cnHaJOM.BnOcneDnHe DBe cekyHdbI 6baTHOro OTCuTeA 3ymMePbIH CnHaJI 6yDet 3ByuAtb Haue, a 3aTeM abTomatUeCKn HaUHTc3aInCb.

To stop the self-timer before recording
Press START/STOP again. Use the Remote Commander for convenience.
To record still pictures on tapes using the self-timer
Press PHOTO in step 2 (p. 48).
To record still pictures on a "Memory Stick" using the self-timer
Press (self-timer), then press PHOTO in memory mode (p. 181).
To cancel self-timer recording
Press (self-timer) so that the indicator disappears from the LCD or viewfinder screen while your camcorder is in standby mode.
Note
The self-timer recording is automatically cancelled when:
- Self-timer recording is finished.
- The POWER switch is set to OFF (CHG) or VCR.
3aHcB n3o6paXeHnA
Checking the recording - END SEARCH / EDITSEARCH / Rec Review
You can use these buttons to check recorded pictures or shoot so that the transition between the last recorded scene and the next scene you will record is smooth.
Searching the end point of the recording — END SEARCH
You can easily go to the end of the last recorded portion.
Press END SEARCH in standby mode. The camcorder rewinds or fast-forwards the tape and the last five-second recorded picture is played back. After playback the camcorder turns to standby mode. You can monitor the sound from the speaker or headphones.
Changing the next recording start point — EDITSEARCH
You can change the next recording start point in standby mode.
Hold down the + / - side of EDITSEARCH in standby mode. The recorded picture is played back.
- : to go forward
- : to go backward
Release EDITSEARCH to stop playback. If you press START/STOP, re-recording begins from the point you released EDITSEARCH. You cannot monitor the sound.
Checking the last recorded picture — Rec Review
You can check the last recorded portion.
Press the - side of EDITSEARCH momentarily in standby mode.
The last few-seconds of picture is played back and the camcorder returns to standby. You can monitor the sound from the speaker or headphones.
End search function
When you use a tape without cassette memory, the end search function does not work once you eject the cassette after you have recorded on the tape. If you use a tape with cassette memory, the end search function works even once you eject the cassette.
If there is a blank portion at the beginning or between the recorded portions, the end search function may not work correctly (p. 210).
You can monitor the playback picture on the LCD screen. If you close the LCD panel, you can monitor the playback picture in the viewfinder. You can also control playback using the Remote Commander supplied with your camcorder.
(1) Install the power source and insert the recorded tape.
(2) Set the POWER switch to VCR while pressing the small green button. The video control buttons light up.
(3) Slide OPEN in the direction of the mark to open the LCD panel.
(4) Press to rewind the tape.
(5) Press to start playback.
(6) To adjust the volume, press either of the VOLUME + / - buttons.
- Bocnpon3BeDeHne - OchOBhIe noJIOxHnra - Bocnpon3BeDeHne JeHTbl
When monitoring on the LCD screen You can turn the LCD panel over and move it back to the camcorder body with the LCD screen facing out.
Bo Bpem npocmoTa Ha 3KpaHe KKd MoXHo npeBepHyt NaHJIb ynpaBLeHnI N CLOXHTeC KOpNcOM BInDeOkaMepbI, TaK UTo 3KpaH JKKD 6ydt Obpauen HapKy.
When you close the LCD panel
You cannot monitor the sound from the speaker. However, when the LCD panel is turned over to view on the LCD screen, you can monitor the sound from the speaker.
To control the display of the screen indicators
Press DISPLAY on the camcorder or on the Remote Commander supplied with your camcorder. The indicators appear on the LCD screen. To make the indicators disappear, press DISPLAY again.
Ecn 3akpbIb naneHb KKd HeIb36 6yDet npocnyuBaTb 3Byk uee3 rpOMKOrOBOpntB. Ondako, ecn 3KpaH KKd obpaueH hapxu, 3Byk moXHo 6yDet npocnyuBaTb uee3 rpOMKOrOBOpntB.
Your camcorder automatically records not only images on the tape but also the recording data (date/time or various settings when recorded) (Data code).
Press DATA CODE on the camcorder or on the Remote Commander supplied with your camcorder in playback mode.
The display changes as follows: date/time various settings (SteadyShot, white balance, gain, shutter speed, aperture value, exposure mode) no indicator

Date/time/ Data/Bpemr
[a]SteadyShot OFF indicator
[b]Exposure mode/PROGRAM AE mode indicator
[c] White balance indicator
[d]Gain indicator
[e]Shutter speed indicator
[f] Aperture value
To not display the various settings Set DATA CODE to DATE in the menu settings (p. 154).
The display changes as follows: date/time no indicator
IcnoJb3OBAHne yHKcNn KoDa DaHHbIX
Bndeokamepa aBTOMaTNUeCKn 3anncbIbaet HaJeHTy He ToJbKO n3o6paXeHn, Ho n daHHbIe O 3anCn (DaTy/BpeM nn pa3HbI yCTaHOBKn pni 3anCn) (KoD daHHbIX).
B pexime Bocnpoun3BeDHeNHaKmnte KhoNkY DATA CODE Ha BnDeokampe HnHa npNbTe DnCTaHnOHnHO ynpabLeHn, npnilaraemoro K BnDeokampe.
INHnkaun6ydetN3MeHrTbCnEduOuIM 06pa30m:
daTa/Bpemr pa3HbIe ycTaHOBKn (ycTouYBaBcEMeKa,6aHaHc 6eNoRo, yCInJeHne,CKOpOCTb 3aTbopa,BenuHnHa dnaqpaarmbl,peximKcN03nui) 6e3 nHdNKaun
Various settings/ Pa3HbIe yCTaHOBKn
[a]Индikatop BblkIIOueHHOу yCTOuHBOB CbEMKn
[b]Инд�示ахрекиma Экнозии/Npeхиma PROGRAM AAE
[c]ИнданkaTOp 6aHaHca 6eIoro
[d]VHdikatop yCunenHn
[e]Инданкатор ckopoости 3atBopa
[f]BelenuHa nuaaparMbI
ДЯ OTMeHbI OTO6paXKeHn pa3HbIX yCTaHOBOK
YcTaHOBnTe napaMeTp DATA CODE b noIoxKeHne DATE B ycTaHOBkax MeHIO (Ctp. 154).
INDnkaun6yJeT N3MeHArbCnEduOuIM 06pa30m:
ДаТа/BрЕмЯ←6e3ИнДиКациN
Recording data
Recording data is your camcorder's information when you have recorded something. In CAMERA mode, the recording data will not be displayed.
When you use the data code function, "... ----" (date) or "---:---:" (time) appears if:
-A blank portion of the tape is being played back.
- The tape is unreadable due to tape damage or noise.
- The tape was recorded by the camcorder without the date and time set.
Data code
When you connect your camcorder to the TV, the data code also appears on the TV screen (p. 44).
Note on the date/time indicator
Recording date/time is not displayed during shooting, however, it is automatically recorded on the tape. You can check the recording date/ time during playback by pressing DATA CODE.
If the exposure adjustment is set to minimum
"CLOSE" is displayed at the location of the aperture value.
3aHncaHHbIe daHHbIe
3aIncaHbIe daHHbIe coDePkaT INHΦopMaζnO 3aIcN, BbIOnJIeHHoB BIndeOKaMepoN. BpeKIme CAMERA daHHbIe oTo6paKaTaBcR He 6ydyT.
Пи ИСПОЛБ3OBAHИ NФУнкцIN KODaHhhBIX NOВВЯНOTC CUMBOЛы "--- ----" (data) nIN "--- :---" (BpeM),ecn:
-Bocnpo3B0DntcHHe3aIINcaHHbIyuactokJeHTbl.
-JeHTa He NODaTcC uHTbHaHIO n3-3a NOBpeKJeHn IIN NOMex.
-3aIncBHaJeHTy6bIaBbIOJIHeHa BndeOkamepoB6e3YcTaHOBKn DaTbI IN BpemeHn.
KoD daHHbIX
Ecni BnDeokamepy NpDoCoEnHnHTb K TeNeBn3OpY, KoI DaHHbIX TaKxpe 6yDet OTo6paKaTaBcra Ha 3kpaHe TeNeBn3Opa (Ctp.44).
HdkaTop DaTb/BypeMeHN
ДаТВБЕМЯЗАПИСН He OTOБРAXJAOTСВ BO BPEM CБЕМК,ОДHAKO OНa ABTOMATUcheCKN 3aПСыВАЛТСН HaJIENTy.ДaTY/BpeM 3aПИСN MOЖно пOBePиТь В ржIMe BOCПоиЗВeDEни,нжав KHOПКу DATA CODE.
EcIn yCTaHOBNeHO MmHmMaJIbHoe 3HaueHeNkCnOKOppeKcnn
BmecTo 3naueHnIaΦpaarmbl OTO6paKaetcnaDnncb“CLOSE”.
Various playback modes
To operate video control buttons, set the POWER switch to VCR.
To view a still picture (playback pause)
Press I during playback. To resume normal playback, press or I
To advance the tape
Press in stop mode. To resume normal playback, press .
To rewind the tape
Press in stop mode. To resume normal playback, press .
To change the playback direction
Press < on the Remote Commander during playback to reverse the playback direction. To resume normal playback, press .
To locate a scene monitoring the picture (picture search)
Keep pressing or during playback. To resume normal playback, release the button.
To monitor the picture at high-speed while advancing or rewinding the tape (skip scan)
Keep pressing while rewinding or while advancing the tape. To resume rewinding or advancing, release the button.
To view the picture at slow speed (slow playback)
Press during playback. For slow playback in the reverse direction, press < on the Remote Commander, then press . To resume normal playback, press .
Pa3nUHbIepeXmblBocnpOn3VeJeHna
ДяИСПОЛБЗOBАнHA KHONOK ynpaВпЕнЯ BИDEОИЗБОРХЕМЕ YcTaHOBITe nepeKIIQUOHTeNB POWER B noLOJOKeHne VCR.
ДлгпрсмOTра HeNodBuxHoro n3O6paXeHnna (nay3a BocnpOn3BeDeHnna)
HaxMMTE BO BpEMA BOCNPOIN3BEdENH KONKY II.ДЯ BO3O6HOBNeH ObUHOrO BOCNPOIN3BEdENH HaxMMTE KONKY
To view the picture at double speed
Press × 2 on the Remote Commander during playback. For double speed playback in the reverse direction, press < , then press × 2 on the Remote Commander. To resume normal playback, press .
To view the picture frame-by-frame
Press on the Remote Commander in playback pause mode. For frame-by-frame playback in the reverse direction, press .To resume normal playback, press
To search the last scene recorded (END SEARCH)
Press END SEARCH in stop mode. The last five seconds of the recorded portion plays back and stops.
In various playback modes
Sound is muted.
- The previous picture may remain as a mosaic image during playback.
When the playback pause mode lasts for five minutes
Your camcorder automatically enters the stop mode. To resume playback, press
Slow playback
Slow playback can be performed smoothly on your camcorder, however, this function does not work for a signal output through the DV IN/OUT jack.
When you play back a tape in reverse
Horizontal noise may appear at the center, or the top and bottom of the screen. This is not a malfunction.
Bocnpoun3BeDeHne JeHTbI
Ecn npexn may3bI npn Bocnpoun3BeedeHnn DnITcR nTb MmHT
Bndeokamepa aBTOMaTnueckn npeKJIIOuHTcB BpeJIM OCTaHOBA.IIra BO3O6HOBJeHINBOCpON3BeDHeHNAHXMITE KHOKNY
3ameHHeHoe BocnpOn3BeHeHne
3aMeIeHHoe BOCPON3BcEHeHne
BbINOJIHReTcHa BNDeOKaMepe PnABo,6e3
POMex;OdHaKO 3TaФyHKuN He pa6oTaet
PpN BbIXoHOM CnHaje Uepe3 rHe3do Dv
IN/OUT.
PnBocnpOn3BeDeHnJIeHTbI B 6paTHOM HaprabJeHn
B UeHTpe IJIN BBepy N BHN3y 3KpaHa MOrTy NIOBBAITbCRA ROpN3OHTaJIbHbIe NOMExN.
OHaKO 3TO He ABJRAETc HEnCnPaBHOCTbIO.
Viewing the recording on TV
Connect your camcorder to your TV or VCR with the A/V connecting cable supplied with your camcorder to watch the playback picture on the TV screen. You can operate the video control buttons in the same way as when you monitor playback pictures on the LCD screen. When monitoring the playback picture on the TV screen, we recommend that you power your camcorder from the mains using the AC power adaptor (p. 18). Refer to the operating instructions of your TV or VCR.
Open the jack cover. Connect your camcorder to the TV using the A/V connecting cable supplied with your camcorder. Then, set the TV/VCR selector on the TV to VCR.
If your TV is connected to a VCR
Connect your camcorder to the line input on the VCR by using the A/V connecting cable supplied with your camcorder. Set the input selector on the VCR to LINE.
If your TV or VCR is a monaural type
Connect the yellow plug of the A/V connecting cable to the video input jack and only the white plug to the audio input jack on the VCR or the TV. The red plugs are not used.
EcnI TeJIeBn3Op NODKJIIOUeH K BnDEOMaHnToΦOHy
IoiDCoeDInHnTe BnDeOKeMaMepy K BXoDHomy
rHe3dy BnDeOmaHnTOΦoHa C NOMOuBIO
COeDInHnTeJIbHO rKabeJy aUdIO/BnDeO,
KOTOpBn IprNlaRaTcK BnDeOkaMepe.
VCTaHOBceLEKToP BxOHOrO CmHnAHa Ha
BnDEoMaHnTOΦoH BeNoJoxHe LINE.
EcnI TeJIeBn3Op nJIN BnJeOMaHHToΦOH MOHOΦOHnueCKO Tnna
IoiDcoeHInHTe JKeTbIy IuTeKep COeHNHTeBHO KabEna ayDnO/BuJeO K BXoDHOMy rHe3dy BUNDeOCNHaHa nToJbKO 6JIbI yIeKep-K BXoDHOMy rHe3dy ayIOscnHaHa nBuJeOMaHHToOpHe NII TteJeBnOpe. KpaChbIe wTeKepbI He NCNoNb3yIOTCr.
If your TV/VCR has a 21-pin connector (EUROCONNECTOR)
Use the 21-pin adaptor supplied with your camcorder.
This adaptor is exclusive to an output.
EcIn B TeLeBn3Ope/BuDeOMaHrNtOΦoHe Imeetc 21-штbpKOBbI pa3beM (EUROCONNECTOR)
IcnoIb3yIte 21-7tBpBkoBbI aanTep, npnlaeraMbl K BnDeokamepe.
Данны aanTpepneHa3haeH NCKHQUHTeJIbHOДЯ BBIOda.
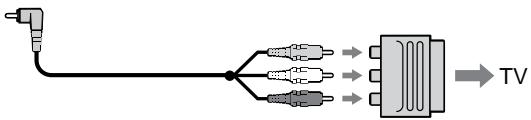
If your TV or VCR has an S video jack Connect using an S video cable (not supplied) to obtain high-quality pictures. With this connection, you do not need to connect the yellow (video) plug of the A/V connecting cable. Connect the S video cable (not supplied) to the S video jacks on both your camcorder and the TV or the VCR. This connection produces higher quality DV format pictures.
When you adjust the TV screen
If you monitor the shooting picture, not the playback picture, set COLOUR BAR to ON in the menu settings (p. 154). The colour bar is displayed on the TV screen.
EcnB TeIeBn3ope nn BnDEOMarHnToΦOHe NMeETcBnDeOrHe3do S.
BbIOpHInTe CoeDInHeHne C NOMOuBbU BnDeOkAbeJr S (He BXoDnT B KOMJIeKt) IaI NIOlyEHHN BbICOKKaueCTBeHHOrO n3O6paXeHn. Pnp TaKOM CoeDInHeHn He HxJHo NpDKJIouHaTb XeJtBbI (BnJeO) UTeKeP coeDInHInTeJbHoro Ka6eJa ayDnO/BnJeO.
ПодсоeДиНTeВиDEOKa6BJS(He BXOДNT B KOMПЛКТ)KВиDEOrHesdAmSHa BИДeOKaMepeиTeLEBn3OpEии BИДeOMaHnToΦoHe.3TO COeДиHneI IO3BOJЯETIOJIyHTbВiCOKOKaYeCTBeHHOe I3O6paXeHneФopMaT a DV.
Hactpoika n36paXeHnHa 3KpaHe TelenBu3opa
Для KOHTPOnI KaueCTBa I3O6paJxHЯ npi CbemKe, a He BOCnPOn3BeDeHIn, B yctaHOBkax MeHIO ДлЯ napaMeTpca COLOUR BAR yctaHOBtne 3HaueHne ON (cTp. 154). Ha 3KpaHe TeLeBn30pa 6yJeT OTo6paXaTbcra CBETOBaII NOloCa.
- Advanced Recording Operations - Recording a still image on a tape - Tape Photo recording
You can record still images on mini DV tapes with all the pixels in the progressive mode. See page 50 for details. This mode is useful when you print images using a video printer (not supplied).
Besides the operation described here, your camcorder can record still images on a "Memory Stick" (p. 177).
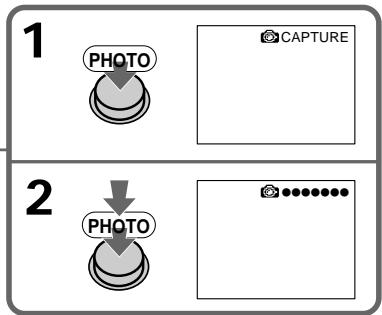
(1) In standby mode, keep pressing PHOTO lightly until a picture freezes. The CAPTURE indicator appears. Recording does not start yet.
To change the image, release PHOTO, select an image again, and then press and hold PHOTO lightly.
(2) Press PHOTO deeper. The still image on the LCD screen or in the viewfinder is recorded for about seven seconds. The sound during those seven seconds is also recorded.
The still image is displayed on the LCD screen or in the viewfinder until recording is completed.
- YcoBepweHCTBOBaHHbIe Opeaun CbemKn 3aNcB HEnoDBrXHOrO N3OpaXeHnHa IeHTy -3aNcBΦOTorpaFm HaJeHTy
Ha KacceTbMIHN DV MOxHO 3aIIMCbIbAtb HeNoDBNXHbIe I3o6paXeHnB IporpeccNBHom pexHMe. PoIpo6hble CBeEHHN IPNBEeHbI Ha cTp. 50. DaHhbI peXm Iono3eH, ecIn HxKHO paCneYaTaTB I3o6paXeHnC NOMOuBIO BnDeOpnPHTepa (He BXoINT B KOMPJIeKT).
Kpome BblseOnncaHNo onepaunn, BnDEOKaMepa MOKeT BbIOnJIrTB 3aINCb HEnoDBNxxHbIX N3O6paXeHn Ha "Memory Stick" (cTp.177).
(1)В рекиме окданая deprхиTe сlerka haxaToH KhoNkY PHOTO Do tex nop,poKa He nOABNTcH HEnoDmKHoe n3o6paXeHne. IoAByTc HnDnKATOp CAPTURE. 3aInCb eue He HauHnaeTcH.ДЯн ИЗмЕнHaI3o6paXeHnE OTNyCTnTe KhoNkY PHOTO,BbIbePte I3o6paXeHne CHOBa,a 3aTeM HaxMnTe n deprxNiTe cIerKa haxaToH KhoNkY PHOTO.
(2)HaXMMTe KHOJNky PHOTO cunbHee. HeNoDbnKHoe n3o6paXeHne Ha 3kpaHe XKД nII B vIIOuCKaTeNe 6yDet 3aIncBtBcR OKOJI O cEMu CEkyHd. B TeueHne 3Tnx CEMu CEkyHd 6yDet 3aIncBtBcR n 3ByK. HeNoDbnKHoe n3o6paXeHne oTo6paXaeTcRa Ha 3kpaHe XKД nII B vIIOuCKaTeNe do Tex nop, nOKa He 3aKOHHTcR 3aIncB.
The number of still images recordable on a mini DV cassette
You can record about 510 images in SP mode and about 765 images in LP mode on a 60-minute cassette.
MaKcMaJIbHoe KOJIuYeCTBO HeNoDBrNkHbIX 3IO6paXeHn, KOTOpoe MOKeT 6bITb 3aIncAHO Ha KAccTeY MmH DV.
Ha 60-MnHyTHoN KAcCeTe MoXHo 3aIncatb npImepHo 510 n3o6paXeHn B pexKMe SP n okono 765 n3o6paXeHn B pexKMe LP.
Recording a still image on a tape - Tape Photo recording
Notes
- During tape photo recording, you cannot change the mode or setting.
- The PHOTO button does not work:
- While the fader function is set or in use.
- While the digital effect function is set or in use.
- Do not shake the camcorder during tape photo recording. The recorded image may be blurred.
To do tape photo recording using the Remote Commander
Press PHOTO on the Remote Commander. Your camcorder immediately records an image on the LCD screen or in the viewfinder.
When you do tape photo recording during normal CAMERA recording
You cannot check an image on the LCD screen or in the viewfinder by pressing PHOTO lightly. Press PHOTO deeper. The still image is then recorded for about seven seconds and your camcorder returns to standby mode.
When shooting a moving object in Tape Photo recording
When playing back the image by another unit, the image may be blurred. This is not a malfunction.
3aHcB HeNoDBrXHHOro n3o6paXeHnHaJeHTy-3aHcB ΦOTorpaΦnHaJeHTy
Примейань
- Bo BpemЯ сфOTOCbEMKn Ha JIeHTy HeBO3MOXKHO N3MeHNTb peXIM NJIYcTaHOBky.
Khonka PHOTO He pa6oTaet:
-ecn yctaHOBJeHa nIn nCNoIb3yeTcA
fynKuIePeIepa
-ecn yctaHOBJeHa nIn nCNoIb3yeTcA
fynKUeLmPpOBbIX 30fKeTOb. - He DeIaIte pe3KxN DvIcxHn BInDeOKaMepoB BO BpEmaΦOTcBEmKn HaJeHTy. 3aIINCbIbAeMOe I3O6paJxHe MoXeT 6bITb HeUETKIM.
Self-timer tape photo recording
You can make a tape photo recording with the self-timer. This mode is useful when you want to record yourself. You can also use the Remote Commander.
(1) Press (self-timer) in standby mode. The (self-timer) indicator appears on the LCD screen or in the viewfinder.
(2) Press PHOTO deeply. Self-timer starts counting down from 10 with a beep sound. In the last two seconds of the countdown, the beep sound gets faster, then recording starts automatically.
To cancel self-timer recording
Press (self-timer) so that the indicator disappears from the LCD or viewfinder screen while your camcorder is in standby mode. You cannot cancel the self-timer recording using the Remote Commander.
Note
The self-timer recording mode is automatically cancelled when:
- Self-timer tape photo recording is finished.
- The POWER switch is set to OFF (CHG) or VCR.
Printing the still image
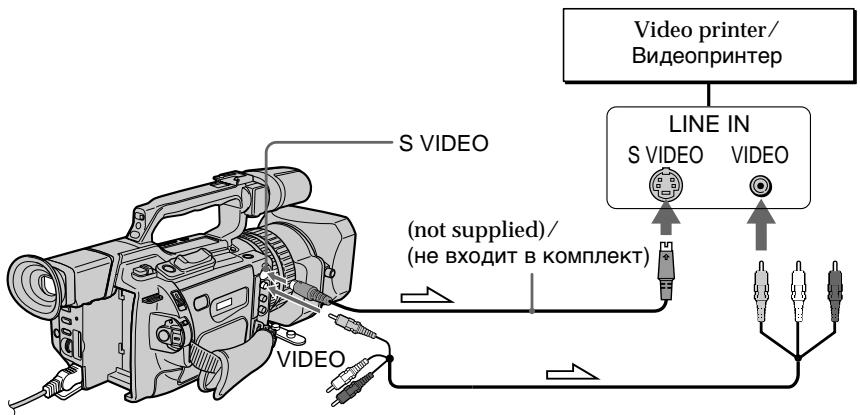
You can print a still image by using a video printer (not supplied). Connect with the video printer using the A/V connecting cable supplied with your camcorder.
Connect the yellow plugs of the cable to the video input of the video printer and the VIDEO jack on your camcorder. Refer to the operating instructions of the video printer as well.
IeaytB HeNoDvXHOro n3o6paXeHHa
HenoDbnHexoe n3o6paXeHne MoxHo
pacNeuataTb C NOMOsbIO BUndeOpnPHTepa (HeBXoNITB KOMPJIeKT). POnKJIouHITe
BUNDeOpPHTep C NOMOsbIO COeDNHITeNBHOKabEny ayDIO/BUDeO, NOCTABNHEMOrOCBUNDeOKamepoI.
IoiDCoeDHHTe JKeTbIe WTeKepbl COeHNHTeJIbHOrO Ka6eIaayIOBvIeO K BXoDHOMy rHe3dY BnDeOcNrHaNa BVNeOpnPHTepa n pa3bemy VIDEO BVNeOkamepbl.CM.TakKe INCTpyKuio no 3KcNlyaTaUIN BVNeOpnPHTepa.
Signal flow/ProxoxKdene cnHaJa
If the video printer is equipped with an S video input
Use an S video connecting cable (not supplied). Connect it to the SVIDEO jack on your camcorder and the S video input of the video printer.
EcIn B BnDeOpnpHTepe NmeeTcBxOdHoe BnDeOrHe3do S
IcnoIb3yIte CoeHInHTeIbHbI BnDeOka6Bb S (He BxOJNT B KOMPJIKeT). PIOcEOHINHT ero K rHe3dy S VIDEO BnDeOkaMepbl N KO BXoDHOMY BnDeOrHe3dy S Ha BnDeOpnHTpe.
Shooting with all the pixels - PROG. SCAN
To import moving images to your PC to view still images, we recommend you record in progressive mode. To use progressive mode, follow the procedure below. Still images produced this way are more stable than those recorded on a mini DV in normal mode, and thus are more suitable for analysing high-speed action such as sports scenes. (Since this camcorder takes in an image every 1/15 of a second in progressive mode, moving images recorded in this mode may be subject to too much jitter. To view moving images, we recommend recording in normal mode.)
CbeMka c nCnoJIb3OBaHnEm BCex NIKCeJIOB - PROG. SCAN
HTO6bIMNOpTnPOBaT dBIXyIeNcER
H3O6paXeHnHa KOMNbIOTeP PC dIa
npOCMOtPa HeNoDVBxKbIX H3O6paXeHn,
peKOMeHNyETcB bInONJIHrT 3aINCb B
npORpeCCNBHOM pEXKMe.ДЯ NCpONb3OBaHn
npORpeCCNBHO pEXKMa BbINOJHNe
DeiCTBn, OINcaHNbIe HNXe. HeNoDVBxKbIe
H3O6paXeHn, NOYuaemIbe TAKM Obpa3OM,
RBIAJOTcB 6oIee yCTOuHBbIMn PO
cpABHeHIO C TeM, KOToPbIE 3aIncAhnHa DV
B O6blHOM pEXKMe, INo3TOMy 6oIee
NOxODaT DnA hAnl3a 6bICTPOdVBxUxnxC
CUeH, HApnPmep cNoPTNBbIX COpeBHOaHn. (PocKobkBy nporpeccNBHOM pEXKMe
BIndeOkamepa CHImaeT N3O6paXeHne
KaJdyU 1/15 ceKyHdbI, DBNXUneCra
H3O6paXeHn, 3aIncAHNbIe B 3oTm peXkMe,
MOrYT CINbHo dPoKaTaB. JnI npOCMOtPa
DBNVxNcR 3IO6paXeHn peKOMeHNyETcR
3aNNCbIBaTb B O6blHOM pEXKMe.)

(1) Press MENU to display the menu in standby mode.
(2) Turn the SEL/PUSH EXEC dial to select , then press the dial.
(3) Turn the SEL/PUSH EXEC dial to select PROG. SCAN, then press the dial.
(4) Turn the SEL/PUSH EXEC dial to select ON, then press the dial.
(5) Press MENU to erase the menu display. The PROG. SCAN indicator lights up.
(1)Haxmte KhoNky MENU dnia OTo6paXeHnMeHIO BpeXmE OxuHaHn.
(2)ПовернITE ДИСК SEL/PUSH EXEC ДЯ
Выбopa установки m, a 3aTeM нажмITE
На ДИСК.
(3)ПовернITE ДИСК SEL/PUSH EXEC ДЯ
Быбopa установки PROG. SCAN, a за tem
нав KMЛТЕ на ДИСК.
(4)ПовернITE диСEL/PUSH EXEC ДдьБбopa усановки ON, a 3aTeM нажмпerteHa диСК.
(5)HaxMMTe KhoNkU MENU dIyuaJIeHnI INdNKaUIM MeHIO. 3arOpNTcI INdNKaTOP PROG.SCAN.
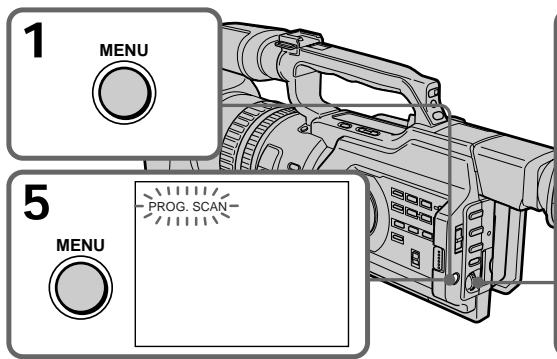
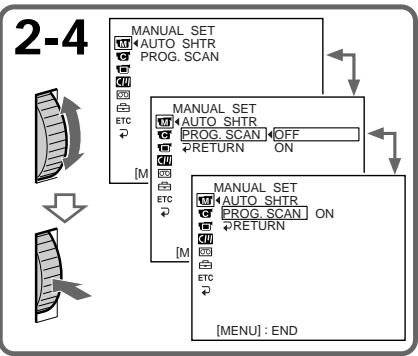
To return to normal mode
Select OFF in step 4, then press the SEL/PUSH EXEC dial.
Note on the progressive mode
A normal TV broadcast divides the screen into two finer fields and displays them in turns every 1/50 of a second (Interlace format). Thus, the actual image displayed in an instant covers only half of the apparent image area. Displaying the whole image simultaneously on a full screen is called displaying with all the pixels. In this mode, the resolution of the still picture is clearer than in the normal mode. This camcorder takes in an image every 2/25 of a second, which may cause the image of a moving object to go out of focus. This camcorder is originally programmed to record in the normal TV format.
When shooting under fluorescent light When shooting in progressive mode under fluorescent light or light bulbs, a rare phenomenon may happen in which the screen lights up brightly (Flicker phenomenon). This is not a malfunction. If you want to stop this phenomenon, set PROG. SCAN to OFF in the menu settings.
On digital zooming
You cannot use digital zooming in this mode.
CbeMa c nCnoJIb3OBAHnEM BCEx NIKCeJIOB - PROG. SCAN
Ipnpepaue o6bUHOro TeBn3HOHOro
n3O6paxeHn npOnCXoDnT pa3dJeHne
3KpaHa Ha DBe YAcTn, KOToPbE NooPeJHO
OTobpaXaOTcKa Kaxdyu 1/50 c
(uepeccTroHna pa3BepTKa).Takm O6pa3OM
pealbHbe pa3Mepbl OTobpaXaEMoro
n3O6paxeHn COCTabJIOT JIMb NOOBHy
BUNIMoro pa3Mepa n3O6paxeHn.
ODHOBPemHeO tO6paxeHne Bcero
n3O6paxeHn Ha 3KpaHe Na3bBaETcN
OTobpaXeHnem C NMOUb BCEx NIKCeNoB. E
3TOM pEXMe pa3PeWeHne HeNOdBHXHOrO
n3O6paxeHn LyUHe, YEm B O6bHOM
peXMe.BNuDeOKaMepa POnIO3BODnT
o6HOBLeHne n3O6paxeHn KaKdIbe 2/25 c,
yTO MOKeT Bb3BaTb NOTepIO fOKycnPOBKn
DBNXUeOcR O6BeKta. IepBOHaayhbo
BInDeOKaMepa 3aNporpamMnpoBAHa Ha 3aNNC
B TELEBn3HOHOM fOpMaTe.
CbemKa npn ILOHmHeCcHToHOM OcBeSeHn Bo BpEmr CbEMKn B nporpeccNBHom pexHme npn OCBeSeHn lamPamM dHeBHO rCBTa uJN lamPamN hakaJIbBaHn, MOKeT BO3HNKHyTb peKoE rABHeNe, pni KOtOpM 3KpaN rPKo CBETnC (MePcaHne). Ondako 3TO He ABnRETC HeNCnpaBHOctBo. Ecln He06XoDMIO N36abTuBcO T 3TOrO ABJeHn, yCTaHOBInTe DnIPExHMa PROG. SCAN 3NaueHne OFF B yCTaHOBkax MeHIO.
O uΦpOBoi TpaHcΦokaun
B 3TOM pexkime HeBO3MOxH0 IcIIOb3OBAHne zuΦpOBoTpaHcΦokaun.
You can easily make the picture be on a horizontal line using the guide frame. The guide frame is not recorded.
(1) Press MENU to display the menu in standby, recording, or memory mode.
(2) Turn the SEL/PUSH EXEC dial to select, then press the dial.
(3) Turn the SEL/PUSH EXEC dial to select GUIDEFRAME, then press the dial.
(4) Turn the SEL/PUSH EXEC dial to select ON, then press the dial.
(5) Press MENU to erase the menu display. The guide frame is displayed on the LCD screen or in the viewfinder.
MoxhoJeKo BbIpOBHrTb N3O6paXeHne no roPn3OHTaNN C NOMOuBo KOHTpOJbHO paMKn. 3aIncb KOHTpOJbHO paMKn Ha JeHTy He npOn3BOdntcra.
(1)HaKmTe KhoNky MENUДЯ
OTobpaXeHnI MeHIO BpeXIme OxuJaHnI,
3aHNC HnI nAmTn.
(2)Повернente ДИСК SEL/PUSH EXEC ДЯ
Выбopa уCTановки [ ] , a 3aTeM нажмITE
На ДИСК.
(3)ПовернITE ДИСК SEL/PUSH EXEC ДЯ
Выбopa усановки GUIDEFRAME, заlem
навKMITE на ДИСК.
(4)ПовернITE диСEL/PUSH EXEC ДдьБбopa усановки ON, a 3aTeM нажмITEHa диСК.
(5)Haxmnte KhoNky MENU ydaJIeHn HdIkaun MeHIO. KoHTpObHaar paMka oTo6paXaetc Ha 3KpaHe KKД nIn B BuDOnCKaTeNe.
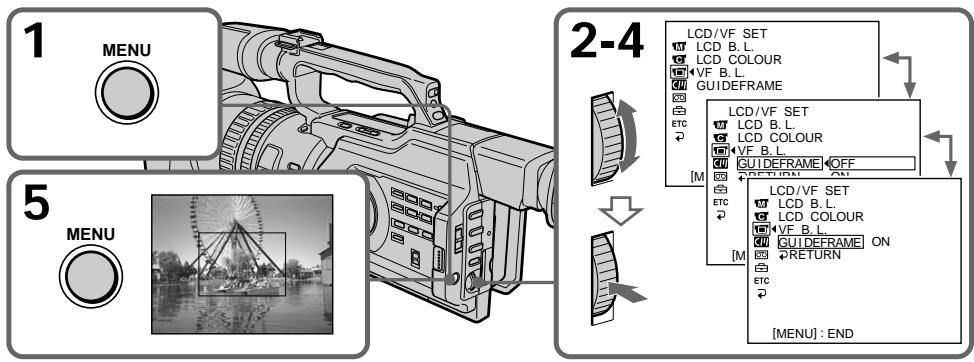
To clear the guide frame
Select OFF in step 4, then press the SEL/PUSH EXEC dial or simply press DISPLAY.
Note
The guide frame indicates only a rough level.
The size and position of the guide frame do not affect the setting of the camcorder.
If you setGUIDEFRAMEtoON
The other screen indicators are also displayed on the LCD screen.
Длг OTMeHbI OTo6paJKeHnKoHTpoJIbHoi paMKn
BbIbePte yCTaHOBky OFF B nyHKTe 4, a 3aTEM haxMnTE nck SEL/PUSH EXEC nnn KhoNkY DISPLAY.
PpmeaHne
KoHTpOlbHaJa paMka noka3bIBaet TOnbKO npImepHbI yPoBeHb. Pa3Mepbl I NIOXKeHne KOHTpOlbHOJ paMKn He BnIAOT Ha yCTaHOBKn BVNeOKaMepbl.
EcInI nIpaMaTePaGUIDEFRAME yCTaHOBJeHO 3NaYeHne ON
You can record a 16:9 wide picture to watch on a 16:9 wide-screen TV (16:9WIDE).
Black bands appear on the LCD screen or in the viewfinder during recording in 16:9WIDE mode [a]. The picture during playback on a normal TV [b] or on a wide-screen TV [c] is compressed in the widthwise direction. If you set the screen mode of the wide-screen TV to the full mode, you can watch pictures of normal images [d].
In standby mode, set 16:9WIDE to ON in in the menu settings (p. 154).
BpeKIMe OxNuaHn yCTaHOBnte napameTp 16:9WIDE B noIOnKeHne ON B C B ycTaHOBkax MeHIO (CTp. 154).
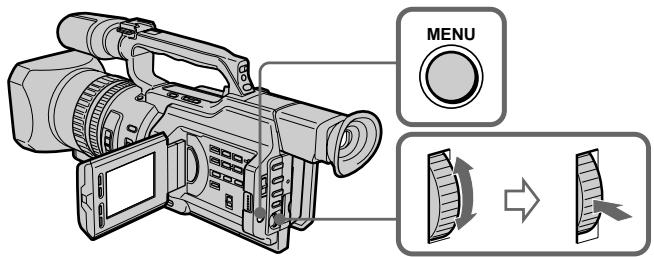
To cancel the wide mode
Set 16:9WIDE to OFF in the menu settings (p. 154).
In wide mode, you cannot select the following modes:
Old movie
- Progressive mode
During recording
You cannot operate the wide mode function. When you cancel the wide mode, set your camcorder to the standby mode and then set 16:9WIDE to OFF in the menu settings.
You can fade the picture in or out to give your recording a professional appearance.
IcnoJb3OBAHne Функци ФeДера
Moxho pergunpoBaT noCTepeHoe nOBHeNE uIN NCye3HOBeHne N3OpaXeHnA, YTO6bl npuaTb CbeMe pOpeccnoHaJIbHbI BnD.
STBY
REC
FADER

[a]


OVERLAP*


WIPE*


DOT* (Random)/ (Бесnosядочи)


[b]
- Fade in only/
*ToIbko nOaBVeHne u3o6paXeHHa
STBY
REC
MONOTONE
When fading in, the picture gradually changes from black-and-white to colour.
When fading out the picture gradually changes from colour to black-and-white.
MONOTONE
(1) When fading in [a]
In standby mode, press FADER until the desired fader indicator flashes.
When fading out [b]
In recording mode, press FADER until the desired fader indicator flashes.
The indicator changes as follows:
FADER MONOTONE OVERLAP
WIPE DOT no indicator
The last selected fader mode is indicated first.
(2) Press START/STOP. After the fade in/out is carried out, your camcorder
automatically returns to the normal mode.
IcnoJb3ObaHne yHKcnn feiepa
(1)При плавом появлени ИЗОБрахжени [a]
B pexime oKuIaHnHaXumaiTe KhoNkY
FADERdoTexnop,nokaHeHaunhet
MnraTb HxKhbl INHdkaTop fepiepa.
PnI PnIaBHom NcYe3HOBeHm N3O6paXeHn [b]
B pexime 3a nciHaximaiTe KhoIky
FADERdoTexnop,nokaHeHaHHeT
MnraTb HxKhbl INHdkaTop fepiepa.
Press FADER until the indicator disappears.
Note
You cannot use the following functions while using the fader function, and vice versa:
- Digital effect
- Low lux mode of PROGRAM AE (Only in OVERLAP, WIPE, or DOT mode)
-Tape Photo recording
-Interval recording - Cut recording
When the OVERLAP, WIPE, or DOT indicator appears
Your camcorder automatically stores the image recorded on a tape. As the image is being stored, the fader indicator flashes fast, and the playback picture appears.
Длг OTMeHbI Функци ФeДера
HaximaiTe KhoIky FADER do Tex nop, noka He nCye3HeT nHnKaTop.
Using special effects - Picture effect
You can digitally process images to obtain special effects like those in films or on TV.
NEG. ART [a]: The colour and brightness of the picture is reversed.
SEPIA : The picture gets sepia-toned.
B&W: The picture appears in monochrome (black-and-white).
SOLARIZE [b]: The light intensity is emphatic, and the picture looks like an illustration.
SLIM [c]: The picture expands vertically.
STRETCH [d]: The picture expands horizontally.

[a]
[b]

[c]

[d]
(1) In standby or recording mode, press PICTURE EFFECT.
(2) Turn the SEL/PUSH EXEC dial to select the desired picture effect mode.
The picture effect indicator changes as follows:
NEG. ART SEPIA B&W
SOLARIZE SLIM STRETCH
Using special effects - Picture effect
To cancel the picture effect function
Press PICTURE EFFECT so that the indicator disappears.
While using the picture effect function You cannot select the old movie mode.
When you turn the power off The picture effect function will be automatically cancelled.
When PROG. SCAN is set to ON in the menu settings
You cannot select SLIM and STRETCH.
IcnoJb3OBAHne cneuaJIbHbIX 3ΦΦeKToB - 3ΦΦeKT n3o6paXKeHHa
ДЯ OTMeHbI ΦyHKcUN 3ΦΦeKTOB n3o6paXeHHa
HaxmTe KhoNky PICTURE EFFECT, YTo6bl HndnKaTOp Ncye3.
Pn nCnoB3OBAHm FyHKcH N 0fKeTa n3o6paKeHn
HeIb3a Bbl6paTb peXm CTapuHHoro KInHO.
Pn BbIKJIIOHeHH NITAHN
Using special effects - Digital effect
You can add special effects to recorded pictures using the various digital functions. The sound is recorded normally.
STILL
You can record a still image so that it is superimposed on a moving picture.
FLASH (FLASH MOTION)
You can record still images successively at constant intervals.
LUMI. (LUMINANCEKEY)
You can swap a brighter area in a still image with a moving picture.
TRAIL
You can record the picture so that an incidental image like a trail is left.
OLD MOVIE
You can add an old movie type atmosphere to pictures. The black bands appear on the upper and lower of the screen to change the virtual screen size to the cinemascope size, and the picture effect is set to SEPIA.
IcnoIb3OBAHne CpeuHaJIbHbIX 3ΦΦeKToB -LHΦpOBoH ΘΦΦeKT
BbMOKeTe DObaJIbTb CneIaJIbHbIe 3ΦΦeKtbl Ha 3aIINcblBaEMOE H3O6paKHeNc c NOMOsbIO pa3NIuHbIX UINΦpOBbIX ΦyHKU. 3aIINcblBaEmbl 3Byk 6byET ObiHbIM.
STILL
BbIMoKTe3aINcSbIbTaHHeNoDVBnXHoe n3O6paXeHne dIra HAnOKeHn erO ha noDVBnXHoe n3O6paXeHne.
FLASH (FLASH MOTION)
Bb moKeTe 3aIINcBiBaTb HeNoDnXhBle n3o6paXeHnI NOcIeNOBaTeNbHO uepe3 onPeJeIeHNbIe INHTepBaJIbI.
LUMI. (LUMINANCEKEY)
BbMOKTe N3MeHrTbApKHe MeCtHa HEnoDBNIXHOM N3O6paXeHn Ha NDoBnXhIe N3O6paXeHn.
TRAIL
BbMOxKeTe 3aINcMbA Tb 3nO6paXeHne C 3ΦΦEKTOM 3aNa3DbBaHnI.
OLD MOVIE
BbMOKeTe BbIIOJIHNITb CbEMKy C3ΦΦeKTOM CTAPINHHORO KInHO. B BerXHeN HnIXHeN qACTN 3KpaHa NOBIIHOTcR YepHbIe NIOOCbI TaK, 4TO6bl PnIDaTB BnPTyAJIbHOMy 3KpaHy npONOpzIM KnHO3KpaHa, PnI 3TOM 3ΦΦeKT n3OpaXeHn yCTaHOBNeB B NIOJOxKeHne SEPIA.

STILL
Still image/ HénpoDBVIXHoe n36pbaxeHne


Moving picture/Побдьхhoe n3o6paackeHne

LUMI.
Still image/ Hénpo dBvHnOe n3o6paXeHne


Moving picture/Побд��жhoe n3обрахени
(1) In standby or recording mode, press DIGITAL EFFECT. The digital effect indicator appears.
(2)Turn the SEL/PUSH EXEC dial to select the desired digital effect mode. The digital effect indicator changes as follows: STILL FLASH LUMI. TRAIL OLD MOVIE
(3) Press the SEL/PUSH EXEC dial. The indicator lights up and the bar appears. In STILL and LUMI modes, the still image is stored in memory.
(4) Turn the SEL/PUSH EXEC dial to adjust the effect.
Items to be adjusted
| STILL | The rate of the still image you want to superimpose on the moving picture |
| FLASH | The interval of flash motion |
| LUMI. | The colour scheme of the area in the still image which is to be swapped with a moving picture |
| TRAIL | The time until the incidental image vanishes |
| OLD MOVIE | No adjustment necessary |
The longer the bar on the screen, the stronger the digital effect. The bar appears in the following modes: STILL, FLASH, LUMI and TRAIL.
IcnoJb3OBAHHe cneuaJIbHbIX 3ΦΦeKTOB -LcnpoBOI 3ΦΦeKT
Using special effects - Digital effect
To cancel the digital effect
Press DIGITAL EFFECT. The digital effect indicator disappears.
Notes
- The following functions do not work in digital effect mode:
-Fader - Low lux mode of PROGRAM AE
-Tape Photo recording - Shutter speed (1/25 or smaller) adjustment
- The following functions do not work in old movie mode:
- Wide mode
- Picture effect
- PROGRAM AE
- Spot light mode
- Shutter speed adjustment
When you turn the power off The digital effect function will b automatically cancelled.
IcnoJb3ObaHne cneuaJIbHbIX 3ΦΦeKToB -LmΦpOBoI 3ΦΦeKT
ДЯ OTMeHbI UΦpOBOrO 3ΦΦeKtA
Haxmnte KhoNky DIGITAL EFFECT.
INdikaTOp znpoBOrO 30pEka TnCye3HeT.
Приимechanicals
BpeKIme cUcfoBoro 30fpeKta He pa6oTaIOT cNeUHOUIne FyHKuIN:
-ФeINep
-PeЖIM Hn3KoO OcBeUeHocTn PROGRAM AE
-ΦOTOCbEMKaHaJIeHTy
-Pereynipobka ckopoctn 3aTbopa (1/25 n Hnke)
BpeXnme cTapHHoro KInHO He pa6oTaHOT cnEduOuIeФyHKcUN:
-山npoko3KpaHbIpeXIM
-3ΦΦeKt n306paXeHnA
-PROGRAM AE
-PeKIM npOKeTOpHOro OcBeueHnA
-Perynipobka ckopoctn 3aTbopa
PnBbIKJIIOHeHNIITaHNA
Shooting with manual adjustment
Under normal conditions, this unit automatically makes various adjustments as it shoots. However, you can adjust the following functions manually to suit your preference.
Functions you can adjust by setting the AUTO LOCK selector to the center (auto lock release) position
Brightness (exposure), shutter speed, white balance, and PROGRAM AE
Functions you can adjust in menu settings Deactivating the SteadyShot
Functions you can adjust by using other selectors/rings
ND filter, zebra pattern, focus, and zoom
The following describes how to adjust all the functions mentioned above except white balance (p. 70), PROGRAM AE (p. 77), focus (p. 81), and zoom (p. 29).
AUTO LOCK selector
Set the selector as shown below to maintain or release the settings of the functions.
CbeMka c nCNoJIb3OBAHnEm pyuHoi peYInpOBKn
B HopMaIbHbIX yCIOBnIX daHHOe yCTpoiCTBO aBTOMaTnueCKn npOIN3BOJNT pa3JIuHbIe HAcTPOiKn B I pOceCE CbEMKn. OdHaKO, IcXoJa n3 cObCTBeHHbIX npEInNoTHeNm, MoXHo peYIinPoBaTb BpyHyU cNe dyUoUne fYHKUIN.
Функции, KOTOpbIe MOxHOb peryLIpOBaTb, yCTaHOBnB nepeKJIuOyateJb AUTO LOCK B ueHTpaJIbHOe NOLOXeHne (OTKJIIOUeHne aBTOMaTHueCKoN peryLIpOBKn)
Apkoctb (aKcno3nua), cKoPoCTb 3aTbopa, 6aIaHc 6eIoro n PROGRAM AE
Функши, KOTOpbIe MOxHObpeRyInpOBaTb B yCTaHOBkAX MeHIO
OTKIIIOHHe yHKuIN yCTOHNBOB CbEMKn
Функции,КOTOBpie MOxHOp perylnpoBaTb, nCNoIb3yA npYrne nepeKJIuOHaTeJn/DnCKn ΦnIbTp ND, noIocaTbI u6BIOH, φokyc n TpaHcΦokaun
Select this position to let the unit adjust all the functions automatically.
HOLD [b]
Select this position after setting the functions manually to maintain the settings.
AUTO LOCK [a]
BbI6epNTe 3To noIOJKeHne, YTO6bl yCTpoiCTBO cAmO aBTOMaTnueCKn npOn3BOdNIO HAcTPOiKN BCex fynKcM.
HOLD [b]
Iocne puHOn hAcTpoKn Bbl6epnte 3TO nIOJKeHHe, YTObI COxpaHHTb BblIOJIHeHHbIyCtAHOBKn.
Shooting with manual adjustment
Manual position (AUTO LOCK release) [c] Select this position to adjust the functions listed above manually.
If you use the video flash light (not supplied)
We recommend that you set the AUTO LOCK selector to AUTO LOCK.
Note
When you manually adjust the exposure during backlight or spot light mode, the backlight or spot light function will be automatically cancelled.
Adjusting exposure
Adjust the exposure manually under the following cases.
The background is too bright (back lighting)
- Insufficient light: most of the picture is dark
- Bright subject and dark background
To record the darkness faithfully
CbeMka c nCnoJIb3OBAHnEm pyHNo peryInpOBKn
PyuHaHa NaCTpOJa (OTKJIIOUeHne AUTO LOCK) [c]
Bb6epnte 3to pnoJxHne, yTO6bI BpyHypoeryIpnoBaTb fynKcN, nepeuNCleHHbIe Bblwe.
PnncnoIb3OBAHnBnDeOBcblkN(He BXoNTB KOMJIeKT)
Pekomehnyetc yctaHaBnBaTb nepeKniouateJIb AUTO LOCK B noIooKeHne AUTO LOCK.
PpmeaHne
PnHacTpoKe 3KcNo3uNIN BpyHyU BOpeXIMe 3aDHeN POnCBETKN INnpOKeKToPHOrO OCBSeHEnN FyHKUns 3aDHeN POoCBTeKN IIN PpOKeKToPHOrO OCBSeHEnN 6bUdY aBTOMaTHueCKN OTKnUOyeHbl.
PerynpoBka 3Kcno3n
BbIolHnIe pyuHyIO peryIINpOBky 3KcNo3nUIN B cIeDyIOxN cIyuaX.
- ΦOH CπικOM CBETbly (ποιCBetKa c3aДи)
- HeIOCTaTOUHO CBeta: 3HaHTeJIbHaY YaCTb n3O6paXeHnTemHa
Apkn ObkeKT Ha TemHom oOhe
Heo6xoJIMOCtB CHIMMaTb IMeHHO TEMHOe n3o6paXeHne
Shooting with manual adjustment
(1) Set the AUTO LOCK selector to the center (auto lock release) position while the camcorder is in standby, recording, or memory mode.
(2) Press EXPOSURE. The exposure indicator appears on the LCD screen or in the viewfinder.
(3) Turn the EXPOSURE dial to adjust the exposure. As you turn the dial, the iris value changes between OPEN and CLOSE and the gain value changes between 0 dB and 18dB. To brighten the picture, adjust the level to the + side.
CbeMka c nCNoJIb3OBAHnEm pyHOn peRyIInpOBKn
(1)Korda kamepa haxoindTcBpekime OxuaHnra,3aHNCn nnPiamrTu, ycTaHOBnte nepeKlouyateIb AUTO LOCK B ceHTpAlbHoE noLoXeHne (OTKluOeHne aBTOMaTHueCKoI perylnipOBKn).
(2)HaxkMnte KhoNky EXPOSURE. Ha 3kpAne XXKД nIIN B VbINOcKaTeJI NOBNTcI INdIKaTOp 3KcNo3nIiN.
(3)ПовернITE ДИСК EXPOSURE ДЯ
perуларовки зклоци.
При повороTe ДИSCKa 3наченыnpсобов
диадрaramы мениетс оТ OPEN
(OTКрыт)adoCLOSE (Зakрыт),а
Велочина услиенья -от 0 д5 до 18 д5.
Чтосы сdenатизбрахенe 6олee
ярков,смecтinte у探测ьв в CTОPOH +.
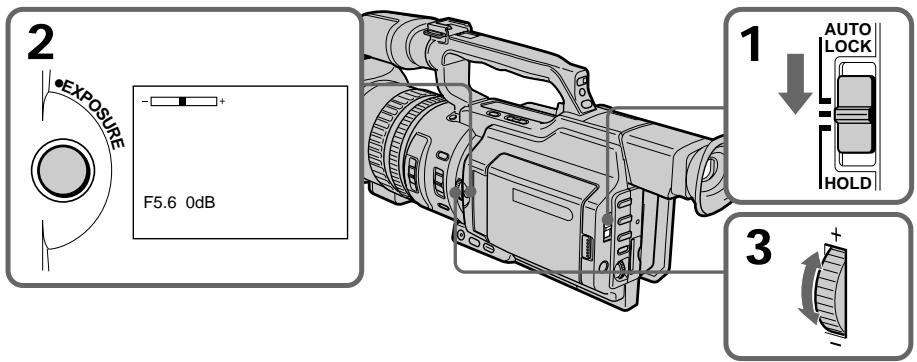
To return to automatic exposure mode
Set the AUTO LOCK selector to AUTO LOCK or press EXPOSURE. The exposure indicator disappears from the LCD or viewfinder screen.
If you press PROGRAM AE when adjusting the exposure manually
The exposure comes back to automatic adjustment again.
ДлЯ BO3BpaTa B peKIM aBTOMaTnueCKO 3KcNo3nCm
YcTaHOBnTe nepeKJIIOUaTeIb AUTO LOCK B nOLOKeHne AUTO LOCK nIIN hAkmnte KhONky EXPOSURE. INdNkaTOp 3KnCNo3uIN nCue3HeT c 3KpaHa JKKD nIIN bNdoNcKaTeJIa.
Ecnn Bo Bpemr pyHoi perynipoBkn 3Kcno3nHaxaTb KhoNky PROGRAM AE 3Kcno3nIChOBA nepeKJIIOuaeTcB pexm ABTomATUeCKoI perynpOBKn.
Adjusting the shutter speed
(1) Set the AUTO LOCK selector to the center (auto lock release) position while the camcorder is in standby, recording, or memory mode.
(2) If the PROGRAM AE indicator is lit, press PROGRAM AE repeatedly until the indicator disappears from the LCD or viewfinder screen.
(3) Press SHUTTER SPEED. The shutter speed indicator appears on the LCD screen or in the viewfinder.
(4) Turn the SEL/PUSH EXEC dial to select the desired speed. The available shutter speed ranges from 1/3 to 1/10000. As you turn the dial, the shutter speed changes as follows:
$$ \begin{array}{l} 1 / 3 \longleftrightarrow 1 / 6 \longleftrightarrow 1 / 1 2 \longleftrightarrow 1 / 2 5 \longleftrightarrow \dots \longleftrightarrow \ 1 / 3 5 0 0 \leftrightarrow 1 / 6 0 0 0 \leftrightarrow 1 / 1 0 0 0 0 \ \end{array} $$
To increase the shutter speed, select a smaller setting (large value indicator on the LCD screen or in the viewfinder).
CbeMka c nCnoJIb3OBAHnEm pyHNo peryInpOBKn
PerynipoBkA cKOpocTn 3aTbopa
(1)KorДаКамерихoДИТСВЕЖIMe OxuДaHnI,3aПиСи nIл ПamrTи, yCTaHOBInTe NepeKJIIOUcATEIb AUTO LOCK B UeHTpaNbHoe NOJIOXeHne (OTKJIIOUeHne aBTOMaTnueCKO peryInpOBKn).
(2)Ecni ropnt INdikatop PROGRAM AE, Haxmnte KhoNky PROGRAM AE HeCKoJIbKO pa3, NOKa INdikatop He Icye3HeT c 3KpaHa KKД nII BnIOuCKaTeJI.
(3)Haxmnte SHUTTER SPEED. Ha 3kpaHe XKД nIи B vIOnsKaTeNe NOBtCn IHNdkaTOp CkOPOCTN 3aTBopa.
(4)ПовернITE ДИСК SEL/PUSH EXEC ДЯ
Быбopa hyжно ckорoctи. Сkopocь
Затвopa может 6ыть установлеса В
празелax ot 1/3 до 1/10000. Ри
поворе ДИСКА СКОРOCь 3аТВopa
Измениетс сдуюшим обраэм:
1/3 ↔ 1/6 ↔ 1/12 ↔ 1/25 ↔ ... ↔
1/3500 ↔ 1/6000 ↔ 1/10000
Дя вением_CКОРСТУ 3aTВopa
Быбрп Te меньшee 3нчЕне (Инданкотop
Болшей Велинины на захал�)
Видаочka-teile).
To return to automatic shutter speed mode
Set the AUTO LOCK selector to AUTO LOCK or press SHUTTER SPEED. The shutter speed indicator disappears from the LCD or viewfinder screen.
ДлЯ BO3ВpaTаВ ржим abTomatн ueckор PerylnpoBkn CKOPOCTn 3aTBopa
YcTaHOBInTe nepeKlnOuataJIb AUTO LOCK B noJIOXeHne AUTO LOCK nIIN hAXMnTe SHUTTER SPEED. INdIkaTOp cKOpocTn 3aTBopa nCue3HeT c ekpaHa JKKД nIIN BUNoNCKaTeJIa.
Shooting with manual adjustment
When shooting at slow shutter speed At slow shutter speed, automatic focus may be lost. Use a tripod and adjust the focus manually.
When shooting under fluorescent light or light bulbs
When shooting under fluorescent light or light bulbs, a rare phenomenon may happen in which the screen lights up brightly depending on the shutter speed (Flicker phenomenon).
If you set the shutter speed value to 1/25 or smaller
You cannot use the spot light (p. 33) and digital effect (p. 58) functions.
Using the ND filter
Using the ND filter (the ND filter 1 setting corresponds to 1/4 of the quantity of light and the ND filter 2 setting corresponds to 1/32 of the quantity of light), you can record a picture clearly by adjusting light amounts, even if you shoot under too bright conditions.
CbeMka c nCNoJIb3OBAHnEm pyHOn peRyInpOBKN
Pn CbEMKe C HN3KoC KcOpocTbO 3aTBopa Pn CbEMKe C HN3KoC KcOpocTbO 3aTBopa MoKeT He pa60TaTb ABTOMaTneCKaH OKycuPOBa. NcNoJIb3yIe UtaHB u YCTaHOBtE OKyc BpyHyIO.
CbeMaKApnOCBeUeHmJAMnAmM DHeBHOrCBetAUNJAMnAMN HAKaJIbBaHr
Bo Bpem CbEMKn PnO OcBeSeHn IaMpaMn DHeBHOr CBeTa NIN IaMpaMn HaKaIbNAHn MOKeT BO3HKNHYb peKOE ABLeHne, Pn KOTOpOM 3KpaH rPKO BCnbIXNBaET B 3aBNCIMOCtN OT CKOPoCTN 3aTBopa (MepuHne).
EcIn yCTaHOBHeA BeINuHa cKOpocTn 3aTBopa,paBna1/25 nIi HnKe
HeIb3a 6yIeT nCnONb3ObaTb fynKcIM npoxKeTOpHOro oCBeueHnra (ctp. 33) n uΦpOBoro 3ΦΦeKaTa (ctp. 58).
IcnoJIb3OBAHnE ΦnJIbTp a ND
IcnoIb3yIΦnIbTpND (no3nIa IΦnIbTp a ND cooTBeTCTByET 1/4 KOJIuYeCTBa CBeta, a no3nIa 2ΦnIbTp a ND cooTBeTCTByET 1/32 KOJIuYeCTBa CBeta), MOXHO OTeTJINBO CHaTb KapTHKy, KOTopar npn 3tOM He BbIeT n3 φokyca, 6byuH npK OcBceHHO.
When the ND1 or ND2 indicator flashes on the LCD screen or in the viewfinder
The ND filter is necessary. When ND 1 flashes, set the ND FILTER selector to 1 so that the ND 1 indicator lights up on the LCD screen or in the viewfinder. When ND 2 flashes, set the ND FILTER selector to 2 so that the ND 2 indicator lights up on the LCD screen or in the viewfinder.
When ND OFF flashes on the LCD screen or in the viewfinder
The ND filter is not necessary. Set the ND FILTER selector to OFF so that the indicator disappears from the LCD or viewfinder screen. The ND filter is now deactivated.
CbeMka c nCNoJIb3OBAHnEM pyHOn peryIInpOBKn
KordaHa3kpaHe KKД uInu B BuOnCKaTeJI MraeT uHdNkaTop ND1 uIn ND2
Tpe6yETcHnIbTp ND.
Korda miraet nHdkaTOp ND 1, yCTaHOBtene
nepeKIOuHTeNBND FILTER B nOJoxKeHne 1,
yTO6bHa n3KpaHe KKn nIn B vDIOUcKaTeNe
3aRopeJIcNnHdkaTOp ND 1.
Korda miraet nHdkaTOp ND 2, yCTaHOBtene
nepeKIOuHTeNBND FILTER B nOJoxKeHne 2,
yTO6bHa n3KpaHe KKn nIn B vDIOUcKaTeNe
3aRopeJIcNnHdkaTOp ND 2.
Korda mnaeT nHnkaTop ND OFF ha əkpaHe XKKД nIb B VbdoNcKaTeIe
ФильТР ND He Huxhen. YcTaHOBnTe nepeKluOuATEnelb ND FILTER B noLoXeHne OFF,чTO6bl NcYe3 nHdNkaTOp Ha 3KpaHe XXKД nII INB BnDOnCKaTeIe.
ФильТР ND Tepeb OTKluOyen.
Notes
- If you set the ND FILTER selector to another positions during recording, the picture may be blurred or audio noise may occur. We recommend that you check the position of the ND FILTER selector before shooting.
- When shooting a too bright object, diffraction off the small aperture may cause slight off set in focusing. This phenomenon is quite common with a use of a video camera recorder. Using the ND filter will reduce influence of such phenomenon, and you can attain a better shooting condition.
If you use the video flash light (not supplied)
Set the ND FILTER selector to OFF when you use the flash.
Примеань.
- Ecni BO Bpem3aHnCn nepeDbNHyTb nepeKluOaTeIb ND FILTERB npyroe noJoxHe, n3o6paKeHne MOxET CtaTb Hepe3KIM Nm MoXeT NOBtCBsUyM. IonoJoxHe nepeKluOaTeIaNDFILTER peKOMeHdyETc npOBeprTa nepeDcbEmKoI.
- Bo BpemcBcEMKn cIIuKOM npKoTO o6bekTa dIqpaKun npn He6Oblwom 3NaueHm INaOpambl MoKeT Bbl3BaT JERKoe CmeUeHne pOKycuropOBKn. 3To BNoJIHe O6bIHyOe ABLeHne npn IcNolb3OBaHm BNdeOkampebl. Pn nCnOlb3OBaHm FInlBtpa ND 3TO ABNeHne CTAnOBtCMeHee 3AmETbHM, n DOCTNIAOTc 60Jee 6laorponpAHTbIe yCNOBnC bEmKn.
PnHcNoJIb3OBAHnBnDEOBcblIskn(He BXoIIT B KOMJIeKT)
Ecnn nCnoJb3yeTcB CnblIka, yCTaHOBtenepeKluoyatel NB FILTER B noLoXeHne OFF.
Shooting with the zebra pattern
You can set the camcorder to display a zebra pattern (diagonal stripes) in the portion of the picture on the LCD screen or in the viewfinder with a subject whose brightness exceeds a certain level. When the ZEBRA selector is set to 100, the portion of the picture where zebra pattern appears is an area of high brightness and overexposure. You can check the picture level of a subject by displaying the zebra pattern. Use the zebra pattern as a guide for adjusting the exposure and shutter speed so that you can get the desired picture.
Set the ZEBRA selector to 70 or 100 in standby or memory mode.
CbeMka c nCNoJIb3OBAHnEm pyHOn peRyInpOBKn
Cbemka c nCloNb3OBAHnEM nolocatoro 7a6l0ha
Moxho hactpoNTb Bndeokamepy Ha
OTobpaXeHne PONocatoRO 7a6NoHa
(DnAHOHbHbIX PONOC) B ToY qactN
n3obpaXeHnHa 3KpaHe XKDi nIiB
BVIOUCKaTeNe, rIe JRPKocTb PneBbIaEaT
OppeDenHbI yPoBeHb. Korda
pepeKnIOuOaTeNb ZEBRA yCTaHOBJIen B
PONooXeHne 100, PONocAtbI 7a6NoH
OTobpaXaETcR B O6NaCTx C BtICOKoI
JRPKocTbIO npepeDepkKoI. MoxHo npOBepTuB
yPoBeHb JRPKocTn 6ObekTa, OTobpa3INB
PONocTbII 7a6NoH. PONocAtbI 7a6NoH
NCPOb3yETcR B KaueCTBe OpiENTnpa dJa
HACTpoKN Heo6XoDMoN 3KcNO3nCNI N
CKOPoCTN 3aTBopa dJa nOJyHeHH
XeJaEMOrO n3obpaXeHnI.
UcTaHOBiTte nepeKJIIOuataTeIb ZEBRA B noLoXKeHne 70 nIIN 100 B pexIme OxNdaHn IJIN pAMrTIn.
| Setting | Meaning |
| 70 | The zebra pattern appears in the portion of the picture on the LCD screen or in the viewfinder with a subject whose brightness is about 70%. |
| 100 | The zebra pattern appears in the portion of the picture on the LCD screen or in the viewfinder with a subject whose brightness exceeds more than 100%. |
| OFF | The zebra pattern does not appear on the LCD screen or in the viewfinder. |
To erase the zebra pattern
Set the ZEBRA selector to OFF.
Note on shooting with the zebra pattern Even though you see the zebra pattern on the LCD screen or in the viewfinder, the zebra pattern is not recorded.
When the SteadyShot function is working, the camcorder compensates for camera-shake. You can release the SteadyShot function when you do not need to use it. The indicator appears on the LCD screen or in the viewfinder. Do not use the SteadyShot function when shooting a stationary object with a tripod.
(1) Press MENU to display the menu in standby or memory mode.
(2) Turn the SEL/PUSH EXEC dial to select , then press the dial.
(3) Turn the SEL/PUSH EXEC dial to select STEADYSHOT, then press the dial.
(4) Turn the SEL/PUSH EXEC dial to select OFF, then press the dial.
(5) Press MENU to erase the menu display.
OTKJIUOHeHneФyHKcUN yCTOnuHBOcBemKn (SteadyShot)
Korda BkIIOUeHa yHKcIy yCTOuHbO
cbEMKn, BnDEoKaMepa KOMNeHCnpyET
noDparINBaHn. Korda 3Ta yHKcIy He
Tpe6yeTcA, ee MOxHO OTKIOHTb. Ha 3KpaHe
XKJ, nII IN B BnOONCKaTeJIe NOBNTcH
InNdkatop *F. He nCNoJIb3yIte yHKcuIO
yCTOuHbO B cbEMKn pRn CbeMKe
HEPOdBHXHoro O6BeKTA C NOMOsbIO
WtATnBa.
(1)HaKMnte KhoNky MENU nIy OTo6paKeHnMaMeHIO BpeKIme OXnDaHnI NJI nAmrTn.
(2)ПовернITE диСEL/PUSH EXEC ДЯ
Выбoga установки ,а затем нажмITE
НдИСК.
(3)ПовернITE ДИСК SEL/PUSH EXEC ДЯ Вьбopa установки STEADYSHOT, за тем нажмITE ДИСК.
(4)ПовернITE диСEL/PUSH EXEC дя Выбoga OFF, 3aTeM нажмITE диСК.
(5)Haxmnte KhoNky MENU ydaJIeHnI INdkaun MeHIO.
Shooting with manual adjustment
To activate the SteadyShot function again
Select ON in step 4, then press the SEL/PUSH EXEC dial.
Notes on the SteadyShot function
- The SteadyShot function will not correct excessive camera-shake.
- If you use a tele conversion lens (not supplied) or a wide conversion lens (not supplied), these lens may influence the SteadyShot function.
CbeMka c nCNoJIb3OBAHnEm pyHOn peRyIInpOBKn
YTO6bI CHOBA AKTINB3NPOBaTb yHKZU yCTOnyHBOB CbeMKu
Bb6epnte ON bnykTe 4,3aTe m haxmTe dNcK SEL/PUSH EXEC.
PpmeaHnno fynkun yctOuBOB CbeMKN
Функцу yctOuHBOB cBEmKn He B COCTOAHN KOMNeHCnPOBaT Ype3MepHoe NOpaRnBaHne BInDeOKaMepbI.
- IcnoIb3OBAHnE TeIe- nIINI INPOKOyROJbHOro ObBeKTHOBB (He BXoJrT B KOMIIeKT) MOXeT BnIaTb Ha pa6oTy fYHKuIN yCTOnuHBOB CbeMKn.
Adjusting the white balance
White balance adjustment makes white subjects look white and allows more natural colour balance for camera recording. Normally, white balance is automatically adjusted. You can obtain better results by adjusting the white balance manually when lighting conditions change quickly or when recording outdoors: e.g., neon signs, fireworks.
(1) Set the AUTO LOCK selector to the center (auto lock release) position while the camcorder is in standby, recording, or memory mode.
(2) Press WHT BAL. The white balance indicator appears on the LCD screen or in the viewfinder.
(3) Turn the SEL/PUSH EXEC dial to select the appropriate white balance mode under the following conditions. As you turn the dial, the display changes as follows:
(One-push white balance) (Outdoor) (Indoor)
PeruInpoBka 6aHaHca 6eIoro cBeTa
Perylnpobka 6aIahca 6eIoro 2eTa
No3BOJAEr PtIaTb 6eblm O6BeKtAm
NCTINHO 6eIbI 2eETn DoBHTcB 6oJIee
ecTeCTBeHOrO 2eTOBOrO 6aIahca npi
CbeMeke. O6bIHyO perylnpobka 6aIahca
6eIoro 2eBa T bInONHaTe cABToMaTuYeCKn.
Perylnpobka 6aIahca 6eIoro 2eTa BpyHyIO
No3BOJAEr NOnyUHTb LyuHne pe3yIbTaTbIB
TEX CnyuaX, KOrDa yCNOBnO NCBeUeHnE
6bICTro N3MeHApOTc NII npi CBeMe Ha
yUnie: HAnpIMep, HeOHOBx BbIEcOK,
feIepBepKOB.
(1)Korda kamepa haoodntcBpekime OxuaHnra,3aINCSnIINpAMrTn, yctahOBHTe nepeKJIouyateIb AUTO LOCK B ceHTpaIbHOe NOLOXeHne (OTKIOUeyHne aBTOMATNUeCKo peRyIUPOBKn).
(2)Haxmnte KhoNky WHT BAL. Ha 3kpaHe XKД nIи B vIOnckaTeJe noBNTcI INdikatop 6anaHca 6eIoro cBeTa.
(3)ПовернiteДСКSEL/PUSH EXECдЯ
Быбopa HeobxOДИМО rpeKIMa 6baIahca
6eIoro B cIeIyUOuX yCIOBnIX. При
ПовороTe ДИСКа ИДИКaцИЯ ИЗМЕнгетс
cIeIyUOuM O6pa30M:
(6baIaHc 6eIoro OДИМ hαжATneM)←
(нупuce)← (nomeшениe)
Adjusting the white balance
| Indicator | Shooting conditions |
| (Outdoor) | ·Adjusting the white balance according to the light source. This operation is not available during recording. Follow the procedure described below to adjust the setting again. |
| ·Recording a sunset/sunrise, just after sunset, just before sunrise, neon signs, or fireworks ·Under a colour matching fluorescent lamp | |
| (Indoor) | ·Lighting condition changes quickly ·Too bright a place such as a photography studio ·Under sodium lamps or mercury lamps |
If you have selected 2 in step 3
When you set the white balance to one-push white balance mode, the setting is locked and maintained even if lighting conditions change. You can achieve recording with natural colours without the image being affected by ambient light.
(With the indicator on the screen)
(1) Shoot a white object such as paper fully.
(2) Press the SEL/PUSH EXEC dial.
The indicator flashes quickly. When the white balance has been adjusted and stored in the memory, the indicator stops flashing. The setting will be maintained even if the battery is detached.
To return to automatic adjustment
Set the AUTO LOCK selector to AUTO LOCK or press WHT BAL. The white balance indicator disappears from the LCD or viewfinder screen.
Perylnpobka 6aJahca 6eJoro Cbeta
EcnnBnyHKTe 3 BbI6paHa yCTaHOBka

EcIn yctaHOBnEH pexm peynpobKn 6aIahCa 6eIoro Ondn HaxaTneM,TO BbIbpaHHa YcTaHOBA qNKcNpyETca N coXpaHHeTcNoTex np, noka He n3MeHrTcN ycIOBnO cObSeHn. Bpe3ynbTaTe nOlyaTeC3aIncb C eCTeCTBeHHbIMn CBeTaMn,Ha n3ObpaXeHne He BJIureT OkpykaUoJn CBeT. (Korda Ha 3kpane ropnt INdNKatOp
(1)Cbemka TOnbko 6eIoro 06BeKta, HapnMep, 6eIoi 6yMaHn.
(2)HaXmTe HaДnCK SEL/PUSH EXEC. HnDnKaTOp 7aCto 3amiraet. Nocne HacToPouKn 6bAHaCA 6eIoro n COxpaHEnr erO B nAmrtn INDnKaTOp nepeCTaHET MIRatb. HAcToPouKa coxpaHntc TaJKe nocLe OTKlUoyHn6BaTapei.
YTo6bI CHOBA BKJIIOHTb peXIM abTOMaTHUeCKo HAcTpOuKn
YcTaHOBInTe nepeKlnHouaTeJIb AUTO LOCK B noJIOKeHne AUTO LOCK nIIN hAekMnte KhoNky WHT BAL. INdNkaTOp 6aJaHca 6eIoro nCue3HeT c 3KpaHa JKKД nIIN B BnDOnCKaTeIe.
Notes on white balance
- When you shoot with studio lighting or video lighting, use the (indoor) mode.
- When you shoot with fluorescent lighting, readjust the white balance using the 1 (onepush white balance) mode, or use the automatic white balance mode. If you use the 杂 (indoor) mode, white balance may not be adjusted appropriately.
Shooting when lighting conditions have changed
- When lighting conditions have changed, readjust the white balance while the camcorder is in standby mode.
-
In automatic white balance mode, point your camcorder at a white subject for about 10 seconds after setting the POWER switch to CAMERA to get a better adjustment when:
-
You detach the battery for replacement.
- You bring your camcorder outdoors from the interior of a house, or vice versa.
If the indicator does not stop flashing after you press the SEL/PUSH EXEC dial The white balance cannot be set. Use the automatic white balance mode.
Perylnpobka 6aJaanca 6eJoro CBeta
3aMeaHnO tHOcHTeJIbHo 6aHaHa ca 6eNoRo
-Пис bemke CO CTyДинБIM OCBeшенm
ИИС C NOMOью BnDEОДCBETKN
ИСПОЛьзуТе ржим 杂(В РОмeшениm).
-Пи CBemke c OCBeSeHnEM lamPamn DHeBHO rCBeta OTpeyInpuyTe 6aIaHC 6BeIoro, nCpOJIb3yra peXIM (peYIpOBKa 6BaIaHaCA 6BeIoro OdHm HaxKaTneM) IIN ABToMaTHuYeCKoR peYIpOBKn. B Cnyae IcPOnIb3OBAHNr peXIMa 念 (B NOMeUeHn), peYIpOBKa 6aJIaHaCA 6BeIoro MoKet BbINOJIHrTBcA HeBepHo.
Cbemka npn n3mehn ycnoBn OCbeueHn
- EcIy uCIOBnOOCBEeHnI3MeHnJIinCb, nepeKJIIOHTe BUNDeOKaMepy B pexIM OxuDaHn I 3aHOBO OTpeRyInpyTe 6baNaHc 6enoro.
Bpejxime aBTOMaTnueecko perynnpOBKn 6baIahca 6beIoro HnpaPbTe BndeOkaMepy Ha 6beIby npeMeT npIb3ntelbHo Ha 10 cekyHn noCne yctaHOKN pepeKIOUaTeJIa POWER B nIoXeHne CAMERA dIra nOnyuHnryuLyuShenHNoNcTpoKn perynnpOBKn, KOrDa:
-Bbl OTcoeHnHre 6aTapeHbI 6NOK nla 3aMeHbI.
-BbI BbIXoDInTe C KAmepo N3 POMeUeHnHa yuNtu nn HaO6OpOT.
Ecni HndkaTop npoDJIkaet MraTb nocIe haxatna Ha nck SEL/PUSH EXEC
BaIaHc 6eIoro HeBO3MOXHO yCTaHOBnTb.
IVcNoIb3yItepeKIM aBTOMaTHueCKO
peRyIuPobKn 6aHaHca.
Adjusting recording level manually - Sound recording level
You can adjust the recording sound level. Use headphones to monitor the sound when you adjust it.
Setting up the menu
(1) Set the POWER switch to CAMERA or VCR.
(2) Press MENU to display the menu.
(3) Turn the SEL/PUSH EXEC dial to select, then press the dial.
(4) Turn the SEL/PUSH EXEC dial to select MIC LEVEL, then press the dial.
(5) Turn the SEL/PUSH EXEC dial to select MANUAL, then press the dial.
(6) Press MENU to erase the menu display.
Adjusting the recording level
(7) Press AUDIO LEVEL to display the recording level adjustment display in standby or recording mode.
(8) Turn the SEL/PUSH EXEC dial to adjust the recording level.
Perylnpobka ypOBHn3aIncn BpyHyIO - YpOBeHb 3aIncn 3ByKa
Moxho HactpanBaT ypoBeH 3aIncn 3Byka.
IpyocnyuBAnHa 3Byka BO BpeM
peryInpOBKn nCOnJb3yTe HayuNkn.
HacTpoKa MeHIO
(1)Установпейсякючateь POWER в положене CAMERA ии VCR.
(2)HaxmTe KhoNkY MENU dIa OTo6paXeHHa MeHIO.
(3)ПовернITE ДИСК SEL/PUSH EXEC ДЯ
Выбopa уCTановки , a 3aTeM нажмITE
НдИСК.
(4)ПовернITE ДИСК SEL/PUSH EXEC ДИВЮбopa установки MIC LEVEL,Затем НжмITE на ДИСК.
(5)ПовернITE ДИСК SEL/PUSH EXEC ДИВЮбopa установки MANUAL, 3atem НжмITE на ДИСК.
(6)HaxmTe KhONkY MENU dIy ydaJIeHnI INdIKaUN MeHO.
PerylnpobKa ypOBn3aHncn
(7)HaXMMTe KHONky AUDIO LEVEL dIra oTo6paKeHnE 3KpaHa peryInpOBKn yPOBnI 3aIncN B pexIme OxuIaHnI nIi 3aIncN.
(8)ПовернITE ДИСК SEL/PUSH EXEC Дпгетуларвкурьгязп.
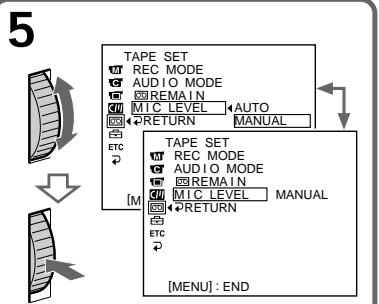
Adjusting recording level manually - Sound recording level
[a]Recording level meter
[b]Decreases the recording level
[c] Increases the recording level
To clear the recording level adjustment display
Press AUDIO LEVEL again.
To adjust the recording level automatically
Select AUTO in step 5, then press the SEL/PUSH EXEC dial.
Notes on the manual adjustment
- The recording level setting is retained for about five minutes after removing the battery.
- The recording level indicator appears at the lower-right on the LCD screen or in the viewfinder.
The sound input through the AUDIO L/R jacks or DVI IN/OUT jack
You cannot adjust the recording level.
When MIC LEVEL is set to AUTO
You cannot adjust the recording level, however, the recording level adjustment display is displayed.
PerynipoBka ypOBH 3aIncn BpyHyIO - YpOBeH 3aIncn 3ByKa
[a]Индикатуровая заимс]
[b]YMeHbIaeT yPoBeHb 3aIINcI
[c]YBeJIInuINBaETyPoBEnb3aIINcN
Длг OTMeHbI OTO6paXeHHa 3KpaHa peryJInpOBKn yPObHn 3aNcN
HaxmTe KhoNky AUDIO LEVEL eue pa3.
Длг abTomatuecko Hactpoynu ypoBn 3aHnc
BbIepeTe yctaHOBky AUTO B nyHKte 5, 3aTEM haxmTe dNcK SEL/PUSH EXEC.
3ameuHnO OTHOCHTeIbHo pyHOn perynnpOBKn
- HactpoKa ypOBn 3aIncu CoXpaHReTcB TeueHne npMepHo PAn MHyT nocLe OTKluOeHn 6aTapen.
- INДИКATOP yPOBHA 3aIINc OTObpaXaETcB INpabOM HIXHem YrIy Ha 3KpaHe XXKД nInn B BuDOnCKaTeNe.
Bxodno 3ByKOBoN cnHaJI uepe3 rHe3da AUDIO L/R nI, DV IN/OUT
YpOBeH 3aIImc He peryIynpyeTcA.
Korda KomaHa MIC LEVEL yctaHOBneHa B noJoxHe AUTO
Pereynipobka ypOBH 3aIncn HeBO3MOxHa, HO 3kpan pereynipobKn ypOBH 3aIncn OTo6paXaetc.
Presetting the adjustment for picture quality - Custom preset
You can preset the camcorder to record the picture with the desired picture quality.
When presetting, adjust the picture by shooting a subject and checking the picture displayed on a TV using the menu settings.
(1) Press CUSTOM PRESET to display the CUSTOM PRESET menu in standby or memory mode.
(2) Press the SEL/PUSH EXEC dial.
(3) Turn the SEL/PUSH EXEC dial to select SET, then press the dial.
(4) Turn the SEL/PUSH EXEC dial to select ON, then press the dial.
(5) Turn the SEL/PUSH EXEC dial to select the desired item, then press the dial.
(6) Turn the SEL/PUSH EXEC dial to adjust the selected item, then press the dial.
(7) Press CUSTOM PRESET.
The CUSTOM PRESET menu disappears and the indicator CP appears on the LCD screen or in the viewfinder.
Items to be adjusted/3neMeHTbI dIaI pyerInpOBKn
| Item/Злем ent | Meaning/Ha3нauениe | Adjustment value/Belушина ретулировки |
| COLOUR LVL | Colour intensity/ИntehсиьhoeчыцьetoB | Decreases colour intensity ↔ Increases colour intensity/Уменшениe ИntehсиьhoeчыцьetoA ↔Уменшениe ИntehсиьhoeчыцьetoA |
| SHARPNESS | Sharpness/Рeshкость | Softer ↔ Sharper/Сглаженhoe ↔ Pe3коe |
| WB SHIFT | White balance/Баланс белого | Bluish ↔ Reddish/Синий ↔ Красный |
| AE SHIFT | Brightness/ЯркOSTь | -4 ↔ +4 |
| AGC LIMIT | Auto Gain-limit/АвTomатиеслое ограличениe усilенья | 6 dB/12 dB/OFF/6 dB/12 dB/OFF |
| RESET | Sets items above to the default settings./Установka для вишикуа зааньix злем entobьзни по умочанию. | |
To cancel using the custom preset
Select OFF in step 4, then press the SEL/PUSH EXEC dial.
To return to the standard setting
Select OK from the RESET item in step 5, then press the SEL/PUSH EXEC dial. To cancel, select RETURN, then press the SEL/PUSH EXEC dial.
To check the custom preset setting
Press CUSTOM PRESET while the camcorder is in standby, recording or memory mode.
The custom preset setting appears on the LCD screen or in the viewfinder.
Once you adjust AE shift
You can adjust the brightness of the picture according to recording circumstances or objects.
About the AGC Limit
When adjusting the exposure manually, the level of the gain is up to 18 dB (OFF).
When you preset the desired picture quality in CAMERA or memory mode
The preset is only available in each mode you preset. If you want to use a preset both in CAMERA and memory modes, you have to preset in each mode.
You can select from five PROGRAM AE (Auto Exposure) modes to suit your shooting situation, referring to the following.
Selecting the best mode
Select a proper PROGRAM AE mode referring to the following description.
ИспOLSьЗОВане функци PROGRAM AE
Moxho Bb6paTb OIN H3 PAnu peKmOB PROGRAM AE (aBtOMaTnuecka 3KcNo3nua) B COOTBeTCTBn C yCIOBnAMn CbeMKn,pyKOBOdCTByac CneDyOuIm.
Bb6op Han6oJee noDxoJzeropeKIma
BbIbePte Heo6xoIaMbI peKIM PROGRAM AE Ha oCHOBe cJeDyUOeTo OINcaHn.


AE A: Aperture priority mode
Selecting the aperture to determine the desired depth of field. Gain and shutter speed are automatically set in combination with the aperture value to maintain appropriate exposure.
AE S:Shutter speed priority mode
Selecting the shutter speed manually. The exposure value changes in accordance with the selected shutter speed.
Sports lesson mode
Capturing high-speed action in sports such as golf or tennis
:Sunset & Moon mode
Recording sunset, night views, fireworks or neon signs
: Low lux mode
For recording a subject in insufficient light. Subject becomes bright.
A E A: Pekim npnopute daaparmbl
Bb6op dnaΦpaMblIgIOnpeDeHnHn HcOxOdmoIgIy6bHbIpe3KoCTn.YcInHeNcCKOpocTb 3aTbopa HactpAnBaIOTcABTomATUeCKN B COOTBETCTBnC yCTaHOBJEHbIM 3HaueHem DnaΦpaMblIgIPOJyEHHn HeOxOdmoI 3KcNo3n.
AE S: Pekim npnopnta ckopoctn 3aTbopa
Bb60p ckopoctn 3aTBopa BpyHyIO. 3NaueHne 3KcNo3nUIN N3MeHReTcB COoTBeTCTBn C Bb6paHHoN CKoPocTbIO 3aTBopa.
PeknCnpTbBbIX COCT3aHm
CbeMa 6bIcTpo DnKxuXcxO bekTOB, Hapmep, BO BpemN rpbB roIbΦ nIN TEHHNC
C: Pexm 3aKaTa coHca n lyHHoro OCBeueHn
CbeMka 3aKaTOB cOnHca, HOnHbIX BnIOB, fpeepBepKOB IN HeOHOBix peKJ lam
: Pexm Hn3KoJ OCeBueHHOCTN
Дясевский obektob npи HeodctaTOHOM Oceuehen.Obekt ctaHOBNTcRApKIM.
Using the PROGRAM AE function
(1) Set the AUTO LOCK selector to the center (auto lock release) position while the camcorder is in standby, recording, or memory mode.
(2) Press PROGRAM AE. The PROGRAM AE indicator appears on the LCD screen or in the viewfinder.
(3) Turn the SEL/PUSH EXEC dial to select the desired PROGRAM AE mode. The PROGRAM AE mode changes as follows: Aperture priority mode Shutter speed priority mode Sports lesson mode Sunset & Moon mode Low lux mode When you select the aperture priority mode or the shutter speed priority mode, press the SEL/PUSH EXEC dial.
(4) In aperture priority mode (AE A) or shutter speed priority mode (AE S), turn the SEL/PUSH EXEC dial to select the desired aperture value (F value) or shutter speed. Aperture priority mode:
Turn the SEL/PUSH EXEC dial to select the desired aperture value. As you turn the dial, the F value changes between F1.6 and F11.
For a smaller aperture, select a higher value. The gain and shutter speed change in accordance with the selected aperture value.
Shutter speed priority mode:
Turn the SEL/PUSH EXEC dial to select the desired shutter speed. As you turn the dial, shutter speed changes between 1/50 and 1/10000.
For a faster shutter speed, select a smaller value indicator on the LCD screen or in the viewfinder. The gain and aperture values change in accordance with the selected shutter speed.
Set the AUTO LOCK selector to AUTO LOCK or press PROGRAM AE. The PROGRAM AE indicator disappears from the LCD or viewfinder screen.
Notes
- In sports lesson mode, you cannot take close-ups. This is because your camcorder is set to focus only on subjects in the middle to far distance.
- In sunset & moon mode, your camcorder is set to focus only on distant subjects.
- The old movie mode and the shutter speed adjustment do not work in PROGRAM AE mode.
-
The following functions do not work in low lux mode:
-
Digital effect
- Overlap
-Wipe - Dot
-
Spot light mode
-
While shooting in memory mode, the low lux and sports lesson modes do not work. (The indicator flashes.)
If you are recording under a discharge tube such as a fluorescent lamp, sodium lamp or mercury lamp
Flickering or changes in colour may occur in sports lesson mode. If this happens, turn the PROGRAM AE function off.
Even if the PROGRAM AE function is selected
You can adjust the exposure.
When you focus in telephoto
You cannot choose F1.6 and F2.
About the depth of field
The depth of field is the in-focus range, measured from the distance behind a subject to the distance in front. The depth of field can vary with the iris (F value) and the focal length. Lowering the F value (large iris) reduces the depth of field. Raising the F value (small iris) provides a larger depth of field. Zooming in telephoto position offers a smaller depth of field while the depth of field in the wide-angle position is greater.
| The depth of field | Shallow | Deep |
| Iris | Near open (Low F value) | Near close (High F value) |
| Zoom | Telephoto (T) | Wide (W) |
IcNoJIb3OBAHneФункцIN PROGRAM AE
Ecnn Cbemka npOn3BoaHnTc npn
ncnoJIb3ObaHHn ra3Opa3PdHbIX lamn,
HaNPmep, lamn dHeBHO CBeta,
HaTpneBbIX nI IN pTyTHbIX lamn
BpeXmme cnpToHBbIX coCTraHHM MOKeT
BO3HNKHyTb MePauHne IIN N3MeHENH
CBeTHocTn. Ecnn 3TO npOn3oJDeT,
BbIKIIOuHTe cyHKUIO PROGRAM AE.
EcnBbIbpaHaФyHKnIg PROGRAM AE
You can gain better results by manually adjusting the focus in the following cases:
-
The autofocus mode is not effective when shooting
-
subjects through glass coated with water droplets
- horizontal stripes
- subjects with little contrast with backgrounds such as walls and sky
- When you want to change the focus from a subject in the foreground to a subject in the background
- Shooting a stationary subject when using a tripod
Jyuime pe3yIbTaTbIC NOMOuBIO pyHOB φOKYCINPOBKN MOXHO NOJUHTb B CNeDyUOxN CnyuaX:
-PeKIM aBTOMaTnueckoФokycuPobkN YBJIeTcH He3ΦΦeKTnHBbIM PnBbIIOJIHeHm CbEMKn
-ObbeKToB Yepe3 CTeKNo, NOKpbIToe KaJIIMN
-Topn3OHTaJIbHbIX NOJOC
-ObbeKToB C MaJIoN KOHTpAcTHoCTbI Ho Ha TaKOM ΦOHe, KAK CTeHa NII He60
-ECnHyXHo BbIIOJIHITb N3MeHeHneФokycuPOBKcOObEKeTHa NepeJHemПlaHe Ha OBeKt Ha 3aDHeM ПlaHe
-Пис CBemke HeNoDbxHOrO ObBeKTa C nOMoCbIu WtTaTnBa

(1) Slide FOCUS down to MANUAL in standby, recording, or memory mode. The indicator appears on the LCD screen or in the viewfinder in recording, standby, or memory mode.
(2) Turn the focus ring to sharpen the focus.
(1)Пелердьнь TepeгултOpFOCUSBn3В noLoJoxHeM MANUAL, KOrdaKaMepa haxoДNTcB peKIMe OxuДaHnI, 3aIncn IJIN pAmTn. BpeXIMe OxuДaHnI, 3aIncn IJIN pAmTn Ha 3KpaNe JKKД nIJN B BINOONCKaTeJIne NOBtCn INDInKaTOp F
(2)ПовернITE кольцо Фокс neuropВКДплелуеня чеков Фокс neuropВК.
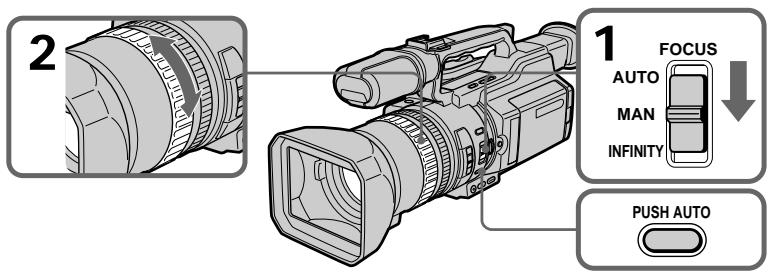
To return to the autofocus mode
Slide FOCUS up to AUTO to turn off the _总 or indicator.
To focus in infinity
Slide FOCUS to INFINITY. The indicator appears on the LCD screen or in the viewfinder. This function is useful when the nearer subject is focused automatically, even though you want to focus on a faraway subject.
To shoot with auto focusing momentarily
Press PUSH AUTO.
The auto focus functions while you are pressing PUSH AUTO.
Use this button to focus on one subject and then another with smooth focusing.
When you release PUSH AUTO, manual focusing resumes.
To obtain the correct focus
First, focus on a subject manually with the zoom set toward the "T" (telephoto) side, then adjust the zoom by pressing the "W" side of the lever gradually.
When you shoot close to the subject
Focus at the end of the "W" (wide-angle) position.
changes as follows:
when recording a distant subject.
when the subject is too close to focus on.
You can make a time-lapse recording by setting the camcorder to automatically record and standby sequentially. You can achieve an excellent recording for flowering, emergence, etc., with this function.
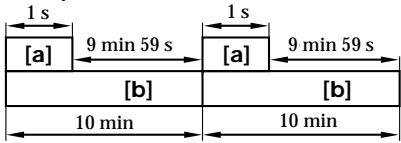
Example
[a] Recording time
[b] Waiting time
3a\Pncb c nHTepBaJamn
Moxho BbIOnHnTb CbEmky C 3ΦΦeKToM yCKopeHHOro DvNxKeHnA, HAcTPOINB BuDeokamepy TaKIM o6pa3OM, YTO6bl OHa NocLeIOBaTeJbHO BbIOnHnra 3aNcB n nepexOuIna B pexkM OxUdaHnA. C NOMOuBb 3Toi FyHKuM MoXHo NOpYuHTb YHKnAJIbHyO CbeMcy packpbITnA UBeTKa, NOBJIeHnABCXoDob n T.D.
Ppimep
[a]Bpem3aHnCn
[b]BpeMaOxuDanH
(1) Press MENU to display the menu in standby mode.
(2) Turn the SEL/PUSH EXEC dial to select , then press the dial.
(3) Turn the SEL/PUSH EXEC dial to select INT. REC, then press the dial.
(4) Turn the SEL/PUSH EXEC dial to select SET, then press the dial.
(5) Set INTERVAL and REC TIME.
① Turn the SEL/PUSH EXEC dial to select INTERVAL, then press the dial.
② Turn the SEL/PUSH EXEC dial to select the desired interval time, then press the dial.
The time: 30SEC 1MIN 5MIN 10MIN
③ Turn the SEL/PUSH EXEC dial to select REC TIME, then press the dial.
④ Turn the SEL/PUSH EXEC dial to select the desired recording time, then press the dial.
The time: 0.5SEC 1SEC 1.5SEC 2SEC
⑤ Turn the SEL/PUSH EXEC dial to select RETURN, then press the dial twice.
(1)HaKmTe KhoNky MEnu IJn OTo6paXeHnMeHIO BpeXmE OxndaHn.
(2)ПовернITE дИСК SEL/PUSH EXEC ДЯ
БИбора утАновки [ ] , a 3aTeM наЖМЛТЕ
НдИСК.
(3)ПовернITE диСК SEL/PUSH EXEC ДЯ
Выбoga установский INT. REC, заразим
нжмпerte на диСК.
(4)ПовернITE ДИСК SEL/PUSH EXEC ДИВБIDA утай�уг SET, затем нажмпЕ
HAДМСК.
(5) YctaHOBtTe npaMeTpbl INTERVAL n REC TIME.
①ПовернITE ДИСК SEL/PUSH EXEC ДЯ Вьбopa установки INTERVAL,Затем НжмITE на ДИСК.
②ПовернITEДСКSEL/PUSHEXECДЯ
ВыбopaНEOБхODIMо
пpoДОЛЖИТЕЛьНСТУИНТЕРBA?
3aTeMHAЖMITeHaДСК.
Врем:30SEC←1MIN←5MIN←
10MIN
③ ニовернITE диСК SEL/PUSH EXEC ДЯВыбopa установки REC TIME,ЗаTemнжмпerte Na диСК.
④ПовернITEДСКSEL/PUSHEXECДЯ
ВыбораНEOБХODIMOROBpeMeHIN
ЗАПСИ,ЗАТЕМHAЖМЛТЕНДСК.
ВpeM:0.5SEC←1SEC←1.5SEC
←2SEC
⑤ ПовернITE ДИСК SEL/PUSH EXEC ДИВБОРА RETURN,Затем ДИВЖДыНжмITE HaДИСК.
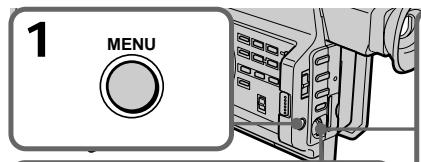
5


1
CAMERA SET
INT,REC
INTERVAL 30SEC
REC TIME
RETURN
2
CAMERA SET
INT. REC
INTERVAL 430SEC
REC TIME 1MIN
RETURN 5MIN
3
CAMERA SET
INT. REC
INTERVAL
[REC TIME] 0.5SEC
RETURN
4
CAMERA SET
INT,REC
INTERVAL
REC TIME 0.5SEC
RETURN 1SEC
1.5SEC
2SEC
(6)Turn the SEL/PUSH EXEC dial to select ON, then press the dial.
(7) Press MENU to erase the menu display. The interval recording indicator flashes.
(8) Press START/STOP to start interval recording. The interval recording indicator lights up.
(6)ПовернITE дисK SEL/PUSH EXEC Ддя Вьбopa установки ON, a 3aTeM нажмITE на дисK.
(7)HaxmTe KhONky MENUДЯУдаленя Инданкци Мени.Замiraет ИнданkaTOp 3aПСС ИНТерВалам.
(8)HaxmTe KhoNky START/STOP, yTo6bl Haayt b3aIncb C nHTepBaJAMn. 3aropntc HnDnKaTOp 3aIncn C nHTepBaJAMn.
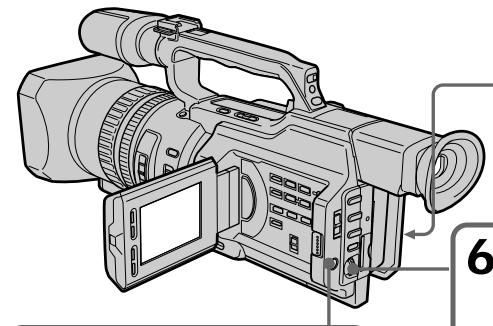

7
MENU

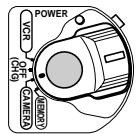
8

6


CAMERA SET D ZOOM
G16:9WIDE
STADYSHOT
FRAMEREC
INT. REG ON
RETN
STC
E
To cancel the interval recording
- Set INT. REC to OFF in the menu settings.
- Set the POWER switch to OFF (CHG), VCR or MEMORY.
To stop the interval recording momentarily and perform normal recording
Press START/STOP. You can perform normal recording only once. To cancel the normal recording, press START/STOP again.
Длг OTMeHbI 3aHnC n HHTepBaJIaMn
- YctaHOBIne KOMaHny INT. REC B nOIOxKeHne OFF bYcTaHOBkax MeHIO.
- YctaHOBtne nepeKlOuTaTeIb POWER b noLoXeHne OFF (CHG), VCR nIM MEMORY.
YTo6bl MrHOBeHNO OCTaHOBNtB 3aINCb C INHTepBaJAmN BbIIOJHNtB 06bIHyU 3aINCb
Hajmnte KhONky START/STOP.ObuHyIO 3aNNcMoXHO CdeIaTb TOnbKO OINH pa3. IJIaOTMeHbIO bUChHoi 3aINc HaxMnte KhONky START/STOP eue pa3.
Note on interval recording
You cannot do interval recording in memory mode.
On recording time
There may be a discrepancy in recording time of up to + / - 6 frames from the selected time.
Even if you press INDEX MARK during interval recording
You cannot mark an index.
3ameaHn OTHocntelbHo 3annc C nHTepBaIamn
3aIncb c INTepeBaJIaMn HeBO3MOxHa B peKJMe nAMrTn.
OBpemEn 3aIncn
PeaJIbHOe BpEMa 3aIINCU MoKcET OTJIuHATbCt OT BBi6paHHoro Ha + / - 6 KaIPOB.
Дахе ecин haжкыkhonky INDEX MARK BO Bpem 3aHcN C nHTepBaIamn
3aINcB INDeKChOeMTKHeBO3MOXHa.
Frame by frame recording - Cut recording
You can make a recording with a stop-motion animated effect using cut recording. To create this effect, alternately move the subject a little and make a cut recording. We recommend that you use a tripod, and operate the camcorder using the Remote Commander after step 6.
(1) Press MENU to display the menu in standby mode.
(2) Turn the SEL/PUSH EXEC dial to select , then press the dial.
(3) Turn the SEL/PUSH EXEC dial to select FRAME REC, then press the dial.
(4) Turn the SEL/PUSH EXEC dial to select ON, then press the dial.
(5) Press MENU to erase the menu display. The FRAME REC indicator lights up.
(6) Press START/STOP to start cut recording. The camcorder makes a recording for about six frames, and returns to recording standby.
(7) Move the subject, and repeat step 6.
Frame by frame recording - Cut recording
To cancel the cut recording
- Set FRAME REC to OFF in the menu settings.
- Set the POWER switch to OFF (CHG), VCR, or MEMORY.
Notes on cut recording
- The last recorded cut is longer than other cuts.
- The proper remaining tape time is not indicated if you use this function continuously.
- You cannot mark an index during cut recording.
PokaPoBaJ 3aInscb - 3aInscb c MOHTaXHbIMKaDpAMN
Длг OTMeHbI 3aIncn C MOHTaXHbIMN KaIpaMn
- YctaHOBIne KOMaHny FRAME REC B
- noIoxKeHne OFF B yCtahOBkax MeHIO.
- YctaHOBITE nepeKIOUaTeIb POWER B nOIOXeHne OFF (CHG), VCR nIM MEMORY.
3aMeuHnO OTHoCHTeNbHO 3aIncn C MOHTaXhblIMKaIpaMn
-Последни записн布局 Кад рдльшешоctаьнix.
OCTaBWeecB BpEm 3aIncn Ha KaccTe OTo6paKaTa TcHbepHo,ecn 3Ta cyHKuN IcNoJIb3yETcTc qAto.
- Bo Bpem 3aIncn C MOHTaxKhbIMKaIpaMn HeBO3MOXHO 3aIncTa b INDeKCHbIe MeTKN.
If you mark an index at the scene you want to search for, you can easily search for the scene later (p. 93).
In recording mode [a]:
Press INDEX MARK.
The "INDEX MARK" indicator appears on the LCD screen or in the viewfinder for seven seconds and the index is marked after the indicator disappears.
In standby mode [b]:
Press INDEX MARK.
The "INDEX STBY" indicator appears on the LCD screen or in the viewfinder. And when you press START/STOP to start recording, the "INDEX STBY" indicator changes to "INDEX MARK" and after the indicator disappears, the index marking is complete.
The camcorder starts index-marking at the 11th frame from the recording start point. An index signal will be recorded on cassette memory about 0.3 sec, and on a tape about five seconds.
You can mark an index in VCR mode (p. 129).
3aPncb nHdEckchoi METKn
EcnI nIy onpeJeHnHO 3nn3Oa 3ancaTb INHeKCHyIO MeKy, TO B daJIbHeIWeM MoXHO 6e3 Tpya erO hAIITN (CTp.93).
B pexkme 3aunnc [a]:
Hakmnte KhoNky INDEX MARK.
Ha 3KpaHe JKKД nIиВ BnDOnCKaTeJIe B TeUeHne CEMN cEkyHd 3aROpNTcH INDInKaTOP "INDEX MARK". INHeKCHaMeTka 6yTeT 3aIncaHa nOcNe TOrO, KaK IcYe3HET INDInKaTOP.
Bpekmme oXnidaHn [b]:
HaXmnte KhoNky INDEX MARK. Ha 3KpaH e KKД nIi B vUdoNcKaTeNe noBvNTcR uHdNKaTOp "INDEX STBY". Korda na HaxnMaEcTc KhoNka START/STOP nIa Hauana 3aInc, BMeCTo uHdNKaTOp a "INDEX STBY" noBvlnEeTc NduNKaTOp "INDEX MARK", a KOrDa OH uChcE3aT, yCTaHOBKa HndKeCHOH MTeKn 3aKoHueHa.
Bndeokamepa yctaHaabnBaet nHDeKCHyU MeTKy Ha 11-OM KaJpe C ToUKN Haayana 3aIncN. INHeKChbI CNrHaI 3aIncsBiAeTcB KaccTeHyO NaMBy PnpBn3nteIbHO B TeueHne 0,3 c,a HaJeHTy -OKoNo 5 ceKyHd.
HJekchy MeKy MoXHO 3aIncatb B peXnme VCR (cTp.129).
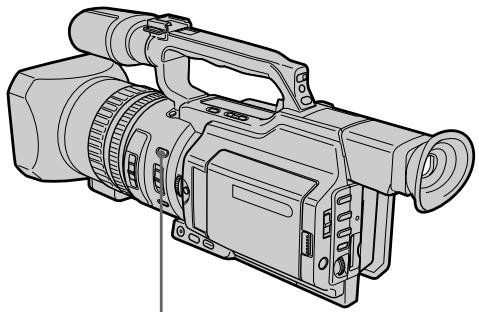
[a]
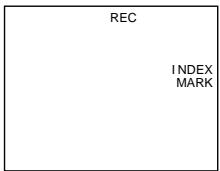
INDEX MARK
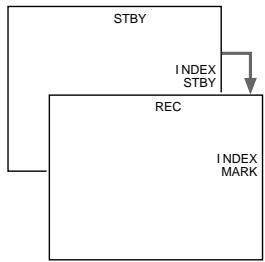
[b]
To cancel index marking
Press INDEX MARK again in standby mode.
Notes on the index
- Index marks are recorded during recording, you cannot mark an index after recording.
- Index signals will be recorded both on the tape and on cassette memory. If you use cassettes without cassette memory or the cassette memory is full, the signals will be recorded only on the tape.
- When you record over the recorded tape and mark an index on the tape, we recommend that you clear all data in the cassette memory before marking an index.
ДЯ OTMeHbI 3aHnCn INHeKcHOn METKN
Hakmnte KhoNky INDEX MARK eue pa3, KOrda KaMepa HaxoDITcB peKIme OXuDaHn.
3ameuHnO THOcHTeIbHo INHeKCHoMETKN
- INHДЕКСВЕ MEТКИ YCТАнБЛВИBAIOTСВ BO BРЕМ 3аПИСИ, 3aПИСь INHДЕКСΗОМ MEТКИ NOСLE CБЕМКИ HeBO3MOXKAHA.
- Инданные сигнаны 6ут 3аиcaны кak
нлentу, tak и в касени памть.Еся
псюльетая касета 6e3 касени
памтейни Касени памть
пегенонна, сигнаны 6ут 3аиcaны
Толъко на леHTe.
-Прии ВьлОнHeHn 3aIncn uYcTaHOBKe nHdEChOH MeTKn HaJIeHTy,CoDEpKaaUpo paHee CSeIaHHyU 3aIncb,IpeJxDe Yem yCTaHaBInBaTb INHdEChCHyU MeTKy, peKOMeHdyeTCr CTepTe Bce DaHHbIe N3 KACCETHOI pAMrTN.
- Advanced Playback Operations - Quickly locating a scene using the zero set memory function
Using the zero set memory function, your camcorder rewrites or advances the tape to locate the desired scene, and the searching automatically stops at the scene having a tape counter value of "0:00:00." You can do this with the Remote Commander.
(1) In playback mode, press DISPLAY if the counter is not on the LCD screen or in the viewfinder.
(2) Press ZERO SET MEMORY at the point you want to locate later. The tape counter shows "0:00:00" and the ZERO SET MEMORY indicator flashes.
(3) Press when you want to stop playback.
(4) Press to rewind the tape to the tape counter's zero point. The tape stops automatically when the tape counter reaches approximately zero. The ZERO SET MEMORY indicator disappears and the time code appears.
(5) Press . Playback starts.
- UcoBepueHCTBOBaHhIe Opeaunu Bocnpou3BeDeHHN - BbICTpbI NOnCK 3nN3OJa C NOMoUbO ΦyHKcUN PAMrTH HJLeBOI OTMeTKN
C NOMOJIbHcYHKUIN PAMATN HJLEBOI OTMeTKn BnDEOKaMepaTbIbAeTJeHTy Ha3aIu INBpePeI DJIr OTBICKAHN HJXHO T3NI3OJa C aBTOMaTNUeCKoN OCTaHOBKOI NOCKa Ha 3NI3Ode, rIe NOKa3aHne CChETNuKa IeHTbI -0:00:00).TO MoXHo CDeLaTb C NOMOJIbU NjLbTa dInCTaHcUNOHHO ynpabJIeHn.
(1)В реки IMe BOCPOn3BedeHЯнжMITE KhoNky DISPLAY,ecnHa 3KpaHe JKKД ИЛВ ВИДоИСКаTeI He OTObpaXaEТСЧETCHИK.
(2)HaxmTe KhoNky ZERO SET MEMORY B MeCTe, KOtOpoe NOTpe6yETc HauTn no3Xe. Poka3aHne CteTuKc cTaHet paBbIM "0:00:00", n HauchET MInrTaTb INDkaTOp ZERO SET MEMORY.
(3)HaxMMTe KHOJNky ,KOrJa Heo6XoJIMO OCTaHOBnTB BOCpON3BeDeHne.
(4)HaXMMTe KHONKy dIy yCKOpEHHOI nepemOTKn IeHTbI Ha3aD K HynEBoT TOUKe CteTnKa IeHTbI. IeHTa OCTaHOBITcA BTOMaTnueckN, KOJa CteTnK DOCTnHET HnyEBoI OTMeTkn. INdInKaTOp ZERO SET MEMORY nCue3HeT, nNoBtCk KoD BpeMeHn.
(5)HaxMMTe KHOJky▶.HaunHeTcB BOCnpon3BeDeHne.
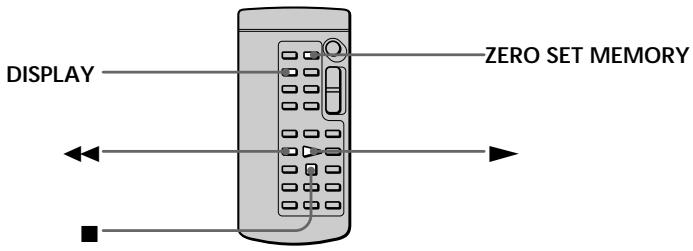
Notes
- When you press ZERO SET MEMORY again before rewinding the tape, the zero set memory function will be cancelled.
- There may be a discrepancy of several seconds from the time code.
Приимеань.
- Ecni eue pa3 haxkTaB KhoNky ZERO SET MEMORY Do nauana o6paTHOI nepeMoTkn IeHTbI,TO fynKUIN pAmrTH HynEBOI OTMeTKn 6ydtOTMeHeHa.
- Меку КODOM Времени ДейСТВИЕЛьнБИМ Времен MOжET сыт bpaCXOXДЕНЕ B HeCKOЛьКО CEKYHД.
Quickly locating a scene using the zero set memory function
When there is a blank portion between pictures on a tape
The zero set memory function may not work.
ZERO SET MEMORY functions also in standby mode
When you insert a scene in the middle of a recorded tape, press ZERO SET MEMORY at the point you want to end the insertion.
Rewind the tape to the insert start point, and start recording. Recording stops automatically at the tape counter zero point. Your camcorder returns to standby mode.
БыICTpbI NONCK эПИЗОДС NOMOUIO ФУнКЦИ ПAMЯТИ HUJIeBOI OTMeTKI
EcIn Mekdy 3aHncaHHbIMn Ha JeHTe n3o6paXeHNMa IMeTcH He3aHncaHHbI yAcToK
Функци памгтн hyneBOО OTMeTKN MOKET He pa6oTaTb.
ФункцЯ ZERO SET MEMORY pa6oTaet TaKxE B pexmme roTOBHOCTN K 3aHnCn
Searching for a recording by index - Index search
You can automatically search for the point where an index is marked and start playback from that point (Index search). Use a tape with cassette memory for convenience. Use the Remote Commander for this operation. Use this function to check where indexes are marked or to edit the tape at each sequence where the index is marked.
Searching for the index point using cassette memory
You can use this function only when playing back a tape with cassette memory (p. 210).
(1) Set the POWER switch to VCR.
(2) Set CM SEARCH in to ON in the menu settings (p. 154). The default setting is ON.
(3) Press SEARCH MODE on the Remote Commander repeatedly, until the index search indicator appears. The indicator changes as follows: INDEX SEARCH TITLE SEARCH DATE SEARCH PHOTO SEARCH PHOTO SCAN no indicator
(4) Press or on the Remote Commander to select the index point for playback. Your camcorder automatically starts playing back at the selected index point.
Searching for a recording by index - Index search
To stop searching
Press ■.
In the 00 mark
- The bar in the 00 mark indicates the present point on the tape.
The x mark in the 001 indicates the actual point you are trying to search for.
If a tape has a blank portion between recorded portions
The index search function may not work correctly.
If you mark an index onto an external input signal
"LINE" appears in the CH column.
The index of the recording start point when recorded from external audio equipment
The index mark is not recorded in cassette memory when recorded from external audio equipment. If you want to search for the index point, set CM SEARCH to OFF in the menu settings and search for the index point without cassette memory.
Searching for the index point without using cassette memory
(1) Set the POWER switch to VCR.
(2) Set CM SEARCH in to OFF in the menu settings (p. 154). If using a tape without cassette memory, skip this step.
(3) Press SEARCH MODE on the Remote Commander repeatedly, until the index search indicator appears. The indicator changes as follows: INDEX SEARCH DATE SEARCH PHOTO SEARCH PHOTO SCAN no indicator
(4) Press on the Remote Commander to search for the previous index point or press on the Remote Commander to search for the next index point. Your camcorder automatically starts playback at the selected index point. Each time you press or your camcorder searches for the previous or next index point.
To stop searching
Press ■.
Ponck 3aHncn no Hndekcy
-Поиск по Инд ekcy
ДлЯ OCTaHOBkn NOuCKa
HakmTe KhONKy
B nHnKkaTope 00
-Полоча ВИнДиКаTope 00 yKa3bIbAeT TEKUüee MecTo Ha JIeHTe.
-MetkaB INHdNkatope 0yKa3bIbaETeKyuue MeCTO NOnCKa.
EcInHaJeHTe HmEeTcH He3aNNcaHHbIyUacTOK Mekdy 3aNNcaHHbIMu YactAMnФyHKJIA NO NHeNKeCHoM MeTKe MOKetpa60TaTb HenpabvibNo.
EcIn HnDeKCha MetKa 3aNcBbAeTcHa BHeuHIN BXoHON CnHaJI
B cToI6e CH noRbNTcHnDnKaUa“LINE”.
VcTaHOBKA HnDeKCHO MtKN HaYana 3aINs Pn BInIOJIeHN 3aINcC BHeuHrO ayDmOCTpoICTBa
При ВыллнEHи 3aHnC n BHeшнero aydnoOCTpoCTBa INdEKeCHaMeTka He 3aHnCbIbAeTCB KACCETHyO nAmrTb. EcIn Tpe6eTcH NaHTn ToUky UcTaHOBKn INdEKeCHOmEtKu, yKaXnTe B YcTaHOBkax MeHIOДЯnapaMeTpca CM SEARCH 3naHene OFF INBbIOLHnTe NOnCK ToUky UcTaHOBKn INdEKeCHOmEtKu Be3 NcNoJIb3OBaHnN KACCETHOJ nAMrTn.
Searching the boundaries of recorded tape by title - Title search

If you use a tape with cassette memory, you can search for the boundaries of recorded tape by title (Title search) (p. 210). Use the Remote Commander for this operation.
(1) Set the POWER switch to VCR.
(2) Set CM SEARCH in to ON in the menu settings (p. 154). The default setting is ON.
(3) Press SEARCH MODE on the Remote Commander repeatedly, until the title search indicator appears. The indicator changes as follows: INDEX SEARCH TITLE SEARCH- DATE SEARCH PHOTO SEARCH PHOTO SCAN no indicator
(4) Press or on the Remote Commander to select the title for playback. Your camcorder automatically starts playback of the scene having the title that you selected.
Searching the boundaries of recorded tape by title - Title search
To stop searching
Press ■.
If you use a tape without cassette memory. You cannot superimpose or search for a title.
In the 00 mark
- The bar in the mark indicates the present point on the tape.
- The x mark in the 0 indicates the actual point you are trying to search for.
If a tape has a blank portion between recorded portions
The title search function may not work correctly.
Searching a recording by date - Date search
You can automatically search for the point where the recording date changes and start playback from that point (Date search). Use a tape with cassette memory for convenience. Use the Remote Commander for this operation. Use this function to check where recording dates change or to edit the tape at each recording date.
Searching for the date using cassette memory
You can use this function only when playing back a tape with cassette memory (p. 210).
(1) Set the POWER switch to VCR.
(2) Set CM SEARCH in to ON in the menu settings (p. 154). The default setting is ON.
(3) Press SEARCH MODE on the Remote Commander repeatedly, until the date search indicator appears.
The indicator changes as follows:
INDEX SEARCH TITLE SEARCH DATE SEARCH PHOTO SEARCH PHOTO SCAN no indicator
(4) Press or on the Remote Commander to select the date for playback. Your camcorder automatically starts playback at the beginning of the selected date.
Searching a recording by date - Date search
To stop searching
Press ■.
Note
If one day's recording is less than two minutes, your camcorder may not accurately find the point where the recording date changes.
In the 00 mark
- The bar in the 00 mark indicates the present point on the tape.
- The x mark in the 00 indicates the actual point you are trying to search.
If a tape has a blank portion between recorded portions
The date search function may not work correctly.
Searching for the date without using cassette memory
(1) Set the POWER switch to VCR.
(2) Set CM SEARCH in to OFF in the menu settings (p. 154). If using a tape without cassette memory, skip this step.
(3) Press SEARCH MODE on the Remote Commander repeatedly, until the date search indicator appears. The indicator changes as follows: INDEX SEARCH DATE SEARCH PHOTO SEARCH PHOTO SCAN no indicator
(4) Press on the Remote Commander to search for the previous date or press on the Remote Commander to search for the next date. Your camcorder automatically starts playback at the point where the date changes. Each time you press or, your camcorder searches for the previous or next date.
To stop searching
Press ■.
Searching for a photo - Photo search/Photo scan
You can search for a still picture you have recorded on a mini DV tape (photo search). You can also search for still pictures one after another and display each picture for five seconds automatically regardless of cassette memory (photo scan). Use the Remote Commander for these operations. Use this function to check or edit still pictures.
Searching for a photo using cassette memory
You can use this function only when playing back a tape with cassette memory (p. 210).
(1) Set the POWER switch to VCR.
(2) Set CM SEARCH in to ON in the menu settings (p. 154). Default setting is ON.
(3) Press SEARCH MODE on the Remote Commander repeatedly, until the photo search indicator appears. The indicator changes as follows: INDEX SEARCH TITLE SEARCH DATE SEARCH PHOTO SEARCH PHOTO SCAN no indicator
(4) Press or on the Remote Commander to select the date for playback. Your camcorder automatically starts playback of the photo having the date that you selected.
Moxho BbIOpHnTb NOnCK HEnoDbXHOrO n36paKeHnA, 3aPiNCaHNO Ha JIeHTe MInH DV (ΦoToonouck).
MoxHo TaKKe BbIOnHrTaB NOCK HEnoDbNkHbIX N3O6paXeHn NoopeEHO N OTO6paXaTb KAKDoE N3 HmX B TeCHHe NPTN cEkyND, He3aBNCmO OT KACCtHOr NpAMrN (ΦoToCkAHPoBaHne).ДЯ 3Tnx OnpaCn INcNoJIb3yIte NylbT DInCTAHIOHHO UynpaBHeN. IcNoJIb3yIte 3TyФyHKUIO JIpy npOBepKn IJIN MoHTaKa HEnoDbNkHbIX N3O6paXeHn.
ПоньфOTOсИСПОЛьЗОВАнемКассETHОпамгТи
3TyФyHKUHO MOXHO IICNoJIb3OBaTb TOJIbKo
IPIN BOCpON3BVeDEHm JIeHTbIC KACCETHO
PAMrTbHO (CTP.210).
(1)YcTaHOBInTe npeKJIouaTeIb POWER B noJIOKeHne VCR.
(2)YcTaHOBInTe KOMaHny CM SEARCH B CnB NOJIOXeHne ON B YcTaHOBkAx MEHNO(cTp.154).YcTaHOBkoI NO yMOJIuaHIORBJIaETcN ON.
(3)HaJIMMaTe KHOJky SEARCH MODE Ha
nyIbTe DnCTaHcNIOHHOrO ynpaBNeHnRA Do
Tex nop, NOKa He NOBHTcR INDInKaTOp
noncKa foTO.
INDInKaTOp IN3MeHReTcR CLeDyHouzIM
6pbazOM:
INDEX SEARCH TITLE SEARCH DATE SEARCH PHOTO SEARCH PHOTO SCAN 6e3 INDInKaTopa
(4)HaxmTe I nn HnI ▷Ha npIbTe DInCTaHnOHHoro UnpaBHeHn, YTO6bl BbIbpaTb DaTy dIy BOCpON3BeDEHn. BuJeOKaMepa aBTOMaTHueckn HaHET BOCpON3BeDEHne FOTo C BbIbpaHnO DaTbI.
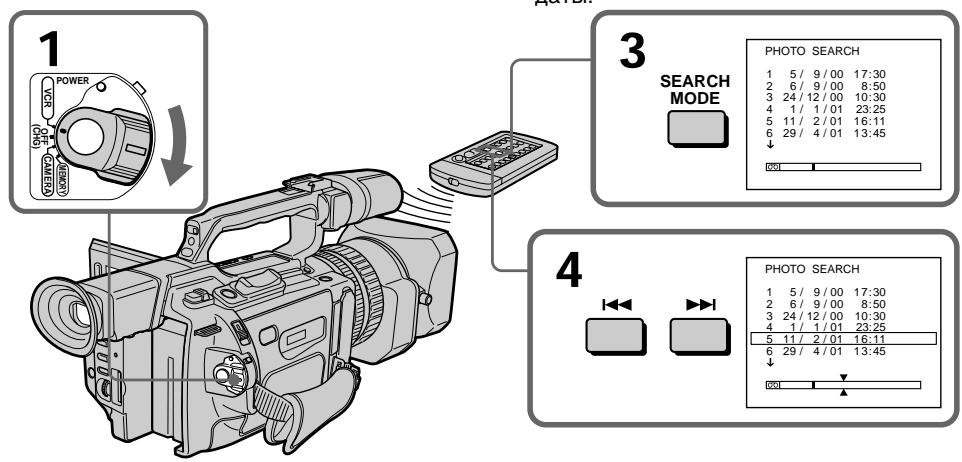
Searching for a photo - Photo search/Photo scan
To stop searching
Press ■.
In the 00 mark
- The bar in the 00 mark indicates the present point on the tape.
- The x mark in the 00 indicates the actual point you are trying to search for.
If a tape has a blank portion between recorded portions
The photo search function may not work correctly.
Searching for a photo without using cassette memory
(1) Set the POWER switch to VCR.
(2) Set CM SEARCH in to OFF in the menu settings (p. 154).
(3) Press SEARCH MODE on the Remote Commander repeatedly, until the photo search indicator appears. The indicator changes as follows: INDEX SEARCH DATE SEARCH PHOTO SEARCH PHOTO SCAN no indicator
(4) Press or on the Remote Commander to select a photo for playback. Each time you press or your camcorder searches for the previous or next photo. Your camcorder automatically starts playback of the photo.
To stop searching
Press ■.
ПоньфOTO -ФOTONOИС/ФOTOCKAHINPOBAHne
(1) Set the POWER switch to VCR.
(2) Press SEARCH MODE on the Remote Commander repeatedly, until the photo scan indicator appears. The indicator changes as follows: INDEX SEARCH TITLE SEARCH DATE SEARCH PHOTO SEARCH PHOTO SCAN no indicator
(3) Press or on the Remote Commander. Each photo is played back for about five seconds automatically.
Сканироваиме ФOTO
(1)Установпейpeключateь POWER в положене VCR.
(2)Haxmaite KhoNky SEARCH MODE Ha nyIbTe NICTaHcIOHNOrO ynpaBLeHnra Do Tex nop, IOKa He NOBtCn INdIkaTOp noncKa fOTOCKaHNPoBaHn. INdIkaTOp n3MeHneTcR cJeDyHOuMm 6pbazom: INDEX SEARCH TITLE SEARCH DATE SEARCH PHOTO SEARCH PHOTO SCAN 6e3 INdIkaToppa
(3)HaxmTeI HnI ▷Ha npIbTe DuctaHIOHHO ynpabNeHHa. KaKdoe fOTo 6yDet aBtOMaTneckn OTo6paKaTbcra B TeueHne np6bn3nteJbHo nTn CekyHd.
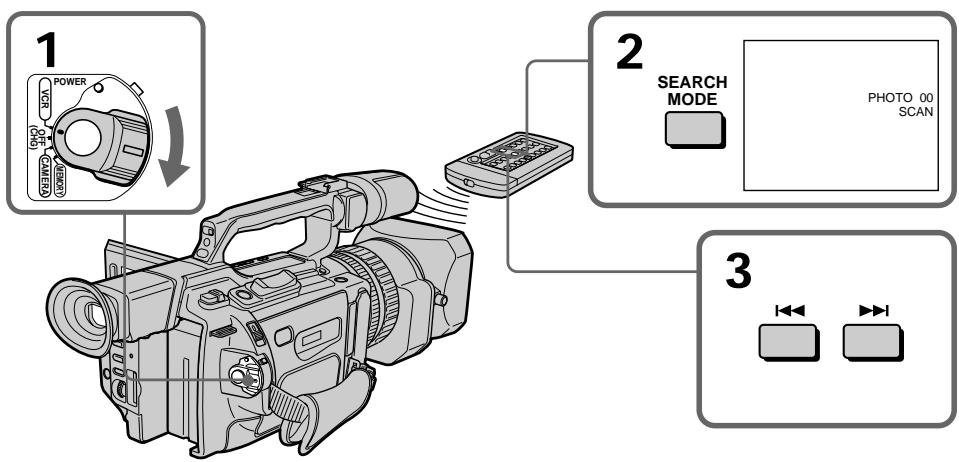
To stop scanning Press
ДлЯ OCTaHOBKn CkaHnpObaHnHaXKMTe KhONKy ■.
Playing back a tape with picture effects
During playback, you can process a scene using the picture effect functions: NEG. ART, SEPIA, B&W and SOLARIZE.
In playback or playback pause mode, press PICTURE EFFECT and turn the SEL/PUSH EXEC dial until the desired picture effect indicator (NEG. ART, SEPIA, B&W or SOLARIZE) appears.
For details of each picture effect function, see page 56.
Bocnpon3BeDeHne JeHTbI c 3ΦΦeKtAmn n3O6paXeHnA
Bo BpemBocPon3BeJeHnMoXHO BuON3MeHrTb N3OpaXeHne C NOMOsbIO fHyKnn 3ΦΦeKToB N3OpaXeHnNE: NEG. ART,SEPIA,B&W n SOLARIZE.
В ржиме воссаньдения пл пay3bl BOCPON3BDEENHнжмпг КнорК Y PICTURE EFFECTИ поворачивайт ДИСК SEL/PUSH EXECdo tex nop,пoka He noЯВNTсИДКаTOp hyЖногО uФрOBOrO 3фбкета (NEG. ART, SEPIA, B&W пл SOLARIZE).
Iopobhie CbeHnno KaKdof yHKmU nOeBbIX 3oFekTOB npBeHeHbHa cTp.56.
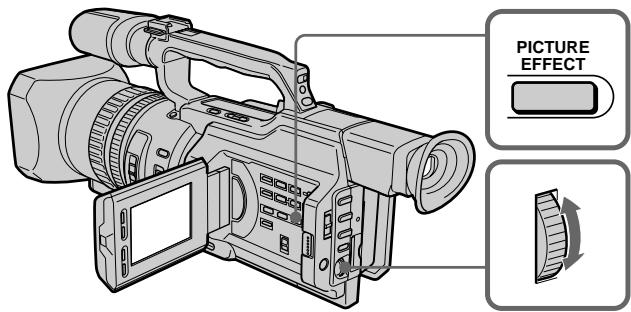
To cancel the picture effect function
Press PICTURE EFFECT so that the indicator disappears.
Notes
- You cannot process a picture using the picture effect function that is input from other equipment.
- To record pictures that you have processed using the picture effect function, record the pictures on the VCR, using your camcorder as a player.
Pictures processed by the picture effect function
Pictures processed by the picture effect function are not output through the DV IN/OUT jack.
When you set the POWER switch to OFF (CHG) or stop playing back
The picture effect function will be automatically cancelled.
Длг OTMeHbI Φункци 3ффektOB n3o6paXeHHa
Hakmte KhoNky PICTURE EFFECT, YTo6bl INdkaTOp Ncye3.
Примейаня
- I3o6paXeHnI, BBeDeHbIe C pyrOy annapaTpybl, HeBO3MOxHO n3MeHrTb C nOMoUbIO fynKcMn EΦΦeKTOB n3o6paXeHnI.
-Длгзаисин3обрахени,кOTьебылпВИДОИЗМЕнБИС ПOMОШьЮФУнКУПИЗФСБЕKTOBи3обрахени,ЗАПИShITeИЗобрахениHaВИDEOMaHNToФОH,ИСПОЛБУВИDEOKaMepуВkaYeCTBe nJIeepa.
N306paXeHn, BUNOn3MeHeHHbIe c nOMOuHO yHKun 3ΦΦeKTOB n306paXeHn
H3o6paXeHnB, BINO3MeHHeBle C NOMOuBIOfYHKUIN 30FKeTOB H3o6paXeHnA, He nepeLaIOrTa Yep3 rHe3do BVxOa/BbIXOda DV IN/OUT.
Pn yctaHOBKe npeKlnOuATEJr POWER B noJIOXeHne OFF (CHG) uIIN octaHOBKe BOCpON3BeDeHnR
Playing back a tape with digital effects
During playback, you can process a scene using the digital effect functions: STILL, FLASH, LUMI. and TRAIL.
(1) In playback or playback pause mode, press DIGITAL EFFECT and turn the SEL/PUSH EXEC dial until the desired digital effect indicator (STILL, FLASH, LUMI, or TRAIL) flashes.
(2) Press the SEL/PUSH EXEC dial. The digital effect indicator lights up and the bars appear. In STILL or LUMI mode, the picture is captured and is stored in memory as a still picture at the time you press the SEL/PUSH EXEC dial.
(3) Turn the SEL/PUSH EXEC dial to adjust the effect. For details of each digital effect function, see page 58.
Bocnpon3BeDeHne JeHTbI c uΦpOBbIMN 3ΦΦeKtAmN
Bo BpemBocnpon3BeDeHnMoXHo BUNOIN3MeHrTb N3o6paXeHne C NOMOuHO cyHKnI cNpPoBbIX 3cFcEKTOB: STILL, FLASH, LUMI. n TRAIL.
(1)В ржиме BOCPON3BEdENHЯ Или пay3bl BOCPON3BEdENHЯ НЖМITE KHOПК Y DIGITAL EFFECT И поворачиьайтЕ дИСК SEL/PUSH EXEC до,text nop,пoka He NaЧHeT MИгТь ИДИКaTOp HУЖНOrO UФрOBOrO eФфeКТа (STILL, FLASH, LUMI. Или TRAIL).
(2)HaXMMTe HaДNCK SEL/PUSH EXEC. 3aROpNTcH INDnKATOp cnpoBoro 3ΦΦeKTA nOABTcR nOncbI.BpeXmE STILL nU LUMI. BO BpeMra HaxKaTna Dncka SEL/PUSH EXEC n3o6paXeHne CHIMaeTcH n COxpaHReTcR b NaMaTb KaK HeNoDnKHOe n3o6paXeHne.
(3)ПовернITEДСКSEL/PUSH EXECдп
perулровки зфөгкта.
Поюбные CBeDEни NO каддои
Функции UNФpoВых офөгктOB
приve徳ы Ha CTp. 58.

To cancel the digital effect function
Press DIGITAL EFFECT so that the indicator disappears.
ДЯ OTMeHbI Φункин сифpoBbIX 3ФФeKTOB
Haxmte KhoNky DIGITAL EFFECT, yTo6bl HnDnKaTOp nCye3.
Playing back a tape with digital effects
Notes
- You cannot process a picture using the digital effect function that is input from other equipment.
- To record pictures that you have processed using the digital effect function, record the pictures on the VCR, using your camcorder as a player.
Pictures processed by the digital effect function
Pictures processed by the digital effect function are not output through the DV IN/OUT jack.
When you set the POWER switch to OFF (CHG) or stop playing back
The digital effect function will be automatically cancelled.
Bocnpo3BeDHeNe JeHTbI C uΦpOBbIMn 0ΦΦeKTamN
Приимechanicals
ИЗбрахен,在ВБеДEHьe cДpyroI aПаразурь,HEBO3MOxH0 N3MeHЯТь c nOMOuHIOФyHKUIN LcΦpOBbIX 3ΦΦeKTOB.
-Длгздпсинзбржehи,кOTьгьбыИВIDON3MeHEnbIC NOMO乙HФунКцИЗФРOBxI 3ФФЕKTOB,3aПиNTeN36ржehнHa BДeOMaHnTOΦOH,ИСПОЛБ3УВДeOKaMepyВ KaYeCTBeПлелера.
N3o6paXeHnB, BnDOn3MeHeHHbIe C NOMOuBIOyHKUINuΦpOBbIX 3ΦΦeKTOB N3o6paXeHnB, BnDOn3MeHeHHbIe C NOMOuBIO yHKUINuΦpOBbIX 3ΦΦeKTOB, He nepeDaIoTcYape3 rHe3do BXoJa/BbIXoJa DV IN/OUT.
Ppnu yctaHOBKe nepeKlnuOaTeNa POWER B noJooXeHne OFF (CHG) nIi ocTaHOBKe BOCpOn3BeDeHn
ФункцицрьхсфektOB
ABTOMATNueeCKN OTMeHReTcR.
Dubbing a tape
Using the A/V connecting cable
Connect your camcorder to the VCR using the A/V connecting cable supplied with your camcorder.
Before a dubbing
Set DISPLAY to LCD in the menu settings.
(Default setting is LCD.)
Set the input selector on the VCR to LINE, if available.
(1) Insert a blank tape (or a tape you want to record over) into the VCR, and insert the recorded tape into your camcorder.
(2) Set the input selector on the VCR to LINE. For details, refer to the operating instructions of the VCR.
(3) Set the POWER switch to VCR.
(4) Play back the recorded tape on your camcorder.
(5) Start recording on the VCR. For details, refer to the operating instructions of the VCR.
Пepe3a\Pncb ЛeNTbl
UcnoIb3OBAHnE CoeHNHTelbHOro Ka6eJyauDIO/BuDeO
ПоДсоeДиНTe BИdeOKaМepу K BИдeОмагнITофОну C ПOMOцьЮ coeДиНTeЛьНOrO Kaбеля ayДиNo/BИдeо, KOTOPыйnpилагаeТСКВИдeOKaМepe.
Ipeep nepe3anncbio
YcTaHOBnTe npaMeTp DISPLAY B noLoXeHne LCD B ycTaHOBkax MeHIO. (ycTaHOBkoNo ymOuHaHIO RaJIaReTcA LCD.)
YctaHOBtCe CeJIeKToPbI NepeKJIIOuTaTeIb BXoJHOrO CnHaHa Na BnDeOmaRHToCPOHe B NOJOXeHne LINE,ecJIn TAKOBoe IMeETcR.
(1)BcTaBbTe He3aIncAHHyIO JeHTy (UNIJeHTy,Ha KOTopyIO Heo6XoDIMO BbIOJIHNbT 3aINCb) B BNDeOMaHHTOΦOH IN BcTaBbTe 3aIncAHHyIO JeHTy B BNDeOKaMepy.
(2)VcTaHOBInCe cIeKTop BXoDHorO CnHnHaHa HbNDeOMaHrHToΦOHe BNoJIOXKeHne LINE. IOpRo6HbIe CBeJeHnCM.B INHCTpyKuIN NO 3KcPnLyatauIN BUnDeOMaHrHToΦOHa.
(3) YctaHOBInTe npeKJIIOUaTeIb POWER B noJIOKeHne VCR.
(4)HaunHe BocnpOn3BedeHne 3aIncanHnoJIeHTbI Ha BNDeOKamepe.
(5)HaunHe 3aIncB Ha BnDeomarHnToΦoHe. IoppoHbIe CBeJeHnC M.B INCTpyKuIN NO 3KcNpyaTaUIN BnDeomarHnToΦoHa.
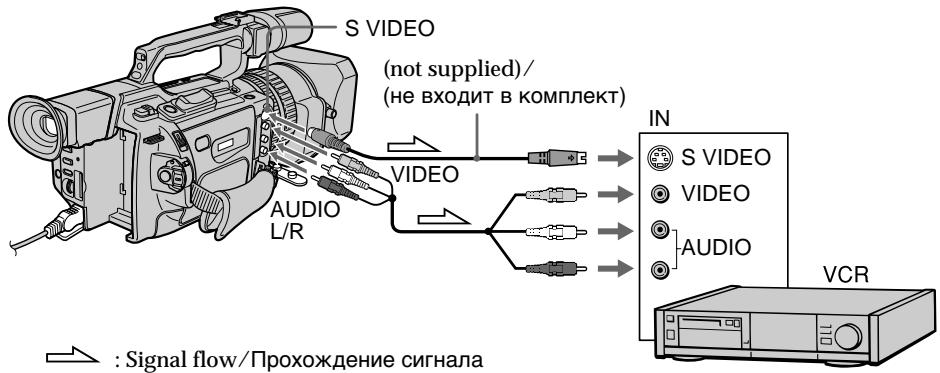
When you have finished dubbing the tape
Press on both your camcorder and the VCR.
Korda nepezanncIeHTbI 3aKOHHeHa
HaxmTe KhONky Ha BnDeokampe n Ha BnDeomarHnToΦOHe.
Be sure to clear the indicators from the screen
If they are displayed, press the following buttons so as not to record the indicators on the dubbed tape:
- The DISPLAY button
- The DATA CODE button
- The SEARCH MODE button on the Remote Commander
You can edit on VCRs that support the following systems
8 mm, Hi8 Hi8, Digital8, VHS VHS, S-VHS, VHSC, VHSC S-VHSC
B Betamax,ED Beta ED Betamax, Mini DV or DV
If your VCR is a monaural type
Connect the yellow plug of the A/V connecting cable to the video input jack and the white plug to the audio input jack on the VCR or the TV. The red plugs are not used.
Connect using an S video cable (not supplied) to obtain high-quality pictures With this connection, you do not need to connect the yellow (video) plug of the A/V connecting cable. Connect the S video cable (not supplied) to the S video jacks on both your camcorder and the TV or the VCR. This connection produces higher quality DV format pictures.
If you use a LANC cable
You can edit precisely by connecting a LANC cable (not supplied) to this camcorder and other video equipment having a fine synchro-editing function, using this camcorder as a player.
Using an i.LINK cable (DV connecting cable)
Simply connect the i.LINK cable (DV connecting cable) (not supplied) to DV IN/OUT and to DV IN/OUT of the DV products. With a digital-to-digital connection, video and audio signals are transmitted in digital form for high-quality editing. You cannot dub the titles, display indicators or the contents of cassette memory.
06a3aTeIbHO OTKIOUHTe INDkaTOpbI Ha 3KpaHe
EcnOn OTHoTObpaXaOTcH, HaxMMITe cIeDyUOiNe KHOKN, YTObIe He 3aNcBbAItb INdNkATOpBoHa Nepe3aNcBbBAeMyIO JENTHY?
- Khonka DISPLAY
- Khonka DATA CODE
KhoKa SEARCH MODE Ha npIbTe nCTaHOnOHoro ynpaBHeHH
MOHTAX MOXKHO BbINOJHrTb Ha BVNeOMaHrHToΦoHaX, KOTOpble NOdEpxkBaIOT CJIeDyUOuNE CnCTembl
8 MM, Hi8 Hi8, Digital8, VHS VHS S-VHS, VHSC VHSC, VHSC S-VHSC, Betamax, ED Beta ED Betamax, Min DY MHH DV mnn DV
EcnBnIeOMarHHTofoh MOHOOHueCKO Tnna
ПодсоeДиНITEжENTbIшТeКep COeДиНTeЛьнОгАКаБЕЯayДиO/BuДeоK BxOДнOMугHe3dByBnDEOCINHana,a6БeIbI shTeKep- K BXoDHomуrgHe3dvyayDNOCINHana Na BxIDeOMaRHTHOTOpHNeNTEJEBN3Ope. KpaChbIeшТeKepbl He mCNoJIb3yIOTcR.
CoeHHeHne c NOMOsbIO BnDeoKa6eJIaS (He BXoIbT B KOMnJIeKT) dJIa NOLyUeHnB bICOKoKaueCTBeHHbIX N3o6paXKeHn
ПиТаКOM COeINHeHIn He HUxHo
NoДКЛIOuATb XeJIbI (BnDEo) WTeKepe
COeINHITIELBOKABeJIa aydIO/BnDEo.
ПОдСоeINHITe BnDEOkaBeJIb S (He BXoINT B
KOMIINEKT) K BnDEOrHe3dAm S Ha
BnDEOKaMEpe n TeLeBn3OpE INN
BnDEOMaHHToPoHE. 3To COeINHEne
No3BOJAErT NOyUHTb BbICOKOKaYeCTBeHHoe
n3O6paXeHne fopMaTa DV.
Ecnn nncnoj3yetcKa6eJb LANC
CoeHHeHne 3ToB BnDeOkaMepbI c DpyroB BnDeoannapaTpyo, IMeIoUeI cyHKUIO TOOH O CINXPOHn3aUIN dJI MONTaJxA, C NOMOuBIO Ka6eLANC (He BXoDITB KOMNKeT) I NOCJeIyUoUee IcNOJIb3OBAHne BnDEOkApeBb I KaueCTBe NIIeepa IOnB0JIaET BbINOHNb OYeHb TOnHbIMOHTax.
IcnoJIb3OBAHne Ka6eIaLINK (coeHNHTeNbHi Ka6eIb DV)
IpocTo noCoeDInHTe Ka6bI.lLINK (coeDInHTeBbIyKa6bI DV) (He BXoNT B KOMnJIeKt) K rHe3dy BV IN/OUT n rHe3dy DV IN/OUT annapatob DV. Pnp IcNoIb3OBAHmN CuPPOBOrO CoeDInHeHnBnDeo- N ayDIOcRHaJbI nepeDaIOTCBuCpPBOBOM BnDe, yTO oEcbceNBAeT BbICOKoe KaueCTBo MOThaJa.TITpbI, INDkATOpbl HaIcnCpEe nn CoepKahne KaccetHOJ nAMrtnpepeAINCbBaT Heh3n.
(1) Insert a blank tape (or a tape you want to record over) into the VCR, and insert the recorded tape into your camcorder.
(2) Set the input selector on the VCR to the DV input position if the VCR is equipped with an input selector. For details, refer to the operating instructions of the VCR.
(3) Set the POWER switch to VCR.
(4) Play back the recorded tape on your camcorder.
(5) Start recording on the VCR.
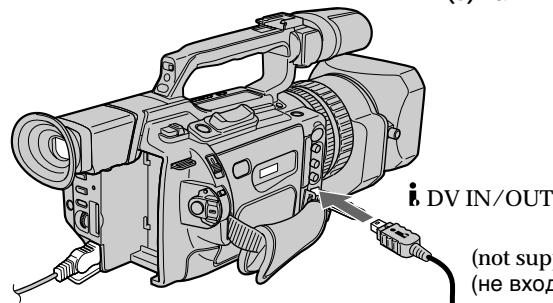
Signal flow/IpoxokdeneHne cnHnana
Ipepe3anncb IeHTbl
(1)BCTaBbTe He3aHncaHHyIO JeHTy (UNIJeHTy,Ha KOTopyIO Heo6xoJIMO BbIOJIHNbT 3aINCb) B BNDeOMaHHTOΦOH IN BCTaBbTe 3aHncaHHyIO JeHTy B BNDeOKaMepy.
(2)YCTaHOBInTe CeIeKTop BXoDHorO CnHnHaJa Ha BnDEOMarHnToΦoHe (ecn TaKOBnMeeTcA) B nIoXKeHne DV. PoJpO6HbIE CBeDeEHn CM. B NHCtpyKuIMn NO3KcNlyaTaUIN BnDEOMarHnToΦoHa.
(3) YctaHOBInTe npeKJIIOUaTeIb POWER B noJIOKeHne VCR.
(4)Haunite BoCnpOn3BedeHne 3aIncAHHoJIeHTbI Ha BnDeOKaMepe.
(5)HaunHe 3aIncB Ha BnDeomarHHTocOHe.
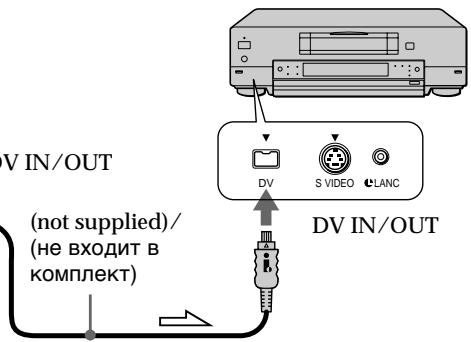
When you have finished dubbing a tape
Press on both your camcorder and the VCR.
You can connect one VCR only using the i.LINK cable (DV connecting cable)
Pictures processed by the digital effect or picture effect function
Pictures processed by the digital effect or picture effect function are not output through the DV IN/OUT jack.
If you record a playback pause picture with the DV IN/OUT jack
The recorded picture becomes rough. And when you play back the picture using other video equipment, the picture may jitter.
Korda nepezanncIeHTbI 3aKOHHeHa
HaxMMTe KhoNky Ha BnDeOkamepe n Ha BnDeOMaHHTofoHe.
C nomoo bIO ka6eIa.LINK (coeINHtJIbHbI K6eIb DV) MOxHO IOcOeHNHTb TOJIbKO OINH BnDEOMarHnTOΦOH
N3o6paXeHnB, BnDOn3MeHeHHbIe C NOMOsbIO yHKcun cHpOBbIX 3o6KeTob NIN FyHKcUN 3o6KeTob N3o6paXeHn
I3o6paKeHnB, BnOIN3MeHHeHbIe C NOMOuBIO cyHKnI cNcPobBix 3cpeKTOB nII 3cpeKTOB I3o6paKeHnB, He nepeDaIOTcA uepe3 rHe3do BXoJa/BxOJa DV IN/OUT.
Pn3aHcN HenoDbXHHoro 1306paXeHH nomooI rHe3da DV IN/OUT
3aIncbIbAemoe n3o6paXeHne 6yJeT HeueTKIM. PnB BocnpOn3BeDeHNn n3o6paXeHnHa npyro BnDeoannapaType OHO MOxET dpOkaTb.
Dubbing only desired scenes - Digital program editing
You can duplicate selected scenes (programs) for editing onto a tape without operating the VCR. Scenes can be selected by frame.
Ipe3aHcB TOnbKO HUxHbIX 3n3oDob -CnΦpOBoB BndeOMHTax NO nporpaMMe
MoxHo HeckoIbKO pa3 3aIncbIbTaH KaaccTeY BbIbpaHHbIe IJRA MOHTaKa 3Nn3OdbI (nporpaMMbI), He ynpabJIaB BVNeOmaHHTocfoHOM. 3Nn3OdbI MoxHO BbIbpaTb IO KaIpaM.
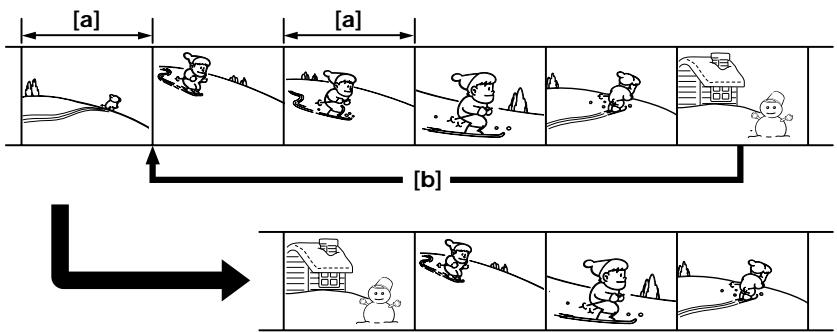
[a] Undesired frame
[b]Moves the scene
Before operating the digital program editing
Preparation 1 Connecting the VCR (p. 105, 107).
Preparation 2 Setting the VCR to operate by infrared rays emitter (p. 110)/Setting the VCR to operate with an i.LINK cable (DV connecting cable) (p. 116).
Preparation 3 Adjusting the synchronization of the VCR (p. 117).
When you dub using the same VCR again, you can skip Preparations 2 and 3.
Using the digital program editing function
Operation 1 Making programs (p. 121).
Operation 2 Performing a digital program editing (Dubbing a tape) (p. 124).
[a]HeHyKbI KaIp
[b]IpeMeueHne 3n30da
Ipeed Haayalom uippoBoro MOHTaKa no nporpamme
IoproToBka 1 POnkNIOueHne BnDEOMarHnTocpOHa (CTp. 105, 107).
IoproToBka 2 HactpoKa ynpaBHeHn BIndeOMarHHTofoHa OT INHpaKpacHOrO n3JyuteJa (ctp.110)/HactpoKa BIndeOMarHHTofoHa dJa pa6ToI c Ka6eJeM i.LINK (coedinHITeIbHbIM Ka6eJeM DV) (ctp.116).
IoproToBka 3 HacTpoKa CnHxPoHn3aCnn BnDEOMarHnTOphiA (cTp.117).
Ecn npe3aHc b CHOBa BblonHreTc c nmooubTOrO Xe BndeomarHnToΦoHa, PoIroTOBky 2 n 3 MoXHo npOnyctNtB.
IcnoJIb3OBAHnE yHKuINuΦpOBOro MOHTaKa IIO nporpaMme
Дистпe 1 CocTаьлелпгограмM (cTp. 121).
IeBcTbue 2 BbInonHeHne cHpPoBOro MOHTaKa IporpaMMbl (pepezanncb Kaccetbl) (ctp.124).
Dubbing only desired scenes - Digital program editing
Ipee3aHncb TOnbKO HxKhbIX 3nN3oDob -LnΦpOBoB BnDEOMHTaX NO nPporpaMMe
Notes
- You cannot dub the titles, display indicators, or the contents of cassette memory.
- When you connect with an i.LINK cable (DV connecting cable), you may not be able to operate the dubbing function correctly, depending on the VCR.
Set CONTROL to IR in the menu settings of your camcorder.
- You cannot send the control signal of the digital program editing through the LANC) jack.
If you connect using an i.LINK cable (DV connecting cable)
With digital-to-digital connection, video and audio signals are transmitted in digital form for high-quality editing.
Preparation 1: Connecting the VCR
Connect your camcorder and the VCR as shown on pages 105 and 107.
You can use an A/V connecting cable, or an i.LINK cable (DV connecting cable).
Примеанья
Tntpbl,INHdkaTopbHaDnCnpeN COePkaHHe KaccTeHn NaMRTN He nepe3anncbIbAOTc.
-Пи рпдклоченс симоцьк Kaбеля i.LINK (coeindntelhoro Ka6eЯ DV) Функци поразеташи может pa6oTaTB He npaBnIbHO,ВЗвИСИМОCTN O T BИdeOMaHITOnOHa.
B yctaHOBkax MeHIO BnIeOkaMepbl yctaHOBnTE CONTROL B noIooKeHne IR.
- Ipepa cunhana ynpaBneHn npi cnpoBOM MOHTaKe n nporpamme chee3 rHe3do LANC) HeBO3MOxHa.
Ecni nodkJIOUeHne npou3BOuNTcncnomooub Ka6eIa.LINK(coeHNHTeBHyi Ka6eIb DV)
PnCpOBOM CoeHHeHn BnDeO- ayDnOCnHaJIbI nepaIoTcB CnpOBOM BnDE,TO ObecneHbAet BbICOKoe KaeeCTBO MOHTaxa.
Preparation 2: Setting the VCR to operate by infrared rays emitter
To edit using the VCR, send the control signal by infrared ray to the remote sensor on the VCR. When you connect using the A/V cable, this procedure is required.
(1) Set the POWER switch to VCR on your camcorder.
(2) Turn the power of the connected VCR on, then set the input selector to LINE. When you connect a video camera recorder, set its POWER switch to VCR.
(3) Press MENU to display the menu.
(4) Turn the SEL/PUSH EXEC dial to select ETC, then press the dial.
(5) Turn the SEL/PUSH EXEC dial to select EDIT SET, then press the dial.
(6) Turn the SEL/PUSH EXEC dial to select CONTROL, then press the dial.
(7) Turn the SEL/PUSH EXEC dial to select IR, then press the dial.
Set the IR SETUP code
(8) Turn the SEL/PUSH EXEC dial to select IR SETUP, then press the dial.
(9) Turn the SEL/PUSH EXEC dial to select the IR SETUP code of your VCR, then press the dial. See "About the IR SETUP code" on page 112.
IoprotoBka 2:HaCtpoKa ynpaBHeHn BnDeomarHnToΦoHa OT HΦpaKpachOrn3JyataTeJ
About the IR SETUP code
The IR SETUP code is stored in the memory of your camcorder. Be sure to set the correct code, depending on your VCR. Code number 1 is the default setting.
| Brand | Remote control code |
| Sony | 1, 2, 3, 4, 5, 6 |
| Aiwa | 53 |
| Akai | 62, 50, 74 |
| Alba | 73 |
| Baird | 36, 30 |
| Blaupunkt | 83, 78 |
| Bush | 74 |
| Canon | 97 |
| CGM | 47, 83, 36 |
| Clatronic | 73 |
| Daewoo | 26 |
| Ferguson | 76 |
| Fisher | 73 |
| Funai | 80 |
| Goldstar | 47 |
| Goodmans | 26, 84 |
| Grundig | 83, 09 |
| Hitachi | 42, 56 |
| ITT/Nikia Instant | 36 |
| JVC | 12, 21, 15, 11 |
| Kendo | 47 |
| Loewe | 16, 47, 84 |
| Luxor | 89 |
| Mark | 26* |
| Matsui | 47, 60, 58* |
| Mitsubishi | 28, 29 |
| Nokia | 89, 36 |
| Nokia Oceanic | 89 |
| Nordmende | 76, 100 |
HΦopMaζη o KoJe IR SETUP
KoI IR SETUP copejxntcB namrtn BndeokamepbI. YctaHObITe npaBnIbHbI KoI, COOTBeTCTByUOsiN IcNoJIb3yEMOMY BnDEOMarHnTOfOHy. IYo yMOnJauHIO yCTaHaBnBaetc KoI Homep 1.
| Фирма-нз�овпель | Код пьытадистанцюногуnpавлика |
| Sony | 1,2,3,4,5,6 |
| Aiwa | 53 |
| Akai | 62,50,74 |
| Alba | 73 |
| Baird | 36,30 |
| Blaupunkt | 83,78 |
| Bush | 74 |
| Canon | 97 |
| CGM | 47,83,36 |
| Clatronic | 73 |
| Daewoo | 26 |
| Ferguson | 76 |
| Fisher | 73 |
| Funai | 80 |
| Goldstar | 47 |
| Goodmans | 26,84 |
| Grundig | 83,09 |
| Hitachi | 42,56 |
| ITT/NokiaInstant | 36 |
| JVC | 12,21,15,11 |
| Kendo | 47 |
| Loewe | 16,47,84 |
| Luxor | 89 |
| Mark | 26* |
| Matsui | 47,60,58* |
| Mitsubishi | 28,29 |
| Nokia | 89,36 |
| Nokia Oceanic | 89 |
| Nordmende | 76,100 |
Dubbing only desired scenes - Digital program editing
| Brand | Remote control code |
| Okano | 60, 62, 63 |
| Orion | 70, 58* |
| Panasonic | 16, 78, 96 |
| Philips | 83, 84, 86 |
| Phonola | 83, 84 |
| Roadstar | 47 |
| SABA | 76, 21 |
| Samsung | 93, 94, 52, 22 |
| Sanyo | 36 |
| Schneider | 84, 10 |
| SEG | 73 |
| Seleco | 47, 74 |
| Sharp | 89 |
| Siemens | 10, 36 |
| Tandberg | 26 |
| Telefunken | 91, 92 |
| Thomson | 76 |
| Thorn | 36, 47 |
| Toshiba | 40 |
| Universum | 92, 70, 47 |
| W. W. House | 47 |
| Watson | 83, 58 |
- TV/VCR component
Note on remote control code
You cannot do assemble editing with some VCRs (for recording) if the remote control code does not correspond to this camcorder (for playback).
Ipee3aHncb TOnbKO HUxHBIX 3nN3oJOB -LcnpoBoB BnDEOMONTAX NO nporpaMMe
| Фиrimа-изrogenobintelb | Код пьытадистанцунноунеленя |
| Okano | 60, 62, 63 |
| Orion | 70, 58* |
| Panasonic | 16, 78, 96 |
| Philips | 83, 84, 86 |
| Phonola | 83, 84 |
| Roadstar | 47 |
| SABA | 76, 21 |
| Samsung | 93, 94, 52, 22 |
| Sanyo | 36 |
| Schneider | 84, 10 |
| SEG | 73 |
| Seleco | 47, 74 |
| Sharp | 89 |
| Siemens | 10, 36 |
| Tandberg | 26 |
| Telefunken | 91, 92 |
| Thomson | 76 |
| Thorn | 36, 47 |
| Toshiba | 40 |
| Universum | 92, 70, 47 |
| W. W. House | 47 |
| Watson | 83, 58 |
- TB/BiNeOeOMaHnToΦoH
3ameuHnO OTHoCteIbHO KOa npIbTa DnCTaHcUOnHOrO ynpabLeHH
C HeKoTObIMN BnDEOMaHHTOFOHaMn HEnb3r BbIOnJIHrTb MOHTax (ДЯ 3aIINCU), ecN KoD nylbTa DnCTaHcUHOHOrO ynpaBHeHnHE CoOTBETCTByeT 3ToI BnDEOKaMepe (ДЯ BOCnPON3BeDeHnR).
Setting the buttons to cancel the recording pause on the VCR
(1)Turn the SEL/PUSH EXEC dial to select PAUSEMODE, then press the dial.
(2) Turn the SEL/PUSH EXEC dial to select the button to cancel recording pause on the VCR, then press the dial.
The correct button depends on your VCR. Refer to the operating instructions of your VCR.
HacpoKa KhoNOK JIa OTMeHbI nay3bl npn 3aIncn Ha BIndeomarHHTOfoHe
(1)Повернite DMCK SEL/PUSH EXECДЯ
Быбopa PAUSEMODE,аЗатем нажмпe
НдИСК.
(2)ПовернITE DKSOLPUSH EXEC,уTO6bI Bbl6paTb KHNKUДЛОТМEHb Nay3bl npn 3aHcNHa BUNdeOMarHHTOfoHe,a 3aTeM HaxMNTe Ha DNCK.
Bb6op npabunbHOn KhoNKn 3aBnCnT OT BUndeomarHnToD0Ha.
O6paTntecb K INHCTpyKmI N0 3KcIIyatauBnDeOMaHHTofoHa.
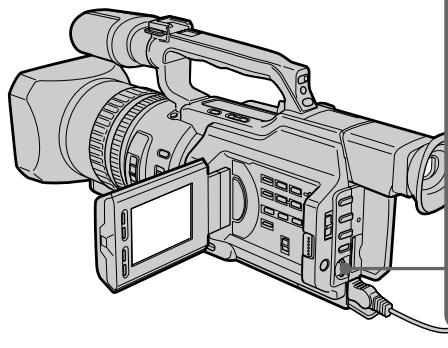
1,2


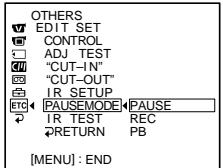

OTHERS
EDIT SET
CONTROL
ADJ TEST
CUT-IN
“CUT-OUT”
IR SETUP
ETCAUSEMODE PAUSE
IR TEST
RETURN
The buttons to cancel recording pause on the VCR
The buttons vary depending on your VCR. To cancel recording pause:
- Select PAUSE if the button to cancel recording pause is I.
- Select REC if the button to cancel recording pause is .
- Select PB if the button to cancel recording pause is .
KhONKnI dIJI OTMeHbI nay3bl npn 3aIncn Ha BInDeOMarHHToΦOHe
KhoNKn OTnUHJOTC B3aBcIMOCTN OT MoDeJI N BuJeOMaHrHToΦoHa.ДЯ OTMeHbI nay3bl npn 3aIncn:
- Bыберп Te PAUSE, ecи Кногкдг OTMeHbI nay3bl npri 3aInci - II.
- Bыберпг REC, ecл Кногкдл OTмны nay3bl 3aПСN - ●.
- BbIbepnte PB, ecnKhONkaДЯ OTMHebl nay3bl 3aIncn -▶.
Setting your camcorder and the VCR to face each other
Locate the infrared ray emitter of your camcorder and face it towards the remote sensor of the VCR.
Set the devices about 30~cm (about 11 7/8 in) apart, and remove any obstacles between the devices.
YcTaHOBKa BnDeOkamepbI IN BnDeOMarHHTofoHa Dpyr npOTNB dpyra
HnppaKpaCbHn3nyaTeIb BnDeOkamepbI HeoXoIMHOHaPabNTb Ha DaTUnK DnCTaHUNHOyPaBLeHnBnDEOMaHHTOfoHa.
YCTAHOBNTe yCTpOJCTBa Ha paCCTOHnnpIMepHO 30 cm n yCTpaHNTe JIObIe npENrTcBnMexkDy HmN.
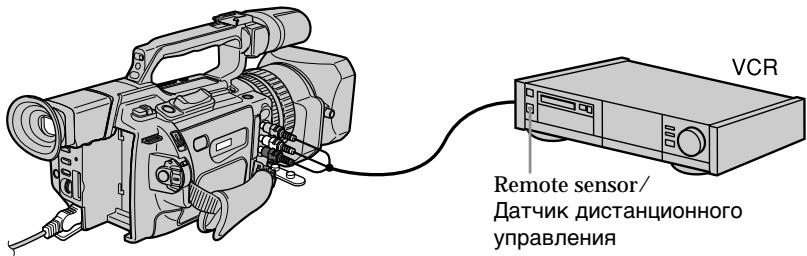
Confirming the VCR operation
(1) Insert a recordable tape into the VCR, then set it to recording pause.
(2) Turn the SEL/PUSH EXEC dial to select IR TEST, then press the dial.
(3)Turn the SEL/PUSH EXEC dial to select EXECUTE, then press the dial.
If the VCR starts recording, the setting is correct.
When finished, the indicator changes to COMPLETE.
EcIn BnIeOMaHrNToΦoH IpnO3B0dNT 3aIINCb,3TO O3HaayaeT npaBnIbHyIO NaCTpoKy.
OTHERS
EDIT SET
CONTROL
CONTRAST ADJ TEST
ADT
"CUT-OUT
OUT OUT LB. SETUP
1. PAUSEMODE
PAUSEMOD IUP TEST
IR TEST
RETURN
Dubbing only desired scenes - Digital program editing
When the VCR does not operate correctly
Set the IR SETUP code, or select the button to cancel the recording pause on the VCR.
Preparation 2: Setting the VCR to operate with an i.LINK cable (DV connecting cable)
When you connect using an i.LINK cable (DV connecting cable) (not supplied), follow the procedures below.
(1) Set the POWER switch to VCR on your camcorder.
(2) Turn the power of the connected VCR on, then set the input selector to DV input. When you connect a video camera recorder, set its POWER switch to VCR.
(3) Press MENU to display the menu.
(4) Turn the SEL/PUSH EXEC dial to select ETC, then press the dial.
(5) Turn the SEL/PUSH EXEC dial to select EDIT SET, then press the dial.
(6) Turn the SEL/PUSH EXEC dial to select CONTROL, then press the dial.
(7) Turn the SEL/PUSH EXEC dial to select i.LINK, then press the dial.
Ipee3aHcB TOJIbKO HUxHbIX 3nN3oJOB -LncpOboB BnDEOMHTax NO nporpaMMe
Ecnn BnDeomarHHTofoh pa6Otae HnPaBnBHO
YctaHOBnte KoI IR SETUP IIN BbIbepnTe KHONKy IJIr OTMeHbI NaY3bl npN 3aIncn Ha BInDeOMaHHTofoHe.
Iodrotobka 2: Hactpoika BndeomarHHTofoHa dJa pa60tbl c ka6elem i.LINK (coedHHTeIbHbIM ka6elem DV)
PnncoeinHc n oomouko ka6eI i.LINK (coeHNHTbHOrO ka6eJr DV) (He BXoNt B KOMnKeT) BblOnlHnTe npOeDpybl, yka3aHHbIe HnKe.
(1)YcTaHOBInTe Ha BnDeOkaMepe nepeKIOuHaTeIb POWER B noLoXeHne VCR.
(2)ВКЛIOЧИТЕ ПИТAHINE Ha NOДСоЕДИНEHOM BИДЕОМАгнITOФОН,3aTEm yCTaHOBITe CEJIΕΚΤΟР BXODHORO CINHANA B NOLOЖЕΗΝ E XOДHORO CINHANA D V. Пи NOДСоЕДИНЕ NH IN BИДEOKAMEpbl YcTAHOΒΙTE ee NepeKЛIOчATEЛь POWER B I NOLOЖЕΗν VCR.
(3)HaxmTe KhoNky MENU OTo6paXeHHa MeHIO.
(4)ПовернITE ДИСК SEL/PUSH EXEC ДЯ
Выбopa установки ETC, a 3aTeM нажмITE
На ДИСК.
(5)Повернite ДИСК SEL/PUSH EXEC ДЯ Вьбopa EDIT SET, a 3aTeM нажмITE на ДИСК.
(6)Повернite DMCK SEL/PUSH EXEC ДЯ Вьбopa CONTROL, a 3aTeM haXmITE Ha DMCK.
(7)ПовернITE диСК SEL/PUSH EXEC дя Выбopa i.LINK, a 3aTeM нажмITE Ha диСК.
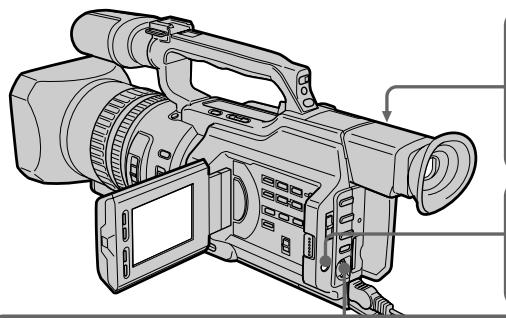
1
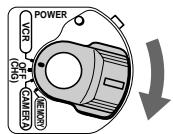

3

4,5
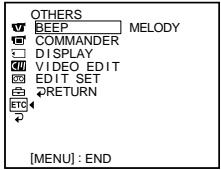


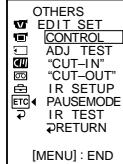

6,7
C

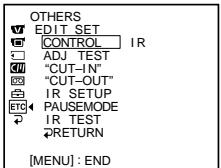
→
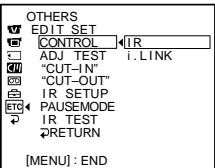
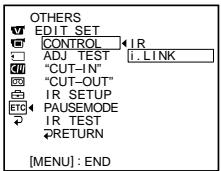
→
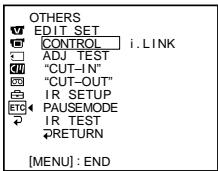
Preparation 3: Adjusting the synchronization of the VCR
You can adjust the synchronization of your camcorder and the VCR.
Remove the cassette from the camcorder
beforehand. We recommend that you prepare a pen and paper for notes.
When you connect to a Sony VCR using an i.LINK cable (DV connecting cable), and have
set CONTROL to i.LINK, the setup below is not necessary.
Побrotовka 3:Насторкa
CNHXPOHn3a4nn
BndeomarHHTOΦoHa
Moxho hactpoNTb cnHxpoHN3aunio
BnDeOkamepbI BNDeOmaHHToHa.
PpeBapntelbno n3BneKeTe Kaccety n3
BndeOKamepbI. PeKOMeHdyetyc npuROTOBtB
pykny6bymarydla3aMeTOK.
Ecni NIOKJIIOHEn BIVeOMaHrNToΦoH Sony C
nomoubIO ka6eIaLINK (coeunHntJIbHorO
Kabéna DV), KOMaHa CONTROL
yctaHOBneHa B noJoxHe i.LINK,
OINCAHHyH HNKe IpoeIpy HaCTpONK
BbINONHATb He HxKHO.
(1) Insert a recordable tape into the VCR, then set it to recording pause. When you connect using an i.LINK cable (DV connecting cable) and have set CONTROL to i.LINK, you do not have to turn the recording VCR to recording pause mode.
(2) Set the POWER switch to VCR.
(3) Press MENU to display the menu.
(4) Turn the SEL/PUSH EXEC dial to select ETC, then press the dial.
(5) Turn the SEL/PUSH EXEC dial to select EDIT SET, then press the dial.
(6) Turn the SEL/PUSH EXEC dial to select ADJ TEST, then press the dial.
(7) Turn the SEL/PUSH EXEC dial to select EXECUTE, then press the dial. CUT-IN and CUT-OUT are recorded on an image for five times each to calculate the numerical values for adjusting the synchronization.
The EXECUTING indicator flashes on the LCD screen or in the viewfinder. When finished, the indicator changes to COMPLETE.
(1)BcTaBbTe KacCeTy dIy 3aIncn B BVdeOmaHHTofoh, 3aTeM yCTaHOBInTe pexm nay3bl 3aIncn. EcIIOKJIIOUChHe BbIOJHeNo C nOMOuBIO Ka6eJIa i.LINK (coEINHITbHoro Ka6eJIa DV) I KOMaHda CONTROL yCTaHOBNeHa B nIoXeHne i.LINK, 3aIncsIBaIOUsI BDeOmaHHTofoH He HUxHo nepeBOdITb B pexm nay3bl 3aIncn.
(2)Установпейpeклоча teь POWER в положене VCR.
(3)HaxmTe KhoNky MENU OTo6paXeHHa MeHIO.
(4)ПовернITE ДИСК SEL/PUSH EXEC ДЯ
Выбopa уCTановки ETC, a 3aTeM наЖмITE
НдИСК.
(5)Повернite ДИСК SEL/PUSH EXEC ДЯ Выбopa EDIT SET,аЗатем НжмITE на ДИСК.
(6)ПовернITE ДИСК SEL/PUSH EXEC ДИВьбopa ADJ TEST,а 3aTeM нахмITE HaДИСК.
(7)ПовернITE ДСК SEL/PUSH EXEC ДЯ
Выбoga установки EXECUTE,а затем
наджмITE на ДСК.
Ндзобрахение 3дпшутся по пгь
metok CUT-IN и CUT-OUT,позвогиши
pacchntaычслобBLEЗнаня ДЯ
настойси снхронидаци.
На ЗкpaneЕ КД Или в Вионскате
miraetting.NДикakTop EXECUTING. По
OKOHаими ИдikakotupИзмeнHTсаHa
COMPLETE.
(8) Rewind the tape in the VCR, then start slow playback.
Take a note of the opening numerical value of each CUT-IN and the closing numerical value of each CUT-OUT.
(9) Calculate the average of all the opening numerical values of each CUT-IN, and the average of all the closing numerical values of each CUT-OUT.
(10) Turn the SEL/PUSH EXEC dial to select "CUT-IN," then press the dial.
(11) Turn the SEL/PUSH EXEC dial to select the average numerical value of CUT-IN, then press the dial.
The calculated start position for recording is set.
(12) Turn the SEL/PUSH EXEC dial to select "CUT-OUT," then press the dial.
(13) Turn the SEL/PUSH EXEC dial to select the average numerical value of CUT-OUT, then press the dial.
The calculated stop position for recording is set.
(14) Turn the SEL/PUSH EXEC dial to select RETURN, then press the dial.
Ipee3aHncb TOnbKO HUxHbIX 3nN3oJOB -LcΦpOBoB BnDEOMONTAX NO IporpaMMe
(8)Перемотайт e kaccetyВ BnDEOMaHHTOfoHe Ha HauaIoo, 3aTeM BKJIIOUHTe 3aMeJdIeHHoe BOCnpOn3BeJeHne. O6paTInTe BnIMaHne Ha HauaJIbHoe YncNoBoe 3NaueHne KaKdoN MeTKn CUTIN N KOHeuHoe YncNoBoe 3NaueHne KaKdoN MeTKn CUT-OUT.
(9)PaccuTaiTe CpeJHee 3NaYeHne BCEx HaayalbHbIx YNCIOBbIX 3NaYeHn KAKdoi MeTKn CUT-IN,a TaKxe CpeJHee 3NaYeHne BCex KOHeuHbIX YNCIOBbIX 3NaYeHn KAKdoi MeTKn CUT-OUT.
(10)ПовернITE ДИСК SEL/PUSH EXEC ДЯ Вьбopa "CUT-IN", a 3aTeM нажмITE на ДИСК.
(11)ПовернITE диck SEL/PUSH EXEC дьБбopa cpeДнero услобого 3начениCUT-IN,Затem нахмITE на диck.PacchintahHoe NaЧальhoe noLOJOKeHneдя 3пИСИУCTaHOBЛЕН.
(12)ПовернITE ДИСК SEL/PUSH EXEC ДИВБОРА “CUT-OUT”,а 3aTeM нажмITE Ha ДИСК.
(13)ПовернITE ДИСК SEL/PUSH EXEC ДЯ
Быбopa срд Hero YИСЮВОЗ 3HAЧЕНИ
CUT-OUT, 3aTeM наЖМЛТе HaДИСК.
PacchintahHoe KOHeUHoe ПОLOжЕпЕ ДЯ
ЗАПSCI yCTaHOBJIeHO.
(14)ПовернITE ДИСК SEL/PUSH EXEC ДЯ
Быбopa RETURN, a за tem нахмITE
На ДИСК.
10,11


OTHERS
W EDIT SET
CONTROLS
ADJ TEST
“CUT-IN”
CUT-OUT
色 IR SETUP
ETC PAUSEMODE
IR TEST
RETURN
OTHERS
EDIT
CONT
ADJ TEST
CUT-IN
CUT-OUT
色 IR SETUP
ETC PAUSEMODE
R
RETURN
12,13


OTHERS
EDIT SET
CONTROL
ADJ TEST
“CUT-IN”
CUT-OUT
自IRSETUP
ETC PAUSEMODE
IR TEST
DRAFT
OTHERS
W EDIT SET
CONTROL
ADJ TEST
“CUT-IN”
“CUT-OUT”
自IRSETUP
ETC PAUSEMODE
E IR
RETURN
Errors in editing
If you connect your camcorder to Sony equipment with the DV jack, the range of errors is within + / - 5 frames.
The range may become wider in the following conditions:
- The interval between CUT-IN and CUT-OUT is less than five seconds (p. 121).
- CUT-IN or CUT-OUT is set at the beginning of the tape.
When "ENGAGE REC PAUSE" appears on the LCD screen or in the viewfinder
Turn the recording VCR to recording pause mode.
If the VCR does not operate correctly
Make sure the IR SETUP code is correct; reset if necessary.
When the operations of the VCR do not work with an i.LINK cable
Keep the i.LINK connection, and carry out Preparation 2 (p. 116) again. The audio and video signals are sent as digital signals.
OuIn6Kn npn MoNTaxe
Operation 1: Making Programs
(1) Insert the tape for playback into your camcorder, and insert a tape for recording into the VCR.
(2) Press MENU to display the menu.
(3) Turn the SEL/PUSH EXEC dial to select ETC, then press the dial.
(4) Turn the SEL/PUSH EXEC dial to select VIDEO EDIT, then press the dial.
(5) Search for the beginning of the first scene you want to insert using the video control buttons, then pause playback (p. 42).
ДeиCTBnE 1:СоctaВлeнe nporpaMM
(1)BCTaBbTe KACCETy, C KOtOpoi Heo6xOJIMOCdJIaTb 3aIncb, B BVNeOkamepy, aKACCETy IJIa 3aIncn - BVNIdeOMarHHToOH.
(2)HaxmTe KhoNky MENU OTo6paXeHHa MeHIO.
(3)ПовернITE ДИСК SEL/PUSH EXEC ДИВБОРа уТановки ETG, a 3aTeM нажмITE на ДИСК.
(4)Повернite ДИСК SEL/PUSH EXEC ДЯ
Быбopa VIDEO EDIT, за tem нахмITE на
ДИСК.
(5)HaIInTe HaaIIO nepBOrO 3nI3oJa, KOToPbI Tpe6yeTcBCTaBnITb,C NOMOuBHO KHONOK BUNDeOkoHTpOJIa,3aTeM BKJIOUHTe peXIM nay3bl BOcPOn3BeDeEHnA (CTp.42).
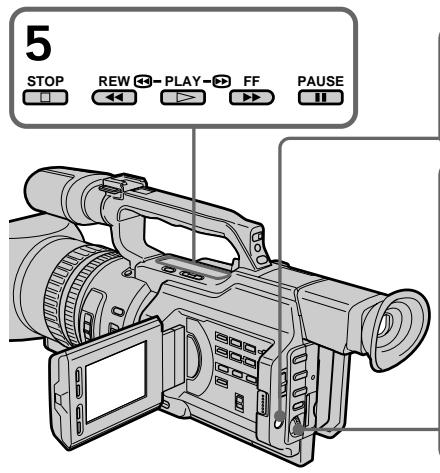

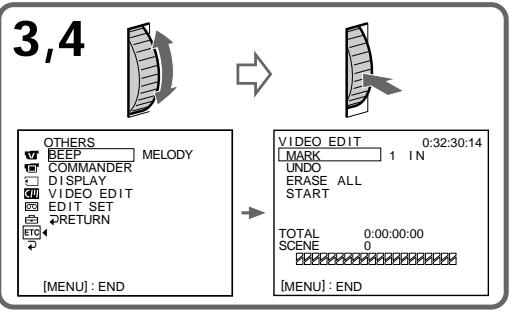
(6) Press the SEL/PUSH EXEC dial, or MARK on the Remote Commander. The CUT-IN point of the first program is set, and the top part of the program mark changes to light blue.
(7) Search for the end of the first scene you want to insert using the video operating buttons, then pause playback (p. 42).
(8) Press the SEL/PUSH EXEC dial, or MARK on the Remote Commander. The CUT-OUT point of the first program is set, then the bottom part of the program mark changes to light blue.
(9) Repeat steps 5 to 8, then set the program. When the program is set, the program mark changes to light blue.
You can set a maximum of 20 programs.
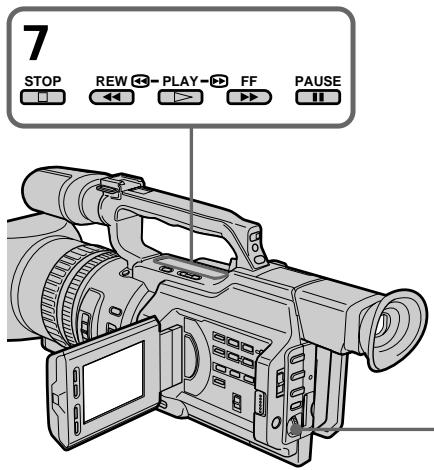
On a blank portion of the tape
You cannot set CUT-IN or CUT-OUT on a blank portion of the tape.
Note
The total time of the programs is indicated on the LCD screen or in the viewfinder, however, if the time code on the tape is not continuous, the time may not be indicated properly.
Ipee3aHncb ToJIbKO HUxHbIX 3n3oIOB -LuΦpOBoB BnDEOMONTaK NO IporpaMMe
(6)HaKMMTe HaДИСК SEL/PUSH EXEC nI IN KHOKNy MARK Ha IyJIte IINCTaHcNoHnOу npaBJIeHnI.
MecTo hauana CUT-IN nepBoro 3aIporpammIOBAHHO rIIM3Oda yCTaHOBJIeHO, uCBET BepXHeRo INHkAToPA MetKn IporpAmMb MeHReTcHa CBeTNO-ToJy6oB.
(7)HaIInTe KOHeu nepBoro 3nH3oJa, KOToPbI Tpe6yeTcR BCTaBntb, C NMOUBo KHOJOK BnDEOKOHTpOJIa, 3aTeM BKJIOUHTe peKIM nay3bl BOCnPon3BeDeHnA (CTp.42).
(8)HaxmTe Ha nck SEL/PUSH EXEC nI KhoNky MARK Ha nyIbTe nctaHnOHHoro ynpabJeHn.
MecTo OKOHuaHnA CUT-OUT nepBoro 3aIporpammIOBAHHOrO eIN3oDa yCTaHOBJIeHO, INCBET HNXHeRo INHKnAtopa MeTNI porpAmMbMeHReTcHa CBeTNO-roJyboi.
(9)Повторипунковыслб 5 по 8,затемаьершпгпограммюване.Посlete завершени пограммюваняцBet Индікагopa MeTKи пограммьMeнhoeТа на CBETNO-гolyбо.
Moxho coctabntb He 6oone 20 nporpamM.
6
VIDEOEDIT 0:08:55:06 MARK 1 OUT
UNDO
ERASE ALL
START
TOTAL 0:00:00:00
SCENE 0

8,9


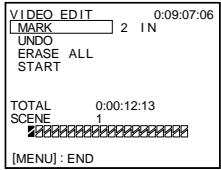
VIDEOEDIT 0:10:01:23
MARK 4 IN
UNDO
ERASE ALL
START
TOTAL 0:00:47:12 DATE Date
Ha He3aIncAHHom yUactKe JIeHTbI
MTeKnHaayana CUT-IN nIn oKoHuaHnCUTOUT HeIb3y yCTaHOBnTb Ha He3aIncHNoYactnJeHTbl.
Ppmeuahne
O6uee Bpemn pnporpaMM yKa3bIbaeTcHa 3KpaHe KkД nIi B BuOnckaTeNe, Ondako, ecN KoD BpemeHn Ha IeHTe He RaJIaETcH He nppeBbHbIM, Bpem MoKeT OTo6paKaTbcH HnpaBnIbHO.
Dubbing only desired scenes - Digital program editing
Erasing the last program
To change the end of the last program, delete the CUT-OUT mark.
To erase the whole program, delete both the CUT-IN and CUT-OUT marks.
(1)Turn the SEL/PUSH EXEC dial to select UNDO, then press the dial. The last set program mark flashes.
(2) Turn the SEL/PUSH EXEC dial to select EXECUTE, then press the dial and the setting is cancelled.
To cancel erasing
Select RETURN in step 2, then press the SEL/PUSH EXEC dial.
Erasing all programs
(1) Select VIDEO EDIT in the menu settings. Turn the SEL/PUSH EXEC dial to select ERASE ALL, then press the dial. All the program marks flash.
(2) Turn the SEL/PUSH EXEC dial to select EXECUTE, then press the dial and the settings are cancelled.
To cancel erasing all programs
Select RETURN in step 2, then press the SEL/PUSH EXEC dial.
To cancel a program you have set Press MENU.
The program is stored in memory until the tape is ejected.
Ipee3aHncb TOnbKO HUxHbIX 3nN3oJOB -LcΦpOBoB BnDEOMONTAX NO IporpaMMe
YdaneHne n3 nporpaMMbI nocJeHero 3anporpamMnPOBaHHORo 3nN3Oda
YTo6bI yCTaHOBnTb DpyrOe MeCTo OKOHuaHnna nocJeHero 3anpOrpaMMnpoBaHHoro 3nn30da, ydaJIte MeTKy CUT-OUT.
YTo6bI ydaJIntb n3 npOrpaMMbI BeCb 3aInporpaMMnpoBaHHbI 3nH3oD, ydaJInte o6e MeTkn CUT-IN n CUT-OUT.
(1)ПовернITE ДИСК SEL/PUSH EXEC ДИВЮбopa UNDO, a 3aTeM наЖмITE на ДИСК. 3amIrGaET MeTka ПОслЕДийnporpaMMbl.
(2)ПовернITE диСEL/PUSH EXEC ДдьБбopa EXECUTE,Затem нахмпerte Ha диСК,И установka bayet OTMeheHa.
ДЯ OTMeHbI ydaJIeHnA
Bb6epTe RETURN B nyHKTe 2,3aTeM hKMTe Ha nCK SEL/PUSH EXEC.
YdaneHne n3 nporpaMMbl BceX 3anpOprpAMMPOBaHHbIX 3nN3oDOB
(1)ВьберпгteVIDEOEDITвустановкхMeHIO.ПовернITEДСКSEL/PUSH EXECДЯ ВьборaERASEALL,a3atEmHAЖМТЕHaДИСК.ЗAMNIGAOTMeTKnBCEX npoRpaMm.
(2)Повернite ДИСК SEL/PUSH EXEC ДЯ
Быбopa EXECUTE,Затем нахмITE на
ДИСК,И установки Бут OTMeHeHbl.
Operation 2: Performing a digital program editing (Dubbing a tape)
Make sure your camcorder and VCR are connected, and that the VCR is set to recording pause. When you use an i.LINK cable (DV connecting cable), you do not have to set the VCR to recording pause. When you use a video camera recorder, set its POWER switch to VCR.
(1) Select VIDEO EDIT. Turn the SEL/PUSH EXEC dial to select START, then press the dial.
(2) Turn the SEL/PUSH EXEC dial to select EXECUTE, then press the dial. The camcorder automatically searches for the beginning of the first program, then starts dubbing. The EXECUTING indicator flashes. The SEARCH indicator appears during search, and the EDIT indicator appears during edit on the LCD screen or in the viewfinder. The program marks light up after dubbing is complete. When the dubbing ends, your camcorder and the VCR automatically stop.
To stop dubbing
Press on this camcorder or on the Remote Commander.
To end the digital program editing function
Your camcorder stops when the dubbing is complete. Then the display returns to VIDEO EDIT in the menu settings.
Press MENU to end the digital program editing function.
ДeиctBnE 2:Вынолнeнe цфpoBOrO MOHTaЖа прогамMbI (nepe3anCb KacceTbI)
Y6eIntecb, cT0 BnIeOkamepa nOdkIIOUeHa K BnIeOMaHnITofoHy, a BnIeOMaHnITofoh BKIOUeH b pexIM na3bl npn 3aInc. EcIn IcNoIb3yeTcKa6elb i.LINK (coeHNITeNbHbIKa6elb DV), BnIeOMaHnITofoH He HxJHO nepeBOIDtB b pexIM na3bl 3aIncn. Ppi 3aIncn Ha BnIeOkamepy yCTaHOBNTe ee nepeKIOuatoJIb POWER B noIoXeHne VCR.
HaxmTe KhoNkny Ha BnDeokamepe NnHa nyIbTe DnCTaHcIOHHO rypabJIeHnA.
UTo6bI OTKHIOHTb FyHKcHIO UINΦpOBORO MOHTaKa IporpaMMbl
Bndeokamepa ocTaHaBnBaetc nocJe 3aBepSeHnI nepe3aIncn. 3aTeM Ha dncnlee cHOBA NOBnEeTc KOMaHda VIDEO EDIT BVcTaHOBkax MeHIO. HaxmTe KhoNky MENU dny 3aBepSeHnI cyHKuIM MOHTaKa npOrpamMbI.
Dubbing only desired scenes - Digital program editing
When the operations of the VCR do not work with an i.LINK cable
Keep the i.LINK connection, and carry out Preparation 2 (p. 116) again.
You cannot record on the VCR when:
- The cassette is not inserted.
- The tape has run out.
- The write-protect tab is set to the protect position.
- The IR SETUP code is not correct. (When IR is selected.)
- The setup to cancel recording pause is not correct (p. 114). (When IR is selected.)
NOT READY appears on the LCD screen when:
- The program to operate the digital program edit has not been made.
- i.LINK is selected but an i.LINK cable (DV connecting cable) is not connected. (When i.LINK is selected.)
- The power of the connected VCR is not turned on.
Ipee3aHncb TOnbKO HUxHbIX 3nN3oJOB -LcΦpOBoB BnDEOMONTAX NO IporpaMMe
EcJIn ynpabJIeHne BnDEOMaHHTOΦOHOM c Ka6eIem i.LINK he pa6oTaet
He oTKJIouyA Ka6eIb i.LINK, BblOJIHnTe PoiDrTOBky 2 (cTp. 116) eue pa3.
Ha BnDeomarHnToΦoH He ydaCTc npOn3BecTn 3aInCb, eCm:
- He BCTaBnEHa KaccetA.
3aKoHunJaCbJeHTa.
-JIeNEcTOK3aUHTbIOT3aINcNyCTaHOBJIeH B IPOJXKeHneIJ3aUHTbl. - HenpaBnBbHbI KOd IR SETUP. (Korda BbIbpaH IR.)
- HenpabunbnaH aacTpoKa IaI OTMHebl na3bl npn 3annc (cTp. 114). (Korda Bb6paH IR.)
HaIINcB NOT READY nOBnEeTcH a 3KpaHe KKd,ecIn:
- He coctablena Hnporpma ynpaBHeHHuNcpoBbIM MOHTaxOM nporpaMMbl.
- BbIbpaH i.LINK, Ho Ka6eBb i.LINK (coeDInHtTeNbHbI Ka6eBb DV) He noKnHouen. (KorDa BbIbpaH i.LINK.)
Подключehн布局ВидаомагнITOФОн He BKJIIOUeH.
Using with an analog video unit and a PC - Signal convert function
You can convert the analog input signal to the digital signal and output it from the DV IN/OUT jack on this camcorder. You can capture images and sound from an analog video unit connecting a PC which has the i.LINK (DV) jack to your camcorder.
IcnoJIb3OBaHHe c aHaIOrObblIM BnDeo6OpyOBoAHem IPK -ФункцЯ пeo6pa3OBaHnI CnHaJa
Moxho npeo6pa3oBaTb aHaIoroBbI BxOHO
CnHaN B uΦpOBOu N BvIBeCTn ero Ha rHe3Do
DV IN/OUT 3ToI BnDeokamepbl. POnKlHouN
K BnDeokampe PIc pa3bEmom i.LINK (DV),
MOxHO 3aPiNCbIBaTb OTdEJIbHbIe KaIpbI N 3ByK
c aHaIoroBOr BO nDeoYcTroPcTba.
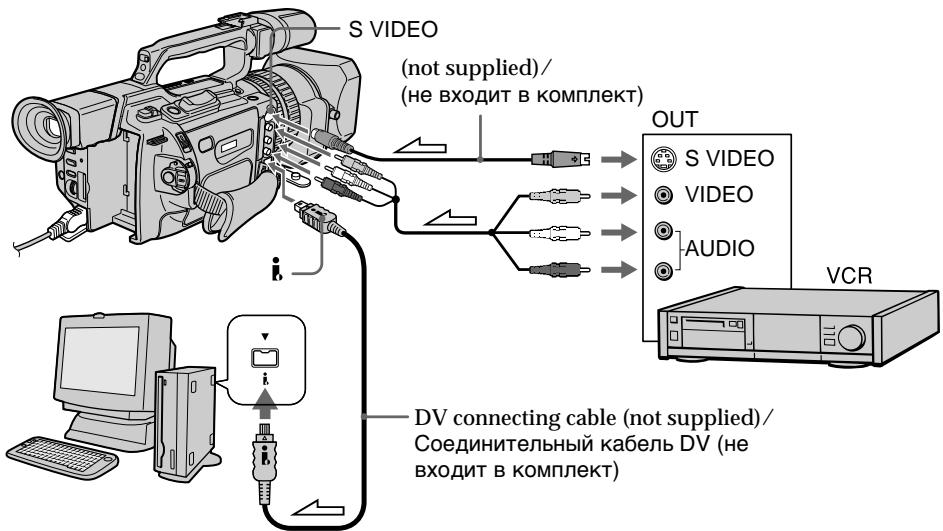
: Signal flow/Прoxждене сгнана
(1) Set the POWER switch to VCR.
(2) Press MENU to display the menu.
(3) Turn the SEL/PUSH EXEC dial to select V, then press the dial.
(4)Turn the SEL/PUSH EXEC dial to select A/ V DV OUT, then press the dial.
(5) Turn the SEL/PUSH EXEC dial to select ON, then press the dial.
(6) Press MENU to erase the menu display.
(7) Start playback on the analog video unit slightly ahead of the point from which you want to start capturing images.
(8) Start capturing procedures on your PC. The operation procedures depend on your PC and the software which you use. For details on how to capture images, refer to the instruction manual of your PC and your software.
(1)Установпейразковая Power в поожене VCR.
(2)HaxmTe KhoNkY MENU dIa OTo6paXeHHa MeHIO.
(3)Повернente ДИСК SEL/PUSH EXEC ДЯ
Выбopa уCTановки [W], a 3aTeM нажмITE
На ДИСК.
(4)ПовернITE ДИСК SEL/PUSH EXEC ДЯ
Выбopa A/V → DV OUT, за tem нахмпт
НдИСК.
(5)Повернente ДИСК SEL/PUSH EXEC ДЯ
Выбopa установки ON, a за tem нажмпerte
На ДИСК.
(6)HaxmTe KhoNky MENUДя удаJIeHnI INДИКaци MEHIO.
(7)BkIIOUHTepeKIMBOCnPOIm3BeEHHa aHaIIOROBOM BUNDeOyCTPOINCTBE HEMHO paHbWe TORO MeCTa, C KOToPOrO HyXHO HaayTaTb 3aIINCb KaIpOB.
(8)Haunite 3aIncB kaDPOB Ha PI. POpJdoK DeiCTBn pni 3TOM 3aBNCIT OT IcNoJIb3yEMoro PI K n npOrpaMMHoro oBeCneueHn. BoJe e noPbo6HyIO IHΦoRmauio O 3aIncN KaDPOB CM. B INHCTpyKUAX NO 3KcIIpyatauN PI n npOrpaMMHoro oBeCneueHn.
Using with an analog video unit and a PC - Signal convert function
After capturing images and sound Stop capturing procedures on your PC, and stop the playback on the analog video unit.
Notes
- When you edit the captured image and sound from the analog video unit by a PC, you need to install an appropriate software which can exchange video signals between the camcorder and a PC.
- Depending on the condition of the analog video signals, the PC may not be able to output the images correctly when you convert analog video signals into digital video signals via your camcorder. Depending on the analog video unit, the image may contain noise or incorrect colours.
- The camcorder cannot output the digital signal when you input the analog signal that includes a copyright protection signal.
IcnoJb3OBAHne c aHaJorOBoBbIM BnDeo6OpyDoBaHnem n PK -Функци пeo6pa3OBAHncaHnla
IocJIe 3aIInc KaIIOB n 3Byka
PpeKpatnte IpoueIpyu 3aIncn Ha PIK n OCTaHOBNTe BOCpOn3BeJeHne Ha aHaJIoROBOM BInDeOyCtpoiCTBE.
PpimueaHn
- PnMOHTaXe CHrTbIX KaIPOB u 3ByKa c aHaIANOBOrO BnDEoYcTpoiCTBa C NOMOuIIO PIK Heo6xoDmO yCTaHOBtB COOTBeTCTBYUoie IporpamMHOe o6ecneHHe, CNOC6Hoe nepeDaBaTb BnDeocnHaJIbI MeKdy BnDeoKAmepoI n PIK.
B 3aBnCmOCTn OT KaueCTBa aHaIaROrOBo BnuDeocnHaJa, PIK MoXeT HePaBnBHo OTo6paXaTb KaDpbl NocSe Ipeo6pa3OBaHnB NbuOeKaMepoa HAnLOROBbIX BnuDeocnHaJOB B uNΦpOBbIe. B 3aBncMooCTn OT aHaIaROrBO RnuDeocYcPoiCTBa, n3o6paXeHne MoKet 6bTb paCnJIbBuYaTbIM nLI C HnPaBnBHO UBeTonepeDaYe.
Bndeokamepa He MoKet BbIaBaTb cnfoboon CnHaJ,ecn BxOHOH aHaIorOBb CNrHaN COePKN T CnHaJ dna 3aunTbAbTOPCKNX npab.
Recording video or TV programs
3a\Pncb BnDeo nJI TeJenporpamM
Using the A/V connecting cable
You can record a tape from another VCR or a TV program from a TV that has video音频 outputs. Use your camcorder as a recorder.
(1) Insert a blank tape (or a tape you want to record over) into your camcorder. If you want to record a tape from the VCR, insert a recorded tape into the VCR.
(2) Set the POWER switch to VCR on your camcorder.
(3) Set DISPLAY in ETC to LCD in the menu settings (p. 154).
(4) Press MENU to erase the menu display.
(5) Press REC and the button on its right simultaneously on your camcorder, then immediately press on your camcorder.
(6) Press on the VCR to start playback if you record a tape from a VCR. Select a TV program if you record from a TV. The picture from a TV or VCR appears on the LCD screen or in the viewfinder.
(7) Press on your camcorder at the scene from which you want to start recording.
UcnOJIb3OBAHnE CoeINHITeIbHOro Ka6eJyauDIO/BuDeO
Moxho BbINHnTb 3aINCb HaJeHTy C dpYrOro BNDeOMarHNTofoHa INI 3aNcTaB TeLEBn3IOHHU IOprpamMy C TeLEBn3Opa, KOtOpbl IMeET BnDeo/ayno BbIXoDbI. IVcNoIb3yIte BNDeOKaMepy B KaeeCTBe 3aNNCbBaOuero yCTpoiCTBa.
(1)BCTaBbTe YIcHTyIJeHTy (IINI JeHTy,Ha KOToTpYIO HxKHO BbINOHNHtB 3aNtCb)BVnDeOkaMepy.EcnI Heo6XoDMo CdeNaTb 3aNNCB C BNDeOMaHrHtTOcoHa,BCTaBbTe 3aNNCaHHyIO JeHTy B BNDeOMaHrHtTOcoOH.
(2)Установские на видаокамеpe nepeклоча teleportь POWER в положене VCR.
(3) YctaHOBInTe KOMaHdY DISPLAY B ETC B NOJIOXeHne LCD B yCTaHOBkax MeHIO (cTp. 154).
(4)Haxmnte KhoNky MENU ydaJIeHnIHdNkaun MeHIO.
(5)ОДНовременно нахмITE кноку RECи Кноку спраВа OT Hee Ha BИdeOKамеpe, 3aTeM CPA3Y нахмITE Kноку IIHa BИdeOKамepe.
(6)HaXMMTe KhoNky Ha BnDeomarHHTOFOHe dIra Hauana BOCnpo3BedeHnE,ecnn 3aInncb BbIOJHHETC C BnDEOMARHHTOFOHa. Bb6epnte TeLEBUNHOHNy IporpaMMy, ecnn 3aINcB bblONJIHETcC TteEBN3Opa. N3o6paxHeC c TeLEBUNOPaNN BnDEOMARHTOFOHa NOBHTcHa 3KpaHe KKД nII B VbDOnCKaTene.
(7)Haxmnte KhONky Ha BnDeokamepeBTOM MeCTe, C KOtOpORo HxXHO HaaTb3aINCb.
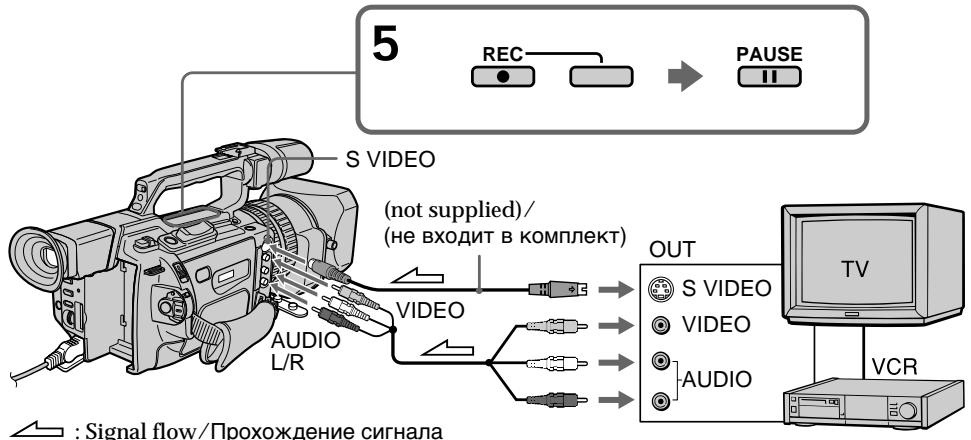
When you have finished recording
Press on both your camcorder and the VCR.
Using the Remote Commander
In step 5, press REC and MARK simultaneously, then immediately press. And in step 7, press at the scene from which you want to start recording.
If your VCR is a monaural type
Connect the yellow plug of the A/V connecting cable to the video output jack and the white plug to the audio output jack on the VCR or the TV. The red plugs are not used.
Connect using an S video cable (not supplied) to obtain high-quality pictures With this connection, you do not need to connect the yellow (video) plug of the A/V connecting cable.
Connect an S video cable (not supplied) to the S video jacks of both your camcorder and the VCR.
This connection produces higher quality DV format pictures.
If you do various playbacks on the VCR during recording
The recorded picture may be blurred.
On the commander mode
Your camcorder works in the commander mode, VTR 2. Commander modes 1, 2 and 3 are used to distinguish your camcorder from other Sony VCRs to avoid remote control misoperation. If you use another Sony VCR in the commander mode VTR 2, we recommend changing the commander mode or covering the sensor of the VCR with black paper.
On index signal
The index is automatically marked on a tape when you start recording. If you mark the index using the INDEX MARK button during recording, "LINE" appears in the CH column on the INDEX SEARCH screen, and the index is recorded on cassette memory.
3a nscb Bndeo nIe TeJe nporpamM
Pocne 3aBepweHn3aHncn
HaxMMTe KhoNky Ha BnDeOkampe n Ha BnDeOMarHHTOfoHe.
IcnoJb3OBAHne npJbTa ductaHUnOHnOro ynpabJeHn
B NyHKe 5 OJHObpeMeHHo HaxMnTe KhoNky REc n KhoNky MARK,3aTEM cpa3y HaxMnTe KhoNky I.B nyHKe 7 HaxMnTe KhoNky B Tom MecTe, C KOtOporo HyXHo Haayatb 3aIncb.
EcIn BndeomarHnToΦOH MOHOHnueckoro Tnna
IoiKJIOUHTe JeNTbIy IwTekep COeINHITBeHOrO KaBEna ayDnO/BuJeO K BbIXoHOMy rHe3dY BuNDeOCrHnA, a 6bEnbI yIwTekeP K BixoHOMy rHe3dY ayDnOCrHnA hBa NlEoMaHrHtOcFOHe nLi TeBEN3ope. KpacHbIe wTekepb He nCnONb3yOTcR.
CoéiHHeHne C nOMOusbIO BVNeOka6eJIaS (He BXoIbT B KOMnJIeKT) dJIr NOLyUeHnB BBICOKOKaueCTBeHHbIX N3O6paJxehn
Ipi TaKOM CoeINHeHn He HUxHo
NoDKIIOuATb XeNTbI (BvDeo) WTeKepe
CoEINHTeNbHO Ka6eNa ayDmo/BVdeo.
PiOnCoeINHtBe BVdeOka6eJIb S (He BXoNt B
KOMPJIeKT) K BVDeOrHe3dAm S Ha
BVdeOKaMepe N BVdeOMaHnTOfoHe.
3To CoeINHeHne No3BOJNeT NOJyUHTb
BbICOKKaueCTBeHHoe N3O6paXeHne
fOpMaTa DV.
EcIn BO Bpem 3aIncn Ha BVideomarHHTOfoHe BOCPpon3BOaTcpa3NlUHbIe 3nn3OdbI
3aIINcIbAeMOe I3O6paXeHHe MOKeT 6bITb Hepe3KIM.
O pexnme npnbTa dncTaHcnoHnHoro ynpablenia
3Ta BnDeOkamepa pa6oTaetB pexmme
nyIbTa DnCTaHnOHHoro ynpabLeHnVTR2.
Pexmbl nyIbTa DnCTaHnOHHoro
ynpaBHeN1,2 3 NcNoIb3yIOcTc dIa
OTNIuHa DaHHOB BnDEOkAmepebl OT dpYrXs
BnDEomarHnTOpOHOB cInpMb SOny BO
n36eKaHne HnPaBnIbHO np60tbl npIbTa
DnCTaHnOHHoro ynpabLeHnE. Ecn
nCNoIb3yeTc DpyRo BnDEOMarHnTOpOH
fnpMb SOny,pa6oTaUoUsn B pexmVe VTR2,
peKomeHdyeTcra N3MeHNb TpeXm PnlbTa
DnCTaHnOHHo r ynpABnE Hn 3aKpbITb
DaTChk DnCTaHnOHHoro ynpabHeN
BnDEomarHnTOpOHa YepHO bymarOI.
06 nHdEChOM cnHaJe
CnHnIHNeKCHoM TeKn 3aNcBbAeTc
cpa3y nocne hauana 3annci. Ecnn INHeKCha
METKa 3aNcBbAeTC C NOMOuBo KHONKn
INDEX MARK BO BpeMa 3annci, B cToIbce
CH Ha 3kpaHe INDEX SEARCH IoraBlaerTc
INHnKaaJr "LINE", INHnDeKCha MeTa
3aNcBbAeTc B KaccTeHyIO NaMrtb.
Using an i.LINK cable (DV connecting cable)
Simply connect the i.LINK cable (DV connecting cable) (not supplied) to DV IN/OUT and to DV IN/OUT of the DV products. With digital-to-digital connection, video and audio signals are transmitted in digital form for high-quality editing.
(1) Insert a blank tape (or a tape you want to record over) into your camcorder, and insert the recorded tape into the VCR.
(2) Set the POWER switch to VCR on your camcorder.
(3) Set DISPLAY in ETC to LCD in the menu settings (p. 154).
(4) Press MENU to erase the menu display.
(5) Press REC and the button on its right simultaneously on your camcorder, then immediately press on your camcorder.
(6) Press on the VCR to start playback. The picture to be recorded appears on the LCD screen or in the viewfinder.
(7) Press on your camcorder at the scene from which you want to start recording.
IcnoJIb3OBAHnE Ka6eIa.LINK (coeHNHTeBHy I Ka6eIb DV)
ПрocTo noCoeHnHTe Ka6eJIb i.LINK (coeHnHTeBHy K6eJIb DV) (He BXoIIT B KOMPNeKT) K rHe3dY Dv IN/OUT n rHe3dy DV IN/OUT annapaTob DV. ПпиФрOBOM coeHnHn BVJeO- n ayDnOciHaJIb nepeDaIOCTB uCnФрOBm BInDe, qTO obecneuHbaet BbICOKoe KaYeCTBO MOHTaKa.
(1)BcTaBbTe He3aIncaHnyIeHTy (nnI neHTy,Ha KOTOpYIO HxKHO BblIOJIHNITb 3aIncb) B BnDeOkaMepy,a 3aIncaHHyo IeHTy-B BnDEOMarHntofoH.
(2)Установские на видаокамеpe nepeклоча teleportь POWER в положене VCR.
(3) YctaHOBInTe KOMaHdY DISPLAY B ETC B NOJoxKeHne LCD B yCTaHOBkax MeHIO (cTp. 154).
(4)Haxmnte KhoNky MENU ydaJIeHnIHdNkaun MeHIO.
(5)ОДНовременно нахмITE кноку RECи Кноку спраВа OT Hee Ha BИdeOKамеpe, 3aTeM CPA3Y нахмITE Kноку IIHa BИdeOKамepe.
(6)HaXMMTe KHOJKy Ha BVNeOaMgHnTOΦOHe dIy HauJaB AOCpOn3BeDeHn. 3aIncbIbAeMoE n3o6paXKeHne IONBUTcHa 3KpaHe KKД NIN B BVDoONCKaTeIe.
(7)Haxmnte KhoNky Ha BndeokamepeBTOM MeCTe, C KOtOpOro HxKHO HaaTaB3aINCb.
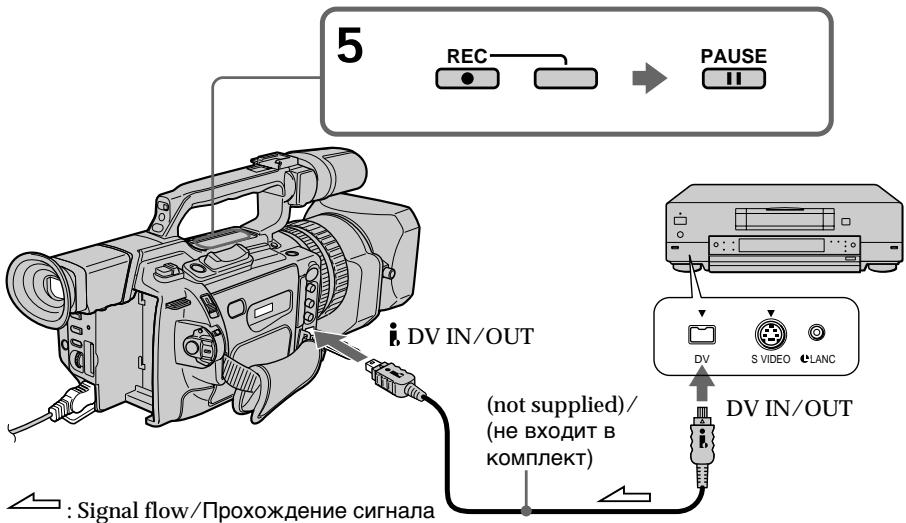
Recording video or TV programs
When you have finished recording
Press on both your camcorder and the VCR.
Using the Remote Commander
In step 5, press REC and MARK simultaneously, then immediately press. And in step 7, press at the scene from which you want to start recording.
You can connect only one VCR using the i.LINK cable (DV connecting cable)
When you dub a picture in digital form The colour of the display may be uneven. However this does not affect the dubbed picture.
If you record a still picture in playback pause mode via the . DV IN/OUT jack
The recorded picture becomes rough. And when you play back the picture using your camcorder, the picture may jitter.
Before recording
Press DISPLAY and make sure that the DV IN indicator appears on the LCD screen or in the viewfinder. The DV IN indicator may appear on both pieces of equipment.
On the commander mode
Your camcorder works in the commander mode, VTR 2. Commander modes 1, 2 and 3 are used to distinguish your camcorder from other Sony VCRs to avoid remote control misoperation. If you use another Sony VCR in the commander mode VTR 2, we recommend changing the commander mode or covering the sensor of the VCR with black paper.
3a nscb Bndeo nn TeJe nporpamM
Pocne 3aBepweHn3aHncn
HaxMMTe KhoNky Ha BnDeOkampe n Ha BnDeOMarHHTofoHe.
IcnoJb3OBAHne npJbTa dNCTaHcUHOHHoro ynpabJIeHnA
BnyHKTe 5 oNHObpeMeHnHaXmnte KhONKy
REC n KhoNky MARK, 3aTeM cpa3y haxMnTE KhoNky II. B nyHKeT e 7 haxMnTe KhoNky III B TOM MecTe, C KOtOpOro HxKHO Haayt b 3aIINCb.
C nomoubIO ka6eIa.LINK (coeINHTeJIbHOro ka6eIa DV) MoXHO IOdCOeINHTb TOJIbKO Odn H BnDEOMarHtOΦOH
Pnpe3anncn 306paXeHnB CnΦpOBOM Bide
LBeT n3o6paxeHnHa nDcNllee MoKeT 6bItb HeoDnHOpOdHbIM. OHaKo 3TO He BnIeT Ha KaueCTBO nepe3aNNcbIAemOro n3o6paxeHn.
Pp3aHcN HeNoBnXHoRo 13o6paXeHHa BpeXMe nay3bI BocpnOn3BeDeHHaYepe3 rHe3do DV IN/OUT
3aanncblaBaemoe n3o6paXeHne 6ydet HeueTKIM. PnBBOcnpOn3BeDeHn HnOdBnXHO n3o6paXeHnHa daHHo BnDEOKaMepe OHO MoKet IpOkaTb.
Ipeep 3aanncbio
HaKmTe KhoNky DISPLAY u y6eDntecb, YTO Ha 3kpaHe XKД nIи B BuOnckaTeNe NOBnCn rHnDnKaTOp DV IN. HnDnKaTOp DV IN MoKeT NoBnTbcr Ha oBx yCTpoCTbax.
O pexnme npylbTa dncTaNCHNOHORO ynpabJIeHnI
3Ta BnDeOkamepa pa60taetB pexIme
nylbTa DnCTaHcOnOHHO ynpabLeHnVTR2.
PexIMbI npbTa DnCTaHcOnOHHO
ynpaBHeHn1,2i3NcNoJIb3yIOCTcDnI
OTJNUHn DaHHoB BnDEOKaMePbI OT dpYrNX
BnDEOMarHnTOfoHOB CnPbM SoNy BO
n36ExKaHne HnPaBnIbHo n pa60Tb IyIbTa
DnCTaHcOnOHOr ynpabLeHn.Ecnn
NCNoJIb3yeTc DpyroB BnDEOMarHnTOfoH
CnPbM SoNy,pa6OtaIoH n BpEXmE VTR2,
peKOMeHNyETcN3MeHHTb PexkM NylbTa
DnCTaHcOnOHOro ynpabHeHn INI 3akpbITb
DaTtIK DnCTaHcOnOHOro ynpabHeHn
BnDEOMarHnTOfoHa CheHNO 6ymarO.
Inserting a scene from a VCR - Insert editing
BcTaBka 3ПИЗОДa C BnIeOMaRGHnTOΦOHa - MoHTaX BcTaBKn
You can insert a new scene from a VCR onto your originally recorded tape by specifying the insert start and end points. Use the Remote Commander for this operation. Connections are the same as on page 105 or 126. Insert a cassette containing the desired scene into the VCR.
Moxho BCTaBHTb HObIy 3n3oD C
BnuDeomarHNTOfoHa Ha yJxE 3aNcAHHyIO
JIeHTy, yKa3aB MeCTa erO hauana I
OKOHuaHry. DnIy 3ToI onepaunu nCNoB3yIte
nybT dNCTaHUnHO rYnpaBHeHry. DaHbIe
CoedHHeHry aHaIOnuHbI OINcaHHbIM Ha cTp.
105 uIn 126.
BCTabTe Kaccety C Heo6xoDMbIM 3n3oDM
BVnuDeomarHNTOfoH.
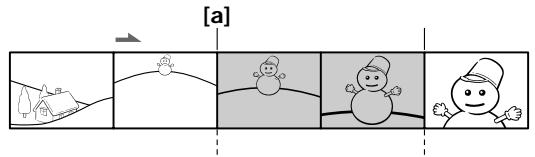
[A]
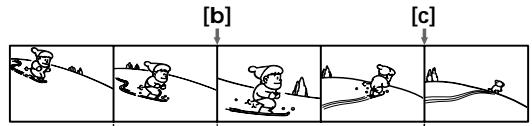
[B]
[C]
[A]:The tape that contains the scene to be superimposed
[B]: The tape to be edited
[C]: The tape after editing
[A]:ЛeHTa, coepeKaaJЯ 3ПИЗODДЯнlaIOXKeHnI
[B]:ЛeHTaДЯ MOrTaJa
[C]:ЛeHTa nOcNe MOHTaXa
Inserting a scene from a VCR - Insert editing
Bctabka 3nn3oJa c BndeomarHHTOfoHa - MoTax BCTabKn
(1) Set the POWER switch to VCR on your camcorder.
(2) On the VCR, locate a point just before the insert start point [a], then press to set the VCR to the playback pause mode.
(3) On your camcorder, locate the insert end point [c] by pressing or . Then press to set it to the playback pause mode.
(4) Press ZERO SET MEMORY on the Remote Commander. The ZERO SET MEMORY indicator flashes and the end point of the insert is stored in memory. The tape counter shows "0:00:00." If the tape counter does not appear, press DISPLAY.
(5) On your camcorder, locate the insert start point [b] by pressing , then press REC and the button on its right simultaneously, then immediately press on your camcorder.
(6) First press on the VCR, and after a few seconds press on your camcorder to start inserting the new scene. Inserting automatically stops near the zero point on the tape counter. Your camcorder automatically returns to the recording pause mode.
(1)Установские на вида ekамеpe nepeклочатуль POWER в пооженке VCR.
(2)Ha BnDeomarHHTOPOHe HaNITe MeCTO, rIe 6yET BCTaBJIeH 3IN3oJ [a], 3aTEM HaxMITE KHOKNy I I JI yCTaHOBKn BnDEOMaHHTOFOHa B pexm Nay3bl BOCnPOn3BeJeHn.
(3)Ha BnIeOKaMepe HaIITe KOHeu BCTabJIeMOrO 3IN3OJa [c], HaxKaB KHOKNy I INI N. 3aTeM HaxMITE KHOKNy I I Jy UcTaHOBKn ee B peXIM nay3bl BOCnpoN3BeDeHnY.
(4)HaxmTe KhONky ZERO SET MEMORY Ha
IyIbTe IINCTaHUNOHOr ynpabLeHH.
HdNkaTOp ZERO SET MEMORY NaHET
MraTb, a MecTO OKOHuaHH BCTaBKN
6yDet COxpaHeHO B nAmrTn. Noka3aHne
cuetuKa cTaHET paBbIM "0:00:00". EcIn
cuetuK He NoRbTcA, HaxmTe KhONky
DISPLAY.
(5)Ha BnIeOKaMepe HaIIMTe MeTo HaaIana BCTaBnIeMOrO 3nI3oJa [b], HaxKaB KHOInKy , 3aTeM OndOBpeMeHNO HaxMITE KHOInKy REC n KHOInKy cnpaba oT Hee i Cpa3y HaxMITE KHOInKy HA BnIeOKaMepe.
(6)СачалнанжмITEКНИКУHa BnDEOMaHHTOfoHe N,CNYCTHa HECKoJIbKOceKHyD,KNHcyIHaBnDEOKaMepeДЯнhaJaNA BCTaBKn HOBOc Czehbl. BcTaBka OCTaHOBITcA bTOMaTHueCKN BMeTe HnyeBoi OTMETK ChetYnKa.BnDEOKaMepa aBTOMaTHueCKN BepHecrBa pexm nay3by 3aInncn.
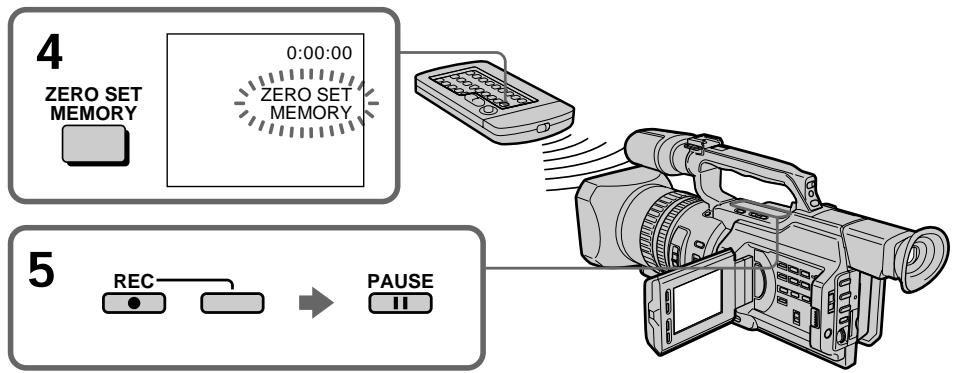
Inserting a scene from a VCR - Insert editing
To change the insert end point
Press ZERO SET MEMORY on the Remote Commander again after step 5 to erase the ZERO SET MEMORY indicator and begin from step 3.
Using the Remote Commander
In step 5, press REC and MARK simultaneously, then immediately press. And in step 6, press at the scene from which you want to start recording.
Note
The picture and sound recorded on the portion between the insert start and end points will be erased when you insert the new scene.
If you insert scenes on the tape recorded with an other camcorder (including an other DCR-VX2000E)
The picture and sound may be distorted. We recommend that you insert scenes on a tape recorded with your camcorder.
When the inserted picture is played back The picture and sound may be distorted at t end of the inserted portion. This is not a malfunction.
The picture and sound at the start point and the end point may be distorted in the LP mode.
To insert a scene without setting the insert end point
Skip steps 3 and 4. Press when you want to stop inserting.
BCTaBka 3nH3Oda c BnDEomarHnToΦoHa - MoTax BCTaBKn
ДлЯИЗмehнЯ Mecta OKOHuaHnBCTaBKn
N306paxeHne H3ByK, 3aIncaHHbIe Ha JIeHTe MExkU MeCTaMn Hauana N OKOHuaHIN BCTaBKn, 6yDyT CTePtbI npN BCTaBKe HOBOrO 3NtzoJa.
PnB BCTaBKe 3nH3oOB Ha JeHTy, 3aHcAHHyU Ha dpyroB BnDeokampe (BkIIOuA npryU kamepy DCR-VX2000E)
N3o6paXeHne N3ByK MOrY T NcKaXaTbCra. PeKOMeHnyETcBCTaBnTb 3NIN3OdbHaJeHTy,3aIncaHHyO C NOMOuBHO daHHoB BNuDeOKaMepbI.
PnBocpnOn3BeHn BCTaJIeHHOro n36paXeHn
You can record an audio sound to add to the original sound on a tape by connecting audio equipment or a microphone. If you connect audio equipment, you can add sound to your recorded tape by specifying the starting and ending points. The original sound will not be erased. You can also use the Remote Commander for this operation.
Connecting the microphone with the MIC jack
Aydnopepe3a\Pncb
BbMOKTe3aINcSbIbTa b ayDIOOCrHAn B
DOONHHeNKe K nepBOHaJbHOMy 3ByKy Ha
JIeHTe, POcOeDNHB aayDIOaNNapaTyu nn
MMKPOpOH. Ecnn POcOeDNHeNA
ayDIOaNNapaTyPA, TO MOxHO Do6aBNb 3ByK
Ha 3aINcAHHUo HENTy, Yka3aB MeCTa NaHana
n OKOHaHN. IepBOHaJcNbHbM 3ByK npn
3TOM He 6yDeT cTePT. DnA 3ToI Opeaun
MOXHO TaKxe NcNOJb3OBaTb NylbT
dNCTaHcNHOHOrO ynpabNeHN.
You can check the picture on TV by connecting with the video jack. You cannot monitor the additional sound by the speaker. Use the headphone jack.
Connecting the audio equipment with the MIC jack
IopdoeHHeHne ayDnOannapaTpybI c NOMOuIO rHe3da MIC

Signal flow/ PpoxoJdeHne cunHaJa
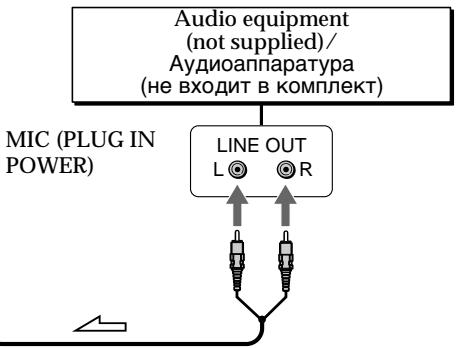
Connecting the microphone with the intelligent accessory shoe
We recommend that you use the gun microphone. If the microphone can select the zoom microphone type, set it to the gun microphone position./ Pekomehdyetcncnolb30BaTb HanpaBHeHbMnKpOfoh. EcnI dIa MmKpOfoHa MoXHO Bb6paTb TnI 3ymMnKpOfoHa, yCTaHOBHTe erO B IIOJKeHne HappaBHeHHoro MmKpOfoHa.
Dubbing with the AUDIO L/R jacks
Ppe3aIncb c nOMOu rHe3da AUDIO L/R
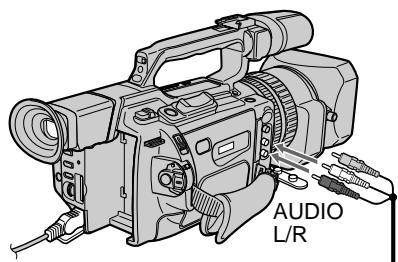

: Signal flow/
PpoxoXdHne cHana
Audio equipment (not supplied)/ AydnoaannapaTya (He BXOJNT B KOMJIeKT)
AUDIO L
LINE OUT
L
R
AUDIO R
Do not connect the video (yellow) plug. / He noDcoeDnHnTe BnDeo (XeIbI) uTekep.
Dubbing with the supplied microphone
No connection is necessary.
Notes
- When dubbing with the built-in microphone or an external one, you can check the recorded picture on the LCD screen, in the viewfinder, or on the screen of equipment connected with the VIDEO jack, and you can check the recorded sound by using headphones.
- When dubbing with the AUDIO L/R jacks, you can check the recorded picture on the LCD screen or in the viewfinder, and you can check the recorded sound by using a headphones.
- You can check both the original sound and new sound that will be dubbed, with headphones.
- You can adjust the balance of the new sound and original sound using AUDIO MIX in the menu settings. You can monitor the sound using headphones during audio dubbing.
Ipee3aHcB c nomoCbIO npilaraemoro mKpOfoHa
HnkaKeIpoIcOeIINHeNHa He Tpe6yIOTcA.
PpIMeuaHn
-Пиpe3aHcNcIcNoIb3OBAHnEM BCTpoeHHOro IINBHEuHrO MInKpOΦHa MoXHO pOBepaTb 3aNNCbIbAemoe N3o6paXeHne Ha 3KpaHe XKД,В BnDOnCKaTeNe IINHa 3KpaHe anNaPaTypbI, NODKnUChHcNc NOMOUsbI rHe3da VIDEO, a TAKKe 3aNNCbIbAembl 3Byk, INCNoJIb3yra TOnOBHbIe TelefoHbl.
- Пи перазимс с поюгизд AUDIO L/R можно поверять заюваемoe n3образенье на захал XXД ил в BИДОИСКАТЕ,а тakxe заюваемы 3BYK C NOMOцьЮ ГOLВьIX TELEФОHOB.
- KaK nepBOHaJbHbI 3ByK, TaK IHOBbI 3ByK, KOToPbI 6yDeT 3aIncAH, MOxHO npOBepaTb C NOMOuHIO rONOBhIX TeJeFOHOB.
- Moxho OTperyIinpoBaTb 6aIaHc HOBoro 3ByKa n IepBOHaayalbHOrO 3ByKa nyTeM Bbl6opa yCTaHOBKn AUDIO MIX BV yCTaHOBkax MeHIO. Bbl MoKeTe KOHTPOJIInpoBaTb 3ByK BO BPemr ayDnOnepe3aIncn C NOMOuBo rOJOBhIx TelefoHOB.
Adding an audio sound on a recorded tape
(1) Insert the recorded tape into your camcorder.
(2) Set the POWER switch to VCR on your camcorder.
(3)Locate the recording start point by pressing. Then press at the point where you want to start recording to set your camcorder to the playback pause mode.
(4) Press AUDIO DUB. The green indicator appears on the LCD screen or in the viewfinder.
(5) Press I and start playing back the audio you want to record at the same time. The new sound is recorded in stereo 2 (ST2) during playback.
(6) Press at the point where you want to stop recording.
Aydnopepe3anncb
Добavenhoe 3ByKOBOrO cnHanaHa 3aIncanHyo JeHTy
(1)BCTaBbTe 3aIncaHHyo JENTy B BnJeOKaMepy.
(2)Установские на видаокамеpeпеклоча teleportь POWERВ пооженец VCR.
(3)HaIInTe MeTo HaaJa 3aIncH,HaXIma KHOINKy▶.3aTEM HxMITE KHOINKY B TOM MecTe,Γe HuxHo HaaTb 3aIncB,ДЯ yCTaHOBKn BnDEOKamepbI B pexm nay3bl BOCnpon3BeDeHnJ.
(4)Haxmnte KhoNky AUDIO DUB. 3eHeBn INdKaTOp IIOBNTcHa 3KpaHe KKДиIN B VbDOnckaTeNe.
(5)HaXMMTe KHOJNky I N OJHOBpEmeHHo NaHnTe BOCPON3BeDeHne 3ByKa, KOtOpbI HxKHO 3aIncaTb. HoBbI 3ByK 6yDcT 3aIncanB pexmE cTepeo 2 (ST2) BO Bpemr BOCPON3BeDeHna.
(6)HaxmTe KhoNky B TOM MecTe, THe HxKHO 3aKoHUnTb 3aIINCb.
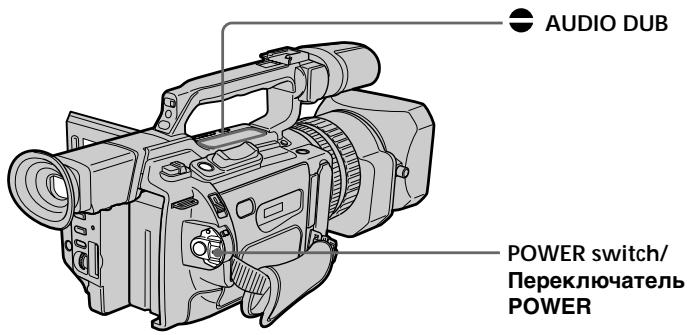
Monitoring the new recorded sound
To play back the sound
Adjust the balance between the original sound (ST1) and the new sound (ST2) by selecting AUDIO MIX in the menu settings (p. 154).
KoHTpoJIb HOBOrO 3aIncaHHoro 3ByKa
Длвocрpon3BedeHn8 3Byka
OtpereynipnyTe 6aHaHc MeKdy nepBOHaayIbHbIM 3BykOM (ST1) HOBbIM 3BykOM (ST2), BbI6paB KOMaHdY AUDIO MIX BV yctaHOBkax MeHIO (cTp. 154).
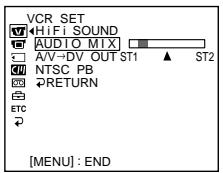
If you wait five minutes after you disconnect the power source or remove the battery pack, the setting of AUDIO MIX returns to the original sound (ST1) only. The default setting is for original sound only.
Notes
- New sound cannot be recorded on a tape already recorded in the 16-bit mode (p. 159).
- New sound cannot be recorded on a tape already recorded in the LP mode.
- You cannot add audio with the DVI/OUT jack.
If you make all the connections
The audio input to be recorded will take precedence over others in the following order.
- MIC (PLUG IN POWER) jack
- Intelligent accessory shoe
- AUDIO L/R jackets
Built-in microphone
If an i.LINK cable (DV connecting cable) (not supplied) is connected to your camcorder You cannot add sound to a recorded tape.
Yepe3 pIb MInHyT nOcNe OTCoeDInHeHn ICTOCHNka PITaHnI NII CNHTN 6aTapeHOrO 6Ioka yCTaHOBKa AUDIO MIX BepHcTcK nepBOHaJbHOMy 3ByKy (ST1). YcTaHOBKa no YMOLUaHHIO pPeJHa3HaueHa ToJIbKO dIpy nepBOHaJbHOrO 3ByKa.
Примеанья
- HOBBI 3BYK HeIb3a 3aIncatb Ha IeHTy, 3aIncahHyB 16-6ntobom pexkime (cTp. 165).
- HoBbI 3ByK He MoXeT 6bITb 3aIncAH HaJIeHTy, yXe 3aIncAHHyO B pexIme LP.
- HeIb3a IIO6aBnTb 3Byk Upe3 rHe3do , DV IN/OUT.
EcnBbI BbInonHnJI Bce noDcoeHHeHn
3aIncbIbAembBxOJHO BnHJI 6yJeT NMeTb npOpNTeT Ha,IpyrMMn CnHAnAmn B cJeDyUoSe IocJeDoBaTeJbHOCTN.
ΓHe3IO MIC (PLUG IN POWER)
Держателдя BCNOMORATeIbHbIX npHaIaIeXHOCTeI
- ΤHe3da AUDIO L/R
- BCTpoeHHbI MmKpOΦOH
EcIn K BnDeokamepe noOpcoeHHeKa6eIb i.LINK (coeHNHTeJIbHbI Ka6eIbDV) (He BXoIHT B KOMPJIeKT)
HeIb3a IobabNTb 3ByK Ha 3ancaHHyIO JENTy.
If you set the write-protect tab of the tape to lock
You cannot record on the tape. Slide the write-protect tab to release the write protection.
We recommend that you add new sound on a tape recorded with your camcorder If you add new sound on a tape recorded with another camcorder (including an other DCR-VX2000E), the sound quality may deteriorate.
To add new sound more precisely Press ZERO SET MEMORY on the Remote Commander at the point where you want to stop recording later in playback mode. Then, follow the procedure from step 3. Recording automatically stops at the point where ZERO SET MEMORY was pressed.
On blank portions
You cannot add an audio.
You can adjust the recording level manually using the recording adjustment display in the following cases:
- Dubbing with an optional external microphone or audio equipment through the MIC jack
- Dubbing with an optional external microphone installed into the intelligent accessory shoe
- Dubbing with the internal microphone
Aydnopepe3anncb
EcIn 3aunTHbIJIeNcTOK yCTaHOBJIeH B NOJIOXKeHne 3aunTbI OT 3aINCn
HeIb3aIncBbAtbHaJIeHTy.IpeEdbHbTe IeNEcTOK 3aUNTbIOT3aIncnIgN OTKIOUeHn3aUNTbl.
PeKOMeHnyeTcI Do6aBJIaTb HObBi 3ByK HaJeHTy,3aIncaHHyIO C NOMOJIbIO DaHHoB BnDEOKamepbI
Superimposing a title

If you use a tape with cassette memory, you can superimpose the title while recording or after recording. When you play back the tape, the title is displayed for five seconds from the point where you superimposed it.
You can select one of eight preset titles and two custom titles (p. 147).
HanoxeHne TnTpa

EcIn BbI nCnObl3yeTe IeHTy c KaccetHNoI NaMrtBIO, BbI MoKTe BbINOJIHTb HANOKeHne TITpa BO BpeM 3aIncN nnI NOcNE 3aIncN. EcIn BbI BocPon3BOJnte IeHTy, TITp 6byET OTo6paKaTbcB TeueHne IaTIc KeYHc C TORO MecTa, rDe BbI HANOKnIIN erO.
BbMOKeTe BbIbpaTb OINH N3 BOcBMn
PpeBaPnteJIbHO yCTaHOBJIeHHbIX TITPOB IN
DByX Co6CTBeHHbIX TITPOB (Ctp.147).

You can also select the colour, size and position of titles./
BbMOKTe TaKxBe BbIbnpaTb CBET, pa3Mep I NOLOXeHne TITpOB.
(1) Press TITLE to display the title menu in standby, recording, playback, or playback pause mode.
(2) Turn the SEL/PUSH EXEC dial to select , then press the dial.
(3) Turn the SEL/PUSH EXEC dial to select the desired title, then press the dial. The title flashes.
(4) Change the colour, size, or position, if necessary.
① Turn the SEL/PUSH EXEC dial to select the COLOUR, SIZE, or POSITION, then press the dial. The item appears.
② Turn the SEL/PUSH EXEC dial to select the desired item, then press the dial.
③ Repeat steps 1 and 2 until the title is laid out as desired.
(5) Press the SEL/PUSH EXEC dial again to complete the setting.
In playback, playback pause, or recording mode:
The "TITLE SAVE" indicator appears on the screen for five seconds and the title is set.
In standby mode:
The "TITLE" indicator appears. When you press START/STOP to start recording,
"TITLE SAVE" appears on the screen for five seconds and the title is set.
(1)HaXMMTe KHONky TITLE dIy OTO6paXeHNMeHIO TITPOB B pEXKIMe OXuJaHN,3aINcN, BOCpON3BeDeHN INI Nay3bIBOCpON3BeDeHN.
(2)Повернite ДИСК SEL/PUSH EXEC ДЛЯ ВИБОпа установский, a 3aTeM нахмITE НАДИСК.
(3)ПовернITE диСК SEL/PUSH EXEC ДЯ
Быбopa hyжHorO тИТра, a 3aTeM habKMITE
На диСК. ТИТр начЕт мигать.
(4)Измени Teцет,размер Или положенп.TNTpa,eclin HxKHO.
B pexme Bocnpoun3BeJeHn, nay3bl Bocnpoun3BeJeHn n 3aIncN:
B TeueHne nIaTn CeKyHd Ha 3KpaHe NOBiTcN HnDnKaTOp "TITLE SAVE", uYctaHOBka TITpa 6yJed 3aBepSeHa.
B pexnme oXnidaHna:
If you set the write-protect tab to lock
You cannot superimpose or erase the title.
Slide the write-protect tab to release the write protection.
To use a custom title
If you want to use the custom title, select in step 2.
If the tape has a blank portion
You cannot superimpose a title on that portion.
If the tape has a blank portion in the middle of the recorded parts
The title may not be displayed correctly.
EcIn 3aunTHbI JIeNcTOK yCTaHOBJeH B NOJIOXKeHne 3aunTbI OT 3aINCn
BbHe CMOXeTe BbIOJHnTb HANOXeHne NIN CTnpaHne TnTp.apeDbNbTe JIeNecToK 3aunTbOT 3aInc DN OTKJIouChENr 3aunTbI.
ДиMCNoJIb3OBAHnCObCTBeHHOro TNtPa
EcnHyXHOHCIOB3OBAbTcO6CTBeHHbI TnTp, BbIbepnte BpyHKTe 2.
EcIn Ha JeHTe IMeETcR He3aIncAHbI yUaCTOK
B 3TOM yuactke haoxhe TnTpah BO3MOXHO.
EcnHaJeHTe MmecTcHs3ancaHHbIyUyactOKMEXKdy3ancaHHbIMuYactAMN
Tntp MoKet OTo6paKaTaBcH HenpaBnIbHO.
The titles superimposed with your camcorder
- They are displayed only on the DV™ format video equipment with the index ttitle function.
- The point you superimposed the title may be detected as an index signal when searching a recording with other video equipment.
To not display titles
Set TITLE DSPL to OFF in the menu settings (p. 154).
Title setting
- The title colour changes as follows: WHITE YELLOW VIOLET RED CYAN GREEN BLUE
- The title size changes as follows:
SMALL LARGE
You cannot input more than 12 characters in LARGE size. - If you select the title size "SMALL," you have nine choices for the title position.
If you select the title size "LARGE," you have eight choices for the title position.
If the "FULL" mark appears
The cassette memory is full. If you erase the title, index data, date data, photo data, or cassette label in the cassette, you can then superimpose a title.
Tntpbl, haJIOXeHHbI c nOmoIbI BaIeBnDcEOKaMepbl
- OHI OTOBpaxaHTc TOnbKO Ha BnDeoannapaType fOpMaTa DV MinD c FyHKnei INHeKCHOrO HANOKeHrN TnTPOB.
- MecTo HanoXeHnI TITpa MoKeT 6bItb 6bHapUxKeHo IIO INHeKCHOMy CnHany npN PONCKe 3aPiNCi NOMOUsbO DpyrO BnDeoannapaTypbl.
Длг OTMeHbI OTo6paXeHnTtPoB
YcTaHOBnTe KOMaHny TITLE DSPL B noJooKeHne OFF b y cTaHOBkax MeHIO (Ctp. 154).
YctaHObKa TnTpA
- LBeT TnTpa N3MeHReTc CNeDyUOuIM o6pa3oM: WHITE (BEnbI) YELLOW (XeJIbI) VIOLET (ΦNIOJETOBbI) RED (KPACHbI) CYAN (FOnyBoI) GREEN (3EJIeHbI) BLUE (CINHIn)
- Pa3mep Tntpa n3MeHReTcra CneDyUOuMm
6bpa3oM:
SMALL (MAJIeHbKnI) LARGE
(BOJIbUOJ)
Прибобшом pa3мeper HeьзЯ Всети 6оле 12 симвов.
- Ecni Bb6paH "SMALL" (MaJIeHbKnI) pa3Mep TITpa, MoJxHO Bbl6paTb OINH n3 DeBAtN BapnaHTOB CmBBOJOB B N03uCNI TITpa.
EcIn Bb6paH "LARGE" (60JIbwoi) pa3Mep TnTpoB, MoXHO Bb6paTb OIN H N3 BOCBMN BapnaHTOB CmBOJOB B No3UNI NITpA.
EcJIN NOABJARETCNMBON "FULL"
KaccetHa namTb nepenonHeHa. Ecn Ha kaccTe cteptb TnTp, INHeKChbIe daHHble, INHOpMaunIO O daTe, DaHHbIe fOTo NnN KaccETHyIO mapKnIpOBky, TO nocIe 3TOro MOXHO CdeJaTb HANOKeHne TnTpA.
Erasing a title
(1) Set the POWER switch to VCR or CAMERA.
(2) Press MENU to display the menu.
(3) Turn the SEL/PUSH EXEC dial to select, then press the dial.
(4) Turn the SEL/PUSH EXEC dial to select TITLEERASE, then press the dial. The title erase display appears.
(5) Turn the SEL/PUSH EXEC dial to select the title you want to erase, then press the dial. The "ERASE OK?" indicator appears.
(6) Make sure the title is the one you want to erase, and turn the SEL/PUSH EXEC dial to select OK, then press the dial. "OK" changes to "EXECUTE."
(7) Press the SEL/PUSH EXEC dial. "ERASING" flashes for about two seconds and "COMPLETE" appears after erasing the title.
CTpapanHe TnTpa
(1)YcTaHOBInTe NepeKJIIOUaTeIb POWER B noJIOKeHne VCR uIN CAMERA.
(2)HaxmTe KhoNky MENU OTO6paXeHnMeHIO.
(3)ПовернITE ДИСК SEL/PUSH EXEC ДЯ
Выбopa установки, a за tem нажмITE
На ДИСК.
(4)ПовернITE диck SEL/PUSH EXEC ДЯ
Быбopa TITLE ERASE, a 3aTeM нажмITE
НдИСК.
ПовьNTСА ИДИКAZИС CTИРАИЗ TИТРА.
(5)ПовернITE диСEL/PUSH EXEC ДпьВыбoga тИТра, кOTOpь BыхOTITECTepeTb, a 3aTeM наЖМITE HaДИСК.ПовВITсЯ ИДИКаТОР "ERASE OK ?".
(6)Y6eIntecb,yTO 3TO IMeHNO TOT TnTp, KOtOpBb Bbl XOTnTe CtepeTb, INOBepHNTe DnCK SEL/PUSH EXEC nra BbIbopa KOMaHdbl OK,a 3aTEM hAKMnTe Ha nCK. INDnKaunr "OK" mMeHHTcHa INHnKauNHO "EXECUTE".
(7)HaKmTe HaДСК SEL/PUSH EXEC. Индакачи“ERASING" muraet npimepno Дe СeКУнды,И пос le CTираиТТТЯп NOВьЯETСЯ Индакачи“COMPLETE”.
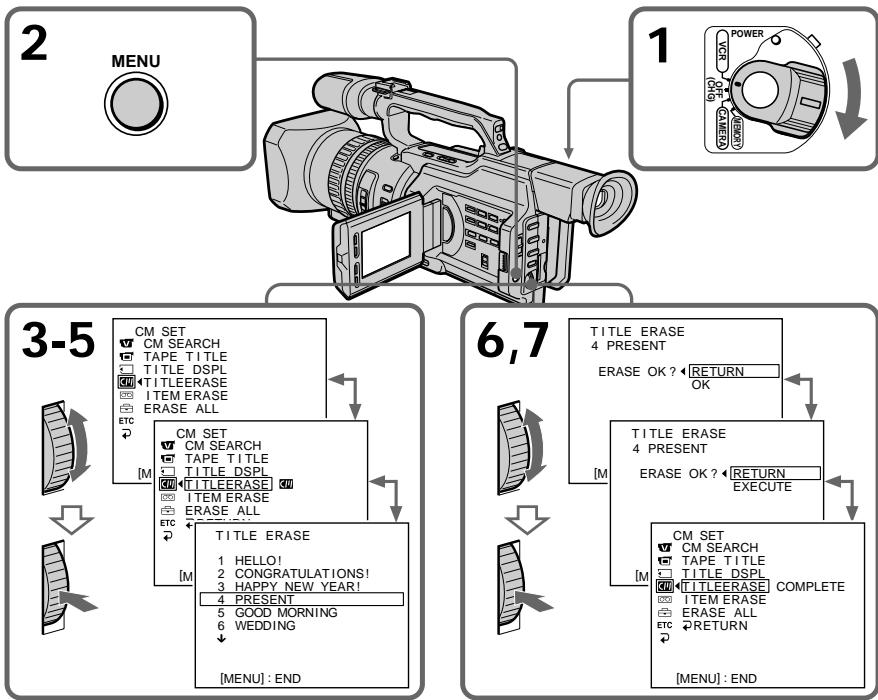
To cancel erasing
Select RETURN in step 6 or 7, then press the SEL/PUSH EXEC dial.
To erase all the titles
See "Erasing the cassette memory data" on page 151.
ДЯ OTMeHbI ydaJIeHnA
Bb6epTe RETURN B nyHKeTe 6 nn7,3aTeM haxmTe Ha nck SEL/PUSH EXEC.
Дяудалени BCex THTPOB
Cm. pa3dien "CTnpaHne daHHbIX nAMrTn Kaccetbl" Ha cTp. 151.
Making your own titles
CM only
You can make up to two titles and store them in cassette memory. Each title can have up to 20 characters.
(1) Press TITLE in the standby, playback, or playback pause mode.
(2) Turn the SEL/PUSH EXEC dial to select , then press the dial.
(3) Turn the SEL/PUSH EXEC dial to select CUSTOM1 SET or CUSTOM2 SET, then press the dial.
(4) Turn the SEL/PUSH EXEC dial to select the column of the desired character, then press the dial.
(5) Turn the SEL/PUSH EXEC dial to select the desired character, then press the dial.
(6) Repeat steps 4 and 5 until you have selected all characters and completed the title.
(7) To finish making your own titles, turn the SEL/PUSH EXEC dial to select [SET], then press the dial. The title is stored in memory.
(8) Press TITLE to erase the title menu display.
Co3dAnHe Baunx co6CTBeHHbIX THTPOB
CM only
Moxho co3daTb He 60nee DByx TnTPOB IN COXPAHNTb IN B KACCCTHOI NAMrN. KaKdbIu TnTp MOKeT CoepaTb do 20 CmMBJOB.
(1)HaKMMTe KhoNkY TITLE BpeXnme OxuDAHn,BOCPoIN3BEdEHnIi npy3bl BOCPoIN3BEdEHn.
(2)ПовернITE ДИСК SEL/PUSH EXEC ДИВьбора установский ,а за tem нахштЕп НдИСК.
(3)ПовернITE ДИСК SEL/PUSH EXEC ДЯ
Выбopa CUSTOM1 SET ИИ Custom2
SET, aЗтЕн НAZMЛТЕ на ДИСК.
(4)Поверн'te ДИСК SEL/PUSH EXEC ДпЯ
Выбopa КОLOнК И СУХьИМ CBMOЛOM, a
3aTeM НЖМИТЕ HAДСК.
(5)ПовернITE диСК SEL/PUSH EXEC ДЯ
Быбoga hyЖно сиMbОla,а 3aTeM
нжмITE на дИСК.
(6)Повторгийпунковы 4и 5doТex по, noka Bы He bblepeRte BCE cMBOJbI n NOHOCTbIO He COCTABnTE TnTP.
(7)ДлЯЗавершени COCTaBЛЕнERY CBOUX cO6CTBEHbIX TITPOB NOBEPHNTeДИС KSEL/PUSH EXEC Дпь Вьбopa КOMaHDbI [SET], a 3aTeM haxmITE HaДСК. TITp 6bydET COXPAHEN B nAMrTи.
(8)HaxmTe KhONky TITLE dIa CTnpAHIN HNDKauM MeHO TnTPOB.
1

PRESET TITLE
HELLO!
面
图12
HAPHYHOLIDAYS
CONGRATULATIONS!
OUR SWEET BABY
WEDDING
VACATION
THE END
2


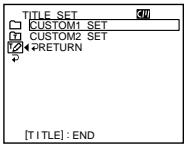
3

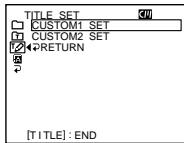

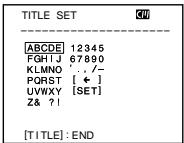
4-6
1

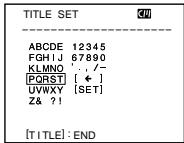
2

TITLE SET
ABCDE 12345
FGHIJ 67890
KLMNO 7
[PPRS] [←]
QWY 7821
2017
3

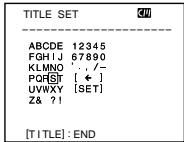
4

TITLE SET
S
ABCDE 12345
FGHIJ 67890
KLMNO
PQFST[←]
UVWXY
Z& ?!
To change a title you have stored
In step 3, select CUSTOM1 SET or CUSTOM2 SET, depending on which title you want to change, then press the SEL/PUSH EXEC dial. Turn the SEL/PUSH EXEC dial to select [<], then press the dial to delete the title. The last character is erased. Enter a new title as desired.
If you take five minutes or longer to enter characters in standby mode while a cassette is in your camcorder, the power automatically goes off
The characters you have entered remain stored in memory. Set the POWER switch to OFF (CHG) once and then follow the procedure from step 7 again.
We recommend setting the operation in playback or playback pause mode or removing the cassette so that your camcorder does not automatically turn off while you are entering title characters.
To erase a character
Turn the SEL/PUSH EXEC dial to select [ ] then press the dial. The last character is erased.
To enter a space
Select [Z& ?!], then select the blank part.
Co3dHnE Baunx co6CTBeHHbIX TnTPOB
IIN3MeHeHH COxpaHeHHoro B nAMrTnTtPa
B NyHKe 3 BbI6epnTe yctaHObky CUSTOM1 SET nIN CUSOM2 SET, B 3aBncmocntoT nTtpa, KOTOpB bBy XOTnTe N3MeHnB, a 3aTe m HaxMnTe nck SEL/PUSH EXEC. POBepnTe nck SEL/PUSH EXEC nJa BBbOpa yCTaHObKn [<], 3aTe m HaxMnTe Ha nck dnydaJIeHN TnTpA. IocneJdNc CMBOB 6yJeT cTept. BBeDnTe HObB hYxHbI TnTp.
EcInBpeKIMeOxHuaHnBA BBOc CmBOLOB3aHMaetPbIbNJI6oJeEMHyT,KOrdaKaCCetaHaxOuNTcB BVdEOKaMepe,HTaHHeABTomatUyecknOTKJIHOaETcR
CmBBoJIb, KOtOpblc Bbl BBEnI, CoXpaHATcB namrtn BuJeokAmepbl. YcTaHOBnTe nepeKluOaTeJb POWER B noLoXeHne OFF (CHG), a 3aTeM ChOBa BblOnHnTe npOceDpy n3 nyHKta 7.
PekomeHnyeTcYcTaHOBnTbpeXIM BOCpOIN3BeDeHnI INI NaY3bl BOCpOIN3BeDeHnI INI IN3BLey KaCCeTy, YTO6bl BInDEOKaMepa ABToMaTnueCKn He BbIKIOUqAJaCb BO BPeM BABoDa CmBOJIOB TITPOB.
Длг STираннсИМВОЛа
Повернite ДИСК SEL/PUSH EXEC ДЯ Быбopa установки [←], a 3aTeM habKMITE ha ДИСК. Последни симьг ol BydET CTePT.
Длвьда npobena
Bb6epnte [Z& ?!], 3aTeM Bb6epnte ncyTio yactb.

If you use a tape with cassette memory, you can label a cassette. The label can consist of up to 10 characters and is
stored in cassette memory. When you insert the labelled cassette and set the POWER switch to VCR, CAMERA, or MEMORY, the label is displayed for about five seconds.
(1) Insert the cassette you want to label.
(2) Set the POWER switch to VCR or CAMERA.
(3) Press MENU to display the menu.
(4) Turn the SEL/PUSH EXEC dial to select, then press the dial.
(5) Turn the SEL/PUSH EXEC dial to select TAPE TITLE, then press the dial. The tape title display appears.
(6) Turn the SEL/PUSH EXEC dial to select the column of the desired character, then press the dial.
(7) Turn the SEL/PUSH EXEC dial to select the desired character, then press the dial.
(8) Repeat steps 6 and 7 until you finish the label.
(9) Turn the SEL/PUSH EXEC dial to select [SET], then press the dial. The label is stored in memory.

Пи ИСПОЛБЗOBАнИ ЛЕNTБ C KACСТНОI ПЯМТБВ ВИ МОЖЕТ ВИПОЛНИТБ МарКИРОВКУ KACСТБЛ. МарКИРОВК MOжET COCTORTи 13 CIMBOLOВ N БСВСВ ПЯМТИ KACСТБ. ПИ ВСВТБЕ POВАHнОД KACСТБИ YUCTAHOBKE ПочаTeЯР N OПОЖЕНИЕ VCR RA ИП M EMemory B TteЧЕпЕ Okоно ЕкУнД 6удET OTOБРаЖATьс ровka.
(1)BcTaBbTe kaccety, KOTOpyIO Bbl XOTnTe MapKInpOBAtB.
(2)Установские поеклочатуль POWER в пооженке VCR ун сAMERA.
(3)HaxmTe KhoNky MENU OTo6paXeHHaMeHIO.
(4)ПовернITE ДИСК SEL/PUSH EXEC ДЯ
Выбoga установки [a], a за tem нахмпerte
На дИСК.
(5)ПовернITE ДИСК SEL/PUSH EXEC ДИВИОпа установский TEAPTE TITLE, a 3aTeMuHЯ ДИСК. ПОВВИТСЕЗOBРASSEМAPKINOPBOKN JIENTBI.
(6)ПовернITE ДИСК SEL/PUSH EXEC ДИЗ
БИБОРа КОЛОНК И HYKHВМ CBMBOЛOM, a
3aTeM НАХМИТЕ на DMСК.
(7)ПовернITE ДИСК SEL/PUSH EXEC ДЯ
Выбoga hyЖно СИМBOЛа, a 3aTeM
Навимпerte НдИСК.
(8)Повторгейпунков6и7doTexnop, noka He 3aBepшte Маркирорky.
(9)ПовернITE ДИСК SEL/PUSH EXEC ДЯ
Выбopa КOMандь [SET], a 3aTeM НжмITE
HAДСК.
MapкИрOBka coхpaHeHa B namrTи.

2
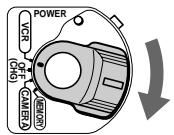
6-8

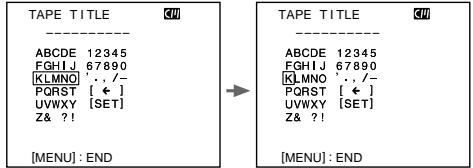

4,5

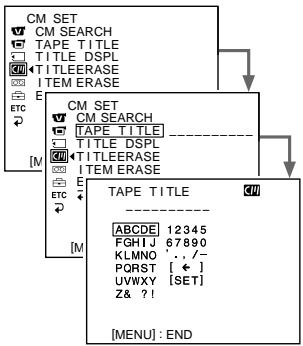
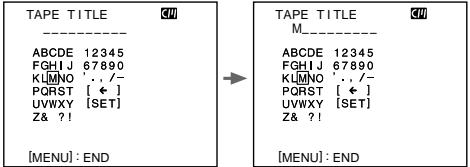
To change the label you have made
Insert the cassette to change the label, and operate in the same way as you do to make a new label.
If you set the write-protect tab of the tape to lock
You cannot label the tape. Slide the write-protect tab to release the write protection.
If you have superimposed titles in the cassette
When the label is displayed, up to four titles also appear.
When the "-----" indicator has fewer than 10 spaces
The cassette memory is full.
The "-----" indicates the number of characters you can select for the label.
To erase a character
Turn the SEL/PUSH EXEC dial to select [ ] then press the dial. The last character is erased.
To enter a space
Select [Z& ?!], then select the blank part.
MapKupOBka KacceTbI
ДяИЗМЕнЯВыЮЛHeHNoI MapKInpOВКи
BCTaBbTe Kaccety, MapKnipOBky KOtOpOHyoXoJIMo N3MeHnHTb, IN BblIOJNHte Te XeDeiCTBnA, YTO N dIaCO3dAHNHOBOmApKnipOBKn.
EcIn 3aunTHbI JeNEcTOK yCTaHOBJeH B NOJIOXeHne 3aunTbI OT 3aINCn
BbI He cMOXeTe BbIIOJIHNITb MapKIpOBKy IeHTbl. IpepeBnHbTe IneNecTOK 3aunTbI OT 3anncd nIg OTKJIHOUeHnA 3aunTbI.
EcIn BblBbIOnHnHn HauOxHeNtTpoB Ha Kaccete
Korda oTo6paxkaetcmaPknipOBkA, TaKKe OTo6paxkaetcdo Yetbipex TnTPOB.
EcInnHdNkATOp“----”coepxnt MeHee 103HaKOB
Kaccettha namrB nepenolheha.
INHДИКaTOP“----”NOKa3bIbaeT KOJImYeCTBO CIMBOLOB, KOTOpbIe MOXHO Bbl6paTb DnA MapKInpOBNi.
Дястураинсимьола
Erasing the cassette memory data
You can erase data stored in cassette memory, each item's data can be erased separately. You can also erase all items' data once.
Стуранке даHHыхпамятNi kaccetbl
Данные,храишпесьКаассгоиnamати MOXHObCTepeTb,прзTOMданькakждог Злем enta DoJxHbI CTnpaTbCЯOTdJIbHO. MoxHoТakxeCTepeTbДaHHbIeBceX Злем entOB OДновсpeMeHHO.
Erasing the cassette memory data
Erasing each item's data separately
(1) Set the POWER switch to VCR or CAMERA.
(2) Press MENU to display the menu display.
(3)Turn the SEL/PUSH EXEC dial to select , then press the dial.
(4) Turn the SEL/PUSH EXEC dial to select ITEM ERASE, then press the dial.
(5) Turn the SEL/PUSH EXEC dial to select the item that you want to erase its data, then press the dial.
| Item | Meaning |
| INDEX ALL | Erases all the index data. |
| TITLE ALL | Erases all the title data. |
| DATE ALL | Erases all the date data. |
| PHOTO ALL | Erases all the photo data. |
(6) Turn the SEL/PUSH EXEC dial to select OK, then press the dial. "OK" changes to "EXECUTE."
(7) Press the SEL/PUSH EXEC dial. "ERASING" flashes for about two seconds and "COMPLETE" appears after erasing the selected item's data.
CTnpaHne DaHHbIX NaMRTN KAccTebl
CTnpaHne DaHHbIX KaKdOrO 3JemeHTa OTdeJbHO
(1)Установские песеклочатуль POWER в пооженке VCR ун сAMERA.
(2)Haxmte KhoIky MENUДлг OTo6paXeHnДИСПЛЯ MeHIO.
(3)ПовернITE диСEL/PUSH EXEC ДЯ
Быбopa установки [M], a 3aTeM haЖмITE
На диСК.
(4)ПовернITE ДИСК SEL/PUSH EXEC ДИВыбopa КOMандbl ITEM ERASE, a 3aTeMHaЖМЛТЕ ДИСК.
(5)ПовернITE диСК SEL/PUSH EXEC ДпьБбора злем enta,данык КOTOPORO HУЖно CTepeTb, a 3aTeM habжмite HaДИСК.
| Злем ent | Назнayениe |
| INDEX ALL | Стupaeted几乎所有��аьные дань们的. |
| TITLE ALL | Стupaeted几乎所有��аь们的 ТИТРов. |
| DATE ALL | Стupaeted几乎所有��аь们的 Дд. |
| PHOTO ALL | Стupaeted几乎所有��аь们的 Фото. |
(6)ПовернITE ДИСК SEL/PUSH EXEC ДЯ
Быбoga установки OK, a заlem нахмпerte
На ДИСК. Индikаши "OK" Изменчся на
Индikakuni "EXECUTE".
(7)HaxmnteHaДnCKSEL/PUSH EXEC. Hndkaun“ERASING"MuraetnpimepHo DBe CeKyHdbI,Ипocle CTnpaHnДaHHbIX Bbl6paHnHO 3JemehTa NOBJIeTcH INdkaun“COMPLETE”.
Erasing the cassette memory data
CTupaHne DaHHbIX NaMaTNU KAcccTebl
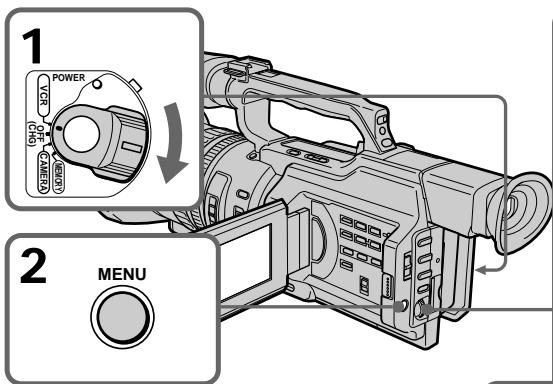
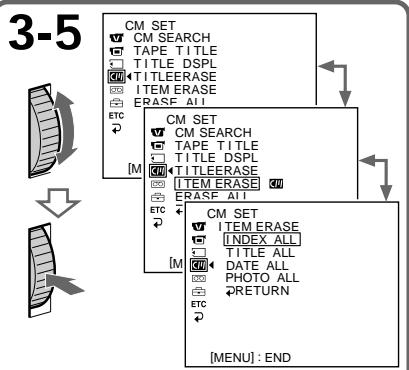

To cancel erasing
Select RETURN in step 6 or 7, then press the SEL/PUSH EXEC dial.
Erasing all the data in cassette memory
(1) Set the POWER switch to VCR or CAMERA.
(2) Press MENU to display the menu display.
(3) Turn the SEL/PUSH EXEC dial to select, then press the dial.
(4) Turn the SEL/PUSH EXEC dial to select ERASE ALL, then press the dial.
(5) Turn the SEL/PUSH EXEC dial to select OK, then press the dial. "OK" changes to "EXECUTE."
(6) Press the SEL/PUSH EXEC dial. "ERASING" flashes for about two seconds and "COMPLETE" appears after erasing all the data.
To cancel erasing
Select RETURN in step 5 or 6, then press the SEL/PUSH EXEC dial.
ДЯ OTMeHbI ydaJIeHnA
Bb6epTe RETURN B nyHKeTe 6 nn7,3aTeMaHxMnTe Ha nck SEL/PUSH EXEC.
CTupaHne Bcex DaHHbIX B KaccETHOI pAMrTn
(1)Установпейсякючateь POWER в положене VCR ун с AMERA.
(2)HaxMMTe KhoNky MENUДЯ OTo6paXeHnДиCnJIe MeHIO.
(3)ПовернITE диСK SEL/PUSH EXEC ДпьБбopa установки ,а затем нажмITEHa диСК.
(4)Повернite ДИСК SEL/PUSH EXEC ДЯ
Выбopa ERASE ALL, a за tem нахмITE на
ДИСК.
(5)Повернente ДИСК SEL/PUSH EXEC ДЯ
Выбoga установки OK, a заlem нахмпerte
На ДИСК. "OK" мениетсни "EXECUTE".
(6)HaxmTe HaДСК SEL/PUSH EXEC. Инданkaци“ERASING" mrgaet npimepno Дев секунды,И посе CTираиь BCex Дадньх NOВЛЯETСА Инданkaци "COMPLETE".
ДЯ OTMeHbI ydaJIeHnA
Bb6epTe RETURN B nyHKe 5 nn 6,3aTe mHaKMnTe Ha nck SEL/PUSH EXEC.
- Customizing Your Camcorder - Changing the menu settings
To change the mode settings in the menu settings, select the menu items with the SEL/PUSH EXEC dial. The default settings can be partially changed. First, select the icon, then the menu item and then the mode.
(1) In standby, or when the POWER switch is set to VCR or MEMORY, press MENU.
(2) Turn the SEL/PUSH EXEC dial to select the desired icon, then press the dial to set it.
(3)Turn the SEL/PUSH EXEC dial to select the desired item, then press the dial to set it.
(4)Turn the SEL/PUSH EXEC dial to select the desired mode, then press the dial to set it.
(5) If you want to change other items, select RETURN and press the dial, then repeat steps 2 to 4.
For details, see "Selecting the mode setting of each item" (p. 156).
-BbInOpHeHne HnDnBnDyaIbHbIX yctaHOBOK Ha BnDeokamepe -
To make the menu display disappear
Press MENU.
Menu items are displayed as the following icons:
MANUAL SET
C CAMERA SET
VCR SET
LCD/VF SET
MEMORY SET
CM SET
TAPE SET
SETUP MENU
ETC OTHERS
ДЯТOrO,ЧTo6bI CkpbITb INHДИКaцIHOMeHIO
HaxmTe KhoNkY MENU.
IyHKtbl MeHIO OTO6paXaHTcB BVide npBVeDeHHbIX HNXe NIKTORpAMM:
MANUAL SET
CAMERA SET
VCR SET
LCD/VF SET
MEMORY SET
CM SET
TAPE SET
SETUP MENU
ETC OTHERS
English
Selecting the mode setting of each item
is the default setting.
Menu items differ depending on the position of the POWER switch.
The LCD screen or viewfinder screen shows only the items you can operate at the moment.
| Icon/item | Mode | Meaning | POWER switch |
| AUTO SHTR | ON | To automatically adjust the electronic shutter speed. | CAMERA |
| OFF | To fix the electronic shutter speed. | MEMORY | |
| PROG. SCAN | OFF | Records still/moving pictures in the interlace format. | CAMERA |
| ON | Records still/moving pictures in progressive mode. | ||
| D ZOOM | OFF | To deactivate the digital zoom. Up to 12× zoom is carried out. | CAMERA |
| 24× | To activate the digital zoom. More than 12× zoom is performed digitally. This value goes up to 24× (p. 30). | ||
| 48× | To activate the digital zoom. More than 12× zoom is performed digitally. This value goes up to 48× (p. 30). | ||
| 16:9WIDE | OFF | To not record a 16:9 wide picture. | CAMERA |
| ON | To record a 16:9 wide picture (p. 53). | ||
| STEADYSHOT | ON | To compensate for camera-shake. | CAMERA |
| OFF | To cancel the SteadyShot function. Natural pictures are produced when shooting a stationary object with a tripod. | MEMORY |
Notes on the SteadyShot function
- The SteadyShot function will not correct excessive camera-shake.
- Attachment of a conversion lens (not supplied) may influence the SteadyShot function.
If you cancel the SteadyShot function
The SteadyShot OFF indicator appears. Your camcorder prevents excessive compensation for camera-shake.
| Icon/item | Mode | Meaning | POWER switch | |
| FRAME REC | ● OFF | Does not make a cut recording. | CAMERA | |
| ON | Makes a cut recording (p. 87). | |||
| INT. REC | ON | Makes an interval recording (p. 83). | CAMERA | |
| ● OFF | Does not make an interval recording. | |||
| SET | Sets the interval time and recording time. | |||
| HIFI SOUND | ● STEREO | To play back a stereo tape or dual sound track tape with main and sub sound (p. 212). | VCR | |
| 1 | To play back a stereo tape with the left sound or a dual sound tape with main sound. | |||
| 2 | To play back a stereo tape with the right sound or a dual sound track tape with sub sound. | |||
| AUDIO MIX | — | To adjust the balance between the stereo 1 and stereo 2 (p. 139). | VCR | |
| ST1 ▲ ST2 | ||||
| A/V→DV OUT | ● OFF | To output analog images in digital format using your camcorder. | VCR | |
| ON | To output digital images in analog format using your camcorder. | |||
| NTSC PB | ● ON PAL TV | To play back a tape recorded on your camcorder on a PAL system TV. | VCR | |
| NTSC 4.43 | To play back a tape recorded in the NTSC colour system on a TV with the NTSC 4.43 mode. | |||
| LCD B. L. | ● BRT NORMAL | To set the brightness on the LCD screen to normal. | VCR | |
| BRIGHT | To brighten the LCD screen. | CAMERA MEMORY | ||
| LCD COLOUR | — | To adjust the colour on the LCD screen with the SEL/PUSH EXEC dial. | VCR | |
| To get low-intensity | CAMERA MEMORY | |||
| VF B.L. | ● BRT NORMAL | To set the brightness on the viewfinder screen to normal. | VCR | |
| BRIGHT | To brighten the viewfinder screen. | CAMERA | ||
| GUIDEFRAME | ● OFF | Does not display the guide frame. | CAMERA | |
| ON | Displays the guide frame (p. 52). | MEMORY | ||
Notes on LCD B.L. and VF B.L.
- When you select "BRIGHT," battery life is reduced a little during recording.
- When you use power sources other than the battery pack, "BRIGHT" is automatically selected.
| Icon/item | Mode | Meaning | POWER switch |
| CONTINUOUS | OFF | Not to record continuously. | MEMORY |
| ON | To record four images continuously (p. 178). | ||
| MULTI SCRN | To record nine images continuously (p. 178). | ||
| QUALITY | SUPER FINE | To record still images in the super fine image quality mode, using a “Memory Stick” (p. 174). | VCR MEMORY |
| FINE | To record still images in the fine image quality mode, using a “Memory Stick” (p. 174). | ||
| STANDARD | To record still images in the standard image quality mode, using a “Memory Stick” (p. 174). | ||
| PRINT MARK | OFF | To erase print marks on still images. | VCR MEMORY |
| ON | To write a print mark on the recorded still images you want to print out later. | ||
| PROTECT | OFF | To release protection from still images. | VCR MEMORY |
| ON | To protect selected still images against accidental erasure (p. 202). | ||
| SLIDE SHOW | To play back all the images as a slide show (p. 200). | MEMORY | |
| DELETE ALL | To delete all unprotected images (p. 206). | MEMORY | |
| FORMAT | RETURN | To cancel formatting. | MEMORY |
| OK | To format an inserted “Memory Stick.” 1. Select FORMAT with the SEL/PUSH EXEC dial, then press the dial. 2. Turn the SEL/PUSH EXEC dial to select OK, then press the dial. 3. After “EXECUTE” appears, press the SEL/PUSH EXEC dial. “FORMATTING” appears during formatting. “COMPLETE” appears when formatting is finished. | ||
| PHOTO SAVE | To duplicate images on a mini DV tape onto a “Memory Stick” (p. 191). | VCR |
Formatting erases all information on the "Memory Stick"
Check the contents of the "Memory Stick" before formatting:
- Formatting erases sample images on the "Memory Stick."
- Formatting erases the protected image data on the "Memory Stick."
Notes on formatting
- Supplied or optional "Memory Stick"s have been formatted at the factory. Formatting with this camcorder is not required.
- While the display shows "FORMATTING," do not turn the POWER switch, press any button, or eject a "Memory Stick."
- You cannot format a "Memory Stick" if the write-protect tab on the "Memory Stick" is set to LOCK.
- Format again if the message "☑" appears.
If formatting fails
The "格式ERROR" message appears.
| Icon/item | Mode | Meaning | POWER switch | |
| CM SEARCH | ON | To search using cassette memory (p. 93, 95, 97, 100). | VCR | |
| OFF | To search without using cassette memory. | |||
| TAPE TITLE | To label a cassette (p. 149). | VCR CAMERA | ||
| TITLE DSPL | ON | To display the title you have superimposed. | VCR | |
| OFF | Not to display the title. | |||
| TITLEERASE | — | To erase the title you have superimposed (p. 145). | VCR CAMERA | |
| ITEM ERASE | — | To erase each item's data in cassette memory (p. 151). | VCR CAMERA | |
| ERASE ALL | — | To erase all the data in cassette memory (p. 153). | VCR CAMERA | |
| REC MODE | ● SP | To record in the SP (Standard Play) mode. | VCR CAMERA | |
| LP | To increase the recording time to 1.5 times the SP mode. | |||
| AUDIO MODE | ● 12BIT | To record in 12-bit mode (two stereo sounds). | VCR CAMERA | |
| 16BIT | To record in 16-bit mode (one stereo sound with high quality). | |||
Notes on the LP mode
- When you record a tape in the LP mode on your camcorder, we recommend playing back the tape on your camcorder. When you play back the tape on other camcorders or VCRs, noise may occur in pictures or sound.
- When you record in the LP mode, we recommend using a Sony Excellence/Master mini DV cassette so that you can get the most out of your camcorder.
- You cannot make audio dubbing on a tape recorded in the LP mode. Use the SP mode for the tape to be audio-dubbed.
- When you record in the SP and LP modes on one tape or you record some scenes in the LP mode, the playback picture may be distorted or the time code may not be written properly between scenes.
Notes on AUDIO MODE
- You cannot dub an audio sound on a tape recorded in the 16-bit mode.
- When playing back a tape recorded in the 16-bit mode, you cannot adjust the balance in AUDIO MIX.
Changing the menu settings
| Icon/item | Mode | Meaning | POWER switch |
| ○○REMAIN | ● AUTO | To display the remaining tape indication: • for about eight seconds after your camcorder is turned on and calculates the remaining amount of tape • for about eight seconds after a cassette is inserted and your camcorder calculates the remaining amount of tape • for about eight seconds after ▲ is pressed in VCR mode • for about eight seconds after DISPLAY is pressed to display the screen indicators • for the period of tape rewinding, forwarding or picture search in the VCR mode | VCR CAMERA |
| ON | To always display the remaining tape indicator. | ||
| DATA CODE | ● DATE/CAM | To display date, time and various settings during playback. | VCR |
| DATE | To display date and time during playback. | ||
| MIC LEVEL | ● AUTO | Adjusts audio recording level automatically. | VCR |
| MANUAL | Adjusts audio recording level manually (p. 73). | CAMERA | |
| ○○CLOCK SET | — | To reset the date or time (p. 168). | CAMERA MEMORY |
| LTR SIZE | ● NORMAL | To display selected menu items in normal size. | VCR |
| 2× | To display selected menu items at twice the normal size. | CAMERA MEMORY | |
| DEMO MODE | ● ON | To make the demonstration appear. | CAMERA |
| OFF | To cancel the demonstration mode. | ||
| ETC WORLD TIME | To set the clock to the local time. Turn the SEL/ PUSH EXEC dial to set a time difference. The clock changes by the time difference you set here. If you set the time difference to 0, the clock returns to the originally set time. | CAMERA MEMORY |
Notes on DEMO MODE
- You cannot select DEMO MODE when a cassette is inserted in your camcorder.
- DEMO MODE is set to STBY (Standby) at the factory and the demonstration starts about 10 minutes after you have set the POWER switch to CAMERA without a cassette inserted. To cancel the demonstration, insert a cassette, set the POWER switch to other than CAMERA, or set DEMO MODE to OFF.
| Icon/item | Mode | Meaning | POWER switch | |
| ETC | BEEP | ● MELODY | To chime a melody in normal operations, and beep a warning sound for five seconds. | VCR CAMERA |
| NORMAL | To beep in the following situations: turning on the power, pressing the start/stop button, and when a warning message appears. | MEMORY | ||
| OFF | To cancel the melody, beep, and shutter click sound. | |||
| COMMANDER | ● ON | To activate the Remote Commander supplied with your camcorder. | VCR CAMERA | |
| OFF | To deactivate the Remote Commander to avoid remote control misoperation caused by an other VCR's remote control. | MEMORY | ||
| DISPLAY | ● LCD | To show the display on the LCD screen and viewfinder screen. | VCR CAMERA | |
| V-OUT/LCD | To show the display on a TV screen, LCD screen and viewfinder screen. | MEMORY | ||
| REC LAMP | ● ON | To light up the camera recording lamps at the front and rear of your camcorder. | CAMERA MEMORY | |
| OFF | To turn the camera recording lamps off. | |||
| COLOUR BAR | ● OFF | Does not display the colour bar. | CAMERA | |
| ON | Displays the colour bar. | |||
| VIDEO EDIT | To make programs and perform video editing (p. 121). | VCR | ||
| EDIT SET | To adjust and set the synchronization of your camcorder and a VCR for dubbing in video program editing mode (p. 110). | VCR | ||
Note
If you press DISPLAY with DISPLAY set to V-OUT/LCD in the menu settings, the picture from a TV or VCR will not appear on the LCD screen even when your camcorder is connected to outputs on the TV or VCR (except using an i.LINK cable (DV connecting cable)).
When recording a close subject
When REC LAMP is set to ON, the red camera recording lamps on the front and rear of the camcorder may reflect on the subject if it is close. In this case, we recommend you set REC LAMP to OFF.
After more than five minutes after removing the power source
The "PROG. SCAN," "HiFi SOUND," "AUDIO MIX," "MIC LEVEL," and "COMMANDER" items are returned to their default settings.
The other menu items are held in memory even when the power source is removed.
Pycckn
Bb6op yctaHOBOK peKIma kaJdoRo 3JeMeHTo
no yMOJIyAHNI.
AIBLAETCyCTaHOBkoI
IyHKtbl MeHIO OTJUauOTcB 3aBucmocnO T NOLOXeHn IpeekJIouateJePOwER.
Ha 3KpaHe KKД ИИ BИДОПСКАТЕ NTOБРаЖАТСТОЛБКО TE ЗЛЕМЕТы, C KOTOPьМN MOЖHO B daHHbIM MOMENT pa6OtaTb.
PpmeuHn no fOpMaTnpoBaHnIO
BxOaB aB KOMJIeK T IIN DOnONHtENo nOCTaBnEma "Memory Stick"
OTΦopMaTIpOBAHa Ha 3aBoJe.ΦopMaTIpOBAHHe Ha 3ToB BnIeOKaMepe He Tpe6yeTcA.
- Пи отобрахени Иndикали "FOMRATTING" He BklnouaTe nepeKlnoaTeIb POWER, He haxmaite KhoNkI Ne IzhBlekaTe "Memory Stick".
- HeJIb3Я foPmaTnpoBaTb "Memory Stick", ecnI IeNecToK 3aunIbI OT 3anCn Ha "Memory Stick" yCTaHOBInB nOJokEneL EOCK.
- Ecni NOBnIOsc BO6ueHne " √" BbINOHNTE φopMaTHpOBaHne eue pa3.
Resetting the date and time
The default clock setting is set to London time for United Kingdom, and to Paris time for the other European countries.
If you do not use your camcorder for about four months, the date and time settings may be released (bars may appear) because the vanadium-lithium battery installed in your camcorder will have been discharged (p. 236). First, set the year, then the month, the day, the hour and then the minute.
(1) Press MENU to display the menu in the standby mode.
(2) Turn the SEL/PUSH EXEC dial to select, then press the dial.
(3) Turn the SEL/PUSH EXEC dial to select CLOCK SET, then press the dial.
(4) Turn the SEL/PUSH EXEC dial to adjust to the desired year, then press the dial.
(5) Set the month, day and hour by turning the SEL/PUSH EXEC dial and pressing the dial.
(6) Set the minute by turning the SEL/PUSH EXEC dial and pressing the dial by the time signal. The clock starts to move.
(7) Press MENU to erase the menu display.
Ecnn BnDeokamepa He NcNolb30BaIacb OKOLO YeTbIpex MecAUEB, YCTaHOBKM DaTb IN BpeMeHN MOyT NcYe3HyTb (NoBRTcY cepTock), NocKoIbky BaHaJneBO-JIITNeBA8 bataPeIka, yctaHOBNeHnaB BnDeokamepe, pa3prAnTCs (ctp.236).
Chauana yctaHOBNTe rO, 3aTeM Mecu, DeHb, Yac N MuHyTu.
(1)HaxmTe KhoNky MENU ДЯ
otobpaXeHЯ MeHIO B peXmE OxuДaHЯ.
(2)ПовернITE ДИСК SEL/PUSH EXEC ДЯ
Выбopa уCTановки, a 3aTeM нажмITE
На ДИСК.
(3)ПовернITE ДИСК SEL/PUSH EXEC ДЯ Выбopa КOMанды CLOCK SET, a 3aTeM HaЖМЛТЕ HaДИСК.
(4)ПовернITE дИСК SEL/PUSH EXEC ДЯ
Выбopa НУЖHOrO рОда, a 3aTeM наЖмITE
На дИСК.
(5)Поворачивая дис SEL/PUSH EXECиндахимая на Hero, yctaHOBITe Mecaц,день и уас.
(6)YCTaHOBNTe MmHyTbI, NOBOpaHNBaR DnCK SEL/PUSH EXEC u Haxmam Ha Hero B MOMENT nepeaun CnHaJa TOhORo BpemeHN. Yacbl NaHyT fHKUHOHPOBaTb.
(7)HaxmTe KhoIky MENUДя удалени Инданкци MeHIO.
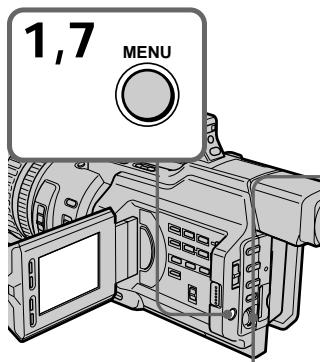
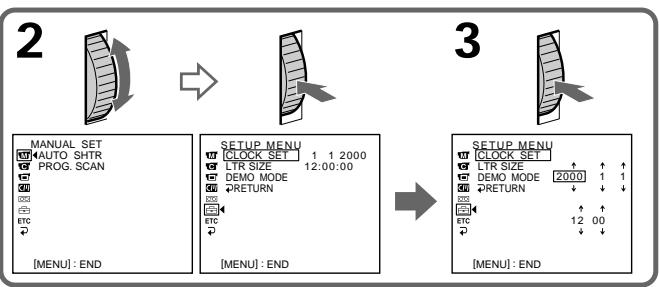
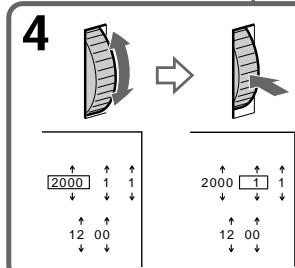

The year changes as follows:
Iod n3mehreTc cneyuOnm 6pa3om:

If you do not set the date and time
"---:---:" (time) and "-------" (date) are recorded on the data code of the tape and the "Memory Stick."
Note on the time indicator
The internal clock of your camcorder operates on a 24-hour cycle.
EcIn Bbl He yctaHOBte daTy n BpeMa
B KoJe DaHbIX Ha JeHTe N KapTe NaMAtn "Memory Stick" 6ydtZanicaHa Hndnkaun "---:---:-"(BpeMa) n ------" (DaTa).
PpimmeaHne no HnDnKaTopy BpeMeHH
BCTpoehhble yacbl 3ToI BNdeokamepbpa6oTaIOB V24-ycaOBOM pexkme.
— "Memory Stick" Operations — Using a "Memory Stick" - introduction
You can record and play back still images on the "Memory Stick" supplied with your camcorder. You can easily play back, record or delete still images. You can exchange image data with other equipment such as a personal computer etc., using the Memory Stick Reader/Writer supplied with your camcorder or a PC card adaptor for Memory Stick (not supplied).
On file format (JPEG)
Your camcorder compresses image data in JPEG format (extension .jpg).
Typical image data file name
100-0001: As displayed on the LCD screen or in the viewfinder of the camcorder.
Dsc00001.jpg: As displayed on your PC screen.
-Операцис "Memory Stick" -
Исpenьзовке "Memory Stick" - Вedlyнe
Moxho 3aIncbIbA Tb N BOCpOuN3BODnTb HenoDbVnxKhble I3o6paXeHnHa "Memory Stick", npunaraemoi K BuJeokampe. Bbl MoKeTe JERKO BOCpOuN3BODnTb, 3aNcBbTaB nJIn ydaJIbT HeNoDVBxKhble I3o6paXeHnHa. MoKHO BbIOJIHnTb OMeH daHHbIMn I3o6paXeHnC dpyroyn aInpapatypoi, HaNpimEp, nepcoHaNbHbIM KOMnbIOTepom n T.I., nCnoJb3yU cTpoiCTBO YTeHn/3aIncs "Memory Stick", npunaraemoe K Bvdeokampe, iJIn aAnTpE PC card nJa "Memory Stick" (He BXoDIT B KOMPnIeKT).
OΦopMaTe ΦaJIIOB (JPEG)
3Ta BnDeOkamepa CxMmaT DaHHbIe n3o6paXeHnBΦOpMaT JPEG (c paCunpeHnem .jpg).
06bIHoe IMa Ia daHHbIX n3o6paXeHNH
100-0001: KaK oTo6paXaetaTcHa 3KpaHe
XKД nII IN B VnIOuCKaTeJIe BInDeOKaMepbl.
Dsc0001.jpg: KaK oTo6paXaetaTcHa 3KpaHe
ПК.
Before using a "Memory Stick"
Перед Исторьанем "Memory Stick"
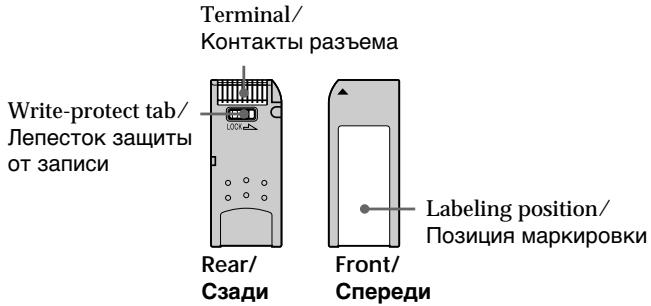
- You cannot record or erase still images when the write-protect tab on the "Memory Stick" is set to LOCK.
- We recommend backing up important data.
- Image data may be damaged in the following cases:
- If you remove the "Memory Stick," turn the power off, or detach the battery for replacement when the access lamp is flashing.
-
If you use a "Memory Stick" near static electricity or magnetic fields.
-
HenoDbNkHbIe n3O6paXeHnI HeBO3MOxHo 3aIncbIbA Tb IIN CTnpaTb, ecIn IeNecToK 3aunTbI OT 3aIncn Ha "Memory Stick" yctahOBJIeB IN NOLOXeHne LOCK.
-ДяВaxньxДаHHbIX peKOMeHdyetyCnCO3daBaTbpe3epBHyIO KOnIIO.
-Данные n3obpaжehн Moryt 6bItb NOBpejdeHb B cIeJyUOxN Cnyuayx: -Ecn Bi n3BneKaete "Memory Stick", BblKlIOyaeTe nITaHnE nIOn OTcoEINHaeTe 6bTaapeHb I6Iok IJIЯ 3aMeHb, KOrda Mrraet lamNochka o6paJeHn ACESS. -EcIn "Memory Stick" nCpONb3yeTc prdom C NCTOCHKAMn CTaTIYeCKORO 3JIeKTPnueCTBa nIJI MaHHTbIX nOJIeN.
Using a "Memory Stick" - introduction
- Prevent metallic objects or your finger from coming into contact with the metal parts of the connecting section.
- Stick its label on the labeling position.
- Do not bend, drop or apply strong shock to a "Memory Stick."
- Do not disassemble or modify a "Memory Stick."
- Do not let the "Memory Stick" get wet.
-
Do not use or keep a "Memory Stick" in locations that are:
-
Extremely hot such as in a car parked in the sun or under the scorching sun.
-Under direct sunlight. - Very humid or subject to corrosive gases.
- When you carry or store a "Memory Stick," put it in its case.
A "Memory Stick" formatted by a computer
A "Memory Stick" formatted by the Windows OS or Macintosh computers does not have a guaranteed compatibility with this camcorder.
Notes on image data compatibility
- Image data files recorded on a "Memory Stick" by your camcorder conform to the Design Rules for Camera File Systems universal standard (DCF98 standard) established by the JEIDA (Japan Electronic Industry Development Association). You cannot play back on your camcorder still images recorded on other equipment (DCR-TRV890E/TRV900/TRV900E or DSC-D700/D770) that does not conform to this universal standard. (These models are not sold in some areas.)
- If you cannot use a "Memory Stick" that is used with other equipment, format it with this camcorder (p. 158). However, formatting erases all information on the "Memory Stick."
- He npikacaiTecb MeTaJIInueckmIMn PpeDMeTaMNI INI PaJIbUcAMN K MeTaJIInueckmU qACTM COeINHITeJIbHbIX CEKUN.
3TnKeTky cIeNyet npKpePJIaTb B No3uIM MapKnipOBKn. - He crnbaiTe, he poHaiTe n CnJIbHo He TpnciTe "Memory Stick".
- He pa3bnpaIte n He moIqnIupyIte "Memory Stick".
- He donnycka Te nona da Hn Bla n Ha "Memory Stick".
He nCnoJb3yIe n He xpaHITe "Memory Stick":
-B CnIshKom JkapKnx MecTax, HapPImep, B ABTOMO6HNe, PpINapKOBaHHOM B COJIHeuHOM MecTe, INI NIO pAnlaUIM COJHNCEM.
-Ha coHnue.
-BOChbBnAaXhBix MecTax NIMMecTax, NOIbBepKeHHbIX BO3dEJIcTBNUO arpeCCNBHbIX ra3OB.
- Пи посяноке Илихраенни "Memory Stick" Heo6xOДМо ПОJOЖИТВ Футлар.
"Memory Stick", oTΦopMaTpUpoBaHHaHa KaOMNbItepe
"Memory Stick", oTφopMaTnPoBaHhbIe c nOMOuMbIO KOMbIoTePOB C OpeaMuHOHc NcTeMoI Windows IIN Macintosh, He o6NaIaTO rapaHTnPoBaHHO CoBMeCTMnOCTbIO C 3ToI BInDeOKaMepoJ.
Примочаим IO COBmecTUMOCTI daHHbIX N306paKeHnI
-Фаилы данньхи 3ибрахен,在аиcaHHье вдeOKамери на“Memory Stick”, COOTBETCTBYOT yHINBepcaJIbHOMy CTaHdapTy (DCF98),corlacho npabnam npoeKtnpoBaHANH φaiNoBix nCtEmДЯ BnDEOKaMep,yCTaHOBInEHOMy accoumauei JEIDA(RnoHcKoI accounauei pa3BHTN3IeKTPoHHOI npomblIeHNocTn).Ha 3ToI BnDEOKaMepe HeJIb3A BOCPNO3BOIDITb HEnOdBxHbIe N36paXeHn,3anicaHbIe Ha dpyrOI annpataType (DCR-TRV890E/TRV900/ TRV900E mII DSC-D700/D770),KOTOPaH He COOTBETCTBYET 3OTMy yHINBepcaJIbHOMy cTaHdAPTy.(9TN moJEN He npoJaOTcB HekotopbIX o5naCTrx.)
- Ecln Bbl He cMOxTe NcNoIb3OBAbT "Memory Stick", KOTOpbe NcNoIb3yUoTcHa dpyroI annapaType, OTΦopMaTnpuTe IN C nOMoUsb 3ToI BNdeOeKaMepbl (CTp. 164). Ondako φopMaTnpOBaHne ydAnIT BCIO nHΦopMaunHO Ha "Memory Stick".
Using a "Memory Stick" - introduction
"Memory Stick" and are trademarks of Sony Corporation.
- Windows is a registered trademark licensed to Microsoft Corporation, registered in the U.S.A. and other countries.
- Macintosh and Mac OS are trademarks of Apple Computer, Inc.
- All other product names mentioned herein may be the trademarks or registered trademarks of their respective companies. Furthermore, "TM" and "®" are not mentioned in each case in this manual.
Испобьзоване "Memory Stick" - Вedlyнe
"Memory Stick" n BnTc TpOBBIM Mapkam Kopnpaun Sony.
- Windows RNAIaETc3aPereNCTpnpoBaHHO TopROB MapKo, KOtopa 3anaTeHTObaHa Kopnpauee Microsoft, 3apereNCTpnpoBaHHO B CUSA n dpyrx cTpaHax.
Macintosh Mac OS ABJIHOTCA TOPROBIMI Mapkami Apple Computer, Inc.
Bce npytne HnmeHOBAHn npOkyTOB, yNOMaHyTbIe B3Tom DOKymHe, MOryt 6bITb TopROBbIMN MapKaMn Nnn 3apeRNCtpnpoBaHbIMN TopROBbIMN MapKaMn COOTBeTCTByUOxKOMNaHn. CmBOJbl "TM" N "R" B KaXdOM Cnyae He yNOMHaOTcB DaHHOM pyKOBODCTBe.
Inserting a "Memory Stick"
Insert the "Memory Stick" with the Sony logo pointing toward the LCD panel and the mark pointing inward.
YcTaHOBka "Memory Stick"
BcTaBbTe "Memory Stick" c əMbIeMoI Sony, yka3bIbaIOuIe B hAnpaBNeHn nAHeN JKД, n O6O3HaYeHnEM 一 , HAnpaBJIeHHbIM BHyTpB.
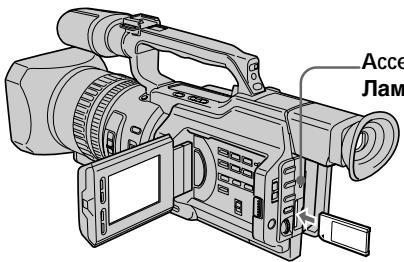
Access lamp/
Jamnoouka o6paueHn
To eject a "Memory Stick"
Push the "Memory Stick" inward, then release your finger. The "Memory Stick" comes out a little.
ДлгинзВьоченя“Memory Stick"
Haxmnte Ha "Memory Stick", 3aTeM OTnycntte. "Memory Stick" BbIeT n3 OTceKa.
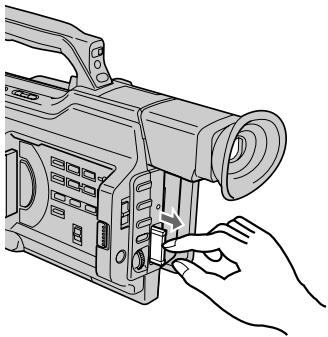
Note
The "Memory Stick" may pop out depending on the way you push it.
When the access lamp is lit or flashing Never shake or strike your camcorder. Do not turn the power off, eject a "Memory Stick" or remove the battery pack. Otherwise, image data breakdown may occur.
PpimeyaHne
"Memory Stick" MoXeT pe3Ko BbIckOuHTb n3 OTceKa, B 3aBcIMOCTn OT HaXaTnHa Hee.
EcIn lamnocka obaaeeHn ropnt nIIMraeT
Hnkorga He TpncTe BnDeokamepu HcTcuHTe No He. He BbIKNoaTe NtTaHne, He n3BLeKaIte "Memory Stick" n3 OTeKa n He ydaJIHrTe 6batapeHbN bIOK. B IpOTNBHom clyuae daHHbIe I3O6paXeHnA MOryT 6bITb NOBpeKdHebl.
If the "MEMORY STICK ERROR" indicator appears
The "Memory Stick" is broken or the file format is not proper. Eject the "Memory Stick," check it, and insert it again. If the same indicator appears, use another "Memory Stick."
Selecting the image quality mode
You can select the image quality mode in still picture recording. The default setting is SUPER FINE.
(1) Set the POWER switch to VCR or MEMORY. Make sure that the LOCK switch is set to the right (unlock) position.
(2) Press MENU to display the menu.
(3) Turn the SEL/PUSH EXEC dial to select l , then press the dial.
(4) Turn the SEL/PUSH EXEC dial to select QUALITY, then press the dial.
(5) Turn the SEL/PUSH EXEC dial to select the desired image quality, then press the dial.
Image quality settings
| Setting | Meaning |
| SUPER FINE | This is the highest image quality in this camcorder. The number of still images you can record is fewer than FINE. The image is compressed to about 1/3. |
| FINE | Use this mode when you want to record high quality images. The image is compressed to about 1/6. |
| STANDARD | This is the standard image quality. The image is compressed to about 1/10. |
Note
In some cases, changing the image quality mode may not affect the image quality, depending on the types of images you are shooting.
Differences in image quality mode Recorded images are compressed in JPEG format before being stored in memory. The memory capacity allotted to each image varies depending on the image quality mode selected. Details are shown in the table below.
| Image quality mode | Memory capacity |
| SUPER FINE | Approx. 190 KB |
| FINE | Approx. 100 KB |
| STANDARD | Approx. 60 KB |
Note on the image quality mode indicator This is only displayed during recording.
Испобьзовны "Memory Stick" - Вedlyнe
YcTaHOBKn KaYeCTBa n3O6paXeHnA
The approximate number of images you can record on a "Memory Stick"
The approximate number of images you can record on a "Memory Stick" that is formatted using this camcorder varies depending on which image quality mode you select and the complexity of the subject.
ПиблзИтельhoe KOЛичEcTBo 306paXeHn, KOTOpoe MOxHo 3aIncatb Ha "Memory Stick"
Приблизпелове КОЛЧЕСТВО ИЗБРАЖЕНКOTOPОЕМожноЗаиcaТьHa "Memory Stick", OTформатированHyо C ПOMOДБЮ ДАнHо ВДЕОКамеры, МЕнгетсь ЗАВSCIMOCNTN OT BыбpaHOrO ржима КачесТВИЗБРАЖЕНИСLOXKHOCТN OBБeКТа.
| Image quality mode/Pexim KaucesTBA u3o6paxeHn | |||
| SUPER FINE | FINE | STANDARD | |
| 4 MB type (supplied) / 4 M6 (ьхODIT B KOMПeKT) | 20 images/20 u3o6paxeHn | 40 images/40 u3o6paxeHn | 60 images/60 u3o6paxeHn |
| 8 MB type (not supplied) / 8 M6 (ньхODIT B KOMПeKT) | 40 images/40 u3o6paxeHn | 81 images/81 u3o6paxeHn | 122 images/122 u3o6paxeHn |
| 16 MB type (not supplied) / 16 M6 (ньхODIT B KOMПeKT) | 82 images/82 u3o6paxeHn | 164 images/164 u3o6paxeHn | 246 images/246 u3o6paxeHn |
| 32 MB type (not supplied) / 32 M6 (ньхODIT B KOMПeKT) | 164 images/164 u3o6paxeHn | 329 images/329 u3o6paxeHn | 494 images/494 u3o6paxeHn |
| 64 MB type (not supplied) / 64 M6 (ьхODIT B KOMПeKT) | 329 images/329 u3o6paxeHn | 659 images/659 u3o6paxeHn | 988 images/988 u3o6paxeHn |
Recording still images on a "Memory Stick" - Memory Photo recording
You can record still images on a "Memory Stick."
Before operation
Insert a "Memory Stick" into your camcorder.
(1) Set the POWER switch to MEMORY. Make sure that the LOCK switch is set to the right (unlock) position.
(2) Keep pressing PHOTO lightly until the desired still picture appears. The green mark stops flashing, then lights up. The brightness of the picture and focus are re-adjusted, being targeted for the middle of the picture and are fixed. Recording does not start yet.
(3) Press PHOTO deeply. The shutter clicks and the image is frozen. The image displayed on the screen will be recorded on the "Memory Stick." Recording is complete when the bar scroll indicator disappears.
3aIncb HeIOBnXhblx H3o6paXeHn Ha"Memory Stick" - 3aIncb foTOrpaФn B namrTb
Ha "Memory Stick" MoXHo 3aIbIbTaB HeIOBnKHbIe I3O6paKeHn.
Ipeed nauanom pa60tbI
BcTaBbTe "Memory Stick" B BuDeokamepy.
(1) YctaHOBInTe nepeKJIIOUaTeIb POWER B noJIOXeHne MEMORY. Y6eINTEcB, yTo nepeKJIIOuATeIb LOCK ycTaHOBIne B npaBoE noJIOXeHne (pa36JOKnPOBaH).
(2)ДерхиTe cIerKa hαkaToi Khonky PHOTO Do TEX nOp, noka He nOraBnTc rTre6yEmoe HEnoDnKHOe n3OpaXeHne. 3eJeHai MeTKa ● npeKpaTnT MIRaTb N 3aTeM 3aRopnTc.RpKocTb n3OpaXeHnN i φokCupOBkHa HAcTpaNBAIoTc NO ueHTpy n3OpaXeHnN iФnkCpUToTc. 3aInCb eue He NaunHaeTcR.
(3)Haxmnte KhoNky PHOTO cnIbHee. ⅢeIKNHT 3aTBoP, n I3o6paXeHne 3aΦnKcnpyTeCn. I3o6paXeHne Ha 3kPaH e 3aIIuTeCnHa "Memory Stick". 3aIncb 6yDet 3aBepSeHa, Korda Ncye3HET INDInKaTOP B BVNe PONockn.
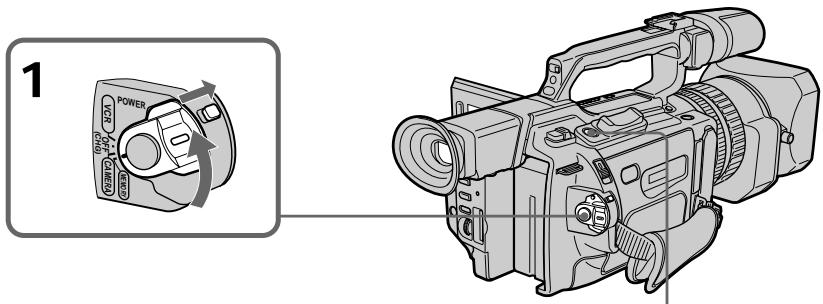
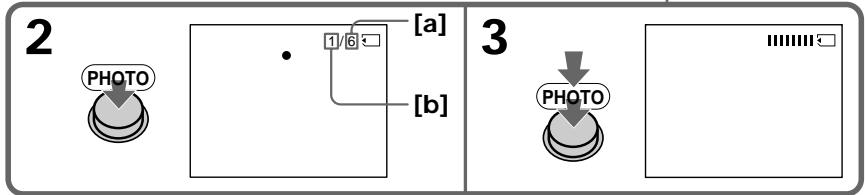
[a]The number of images that can be recorded on the "Memory Stick"
[b]The number of recorded images
[a] KoJIuYeCTBO n3O6paXeHn, KOtOpoe moKcET 6bIb 3aIncAHO Ha "Memory Stick"
[b]KoJIuYeCTBO 3aIInCaHbIx I3O6paKeHn
Recording still images on a "Memory Stick" - Memory Photo recording
When the POWER switch is set to MEMORY The following functions do not work: wide TV mode, digital effect, picture effect, title, digital zoom, fader, shutter speed (1/25 or smaller) adjustment, and low lux mode and sports lesson mode in PROGRAM AE. (The indicator flashes in the low lux or sports lesson mode.)
Note
When you press the PHOTO button lightly at step 2, the focus of the image seems to be momentarily out.
While you are recording a still image You can neither turn off the power nor press PHOTO.
When you press PHOTO on the Remote Commander
Your camcorder immediately records the image that is on the screen when you press the button.
Recording images continuously
You can record still images continuously. Select one of the two modes described below before recording.
Continuous mode [a]
You can four record still images continuously. The number of images is in accordance with remaining capacity of the "Memory Stick."
Multi screen mode [b]
You can record nine still images continuously on a single page.
![SONY DCR-VX2000E - Multi screen mode [b] - 1](/content/2020/04/48855/images/def32212070306ba58a1af1a8685913fc57dc845b07643fd78f39854003c5889.jpg)
3aHnscb HeNoDvNkHbIX H3o6paXeHn Ha "Memory Stick" - 3aHnscb fOToRpaФn B namrTb
Ecni nepeeknouateIb POWER yctaHOBJIeB bnoJxHHe MEMORY
CneyuOuIe cyHKmH He pa6oTaIoT: UnpOKo3KpaHbI TeJeBn3IOHbI pexkM, uΦpOBoI 3ΦcΦEKT, 3ΦcΦEKT 306paXeHnA, TnTp, UmpPobAra TpAChcPoKaun, fpeJdep, peryInpOBKa cKopoCTn 3aTBopa (1/25 nI INxke), pexNIM Hn3KOOnCEBueHNOCTn, a TAKe JpeKIM CnOPTNBbIX COCT3aHn B PROGRAM AE. (INdIKbATOp Mmraet npn CbeMe B peXmME Hn3KOOnCBeUeHNOCTn IINI CnOPTNBbIX COCT3aHn.)
PpimeyaHne
Ecni cIerka HaxaTb KhONky PHOTO B nyHKTe 2, BO3HnKaet OuSyueHne, YTO fOOKcUPOBka N3o6paKeHn KaTkoBpeMeHHo TepaETca.
Ппзаимс HeNoBdNxHOro N3O6paXeHnHeB03MOxHO BbIKNoUHTb PntaHne IINHaKaTb KhoNkY PHOTO.
Ecnna Haxkab KhoNky PHOTO ha npJIbTe ductaHOnHOr ynpabLeHHA
Bvdeokamepa cpa3y xe 3annietn0bpaekHne, KOtOpoe 6ydtHa 3kpahe BMOMEHT HXKATN KHOKN.
HenpepbIBhA 3aINcB n3o6paXeHn
Moxho BbIOnHrTb HeIpepbIbHyIO 3aNNcB HeNOdBXhBix N3O6paXeHn. Ipeed 3aNNcBO BbIbepnte OdNH n3 DByx peXmOB, ONICAHbIX HNKe.
HenpepbHbI npexm [a]
Moxho BbInOnHrTb HnpepbIBHyIO 3aINCb YeBtbpex HnOdBnXhBIX M3OBpaXeHn. KoIueCTBO N3OBpaXeHn 3aBcNT OT o6bema Cbo6oHDn ParnrHa "Memory Stick".
Mhoro3kpaHHbIpeXmB
Moxho 3aHncbIbTaB 9 HeNoDBNXbIX n3O6paXeHn HnpepbIBHO Ha OndHc CTpaHnCe.
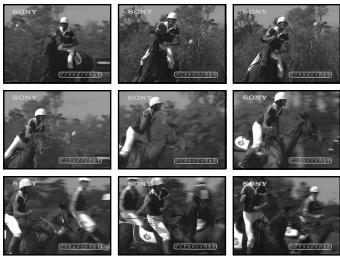
[b]
Recording still images on a "Memory Stick" - Memory Photo recording
(1) Set the POWER switch to MEMORY. Make sure that the LOCK switch is set to the right (unlock) position.
(2) Press MENU to display the menu.
(3) Turn the SEL/PUSH EXEC dial to select, then press the dial.
(4) Turn the SEL/PUSH EXEC dial to select CONTINUOUS, then press the dial.
(5) Turn the SEL/PUSH EXEC dial to select the desired setting, then press the dial.
3aHnscb HeNoDvNkHbIX n3o6paXeHn Ha "Memory Stick" - 3aHnscb fOToRpaФn B namrTb
(1) YctaHOBInTe nepeKJIIOUaTeIb POWER B noJIOKeHne MEMORY. Y6eJNTecb, yTo nepeKJIIOuAteIb LOCK ycTaHOBIne B npaBoe noJIOKeHne (pa3bIoKnipoBaH).
(2)HaxmTe KhoNky MENU OTo6paXeHHa MeHIO.
(3)ПовернITE ДИСК SEL/PUSH EXEC ДЯ
Выбoga установки , a за tem нажмITE
На ДИСК.
(4)ПовернITE ДИСК SEL/PUSH EXEC ДЯ
Выбopa установки CONTINUOUS, за tem
нажмITE на ДИСК.
(5)ПовернITE диСEL/PUSH EXEC ДлЯ Вьбopa кению установки,а затем НжмITE на диСК.
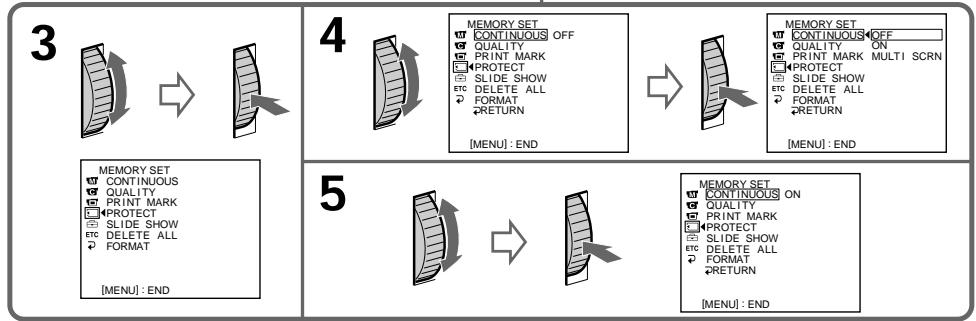
Recording still images on a "Memory Stick" - Memory Photo recording
Continuous shooting settings
| Setting | Meaning (indicator on the screen) |
| OFF | Your camcorder shoots one image at a time. (no indicator) |
| ON | Your camcorder shoots up to four still images at about 0.5 sec intervals. (▲▲) |
| MULTI SCRN | Your camcorder shoots nine still images at about 0.5 sec intervals and displays the images on a single page divided into nine boxes. (▲▲▲) |
If the capacity of the "Memory Stick" becomes full
FULL" appears on the screen, and you cannot record still pictures on this "Memory Stick."
The number of images in continuous shooting
The number of images you can shoot continuously varies depending on the remaining capacity of the "Memory Stick." The shutter always clicks four times, however, the number of images recordable may be less than four.
Note on using a video flash light (not supplied)
The video flash light does not work in the continuous or multi screen mode if you install it to the intelligent accessory shoe.
3aHnscb HeNoDvNkHbIX n3o6paXeHn Ha "Memory Stick" - 3aHnscb foToTgpaФn B namrTaB
YctaHOBKn HnpepbIBHoN CbeMKn
Recording still images on a "Memory Stick" - Memory Photo recording
Self-timer memory photo recording
You can make a memory photo recording with the self-timer. This mode is useful when you want to record yourself. You can also use the Remote Commander.
(1) Set the POWER switch to MEMORY. Make sure that the LOCK switch is set to the right (unlock) position.
(2) Press (self-timer) in standby mode. The (self-timer) indicator appears on the LCD screen or in the viewfinder.
(3) Press PHOTO deeply. The self-timer starts counting down from 10 with a beep sound. In the last two seconds of the countdown, the beep sound gets faster, then recording starts automatically.
3aHnscb HeNoDvNkHbIX H3o6paXeHn Ha "Memory Stick" - 3aHncb fOToRpaΦn B namrTb
ФOTOCbEмka nO TaMepy camo3anycka c coxpaHeHnem B nAmrTu
MOxHO BbINOJIHrTb FOToCObEMKy C COxApaHeHmEB NAMrTI NO TaImepy CAMo3aNcKa.3OT pEKMM NOpE3eH B TOM Cnyae,ecnBbXOTNE CHrTb c6ra.ДЯ 3TORO MOxHO TAKKKe IcNOJIb3OBaTb PJIbT DInCTaHcUHHO ynpabNeHnA.
(1)Установпейсякючateь POWER в положени MEMORY.Убдптесь,что поеклоча电子邮件 LOCK установен в праобе положени (pa36локирван).
(2)В рекиме ождангаяхмптс кногку (ТаIMерCAMO3anycka).HaэКранЕЖКД ИЛВВИДОNUCKaTeNe NOBNTcR INДИКaTOp (ТаIMерCAMO3anycka).
(3)Haxmnte KhoNky PHOTO cInbHee. TaMep caMo3aNycca HaChET 6paTHbIOTcET C 10 c 3ymMePbIM CnHAnOM.B NocLeiHne IBe CEkyHdbIo 6paTHoro OTCcTeA 3ymMePbIcNHaI 6yDet 3ByaTb YaSe, a 3aTe m ABTomATueckn HaChETcra 3aNtCb.
To cancel self-timer recording
Press (self-timer) so that the indicator disappears from the LCD or viewfinder screen. You cannot cancel the self-timer recording using the Remote Commander.
Note
The self-timer recording mode is automatically cancelled when:
- Self-timer recording is finished.
- The POWER switch is set to OFF (CHG) or VCR.
Длг OTMeHbI 3aIncn no TaImepy camo3anycka
Haxmnte KhoNkU (Taimep caMo3anycka), Tto6bI hNdkatop Ncye3 c 3kpana JKKd nnn BnIOINCKaTeIN. 3AInCb no TaMepy caMo3anycka HEB03MOXHO OTMeHb T C NOMOu bIO pIynbTa DnCTAHNOHORO ynpabJIeHN.
PpimeyaHne
Pexim 3aIncn no TaImepy caMo3anycKa
bydET ATOBtAMTUnCeckN OTMeHeN,ecIi:
-OkOnHeA 3aIncb No TaIMpepy caMo3anycKa.
-BbIKNoUaTeJIb POWER yctaHOBJIeN B
noJIOKeHne OFF (CHG) nII VCR.
Superimposing a still image in a "Memory Stick" on a moving picture - MEMORY MIX
You can superimpose a still image you have recorded on a "Memory Stick" on the top of the moving picture you are recording.
M. CHROM (Memory chromakey)
You can swap a blue area of a still image such as an illustration or a frame with a moving picture.
M. LUMI (Memory luminancekey)
You can swap a brighter area of a still image such as a handwritten illustration or title with a moving picture. Record a title on a "Memory Stick" before a trip or event for convenience.
C. CHROM (Camera chromakey)
You can superimpose a moving picture on a still image that used as background. Shoot the subject against a blue background. The blue area of the moving picture will be swapped with a still image.
M. OVERLAP (Memory overlap)
You can make a moving picture fade in on top of a still image.
Haioxehne HenoBHXHoro n3o6paXeHHa "Memory Stick" ha noDbHXHoe 3o6paXeHHe-MEMORY MIX
HenoDbnJxHoe n3o6paXeHne, 3aNcAnHoe Ha "Memory Stick", MoXHo HANOxITb Ha 3aNcBlaBaEMoe nO dBnJxHoe n3o6paXeHne.
M.CHROM (KHOIIKa 3aMeHbI NO ZBETHOCTN) MoXHo 3aMeHrT CnHIO O6NaCTb HEnoDVBHXHO r03OpaXeHnA, HApPIMep, pncyHOK INI KApD, POnDBNXHbIM n3OpaXeHnEM.
M. LUMI (KhoNka 3aMeHbI NO rPkOcTn)
MoxHo 3aMeHbT b6oJee CBeTnyUo 6ObAcb
HeNoDVBXHOrO n3o6paXeHnA, HApPImep,
pucyHok, cDeNaHHbO TpyKn, nInn TnTp,
noDbNxHbIM n3o6paXeHnE. IpePe
nyTeWeCTBnEM nInn KaKm-Hn6byd Co6bITnEM
3aNiWnte TnTp dJa yDo6CTBa Ha "Memory Stick".
C.CHROM (KHOIIKA ZBETHOCTN BIVDEOKAMepbl)
IIOBnIXHoe I3O6paXeHne MoXHO HaIOnKuTb Ha HEnoDnIXHoe I3O6paXeHne, KOToPoE IcNoJIb3yETcBA KaYeCTBe fOHa. ChIMMtE O6bEkT Ha CInHem fOHe. CInHra Yactb IIOBnIXHOrO I3O6paXeHne 6yEt 3aMeHeHa Ha HEnoDnIXHoe I3O6paXeHne.
M. OVERLAP (HANOJEHNE C NOMOJIbIO nAMrTNI)
Moxho CdeIaTb TaK, YTObI NOBnXHoe n3O6paXeHne NocTeENHO NOBnIOc b nobepx HenoDBNXHOrO n3O6paXeHn.
Superimposing a still image in a "Memory Stick" on a moving picture - MEMORY MIX
HaNoXeHne HenoBnXnHoro n3o6paXeHnHa "Memory Stick" Ha noDnBXnHoe n3o6paXeHne - MEMORY MIX
| M. CHROM | Still image/ HelenobvnxHoe иЗобразжения | Moving picture/ Посьхнoe иЗобразжения | Moving picture + Still image/ Посьхнoe iЗобразжения + HelenobvnxHoe iЗобразжiones |
| Background: blue/ Фон: синий | |||
| M. LUMI | Still image/ HelenobvnxHoe иЗобразжения | Moving picture/ Посьхнoe иЗобразжения | Moving picture + Still image/ Посьхнoe iЗобразжения + HelenobvnxHoe iЗобразжiones |
| HAPPY BIRTHDAY | → | HAPPY BIRTHDAY | |
| C. CHROM | Still image/ HelenobvnxHoe иЗобразжения | Moving picture/ Посьхнoe иЗобразжabella | Moving picture + Still image/ Посьхнoe iЗобразжabella + HelenobvnxHoe iЗобразжiones |
| Background: blue/ Фон: синий | |||
| M. OVERLAP | Still image/ HelenobvnxHoe иЗобразжabella | Moving picture + Still image/ Посьхнoe иЗобразжabella + HelenobvnxHoe иЗобразжabella | Moving picture/ Посьхнoe иЗобразжiones |
Superimposing a still image in a "Memory Stick" on a moving picture - MEMORY MIX
Before operation
Insert a recorded "Memory Stick" and a mini DV tape to be recorded into your camcorder.
(1) Set the POWER switch to CAMERA.
(2) Press MEMORY MIX in standby mode. The last recorded or last composed image appears on the lower part of the screen as a thumbnail image.
(3) Press MEMORY + / - or + / - on the Remote Commander to select the still image you want to superimpose. To see the previous image, press MEMORY - or - on the Remote Commander. To see the next image, press MEMORY + or + on the Remote Commander.
(4)Turn the SEL/PUSH EXEC dial to select the desired mode. The mode changes as follows: M.CHROM M.LUMI C.CHROM M.OVERLAP
(5) Press the SEL/PUSH EXEC dial. The still image is superimposed on the moving picture, and your camcorder is in standby mode.
(6) Turn the SEL/PUSH EXEC dial to adjust the effect.
(7) Press START/STOP to start recording.
HaIoxeHne HenoBnXhORo I3O6paXeHnI 13 "Memory Stick" Ha noDbNxHoe I3O6paXeHne - MEMORY MIX
Ipeed hauanom pa60tbi
BcTaBbTe BnuDeokamepy "Memory Stick" c 3aIncbIO JIeHTy MmH DV IJN 3aIncn.
(1)Установпейсяклочаель POWER в положене CAMERA.
(2)HaKMMTe KHOIIky MEMORY MIX B peXmme OxNdaHnI. IocJIeJHee 3aIncaHnOe nI IN CKOMIOHOBaHnOe I3o6paJxehne IORBHTcB HnIXHei YAcTn 3kpaHa B BVDe He6OJIbIoRo I3o6paJxehnI.
(3)HaxmTe KhoNkY MEMORY+/- nnn +/Ha npIbTe DnCTaHcNoHOro ynpaBVeHnna BblOpa HneoDbVnxHOro N3O6paXeHnna, KOtOpoe Tpe6yeTcHnAoXnTb. UTo6bI npocMOTpeTb npdeIbDyuee I3O6paXeHnna, HaxmTe KhoNkY MEMORY -nni -Ha npIbTe DnCTaHcNoHOro ynpaBVeHnna. UTo6bI npocMOTpeTb CNeDuOcEe I3O6paXeHnna, HaxmTe KhoNkY MEMORY + nIn + Ha npIbTe DnCTaHcNoHOro ynpaBVeHnna.
(4)ПовернITE диСК SEL/PUSH EXEC ДЯ
Быбopa Нжноре ржима.
Реким 6удет Измehятсьс следуюцим
образим:
M. CHROM ↔ M. LUMI ↔ C. CHROM
← M. OVERLAP
(5)Haxmnte Ha nck SEL/PUSH EXEC. HenoDbxKHOe n3o6paKeHne HaKJaIbIbAeTcHa IIOBxKHOe, a BnDeOkamepa nepexOHTBpeXIM OxndaHna.
(6)ПовернITE диСК SEL/PUSH EXEC дяперулровки дффекта.
(7)HaxmTe KhoNkY START/STOP nla Naqana 3aIncn.
Items to be adjusted
| M. CHROM | The colour (blue) scheme of the area in the still picture which is to be swapped with a moving picture |
| M. LUMI | The colour (bright) scheme of the area in the still picture which is to be swapped with a moving picture |
| C. CHROM | The colour (blue) scheme of the area in the moving picture which is to be swapped with a still picture |
| M. OVERLAP | No adjustment necessary |
As the bar is shorter, the effect is enhanced.
3JeMeHTbI dIa peryIinpoBkn
| M. CHROM | LüBeTobAra rAmma (cInHЯ) o6nactn HeNoDVBxHOro I3O6paJxEHHa, KOTOpYU HUxHOr 3aMeHHTb I0DvBxHbIM I3O6paJxEHHeM |
| M. LUMI | LüBeTobAra rAmma (cBETnla) o6nactn HeNoDVBxHOro I3O6paJxEHHa, KOTOpYU HUxHOr 3aMeHHTb I0DvBxHbIM I3O6paJxEHHeM |
| C. CHROM | LüBeTobAra rAmma (cInHЯ) o6nactn I0DvBxHOro I3O6paJxEHHa, KOTOpYU HUXHo 3aMeHHTb HeNoDVBxHbIM I3O6paJxEHHeM |
M. OVERLAP Perynipovka He Tpe6yeTc
Hem Kopooyo noIocA, TEm CnIbHee 3cpeKT.
Superimposing a still image in a "Memory Stick" on a moving picture - MEMORY MIX
To change the still image to be superimposed
Do either of the following:
- Press MEMORY + / - after step 6.
- Press the SEL/PUSH EXEC dial after step 6, and repeat the procedure from step 3 (except M. OVERLAP).
To change the mode setting
Press SEL/PUSH EXEC dial after step 6, and repeat the procedure from step 4 (except M. OVERLAP).
To cancel MEMORY MIX
Press MEMORY MIX.
During recording
You cannot change the mode setting.
The "Memory Stick" supplied with your camcorder has 20 images stored
-For M.CHROM:18 images (such as a frame) 100-0001 to 100-0018
- For C. CHROM: two images (such as background) 100-0019 to 100-0020
Sample images
Sample images stored in the "Memory Stick" supplied with your camcorder are protected (p. 202).
If a still image to be superimposed has lots of white areas
The thumbnail image may not be displayed clearly.
Image data modified with personal computers or shot with other equipment You may not be able to play them back with your camcorder.
HaIoxeHne HenoBnXhORo I3O6paXeHnI 13 "Memory Stick" Ha noDbNxHoe I3O6paXeHne - MEMORY MIX
UTo6bln3MeHnTbHaKnaIbIbAemoe HeNoDbNxHoe n3O6paXeHne
BbInOnHnTe Ondo n3 CJeDyUOux DeNCTBn.
-HaXMITE KHOny MEMORY+/- nocne nyHKTa 6.
-HaXMMTe HaДИСK SEL/PUSH EXEC noCte nyHKTa 6 И NOВТОРИТЕ npOeДуpy C nyHKTa 3 (КрOME M. OVERLAP).
ДлнИЗМЕHEHЯ yctaHOBKn peKmHa Na DCNk SEL/PUSH EXEC nocne nyHKta 6и noBToPiTe npOeDpy c nyHKta 4 (Kpome M. OVERLAP).
Длг OTMeHbI peXmAMEMORY MIX
HaxmTe KhoNky MEMORY MIX.
BoBpema3aHncn
YctaHOBkypeXIMaI3MeHbTbHeIb3a.
"Memory Stick", npnilaraemar K Bndeokamepe coepknt 20 n3o6paxhen
Moryt He BOCPON3BODITbC NOMOUsbIO daHHo BNDeOKaMepbI.
Recording an image from a mini DV tape as a still image
Your camcorder can read moving picture data recorded on a mini DV tape and record it as a still image on a "Memory Stick." Your camcorder can also take in moving picture data through the input connector and record it as a still image on a "Memory Stick."
Before operation
Insert a recorded mini DV tape and a "Memory Stick" into your camcorder.
(1) Set the POWER switch to VCR.
(2) Press. The picture recorded on the mini DV tape is played back.
(3) Keep pressing PHOTO lightly until the picture from the mini DV tape freezes. "CAPTURE" appears on the LCD screen or in the viewfinder. Recording does not start yet.
(4) Press PHOTO deeper. The image displayed on the screen will be recorded on a "Memory Stick." Recording is complete when the bar scroll indicator disappears.
3aHnscb n3o6paXeHnC JIeHTbl MmHn DV KaK HeNoDvXhOro n3o6paXeHn
Bndeokamepa moKTe CHTbBaT daHbIe dBXyueoRc n3obpaXeHn, 3aNcAHHbIe HaJIeThe MHN DV, n 3aNcBbATb INx KaK HeNoDVBHXHOe n3obpaXeHne Ha "Memory Stick". Bndeokamepa TaKKe MoKTe npINHMaTb daHHbIe DnBXuyeoRc n3obpaXeHn Upe3 BXoHDnI pa3bEm IN 3aNcBbATb INx KaK HeNoDVBHXHOe n3obpaXeHne Ha "Memory Stick".
Ipeed hauanom pa60tbI
BCTaBbTe 3aIncaHHyIO JeHTy MmHi DV n "Memory Stick" B BnDeOkaMepy.
(1) YctaHOBInTe npeKJIIOUaTeIb POWER B noJIOKeHne VCR.
(2)Haxmnte KhoNkky ▷.HaunetcBocnpoIm3BeJeHne N3O6paKeHnA,3aIncAHOrO HaJIeHTe MHN DV.
(3)ДерхиTe cIeRka HaxkaToH KhoNky PHOTO DoTexnop,nokaИЗбрахжЕнсСЛeHTbIMHN DV He 6yJeT“3aФИКсИрванo”.Ha 3KpaHe JKKД nIN B VINOДСКаTeNe NOBITcH INDInKaUЯ“CAPTURE”.3aINCb eIe He NaHnHaETcR.
(4)Haxmnte KhoNky PHOTO cnIbHee. 13o6paKeHne Ha 3KpaHe 6yDet 3aIncAoHa "Memory Stick". 3aIncb 6yDet 3aBepSeHa, KOrDa IcYe3HeT INDnKaTOP B BVNe nOLOCKn.
3


CAPTURE
4
Recording an image from a mini DV tape as a still image
When the access lamp is lit or is flashing Never shake or strike the unit. Also, do not turn the power off, eject a "Memory Stick" or remove the battery pack. Otherwise, image data breakdown may occur.
If "☑" appears on the LCD screen or in the viewfinder
The inserted "Memory Stick" is incompatible with your camcorder because its format does not conform to that of your camcorder. Check the format of the "Memory Stick."
If you press PHOTO lightly in the playback mode
The playback pauses momentarily.
Sound recorded on a mini DV tape
You cannot record the sound from a mini DV tape.
Titles that are already recorded on mini DV tapes
You cannot record the titles on a "Memory Stick."
When you press PHOTO on the Remote Commander
Your camcorder immediately records the image that is on the screen when you press the button.
3aHcB n3o6paXeHHcJeHTbIMnH DV KaK HenoDbHXHoro n3o6paXeHHa
Korda roput uH Muraet lamnoyka oshaenna
HnKOrda He TpncTe BnDeokamepy n He cTuHrTe Pn He. TaKxe He BbIKIOuayte nITaHne, He BbIHMaJTe "Memory Stick" n3 OTceKa n He ChmMaTe 6bTaapeHbI b6Jok. B npOTNBOM Cnyae daHHbe I3O6paXeHnM OMyT 6blb NOBpeXdeHbl.
EcnHa 3KpaHe KKII INB V BnDOnckaTeIe NOBHTC HINkauH“
YcTaHOBJIeHa "Memory Stick", KOTOPaH He COBMeCTmA C BnDEOKaMepoI, NocKoJIbKy ee fOpMaT He COOTBeTCTByET fOpMaTy BnDEOKaMepbI. IpoBepTe fOpMaT "Memory Stick".
EcIn B peKIMe BocPon3BedeHnCnerKa HaxaTb KOnkPy PHOTO
Bo BpemBocnpoun3BeDnHcpa3y Je BKJIIOUaETcNaY3a.
3Byk, 3aIncaHHbI Ha JeHTy MmH DV
CJIeHbIMHN DV HeIb3aIncbIbTaB 3ByK.
Tntpbl,pahee 3auncaHHbIe HaJIeHTbl MUNH DV
3Tn Tttpbl HeIb3aIncbIbTaHa "Memory Stick".
Ecnna Haxkab KhoNky PHOTO ha nyIbTe dncTaHcOnHOrO ynpaBHeHH
Bndeokamepa cpa3y je 3anuweT n3o6paXeHne, KOtOpoe 6yJeT Ha 3KpaHe B MOMeHT HaxKaTnKHOPIKn.
Recording a still image from other equipment
(1) Set the POWER switch to VCR on your camcorder and set DISPLAY in ETC to LCD in the menu settings.
(2) Play back the recorded tape, or turn the TV on to see the desired program. The picture from the other equipment appears on the LCD screen or in the viewfinder.
(3) Follow steps 3 and 4 on page 187.
When recording an image through theVIDEO jack
3aIncB HeNoDvXHOro n3o6paXeHHc DpyrOro o6OpyDoBaHHa
(1) yctaHOBIne IpeKJIIOuHaTeIb POWER B NOJOxKeHne VCR Ha BnDEOkamepe IN KOMaHdY DISPLAY B ETC B NOJOxKeHne LCD B yCTaHOBkax MeHIO.
(2)HaunHe BoCnpOn3BeJeHne 3aIncaHNoJ IeHTbI INI BKNIOUHTe TeJIeBUN3Op dJa npocMOTpa XeJenaEMoN pIporpaMMbl. H3O6paXeHne CdpyRTO o6OpyDobAHnI NOBNTcHa 3KpaHe XKД INI B BNDOUCKaTeJIe.
(3) BbINOHNTE nyHKtB 3 n 4 h cTp. 187.
Connect the yellow plug of the A/V connecting cable supplied with your camcorder to the video output jack on the VCR or the TV.
Connect using an S video cable (not supplied) to obtain high-quality pictures
With this connection, you do not need to connect the yellow (video) plug of the A/V connecting cable.
Connect an S video cable (not supplied) to the S video jacks of both your camcorder and the VCR/TV.
This connection produces higher quality DV format pictures.
IopKnIOUHTe JKeNTbI uTekep coeHNHTelbHOro Ka6eJIa ayDnO/BuJeO, npJlraeMOrO K BnDEOKaMepe, K BbIXODHomy rHe3dy BnDEOCrHaHa Ha BnDEOMarHnToΦoHe nIi TeLeBn3ope.
CoéiHHeHne c NOMOJIbIO BnDEoKa6eJIaS (He BXoIIT B KOMJIeKT) IJRA NOJUYeHnB bICOKoKaueCTBeHHbIX N3o6paKeHn
Pn TaKOM CoeHHeHn He HyXHo NOKluOaTb JeIbTI (BnDeo) 1TeKepe COeHNHTbHO Ra6enay ayno/BnDeo.
ПодсоeДиНTe BnDEOKa6BJ S (He BXOДNT B KOMNJIeKT) K BnDEOrHc3dAm S Ha BnDEOKaMepe N BnDEOMarHHToФОHe/ TelenBn3Ope.
3TO CoeINHeHne N03BOJnE TNOyUHTb BbICOKOkaYeCTBeHHoe N3o6paXKeHne fOpMaTa DV.
Recording an image from a mini DV tape as a still image
When recording the image through the Dv IN/OUT jack
3aIncB n3o6paXeHnC JIeHTbIMnH DV KAK HeNoDBrXHOrO n3o6paXeHn
Pn3aIncn n3o6paXeHnY cpe3 rHe3do Dv IN/OUT
Copying still images from a mini DV tape - Photo save
Using the search function, you can automatically take in only still images from mini DV tapes and record them on a "Memory Stick" in sequence.
Before operation
- Insert a recorded mini DV tape into your camcorder and rewind the tape.
- Insert a "Memory Stick" into your camcorder.
(1) Set the POWER switch to VCR.
(2) Press MENU to display the menu.
(3) Turn the SEL/PUSH EXEC dial to select , then press the dial.
(4) Turn the SEL/PUSH EXEC dial to select PHOTO SAVE, then press the dial. "PHOTO BUTTON" appears on the LCD screen or in the viewfinder.
(5) Press PHOTO deeply. The still image from the mini DV tape is recorded on the "Memory Stick." The number of still images copied is displayed. "END" is displayed when copying is completed.
KoиpoBaHne HeNoDBrXhblx 136paXeHn CJIeHTbIMHN DV - CoXpaHHeB B pAMrTn FOToCHmKOB
C nomouho cyHKuHn NOCKa MOxHo aBTOMaTnueckn DeNaTb CHIMKn CJeHT MNH DV nocleDoBaTeNbHO 3anCbIbTaBnx Ha "Memory Stick".
Ipeed hauanom pa60tbi
BCTaBbTe 3anncahnyJeHtMy MNH DV BndeOKamepy npepmoTaIe ee Ha3a.i.
BCTaBbTe "Memory Stick" B BnDeokamepy.
(1)YcTaHOBInTe npeKJIouaTeIb POWER B noJIOKeHne VCR.
(2)HaxmTe KhoNky MENU OTo6paXeHHa MeHIO.
(3)ПовернITE диСK SEL/PUSH EXEC дя BBбopa yCTaHOBKN , a 3aTeM haЖмITE Ha диСК.
(4)ПовернITE ДИСК SEL/PUSH EXEC ДЯ
Выбopa установский PHOTO SAVE, a
Затем нахмITE НдИСК. Hab зкра themselves
ДИМ в ВИДОПСКАТЕ NOВВТСЕ ИДИКАЦА
" PHOTO BUTTON".
(5)HaXMMTe KHOJNky PHOTO cInbHee. HeNoDbVnKHoe H3OpbaxKeHne HaJeHTe MmHN DV 3aNNuIeTcHa "Memory Stick". ByDeT OTo6paxKeHo KOINueCTBO cKoINpOBaHbIX HeNoDbVnKhBIX N3OpbaxKeHn. P0 3aBePusHn KOnIPOBaHn8 6yDeT OTo6paxKeHn INDnKaun "END".
Copying still images from a mini DV tape - Photo save
To cancel copying
Press MENU.
When the memory of the "Memory Stick" is full
"MEMORY FULL" appears on the LCD screen or in the viewfinder, and the copying stops. Insert another "Memory Stick" and repeat the procedure from step 2.
When the access lamp is lit or flashing
Never shake or strike your camcorder. Also, do not turn the power off, eject the "Memory Stick" or remove the battery pack. Otherwise, the image data breakdown may occur.
To record all the images recorded on the mini DV tape
Rewind the tape all the way back and start copying.
If the write-protect tab on the "Memory Stick" is set to LOCK
"NOT READY" appears when you select the item in the menu settings.
When you change the "Memory Stick" in the middle of copying
Your camcorder resumes copying from the last image recorded on the previous "Memory Stick."
KoHnpOBaHne HeNoBnXhblx H3O6paXeHm CJeHTbIMnH DV-CoxpaHeHne B nAmrTn fOToCHMkOB
ДЯ OTMeHbI KOnnpoBaHnA
HaxmTe KhoNkY MENU.
B clyae nepenolneHn "Memory Stick"
HnKoIa He TpRcITe BnDeokamepy n He CTyUHTe IIO He. TaKxHe HbIKIoUaIte nITaHne, He BbIHMaIte "Memory Stick" n3 OTcKa n He ChIMaIte 6bTapeiHbI bIok. B npOTuBHom cIpyae daHHbIe I3O6paXeHnA MOrYt 6bItb NOBpeKJdeHbl.
Viewing a still picture – Memory Photo playback
You can play back still images recorded on a "Memory Stick." You can also play back six images at a time by selecting the index screen.
Before operation
Insert a "Memory Stick" into your camcorder.
(1) Set the POWER switch to VCR or MEMORY. Make sure that the LOCK switch is set to the right (unlock) position.
(2) Press MEMORY PLAY. The last recorded image is displayed.
(3) Press MEMORY + / - or + / - on the Remote Commander to select the desired still image. To see the previous image, press MEMORY - or - on the Remote Commander. To see the next image, press MEMORY + or + on the Remote Commander.
BCTaBbTe "Memory Stick" B VbIeOkaMepy.
(1)YcTaHOBInTe nepeKJIIOUaTeIb POWER B noJIOKeHne VCR nIN MEMORY. Y6eINTEcB, yTO nepeKJIIOUaTeIb LOCK ycTaHOBInE B npABoE noJIOKeHne (pa36JIOKupoBaH).
(2)Haxmnte KhoNky MEMORY PLAY. IoBvTcI nocJeDHee 3aIncaHHoe n3o6paXKeHne.
(3)HaXmnte KhoNkY MEMORY + / - nIIN KHOKNy + / - Ha nIbTe InCTaHcUOHHO ynpabLeHnI dIra Bb6Opa Tpe6yEmoR HEnoDBNXKHO r3o6paXeHnI. YTo6bl npocMOTpeT bpeDlyuSce I3o6paXeHne, HaxmTe KhoNkY MEMORY- nIIN-H aIyBe IncTaNcUOnHOrO ynpabLeHnI. YTo6bl npocMOTpeT cIeDyUoSce I3o6paXeHnI, HaxmTe KhoNkY MEMORY + nIIN + Ha nIbTe IncTaHcUOnHOrO ynpabLeHnI.
To stop memory photo playback Press MEMORY PLAY again.
ДлЯ OCTaHOBKIN BOCPON3BedeHnФOTOCHIMKOB N3 namrTи
HaxmTe KhoIky MEMORY PLAY eue pa3.
To play back recorded images on a TV screen
- Connect your camcorder to the TV with the A/V connecting cable supplied with your camcorder before operation.
- When operating memory photo playback on a TV or on the LCD screen, the image quality may appear to have deteriorated. This is not a malfunction. The image data is as good as ever.
- Turn the volume of the TV down before operation, or noise (howling) may be output from the TV speakers.
When no images are recorded on the "Memory Stick"
The message "NO FILE" appears.
Image data modified with personal computers or shot with other equipment You may not be able to play them back with your camcorder.
Note on the date/time indicator
Recording date/time is not displayed,
however, it is automatically recorded on the
"Memory Stick." You can check the recording date/time while in memory playback mode by pressing DATA CODE.
Screen indicators during still image playback
Дя Воспpon3BedeHЯ 3aIncaHHbIX n3O6paXeHn Ha 3KpaHe TeJIeBu3Opa
Total number of recorded images/
Homep n3o6paXeHHa/
O6uee KOnuYeCTBO 3aIncaHbIX N3o6paXejHn
Print mark/
IeuaTHbI 3HaK
Protect indicator/
INHdkaTop 3aunTbI
On data file name
- When the hyphen is indicated between the directory and the file number, this data file name means that this file corresponds to the DCF98 standard.
- When the underscore indicates that the file does not correspond to the DCF98 standard.
- The directory is not indicated if the file structure in the "Memory Stick" does not correspond to the DCF98 standard.
- The "Directory error" message may appear if the file structure in the "Memory Stick" does not correspond to the DCF98 standard. In this case, you cannot record on that "Memory Stick," however, you can play back images in the "Memory Stick."
- When the data file name is flashes, the file may be broken or the file format does not correspond to your camcorder.
Playing back six recorded images at a time (index screen)
You can play back six recorded images at a time. This function is especially useful when searching for a particular image.
(1) Set the POWER switch to VCR or MEMORY. Make sure that the LOCK switch is set to the right (unlock) position.
(2) Press MEMORY INDEX to display the index screen.
CbeHnO mbHn paJna daHHbIX
- Ecni MEXdy Ha3BaHnEm DnpeKTopn N HOMepom faiJa NMeETcAdePnc, TaKoe NIMr faiJa O3NaHaayet, YTO OH COOTBeTCTByET cTaNapTy DCF98.
- EcIn Mexky Ha3BaHnEM DineKTopm n Homepom faiJa IMeETC CnMBOI NOUePKuBAHn, TaKoe NMa faiJa O3HaueT, YTO OH He COOTBeTCTByET cTaHdApTy DCF98.
Директория He yka3bIBaetca,ecnntpya phaIIa Ha "Memory Stick" He COOTBeTCTByeT CTanapTy DCF98. - Ecni CtpyKtpya paima Ha "Memory Stick" He COOTBeTCTByeT CTAndapTy DCF98, MoKeT IORBnTBcA COO6UeHne 一 _ 0 ^ 一 DIRECTORY ERROR". B 3ToM cIyuae npOn3BOuNTb 3aInCb Ha "Memory Stick" HeJIb3r, HO MOxHO BOCIpOn3BOuNTb n3o6paJxHnC "Memory Stick".
KordaIMMaФaIJa DaHHbIX MmraET,TO, BO3MOxHO,paJI NOBpeJcH,INI erO φOpMaT He COOTBeTCTByET daHHoI BnDeOKaMepe.
OndHOBpemHeHoe BocnpOn3BedeHne 8eCTn 3aIncahHbIX N3o6paJxehn (mHndeKcHbI 3KpaH)
Moxho BOCpOu3BOUntb 1eCTb 3aIncAHhIx
H3o6paXeHn OJHOBpeMeHNo. 3Ta fYHKcNIA
ABJIETcO OO6eHHo yO6HoN npi
BbIOJIHeHm IONCKa OTdEJIbHbIX
H3o6paXeHn.
(1)YcTaHOBInTe nepeKJIIOUaTeIb POWER b noLoXeHne VCR nIN MEMORY. Y6eIInTeCb, yTo nepeKJIIOUaTeIb LOCK ycTaHOBInB nPaBOe nIoXeHne (pa36JIOKIpOBAH).
(2)HaxmTe KhoNky MEMORY INDEX nIa oTo6paXeHn INHeKCHOrO 3kpaHa.
Viewing a still picture - Memory Photo playback
A red mark appears above the image that is displayed before changing to the index screen mode.
MEMORY-:to display the previous six images
MEMORY ^+ : to display the following six images
ПрсмOTР HeNoBnXHOrO n3o6paXeHn - BocnpOn3BeJeHne fOTOCHIMKOB u3 NaMrtN
HaɪnɪzɔpʌkæHENm nɒrBntc kpačhər Meɪtka ▶, KOTOPaɪ OɪtɔpʌkæTc rɪpeɪnnepeKlIyueHEm B pɛkɪm INdEκHOrO ɜːkpɑːha.
To return to the normal playback screen (single screen)
Press MEMORY + / - to move the mark to the image you want to display on full screen, then press MEMORY PLAY.
Files modified with personal computers These files may not be displayed on the index screen. Image files shot with other equipment may not be displayed on the index screen either.
Note
When displaying the index screen, a number appears above each image. This indicates the order in which images are recorded on the "Memory Stick." These numbers are different from the data file names.
[a]IMRAaIa
[b]MeTka
Дя BO3Bpata KЭКрану 06bIyHOrO BOCnpon3BeDEHnR (ODINHOHyBn 3KpaH)
Hajmai Te KhoNky MEMORY +/-- nIe npemuehen HMeTkn Kn3o6paXeHIO, KOtOpoe HxKHO OTo6pa3ntb Ha noJIbIy 3kpaH, a 3aTeM HaxMnte KhoNky MEMORY PLAY.
3TnФaIbI MOryT He OTo6paKaTbcra Ha
HNeKCHOM 3KpaHe.ФaIbI N3o6paKeHNI,
CHrTBIX C NOMOsbIO dpyroI aNpapaTypbl,
TaKxE MoRyT He OTo6paKaTbcra Ha
HNDeKCHOM 3KpaHe.
Ppmeuahne
Viewing the recorded images using a personal computer
The image data recorded with your camcorder is compressed in the JPEG format. If you use the application software, "PictureGear 4.1Lite" supplied with your camcorder, you can see images recorded on a "Memory Stick" on a computer screen. Use the Memory Stick Reader/Writer supplied with your camcorder or PC card adaptor for Memory Stick (not supplied) for this operation. For detailed instructions on operation, refer to the operating instructions of the Memory Stick Reader/Writer or PC card adaptor for Memory Stick and your application software. For details, refer to the operating instructions of your accessory.
- Do not modify the directory of the file that corresponds to the DCF98 standard. The modified file will not be read.
- If you use the new "Memory Stick," be sure to use it first with this camcorder.
Copying an image recorded on a "Memory Stick" to mini DV tapes
You can copy still images or titles recorded on a "Memory Stick" to a mini DV tape.
Before operation
Insert a mini DV tape for recording and a "Memory Stick" for playback into your camcorder.
(1) Set the POWER switch to VCR.
(2) Using the video control buttons, search for a point where you want to record the desired still image. Set the mini DV tape to playback pause mode.
(3) Press REC and the button on its right simultaneously on your camcorder. The mini DV tape is set to the recording pause mode.
(4) Press MEMORY PLAY to play back the still image you want to copy.
(5) Press to start recording and press again to stop.
(6) If you have more to copy, repeat steps 4 and 5.
Ko\Pu\rO\BaHne n3ObpaXeHn, 3a\Pu\Ca\HbIx Ha "Memory Stick",HaJIeNTbIMnH DV
Mожно коироваь HeNoOBnKxHbIe 1306paXeHnI INI TnTpbl, 3aINcaHhble Ha "Memory Stick", HaJIeHTy MmH N DV.
Ipeed nayanom pa60tbi
BCTaBbTe IeHTy MmH DV, Ha KOTopy IO 6yIeT npOn3BOuNTbCz 3aIINcB, n "Memory Stick", c KOTOpOJ 6yIeT OCyUeCTBJIaTbCBAocPOn3BeDeHHe, B VInDeOKaMepy.
(1)Установские песеклоча teleportь POWER в положене VCR.
(2)C NOMOUIKHOJOK BUNDeOeOKHTPOJIa HauDnTe MeCTO,OTKYDa Heo6XoIMHOHaatab 3aIncb Tpe6yEMOro HeNoDBNXHORIO3n6paeHn. YctaHOBNTe JNeHTy MInH DV BpeXIM NaYbI BOCPOn3BeDEHn.
(3)Одовременно нажмп Te Kноку RECи Кноку справа OT Hee Ha Bndeokampe. Лента мин DV yctahOBJIeHa в ржим пay3bl 3aПИСN.
(4)HaxMMTe KhoNkY MEMORY PLAY nIy BOCnPOn3BVeDEHnA HeNoDvNxHOrO n3o6paXeHnA, KOtOpoe Heo6xOdmo CKoNpPoBaTb.
(5)HaXMMTe KHOJky III, YTO6bI HaYaTb 3aINcB.ДЯ OCTaHOba 3aINcN CHOBA HaXMMTe KHOJky III.
(6)EcHn HeoXoDmO TaKke cKoNipObaTb npyrIe n3o6paXeHnA, noBToPte npHKtbl 4n5.
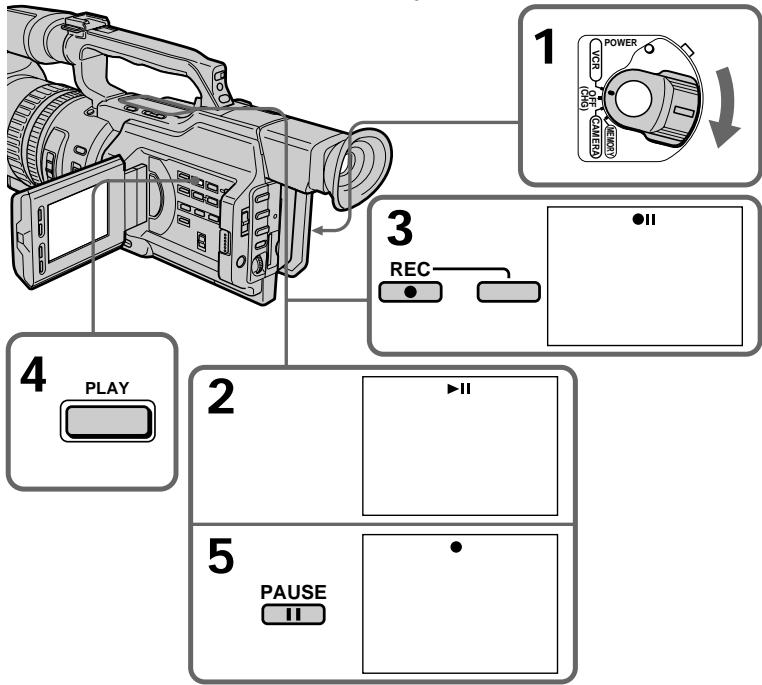
Copying an image recorded on a "Memory Stick" to mini DV tapes
To stop copying in the middle Press
During copying
- You cannot operate the following buttons: MEMORY PLAY, MEMORY INDEX, MEMORY DELETE, MEMORY+, MEMORY-, and MEMORY MIX.
- If you continue copying, do not use EDITSEARCH to search for the point where you want to record the desired still image. If you do, the playback image disappears from the screen.
Note on the index screen
You cannot record the index screen.
Image data modified with personal computers or shot with other equipment You may not be able to copy them with your camcorder.
If you press DISPLAY in standby or recording mode
You can see memory playback and the file name indicators in addition to the indicators pertinent to mini DV tapes, such as the time code indicator.
KoHnpOBaHne n3O6paJxHn, 3aHncaHbIX Ha "Memory Stick", Ha JeHTbl MmH N DV
Bo3MOxH0, INx HEnb3a 6yDet cKoNIpOBaTb C nOMOsbu BnDeokamepbl.
EcJn HaxaTb KhoNky DISPLAY BpeXmE OxuDaHnI nn 3aIncn
Kpome INHINKATOPOB,OTHOCAUINXCA K JIeHTAMMHN DV,HaPnIMep,INHINKATOP KOaBpeMeHN,MOXHO yBNDeTb INHINKATOPbIBOCpON3BeDEHNA 13 pAMrTN N IMEHNpaJna.
Playing back images continuously - SLIDE SHOW
You can automatically play back images in sequence. This function is useful especially when checking recorded images or during a presentation.
Before operation
Insert a "Memory Stick" into your camcorder.
(1) Set the POWER switch to MEMORY. Make sure that the LOCK switch is set to the right (unlock) position.
(2) Press MENU to display the menu.
(3) Turn the SEL/PUSH EXEC dial to select l , then press the dial.
(4) Turn the SEL/PUSH EXEC dial to select SLIDE SHOW, then press the dial.
(5) Press MEMORY PLAY. Your camcorder plays back the images recorded on the "Memory Stick" in sequence.
HenpepbIBHoe Bocnpo3BedeHne n3o6paXeHn - SLIDE SHOW
Moxho aBTOMaTnueCKN BOCPOn3BODnTb
H3O6paXeHNrB HnepepbIBHO
nocLeDoBaTeIbHOCTN. 3Ta cyHKs
oc6eHHo yO6Ha npn npOBepKe 3aIncAHhIX
H3O6paXeHNuIN BO BPem Ppe3ENTaUN.
Ipeed hauanpa60tbI
BcTaBbTe "Memory Stick" B BnIeokamepy.
(1)Установпейсяклочаел POWER в положене MEMORY.Убенитсь,что поеклочаел LOCK установен в праобе положене (pa36лokиров).
(2)HaxmTe KhoNky MENU OTo6paXeHHaMeHIO.
(3)Повернente ДИСК SEL/PUSH EXEC ДЯ
Выбoga уCTановки , a 3aTeM наЖмITE
На ДИСК.
(4)ПовернITE ДИСК SEL/PUSH EXEC ДЯ
Быбopa установки SLIDE SHOW, a за tem
нав KMЛТЕ на ДИСК.
(5)HaXMMTe KhoNky MEMORY PLAY. BnDeokamepa BocnpoIm3BoDnT n3O6paXKeHn, 3aIncaHbIe Ha "Memory Stick", B HnpepbIBHoI nocJeIOBaTeJIbHOCTn.
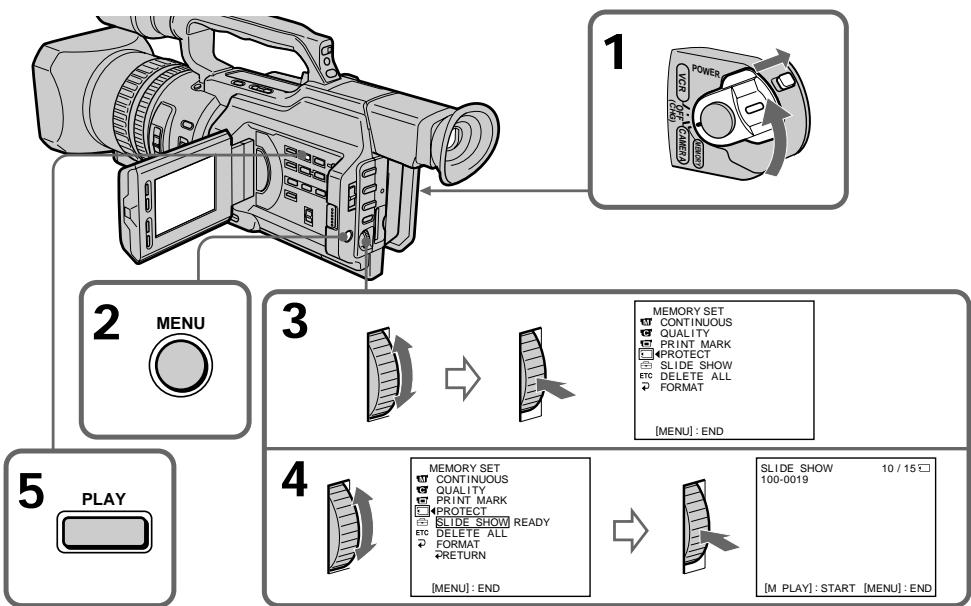
Playing back images continuously - SLIDE SHOW
To stop or end the slide show Press MENU.
To pause during a slide show
Press MEMORY PLAY.
To start the slide show from a particular image
Select the desired image using MEMORY + / - buttons before step 2.
To view the recorded images on TV
Connect your camcorder to a TV with the A/V connecting cable supplied with your camcorder before operation.
If you change the "Memory Stick" during operation
Be sure to follow the steps again from the beginning.
HenpepbIBHOe BOCpOu3BVeJeHne n3o6paXeHn - SLIDE SHOW
Дя OCTaHOBKи IJn IpeKpaUeHnI demOHcTpaCn N3O6paXKeHnI
HaxmTe KhONKy MENU.
Длпay3ы BO Врем Демонстраци n3образхен
HaxmTe KhOnKy MEMORY PLAY.
Дян haуала noka3a n3o6paxken c onpeidenenHoro n3o6paxhen
Ipeep nyHKtOM 2BbIbePnte Tpe6yEmoe n3o6paXeHne c nOmoUbIO KHOIOK MEMORY +/-.
To prevent accidental erasure of important images, you can protect selected images.
Before operation
Insert a "Memory Stick" into your camcorder.
(1) Set the POWER switch to MEMORY or VCR. Make sure that the LOCK switch is set to the right (unlock) position.
(2) Play back the image you want to protect (p. 193).
(3) Press MENU to display the menu.
(4)Turn the SEL/PUSH EXEC dial to select, then press the dial.
(5)Turn the SEL/PUSH EXEC dial to select PROTECT, then press the dial.
(6) Turn the SEL/PUSH EXEC dial to select ON, then press the dial.
(7) Press MENU to erase the menu display. The “o-n” mark is displayed beside the data file name of the protected image.
Пре dioTbpaueHne cnyuahoro ctnpaHn - 3aunTa n3o6paXeHn
Длп п dedotвраши Ссучайно CTирашиьхьхИЗбрахенИ BыбраHHьeИЗбрахенИ можнO 3aцNTТь.
Ipeed hauanom pa6oTbI
BcTaBbTe "Memory Stick" B BnDeokamepy.
(1)Установпейсякючateь POWER в положене MEMORY ул ВСR.
Y6eIInTeCb, YTO nepeKlnuOaTeJIb LOCK yCTaHOBnE H IpaBOe NIOJXeHne (pa36JIOKIpOBaH).
(2) Bocnpoun3BeInTe n3o6paXKeHne, KOTOpoe HxKHO 3aUHTnTb (CTp. 193).
(3)HaxmTe KhONkY MENU dIЯ OTo6paXeHnMaMeHIO.
(4)ПовернITE ДИСК SEL/PUSH EXEC ДЯ
Выбopa уCTановки , a 3aTeM нажмITE
На ДИСК.
(5)ПовернITE диСК SEL/PUSH EXEC дя Выбopa усТановки PROTECT, a 3aTeM нажмITE Ha диСК.
(6)ПовернITE диСK SEL/PUSH EXEC ДЯ
Быбopa усановки ON, a 3aTeM нахмITE
На диСК.
(7)HaxmTe KhoNky MEnU dIyuaIeHnIuIkaIeMHeIO.PaDMc Ha3BaHnEM paIIaI3auIeHHoro N3O6paJxEHnI NOBHTC3Hak "0-".
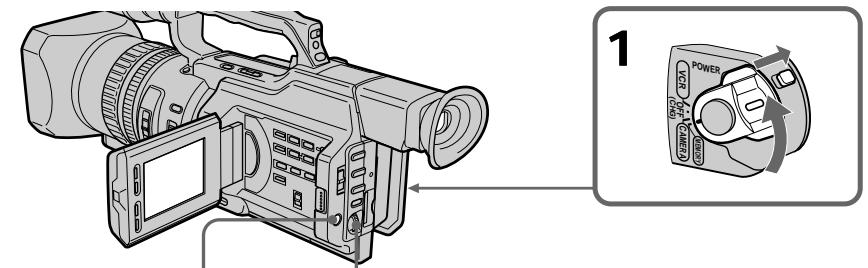
3,7
MENUE
4


5
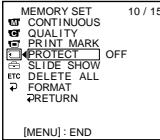


6


10/15□

Preventing accidental erasure - Image protection
To cancel image protection
Select OFF in step 6, then press the SEL/PUSH EXEC dial.
Note
Formatting erases all information on the "Memory Stick," including the protected image data. Check the contents of the "Memory Stick" before formatting.
If the write-protect tab on the "Memory Stick" is set to LOCK
You cannot carry out image protection.
Пре dioTbpaueHne clyuaHoroCTnpaHn - 3aunTa n3o6paKeHn
ITRAOTMeHbI3aunTbIM3o6paXeHNIA
BbIbePte yctaHOBky OFF b nyHKTe 6, a 3aTeM haxmTe Ha dNc SEL/PUSH EXEC.
Приимechание
Bo Bpemf opmatipobAHn ydaJIyOTcBce daHHbIe Ha "Memory Stick", BKIOUaJ daHHbIe 3aunuHbIX n3O6paXeHIn. Ipeed fopmatipobAHnem npOBepbTe coOpexKmOe "Memory Stick".
EcInI JeneCTOK 3aunTbI OT 3aHcN Ha "Memory Stick" yctahOBJIeB N IIOJXeHne LOCK
BbIIOJIHITb 3aIHTy n3O6paXKeHn8 6yJeT HeBO3MOxHO.
Deleting images
You can delete images stored in a "Memory Stick."
Deleting selected images
Before operation
Insert a "Memory Stick" into your camcorder.
(1) Set the POWER switch to MEMORY or VCR. Make sure that the LOCK switch is set to the right (unlock) position.
(2) Play back the image you want to delete (p. 193).
(3) Press MEMORY DELETE. "DELETE?" appears on the LCD screen or in the viewfinder.
(4) Press MEMORY DELETE again. The selected image is deleted.
YdaJIeHne H3o6paJKeHn
YdaJIeHne BbIbpaHHbIX n3o6paxKeHn
Ipeed hauanpa60tbI
BcTaBbTe "Memory Stick" B BnDeokamepy.
(1)Установпейсякючать POWER в положене MEMORY ул ВСR.
Y6eIntecb, YTO nepeKnIOuATEJIb LOCK yCTaHOBInE B npAOE NOLOXKeHne (pa36JIOKIpOBAH).
(2) Bocnpo3BeNeIte 306paXeHne, KOTOpoe Heo6xoJIMO ydaJIntb (cTp. 193).
(3)HaxmTe KhONky MEMORY DELETE. INdNkaTOp "DELETE?" noBvTcRa Ha 3KpaHe KKД nIIN B vDOnCKaTeNe.
(4)HaKmTe KhONkY MEMORY DELETE eue pa3. BbI6paHoe n3o6paXeHne 6ydet ydaJIeHO.
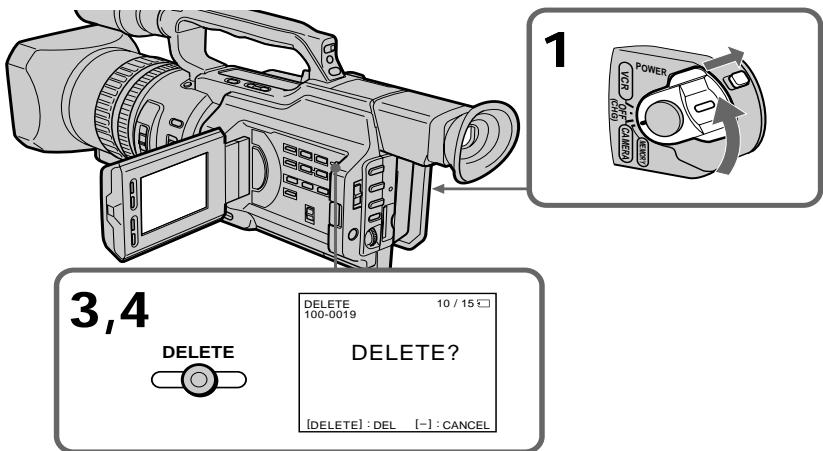
To cancel deleting an image
Press MEMORY - in step 4.
To delete an image displayed on the index screen
Press MEMORY + / - to move the mark to the desired image and follow steps 3 and 4.
Длг OTMeHbI ydaJIeHnI N3O6paXeHnI
HaxmTe KhoNky MEMORY - B nyHKte 4.
- To delete a protected image, first cancel image protection.
- Once you delete an image, you cannot restore it. Check the images to be deleted carefully before deleting them.
While "DELETING" appears
Do not turn the POWER switch or press any buttons.
If the write-protect tab on the "Memory Stick" is set to LOCK
You cannot delete any image.
Примеанья
He n3meHnIte noIOnOKeHne nepeKJIouChaTeN POWER n He haxImaIte HnKaNX KHOJOK.
EcIn JIeNEcTOK 3aunTbI OT 3aHcN Ha "Memory Stick" yCTaHOBJIeB N IIOJXeHne LOCK
HeBo3MoXHo 6yJeT yJaIITb Hn OJHO n3o6paJxHne.
Deleting all the images
You can delete all the unprotected images in a "Memory Stick."
Before operation
Insert a "Memory Stick" into your camcorder.
(1) Set the POWER switch to MEMORY. Make sure that the LOCK switch is set to the right (unlock) position.
(2) Press MENU to display the menu.
(3) Turn the SEL/PUSH EXEC dial to select , then press the dial.
(4) Turn the SEL/PUSH EXEC dial to select DELETE ALL, then press the dial.
(5) Turn the SEL/PUSH EXEC dial to select OK, then press the dial. "OK" changes to "EXECUTE."
(6) Press the SEL/PUSH EXEC dial. "DELETING" appears on the LCD screen or in the viewfinder. When all the unprotected images are deleted, "COMPLETE" is displayed.
YdaJIeHne Bcex n3o6paXKeHn
Moxho ydaTb BCE He3aunHHeHHle n3o6paxeHnHa "Memory Stick".
Ipeed hauanom pa60tbi
BCTaBbTe "Memory Stick" B VbIeokamepy.
(1) YctaHOBInTe nepeKJIIOUaTeIb POWER B noJIOKeHne MEMORY. Y6eINTEcB, yTO nepeKJIIOuATeIb LOCK ycTaHOBInB npaBoE noJIOKeHne (pa3bIoKInpOBAH).
(2)HaxmTe KhoNkY MENU OTo6paXeHnMeHIO.
(3)ПовернITE ДИСК SEL/PUSH EXEC ДЯ
Выбoga установки , a за tem нахмпerte
На ДИСК.
(4)ПовернITE ДИСК SEL/PUSH EXEC ДЯ
Выбopa установки DELETE ALL, a 3aTeM
навKMITE на ДИСК.
(5)Повернente ДСК SEL/PUSH EXEC张家界 BBбора установки OK, a за tem нахшtenу Ндес. Инданкаши "OK" Изменч成为一名 INДИКАЦИО "EXECUTE".
(6)HaKmTe HaДnCK SEL/PUSH EXEC. HdNkaTOp "DELETING" noBHTcRa Ha 3kpaHe XKД nIi B vBIOUckaTeNe. KoIa BCE He3aunueHbIe n3o6paKeHn8 6yDt yJaJIeHbI, Ha DnCIIee nOraBNTcR HdNkaZuRA "COMPLETE".
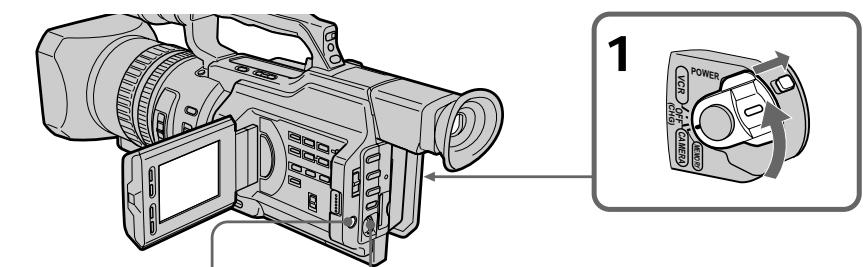

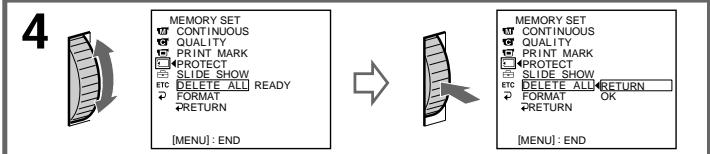
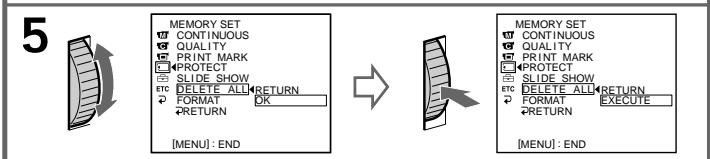
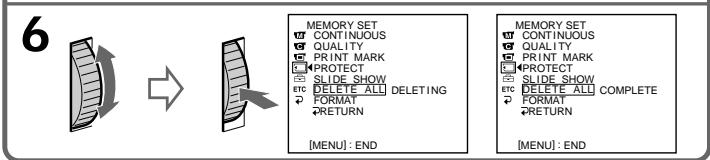
To cancel deleting all the images in the "Memory Stick"
Select RETURN in step 5 or 6, then press the SEL/PUSH EXEC dial.
Длг OTMeHbI ydaJIeHnB BCEx n3O6paxeHn Ha "Memory Stick"
BbI6epnte RETURN B nyHKe 5 nJn 6,3aTeMaHaxMnTe Ha nnck SEL/PUSH EXEC.
Writing a print mark - Print mark
You can specify the recorded still image to be printed out. This function is useful for printing out still images later.
Your camcorder conforms with the DPOF (Digital Print Order Format) standard for specifying the still images to print out.
Before operation
Insert a "Memory Stick" into your camcorder.
(1) Set the POWER switch to MEMORY or VCR. Make sure that the LOCK switch is set to the right (unlock) position.
(2) Play back the image to be printed out (p. 193).
(3) Press MENU to display the menu.
(4)Turn the SEL/PUSH EXEC dial to select, then press the dial.
(5)Turn the SEL/PUSH EXEC dial to select PRINT MARK, then press the dial.
(6) Turn the SEL/PUSH EXEC dial to select ON, then press the dial.
(7) Press MENU to erase the menu display. The "mark" mark is displayed beside the data file name of an image.
3aHcB neaTHbIX 3HaKOB - Print Mark
Moxho yka3aTb 3aHncaHHbIe HenoDbNkHbIe
1306paXeHn IJpa pacNeYaTK. 3Ta fynKcua
RBJIETc NOE3HO JIN PocJeDyUOeJ
pacNeaTK HenoDbNkHbIX 1306paXeHn.
DaHHa BnDeOKaMepa YDOBNETBOPAE
TpeBOAHm CTaNapTa DPOF (uHpOboi
fOpMaT NopJaKa neaTu) IJna neaTu
HenoDbNkHbIX 1306paXeHn.
Ipeed hauanom pa60tbI
BCTaBbTe "Memory Stick" B BnDeokamepy.
(1)Установские песеклочаши POWER в пооженке MEMORY ун VCR.
Y6eIntecb, YTO nepeKnIOuATEJIb LOCK yCTaHOBInE B npAOE NOLOXKeHne (pa36JIOKIpOBAH).
(2) Bocnpoun3BeNeIte n3o6paXeHne, KOtOpoe Heo6xOJIMo paCneuataTb (cTp. 193).
(3)HaxmTe KhoNkY MENU dЯ OTo6paXeHnMaMeHIO.
(4)ПовернITE дисK SEL/PUSH EXEC Ддя Вьбopa установки ,а затем нажмпerte НдИСК.
(5)ПовернITE ДИСК SEL/PUSH EXEC ДЯ
Быбopa установки PRINT MARK, a 3aTeM
НжмITE НДИСК.
(6)ПовернITE диСK SEL/PUSH EXEC Дяп Вьбopa установки ON, a 3aTeM нажмITE на диСК.
(7)HaxmTe KhoNky MENU ydaJIeHnI HdNKaUN MeHIO. PAnOM cHa3BaHneM faina n3O6paXeHnI NOBNTcR 3HaK "
Writing a print mark - Print mark
3aHcB neuathbIX 3HaKOB - Print Mark
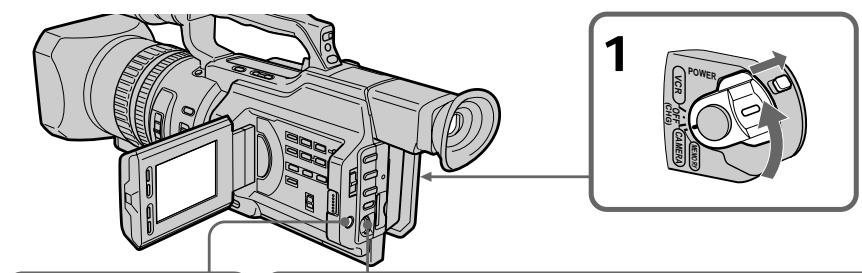
3,7

4


5

MENU END
MEMORY SET 10/12
CONTINUOUS
QUALITY
PROTECT MARK
PROTECTSLIDE.SHOW
CTDETEALL
- DELETET AEE
RETURN


MEMORY SET 10/12
CONTINUOUS
QUALITY
PRINT MARKONPROTECT QEE
PROTECT QEE SLIDE SHOW
CTDESHOW 1C,DELTEALL
- FORMAT
RETURN
6


MEMORY SET
CONTINUOUS
QUALITY
PRINTMARKON
PROTEC
SLIDE SHOW
EC DELETE ALL
FORMAT
RETURN
To cancel writing print marks
Select OFF in step 6, then press the SEL/PUSH EXEC dial.
If the write-protect tab on the "Memory
"Stick" is set to LOCK
You cannot write print marks on still images.
ДЯ OTMeHbI 3aINcN NeaTHbIX 3HaKOB
Bb6epnte yctaHOBky OFF bnyKTe 6, a 3aTeM haxmTe Ha dNc SEL/PUSH EXEC.
Ecnn JenectOK 3aunTbI OT 3annCn Ha
"Memory Stick" yctaHOBJIeH B NOJIOKeHne LOCK
BbI He CMOXeTe 3aIncatb neaThbte 3HaKn Ha HENoDVBxHbIX N3O6paXeHENIA.
Selecting cassette types
You can use the _min^min mini DV cassette only*. You cannot use any other 8 mm, Hi8 Hi8, Digital8, VHS VHS, VHSC, S-VHS, SVHS S-VHSC, Betamax, ED Beta ED Betamax or DV cassette.
- There are two types of mini DV cassettes: with cassette memory and without cassette memory. Tapes with cassette memory have CIII (Cassette Memory) mark. Sony recommends that you use a tape with CIII mark to enjoy your camcorder fully.
The IC memory is built in the cassette with cassette memory. Using this IC memory, your camcorder can read, write, and search data such as the date of recording or titles. The functions using the cassette memory require successive signals recorded on the tape. If the tape has a blank portion in the beginning or between the recorded portions, a title may not be displayed properly or the search functions may not work correctly.
Not to make any blank portion on the tape, press END SEARCH to return to the end of the recorded portion before you begin the next recording when:
- You have ejected the cassette while recording.
- You have played back the tape in VCR mode. If there is a blank portion or discontinuous signal on your tape, re-record from the beginning to the end of the tape concerning above.
When you record, using a digital video camera recorder without a cassette memory function, on a tape recorded by one with the cassette memory function, the same result may occur.
Bb6op Tnna Kaccet
MOxHO NcNoJIb3OBAb TOJIbKO KaCCeTb MHNV DV MinD*. HeJIb3r NcNoJIb3OBAb KaKHe-JIb6o DpyRHe KacCeTb TnPa 8 mm, Hi8 Hi8, Digital8, VHS VHS, VHS VHS, SVHS S-VHS, SVMSC S-VHSC, Betamax, EDBetaED Betamax nnn DV.
* CyuectByet DbA Tnna Kaccet MmH DV: c KaccctHOJ nAMrTbU O 6e3 KaccCTHOJ nAMrTn. JIeHTbIC KACCCTHOJ nAMrTbIO NMeOT 3NaK (KACCtHAR nAMrTb). Kopnpaunra Sony pekomehyET IcNoIb3OBA Tb JeHTy CO 3HaKOM CII, TaK KaK 3TO HAnbolee NOxOJaIuN TIN dJa DaHHoB BnDeOKaMepbl.
Ha daHOM Tnne Kaccet yCTaHOBJeHa naMaTb B VnDE nHTerpaIbHo CXembl. BnuDeokamepa MoXeT CHTbIBaTb N 3aNNcBbTaB DaHHbIe, TaNke Ka DaTbI 3aNCSuNtNTpbl N.T.D., Ha 3Ty nHTerpaJIbHyIO CXEmy NaMrtN. Jnra YHKsui, IcNOJb3yOuix KACCETHyIO NaMrtB, Tpe6yETc 3aNcB H JeHTy NocleDoBaTeIbIbIX CnHAnOB. EcnH aJeHte IMeETC He3aINcaHHbI yAcTOK B Hauane INI MEXdy 3aINCaHHbIMu cAtractM, TO TnTP MoXeT OTObpaKaTbCnCKaKeEHnMn, INI YHKsui NOncKa MoXeT pa6oTaTb HEnpaBnIbHO.
ДлгТOrO,чTO6bl HeДOnyCTNtB NOrBHeHnI
He3aIncAHbIX yUacTKOB HaJIeTHe,HaXMMTe
KHOrkY END SEARCH ДЯ BO3BpTa K KOHcy
3aIncAHnOу yUacTKa NepeD HauJAMo
CneIyUoSei 3aInci,ecIi:
-KaccTa 6blIa N3BleueHa BO BpeM 3aInci.
JIeHTa BocPon3BoDInLacb B pexmme VCR.
EcIiHa JLeHTe IMeeeTC He3aIncAHHbI
yUacTOK NNl PpeBbIAoUnsC sINHaJ,
BbINOJIhTe nepe3aIncS c NaJa lo KOHca C
yUeTOM Bblwecka3aHHoro.
Takoi JKe pe3yIbTaT MoXeT NOnUynIbC npn BbINONHeHn 3aIncn C NOMOuBcNΦpBOB BNDeOKaMepbl 6e3 FyHKuN KACCETHOI nAMrTN Ha JeHTy, 3aIncaHHyIO C NOMOuBcFOyHKuN KACCETHOI nAMrTN.
CII4K mark on the cassette The memory capacity of tapes marked with CII4K is 4 Kb. Your camcorder can accommodate up to 16 Kb. 16 Kb tape is marked with CII16K.
The maximum number of data recordable on cassette memory (when using 4 Kb cassette memory)
| Data | Numbers |
| INDEX | 32 (15 bytes/one item of the data) |
| TITLE | 25 |
| DATE | 6 (10 bytes/one item of the data) |
| PHOTO | 12 (10 bytes/one item of the data) |
| CASSETTE LABEL | 1 |
The numbers above are as a guide.
Copyright signal
When you play back
When you connect your camcorder to any other video camera recorder to dub a tape that has recorded copyright control signals for copyright protection, you may not record the tape that played back on your camcorder.
When you record
You cannot record software on your camcorder that contains copyright control signals for copyright protection of software. "COPY INHIBIT" appears on the LCD screen, in the viewfinder or on the TV screen if you try to record such software.
Your camcorder does not record copyright control signals on the tape when it records.
UcnoJb3yeMbIe KacceTbl
12-bit mode: The original sound can be recorded in stereo 1, and the new sound in stereo 2 in 32kHz . The balance between stereo 1 and stereo 2 can be adjusted by selecting AUDIO MIX in the menu settings during playback. Both sounds can be played back. 16-bit mode: A new sound cannot be recorded but the original sound can be recorded in high quality. Moreover, it can also play back sound recorded in 32kHz , 44.1kHz or 48kHz . When playing back a tape recorded in the 16-bit mode, 16BIT indicator appears on the LCD screen or in the viewfinder.
When you play back a dual sound track tape
When you play back a dual sound track tape recorded in a stereo system, set HiFi SOUND to the desired mode in the menu settings (p. 154).
Sound from speaker
| HiFi SOUND mode | Playing back a stereo tape | Playing back a dual sound track tape |
| STEREO | Stereo | Main sound and sub sound |
| 1 | Left sound | Main sound |
| 2 | Right sound | Sub sound |
You cannot record dual sound programs on your camcorder.
Aydnopexim
12-6nTOBbI pexIM: IpeBOHaayabHbI 3ByK MoXeT 6bITb 3aIncan Ha cTepeOphiOnueckn KaHaN 1, a HOBbI 3ByK - Ha cTepeOphiOnueckn KaHaN 2 B pexIme 32 KfU. BaIaHc MExdy cTepeOphiOnueckm KaHalom 1 n CtepeOphiOnueckm KaHalom 2 MOxHO OTPeryuInpoBaT nyTEM BblOpa yCTaHOBKn AUDIO MIX B yCTaHOBkax MeHIO BO BPemr BOCpON3BeDeHnA. MoxHO BOCpON3BODtB o6a KaHana. 16-6nTOBbI pexIM: Helb3ra3aIncatb HOBbI 3ByK, ODAHko MOxHO 3aIncatb IpeBOHaayabHbI 3ByK BblCOKOro KaYeCTBa. KpOME TORO, 3ByK MOxHO BOCpON3BODtB B pexImax 32 KfU, 44,1 KfU nIIy 48 KfU. Pnp BOCpON3BeDeHnJIeHTbl, 3aIncahNoB V 16-6nTOBOM pexIme, Na 3kpaHe KKД nII B BVIOUNCKaTeJe NOBtCnIHdNkaTop 16BIT.
Pn BocnpOn3BeDeHnn JeHTbI C DBOH0N 3ByKO0B DOPOXK0N
ПиВ BOCNpOu3BVeHn JIeHTbI C DINOHOn 3ByKOBoI DOpOxKoN, 3aINcAHNoB CtepeofoHnueckoCnCTeMe,yCTaHOBtE KOMaHdy HiFi SOUND B HUxHbI peXmB yCTaHOBkax MeHIO (CTp.154).
3Byk uepe3 rpoMkoROBOpnteIb
Be sure to affix a label only on the locations as illustrated below [a] so as not to cause malfunction of your camcorder.
Rewind the tape to the beginning, put the cassette in its case, and store it in an upright position.
If the cassette memory function does not work
Reinsert a cassette a few times. The gold-plated connector of mini DV cassettes may be dirty or dusty.
Cleaning the connector
If the gold-plated connector of mini DV cassettes is dirty or dusty, you may not operate the function using cassette memory. Clean up the gold-plated connector with cotton-wool swab, about every 10 times ejection of a cassette. [b]
IcnoJb3yeMbte KacceTbI
Your camcorder is equipped with the DV input/output connector based on i.LINK (IEEE1394) standard.
This section explains the specifications and features of i.LINK.
What is i.LINK?
i.LINK is a digital serial interface designed to integrate the devices equipped with i.LINK connector. By connecting i.LINK devices, i.LINK allows your device to:
- Transmit and receive data such as digital audio and digital video signals in two ways
- Control other i.LINK devices
- Easily connect with another device using just an i.LINK cable.
Your i.LINK device is capable of connecting AV devices and perform various operations and data transfer. Further availability for connections with versatile equipment and operations will be planned in the future. Other advantages include the following feature. When connecting multiple i.LINK devices, your device cannot only perform operations and data transfer with the directly connected device but also perform them with any of the devices that are connected via other devices. Therefore, you will not need to concern the order of connecting devices. However, depending on the features and specifications of the connected devices, you may need to operate certain functions differently or may not be able to perform certain operations or data transfer.
Note
Your camcorder can be connected to one device with the i.LINK cable (DV cable). When you connect with a device that has two or more i.LINK connectors, refer to the operating instructions supplied with the connected device.
Tips
- i.LINK, a nickname for IEEE 1394 that Sony proposed, is a trademark supported by a majority of companies worldwide.
- IEEE 1394 is an international standard defined by IEEE, The Institute of Electrical and Electronics Engineers, Inc.
O ka6ene i.LINK
Baisha KaMepa obopydobaHa BxOHNbIM/
bBIXoNDbIM pa3eMOM dIa DV, paccHTaHHbIM
Ha Ka6JIb cTaNapTa i.LINK (IEEE1394).
B 3OTn pa3dJe o6brcHebl xapaKTepuCTNkn
nФyHKmI i.LINK.
YTo TaKoe i.LINK?
i.LINK - 3To UnpoBoI nocJeDoBaTeBHy IHTeppeic, npedHa3NaeHbI dJa INOkNoUeHn OOBpyOBAHN, IMeIoUeero pa3bemli.LINK. Pnip NOkNoUeHn i.LINKycTpoIsCTB dpyrKdpyrFyHKzIaI.LINK No3BOJAE TINM YCTPOINCTBAM:
-Перетаыт b Илolyatb В oboxn HappaJIeHIXДaHHIe,ТakHe KaK UcIpOвье aydnoИсIpOвье BIndeO CnHJIbl
-Управл raftы ругими i.LINK-усторстваши.
-Jerko PNOKNIUOaTbC K DpyrUM yCTpoiCTBAM pN NOMOuONHO TOLKBOK Kaebela i.LINK.
Baue i.LINK-ycTrooCTBO MOKET 6bITb
noDCoeDInHeHO K AV-yTrooCTBAM n
BbIOnHrTa pa3JnUHbIe Opeaunn
TpaHCnOPt DaHHbIX. B 6yDuIeM PJIaHpyETcR
n DaJeep PaCUnpTa BO3MOXHoCTN
NoDKLIOUeHnK pa3JNuHbIM npi6Opam n
fYHKqmR.
IOnonHnTeJIbHbIe npEnMUYIecCTBa 06eCneuBAIOrCA CNeyUOUMM FyHKUIMM.
ПисоeДинeHинecКoькnxi.LINKyctpoIcTB BaWe yctpoIcTBcMOxetBbINHnTbONpeDJIeHhIbe ONEpaCmNIO6MeHnBaTbCЯDAHHbMn He TOnbKO c TemycToIcTBOM,K KOTOPOMOYHOHNoCpeDCTBeHNO NOKJIoueHo,HO INCOBCEMYNyctpoIcTBaMn,C KOTOpBMnBaWeyctpoIcTB CB3aHOb NocpeDCTBOMero.CJeDoBaTeNbHO,yBaCeBOdHMnKHeTNeO6bOAnMoCtNcoBIOdaT nobAOKnEO6KNoUChEHNy YcTpoIcTB dpyr K dpyry.
Ondako, B3aBnCmOcTn OT Ha60paФyHKuI IN xapakTepnCTN POKJIIOUeHHbIX yCTPOiCTB, pa6oTa OTdEhBbIXФyHKcIM 6yDeT, BO3MOXHO, YnpaBnTbCn NO-pa3HOMy, a HEKOTOpIe OpeaMn INI TpaHCnOpT DaHHbIX 6byT HeBO3MOxHbIMN.
PpmeHne
About data transfer speed of i.LINK
i.LINK defines a maximum data transfer speed of approximately 100, 200 and 400Mbps^* that are described as S100, S200 and S400 respectively.
For i.LINK devices, a maximum data transfer speed that the device supports is identified on "Specifications" page of the operating instructions supplied with the device or near its i.LINK connector.
With a device that does not identify the data transfer speed, the maximum data transfer speed that the device supports is S100.
When connecting with the device that support different data transfer speed, the actual data transfer speed may be different from those described on the i.LINK connectors.
*What is Mbps?
Mega bits per second. A measure of the rate at which data is transmitted per second. In case of 100 Mbps, 100 Mega bits of data can be transmitted per second.
i. LINK operation with your camcorder
For details on dubbing your camcorder to your VCR equipped with DV input/output connector, see page 106, 130.
Your camcorder is available for use with other devices equipped with Sony i.LINK (DV) connector (eg. VAIO personal computer series).
For details on connection with i.LINK cable and necessary software, refer to the operating instructions supplied with the connected device.
Use Sony i.LINK cables
Use Sony i.LINK cables to connect the i.LINK devices.
4 pins 4 pins (For dubbing)
i.LINK and are trademarks.
O ckopocTn TpaHcnpTa daHHbIX B ueN i.LINK
i.LINK npedocabIeT cIeIyUOJIe 3NaueHnMaKcIMaIbHbIX cKOpOCTeI TpaHCnOpTaDaHHbIX:OKoI0100,200u400M6uT/c*uIN S100,S200 uS400coOTBeTCTBeHNO.
Длг acToPcb i.LINK MaKcMaJIbHaN aCKOpOCTb TpaHcnpoT DaHHbIX, NOdEprKbIbMaM aDHHbIM YcToPoiCTBOM, yKa3bIbAeTcB pa3JeIe "XapAKTePncTKn" INCHpyKcIIN pOKCnIyatauIN, npINaRaembIX KycToPoiCTBy, nIN prIDom c pa3BeMOM i.LINK. Длг acToPcb, ckOpOCTb TpaHcnpoT daHHbIX KOtOpbIX He yKa3aHa, MaKcMaJIbHoe 3NaueHHe 3TORO napaMeTpca CoCTabJIaET S100.
If you run into any problem using your camcorder, use the following table to troubleshoot the problem. If the problem persists, disconnect the power source and contact your Sony dealer or local authorized Sony service facility. If "C:□□:□□" appears on the LCD screen, display window or in the viewfinder, the self-diagnosis display function has worked. See page 222.
In the recording mode
| Symptom | Cause and/or Corrective Actions |
| START/STOP does not operate. | ·The POWER switch is not set to CAMERA. → Set it to CAMERA. (p. 22) ·The tape has run out. → Rewind the tape or insert a new one. (p. 20, 42) ·The write-protect tab on the cassette is set to expose the red mark. → Use a new tape or slide the tab. (p. 20) ·The tape is stuck to the drum (moisture condensation). → Remove the cassette and leave your camcorder for at least one hour to acclimate. (p. 234) |
| The power goes off. | ·While being operated in CAMERA mode, your camcorder has been in the standby mode for more than five minutes. → Set the POWER switch to OFF (CHG) and then to CAMERA again. (p. 24) ·The battery pack is dead or nearly dead. → Install a charged battery pack. (p. 13, 14) |
| The image on the viewfinder screen is not clear. | ·The viewfinder lens is not adjusted. → Adjust the viewfinder lens. (p. 28) |
| The SteadyShot function does not work. | ·STEADYSHOT is set to OFF in the menu settings. → Set it to ON. (p. 154) |
| The autofocusing function does not work. | ·The camcorder is in manual focus mode. → Turn to auto focus mode. (p. 81) ·Shooting conditions are not suitable for autofocus. → Adjust focus manually. (p. 81) |
| The fader function does not work. | ·The digital effect function is working. → Cancel it. (p. 54) |
| A vertical band appears when you shoot a subject such as lights or a candle flame against a dark background. | ·The contrast between the subject and background is too high. This is not a malfunction. |
| Vertical streaks appear when you shoot a very bright subject. | ·This is called the smear phenomenon. This is not a malfunction. |
| Some tiny white spots appear on the LCD screen or in the viewfinder. | ·When the shutter speed is too low or the low lux mode is selected. |
| Unknown pictures or messages are displayed on the LCD screen or in the viewfinder. | ·If 10 minutes elapse after you set the POWER switch to CAMERA or DEMO MODE is set to ON in the menu settings without a cassette inserted, your camcorder automatically starts the demonstration. →Insert a cassette. The demonstration stops. You can also cancel DEMO MODE. (p. 160) |
| The click of the shutter does not sound. | ·BEEP is set to OFF in the menu settings. →Set it to MELODY or NORMAL. (p. 154) |
| The image is not bright even if you use the video flash light. | ·The ND FILTER selector is set to 1 or 2. →Set it to OFF. (p. 66) ·The manual adjustment is not suitable for the situations. (The indicator flashes.) →Set the AUTO LOCK selector to AUTO LOCK, or cancel the manual adjustment. (p. 61) |
In the playback mode
| Symptom | Cause and/or Corrective Actions |
| The tape does not move when a video control button is pressed. | ·The POWER switch is not set to VCR. →Set it to VCR. (p. 38) |
| The playback button does not function. | ·The tape has run out. →Rewind the tape. (p. 42) |
| There are horizontal lines on the picture or the playback picture is not clear or does not appear. | ·The video head may be dirty. →Clean the heads using the Sony DVM12CL cleaning cassette (not supplied). (p. 235) |
| No sound or only a low sound is heard when playing back a tape. | ·The volume is turned to minimum. →Turn up the volume. (p. 38) ·AUDIO MIX is set to the ST2 side in the menu settings. →Adjust AUDIO MIX. (p. 154) |
| The title search function does not work. | ·The tape has no cassette memory. →Use a tape with cassette memory. (p. 95, 210) ·CM SEARCH is set to OFF in the menu settings. →Set it to ON. (p. 154) ·There is no title in the tape. →Superimpose the titles. (p. 141) ·The tape has a blank portion in the recorded portion. (p. 95) |
(continued on the following page)
| Symptom | Cause and/or Corrective Actions |
| Displaying the recorded date, date search function does not work. | ·The tape has no cassette memory. →Use a tape with cassette memory. (p. 97, 210) ·CM SEARCH is set to OFF in the menu settings. →Set it to ON. (p. 154) ·The tape has a blank portion in the recorded portion. (p. 98) |
| The new sound now being added, or that has been added to the recorded tape is not heard. | ·AUDIO MIX is set to ST1 side in the menu settings. →Set it to the side you want to monitor. (p. 154) |
| The title is not displayed. | ·TITLE DSPL is set to OFF in the menu settings. →Set it to ON. (p. 154) |
| The sound is muted or images do not appear when monitoring images through TV/VCR. | →Pull out the A/V connecting cable from the AUDIO L/R and VIDEO jacks, then connect it again. |
In the recording and playback modes
| Symptom | Cause and/or Corrective Actions |
| The power does not turn on. | ·The battery pack is not installed, or is dead or nearly dead. → Install a charged battery pack. (p. 13, 14) ·The AC power adaptor is not connected to the mains. → Connect the AC power adaptor to the mains. (p. 18) |
| The end search function does not work. | ·The tape was ejected after recording when using a tape without cassette memory. (p. 36, 43) ·You have not recorded on the new cassette yet. (p. 36, 43) |
| The end search function does not work correctly. | ·The tape has a blank portion in the beginning or middle. (p. 37) |
| The picture does not appear in the viewfinder. | ·The LCD panel is open. → Close the LCD panel. (p. 25) |
| The battery pack is quickly discharged. | ·The operating temperature is too low. ·The battery pack is not fully charged. → Charge the battery pack fully. (p. 14) ·The battery pack is completely dead, and cannot be recharged. → Replace with a new battery pack. (p. 13) |
| The battery remaining indicator does not indicate the correct time. | ·You have used the battery pack in an extremely hot or cold environment for a long time. ·The battery pack is completely dead, and cannot be recharged. → Replace with a new battery pack. (p. 13) ·The battery is dead. → Use a full-charged battery pack. (p. 13, 14) |
| The cassette cannot be removed from the holder. | · The power source is disconnected. → Connect it firmly. (p. 13, 18) · The battery is dead. → Use a charged battery pack. (p. 13, 14) |
| The ⊥ and ▲ indicators flash and no functions except for cassette ejection work. | · Moisture condensation has occurred. → Remove the cassette and leave your camcorder for at least one hour to acclimateze. (p. 234) |
| [√] indicator does not appear when using a tape with cassette memory. | · The gold-plated connector of the tape is dirty or dusty. → Clean the gold-plated connector. (p. 213) |
| Remaining tape indicator is not displayed. | · The [√] REMAIN is set to AUTO in the menu settings. → Set it to ON to always display the remaining tape indicator. (p. 154) |
When operating using the "Memory Stick"
| Symptom | Cause and/or Corrective Actions |
| Operations do not function. | ·The POWER switch is set to CAMERA or OFF (CHG). →Set it to MEMORY or VCR. ·The “Memory Stick” is not inserted. →Insert a “Memory Stick.” (p. 173) |
| Recording does not function. | ·The “Memory Stick” has already been recorded to its full capacity. →Erase unnecessary images and record again. (p. 177, 204) ·The “Memory Stick” formatted incorrectly is inserted. →Format the “Memory Stick” or use another “Memory Stick.” (p. 158) ·The write-protect tab on the “Memory Stick” is set to LOCK. →Set the tab to write. (p. 170) |
| The image cannot be deleted. | ·The image is protected. →Cancel image protection. (p. 202) ·The write-protect tab on the “Memory Stick” is set to LOCK. →Set the tab to write. (p. 170) |
| You cannot format the “Memory Stick.” | ·The write-protect tab on the “Memory Stick” is set to LOCK. →Set the tab to write. (p. 170) |
| Deleting all the images cannot be carried out. | ·The write-protect tab on the “Memory Stick” is set to LOCK. →Set the tab to write. (p. 170) |
| You cannot protect the image. | ·The write-protect tab on the “Memory Stick” is set to LOCK. →Set the tab to write. (p. 170) ·The image to be protected is not being played back. →Press MEMORY PLAY to play back the image. (p. 193) |
| You cannot write a print mark on the still image. | ·The write-protect tab on the “Memory Stick” is set to LOCK. →Set the tab to write. (p. 170) ·The image that you will write a print mark is not being played back. →Press MEMORY PLAY to play back the image. (p. 193) |
(continued on the following page)
| Symptom | Cause and/or Corrective Actions |
| The photo save function does not work. | ·The write-protect tab on the “Memory Stick” is set to LOCK. →Set the tab to write. (p. 170) ·The battery pack is dead. →Install a charged battery pack or use the AC power adaptor instead of the battery pack. (p. 13, 18) |
Others
| Symptom | Cause and/or Corrective Actions |
| The title is not recorded. | ·The tape has no cassette memory. →Use a tape with cassette memory. (p. 141, 210) ·The cassette memory is full. →Erase unnecessary title. (p. 145) ·The tape is set to prevent accidental erasure. →Slide the write-protect tab so that red portion is not visible. (p. 20) ·Nothing is recorded in that position on the tape. →Superimpose the title to the recorded position. (p. 141) |
| The cassette label is not recorded. | ·The tape has no cassette memory. →Use a tape with cassette memory. (p. 149, 210) ·The cassette memory is full. →Erase some data. (p. 151) ·The tape is set to prevent accidental erasure. →Slide the write-protect tab so that red portion is not visible. (p. 20) |
| While editing using the i.LINK cable (DV connecting cable), recording picture cannot be monitored. | →Disconnect the i.LINK cable (DV connecting cable), and connect it again. (p. 106) |
| Digital program editing does not function. | ·The input selector on the VCR is not set correctly. →Check the connection and set up the selector position. (p. 105) ·The camcorder is not connected to Sony DV equipment. →Set CONTROL to IR in the menu settings and set the recording VCR to be controlled by infrared rays. ·Setting program on a blank portion of the tape is attempted. →Set the program again on a recorded portion. (p. 122) ·Your camcorder and the VCR are not synchronized. →Synchronize them. (p. 117) |
| The Remote Commander supplied with your camcorder does not work. | ·COMMANDER is set to OFF in the menu settings. → Set it to ON. (p. 154) ·Something is blocking the infrared rays. → Remove the obstacle. ·The batteries are inserted in the battery holder with the + − polarities incorrectly. → Insert the batteries with the correct polarity. (p. 253) ·The batteries are dead. → Insert new ones. (p. 253) |
| The input picture does not appear on the LCD screen or in the viewfinder when your camcorder is connected to outputs on the TV or VCR. | ·DISPLAY is set to V-OUT/LCD in the menu settings. → Set it to LCD. (p. 154) |
| The melody or beep sounds for five seconds. | ·Moisture condensation has occurred. → Remove the cassette and leave your camcorder for at least one hour to acclimate. (p. 234) ·Some troubles have occurred in your camcorder. → Remove the cassette and insert it again, then operate your camcorder. |
| When charging the battery pack, no indicator appears or the indicator flashes on the display window. | ·The AC power adaptor is disconnected. → Connect it properly. ·The battery pack malfunctions. → Contact your Sony dealer or local authorized Sony service facility. |
| You cannot charge the battery pack. | ·The POWER switch is not set to OFF (CHG). → Set it to OFF (CHG). |
| The camcorder is immediately turned off even if the amount of the battery remaining time is enough to operate. | → Charge the battery pack fully again. The correct remaining time is displayed. |
| No function works though the power is on. | → Disconnect the mains lead of the AC power adaptor or remove the battery, then reconnect it after about one minute. Turn the power on. If the functions still do not work, press the RESET button located at the lower-right of the ZEBRA selector using a sharp-pointed object. (If you press the RESET button, all the settings including the date and time return to the default.) (p. 18, 246) |
Your camcorder has a self-diagnosis display function.
This function displays the current condition of your camcorder as a 5-digit code (a combination of a letter and figures) on the LCD screen, display window, or in the viewfinder. If a 5-digit code is displayed, check the following code chart. The last two digits (indicated by ) will differ depending on the state of your camcorder.
On the LCD screen or in the viewfinder, on the display window
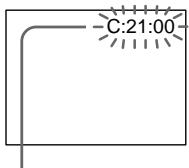
Self-diagnosis display
C:□□:□□
You can service your camcorder yourself.
E:□□:□□
Contact your Sony dealer or nearest local authorized Sony service facility.
| Five-digit display | Cause and/or Corrective Actions |
| C:04:□□ | • You are using a battery pack that is not an “InfoLITHIUM” battery pack. → Use an “InfoLITHIUM” battery pack. (p. 14) |
| C:21:□□ | • Moisture condensation has occurred. → Remove the cassette and leave your camcorder for at least one hour to acclimateze. (p. 234) |
| C:22:□□ | • The video heads are dirty. → Clean the heads using the Sony DVM12CL cleaning cassette (not supplied). (p. 235) |
| C:31:□□ | • A malfunction other than the above. |
| C:32:□□ | • Remove the cassette and insert it again, then operate your camcorder. → Disconnect the mains lead of the AC power adaptor or remove the battery pack. After reconnecting the power source, operate your camcorder. |
| E:61:□□ | • A malfunction that you cannot service has occurred. |
| E:62:□□ | • Contact your Sony dealer and inform them of the 5-digit code. (example: E:61:10) |
If you are unable to rectify the problem even if you try corrective actions a few times, contact your Sony dealer or nearest local authorized Sony service facility.
YcTpaHHe HEnCnPaBHOCTeI
Ecn y Bac Bo3HnKla kakaJ-16o np6bIeMa npi nCpOJb3OBaHN BInDeOkaMepbl, BocnoIb3yntecb cJeDyUoSeT TaBnuee dnn ee ycTaPHeHra. Ecn np6bIeMa He ycTaPAnrTe, TO cJeDyET OTCoeDHHtB NcTOuHKn NITaHnN I OcbPaTHTCB C cepBnCHbI CEHTp Sony nIN B MeCTHO yONlHOMOeHHoe PpeDnprTne No oCbnyXnBaHNIO 3denn Sony. Ecn Ha 3kpane XXKD, B OKHe DmCIIeN INB V BnDOncKaTeNe IOABnIacb INDnKaun "C:□□:□□", 3To 03NaHaet, YTO cpa6oTala fynKUnI DmcIIeN camOdnarHocTKN. Cm. cTp. 229.
B pexkme 3ainnc
HdNkauncaMoDnaarHOCTNK
C:□□:□□
BbIMoKTe BbINOHHTb 6cIyKbBaHne BaSei BnDEOKaMepbI camOCTOeTbHO.
E:□□:□□
O6paTntecb B cepBnchbI ueHtp Sony nIN B 6JInxKaJWee MeCTHOe yNOLHOMOeHHOe IpeIpnrAtne no o6cnyXnBaHIO u3dEIny Sony.
| Пелейзуная Иndикада | Вер�туная ручни и/и метор устраенья |
| C:04:□□ | • Бы Incрпьзуete батарейный 6лok, кOTOPь HeЯ ВДЛЕТСАбатарейный 6лokInfoLITHIUM"→ИсрпьзуITE сдддддддддддддддддддддддддддддддддддддддддддддддддддддддддддддддддддддддддддддддддддддддддддддддддддд徳. |
| C:21:□□ | • ПОНЗОЛа КОДЕнCSAQUINBAлгИ.→ИЗВLEКИTE KACCETУ ANDSTABTe BVDeOKAMepy prINБЛЗИТЕНБИHAODINHac, пOKA He ICSnapITcR BnAra. (CTP. 14) |
| C:22:□□ | • 3aGrРЗнБИ BVDeOEROLOBKN.→ПОчИСТЕ ГLOВКИС POMOШь YI NCTAшь KACCETb SONY DVM12CL (HeBXODIT B KOMNJIeKT). (CTP. 235) |
| C:31:□□ | • НЕОДАКla, OTMЛЧАЯ OT priВЕDEнHBIX BVIshE. |
| C:32:□□ | • BByHbTe KACCETU bVCTABbTe eе ChOBA, a 3aTeM BKVIIQUHITe BaShyBVDeOKAMepy.→OTcoEДИнITE pROвОД ЗALEKTPoRITANHЯ CSEТБОGA aDAIТЕРа nepEMEHHOROTOKA ИЛСHIMITe BVDaPEHIVI BVDaK. ПОСLE NOВТOPHOrO NOДCoEДИHENHINCTOCHNIGA ПИТAHЯ BKVIIQUHITe BAshy BVDeOKAMepy. |
| E:61:□□ | • ПОНЗОЛа HENOLДАКla, KOTOPYЮ Bы He CMOЖeTe yCTpaHNTb |
| E:62:□□ | camocToTЯЛьно.→ОБразИТeСь в сервись的同时 РэТР Sony u coOБцInte Im 5-3нaчнь кOD.(нарprimер: E:61:10) |
EcIn Bam He ydaetc caMoCToTEnbHo ycTaPAnHt HenoJaKy daKe noCle onpOboaHncoOTBeTCTByUOxH MeToOB uCTpaHeHn HeCKoIbKO pa3, o6paTntecB cepBnchbI ceHTp SonyIIN B MeCTHO yNoHOMOeHHoe ppeDpnpTne nO bcnyXBaHnIO 3dJIli Sony.
Warning indicators and messages
If indicators and messages appear on the LCD screen or in the viewfinder, check the following:
See the page in parentheses () for more information.
Warning indicators
The battery is dead or nearly dead Slow flashing:
- The battery is nearly dead.
Depending on conditions, the indicator may flash, even if there are five to 10 minutes remaining. If this flashes, we recommend that you charge the battery or install the charged battery.
Fast flashing:
The battery is dead (p. 14).
The battery is completely dead.
Warning indicator as to tape
Slow flashing:
- The tape is near the end.
- No tape is inserted (p. 20).*
- The write-protect tab on the cassette is out (red) (p. 20).*
Fast flashing:
The tape has run out (p. 42).*
You need to eject the cassette
Slow flashing:
The write-protect tab on the cassette is out (red) (p. 20).
Fast flashing:
- Moisture condensation has occurred (p. 234).
The tape has run out (p. 42).
- The self-diagnosis display function is activated (p. 222).
Moisture condensation has occurred* Fast flashing:
- Eject the cassette, turn off your camcorder, and leave it for about one hour with the cassette compartment open (p. 234).
PpeDynpexkaioune HndnkaTopbI n COo6eHna
EcIn Ha 3KpaHe KKДиИВвIDOnckaTeNe NOBnIOTcH INDnKaTOpbI N COOSeHnI, npOBepbTe cneDuOuee:
Bolee noDpo6hnyu HOpMauncM. Ha cTpaHnue B KpyrIbIX CkO6Kax “()”
Ppeynpexkdaioiue HndkaTopbi
Warning indicators and messages
Warning indicator as to cassette memory
Slow flashing:
- No tape with cassette memory is inserted (p. 210).*
Self-diagnosis display (p. 222)
The still image is protected
Slow flashing:
- The still image is protected (p. 202).
Warning indicator as to "Memory Stick" Slow flashing:
- No "Memory Stick" is inserted (p. 173).
Fast flashing:
- Unreadable "Memory Stick" is inserted.
100-0001 " (Warning indicators) Memory Stick" file error*
Slow flashing:
- File is broken.
- File has no compatibility.
"Memory Stick" format error* Fast flashing:
- There are tow directories or more.
Data is broken.
"Memory Stick" is not formatted correctly (p. 158).
Warning messages
- CLOCK SET
Reset the date and time (p. 168).
FOR "InfoLITHIUM" BATTERY ONLY Use an "InfoLITHIUM" battery pack (p. 14). - MEMORY FULL
The "Memory Stick" is full in photo save function (p. 192).
CLEANING CASSETTE The video heads are dirty (p. 235).*
FULL The tape cassette memory is full (p. 144).
IpeDynpexJaIOUne INHdNkaTOpbl ncoo6eHnA
CII PpeDynpexKaIOuN INDnKaTOp KACCEbI C NaMAtBIO
MeDneHHOe MmraHne:
- He yctaHOBLeHa JIeHTa C KACCETHOI nAMrTbIO (CTp. 210).*
Инданкацma camodnaharnoctkn (ctp. 229)
m3o6paXeHne 3aunuHo
MeDJIeHHoe MmraHne:
- He BCtAbJeHa "Memory Stick" (cTp. 173).
Быст Poe маганe:
- BCTaBHeHa HeuHtæMaJ "Memory Stick".
AUDIO MODE is set to 16BIT.* You cannot dub new sound (p. 159).

REC MODE
REC MODE is set to LP.* You cannot dub new sound (p. 159).

TAPE
There is no recorded portion on the tape.* You cannot dub new sound (p. 138).

“i.LINK”CABLE
i.LINK cable is connected (p. 139).* You cannot dub new sound.
FULL
The "Memory Stick" is full (p. 180).*
The write-protect tab on the "Memory Stick" is set to LOCK (p. 170).*
NOFILE
No still image is recorded on the "Memory Stick" (p. 194).*
NO MEMORY STICK
No "Memory Stick" is inserted (p. 173).*
- MEMORY STICK ERROR
The "Memory Stick" data is corrupted (p. 173).*
FOMATERROR(p.158)*
-
DIRECTIONAL ERROR (p. 195)*
-
COPY INHIBIT
The tape contains copyright control signals for copyright protection of software (p. 211).*
The tape has reached the end of the tape (p. 42).*
- NO TAPE
Insert a cassette tape (p. 20).*
- You hear the melody or beep sound.
** and the message appear alternately.
IpeDynpexKdaIOuSne HndNKaTOpbl ncoo6eHn

16BIT
AUDIO MODE yctaHOBJIeH B nOJoxKeHne 16BIT.* HoBbI 3ByK HeBO3MOxHNo nepe3aIncatb (CTp. 165).

REC MODE
REC MODE yctaHOBJIEN B NOJIOKeHne
LP.* HObBI 3ByK HeBO3MOxHO
pepe3ancaTb (cTp.165).

TAPE
Ha JeHTe HET 3aIncaHnHO yUacTka.*
HObbI 3ByK HeB03MoXHo
pepe3aIncaTb (ctp. 138).

"i.LINK" CABLE
Подключен кабел b i.LINK (ctp. 139).*
Hовь iiiByk HeBO3MOxHo
nepe3aIncatb.

ULL "Memory Stick" nepenolheHa (cTp. 180).*

JIeNecTOK 3aunIbI OT 3anncnHa "Memory Stick" ycTaHOBnB n noJoxKeHne LOCK (ctp.170).*

IOFILE Ha"MemoryStick"HET3aIncanhbix HenoDbXhBIXn3o6paXeHn (ctp.194).*

IO MEMORY STICK
He BCtBaIeHa "Memory Stick" (ctp. 173).*

ORMAT ERROR (ctp. 164)*

DIRECTIONAL ERROR (ctp. 195)*

PY INHIBIT
Ha JeHTe coOpkatac ynpabJIyIoune
CINHaJIbI aBTOpCKNx npaB dJa 3aUnTbI
aBTOpCKNx npaB Ha npoRpaMMHoe
ObeScneUHe (ctp. 211).*

Using your camcorder abroad
Using your camcorder abroad
You can use your camcorder in any country or area with the AC power adaptor supplied with your camcorder within 100V to 240V AC, 50/60 Hz.
Your camcorder is a PAL system based camcorder. If you want to view the playback picture on a TV, it must be a PAL system based TV with the AUDIO/VIDEO input jack. The following shows TV colour systems used overseas.
PAL system
Australia, Austria, Belgium, China, Czech Republic, Denmark, Finland, Germany, Great Britain, Holland, Hong Kong, Italy, Kuwait, Malaysia, New Zealand, Norway, Portugal, Singapore, Slovak Republic, Spain, Sweden, Switzerland, Thailand, etc.
PAL-M system
Brazil
PAL-N system
Argentina, Paraguay, Uruguay
NTSC system
Bahama Islands, Bolivia, Canada, Central America, Chile, Colombia, Ecuador, Jamaica, Japan, Korea, Mexico, Peru, Surinam, Taiwan, the Philippines, the U.S.A., Venezuela, etc.
SECAM system
Bulgaria, France, Guyana, Hungary, Iran, Iraq, Monaco, Poland, Russia, Ukraine, etc.
Simple setting of clock by time difference
You can easily set the clock to the local time by setting a time difference. Select WORLD TIME in the menu settings. See page 154 for more information.
Maintenance information and precautions
Moisture condensation
If your camcorder is brought directly from a cold place to a warm place, moisture may condense inside your camcorder, on the surface of the tape, or on the lens. In this condition, the tape may stick to the head drum and be damaged or your camcorder may not operate correctly. If there is moisture inside your camcorder, the beep sounds and the indicator flashes. When the indicator flashes at the same time, the cassette is inserted in your camcorder. If moisture condenses on the lens, the indicator will not appear.
If moisture condensation occurred
None of the functions except cassette ejection will work. Eject the cassette, turn off your camcorder, and leave it for about one hour with the cassette compartment open. Your camcorder can be used again if the indicator does not appear when the power is turned on again.
Note on moisture condensation
Moisture may condense when you bring your camcorder from a cold place into a warm place (or vice versa) or when you use your camcorder in a hot place as follows:
- You bring your camcorder from a ski slope into a place warmed up by a heating device.
- You bring your camcorder from an air-conditioned car or room into a hot place outside.
- You use your camcorder after a squall or a shower.
- You use your camcorder in a high temperature and humidity place.
How to prevent moisture condensation
When you bring your camcorder from a cold place into a warm place, put your camcorder in a plastic bag and tightly seal it. Remove the bag when the air temperature inside the plastic bag has reached the surrounding temperature (after about one hour).
Информацnia по ухODу 3a apnapaTom И МерыnpedoctopoЖноCTN
KoHdeHcaZnBlaRn
EcIn BnDeOkamepa npHecHeHa 3X OIoOHDoro MeCTA B TeIIOe NOMeUeHne, TO BHyTpN BnDEOkamepbl, Ha NOBepxHOCTNI JENTBI IINI HA o6BeKTHBE MoKET nPOn30JTN KOHNcAun BlaRn. B TAKOM COCToAHnn IeHTa MOKET npuINnHyTb K bapab6aHy rOBoBNi H6yDet NOBpeXJdEHa, INI Xe BnDEOkamep He CMOKET pa6OtaTb HAnLnxKaUIMM Obpa3OM. EcIn BnUTPi BnDeOkamepbl nPOn3OuJa KOHNcAun BlaRn, IpO3ByuHT 3ByKOBoi CnHAn 3Amiraet INDnKaTOp E.CIn ONDOBpemEHNO MraEt INDnKaTOp A, 3TO 3NaHT, YTO KACCtA BCTaBnHeBA BnDEOkamepy. EcIn Bnara cONDeHcnpoBaIaNb Ha O6BeKTHBe, INDnKaTOp NOrBIArTBcH He 6yDet.
Ecn npon3oJna KOHdEhcaunBlaRn
Hn OHa n3ФyHKcN, KpOME n3BLeueHnA kaccTebl, He 6ydet paBoTaTb. N3BLeKeNTe KaccTeY, BbIKIIOUHTe BnDEOKaMEpy NocTaBBte ee npIMepHO Ha oINH qac COTKpbTbIM OTCEkom DnA KaccTebl. BnDEOKaMEpy CHOBA MoXHO NCNoJIb3OBAtB, eCNI INDkaTOP He NOBnEeTcPn IOBTOPHOM BKNIOUeHN PntAHn.
PpimueaHne no KOHeHcaun BlaRn
Bnara moKeT o6pa3oBaTbCS, ecnI nepeHeCTN BnuDEOKaMepy nX XOJHOrO MeCTa B TcENIOE (nn HaobopOT) nn npn nCNoJIb3OBAHnn BnuDEOKaMepb I JxapkOM MeCTe B CNeDyUOxN CUYaHx:
- EcnBn BInDeOKaMepa npHecea co ChexKHOcKIOHa B nOmeJeHne, rIe pa6oTaet o6OrpeBaTeIb.
- EcIn BnDeokamepa npHecea n3 abTOMOBIIJI INI NOMEueHINB KOTOpbIX pa6oTaET KOHNICIOHEP, B XkapKoe MeCTO.
- Ecnn Bnueokamepa nCnoJb3yeTcnaocne rpo3blndoxjra.
- EcIn BnDeOkamepa NcNoIb3yeTcB JkapKOM MecTe INN MeCTe C NOBblueHHoB BJIaxHHOCTbIO.
Kak npedotbpaTb KOHdeHcauio Blaar
Ecni BnDeokamepa npinHecHa n3 XoJIOHOrc MeCTa B TEnIOe, noJoxNtE BnDeokamepy B noJIN3TnIeHOBBi nakET n IIOITHO 3aKNeIte erO. BbIbTe BnDeokemepy n3 noJIN3TnIeHOBOrO nakTa, KOrDa TEMnepaTypa BO3dyxa BHyTpri naKeTa DOCTINHTempeAtpbl OkpyXaOHero BO3dyxa (npIn6JI3nTEnbHO uee3 ODNH Yac).
Maintenance information and precautions
Removing Dust from Inside the Viewfinder
Before cleaning, remove the sticker below the viewfinder lens adjustment lever.
(1) While holding down the hook ①, slide the eyecup in the direction of the arrow and remove it out ②.
(2) Clean the surface with a commercially available blower.
HnΦopMaun no yxOy 3a annapaTom m Mepbl npeDocTopoXhOCTn
YdaJIeHne 3aIrp3HeHn C BHyTpEHHeN CTOpOHbI BNDONCKaTeJr
Ipeed uctkoydaiTe HaknekyoIp blyarom perynipOBKn ObeekTbBa BIDONCKaTeJI.
(1)HaKIMMaHa KpOuOK ①, CzBnHbTe OkyIarp B HappaBJIeHNi CTpeKNi N CHmMTE erO ②.
(2)ПюизВоДиTe OчИсТКУ ПОБЕХНOCТС ПОМОцьЮ ИМЕЮЧEROСВ В пpoДаже BO3dYxOуBнOrO ппспocблENHЯ.
1

2
To reattach the eyecup
Do step 1 above sliding the eyecup in the reverse direction of the arrow.
Maintenance information
Cleaning the video head
To ensure normal recording and clear pictures, clean the video heads. The video head may be dirty when:
- mosaic-pattern noise appears on the playback picture.
- playback pictures do not move.
- playback pictures do not appear.
- the × indicator and “CLEANING CASSETTE” message appear one after another on the LCD screen or in the viewfinder.
YTo6bl CHOBA BCTABNTb OKyJAp
Maintenance information and precautions
If the above problem, [a] or [b] occurs, clean the video heads for 10 seconds with the Sony DVM12CL cleaning cassette (not supplied).
Check the picture and if the above problem persists, repeat cleaning.
HΦopMaζη no yxOу 3a annapaTOM n Mepbl ppeoctOpoxKHOCTn
При ВОЗнКHOВЕМпрблм TиNA [a] ИЛ [b], NOИСТИТЕ BИДеог罗OBKN C NOMOьH OчICTЯш Кассеты Sony DVM12CL (He BXOДNT B KOMПLEKТ)В TeчЕнe 10 cekyHД. ПроверTe n3obpaЖeнe n, ecIn ONIcaHHbIe Bblse np6JIembl He ycTpaHeHbl, nobTopnte ChCTKY.


[a]

or/ nnn

[b]
Cleaning the LCD screen
If fingerprints or dust make the LCD screen dirty, we recommend using a LCD Cleaning Cloth (not supplied) to clean the LCD screen.
Charging the vanadium-lithium battery in your camcorder
Your camcorder is supplied with a vanadium-lithium battery installed so as to retain the date and time, etc., regardless of the setting of the POWER switch. The vanadium-lithium battery is always charged as long as you are using your camcorder. The battery, however, will get discharged gradually if you do not use your camcorder. It will be completely discharged in about four months if you do not use your camcorder at all. Even if the vanadium-lithium battery is not charged, it will not affect the camcorder operation. To retain the date and time, etc., charge the battery if the battery is discharged.
Charging the vanadium-lithium battery:
- Connect your camcorder to mains using the AC power adaptor supplied with your camcorder, and leave your camcorder with the POWER switch turned off for more than 24 hours.
- Or install the fully charged battery pack in your camcorder, and leave your camcorder with the POWER switch turned off for more than 24 hours.
Чистka Зкрана ККД
EcnHa 3KpaHe KKJ NOBATcO TneuATkn NaJIbueB INI NblB,INI ONUCTKN 3KpaHa KKJ peKOMeHnyETcN CNOJB3OBaTb CneuaNbHyU TkaHb (HE BXoNT B KOMnJIeKT).
3apKa BaHaDnEBO-JNTHeBOB 6aTapeKn B BaSei BVdeOkamepe
B Bašew BnDEOKaMepe yctaHOBneHa
BaHaNIEBO-NTNeBae 6aTapeiKa, KOTopar
coxpaHReT B nAMrT DaTy u BpEmu T.I.
He3aBnCmO OT yCTaHOBKn nepeKlIOuATEIa
POwer. BaHaNIEBO-NTNeBae 6aTapeiKa
3apRjXaeTcB Ccerda, KOrDa BbNcNoJIb3yeTe
CBOU BnDEOKaMepy. OdHaKO 6aTapeiKa
6ByET NoCTeHNO pa3PjXaTbcra, ecn BbI He
ncNoJIb3YeTe BnDEOKaMepy. Ecnn
BnDEOKaMepa COBepSeHNO He nCNoJIb3yeTcra,
To 6aTapeiKa nONHOCTbO pa3PjNDTCs
np6bn3InTeJbHo Chepe3 4 MecaZa. Daxe ecn
BaHaNIEBO-NTNeBae 6aTapeiKa He
3apRjXeHa, 3TO He nOBmIAET Ha pa6OTy
BnDEOKaMepbI. DnA COXpaHEHn B nAMrTn
DaTbI N BpEMHn CLeDyET 3apRJNDtB
6aTapeiKy, ecn OHa pa3PjXeHa.
3apdka BaHadneBO-JHTneBOB 6aTapeKn
Maintenance information and precautions
Precautions
Camcorder operation
- Operate your camcorder on 7.2V (battery pack) or 8.4V (AC power adaptor).
- For DC or AC operation, use the accessories recommended in this operating instructions.
- If any solid object or liquid get inside the casing, unplug your camcorder and have it checked by a Sony dealer before operating it any further.
- Avoid rough handling or mechanical shock. Be particularly careful of the lens.
- Keep the POWER switch set to OFF (CHG) when you are not using your camcorder.
- Do not wrap your camcorder with a towel, for example, and operate it. Doing so might cause heat to build up inside.
- Keep your camcorder away from strong magnetic fields or mechanical vibration. Noise may appear on the image.
- Do not touch the LCD screen with a sharppointed object.
- If your camcorder is used in a cold place, a residual image may appear on the LCD screen. This is not a malfunction.
- While using your camcorder, the back of the LCD screen may heat up. This is not a malfunction.
On handling tapes
- Do not insert anything into the small holes on the rear of the cassette. These holes are used to sense the type and thickness of the tape and if the recording tab is in or out.
- Do not open the tape protect cover or touch the tape.
- Avoid touching or damaging the terminals. To remove dust, clean the terminals with a soft cloth.
HΦopMaζη no yxOy 3a annapaTom m Mepbl ppeoctopoXhOCTn
MepblnpedocTopoXHoctn
3KcnnyatazaBnDeoKaMepbI
- 3KcπnyaTupyIte Bndeokamepy ot 7,2 B (6aTaapeHbI b6nO) nIIN 8,4 B (ceTeBOI aDanTep nepemehHoro TOKa)
- UTo Kacaetc3KcNpyaTaunBnDeOkampeblOT NOCTOHHORIO INepeMeHHORO TOKa,NCNOb3yIte PnHa,dNLeXHoCTn,peKoMeHdyeMbIe B DaHHOINHCTpyKUIM N03KcNpyaTaun.
- Ecnn BHyTpb Koprnyca nona KaKoH-Nb6yDb TBePbIy IpeDMET ININ XNIDKOCTb, BByIKJIIOuTe BnDEOKaMEpy N nepeD daIbHeNee ee 3KcPnlyaTauae nPoBepbTe ee y dUnepa Sony.
He donyckaTRe rpybOro o6paueHnC bUneokAmepRoI IIM MeXaHNuecknx yIapOB. ByIbTe Ooc6eHNO OCTOpoxKbI c 06BeKTHBOM.
Korda Bundeokamepa He nCnoJb3yETc, yctahOBnTe nepeKnUoateJIb POWER B noIooXeHne OFF (CHG).
He 3abopauBaai Te BnDeokamepy, HnPnMepB NNoTOnHue, Hne 3KcNpyaTnpuYte ee B TaKOM CoCTOHN. 3To MoKeT npnbEeCTK NOBbUeHNI ToMeIepaTpyb BHyTpN BnDeokamepbI.
-ДерхиTe BaSu BnDeokamepy noJaIbIe OT CnIbHbIX MaHnTHbIX NOJIe I He NOIbBepraIe ee MexaHnueckoB N6paCm. Ha n3O6paXeHm MOrYT Bo3HnKHyTb NOMEXI. - He npikacaiTecb k ekpaHy KKД ocTpblmnpedMetamn.
-Пиэксплуataци Baшew BindeokamepbI BXOLOHOM MecTe,Ha 3KpaHe XKKД moKet NOBnTbC8OCTaTOUHOe N3O6paxKeHne. Odnako 3TO HeЯBnReTc HEnCnPaBHoCtBu.
-При за валшдддддддддддддддддддддддддддддддддддддддддддддддддддддддддддддддддддддддддддддддддддддддддддддддддддд 3aДнЯ CTОпа 3Крана XXКД можET HarpeBaTсЯ.ОДнako 3TO He YВлЯЕТС HиСпразВноCTьЮ.
OTHOCHTeNbHO o6paueHnC JIeHTAMN
He BCTabJIrTe HnKaKIN pEIMeTOB BMaJIeHbKne OTBepCTnHa 3aJHei CTOpOHe KAcCEtbl. 3TN OTBepCTnI NCNOLbYOTcI dJI ONPeDEJIeHn TIna N TOJIuINHb JIeHTbl, a TaKKe IJN ONpeDEJIeHn HAJIuNHaII OTCyTCTBnJI JeNEcTKa 3aUNTbl OT 3aIINCn HaJIeHTe.
He OtkpbIbAte IpeDoXpaHITeIbHyIO KpbIbUky JeHTbI Ne IpePnKaacaiTeCb KJeHTe.
He npikacaiTecb K noJIocam n He donyckaIte nx nobpeJdeHn. Iyn ydaJeHn PbIIN YNCTIne NOIOCA C NOMOsbIO MfKoI TkaHn.
Camcorder care
- Remove the tape, and periodically turn on the power, operate the CAMERA and VCR sections and play back a tape for about three minutes when your camcorder is not to be used for a long time.
- Clean the lens with a soft brush to remove dust. If there are fingerprints on the lens, remove them with a soft cloth.
- Clean the camcorder body with a dry soft cloth, or a soft cloth lightly moistened with a mild detergent solution. Do not use any type of solvent which may damage the finish.
- Do not let sand get into your camcorder. When you use your camcorder on a sandy beach or in a dusty place, protect it from the sand or dust. Sand or dust may cause your camcorder to malfunction, and sometimes this malfunction cannot be repaired.
AC power adaptor
- Unplug the unit from the mains when you are not using the unit for a long time. To disconnect the mains lead, pull it out by the plug. Never pull the mains lead itself.
- Do not operate the unit with a damaged cord or if the unit has been dropped or damaged.
- Do not bend the mains lead forcibly, or place a heavy object on it. This will damage the lead and may cause fire or electrical shock.
- Prevent metallic objects from coming into contact with the metal parts of the connecting section. If this happens, a short may occur and the unit may be damaged.
- Always keep metal contacts clean.
- Do not disassemble the unit.
- Do not apply mechanical shock or drop the unit.
Maintenance information and precautions
- While the unit is in use, particularly during charging, keep it away from AM receivers and video equipment. AM receivers and video equipment disturb AM reception and video operation.
- The unit becomes warm during use. This is not a malfunction.
- Do not place the unit in locations that are: - Extremely hot or cold
- Dusty or dirty
- Very humid
Vibrating
Battery pack
- Use only the specified charger or video equipment with the charging function.
- To prevent accident from a short circuit, do not allow metal objects to come into contact with the battery terminals.
- Keep the battery pack away from fire.
- Never expose the battery pack to temperatures above 60^ (140^) , such as in a car parked in the sun or under direct sunlight.
- Keep the battery pack dry.
- Do not expose the battery pack to any mechanical shock.
- Do not disassemble nor modify the battery pack.
- Attach the battery pack to video equipment securely.
- Charging while some capacity remains does not affect the original battery capacity.
- The battery pack is not resistant to water. Do not wet the battery pack.
- Unless you use the battery pack for a long period, store the battery pack after you charge it fully and use it completely once a year.
- Store the battery pack in a cool, dry place.
HnΦopMaun no yxOy 3a annapaTom m Mepbl npeDocTopoXhOCTn
-При Исплььзовани annapaTa,OC6eHNO BO Bpem3apdKn,Держnte ero noJaIbwe ot npemMнкOBAM-paNoBeeuHaNn IBdeOaPnpaTpybl.PpemMHKnAMpaNoBeeuHaNnIBdeOaPnpaTpya HapyuaiOT AM-paNoopnEm pa60Tu BnDeOaPnpaTpybl.
B npoecce 3kcnnyataun annapat HarpeBaetc. Ondako 3TO He RbIeTcH enCnpaBHOCTbIO.
- He pa3meuai Te annapaT B mecTaX:
- 4pe3mepHo XapKnx NJIx XOJIoHbIX
-Пылбньх ИИngрЯЗньх
-OueHbBlaXHbIX
-Повержени Вибаци
BatapeHbIb6Jok
Испόлььтугу только pekomehуеме зарндhoe устороств по видаоапарatypeс суннкштабядки.
-ДлгпрдOTВрашенн HeсчacTHORO cnyuaHn3-3a KOPOTKOrO 3ambikaHn He ДОпуSCaIteCOmpNKOCHOBEHn MeTaJIINueCKNXпрдMeTOB C NOJIUCAMN 6aTapeHnORO6JOKa.
- He ĀpχnTe 6aTapeHbɪn 6JIOK B6JIu3n ORHJ.
- He noДверрага调解батуеньблOK BO3дeястBNIO Temператусыше 60°C, Ини PMER He OCTabлгinte erO b aВТOMOBиЛe, пИпаркованHom B COЛнHeCHHOM MeCTe, ИПИ ПОД ПРЯMbIM COЛнHeCHbIM CBETOM.
-Держinteбатеиь6лOKВсyxOM COCTOAHIN.
- He noDBeprAte 6aTapeHbI 6LoK BO3DeIcTBnIO KaKnx-Ⅱ6o MexaHnuecknx yIapOB.
- He pa3bnpaIte n He BnOu3MeHnTe 6bTaapeiHbI 6NoK.
- Плотно прикpenпг Te 6aТарейнь 6лOK K BидаоанnapaType.
3apKa npHaHnUHe OCTaTOHOrO 3apJa He OTPaxaETcHa NepBOHaJbHO EmKocTb6aTapen.
BaTapeHbI 6LOK He HbIeTcB BOHOHePOnHuaembIM. He NoDBePraTe 6BaTapeHbI 6LOK Bo3DeIeCTBnIO BnIg.
- Ecni Bbl dIInTeNbHoe Bpemr He
ncnlo3yTe 6bataeHbI bIOK, nOHOCTbIO
3apAnITE erO nXpaHNTe OTdEHLHO.
BaataeHbI 6JOK pa3B roD heo6xoDIMO
nonHOCTbIO pa3PJAkTaB.
XpaHnTe 6aTapeHbI 6NoK BCyXOM npoxlaHOM MeCTe.
Notes on dry batteries
To avoid possible damage from battery leakage or corrosion, observe the following:
- Be sure to insert the batteries with the + - polarities matched to the + - marks.
- Dry batteries are not rechargeable.
- Do not use a combination of new and old batteries.
- Do not use different types of batteries.
- Current flows from batteries when you are not using them for a long time.
- Do not use leaking batteries.
If batteries are leaking
- Wipe off the liquid in the battery compartment carefully before replacing the batteries.
- If you touch the liquid, wash it off with water.
- If the liquid get into your eyes, wash your eyes with a lot of water and then consult a doctor.
If any problem occurs, unplug your camcorder and contact your nearest Sony dealer.
Cyxne 6atapeiKu
Bo n36eKahne Bo3MOxHOro NOBpeXdEHHa BnDEOKaMepb I BCNEcCTBne yTeuKN BByTpHenro BeuecTba 6aTaapeek nn Koppo3nn Co6IIOdaIte cneDuOuee:
-Пиустановкебатаразецкоблюдайтправильнуюпалрноctь+ -В COOTBETCTBUN C Metkamn +-.
Cuyxie 6aTapeiKn HeIb3 nepe3apaxaTb.
- He nCNoJIb3yIte HOBIIe 6aTapeKn BmecTe CO CTapblMn.
- He nçnojlb3yüte 6aTaapeiKn pa3Horo Tuna.
- Ecni 6aTapeiKHe IcNoJIb3yIOTcI dIInTeJIbHOe BpEm, OHI NOCTePeHHO pa3prXkaIOTcI.
He nCnoJIb3yIe 6aTapeiKn, KOTOpblne NOTEKIn.
EcIn npOn3oUna yTeuKa BHyTpEnHero BeuecTb6aTaapeek
-Перед Tem,кakЗamehntbбатайки,TшательноptpnteoctaTKKndkoctnBOTcekeДЯбатapeek.
Bcnyae nonaandaHnJnKocTn Ha Koxy, cMOte ee BOdoi.
B cnyuae nonaadaHnJxuKoCTn B rJa3a, npomTe rJa3a 60bnbIm KOnuHeCTBOM BOdbI, nocne Yero o6paTntecb K BpaCy.
B cnyae Bo3HKnHOBeHn KaKnx-Jn6o np6bEm,OTKJIOnuTe BInDeOkaMepy OT nCTOHTNkA PNTaHnI O6paTntEcB B 6JnKaaShn cepBnChbI uehtp Sony.
Video camera recorder
System
Video recording system
2 rotary heads
Helical scanning system
Audio recording system
Rotary heads, PCM system
Quantization: 12 bits (Fs 32kHz stereo 1, stereo 2), 16 bits
(Fs48 kHz, stereo)
Video signal
PAL colour, CCIR standards
Usable cassette
Mini DV cassette with the Mini DV
mark printed
Tape speed
SP: Approx. 18.81mm / s
LP: Approx. 12.56mm / s
Recording/playback time (using cassette DVM60)
SP:1h
LP: 1.5 h
Fast-forward/rewind time (using cassette DVM60)
Approx. 2 min and 30 s
Viewfinder
Electric viewfinder (colour)
Image device
1/3 type CCD (3 Charge Coupled
Device)
Approx. 450 000 pixels
(Effective: Approx. 400 000 pixels) Lens
Combined power zoom lens
Filter diameter 58mm (2 3/8 in)
12 × (Optical), 48 × (Digital)
F1.6-2.4
Focal length
6-72 mm (1/4 - 2 7/8 in)
When converted to a 35mm still camera
43.2 - 518.4 mm (1 3/4 - 20 1/2 in)
Colour temperature
Auto, Indoor (3200K),
Outdoor (5800K),
Minimum illumination
2 lux (F1.6)
Input/Output connectors
S video input/output
Input/output auto switch
4-pin mini DIN
Luminance signal: 1Vp - p
75 ohms, unbalanced
Chrominance signal: 0.3Vp - p
75 ohms, unbalanced
Video input/output
Input/output auto switch
RCA pin-jack, 1 Vp-p, 75 ohms,
unbalanced, sync negative
Audio input/output
Input/output auto switch
RCA pin-jack, 327mV (at output
impedance more than 47 kilohms)
Output impedance with less than
2.2 kilohms
Input impedance more than
47 kilohms
Headphones jack
Stereo minijack ( 3.5mm)
LANC control jack
Stereo mini-minijack ( 2.5mm)
MIC jack
Minijack, 0.388mV low imped
ance with 2.5 to 3.0VDC output
impedance 6.8 kilohms ( 3.5mm)
Stereo type
DV input/output
4-pin connector
Speaker
Dynamic speaker ( 20mm)
LCD screen
Picture
2.5 type measured diagonally
49.9 × 37.3 ~mm (2 × 1 ~l / 2 in)
Total dot number
200640 (880× 228)
General
Power requirements
7.2 V (battery pack)
8.4 V (AC power adaptor)
Average power consumption
(when using the battery pack)
During camera recording using
LCD
4.1 W
Viewfinder
4.0 W
Operating temperature
0^ to 40^ (32^ to 104^)
Storage temperature
-20^ to +60^ (-4^ to +140^)
Dimensions (approx.)
115× 146× 342mm (45 / 8× 53 / 4
× 131 / 2 in) (w / h / d)
Mass (approx.)
1.4 kg (3 lb 1 oz)
main unit only
1.6kg (3 lb 8 oz)
including the battery pack,
NP-F330, cassette DVM60 and
hood cap
Supplied accessories
See page 5.
AC power adaptor
Power requirements
100 - 240 V AC, 50/60 Hz
Power consumption
23 W
Output voltage
DC OUT: 8.4 V, 1.5 A in the
operating mode
Operating temperature
0^ to 40^ (32^ to 104^)
Storage temperature
-20^ to +60^ (-4^ to +140^)
Dimensions (approx.)
125× 39× 62mm
(5× 19 / 16× 21 / 2 in (w / h / d)
excluding projecting parts
Mass (approx.)
280 g (9.8 oz)
excluding power cord
Cord length (approx.)
Mains lead: 2m (6.6 feet)
Connecting cord: 1.6m (5.2 feet)
Battery pack
Output voltage
DC 7.2 V
Capacity
5.0 Wh
Dimensions (approx.)
38.4 × 20.6 × 70.8 ~mm (19 / 16 ×
13 / 16× 27 / 8 in) (w / h / d)
Mass (approx.)
70g (2.5 oz)
Type
Lithium ion
"Memory Stick"
Memory
Flash memory
4 MB: MSA-4A
Operating voltage
2.7 V -3.6 V
Power consumption
Approx. 45mA in the operating mode
Approx. 130~ A in the standby mode
Dimensions (approx.)
50× 2.8× 21.5mm
(2× 1 / 8× 7 / 8 in (w / h / d)
Mass (approx.)
4 g (0.14 oz)
Design and specifications are
subject to change without notice.
TexHnueckne xapaKTepeNCTnKN
Budekamepa
CnCTema
CnCTema BnDeo3aHnCn
2BpauoouneecraIOBKN
CnCTemaHaKIOHHOI
MexaHnuecko pa3BepTKN
Cnctema aydn03annc
Brazaiounece rOJOBK, cIcTeMa INKM
DnckpeTn3aun:126nt(cdBn
chaTObI 32 KΓ, cTepeo 1, cTepeo
2), 16 6nt
(CdBnHacToTb48KΓu,CTepeo)
BndeocnHaJ
Lbetoboi cnHAPAL, cTaNapt MKKP
UcnoJb3yeMbIe KacceTBI
KacceTbIMHn DVc neaTHbIM
3HaKOM MinD
CkopoocTb JnHTbl
SP: npn6n. 18,81 MM/c
LP: npn6n. 12,56 MM/c
Bpem3aHnc/
Bocnpon3BeDenn (npn
NcNoJIb3OBaHnKacCeTbl
DVM60)
SP:14
LP:1.54
Bpem yckopenno nepemotkn
BnpeD/Ha3aD (npi
NCNoJIb3OBAHm KAcCEtbl
DVM60)
Pn6n.2MmH.n30ceK.
BudonckateJIb
3NeKtpnueckn BUnOnCKaTeIb
(LIBETHOJ)
ΦopMnpoBaTeIb n306paXeHnA
π3C Tnna 1/3 (3 npnbopa c
3apAIOBOCB83bO)
Pn6J.450 000 toeK
(Pa6oyné: npn6n. 400 000 toye)
06beKTHB
YHnBepcaJIbHbI OObEeKTHB C
3NEKTPONPNUBODOM
TpaHcΦokaTopa
Dnametp cnjltpa 58 MM
12× (ontnueckn), 48×
(LIDPPOBOI)
F1.6 - 2.4
ΦokychoepacctOaHne
6-72MM
Ppi npeo6pa3ObaHnB 35-MM
ΦoTOKaMepy
43,2 - 518,4 MM
UBeTobA TempepaTypa
ABTOpeRyInpObaHne, B
PomecheHH (3 200 K),
Ha ynue (5 800 K),
MnHmAlbHaOcBSeHHOCTb
2 liokc (F1.6)
Pa3bemblBxOdHbIX/
BbIXOdHbIX CnHraHOB
BndeOBXoB/BndeOBbIXoS
ABMATUHcKNeIpeKeNIOuHaTeNb BXOa/BxBxOa
4-ITbIPbKOBoE MHNrHe3do DIN
CnHraJI npKoCTn:1BHa ToHKy,
75 OM, HecnMMeTpnuHbI
CunhaJzBetheOCTn:0,3BHa
TOUky, 75 Om, HecmmMeTpHbI
Bndeo BXoBbIXoD
ABTomatneckn nepeKlnuOaTeIb BxOJa/BxIXoDa
Pa3bem RCA, pa3max cnHaJa 1
BHaTochky,75OM
HEcMMMeTpUHbI,
CINHXPOHN3NPOBaHHbI
OTpucaTeJIbHbI NOnIOc
Aydno BXoB/BblXoD
ABTOMaTnueckn nepeKJIIOuTaTeJb
BxOa/BbIXoA
Pa3bem RCA, 327 MB (PnI nOJIHOM
BbIXOHNOM COIPOTNBJIeHIN 60Jee
47 KOM)
Полhoe ВьхODhoe
COPPOTNBHeHne-MeHee2,2KOM
PoiHoe BXoDHOe CONpOTnBJIeHne -
6onee
47 KOM
THe3doДЯrOIOBbIX
TeIefoHOB
CTepeofoHnueckoe MHNrThe3do
(03,5MM)
THe3do ynpabVeHnA LANC
CtepeofoHnueckoe MHNrTHe3do
(0 2,5 MM)
THe3oMIC
MHH-rHe3do,0,388MB,Hn3Koe
nonhoe conpoTubnene ot 2,5 do
3,0 B noctoHHoro Toka,
BbIXoHoeIIOHoeCOnpoTINBJIeHne
6,8 KOM (Ø 3,5 MM)
CtepeofoHnueckn TIN
BxoBbIXoD V
4-ItbipbKOBbl pa3beM
PomKorOBopntIb
HnHAMK rPOMKOROBOpNTeJI
(0 20 MM)
3KpaH KKD
N306paXeHne
Ppnilaraemble pnpHaJnEkhOCTn
CM. cTp. 5.
Cetebon aanterp
NepemehHoro TOKa
Tpe6obAHnK nntaHnIO
100 - 240 B nepeMeHHoro Toka,
50/60 T
Notpe6JrEma MoUHocTb
23 B
BbIXoHoe HapRjXeHne
BbIXoNocT. Toka: 8,4 B, 1,5 A B
pa6oem pexnme
Pa6o7a TEmpepatya
OTo 0^ do 40^
TemnepaTypa xpaHeHNA
OT-20°C 10+60°C
Pa3mepbl (np6J.)
125 × 39 × 62 MM
(Ⅲ/B/D), He BKJIIOHcA
BbICTyIaIouIne YactN
Bec (npn6J.)
280
6e3 ceTeBOrO shHypa
Диннашура (npn6.)
CteBoH uHyp: 2 M
CoeHHntelhny Hyp:1,6 M
BaTapeiHbI 6JIOK
BbIXoHoe HapRjXeHne
7,2B noct. Toka
MoHoctb
5.0 Bt-4.
Pa3mepbl (npn6n.)
38.4 × 20.6 × 70.8 MM(L / B / r)
Bec (npn6J.)
70r
Tin
JIITHeBO-NOHbI
"Memory Stick"
NamrTb
Φn3n- nAMrTb
4 M6: MSA-4A
Pa60ee Hanp8KeHne
2,7-3,6B
Notpe6JrEma MoUHocTb
Ppi6n.45MABpa6oempexime
Pn61. 130 uA B peXmE
OxndaHnA
Pa3mepbl (npn6n.)
KoHCTpyKzIy I TeXnHuEckne
XapakTepeNCTnKMOrYT
N3MeHrTbC86e3
PpeBapuTeNbHO yBeOMJeHnA.
- Quick Reference - Identifying the parts and controls
-ОпаTNBньcnpaBOchNK -ОбоЗаченичacTeиpeултOpOB
Camcorder
Bvdeokamepa

1 INDEX MARK button (p. 89)
2 Zoom ring (p. 30)
3 Focus ring (p. 81)
ND FILTER selector (p. 66)
FOCUS selector (p. 81)
6 PUSH AUTO button (p. 81)
7 FADER button (p. 55)
8 BACK LIGHT button (p. 32)
END SEARCH button (p. 36)
10 EDITSEARCH buttons (p. 36)
11 EXPOSURE dial (p. 63)
12 EXPOSURE button (p. 63)
13 Display window (p. 253)
14 OPEN button (p. 22, 38)
15 SPOT LIGHT button (p. 33)
1 Khonka INDEX MARK (cTp. 89)
2 Kolbuto TpaHcfoKaTopa (ctp. 30)
3KoJIbUcΦokycnPoBKn (CTp.81)
4 CeNeKtop ND FILTER (ctp. 66)
5 CeIeKTop FOCUS (cTp. 81)
6 KhoNka PUSH AUTO (cTp. 81)
7 KhoNka FADER (cTp. 55)
8 Khonka BACK LIGHT (cTp. 32)
9 Khonka END SEARCH (cTp. 36)
10 Khonkn EDITSEARCH (ctp. 36)
11 Dnck EXPOSURE (cTp. 63)
12 Khonka EXPOSURE (cTp. 63)
13 Okoiko DnCnIe (cTp. 253)
14 KhoNka OPEN (ctp. 22, 38)
15 Khonka SPOT LIGHT (ctp. 33)
Identifying the parts and controls

This mark indicates that this product is a genuine accessory for Sony video products.
When purchasing Sony video products, Sony recommends that you purchase accessories with this "GENUINE VIDEO ACCESSORIES" mark.
Mini Digital Cassette Mini DV Video Cassette Memory
These are trademarks.
Intelligent Accessory Shoe
Notes on the intelligent accessory shoe
- The intelligent accessory shoe supplies power to optional accessories such as a video light or microphone.
- The intelligent accessory shoe is linked to the POWER switch, allowing you to turn the power supplied by the shoe on and off. Refer to the operating instructions of the accessory for further information.
- The intelligent accessory shoe has a safety device for fixing the installed accessory securely. To connect an accessory, press down and push it to the end, and then tighten the screw.
- To remove an accessory, loosen the screw, and then press down and pull out the accessory.
06o3haueHne yacTei nperyIaTOpOB

Intelligent Accessory Shoe
Speaker
17 LCD screen (p. 25)
18 LCD BRIGHT buttons (p. 26)
VOLUME buttons (p. 38)
20 MEMORY PLAY button (p. 193)
21 DISPLAY button (p. 39)
22 MEMORY - button (p. 184, 193)
23 DATA CODE button (p. 39)
24 TITLE button (p. 142)
25 (self-timer) button (p. 34, 48, 181)
16 TpomKorOBopnteIb
17 3KpaH XKd (cTp.25)
18 Khonkn LCD BRIGHT (cTp. 26)
19 KhonKnu VOLUME (cTp. 38)
20 KhoNka MEMORY PLAY (cTp. 193)
21 Khonka DISPLAY (cTp. 39)
22 Khonka MEMORY - (cTp. 184, 193)
23 Khonka DATA CODE (cTp. 39)
24 KhoNka TITLE (cTp. 142)
25 KhoNka (Taimep camo3anycka) (cTp. 34, 48, 181)
Identifying the parts and controls
26 Battery pack (p. 13)
27 ZEBRA selector (p. 67)
28 RESET button (p. 221)
29 MEMORY INDEX button (p. 195)
30 MEMORY DELETE button (p. 204)
31 MEMORY + button (p. 184, 193)
32 MEMORY MIX button (p. 184)
33 PICTURE EFFECT button (p. 56)
34 DIGITAL EFFECT button (p. 59)
06o3haueHne yacTei nperyIaTOpOB
26 BaatarpeiHbI 6JIOK (cTp.13)
27 IpekeKnioaTeIb ZEBRA (ctp. 67)
28 Khonka RESET (cTp. 228)
29 Khonka MEMORY INDEX (ctp. 195)
30 Khonka MEMORY DELETE (cTp. 204)
31 Khonka MEMORY + (ctp. 184, 193)
32 KhoNka MEMORY MIX (cTp. 184)
33 Khonka PICTURE EFFECT (ctp. 56)
34 Khonka DIGITAL EFFECT (ctp. 59)
35
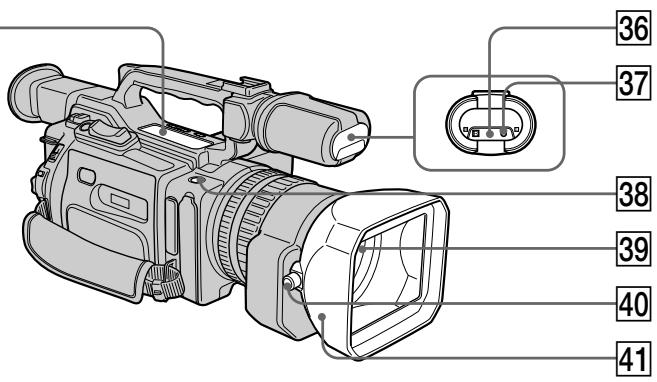
SLOW (slow playback)
AUDIO DUB (dubbing)
STOP (stop)
REW (rewind)
PLAY (playback)
FF (Fast-forward)
PAUSE (pause)
REC (recording)
35 Video control buttons (p. 38, 42, 121)
The control buttons light up when you set the POWER switch to VCR.
Remote sensor/infrared ray emitter
37 Camera recording lamp (p. 22)
35 KhoNKn BnDeoKoHToPOn (cTp. 38, 42, 121)
II SLOW (3aMeIeHoe Bocnpoun3BedeHne)
AUDIO DUB (nepezannc)
STOP (ocTaHOBka)
REW (yckopeHHa nepemOTka Ha3a)
PLAY (Bocnpoun3BeDeneHne)
FF((yckopenhna nepemOTka bpei)
II PAUSE (nay3a)
REC (3ainncb)
KhONk ynpaBleHn IoCBeuBaHTcA, ecnI nepeKJIouaTeNb POWER ycTaHOBlen B noIoXeHne VCR.
Identifying the parts and controls
38 REC START/STOP (p. 27)
39 Lens
40 Lens hood fixing screw
41 Lens hood
You can attach a wide teleconversion lens (not supplied) by removing the lens hood.
Removing the lens hood
To remove the lens hood for attachment of the wide teleconversion lens, etc., loosen the lens hood fixing screw, and unscrew the lens hood conuterclockwise.
When using additional filters
We recommend that you use Sony made filters having the genuine accessory mark.
Notes on replacing the eyecup
- When replacing the supplied eyecup (large or small), clutch the upper and lower of it by your fingers [a], insert your finger into the unfasten portion between the eyecup and viewfinder [b], then remove it.
- Do not pull the eyecup inward or with excessive force [c]. Doing so may damage the eyecup.
PekomeHdyetcN CnOJb3ObaTb PnIbTpbl npOn3BOdCTBa Kopnpaunn Sony, mMeIoune 3NaK NoDInHHoPiHaJaLexKHOCTN K MapKe.
PpmeaHnno 3ameHe okyIpa
-ПиЗзамепрILAЯмORO OKулра (60ьшою Или Малою) BO3bMITEc b naJIbцAMN 3a erO BepXHIOU HnKHOU YacTb [a], BCTaBbTe paleu B NOBBUWUOCr ZeIb mEXkDy OKyIpyOM N BuDOnCKaTeJEM [b], 3aTEM CHIMITE erO.
- He BbIbOpaunBaIte erO BHyTpB n He npInaraiTe n3nIuHnx ycNl [c]. 3To MoKet pInBeCTn K NobpeJdeHIO OkyIpa.
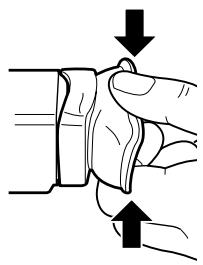
[a]
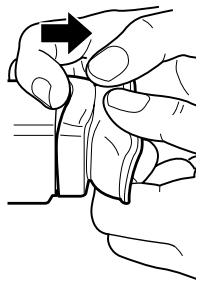
[b]
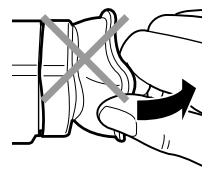
[c]
Identifying the parts and controls
06o3haueHne yacTei nperyIaTOpOB
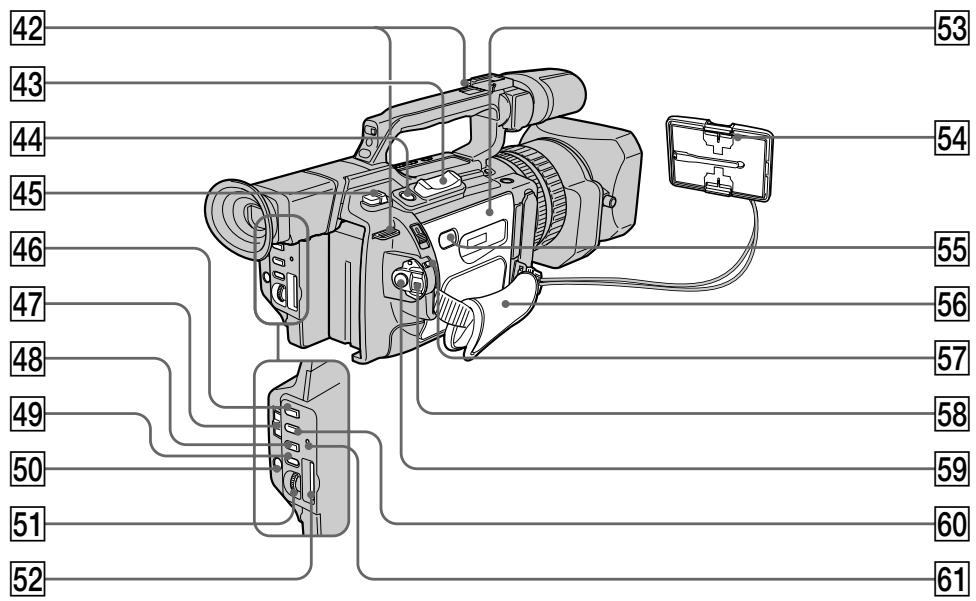
42 Hooks for shoulder strap
43 Power zoom lever (p. 29)
44 PHOTO button (p. 46, 177)
45 BATT (battery) RELEASE lever (p. 13)
46 PROGRAM AE button (p. 77)
47 AUTO LOCK selector (p. 61)
48 WHT BAL button (p. 70)
49 AUDIO LEVEL button (p. 73)
50 MENU button (p. 154)
51 SEL/PUSH EXEC dial (p. 154)
52 "Memory Stick" slot (p. 173)
53 Cassette lid (p. 20)
54 Hood cap (p. 22)
55 PUSH button (p. 20)
42 Kpouckn dIJI pIeueBOro peMHa
43 Pbyar npuBoa TpaHcfoKaTopa (ctp. 29)
44 KhoNka PHOTO (cTp. 46, 177)
45 PbyaKoB BATT RELEASE (ctp. 13)
46 Khonka PROGRAM AE (cTp. 77)
47 IpekeKIOUaTeIb AUTO LOCK (cTp. 61)
48 KhoNka WHT BAL (cTp. 70)
49 Khonka AUDIO LEVEL (cTp. 73)
50 KhoNka MENU (cTp. 154)
51Диack SEL/PUSH EXEC (ctp. 154)
52 THe3do dJa "Memory Stick" (cTp. 173)
53 Kpbiuka kaccetHoro otceka (ctp. 20)
54 Kpbioka (ctp. 22)
55 Khonka PUSH (ctp. 20)
Identifying the parts and controls
Grip strap
57 LOCK switch (p. 22)
58 POWER switch (p. 22)
59 START/STOP button (p. 22)
60 SHUTTER SPEED button (p. 64)
61 Access lamp (p. 173)
Fastening the grip strap
06o3haueHne yacteN peyIaTOpOB
56 PemehbДЯЗaxBaTa
57 NepekeIIOuataTeNb LOCK (cTp. 22)
58 IpekeKlIOuateIb POWER (cTp. 22)
59 Khonka START/STOP (ctp. 22)
60 Khonka SHUTTER SPEED (cTp. 64)
61 Jlamnocha oshaene (ctp. 173)
Fasten the grip strap firmly.
Attaching the shoulder strap
Attach the shoulder strap supplied with your camcorder to the hooks for the shoulder strap.
HaedexHo npnKpeHnTe peMeHb Ia3xAbaTa.
PpKpeIeHne IJIeueBOro peMHa
PpNkpeNTe PnueyBoi peMeHb, npnlaRaembl K BaWeB BnDeoKampe, K KpUoyKaM dJa npeyeBoro pemHa.
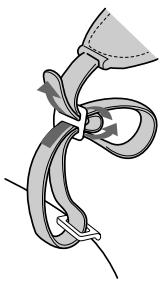
Identifying the parts and controls
06o3haueHne yacTei nperyIaTOpOB
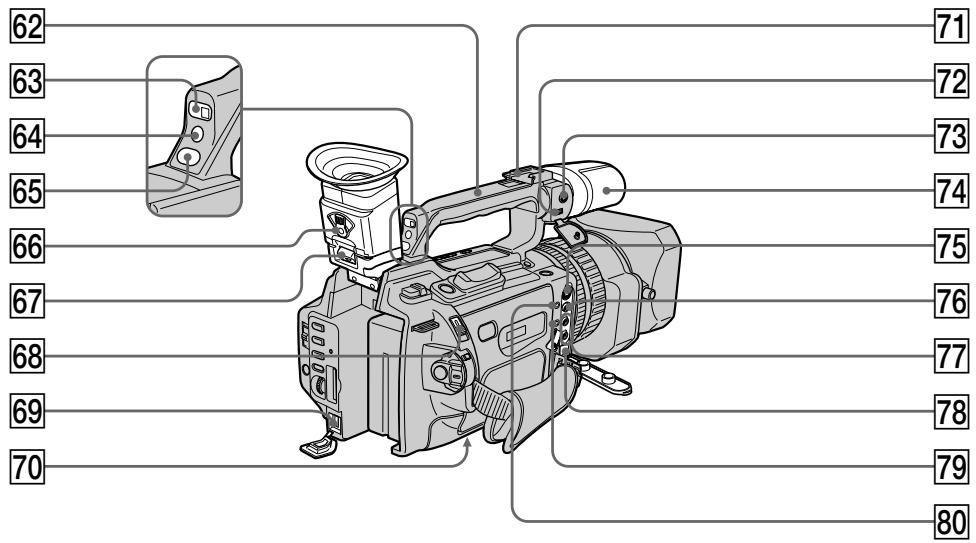
62 Carrying handle
63 Remote sensor
64 Camera recording lamp (p. 22)
65 CUSTOM PRESET button (p. 75)
66 Viewfinder adjustment lever (p. 28)
67 Hook for removing the viewfinder (p. 235)
68 EJECT switch (p. 20)
69 DC IN jack (p. 14)
70 Tripod receptacle Make sure that the length of the tripod screw is less than 6.5mm (9/32 inch). Otherwise, you cannot attach the tripod securely and the screw may damage your camcorder.
71 Intelligent accessory shoe
72 MIC/LINE switch (p. 135)
62 Puyka dIJI nepeHocKn
63 DaTnK nCTaHcNoHHoro ynpabJIeHn
64 JIAMIOUka 3aHcN BIndeOKamepo (cTp.22)
65 KhoNka CUSTOM PRESET (ctp. 75)
66 PbyaXok perylnpoBkn BIDOnckaTeTn (cTp.28)
67 KpOyokIa CHaTHa BuaOnckaTeJIa (cTp.235)
68 IpekeKIOUaTeIb EJECT (cTp. 20)
69 THe3do DC IN (ctp. 14)
70 THe3do Dnla WtataBa Y6eInTeCb, YTO dInHa BnHTa WtataBa He npEbyIaAet 6,5 MM. B IpOTNBHom Cnyae BbI He cMOxKeTe HaJeXHo pInKpeINb WtataB, a BNHT MOxET NOBpeINb BInDeOKaMepy.
71Держателдг BCNOMORAteIbHbIX npHaadJeKHOCTeI
72 PereklnouateJIb MIC/LINE (cTp. 135)
Identifying the parts and controls
73 MIC jack (PLUG IN POWER) (p. 135) The MIC jack is used to supply the power to the "plug-in-power" microphone connected, and is used as an audio input jack for an external microphone or audio equipment. When connecting an external microphone, set the MIC/LINE switch to MIC, and when connecting audio equipment, set it to LINE.
74 Microphone (p. 137)
75 SVIDEO jack (p. 44, 49, 105, 128, 189)
76VIDEO jack (p.44, 49, 105, 128, 189)
77 AUDIO L/R jack (p. 44, 105, 128, 135)
78 DVI/OUT jack (p. 107, 130, 190) This "i.LINK" mark is a trademark of Sony Corporation and indicates that this product is in agreement with IEEE 1394-1995 specifications and their revisions.
The DV IN/OUT jack is i.LINK compatible.
79 LANC jack LANC stands for Local Application Control Bus System. The LANC control jack is used for controlling the tape transport of video equipment and peripherals connected to it. This jack has the same function as the jack indicated as CONTROL L or REMOTE.
80 (headphones) jack When you use headphones, the speaker on your camcorder is silent.
The buttons that have the same name on the Remote Commander as on your camcorder function identically to the buttons on your camcorder.
1 Transmitter
Point toward the remote sensor to control your camcorder after turning on your camcorder.
ZERO SET MEMORY button (p. 91)
3 PHOTO button (p. 46, 177)
4 DISPLAY button (p. 39)
5 Memory control buttons (p. 184, 193)
6 SEARCH MODE button (p. 93, 95, 97, 99)
Video control buttons (p. 42)
REC button (p. 128)/MARK button (p. 121)
9 DATA CODE button (p. 39)
10 START/STOP button (p. 22)
11 Power zoom button (p. 29)
12 1/▶按钮 (p.93,95,97,99)
13 AUDIO DUB button (p. 138)
1 PeredaTnuK
Дя управлия вideokamериНаразьтпульт на датчн посе eeBКЛЮЧЕни.
2 KhoNka ZERO SET MEMORY (ctp. 91)
3 KhoNka PHOTO (cTp. 46, 177)
4 Khonka DISPLAY (ctp. 39)
5 KhoNknypaBHeHnIaMaTbHO (cTp. 184, 193)
6 KhoNka SEARCH MODE (cTp. 93, 95, 97, 99)
7 Khonkn BndeokOHpoJ (ctp. 42)
8 KhoNka REC (cTp. 128)/KhoNka MARK (cTp. 121)
9 KhoNka DATA CODE (cTp. 39)
10 Khonka START/STOP (ctp. 22)
11 KhoNka npNbOda TpaHcΦokaTopa (cTp. 29)
12 KhonknI ▲/▶I (ctp. 93, 95, 97, 99)
13 Khonka AUDIO DUB (ctp. 138)
Identifying the parts and controls
To prepare the Remote Commander Insert two R6 (size AA) batteries by matching the ^+ and - polarities on the batteries to the + - marks inside the battery compartment.
Notes on the Remote Commander
- Point the remote sensor away from strong light sources such as direct sunlight or overhead lighting. Otherwise, the Remote Commander may not function properly.
- Your camcorder works in the commander mode VTR 2. Commander modes 1, 2 and 3 are used to distinguish your camcorder from other Sony VCRs to avoid remote control misoperation. If you use another Sony VCR in the commander mode VTR 2, we recommend changing the commander mode or covering the sensor of the VCR with black paper.
Display window
PpmeaHnno npIbTy dntaHcNoHHoro ynpabLeHn
Держnte ДистанционьдаТчнК ha pacctOTHHm OT CINbHbIX NCTOCHNKOB CBeta, HAnpIMePnpaMbIX COJIHeUHbIX JUYeI INJn IamNbl npoeKTopa. B npotNBHom cIyueae DInCTaUNOHoe ynpabLeHne MOxet He DeIcTBOBaTb.
Данная Вдебокамер pa6obTaETВ ржимепьтадиТанционноуnpablenя VTR2.Pжимы пьлta диТационноуnpablenя1,2и3иСпоьь3уOTсЯДЯТANHOB WdEOKampebI OT dpyrnxBVDeOMarHnTofoHOBФрмБОYi36жанHe HnPabInlbHOn pa6OtblNtDACTaONHOrO ynpablenя.EcnilncNoIb3yETcRdpyroB WdEOMarHnTOfOphФрмБОl Sony,pa6OtaUoMnВ p9ximeVTR2,peKOMeHdyETcRn3MeHnTbPEKIMmПЛБaNTaDHTAUNHOHRo ynpablenyaIIIN 3akpbITbDaTCHNK DnCTaHUNOHORO ynpablenia BWDeOMarHnTOfOha YepHOH bymarO.
Okowko dincpnjeA

1 Remaining battery time indicator (p. 14)/Tape counter (p. 91)/Memory counter (p. 194)/Time code indicator (p. 31)/Self-diagnosis indicator (p. 222)
2 FULL charge indicator (p. 14)
3 Remianing battery indicator (p. 14)
1 INHdNKaTOP octabweroC8 3apya 6batapeHoro 6Ioka (ctp. 14)/CteTnK IeHTbl (ctp. 91)/CteTnK namrtn (ctp. 194)/INHdNKaTOP KOJa BpeMeHn (ctp. 31)/INHdNKaTOP cAmOHaIraHoCTnKn (ctp.229)
2 NHHKaTOp 3apAKn FULL (cTp.14)
3 INHnKaTOp OCTaBweroOc8 3apya (ctp.14)
Operation indicators
Pa6oUne uHdNkaTOpbl
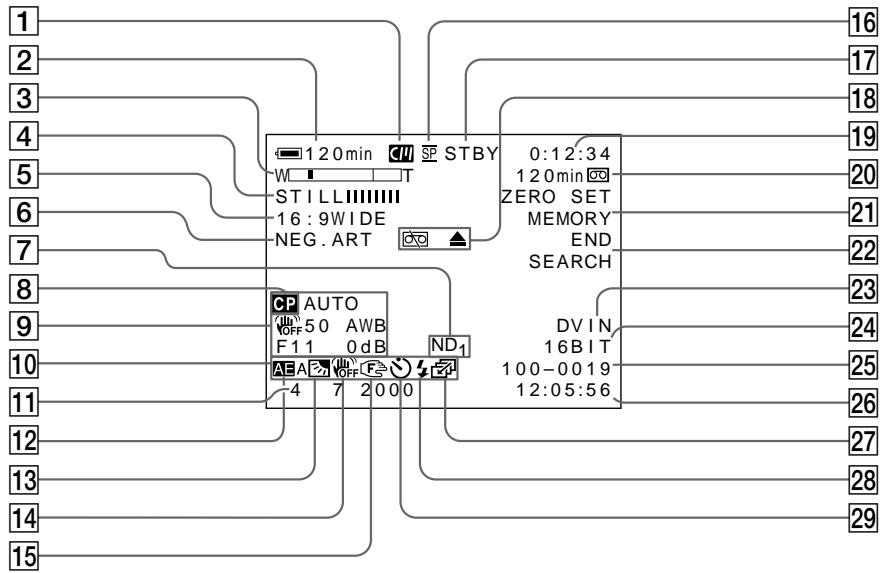
1 Cassette memory indicator (p. 210)
2 Remaining battery time indicator (p. 31)
3 Zoom indicator (p. 29)/Exposure indicator (p. 63)/Data file name indicator (p. 170)
4 Digital effect indicator (p. 58)/FADER indicator (p. 54)/MEMORY MIX indicator (p. 184)
16:9WIDE indicator (p. 53)/PROG. SCAN indicator (p. 50)
6 Picture effect indicator (p. 56)
ND filter indicator (p. 66)
8 Custom preset indicator (p. 75)
9 Data code indicator (p. 40)
1 INHdNKaTOP KacceTHoN PAMrTn (cTp. 210)
2 INdikKaTOp 0ctaBweroOc3apya6atapeHoro 6Ioka (cTp.31)
3 INHdNkaTop TpaHcfoKaTopa (ctp. 29)/ INHdNkaTop 3KcNo3nMn (ctp. 63)/ INHdNkaTop Ha3BaHnJaAHhBix (ctp. 170)
4 INHdkaTOp cHpPoBOrO 3ΦeKTa (cTp.58)/INHdkaTOp FADER (cTp.54)/ INHdkaTOp MEMORY MIX (cTp.184)
5 INHdNkaToppeXnMa16:9WIDE(cTp.53)/ INHdNkaTop PROG.SCAN(cTp.50)
6 INHdkaTop 3ΦΦeKta n3o6paXeHn (cTp.56)
7 INHdkaTop qnIbtpa ND (ctp. 66)
8 INHdkaTop INHdNbUdaJIbHoI HAcTPOIKn (ctp. 75)
9 HndkaTop Koka daHHbIX (ctp. 40)
Identifying the parts and controls
10 LCD bright indicator (p. 26)/Volume indicator (p. 38)
11 Date indicator
12 PROGRAM AE indicator (p. 77)
Backlight indicator (p. 32)/Spot light indicator (p. 33)
14 SteadyShot OFF indicator (p. 156)
15 Manual focus/Infinity indicator (p. 81)
16 Recording mode indicator (p. 159)
17 Standby/Recording indicator (p. 22)/ Video control mode indicator (p. 42)/ Image quality mode indicator (p. 174)
Warning indicators (p. 230)
19 Tape counter indicator (p. 91)/Time code indicator (p. 31)/Self-diagnosis indicator (p. 222)/Photo mode indicator (p. 46)/Image number indicator (p. 194)
20 Remaining tape indicator (p. 31)/ Memory playback indicator (p. 194)
21 ZERO SET MEMORY indicator (p. 91)/ FRAME REC indicator (p. 87)/Interval recording indicator (p. 84)
22 END SEARCH indicator (p. 36)
23 DV IN indicator (p. 131)/A/V→DV OUT indicator
24 Audio mode indicator (p. 159)
25 Data file name indicator This indicator appears when the MEMORY MIX functions work.
26 Audio input level/Time indicator
27 Continuous mode indicator (p. 179)
Video flash ready indicator This indicator appears when you use the video flash light (not supplied).
29 Self-timer indicator (p. 34)
Functions to adjust exposure (in the recording mode)
- In insufficient light
Low lux mode (p. 77)
- In dark environments such as sunset, fireworks, or general night views
Sunset & moon mode (p. 77)
- Shooting backlit subjects
BACK LIGHT (p. 32)
- In spotlight, such as at the theater or a formal event
SPOT LIGHT (p. 33)
Functions to give images more impact (in the recording mode)
- Smooth transition between scenes
FADER (p. 54)
- Taking a still picture
PHOTO (p. 46, 177)
- Digital processing of images
PICTURE EFFECT (p. 56)/DIGITAL
Superimposing a title
EFFECT (p. 58)
TITLE (p. 141)
Functions to give a natural appearance to your recordings (in the recording mode)
- Preventing deterioration of picture quality in digital zoom
D ZOOM MENU (p. 154)
- Focusing manually
Manual focus (p. 81)
- Recording fast-moving subjects
Sports lesson mode (p. 77)
Functions to be used in editing (in the recording mode)
- Watching the picture on a wide-screen TV
Wide mode (p. 53)
Viewing images using a personal computer
"Memory Stick" (p. 170)
Functions to be used after recording (in the playback mode)
- Digital processing of recorded images
PICTURE EFFECT (p. 102)/DIGITAL
- Displaying the date/time or various settings when you recorded
EFFECT (p. 103)
- Quickly locating a desired scene
Data code (p. 40)
- Searching for scenes having a title
Zero set memory (p. 91)
- Searching for scenes recorded in the photo mode
Title search (p. 95)
- Scanning scenes recorded in the photo mode
Photo search (p. 99)
- Playing back monaural sound or sub sound
Photo scan (p. 101)
HiFi SOUND MENU (p. 154)
KpaTKoe pyKOBoIDCTBO NO yHKcIaM
Pexm Hn3KoO OcBeueHHOCTn (CTp. 77)
Pexm 3aKaTa coNHa u N LyHNoOOCBeUeHnA (CTp.77)
"Memory Stick" (cpt. 170)
Camera chromakey 182
Cassette memory 10, 210
Charging battery 14
Charging vanadium-lithium battery 236
COLOUR BAR 161
Connection (dubbing a tape) 105 (viewing on TV) 44
Continuous 178
Custom preset 75
Cut recording 87
Data code 40
Date search 97
Date/time indicator 41
DEMO. 160
DIGITAL EFFECT 58
Digital program editing... 108
DISPLAY 39
DOT 54
Dual sound track tape..... 212
Dubbing a tape 105
DV connecting cable. 106
E
EDITSEARCH 36
END SEARCH 36, 43
Exposure 62
External microphone (not supplied) 251
F, G, H
Fade in/out 54
FADER 54
FLASH MOTION. 58
FOCUS 81
Format 158
Full charge 14
Grip strap 249
Guide frame 52
Headphones jack 251
Heads 235
HiFi SOUND 157
I, J, K, L
i.LINK 251
Image protection 202
Image quality mode 174
INDEX MARK 89
INDEX (Multiple) display 195
Index search 93
"InfoLITHIUM" battery .... 14
Intelligent accessory shoe . 136
Interval recording 83
JPEG 170
Labeling a cassette 149
LANC 251
LCD screen 25
LUMINANCEKEY 58
M, N
Main sound 157
Manual adjustment 61
Manual focus 81
Memory chromakey 182
Memory luminancekey..... 182
Memory mix 182
Memory overlap 182
Memory photo recording . 177
"Memory Stick" 170
Menu settings 154
MIC (PLUG IN POWER) .. 135
Mirror mode 25
Moisture condensation .... 234
MONOTONE 54
ND filter 65
Normal charge 14
O, P, Q
OLD MOVIE 58
Operation indicators 254
OVERLAP 54
PAL system 233
Photo scan 101
Photo search 99
PICTURE EFFECT 56
Picture search 42
Playback pause 42
Power sources
(battery pack) 13
(car battery) 19
(mains) 18
Power zoom. 29
Printmark. 208
PROGRAMAE. 77
Progressive 50
R, S
Rec Review 37
Recording level 73
Remaining battery time indicator 31
Remaining tape indicator ... 31
Remote Commander 252
Remote control jack (LANC) 251
Remote sensor 246
RESET 221
SVIDEO jack.....45,105,128
SEL/PUSH EXEC dial .... 154
Self-diagnosis display .... 222
Self-timer. 34, 48, 181
Serial port adaptor 197
Skip scan 42
Slide show 200
Slow playback 42
Spotlight mode 33
STEADYSHOT 156
Stereo tape 212
STILL 58
Sub sound 157
T, U, V
Tape counter 91
Tape photo recording 46
Telephoto 29
Time code 31
Title 141
Title search 95
TRAIL 58
Transition 24
TV colour system 233
W,X,Y,Z
Warning indicators 230
White balance 70
Wide mode 53
Wide-angle 29
WIPE 54
WORLD TIME 160
Write-protect tab 21
Zebra pattern 67
Zero set memory function .. 91
Zoom 29
AnpaBnThbI yKa3aTeIb
A,B,B,Γ
AaTep nocTeIOBATEbHoro npota 197
Aydnopepe3a\Pncb 135
Aydnopexim 165
BanaHc 6eIoro 70
BatapehHbIy 6bnok InfoLITHIUM .14
BaTapeHbIb 6nok 13
Budoeorolovkn 235
BHeuHmMnKpOΦoH (He BXoIIT B KOMPJIeKT) 251
BcnoMOraTeJIbHbI 3ByK .. 163
THe3do SVIDEO 45,105,128
Гелдо Достанционноуразьдени(LANC).....251
THe3IO DnI rOIOBbIX 251
d,3
Pay3a Bocnpn3BeDHeH..42
Pepe3anncb JeHtbl 105
IepexoI 24
ПeЧаТьи 3нak 208
Ponck DaTbI 97
Ponck n3o6paXeHnA 42
Ponck MeToDom nporoHa ... 42
Ponck no INdeKcy 93
Ponck TnTpa 95
PokaDpoBa cBemKa 87
Полная заюка 14
PonocatbIuwa6noH 67
PpeDynpexJaIooune INdMakToBp 230
PporpeccnBbI 50
PpocMToTp 3aHcN 37
PnBt DCTaHNOHOHR ynpablanen 252
Pa6o7ne HnDnKaTOpbl 254
Peryunobka BUDOKATENA 28
PeximKaueCTBa 174
PexkIM npoxekTopHoro
OCBeseHn 33
I3roTOBnteIb: CoHn KopnpoeiunH
Ampec: 6-7-35 Kntaunharaba,
山HaraKa-Ky, Tokno 141-0001, JnOhna
CtpaHa-npOun3BovuTeJIb:JIOHnIa