AVICZ6110BT - GPS Navigation System PIONEER - Free user manual and instructions
Find the device manual for free AVICZ6110BT PIONEER in PDF.

User questions about AVICZ6110BT PIONEER
0 question about this device. Answer the ones you know or ask your own.
Ask a new question about this device
Download the instructions for your GPS Navigation System in PDF format for free! Find your manual AVICZ6110BT - PIONEER and take your electronic device back in hand. On this page are published all the documents necessary for the use of your device. AVICZ6110BT by PIONEER.
USER MANUAL AVICZ6110BT PIONEER
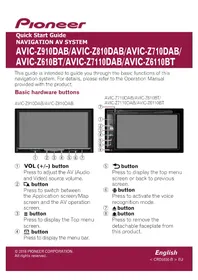
This guide is intended to guide you through the basic functions of this navigation system. For details, please refer to the Operation Manual provided with the product.
Basic hardware buttons
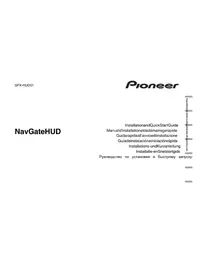
AVIC-Z910DAB/AVIC-Z810DAB
text_image
① ② ③ ④ ⑤ ⑥ ⑦① VOL (+/-) button
Press to adjust the AV (Audio and Video) source volume.
② ▲ button
Press to switch between the Application screen/Map screen and the AV operation screen.
③ : button
Press to display the Top menu screen.
④ button
Press to display the menu bar.
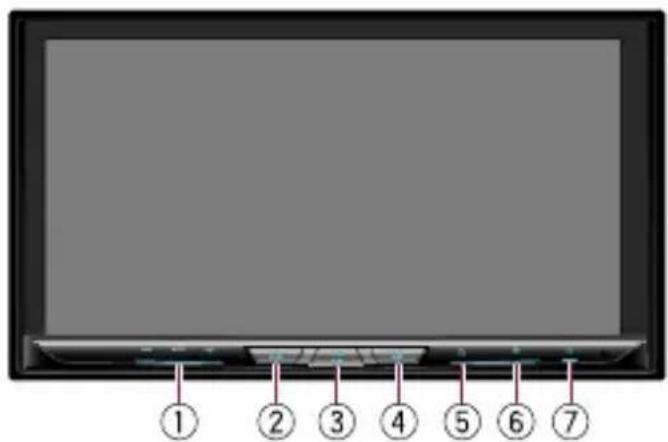
AVIC-Z710DAB/AVIC-Z610BT/ AVIC-Z7110DAB/AVIC-Z6110BT
text_image
Diagram of a digital tablet with numbered labels pointing to the screen area⑤ ← button
Press to display the top menu screen or back to previous screen.
⑥ button
Press to activate the voice recognition mode.
⑦ ▲ button
⑧ ▲ button

Press to remove the detachable faceplate from this product.
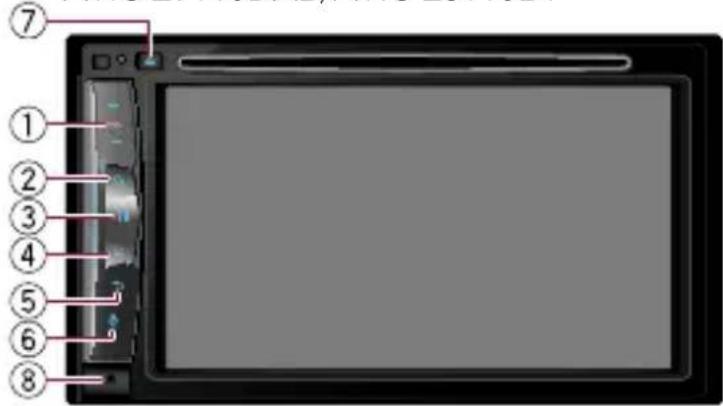
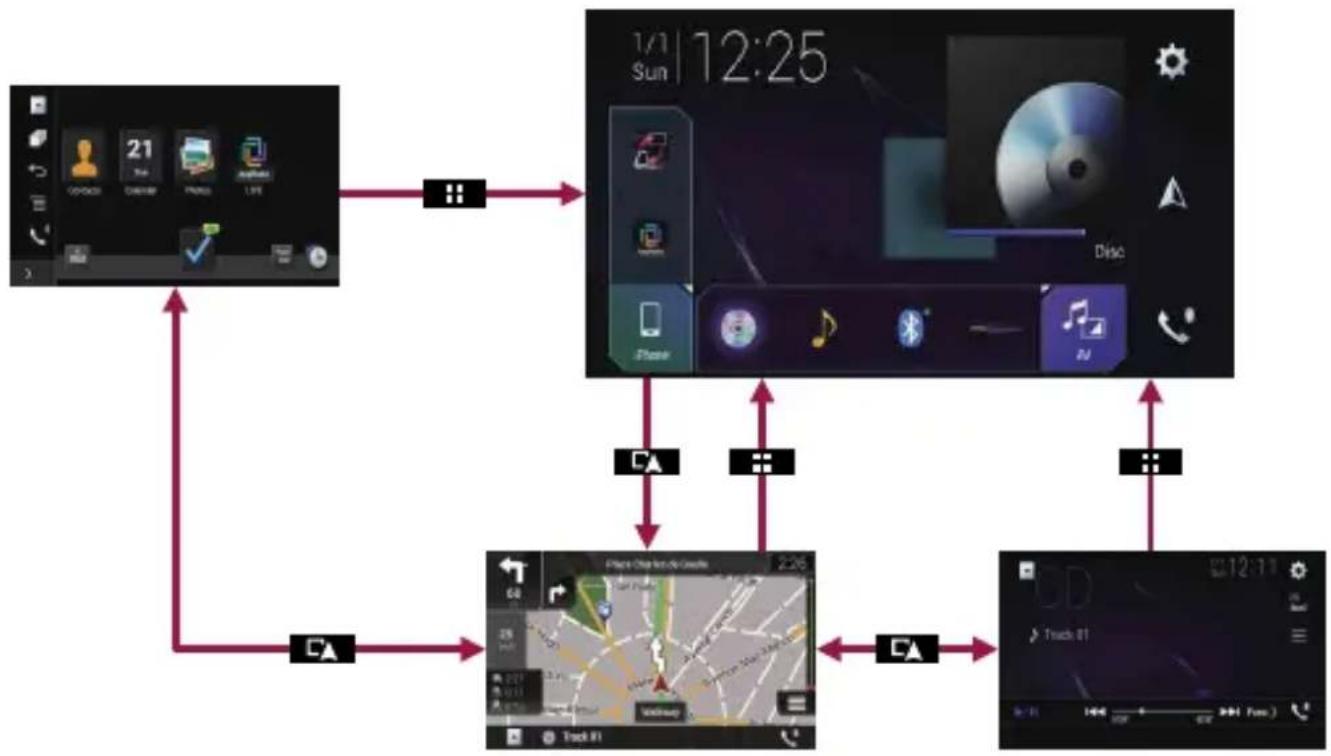
Switching screens using the touch panel keys
flowchart
graph TD
    A["User Interface"] --> B{Status}
    B -->|Yes| C["Phone Back"]
    B -->|No| D["Action/Control"]
    C --> E["Mobile Phone"]
    D --> F["Mobile Phone"]
    E --> G["Car with CD"]
    F --> H["Car with Bluetooth"]
    G --> I["Car with Smartphones"]
    H --> J["Car with Smartphones"]
    I --> K["Car with Smartphones"]
    J --> L["Car with Smartphones"]
    K --> M["Car with Smartphones"]
    L --> N["Car with Smartphones"]
    M --> O["Car with Smartphones"]
    N --> P["Car with Smartphones"]
    O --> Q["Car with Smartphones"]
    P --> R["Car with Smartphones"]
    Q --> S["Car with Smartphones"]
    R --> T["Car with Smartphones"]
    S --> U["Car with Smartphones"]
    T --> V["Car with Smartphones"]
    U --> W["Car with Smartphones"]
    V --> X["Car with Smartphones"]
    W --> Y["Car with Smartphones"]
    X --> Z["Car with Smartphones"]
    Y --> AA["Car with Smartphones"]
    Z --> AB["Car with Smartphones"]
Switching screens using the hardware buttons
flowchart
graph TD
    A["Device Interface"] -->|Data Transfer| B["Network Display"]
    B -->|Data Transfer| C["App Store"]
    C -->|Data Transfer| D["Mobile Device"]
    D -->|Data Transfer| E["Desktop"]
    E -->|Data Transfer| F["Mobile Device"]
    F -->|Data Transfer| G["Desktop"]
    G -->|Data Transfer| H["Mobile Device"]
    H -->|Data Transfer| I["Desktop"]
    I -->|Data Transfer| J["Mobile Device"]
    J -->|Data Transfer| K["Desktop"]
    K -->|Data Transfer| L["Mobile Device"]
    L -->|Data Transfer| M["Desktop"]
    M -->|Data Transfer| N["Mobile Device"]
    N -->|Data Transfer| O["Desktop"]
    O -->|Data Transfer| P["Mobile Device"]
    P -->|Data Transfer| Q["Desktop"]
    Q -->|Data Transfer| R["Mobile Device"]
    R -->|Data Transfer| S["Desktop"]
    S -->|Data Transfer| T["Mobile Device"]
    T -->|Data Transfer| U["Desktop"]
    U -->|Data Transfer| V["Mobile Device"]
    V -->|Data Transfer| W["Desktop"]
    W -->|Data Transfer| X["Mobile Device"]
    X -->|Data Transfer| Y["Desktop"]
    Y -->|Data Transfer| Z["Mobile Device"]
    Z -->|Data Transfer| AA["Desktop"]
    AA -->|Data Transfer| AB["Mobile Device"]
    AB -->|Data Transfer| AC["Desktop"]
    AC -->|Data Transfer| AD["Mobile Device"]
    AD -->|Data Transfer| AE["Desktop"]
    AE -->|Data Transfer| AF["Mobile Device"]
    AF -->|Data Transfer| AG["Desktop"]
    AG -->|Data Transfer| AH["Mobile Device"]
    AH -->|Data Transfer| AI["Desktop"]
    AI -->|Data Transfer| AJ["Mobile Device"]
    AJ -->|Data Transfer| AK["Desktop"]
    AK -->|Data Transfer| AL["Mobile Device"]
    AL -->|Data Transfer| AM["Desktop"]
    AM -->|Data Transfer| AN["Mobile Device"]
    AN -->|Data Transfer| AO["Desktop"]
    AO -->|Data Transfer| AP["Mobile Device"]
    AP -->|Data Transfer| AQ["Desktop"]
    AQ -->|Data Transfer| AR["Mobile Device"]
    AR -->|Data Transfer| AS["Desktop"]
    AS -->|Data Transfer| AT["Mobile Device"]
    AT -->|Data Transfer| AU["Desktop"]
    AU -->|Data Transfer| AV["Mobile Device"]
    AV -->|Data Transfer| AW["Desktop"]
    AW -->|Data Transfer| AX["Mobile Device"]
    AX -->|Data Transfer| AY["Desktop"]
    AY -->|Data Transfer| AZ["Mobile Device"]
    AZ -->|Data Transfer| BA["Desktop"]
    BA -->|Data Transfer| BB["Mobile Device"]
    BB -->|Data Transfer| BC["Desktop"]
    BC -->|Data Transfer| BD["Mobile Device"]
    BD -->|Data Transfer| BE["Desktop"]
    BE -->|Data Transfer| BF["Mobile Device"]
    BF -->|Data Transfer| BG["Desktop"]
    BG -->|Data Transfer| BH["Mobile Device"]
    BH -->|Data Transfer| BI["Desktop"]
    BI -->|Data Transfer| BJ["Mobile Device"]
    BJ -->|Data Transfer| BK["Desktop"]
    BK -->|Data Transfer| BL["Mobile Device"]
    BL -->|Data Transfer| BM["Desktop"]
    BM -->|Data Transfer| BN["Mobile Device"]
    BN -->|Data Transfer| BO["Desktop"]
    BO -->|Data Transfer| BP["Mobile Device"]
    BP -->|Data Transfer| BQ["Desktop"]
    BQ -->|Data Transfer| BR["Mobile Device"]
    BR -->|Data Transfer| BS["Desktop"]
    BS -->|Data Transfer| BT["Mobile Device"]
    BT -->|Data Transfer| BU["Desktop"]
    BU -->|Data Transfer| BV["Mobile Device"]
    BV -->|Data Transfer| BW["Desktop"]
    BW -->|Data Transfer|
BX["User Interface"] --> A
    A --> A
How to use the navigation menu screens
You can use various functions such as the route guidance and related settings.
text_image
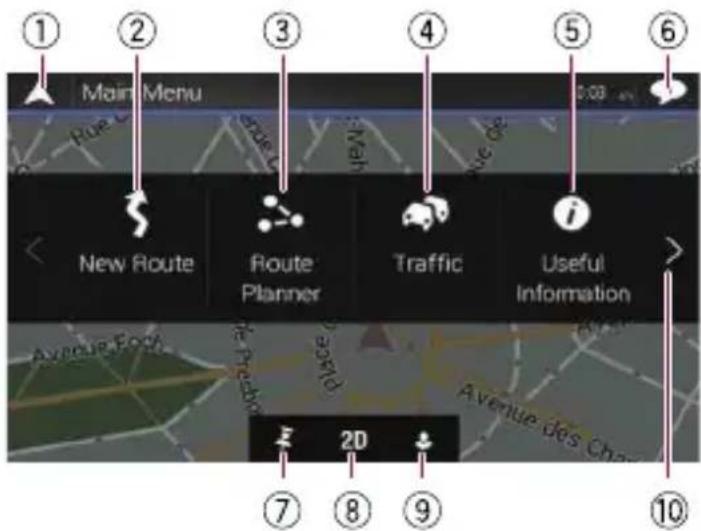
① ② ③ ④ ⑤ ⑥ Main Menu Rue de New Route Route Planner Traffic i Useful Information Avenue Port 2D ⑦ ⑧ ⑨ Avenue des Chou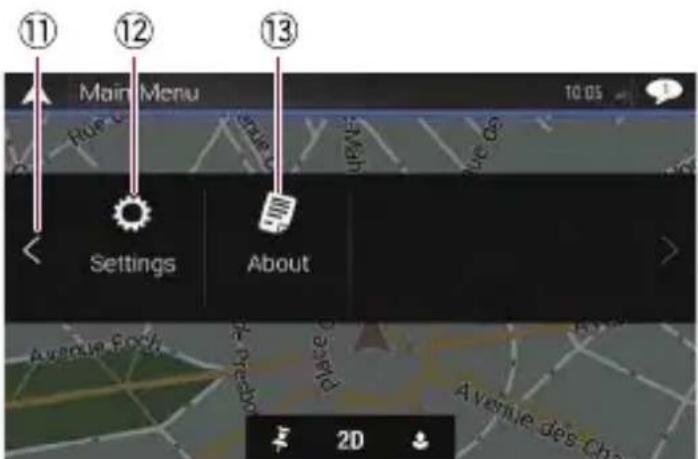
text_image
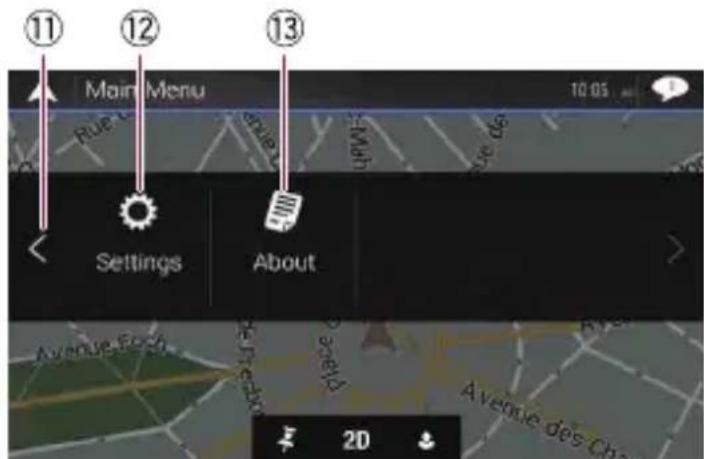
⑪ ⑫ Main Menu 10:05 Rue U Settings About Avenue Rock Place O Avenue des Cha 2D① Returns to the Map screen.
② Searches for your destination by the address or coordinates, or searches for the selected place of interest, etc.
③ Builds your route or edits the route currently set.
④ Displays the traffic information.
⑤ Displays useful information to support your driving.
⑥ Displays notifications that contain important information.
⑦ Displays the location that you saved as a favourite.
⑧ Switches among 2D, 3D, and 2D North up view modes.
⑨ Displays the "User Profiles" screen where you can create new profiles or edit the existing profiles.
⑩ Displays the next page of the navigation menu.
⑪ Displays the previous page of the navigation menu.
⑫ Configures the navigation-related settings and enables you to access the "SyncTool" screen.
⑬ Displays the information of your navigation system (the version information, or licences, for example).
Searching for a location by address
1 Press 📄 button.
The Map screen appears.
2 Touch 📄 to display the navigation menu on the Map screen.
3 Touch [New Route].
4 Touch [Address].
5 Input the information for the location you want to set as the destination.
text_image
Find Address Country France Town or Pecalcode Parts Street Enter Street Name Go to TownTouching the item next to each option displays the screen to enter the character or select one of options. After narrowing down your destination, the searched location appears on the Map screen.
6 Touch [Select as Destination].
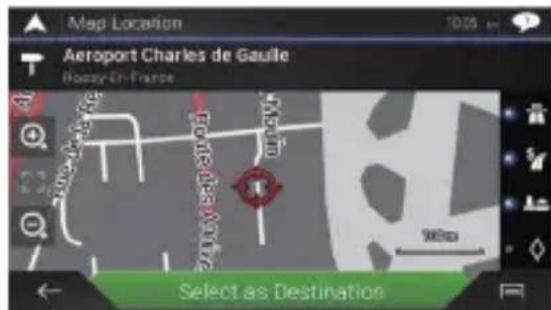
text_image
Map Location Aeroport Charles de Gaulle Rissey-En-France Select as DestinationAfter a short summary of the route parameters, a map appears showing the entire route. The route is automatically calculated.
7 Touch [Start Navigation].
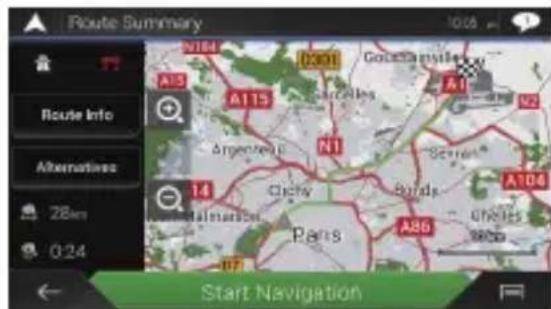
text_image
Route Summary Route Info Alternatives 28m 0:24 N184 A13 A115 Argenteuil N1 Cichy Paris A86 Start NavigationYour navigation system starts the route guidance.
How to use the map
Most of the information provided by your navigation system can be seen on the map. You need to become familiar with how the information appears on the map.
The following information marked with an asterisk (*) appears only when a route is set.
AV information is displayed at the bottom of the Map screen.

text_image
Place Charles de Gaulle 2:26 ① ② ③ 60 m Rue-Rude 25 km/h Avenue Carnot Avenue Mac-Mahon ⑤ ⑥ 237 Boston 0:11 67 km Avenue Kléber Place Charles de Gaulle Walkway Track 01 ⑦ ⑧ ⑨ ⑩① Shows the number and name of the street to be used (or next guidance point).*
② Shows the next guidance point (manoeuvre).*
③ Shows the distance to the next guidance point (manoeuvre).*
④ Shows the manoeuvre after the next manoeuvre.*
⑤ Indicates the current location of your vehicle.
⑥ Displays the time and distance information for your route.*
⑦ Shows the name of the street (or city) that your vehicle is travelling on (or in).
⑧ Indicates the current route.*
⑨ Displays the Navigation menu screen.
⑩ Indicates the progress to the final destination.*
Pairing your Bluetooth ^® devices
You can use various functions (hands-free phoning and Bluetooth audio etc.) by connecting your Bluetooth devices to this navigation system. To use the functions, pair the devices with the navigation system in advance.
1 Activate the Bluetooth wireless technology on your devices.
2 Press the ☐ button to display the Top menu screen.
3 Touch and then
The "Bluetooth" screen appears.
4 Touch [Connection].
5 Touch.
The system searches for Bluetooth devices waiting for a connection and displays them in the list if a device is found.
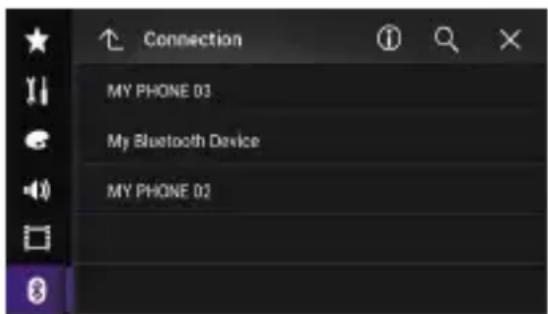
text_image
Connection MY PHONE 03 My Bluetooth Device MY PHONE 026 Touch the Bluetooth device name you want to register.
After the device is successfully registered, a Bluetooth connection is established by the system. Once the connection is established, the device name is displayed on the list.
Using hands-free phoning
If your mobile phone features Bluetooth technology, this navigation system can be connected to your mobile phone wirelessly. Using this hands-free function, you can operate the navigation system to make or receive phone calls. You can also transfer the phone book data stored in your mobile phone to the navigation system.

text_image
Phone Book ① abcdefghi ② abcdefghi ③ abcdefghi ④ abcdefghi ⑤ abcdefghi① Displays the preset dial screen.
② Switches to the phone book list.
③ Switches to the missed, received and dialled call lists.
④ Switches the mode to enter the phone number directly.
⑤ Switches to the voice recognition function.
⑥ Displays the Setting menu screen.
⑦ Closes the screen.
Using the radio
You can listen to the radio using this product.
Once you have stored broadcast channels, you can easily recall preset channels from memory with a single touch of a key.
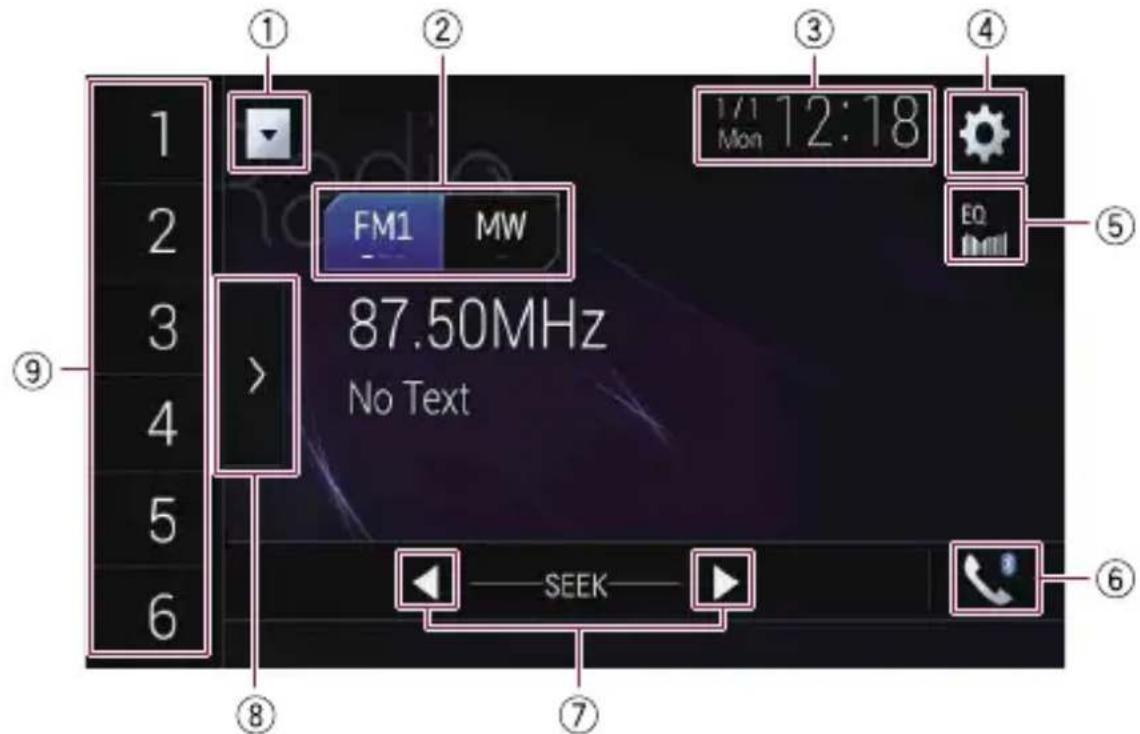
text_image
1 2 3 4 5 6 ⑨ ① ② ③ ④ 1/1 12:18 Mon FM1 MW EQ bull ⑤ 87.50MHz No Text SEEK ⑦ ⑥① Displays the source list.
② Selects a band.
③ Displays the Time and date setting screen.
④ Displays the Setting menu screen.
⑤ Recalls equaliser curves.
⑥ Displays the Phone menu screen.
⑦ Performs manual tuning or seek tuning.
⑧ Displays the preset channels.
⑨ Recalls the preset channel stored to a key from memory with a single touch of the key.
Stores the current broadcast frequency to a key for later recall by continuing to touch the key.
Guide de démarrage rapide SYSTEME DE NAVIGATION AV
AVIC-Z910DAB/AVIC-Z810DAB/AVIC-Z710DAB/AVIC-Z610BT/AVIC-Z7110DAB/AVIC-Z6110BT
text_image
Diagram of a monitor front panel with seven labeled buttons pointing to the screen area① Bouton VOL (+/-)
text_image
Main Menu New Route Route Planner Traffic Useful Information 2D Avenue des Cha ⑦ ⑧ ⑨ ⑩