
BPCD180 - Hammer BLACK & DECKER - Free user manual and instructions
Find the device manual for free BPCD180 BLACK & DECKER in PDF.

| Product type | Cordless hammer drill |
| Brand | Black & Decker |
| Model | BPCD180 |
| Rated voltage | 18 V |
| No-load speed (1st gear) | 0 - 400 rpm |
| No-load speed (2nd gear) | 0 - 1350 rpm |
| Maximum torque | 16 Nm |
| Chuck capacity | 10 mm (keyless) |
| Drilling capacity - Steel | 10 mm |
| Drilling capacity - Wood | 25 mm |
| Drilling capacity - Masonry | 10 mm |
| Battery type | NiCd or NiMH (depending on model) |
| Battery voltage | 18 V |
| Battery capacity | 1.0 Ah (NiCd) or 1.5 Ah (NiMH) |
| Charging time | Approximately 3 to 10 hours (depending on battery type and charger) |
| Weight (with battery) | Approximately 0.7 - 0.9 kg |
| Speed selector | 2 mechanical speeds |
| Rotation direction | Reversible (right/left) |
| Clutch | Adjustable with torque ring (multiple positions) |
| Hammer mode | Yes, for masonry drilling |
| Chuck | Keyless, manual tightening |
| Power source | Rechargeable battery |
| Usage | Household |
| Included accessories | Battery, charger, double screwdriver bit |
| Warranty | 12 months (depending on conditions) |
Frequently Asked Questions - BPCD180 BLACK & DECKER
User questions about BPCD180 BLACK & DECKER
0 question about this device. Answer the ones you know or ask your own.
Ask a new question about this device
Download the instructions for your Hammer in PDF format for free! Find your manual BPCD180 - BLACK & DECKER and take your electronic device back in hand. On this page are published all the documents necessary for the use of your device. BPCD180 by BLACK & DECKER.
USER MANUAL BPCD180 BLACK & DECKER
Your Black & Decker drill/screwdriver BPCD120,BPCD120KB/BPCD180,BPCD180KB has been designed for screwdriving applications and for drilling in wood, metal, plastics and soft masonry. This tool is intended for consumer use only.
Safety instructions
General power tool safety warnings

Warning! Read all safety warnings and all instructions. Failure to follow the warnings and instructions listed below may result in electric
shock, fire and/or serious injury.
Save all warnings and instructions for future reference.
The term "power tool" in all of the warnings listed below refers to your mains operated (corded) power tool or battery operated (cordless) power tool.
- Work area safety
a. Keep work area clean and well lit. Cluttered or dark areas invite accidents.
b. Do not operate power tools in explosive atmospheres, such as in the presence of flammable liquids, gases or dust. Power tools create sparks which may ignite the dust or fumes.
c. Keep children and bystanders away while operating a power tool. Distractions can cause you to lose control.
- Electrical safety
a. Power tool plugs must match the outlet. Never modify the plug in any way. Do not use any adapter plugs with earthed (grounded) power tools. Unmodified plugs and matching outlets will reduce risk of electric shock.
b. Avoid body contact with earthed or grounded surfaces such as pipes, radiators, ranges and refrigerators. There is an increased risk of electric shock if your body is earthed or grounded.
c. Do not expose power tools to rain or wet conditions. Water entering a power tool will increase the risk of electric shock.
d. Do not abuse the cord. Never use the cord for carrying, pulling or unplugging the power tool. Keep cord away from heat, oil, sharp edges or moving parts. Damaged or entangled cords increase the risk of electric shock.
e. When operating a power tool outdoors, use an extension cord suitable for outdoor use. Use of a cord suitable for outdoor use reduces the risk of electric shock.
f. If operating a power tool in a damp location is unavoidable, use a residual current device (RCD) protected supply. Use of an RCD reduces the risk of electric shock.
- Personal safety
a. Stay alert, watch what you are doing and use common sense when operating a power tool. Do not use a power tool while you are tired or under the influence of drugs, alcohol or medication. A moment of inattention while operating power tools may result in serious personal injury.
b. Use personal protective equipment. Always wear eye protection. Protective equipment such as dust mask, non-skid safety shoes, hard hat, or hearing protection used for appropriate conditions will reduce personal injuries.
c. Prevent unintentional starting. Ensure the switch is in the off-position before connecting to power source and/or battery pack, picking up or carrying the tool. Carrying power tools with your finger on the switch or energising power tools that have the switch on invites accidents.
d. Remove any adjusting key or wrench before turning the power tool on. A wrench or a key left attached to a rotating part of the power tool may result in personal injury.
e. Do not overreach. Keep proper footing and balance at all times. This enables better control of the power tool in unexpected situations.
f. Dress properly. Do not wear loose clothing or jewellery. Keep your hair, clothing and gloves away from moving parts. Loose clothes, jewellery or long hair can be caught in moving parts.
ENGLISH
g. If devices are provided for the connection of dust extraction and collection facilities, ensure these are connected and properly used. Use of dust collection can reduce dust-related hazards.
- Power tool use and care
a. Do not force the power tool. Use the correct power tool for your application. The correct power tool will do the job better and safer at the rate for which it was designed.
b. Do not use the power tool if the switch does not turn it on and off. Any power tool that cannot be controlled with the switch is dangerous and must be repaired.
c. Disconnect the plug from the power source and/or the battery pack from the power tool before making any adjustments, changing accessories, or storing power tools. Such preventive safety measures reduce the risk of starting the power tool accidentally.
d. Store idle power tools out of the reach of children and do not allow persons unfamiliar with the power tool or these instructions to operate the power tool. Power tools are dangerous in the hands of untrained users.
e. Maintain power tools. Check for misalignment or binding of moving parts, breakage of parts and any other condition that may affect the power tools operation. If damaged, have the power tool repaired before use. Many accidents are caused by poorly maintained power tools.
f. Keep cutting tools sharp and clean. Properly maintained cutting tools with sharp cutting edges are less likely to bind and are easier to control.
g. Use the power tool, accessories and tool bits etc. in accordance with these instructions, taking into account the working conditions and the work to be performed. Use of the power tool for operations different from those intended could result in a hazardous situation.
- Battery tool use and care
a. Recharge only with the charger specified by the manufacturer. A charger that is suitable for one type of battery pack may create a risk of fire when used with another battery pack.
b. Use power tools only with specifically designated battery packs. Use of any other battery packs may create a risk of injury and fire.
c. When battery pack is not in use, keep it away from other metal objects, like paper clips, coins, keys, nails, screws, or other small metal objects, that can make a connection from one terminal to another. Shorting the battery terminals together may cause burns or a fire.
d. Under abusive conditions, liquid may be ejected from the battery; avoid contact. If contact accidentally occurs, flush with water. If liquid contacts eyes, additionally seek medical help. Liquid ejected from the battery may cause irritation or burns.
6. Service
a. Have your power tool serviced by a qualified repair person using only identical replacement parts. This will ensure that the safety of the power tool is maintained.
Additional power tool safety warnings

Warning! Additional safety warnings for drills and impact drills
- Wear ear protectors with impact drills. Exposure to noise can cause hearing loss.
- Use auxiliary handles supplied with the tool. Loss of control can cause personal injury.
- Hold power tool by insulated gripping surfaces when performing an operation where the cutting accessory may contact hidden wiring or its own cord. Cutting accessory contacting a "live" wire may make exposed metal parts of the power tool "live" and could give the operator an electric shock.
- Use clamps or another practical way to secure and support the workpiece to a stable platform. Holding the work by hand or against your body leaves it unstable and may lead to loss of control.
- Before drilling into walls, floors or ceilings, check for the location of wiring and pipes.
-
Avoid touching the tip of a drill bit just after drilling, as it may be hot.
-
This tool is not intended for use by persons (including children) with reduced physical, sensory or mental capabilities, or lack of experience and knowledge, unless they have been given supervision or instruction concerning use of the appliance by a person responsible for their safety. Children should be supervised to ensure that they do not play with the appliance.
- The intended use is described in this instruction manual. The use of any accessory or attachment or performance of any operation with this tool other than those recommended in this instruction manual may present a risk of personal injury and/or damage to property.
Labels on tool
The following pictograms are shown on the tool:

Warning! To reduce the risk of injury, the user must read the instruction manual.
Additional safety instructions for batteries and chargers
Batteries
- Never attempt to open for any reason.
- Do not expose the battery to water.
- Do not store in locations where the temperature may exceed 40^ .
- Charge only at ambient temperatures between 10^ and 40^ .
- Charge only using the charger provided with the tool.
- When disposing of batteries, follow the instructions given in the section "Protecting the environment".

Do not attempt to charge damaged batteries.
Chargers
- Use your Black & Decker charger only to charge the battery in the tool with which it was supplied. Other batteries could burst, causing personal injury and damage.
- Never attempt to charge non-rechargeable batteries.
- Have defective cords replaced immediately.
- Do not expose the charger to water.
- Do not open the charger.
- Do not probe the charger.

The charger is intended for indoor use only.
Read the instruction manual before use.
The charger automatically shuts off if the ambient temperature becomes too high. The thermal cut out operates only once and then requires complete replacement.

Electrical safety

Your charger is double insulated; therefore no earth wire is required. Always check that the
mains voltage corresponds to the voltage on the rating plate.
Never attempt to replace the charger unit with a regular mains plug.
- If the supply cord is damaged, it must be replaced by the manufacturer or an authorised Black & Decker Service Centre in order to avoid a hazard.
ENGLISH
Features
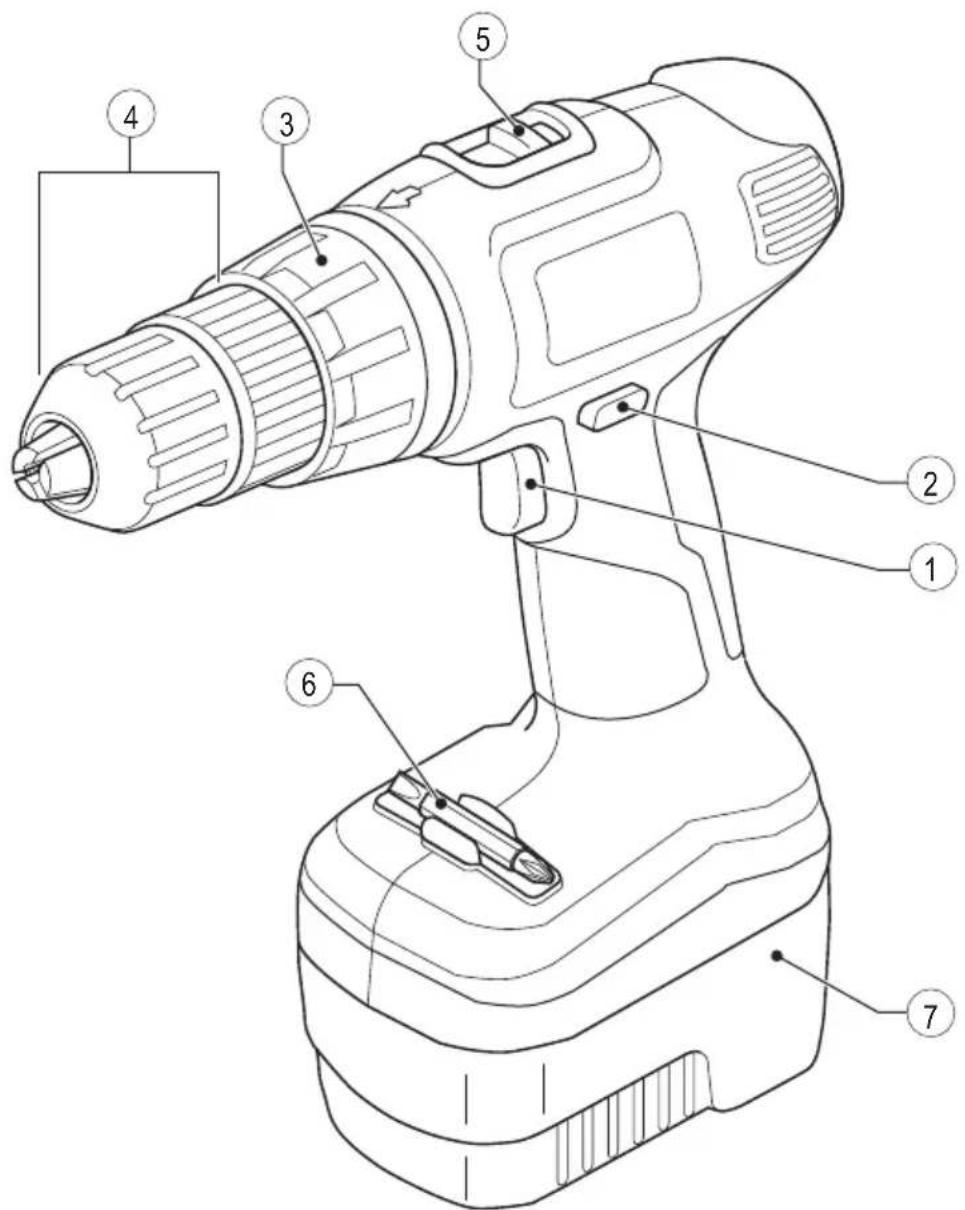
This tool includes some or all of the following features.
- Variable speed switch
- Forward/reverse slider
- Mode selector / torque adjustment collar
- Chuck
- Speed selector
- Bit holder
- Battery
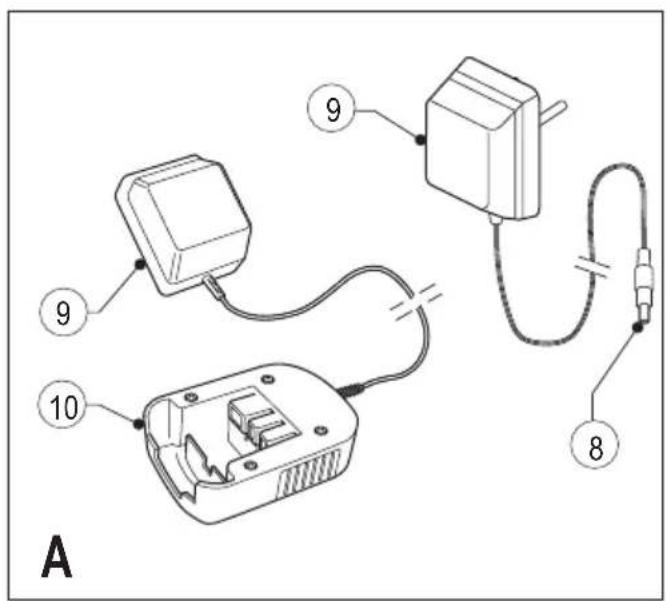
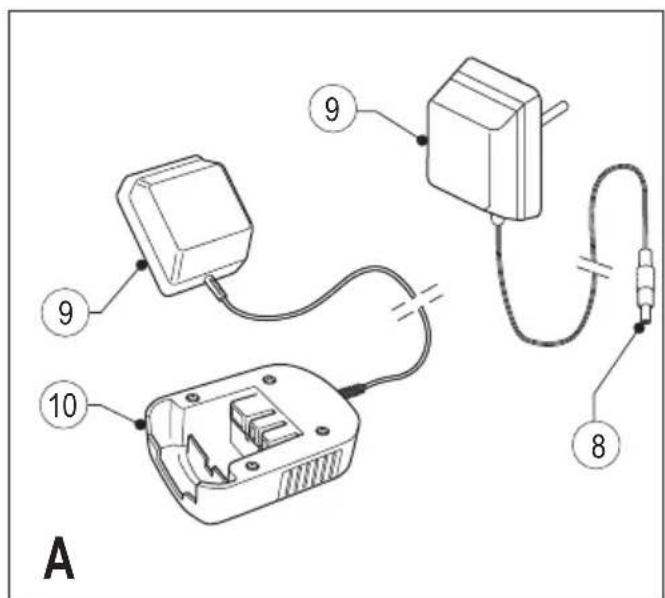
Fig. A
- Charger plug
- Charger
- Charger receptacle
Assembly
Warning! Before assembly, remove the battery from the tool.
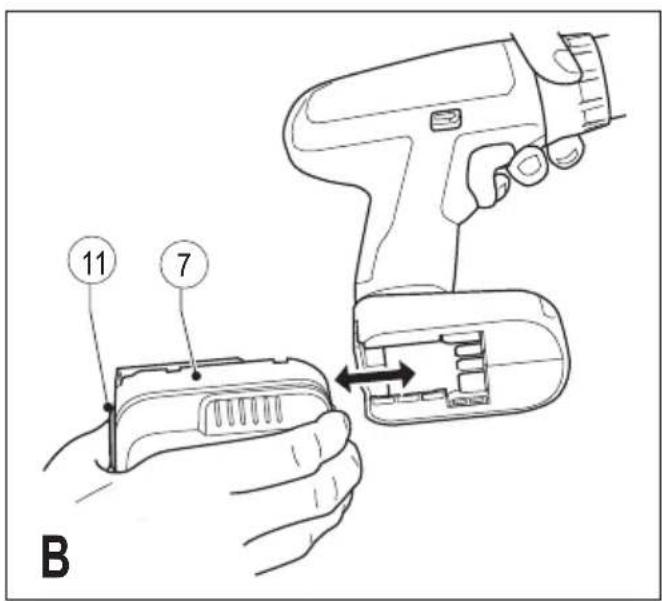
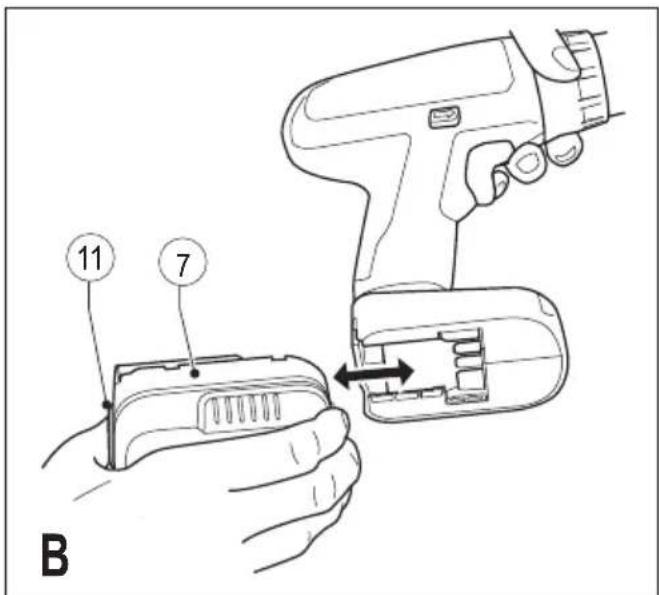
Fitting and removing the battery (fig. B & C)
- To fit the battery (7), line it up with the receptacle on the tool. Slide the battery into the receptacle and push until the battery snaps into place.
- To remove the battery, push the release button (11) while at the same time pulling the battery out of the receptacle.
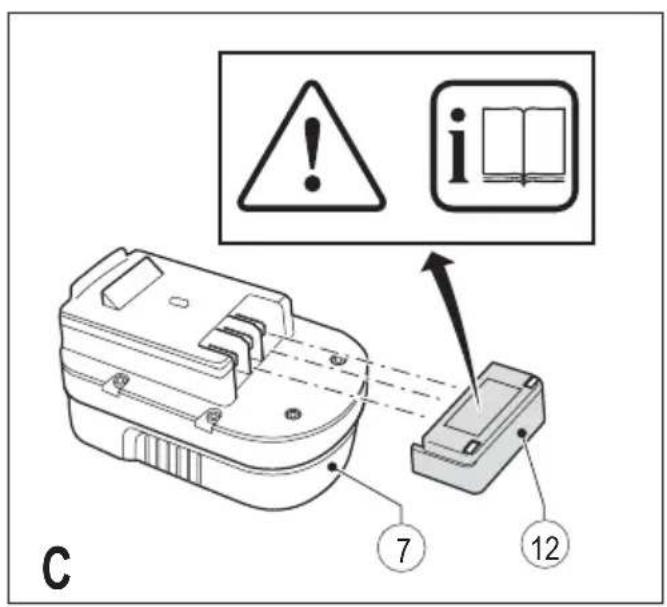
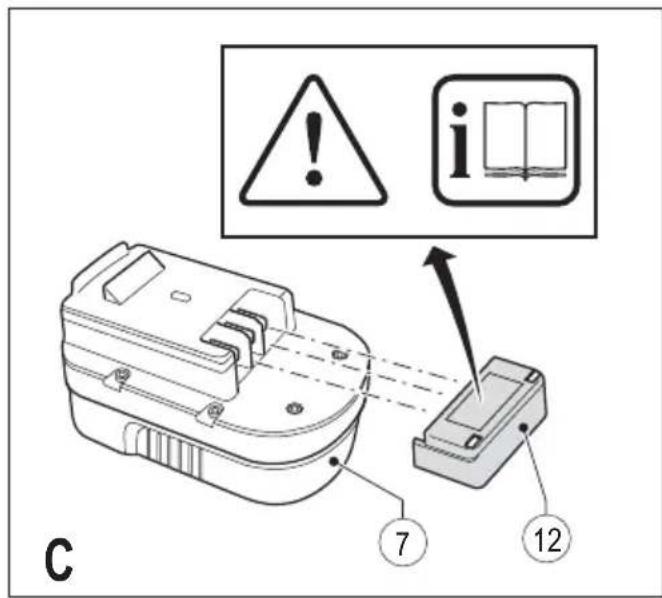
Fitting the battery cap (fig. C)
Warning! Fit the cap (12) to the battery (7) for transportation and storage.
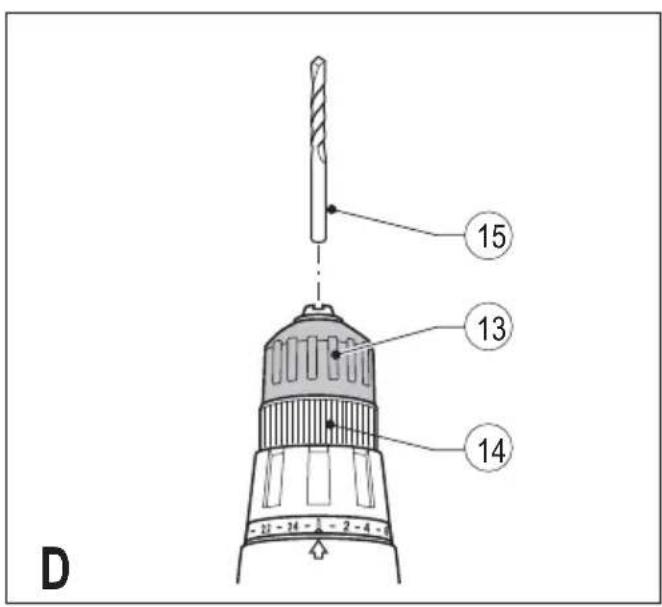
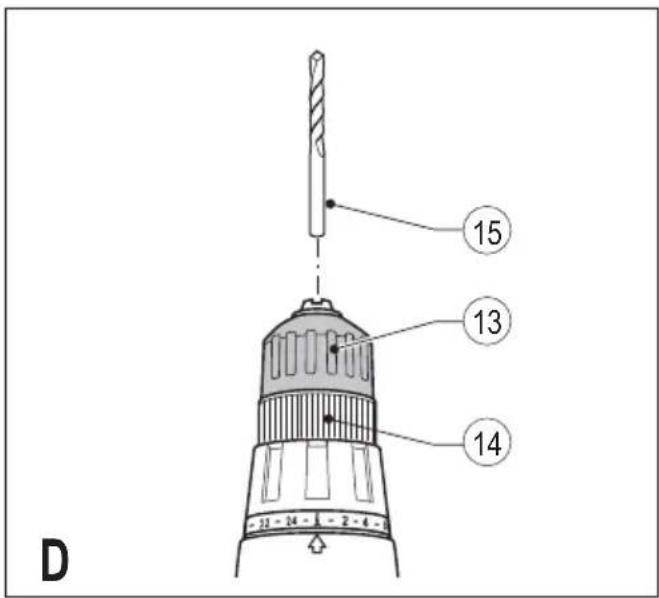
Fitting and removing a drill bit or screwdriver bit (fig. D)
This tool is fitted with a keyless chuck to allow for an easy exchange of bits.
- Lock the tool by setting the forward/reverse slider (2) to the centre position.
- Open the chuck by turning the front part (13) with one hand while holding the rear part (14) with the other.
- Insert the bit shaft (15) into the chuck and firmly tighten the chuck.
This tool is supplied with a double-ended screwdriver bit in the bit holder (6).
- To remove the screwdriver bit from the bit holder, lift the bit from the recess.
- To store the screwdriver bit, firmly push it into the holder.
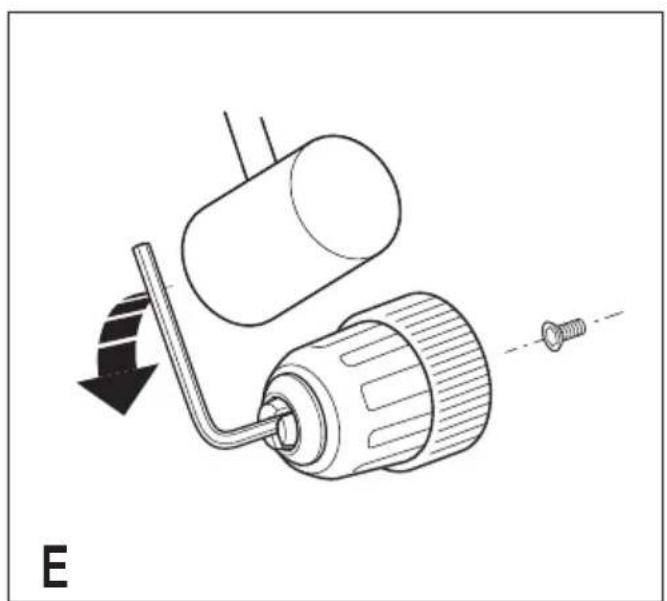
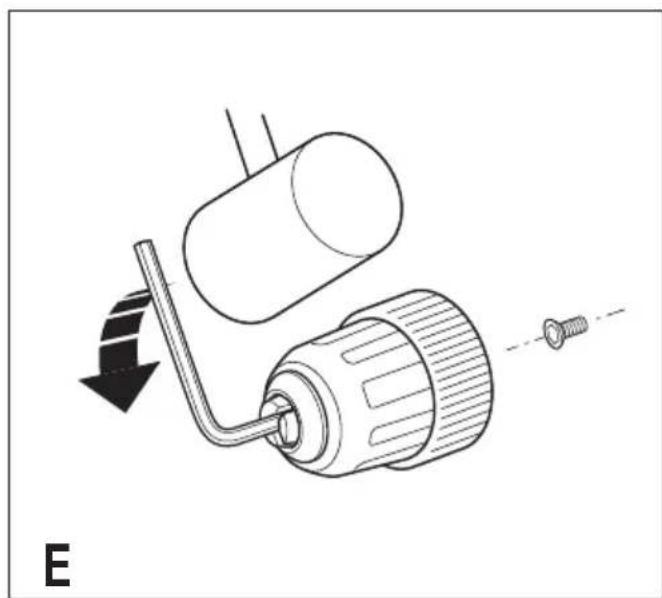
Removing and refitting the chuck (fig. E)
- Open the chuck as far as possible.
- Remove the chuck retaining screw by turning it clockwise using a screwdriver.
- Tighten an Allen key into the chuck and strike it with a hammer as shown.
- Remove the Allen key.
- Remove the chuck by turning it counterclockwise.
- To refit the chuck, screw it onto the spindle and secure it with the chuck retaining screw.
Residual risks
Additional residual risks may arise when using the tool which may not be included in the enclosed safety warnings. These risks can arise from misuse, prolonged use etc.
Even with the application of the relevant safety regulations and the implementation of safety devices, certain residual risks can not be avoided. These include:
- Injuries caused by touching any rotating/moving parts.
- Injuries caused when changing any parts, blades or accessories.
- Injuries caused by prolonged use of a tool. When using any tool for prolonged periods ensure you take regular breaks.
Impairment of hearing. - Health hazards caused by breathing dust developed when using your tool (example:- working with wood, especially oak, beech and MDF.)
Use
Warning! Let the tool work at its own pace. Do not overload.
Warning! Before drilling into walls, floors or ceilings, check for the location of wiring and pipes.
Charging the battery (fig. A & F)
The battery needs to be charged before first use and whenever it fails to produce sufficient power on jobs that were easily done before. When charging the battery for the first time, or after prolonged storage, it will only accept an 80% charge. After several charge and discharge cycles, the battery will attain full capacity. The battery may become warm while charging; this is normal and does not indicate a problem.
Warning! Do not charge the battery at ambient temperatures below 10^ or above 40^ . Recommended charging temperature: approx. 24^ .
Using the charger
- To charge the battery (7), remove it from the tool and slide the charger receptacle (10) onto the battery.
- Plug in the charger (9).
The battery will become warm while charging. After approx. 3 hours of charging, the battery will be sufficiently charged for use in regular applications. After approx. 8-10 hours of charging, the battery will be fully charged.
- Remove the charger receptacle from the battery.
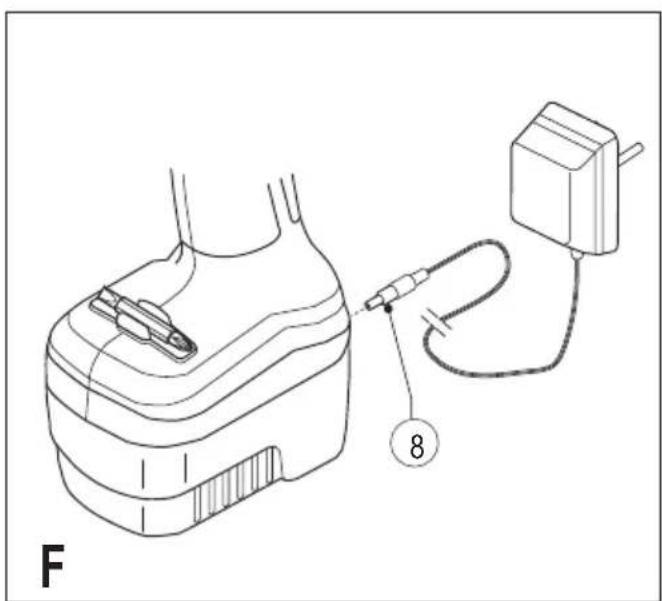
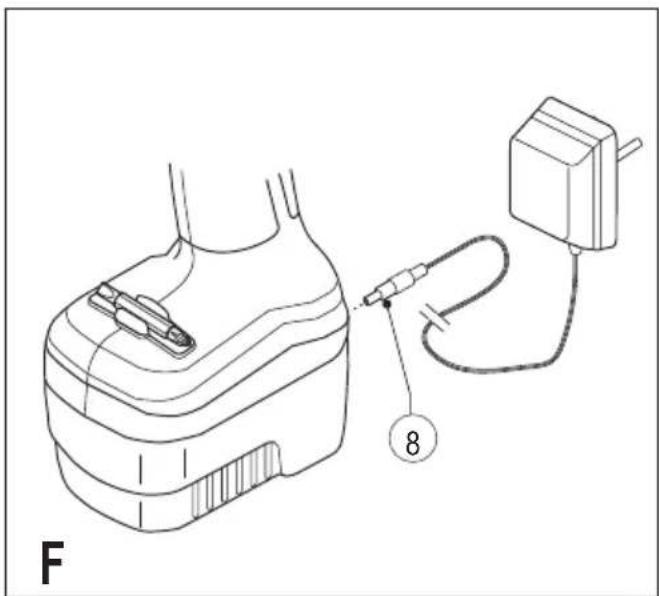
Charger with charging plug
- To charge the battery, make sure that it is fitted on the drill.
- Insert the charger plug (8) into the connector.
- Plug in the charger.
- Switch on at the mains.
After normal use, a charging time of 3 hours will provide sufficient power for most applications.
However, further charging for up to 6 hours could significantly increase the use time, depending on the battery and charging conditions.
- Disconnect the tool from the charger.
Warning! Do not use the tool while it is connected to the charger.
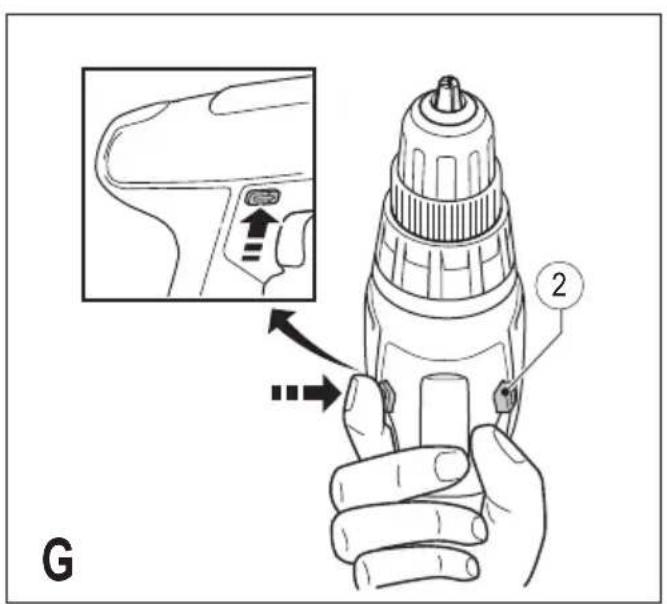
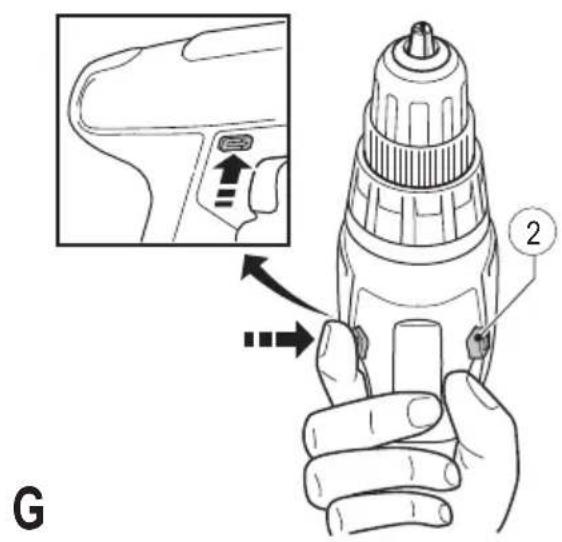
Selecting the direction of rotation (fig. G)
For drilling and for tightening screws, use forward (clockwise) rotation. For loosening screws or removing a jammed drill bit, use reverse (counterclockwise) rotation.
To select forward rotation, push the forward/reverse slider (2) to the left.
- To select reverse rotation, push the forward/reverse slider to the right.
- To lock the tool, set the forward/reverse slider into the centre position.
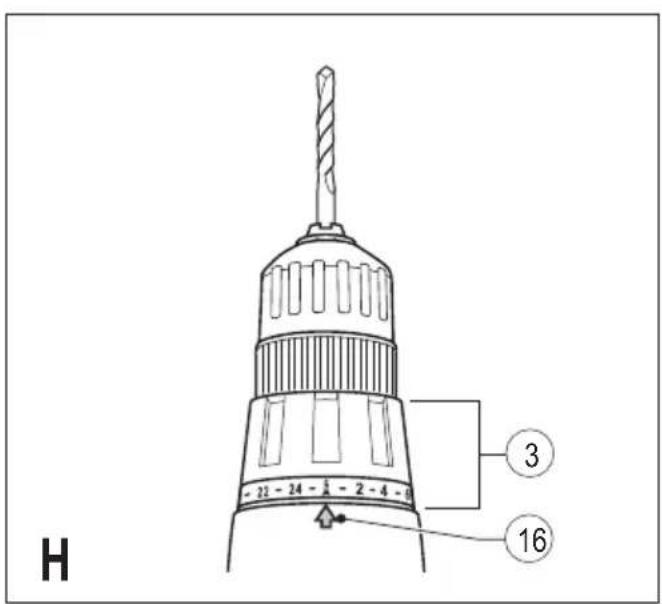
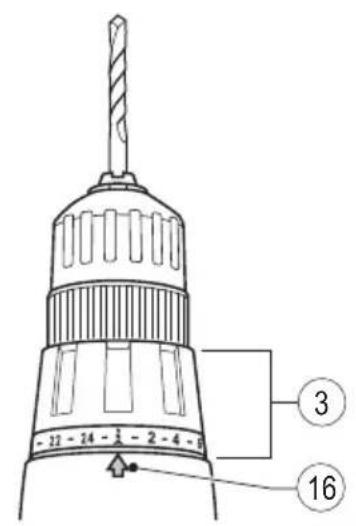
Selecting the operating mode or torque (fig. H)
This tool is fitted with a collar to select the operating mode and to set the torque for tightening screws. Large screws and hard workpiece materials require a higher torque setting than small screws and soft workpiece materials. The collar has a wide range of settings to suit your application.
- For drilling in wood, metal and plastics, set the collar (3) to the drilling position by aligning the symbol 1 with the marking (16).
ENGLISH
- For screwdriving, set the collar to the desired setting. If you do not yet know the appropriate setting, proceed as follows:
- Set the collar (3) to the lowest torque setting.
- Tighten the first screw.
- If the clutch ratchets before the desired result is achieved, increase the collar setting and continue tightening the screw. Repeat until you reach the correct setting. Use this setting for the remaining screws.
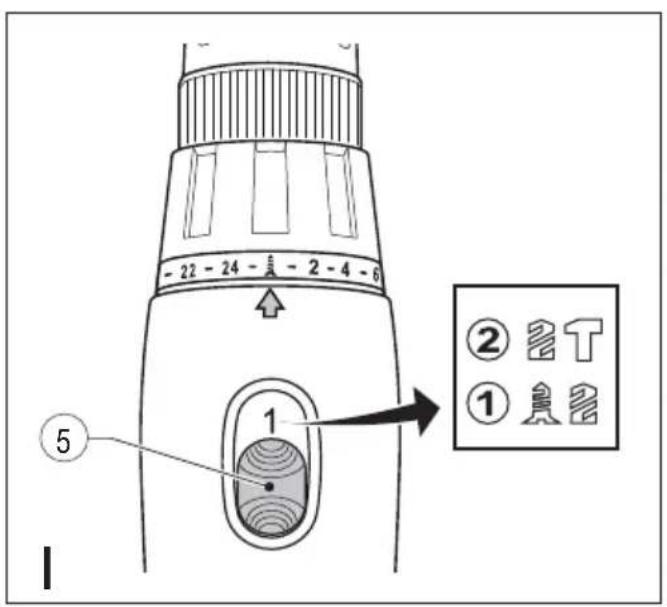
Drilling in masonry (fig. H & I)
- For drilling in masonry, set the collar (3) to the hammer drilling position by aligning the symbol T with the marking (16).
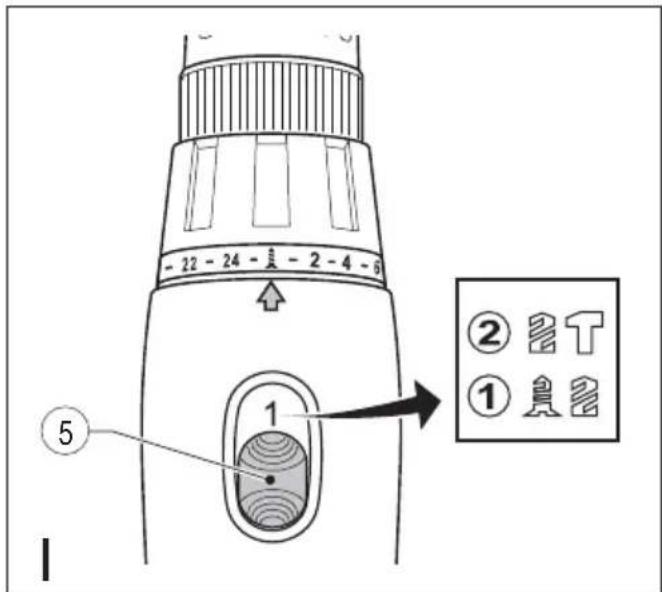
- Slide the speed selector (5) towards the front of the tool (2nd gear).
Speed selector (fig.1)
- For drilling in steel and for screwdriving applications, slide the speed selector (5) towards the rear of the tool (1st gear).
- For drilling in materials other than steel, slide the speed selector (5) towards the front of the tool (2nd gear).
Drilling/screwdriving
- Select forward or reverse rotation using the forward/reverse slider (2).
- To switch the tool on, press the switch (1). The tool speed depends on how far you press the switch.
- To switch the tool off, release the switch.
Hints for optimum use
Drilling
-
Always apply a light pressure in a straight line with the drill bit.
-
Just before the drill tip breaks through the other side of the workpiece, decrease pressure on the tool.
- Use a block of wood to back up workpieces that may splinter.
- Use spade bits when drilling large diameter holes in wood.
- Use HSS drill bits when drilling in metal.
- Use masonry bits when drilling in soft masonry.
- Use a lubricant when drilling metals other than cast iron and brass.
- Make an indentation using a centre punch at the centre of the hole to be drilled in order to improve accuracy.
Screwdriving
- Always use the correct type and size of screwdriver bit.
- If screws are difficult to tighten, try applying a small amount of washing liquid or soap as a lubricant.
- Always hold the tool and screwdriver bit in a straight line with the screw.
Maintenance
Your Black & Decker tool has been designed to operate over a long period of time with a minimum of maintenance.
Continuous satisfactory operation depends upon proper tool care and regular cleaning.
Your charger does not require any maintenance apart from regular cleaning.
Warning! Before performing any maintenance on the tool, remove the battery from the tool. Unplug the charger before cleaning it.
- Regularly clean the ventilation slots in your tool and charger using a soft brush or dry cloth.
- Regularly clean the motor housing using a damp cloth. Do not use any abrasive or solvent-based cleaner.
- Regularly open the chuck and tap it to remove any dust from the interior.
Accessories
The performance of your tool depends on the accessory used. Black & Decker accessories are engineered to high quality standards and designed to enhance the performance of your tool. By using these accessories you will get the very best from your too
Batteries

Black & Decker batteries can be recharged many times. At the end of their useful life, discard batteries with due care for our environment:
- Run the battery down completely, then remove it from the tool.
- NiCd, NiMH and Li-Ion batteries are recyclable. Take them to any authorised repair agent or a local recycling station.
| Charger | |||
| 90500843 90573461 | |||
| 90500847 | 90500849 | ||
| 90500855 | 90500857 | ||
| 90500858 | 90500860 | ||
| Input voltage | VAC | 220-240 | 220-240 |
| Output voltage | V DC | 14.5-15.3 | 21.75-22.6 |
| Current | mA | 210-220 | 210-230 |
| Approx. charging time | h | 8-10 | 8-10 |
Technical data
| BPCD120/ BPCD180 BPCD120KB BPCD180KB | |||
| Voltage V | DC | 12 18 | |
| No-load speed 0-1400 0-1 | /min 350 | 0-450/ 0-400/ | |
| Max. torque Nm | 13 16 | ||
| Chuck capacity | mm | 10 10 | |
| Max. drilling capacity | |||
| Steel/Wood | mm | 10/25 | 10/25 |
| Masonry | mm | 10 10 | |
| Battery A12/A12E A18/A18E | |||
| Capacity | Ah | 1.□ | 1.□ |
| Type | NiCd | NiCd | |
| Weight | kg | 0.5 | 0.7 |
| Battery A12NH A18NH | |||
| Capacity | Ah | 1.5 | 1.5 |
| Type | NiMH | NiMH | |
| Weight | kg | 0.6 | 0.9 |
ENGLISH
Protecting the environment

Separate collection. This product must not be disposed of with normal household waste.
Should you find one day that your Black & Decker product needs replacement, or if it is of no further use to you, do not dispose of it with household waste. Make this product available for separate collection.

Separate collection of used products and packaging allows materials to be recycled and used
again. Reuse of recycled materials helps prevent environmental pollution and reduces the demand for raw materials.
Local regulations may provide for separate collection of electrical products from the household, at municipal waste sites or by the retailer when you purchase a new product.
Black & Decker provides a facility for the collection and recycling of Black & Decker products once they have reached the end of their working life. To take advantage of this service please return your product to any authorised repair agent who will collect them on our behalf.
You can check the location of your nearest authorised repair agent by contacting your local Black & Decker office at the address indicated in this manual. Alternatively, a list of authorised Black & Decker repair agents and full details of our after-sales service and contacts are available on the Internet at: www.2helpU.com.
Guarantee
Black & Decker is confident of the quality of its products and offers an outstanding guarantee. This guarantee statement is in addition to and in no way prejudices your statutory rights. The guarantee is valid within the territories of the Member States of the European Union and the European Free Trade Area.
If a Black & Decker product becomes defective due to faulty materials, workmanship or lack of conformity, within 12 months from the date of purchase, Black & Decker guarantees to replace defective parts, repair products subjected to fair wear and tear or replace such products to make sure of the minimum inconvenience to the customer unless:
- The product has been used for trade, professional or hire purposes.
- The product has been subjected to misuse or neglect.
- The product has sustained damage through foreign objects, substances or accidents.
- Repairs have been attempted by persons other than authorised repair agents or Black & Decker service staff.
To claim on the guarantee, you will need to submit proof of purchase to the seller or an authorised repair agent. You can check the location of your nearest authorised repair agent by contacting your local Black & Decker office at the address indicated in this manual. Alternatively, a list of authorised Black & Decker repair agents and full details of our aftersales service and contacts are available on the Internet at:
www.2helpU.com
Please visit our website www.blackanddecker.co.uk to register your new Black & Decker product and to be kept up to date on new products and special offers. Further information on the Black & Decker brand and our range of products is available at www.blackanddecker.co.uk.

FRANÇAIS
Utilisation prévue
PL_0
111 1
iill pJ iJ 1 Jla
J 1
1
S 1
a
iS O a 1000 1000 1000
JooLs. JdI IyI yIyIyIyIyIyIyIy
Lolal
i 1
. www.2helpU.com
y111110
d www.blackanddecker.co.uk
g 1
y, liLtiog sdi dyl x 20x Lg a logal all jao
www.blackanddecker.co.uk
Arabic
aill aLas

ailll llll llll llll
y 1111111111111111111111111111
Joo 10000000000000000000000000000000000000000000000000000000000000000000
1 1 1 1 1 1 1 1 1 1 1 1 1 1 1 1 1 1 1 1 1 1 1 1 1 1 1 1
aal aal no gannn paae gail paai
sS 15
aill
j jn no jno n no yolgol jai no pao no sui dui jgl a liall l c sasll a rssll aiea. aiaaall no ai pliiil g jagl b
Jlaii jilii jie iia 5jia
Jlal jlln Jll Jll Jll Jll Jll Jll
sJpLusy Jg jgl 1 y gll 1a 1 a
a b a a a a a a a a a a a a a a a a a a a a a a a a a a a a a a a
J 1
y 1
ylo 1
j 3
-
ziiill jiaolai baij 1
1234567890
15e 1111111111111111
a
2
("b"“c"(s))
(3)gglbdu
T(16)
jolll no sooL 0joll aLi (5) aoeill Jzai
("b"J)aegjll
aiai aiee iieae eae
(1)
J 1
(2) (5)
y /
jio jy 1 y
(2) 1( p - 1) ! · 1( p - 2) ! · 1( p - 3) ! · 1( p - 4) !
1c jll a csw laai.(1) cieall bc biol jllj
jz jz jz jz jz jz jz jz jz jz
a a a a a a a a a a a a a a a a a a
Koo g o 1y y
i 1
40 10
24:Lg
Julil
j 1
(10)
y
3 1
1 1
a 8-10 aal all
Jol≤1Lzjgmo
Arabic
(13)
(14)
(15)
(6) aolal lal o gai jgj
y
Lall
(")()
.
aai j 1j 1j 1j 1j 1j 1j 1j
Lae pduuLy aelull y
aJbdo pIaIwLy aIc yol gJbll 1000 Clao
eelllll aee alil 5e gai jalj Jk
1
aaiy jolal
jss 2 a jll g jlll p l s iil iie aiai iiaaia
jblallll jag aaijall aal lglss
111 111 111 111 111 111 111 111
2.0dallolalalalalalalalalalalalalalalal
aill jolal ola Jauaiyall jolal jss
:L
jellbfo 3
4
zjwJyjdz.5
aill 6
a1 = 12,a2 = 3,
1
J.8
9
J.10
1
jll jlll lllll
("g"J)
211 22
jai jia 1
Lgaaogoo
gll (11) 2
Aa
("c"J)
j 7) (12)
"J Jkll) daa aai g aiiaai ai jg
a1gssps
(2)
.
Arabic
jaii jaii jaii jaii jaii jaii jaii jaii
a a a a a a a a a a a a a a a a a a
- = ( x1,y1) , = ( x2,y2)
e 1
.
Jusss ssss
jai jiaol jiaow poao jai
1 1
aallll aal lalal
aJyJzll Jzbl JzjLill aizj0
JolILI. 111jwI IJI JU 111b1g bdd

aLysy11 aXu
a 12
Jz
- jaiil 10g l cagol gll
L 1
a
i 1
L
ailll lal al 5 jn jn jn jnn n
jiaiiejuee liao 1
Sallolal/olalj2
a 1
jlll lal aajallg jlllgl aaiiil g aaii i
pIoc!gPcL cRyU 21 (JlcbU Ld
Jgssssssssssssssssssssssssssssssssssssssssssssssssssssssssssssssssssssssssssssssssss
pae jaoi Jia 1e jaiy
j4
iuiu.1iueoaiy
j11111111111111111111111
y
( x,y) = ( ab + 1,ab)
3 1
ailllll 12jIbll jaiyolpse

Arabic
a aaaal lll p 100000000000000000000000000000000000000000000000
1 1 1 1 1 1 1 1 1 1 1 1 1 1 1 1 1 1 1 1 1 1 1 1 1 1 1 1 1 1 1 1 1 1 1 1 1
a a a a a a a a a a a a a a a a a a a a a a a a a a a a a a a a a a a a a a a a a a a a a a a a a a a a a a a a a
a.6
Jgao aabwgl yiljll jll cIol gaiy i 1
aIe bll JnWl Ioo kllu oLg pIiwl
yiljll jll
yll jll gao 1 aXu
aaiia aiee iieae eae ae eae ee eae eae eae eae eae eae eae eae eae eae eae eae eae eae eae eae eae eae eae eae eae eae eae eae eae eae eae eae eae eae eae eae eae eae eae eae eae eae eae eae eae eae eae eae eae eae eae eae eae eae eee
13 1
Laiie alg jao g aabw y biy jiljll dal .
dwl ay bai oag yolai 1o laaoc iip
"J" Jl lal agall s w y ooi y jgi g ksl wia all
syyi d p n jog"Jy Jll lll llaeall jz jy jy
p 1 1 1 1 1 1 1 1 1 1 1 1 1 1 1 1 1 1 1 1 1 1 1 1 1 1 1 1 1 1 1 1 1 1 1
Jlll 1
i 1
1 4
y 1
aIg aiai ci 111 p 111 gJgJgJgJgJgJgJgJgJgJgJgJgJgJgJgJgJgJgJgJgJgJgJgJgJgJgJgJgJgJgJgJgJgJgJgJgJgJgJgJgJgJgJgJgJgJgJgJgJgJgJ
g/9 g 100000000000000000000000000000000000000000000000000000000000000
Jgliae 1234567890101123456789010112345678901011234567890101123456789010112345678901011234567890101123456789010112345678
J 11111111111111111111111111111111111111111111
aJgJg JgJgJgJgJgJgJgJgJgJgJgJgJgJgJgJgJgJgJgJgJgJgJgJgJgJgJgJgJgJgJgJgJgJgJgJgJgJgJgJgJgJgJgJgJgJgJgJgJgJgJg
111111111111111111111111111111111111111111111111 0000000000000000000000000000000000000000000000000000000000000000000000000
a a a a a a a a a a a a a a a a a a a a a a a a a a a a a a a a a a a a a a a a a a a a a a a a a a a a
g aalall y. aaiiaalll sall g y 9
y baiag daiayag aaiy ie baiy i ayag all
aegall aaiiaaiall ayaii ayaiy ai jy jy jy
12 1
BPCD120.BPCD120KB /BPCD180.BPCD180KB
a
aaiy jll aaii
a 1

S BCD = S COD + S BDO - S BOC
y
ailll lglll 1s jll" sylg5 jq" clll all g (L) sylgll Jjll Jaa sll Jgll Jgll Jgll
jll jll jll jll jll jll jll jll jll jll jll jll jll jll jll jll jll jll jll jll jll jll jll jll jll jll jll jll jll jll jll jll jll jll jll jll jll jll jll jll jll jll jll jll jll jll jll jll jll jll
auiyssi aixuill 2
y 1
jLJI 1J 1J 1J 1J 1J 1J 1J 1J 1J
gss.aaalgljg jll aaiy lsl 1 2
H
Arabic

BLACK&DECKER
WARRANTY REGISTRATION CARD
YOUR NAME/
YOUR ADDRESS
POSTCODE
DATE OF PURCHASE
DEALER'S NAME & ADDRESS/
PRODUCT MODEL NO.BPCD120, BPCD120KB, BPCD180, BPCD180KB
ALGERIA: Sarl Outillage Corporation, 08 Rue Med Bouiaf - Cheraga - Algiers, Algeria. Tel: (213-21) 375130, Fax: (213-21) 369667. ANGOLA: Angoferraria, Lda., Rua Robert Shields, No. 61, Luanda, Angola, Tel: 00244-222-395837 / 222-395034, Fax: 00244-222-394790. AZERBAJAN: Royalton Holdings Ltd. 41 Khagani St. Apt. 47 AZ 1001, Baku, Tel: (994-12) 4935544, Fax: (994-12) 5980378. BAHRAIN: Kavalani & Sons W.L.L., P.O. Box 71, Sitra, Manama, Tel: (973) 17737379. Alfouz Services Co. W.L., P.O. Box 26562, Tubli, Manama. Tel: (973) 17783562, Fax: (973) 17783479. EGYPT: El Farab S.A.E., 15-Nabili El Wawkad Street, Dokki, Giza, Egypt, Tel: 00202-37603946 / 002-010-2582544, Fax: 00202-33352796. ETHIOPIA: Seif Tewfik Sherif, Arada Sub-City, Kebele 01/02, Global Insurance Building, 2nd Floor, Room 43, P.O. Box 2525, Addis Ababa, Ethiopia. Tel: (251-11) 1563968/ 1563969, Fax: (251-11) 1558009. IRAQ: Financial Links, Kazzaz Building Arasat Al-Hindia Block No: 629 Street; 31Building No: 1 Baghdad - Iraq. Tel: 00964 (0)780 195 2223/ 00964 (0)781 3763044. Al Sard Co. for General Trading Ltd. Jbara Bldg. 3Fir, Al Rasheed St. Bagdad. Tel: (964) 18184102. Sakhar Group, Arrassat al-hindya Al Masbah, Bagdad. (964) 7400144446. JORDAN: Palestine Bldg. Mat. (Bashiti Hardware), 93 King Abdullah 2nd Street, Opp. ELBA House, P.O. Box 3005, Amman 11953, Tel: (962-6) 5349098, Fax: (962-6) 5330731. KENYA: Dextron Tools Ltd., P.O. Box 20121-00200, Shariff House, Kimathi Street, Nairobi. Tel: (254-20) 6905000/ 2358021, Fax: (254-20) 6905111/ 6905112. KUWAIT: Al Omar Technical Co., P.O. Box 4062, 1304 Safat, Kuwait. Tel: (965) 24848595/ 24840039, Fax: (965) 24845652. Fawaz Al Zayani Establishment, P.O. Box 42426, Shop No. 18, Al Humaizi Commercial Complex, Khalifa Al Jassim, Shuwaikh, Kuwait. Tel: (965) 24828710, Fax: (965) 24828716. Fawaz Al Zayani Establishment, P.O. Box 42426, Shop No. 18, Al Humaizi Commercial Complex, Khalifa Al Jassim, Shuwaikh, Kuwait. Tel: (965) 24828716. Fawaz Al Zayani Establishment, P.O. Box 42426, Shop No. 18, Al Humaizi Commercial Complex, Khalifa Al Jassim, Shuwaikh, Kuwait. Tel: (965) 24828716. Fawaz Al Zayani Establishment, P.O. Box 42427633. LIBYA: North Africa Trading (El Ghoul Brothers), AlHilal Service Center Tawergha St. Misurata, Tel: 00218-091-3221408. (Benghazi) Snydeld et al., Amr Ibn El-Aas Rd. Tel: (+218) 92 5771120. (Tripoli) Al Barriq Service Center Mokhazin elskarstel, EIFallah. Tel: (+218) 21 48808019. (Misrata) Al Hilal Service Center Tawergha st. Tel: (+218) 21 4880819. (Mislata) Al Hilal Service Center Tawergha st. Tel: (+218) 21 48852752. Oman Marketing & Service Co. Omasco), P.O. Box 2734 Behind Honda Showroom, Wattayah, Oman. Tel: (968) 24560232/ 24560255, Fax: (968) 24560993. Oman Marketing & Service Co. (Omasco), Al Ohi, Sohar, Oman. Tel: (968) 26846379. Fawaz (968) 26846379. Oman Marketing & Service Co. (Omasco), Sanaya, Salalah, Oman. Tel: (968) 2321290, Fax: (968) 23210936. PAKISTAN: ZIT Co - Nasir & Bros., 2nd Floor, Qadri Center, Chowd Dalgran Railway Road, Lahore, Pakistan, Tel: (968-3) 8140914, Fax: (968-3) 8140824. MSS (Al-Mojil Supply & Services). P.O. Box 450, Jubail 31951, Opp.Gulf Bridge Library & Riyadh House. Tel: (966-3) 3612850/ 3624487/ 3621729, Fax: (966-3) 3623589/ 3620783. Dammam) MSS (Al-Mojil Supply & Services). P.O. Box 450, Jubail 31951Opp-Gulf Bridge Library & Riyadh House.Tel:(966-3)361850/3624487/ Est.), P.O.Box 30377,Jeddah -21477Tel:(966-2)6519912Fax:(966-2)651153.Madina) Gariz Trading for Bldg Mat & Decoration.P.O.Box 3364 MadinaTel:(966-4)826 14 90 /8227636.Fax:(966-4)826574.(Riyadh) Industrial Material Organization (IMO), P.O.Box 623 Rail Street,Riyadh,Tel:(966-1)408010 Ext 26 /8001245757,Fax:(966-1)403797.Sultan Garment Factory (RSC), P.O.Box 29912,Riyadh 1147,KSA,Tel:(966-1)448499,Fax:(966-1)448787.(Yanbu) Fawaz Ebrahim Al Zayani Opposite to Al Fouzan,Jedah highway or King Abdul Aziz road,Yanbu.Tel:(966-4)396098o.Fax:(966-4)396198o.Mohamed Ahmed Bin Aff Est., P.O.Box 530,Yanbu,Ahbari Tef' (966-4)322262/3228867.Fax:(966-4)32286/328867.Fax:(966-4)32287o.(Yanbu), Ahrn Ahrn Bahr (P.O.Box 530,Yanbu,Ahbari Tef' (966-4)32287o.(Yanbu), Ahrn Ahrn Bahr (P.O.Box 530,Yanbu,Ahbari Tef' (966-4)32287o.(Yanbu), Ahrn Ahrn Bahr (P.O.Box 530,Yanbu,Ahbari Tef' (966-4)32287 o.(Yanbu), Ahrn Ahrn Bahr (P.O.Box 530,Yanbu,Ahbari Tef' (966-4)32287o.(Yanbu), Ahrn Ahrn Bahr (P.O.Box 530,Yanbu,Ahbari Tef' (966-4)32287o.(Yanbu), Ahrn Ahrn


- Safety instructions
- ENGLISH
- Additional power tool safety warnings
- Labels on tool
- Additional safety instructions for batteries and chargers
- Batteries
- Chargers
- Electrical safety
- Features
- Fig. A
- Assembly
- Fitting and removing the battery (fig. B & C)
- Fitting the battery cap (fig. C)
- Fitting and removing a drill bit or screwdriver bit (fig. D)
- Removing and refitting the chuck (fig. E)
- Residual risks
- Use
- Charging the battery (fig. A & F)
- Using the charger
- Charger with charging plug
- Selecting the direction of rotation (fig. G)
- Selecting the operating mode or torque (fig. H)
- Drilling in masonry (fig. H & I)
- Speed selector (fig.1)
- Drilling/screwdriving
- Hints for optimum use
- Drilling
- Screwdriving
- Maintenance
- Accessories
- Protecting the environment
- Guarantee
- www.2helpU.com
- FRANÇAIS
- Utilisation prévue
- Arabic
- aaiy jolal
- aLysy11 aXu
- L
- yll jll gao 1 aXu
- BLACK&DECKER
- WARRANTY REGISTRATION CARD
Brand : BLACK & DECKER
Model : BPCD180
Category : Hammer