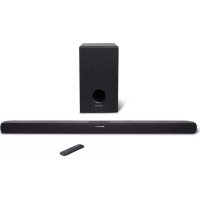
SC200SND - Home Theater System SCHNEIDER - Free user manual and instructions
Find the device manual for free SC200SND SCHNEIDER in PDF.


| Product type | Home cinema system (soundbar + external subwoofer) |
| Brand | Schneider |
| Model | SC200SND |
| Soundbar dimensions (W x D x H) | 920 x 55 x 85 mm |
| Subwoofer dimensions (W x D x H) | 170 x 221 x 296 mm |
| Power supply | AC adapter: input 100-240 V~50-60 Hz, output 24 V 1.5 A |
| Power consumption | 25 W (standby ≤ 0.5 W) |
| Output power | 2 x 45 W + 90 W (subwoofer) |
| Frequency response | 20 Hz - 20 KHz ± 3 dB |
| Bluetooth | Version 2.1, range approx. 10 m |
| Audio inputs | AUX 3.5 mm, optical, coaxial, Bluetooth |
| Sound modes | Normal (Standard) and Cinema (Movie) |
| Bass adjustment | Yes, via remote control |
| Wall mounting | Possible, brackets included |
| Package contents | Soundbar, remote control (CR2032 battery included), AC adapter, 3.5 mm to 3.5 mm audio cable, wall mounting brackets, manual |
| Remote control | Yes, with CR2032 button cell battery |
| Care and cleaning | Wipe with a soft, dry cloth. Do not use abrasive products. |
| Safety | Do not expose to water or moisture. Do not open the device. Keep batteries out of reach of children. |
| After-sales service | ADMEA/LOGISAV, ZI du clos des charmes, 26 rue du clos des charmes, 77090 COLLEGIEN-FRANCE |
Frequently Asked Questions - SC200SND SCHNEIDER
User questions about SC200SND SCHNEIDER
0 question about this device. Answer the ones you know or ask your own.
Ask a new question about this device
Download the instructions for your Home Theater System in PDF format for free! Find your manual SC200SND - SCHNEIDER and take your electronic device back in hand. On this page are published all the documents necessary for the use of your device. SC200SND by SCHNEIDER.
USER MANUAL SC200SND SCHNEIDER
- Getting started 22
- Overview of controls 22
- Remote control 23
- TV Connections 25
- Connecting an MP3 player 27
- Connecting the external subwoofer 27
- General operation 27
- Bluetooth operation 29
- Wall mounting the sound bar 30
- Specifications 32
- Troubleshooting 33
Nederlandss
Accentuation des graves
Important safety instructions - please read carefully and keep for future reference

To reduce the risk of fire or electric shock, do not expose this product to water, rain or moisture. To prevent the risk of electric shock, do not remove the cover or back of this product. In case of product failure, only qualified personnel can repair. There are no user-serviceable parts inside.
CAUTION!
Dangerous tension inside the product! Do not open. Risk of electric shock! No parts can be repaired by the end-user. Only qualified personnel can repair and maintain this product.
If the electric cord is damaged, it must be replaced by the manufacturer or qualified after-sales personnel in order to avoid any danger.
The product must be installed in accordance with local laws.
Damaged batteries must be properly disposed. In order to protect the environment, please dispose the batteries properly, in accordance with local laws (information is available at your reseller).
Remote control battery (included) shall not be exposed to excessive heat (e.g. from sun or fire).
Note: Device operates in frequency range 2454-2483.5MHz is restricted to indoor use in France
Where to install the product
- Place the product on a straight, rigid and stable place. Do not place the product on a carpet.
- Do not place the product on top of another that may cause overheating (for example, a receiver or amplifier).
- Do not place anything underneath the product (for example, CDs or magazines).
Proper ventilation
- Place the product in a sufficiently-aerated place to avoid overheating. Allow at least 10cm spacing at the back and top of the product, and 5cm spacing on both sides to prevent overheating.
- Do not place items such as newspapers, tablecloth, curtains, in front of the ventilating openings.
Do not expose the product to high temperatures, moisture, water and dust.
-
The apparatus shall not be exposed to dripping or splashing. No object filled with liquids, such as vases, shall be placed on the apparatus.
-
Do not place other items close to this product that may damage it (for example, objects containing water or lightened candles).
-
No naked flame sources, such as lighted candles, should be placed on the apparatus.
WARNING
- Do not ingest the battery, Chemical Burn Hazard
- The remote control supplied with this product contains a coin button cell battery. If the coin button cell battery is swallowed, it can cause severe internal burns in just 2 hours and can lead to death.
- Keep new and used batteries away from children.
- If the battery compartment does not close securely, stop using the product and keep it away from children.
- If you think batteries might have been swallowed or placed inside any part of the body, seek immediate medical attention.
Electric supply
- Please unplug the product in case of prolonged non-use.
- If the supply cable is damaged, it must be replaced by the manufacturer or qualified after-sales personnel to avoid any danger.
- This product must be connected to an electrical supply 230V 50Hz .
- The mains plug is used as the disconnect device, so the disconnect device shall remain readily operable
- Only use this product with the AC adaptor provided.
Declaration of Conformity
This appliance is Bluetooth sound bar complies with the essential requirements and other provisions of and the Radio Equipment Directive (RED) 2014/53/EU that goes into effect on 12 June 2016.
The declaration of conformity is available at: http://www.schneiderconsumer.com

Technical Specification:
Name: Soundbar
Operation Frequency: 2402 MHz to 2480MHz (BT 2.1)
RF Transmission Power: 2dBm W (power per channel)
Operation Environment: 0 - 40 DegC
- This logo set on the product means that the recycling of this apparatus come within the framework of the directive 2012/19/EC of July 4, 2012 concerning the waste on electrical and electronic equipment (WEEE).
- The presence of dangerous substances in the electrical and electronic equipments can have potential consequences on the environment and human health in the cycle of reprocessing this product.
- Therefore, at the end of its lifetime, this product shall not be disposed with other non-recycled waste.
- As the end user, your role is of prime importance in the cycles of re-using, recycling, and other forms of valorization of this electrical and electronic equipment. Local authorities and resellers have set special procedures for the purpose of collecting and recycling this product.
- You have the obligation to use the selective waste collection systems put in place by your local authorities.
1. Getting started
What's included?
1 x Sound bar
1 x Remote control (with CR2032 battery)
1 x AC adaptor
1 x Audio cable (3.5mm-3.5mm)
1 x Instruction manual
2x Wall-mount bracket
2. Overview of controls
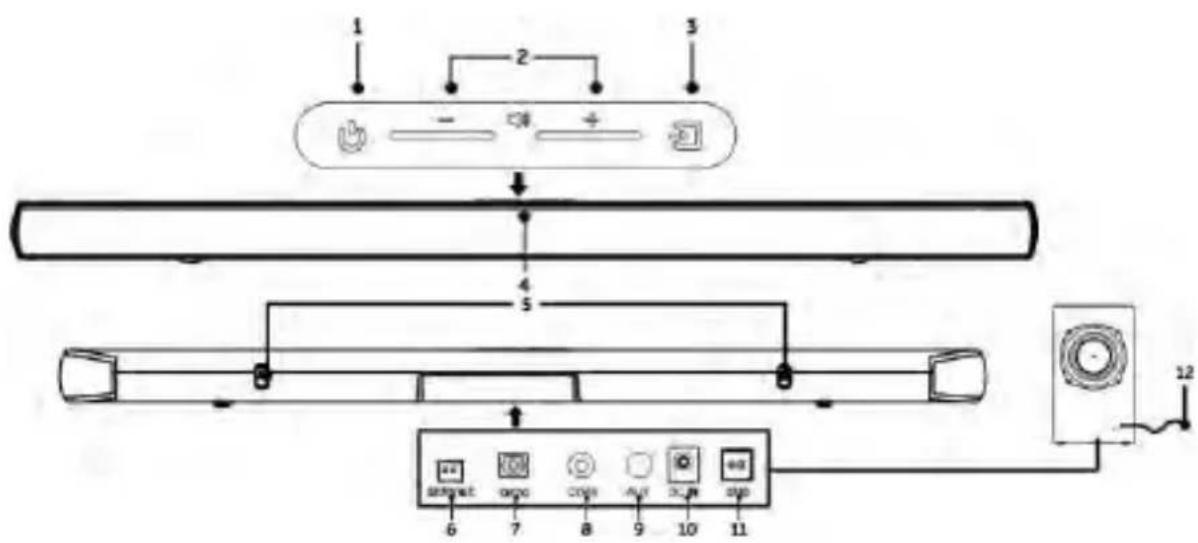
- STANDBY button: Switch on the Sound bar or switch to STANDBY mode.
- VOLUME + / - buttons: Increase or decrease the output volume.
- SOURCE button: Select an audio source from AUX, BLUETOOTH, COAXIAL or OPTICAL inputs.
- STATUS LED: Input mode and standby status.
- Wall-mount bracket
- SERVICE: This port shall only be used to upgrade the unit, and only by means of a software issued by the manufacturer of the device. Unauthorized upgrade would damage the device and be outside the scope of the warrantee.
- OPTICAL AUDIO INPUT: Connect the digital audio output from a TV, DVD or Blu-ray player.
- COAXIAL AUDIO INPUT (RCA): Connect the digital audio output from a TV, DVD or Blu-ray player.
- AUX AUDIO INPUT (3.5mm): Connect the analogue audio output from an MP3 player or similar using a 3.5mm audio cable.
- DC INPUT SOCKET: Only connect to the power adaptor provided.
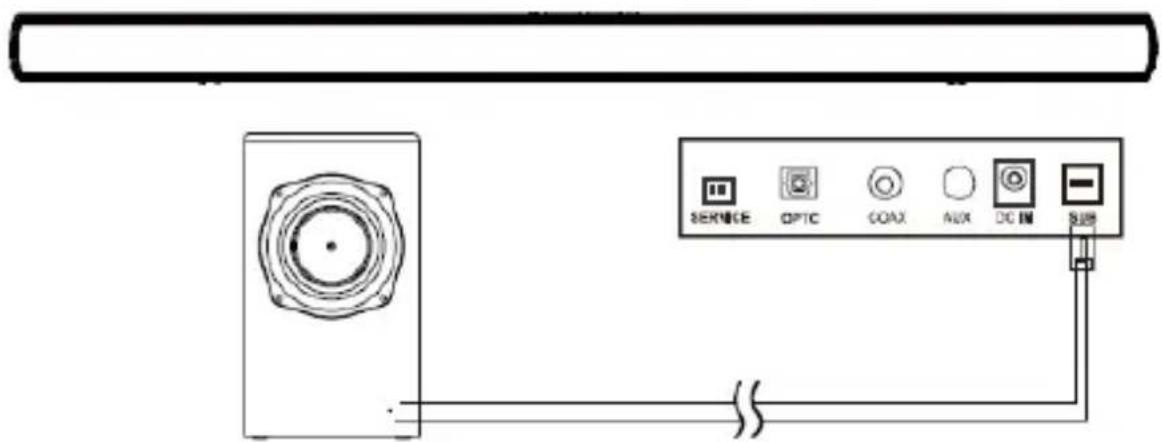
- TO SUBWOOFER CONNECTOR: Connect to the external subwoofer.
- SPEAKER CABLE: Connect the external subwoofer to the sound bar.
3. Remote control
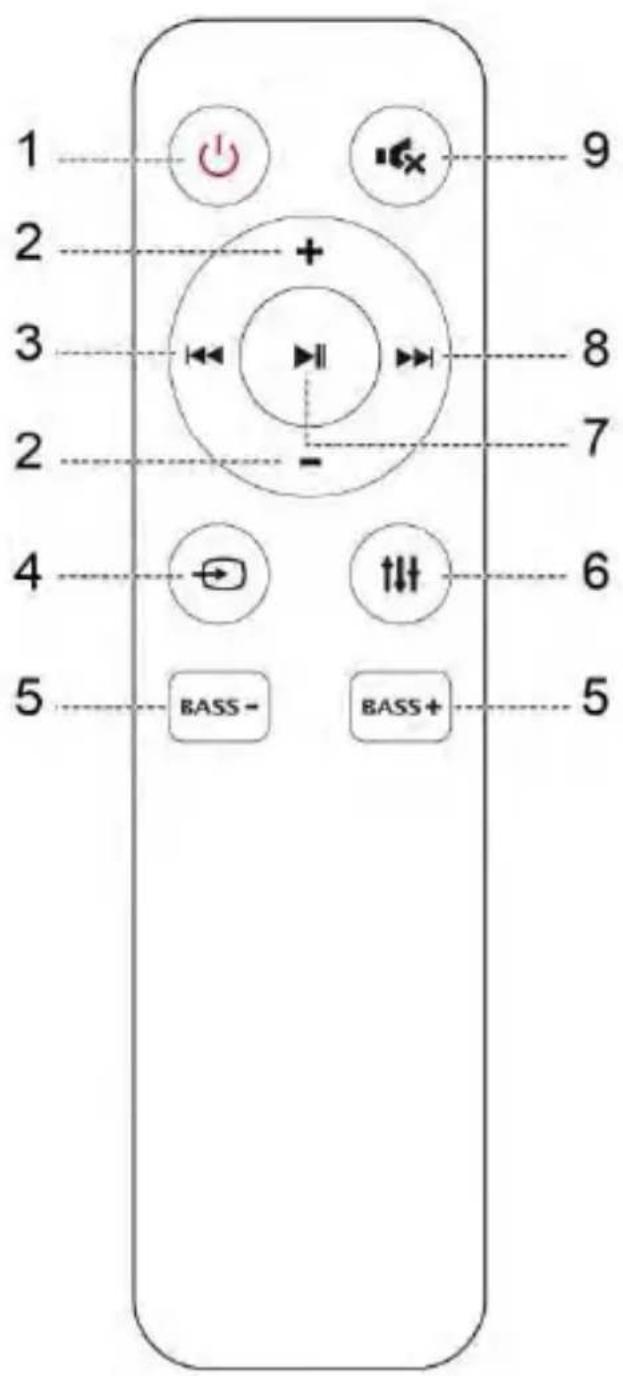
- STANDBY: Switch on the Sound bar or switch to STANDBY mode.
- VOL- / +: Increase or decrease the volume output.
- SKIP : tip to previous track for Bluetooth playback.
- SOURCE: Select an audio source from AUX, BLUETOOTH, COAXIAL or OPTICAL inputs.
- BASS - / +: Increase or decrease the bass output.
- SOUND EQ MODES: Press repeatedly to assign different sound. EQ modes: STANDARD or MOVIE.
- PLAY/PAUSE: START or PAUSE Bluetooth playback. Press and hold for 5 seconds to remove a paired Bluetooth device.
- SKIP skip to next track for Bluetooth playback.
- MUTE: Press to mute or restore the sound output.
Installing batteries to the remote control
-
Turn the battery cover counterclockwise by using a coin. Then remove the battery cover.
-
Insert and fix the CR2032 battery into the battery compartment with the (+) facing upward.
-
Put the battery cover on the remote control and turn it clockwise to close.
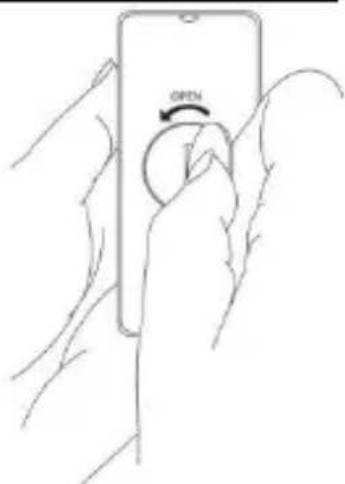
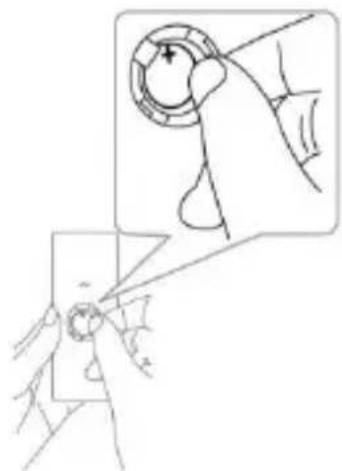
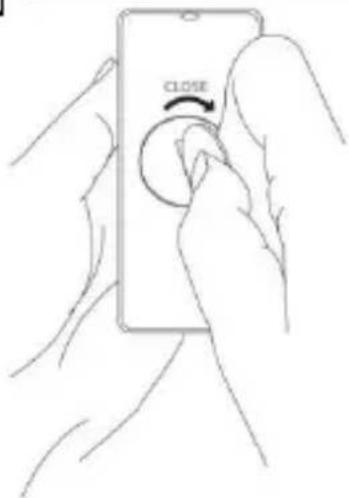
Disposal of batteries
Dispose of used batteries with regard to the recycling regulations in your area. Do NOT short circuit batteries or throw them into water, the general rubbish or in a fire. Weak batteries can leak and damage the remote control. Replace them in good time!
4. TV Connections
4.1 Connecting a TV, DVD, GAMES CONSOLE or SET-TOP BOX using a RCA-3.5mm audio cable (not provided).
NOTE: Ensure that the TV PHONO connectors are audio OUTPUTS and not audio INPUTS. If they are INPUTS then use connection 4.4
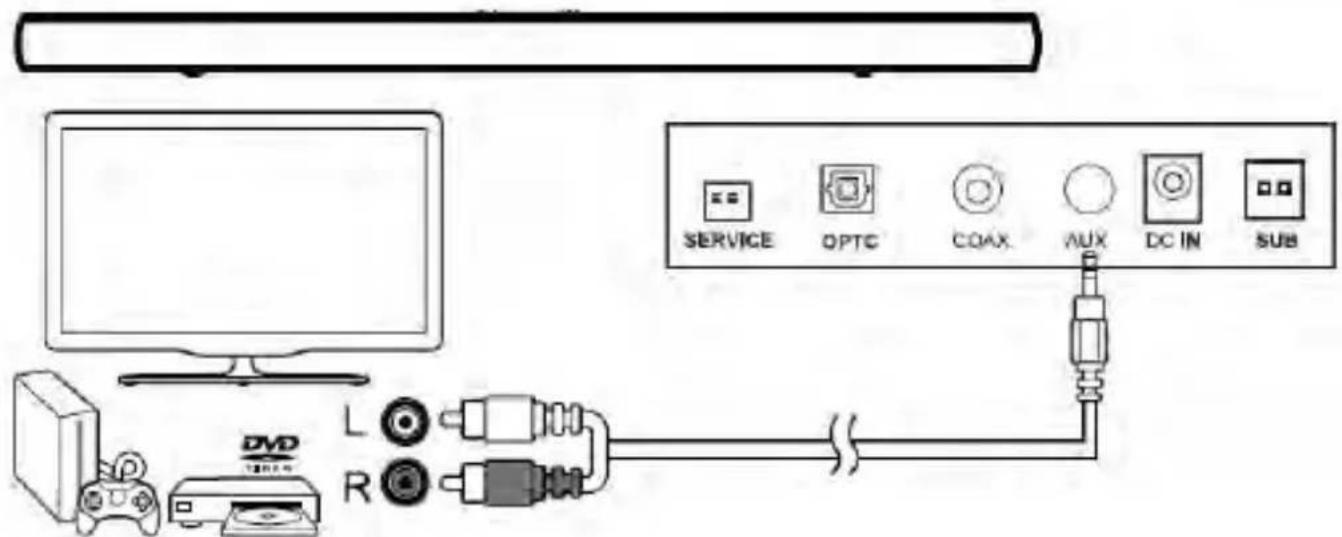
- Connect one end of the RCA cable to the TV, DVD or CONSOLE audio output RCA sockets.
- Connect the 3.5mm (small) end to the AUX inputs on the back of the Sound bar.
NOTE: Take care to match the RED plug to the RED socket and the WHITE plug to the WHITE socket.
4.2 DIGITAL connection to a TV, DVD or Blu-ray player using the COAXIAL cable (not provided).
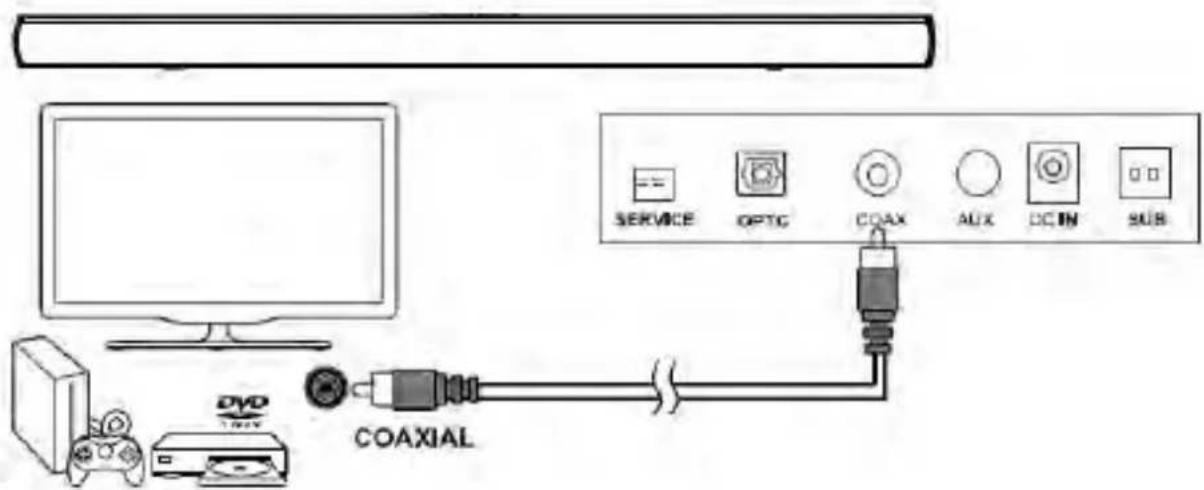
- Connect one end of the COAXIAL cable to the TV, DVD or Blu-ray COAXIAL audio output socket.
- Connect the other end to the COAXIAL input on the back of the Sound bar. NOTE: You may need to activate PCM (Downmix) on your source device: TV, DVD or Blu-ray player.
4.3 DIGITAL connection to a TV, DVD or Blu-ray player using the OPTICAL cable (not provided).
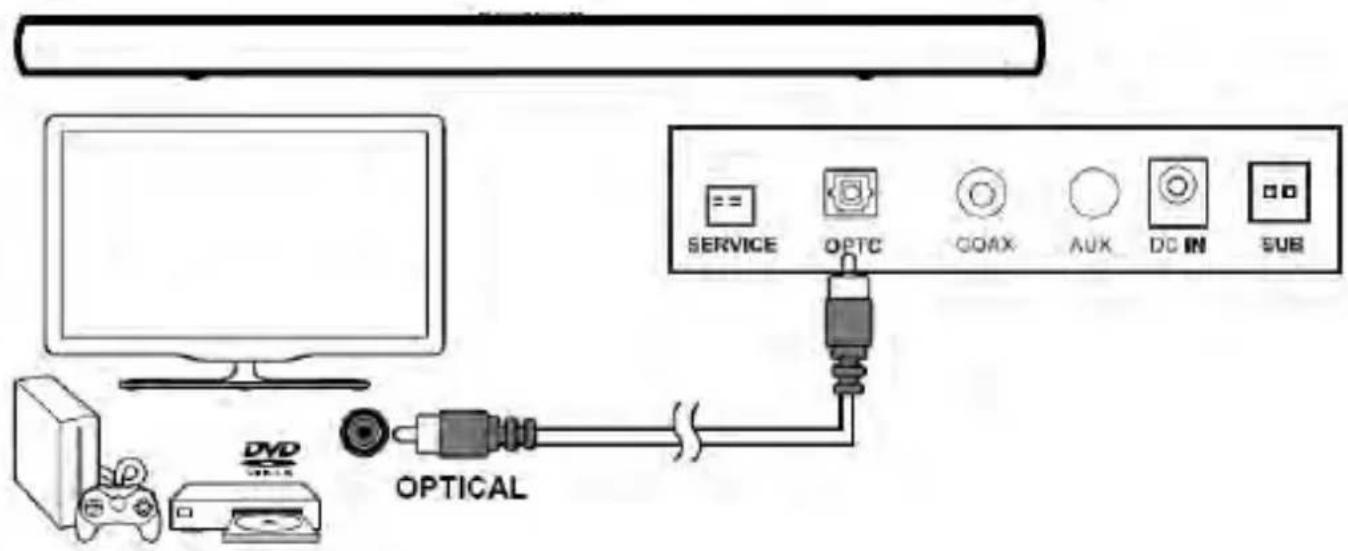
- Connect one end of the OPTICAL cable to the TV, DVD or Blu-ray OPTICAL audio output socket.
- Connect the other end to the OPTC input on the side of the Sound bar.
NOTE: You may need to activate PCM (Downmix) on your source device: TV, DVD or Blu-ray player.
4.4 Connection to a TV using the 3.5mm-3.5mm audio cable.
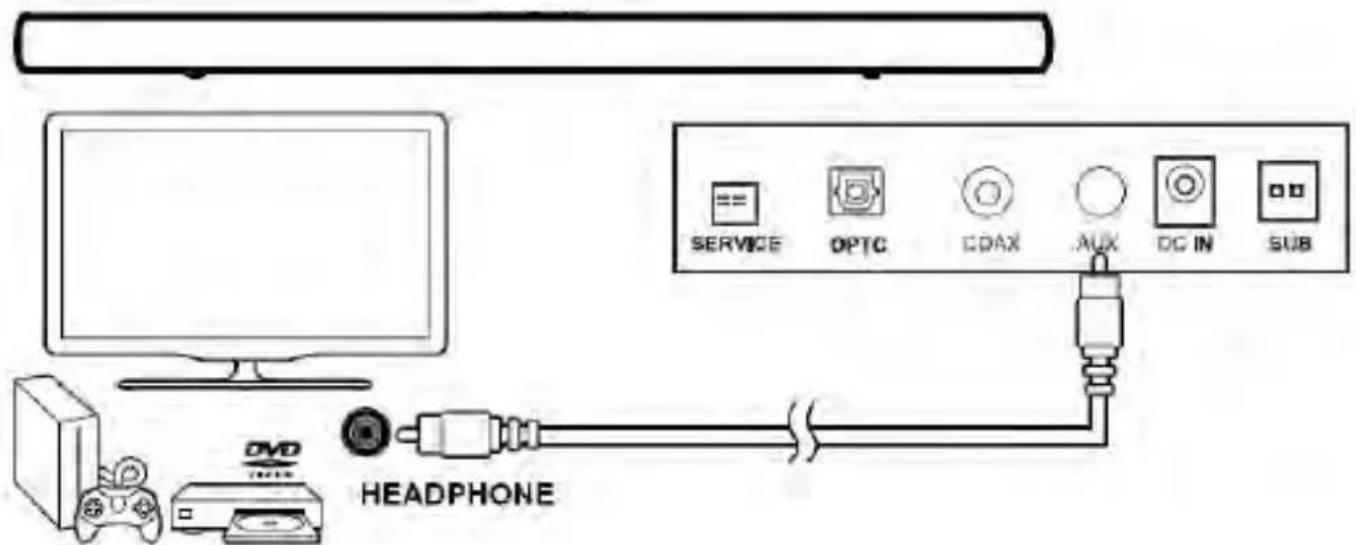
- Connect one end of the 3.5mm cable to the TV headphone 3.5mm audio output socket.
- Connect the other end of the cable to the AUX input on the back of the sound bar
NOTE: In some cases the Sound bar volume output is affected by the volume level on the TV. In this case adjust the TV volume to increase the audio output from the sound bar.
5. Connecting an MP3 player
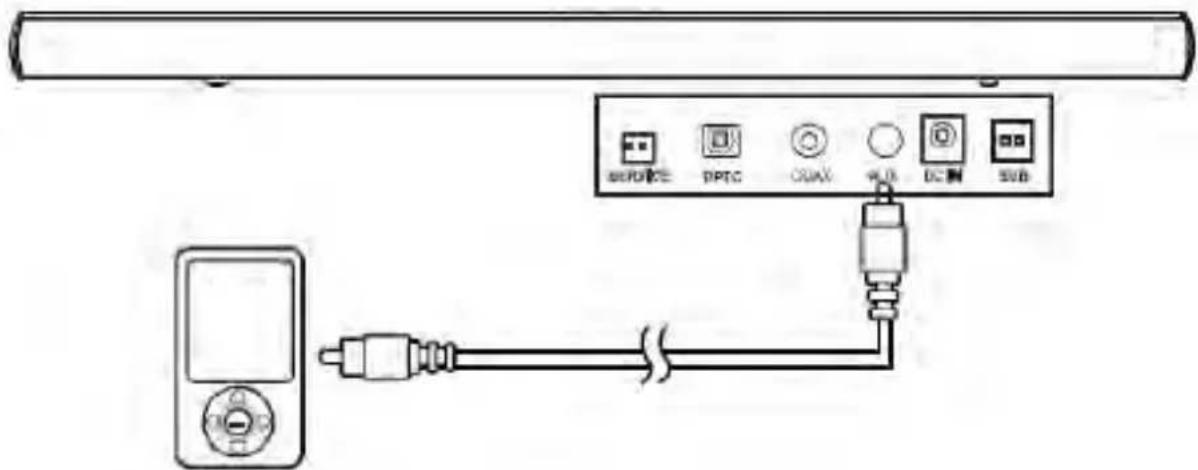
- Connect one end of the 3.5mm audio cable to the headphone output of your MP3 player.
2: Connect the other end to the AUX input (3.5mm socket) on the back of the Sound bar.
6. Connecting the external subwoofer
Connect the speaker cable from external subwoofer to the TO SUB socket on back of the sound bar.
7. General operation
Connecting mains power
- Connect the AC power adaptor of the sound bar between the DC IN socket and the power supply outlet.
- Switch the power outlet ON.
Standby mode
- Press the STANDBY button to wake the unit from STANDBY mode.
- To enter STANDBY mode, press either STANDBY buttons.
NOTE: As part of the power saving mode the unit will enter STANDBY mode automatically after 20 minutes (approx.) of no audio output.
Status LED
| Operation | Description | LED Status |
| STANDBY | Standby | RED (solid) |
| SOURCE | AUX | GREEN (solid) |
| Bluetooth-ready for pairing | BLUE (flash) | |
| Bluetooth paired | BLUE (solid) | |
| Coaxial | WHITE (solid) | |
| Optical | PURPLE (solid) | |
| VOL+/- | Adjust sound volume | Current input source color (blink once) |
| BASS +/- | Adjust bass level | Current input source color (blink once) |
| EQ MODE | Assign sound EQ STANBARD or MOVIE | Current input source color (blink once) |
| MUTE | Mute or restore sound | RED (flash) |
Switching inputs
Follow the below steps to switch inputs among: Auxiliary, Bluetooth, Coaxial or Optical.
- Ensure the Sound bar is powered ON by pressing the STANDBY button.
- Press the SOURCE button repeatedly until you see the corresponding color on the indicator, and then an audible message will follow to confirm the source you selected.
Auxiliary input: GREEN
Coaxial input: WHITE
Bluetooth input: BLUE
Optical input: .PURPLE
NOTE: When switching inputs there will be a 5 second pause after selecting BT while the unit scans for paired devices.
Adjusting the volume level
Press the VOLUME+/- button repeatedly to increase or decrease the volume level.
Sound effect presets
During playback, press the SOUND EQ button repeatedly to change the sound modes between STANDARD and MOVIE.
NOTE: When you select a sound mode, an audible message will follow to confirm the mode you selected.
Bass enhancement
Press Bass+/- to strengthen or lower the level of Bass.
Mute function
-
Press the MUTE button on the remote will temporarily silence the audio output.
-
Press the MUTE button again to resume the audio output.
NOTE: The LED indicator will blink in RED to indicate the mute function is active.
Disable the Audible Message
Follow the steps below in order to disable the audible message.
- Press STANDBY button to switch to STANDBY mode.
- Press and hold button for 5 seconds.
NOTE: Repeat the step 1 and 2 to activate the audible message.
8. Bluetooth operation
Pairing a Bluetooth device
Before you can use the sound bar with your phone or other Bluetooth capable device you will need to pair the device to the sound bar.
- Press SOURCE button repeatedly until you see the LED indicator turns blue, and then stay flashing when no other devices paired.
- Enable the Bluetooth function on your smart phone and search for a device labelled "SC200SND" in the available list.
- Select and enable pairing for the device "SC200SND". If prompted for a password, enter "0000".
- If pairing is successful the sound bar will beep and indicator stops flashing.
- If the connected device goes out of range, the sound bar will attempt to connect for 2 minutes. When the device comes into range the sound bar will reconnect again automatically.
- To remove the currently paired device, press and hold button on the remote control for 5 seconds. The indicator will begin flashing again.
During playback, you can:
- Press PLAY/PAUSE button begin or pause playback of the selected track on the audio device.
- Press k to skip to last or next track.
Bluetooth status table
| Operation | LED Status |
| Connected | RED (solid) |
| Auto re-connecting with last paired device. | GREEN (solid) |
| Pairing mode |
Note:
- The operation range of Bluetooth is approximately 10 meters (30 feet). Any obstacles in the path between devices may reduce this range.
- Only one Bluetooth device can be paired at a time.
- Not all Bluetooth devices are compatible.
9. Wall mounting the sound bar
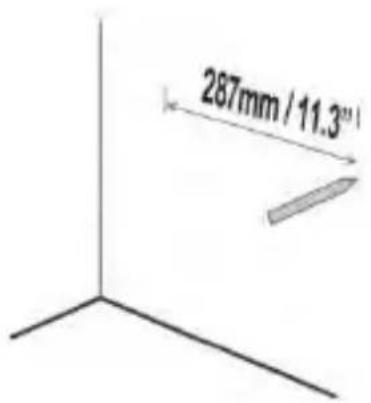
- Align the Sound bar in the chosen location. Use a pencil to mark the 2 drilling positions with a distance of 287mm (11.3") apart.
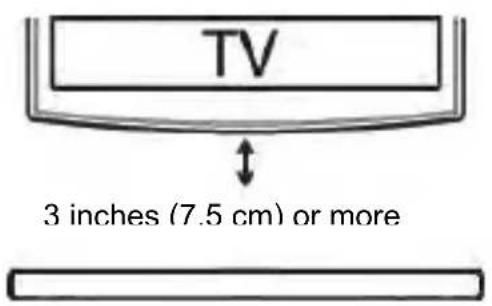
Note: The Sound bar should be located at least 7.5cm (3") below the bottom of the TV.
-
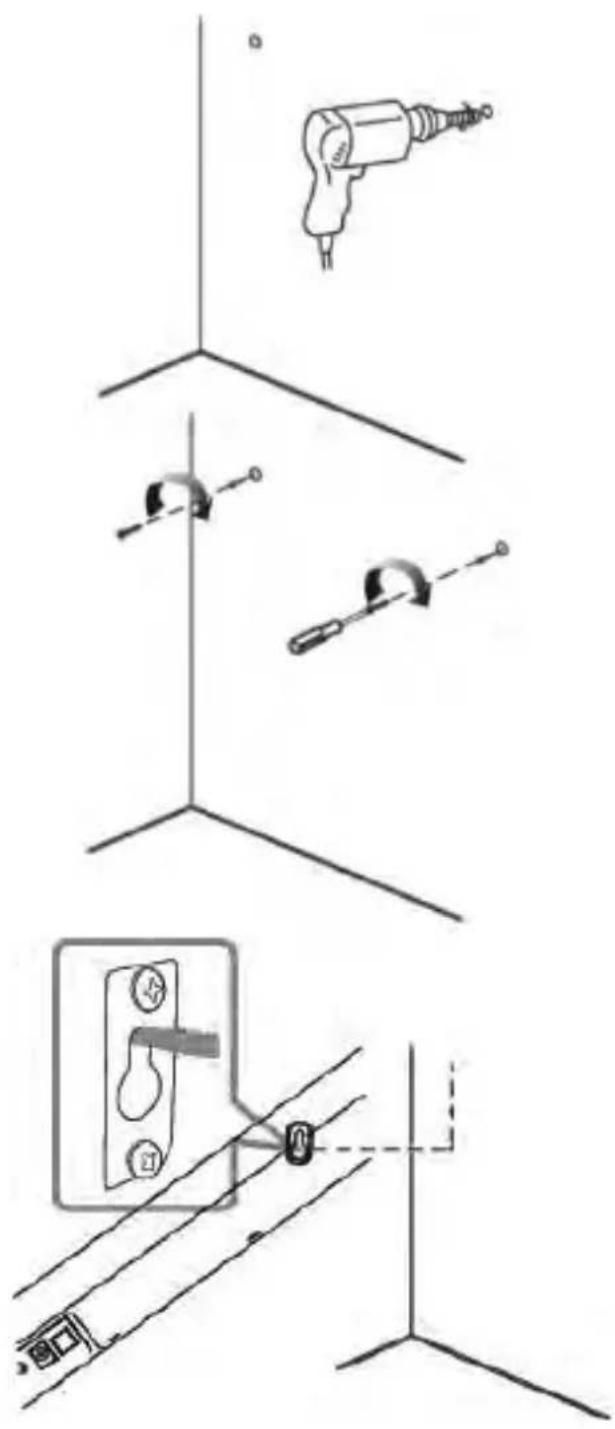
Drill holes as marked in step 1.
-
Insert 2 screws (not supplied) into the holes and tighten. Take care to leave 5mm between the screw heads and the wall. NOTE: You will need to ensure the screws are long enough to sufficiently grip the wall while allowing 5mm between screw head and wall.
-
Hook the Sound bar into the screws. For secure mounting, ensure the screw heads slide firmly into the narrow part of the brackets.
Wall mounting advice
- In order to avoid damage to the equipment and personal injury you should get a qualified person to drill the fixing surface and fit the appropriate wall fixings.
- Take care not to allow the main unit to fall while attempting to hook onto the wall mount brackets.
- Before mounting, check the wall strength; consult qualified personnel if necessary.
- When drilling into walls, always check that there are no hidden wires or pipes etc.
- Make sure the screws and wall plugs are suitable for supporting the unit.
10. Specification
| Amplifier | |
| Power output | 2X45W+90W |
| Frequency response | 20Hz-20KHz ± 3dB |
| Input sensitivity | 550 mV |
| Main unit | |
| Power supply | Input:100-240V ~ 50-60Hz Output: 24V 1.5A |
| Power consumption | 25W |
| Standby power consumption | ≤ 0.5W |
| Full range speaker drivers | Impedance: 4 Ohm, 45mm (1.75") Frequency response: 250Hz ~ 20KH |
| Subwoofer | Impedance: 8 Ohm, 135mm (5.25") Frequency response: 45~250Hz |
| Dimensions | Sound Bar: W920xD55xH85 mm External subwoofer: W170xD221xH296 mm |
| Cable length | 1.5m |
| Remote control | |
| Battery | 1 x CR2032 |
| Bluetooth | |
| Bluetooth compatibility | EDR, A2DP, AVRCP |
| Bluetooth version | 2.1 |
11. Troubleshooting
In the unlikely event of difficulties with your appliance please follow the trouble shooting guide below.
| PROBLEM | POSSIBLE SOLUTION |
| No Power | ·Ensure the mains plug is connected to a power supply, and is switched ON. ·Make sure there is power to the mains socket. |
| No Sound | ·When playing from the AUX input, Make sure the external source has the volume turned up and is playing a track. ·Make sure the volume is turned up. ·If using the digital coaxial or optical cable connection ensure the source DIGITAL output is set to PCM, LPCM, PCM 2Ch stereo or PCM downmix. ·Bluetooth device not paired. Refer to “Bluetooth operation”. |
| No response from the unit | ·Unplug the power cable for 1 minute then plug back in again. |
| Remote control does not work | ·Reduce the distance between the remote and main unit. ·Check the batteries are installed correctly. ·Replace the batteries. ·Aim the remote directly at the Sound bar |
| Unit powers off after 20 minutes | ·This unit is designed to enter STANDBY mode automatically after 20 MINUTES of inactivity. Press the STANDBY button to wake the unit. |
Remark: Watt-peak measurement is obtained by multiplying the continuous average power (RMS) by 2 times the square root of 2 and rounding up the result by the nearest 5 or 0 digit.
SAV
ADMEA/LOGISAV
- Nederlandss
- Accentuation des graves
- Important safety instructions - please read carefully and keep for future reference
- CAUTION!
- Where to install the product
- Proper ventilation
- Do not expose the product to high temperatures, moisture, water and dust.
- WARNING
- Electric supply
- Declaration of Conformity
- Technical Specification:
- Getting started
- What's included?
- Overview of controls
- Remote control
- Installing batteries to the remote control
- Disposal of batteries
- TV Connections
- Connecting a TV, DVD, GAMES CONSOLE or SET-TOP BOX using a RCA-3.5mm audio cable (not provided).
- DIGITAL connection to a TV, DVD or Blu-ray player using the COAXIAL cable (not provided).
- DIGITAL connection to a TV, DVD or Blu-ray player using the OPTICAL cable (not provided).
- Connection to a TV using the 3.5mm-3.5mm audio cable.
- Connecting an MP3 player
- Connecting the external subwoofer
- General operation
- Connecting mains power
- Standby mode
- Switching inputs
- Adjusting the volume level
- Sound effect presets
- Bass enhancement
- Mute function
- Disable the Audible Message
- Bluetooth operation
- Pairing a Bluetooth device
- During playback, you can:
- Note:
- Wall mounting the sound bar
- Wall mounting advice
- Specification
- Troubleshooting
- SAV
Brand : SCHNEIDER
Model : SC200SND
Category : Home Theater System