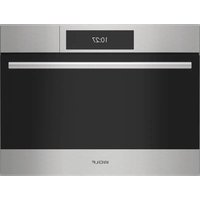
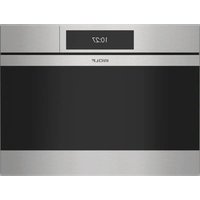
E Series SPO30PESPH - Oven WOLF - Free user manual and instructions
Find the device manual for free E Series SPO30PESPH WOLF in PDF.

| Product Type | Rapid Cook Oven (Microwave, Convection, Grill) |
| Brand | Wolf |
| Model | E Series SPO30PESPH |
| Microwave Power Levels | 10 levels (100% to 10%) |
| Cooking Modes | Manual Cooking, Convection, Grill, Micro Cook, Micro Roast, Auto Defrost, Popcorn, Beverages, Melt/Softener, Keep Warm, Add a Minute, Gourmet (Sensor Cook), Reheat |
| Control Type | Touch Controls with Digital Display |
| Control Lock | Yes (Control Lock) |
| Timer | Yes, up to 99 min 99 sec |
| Clock | Yes, 12h or 24h |
| Turntable | Yes, removable and dishwasher-safe |
| Racks and Supports | 2 racks and 2 supports included, dishwasher-safe |
| Interior Light | Yes |
| Exterior Material | Stainless Steel |
| Cleaning | Non-abrasive stainless steel cleaner; interior: soft damp cloth; racks and turntable: dishwasher |
| Safety | Control lock, automatic shut-off, adult supervision required |
| Warranty | 2 years parts and labor, 5 years limited on select parts |
Frequently Asked Questions - E Series SPO30PESPH WOLF
User questions about E Series SPO30PESPH WOLF
0 question about this device. Answer the ones you know or ask your own.
Ask a new question about this device
Download the instructions for your Oven in PDF format for free! Find your manual E Series SPO30PESPH - WOLF and take your electronic device back in hand. On this page are published all the documents necessary for the use of your device. E Series SPO30PESPH by WOLF.
USER MANUAL E Series SPO30PESPH WOLF
natural_image
Abstract white flame-like shape on red background (no text or symbols)WOLF
SPEED OVEN
Contents
4 SafetyPrecautions
8 Speed Oven Features
9 OvenOperation
20 CareRecommendations
21 Troubleshooting
23 Wolf Warranty
Customer Care
The model and serial number are printed on the enclosed product registration card. Both numbers are also listed on the product rating plate. Refer to page 8 for rating plate location. For warranty purposes, you will also need the date of installation and name of your authorized Wolf dealer. Record this information below for future reference.
SERVICE INFORMATION
| Model Number |
| Serial Number |
| Date of Installation |
| Certified Service Name |
| Certified Service Number |
| Authorized Dealer |
| Dealer Number |
If your product ever needs attention, be sure to use a Wolf Factory Certified Service provider recommended by our Customer Care Center, or select one from our list of providers available at wolfappliance.com/locator. All Factory Certified Service providers are carefully selected and thoroughly trained by us.
Important Note
To ensure this product is installed and operated as safely and efficiently as possible, take note of the following types of highlighted information throughout this guide:
IMPORTANT NOTE highlights information that is especially important.
CAUTION indicates a situation where minor injury or product damage may occur if instructions are not followed.
WARNING states a hazard that may cause serious injury or death if precautions are not followed.
IMPORTANT NOTE: Throughout this guide, dimensions in parentheses are millimeters unless otherwise specified.
IMPORTANT INSTRUCTIONS
IMPORTANT SAFETY INSTRUCTIONS: READ CAREFULLY AND KEEP FOR FUTURE REFERENCE.
- If food being heated begins to smoke, DO NOT OPEN THE DOOR. Turn off the unit, disconnect power at the circuit breaker, and wait until the food has stopped smoking. Opening the door while food is smoking may cause a fire.
- Only use microwave-safe containers and utensils. Do not leave the oven unattended when using disposable plastic, paper, or other combustible food containers.
- Clean the waveguide cover, oven cavity, turntable, and turntable support after use. These must be dry and free from grease. Built-up grease may overheat and begin to smoke or catch fire.
- The oven is intended for heating food and beverages. Drying of food or clothing and heating of warming pads, slippers, sponges, damp cloth, and similar may lead to risk of injury, ignition, or fire.
TO AVOID THE POSSIBILITY OF INJURY:
WARNING
Do not operate the oven if it is damaged or malfunctioning. Check the following before use:
a) The door: verify the door closes properly and ensure it is not misaligned or warped.
b) The hinges and door safety latches: verify they are not broken or loose.
c) The door seals and sealing surfaces: verify they have not been damaged.
d) Inside the oven cavity or on the door: verify there are no dents.
e) The power supply cord and plug: verify they are not damaged.
IMPORTANT INSTRUCTIONS
TO AVOID THE POSSIBILITY OF INJURY:
- Never adjust, repair, or modify the oven yourself.
- It is hazardous for anyone other than a competent person to carry out any service or repair operation, which involves the removal of a cover that gives protection against exposure to microwave energy.
- Do not allow grease or dirt to build up on the door seals and adjacent parts. Follow the instructions for Care Recommendations on page 20. Clean the oven at regular intervals and remove any food deposits. Failure to maintain the oven in a clean condition could lead to a deterioration of the surface that could adversely affect the life of the appliance and possibly result in a hazardous situation.
- Do not attempt to replace the oven lamp yourself or allow anyone who is not authorized to do so. If the oven lamp fails, contact Wolf Factory Certified Service.
TO AVOID THE DANGER OF FIRE:
IMPORTANT: If you are unsure how to connect the oven, please consult an authorized, qualified electrician.
- Do not operate the oven with the door open or alter the door safety latches in any way. Do not operate the oven if there is an object between the door seals and sealing surfaces.
- Neither the manufacturer nor the dealer can accept any liability for damage to the oven or personal injury resulting from failure to observe the correct electrical connection procedure.
IMPORTANT INSTRUCTIONS
TO AVOID THE POSSIBILITY OF EXPLOSION AND SUDDEN BOILING:
WARNING
Liquids and other foods must not be heated in sealed containers since they are liable to explode.
- Microwave heating of beverages can result in delayed eruptive boiling, therefore care has to be taken when handling the container.
- Do not cook eggs in their shells and whole hard boiled eggs should not be heated in microwave ovens since they may explode even after microwave cooking has ended. To cook or reheat eggs which have not been scrambled or mixed, pierce the yolks and the whites, or the eggs may explode. Shell and slice hard boiled eggs before reheating them in the microwave oven.
- To avoid burns, always test food temperature and stir before serving. Pay special attention to the temperature of food and drink given to babies, children, or the elderly.
- Keep children away from the door to prevent them from burning themselves.
- Never use sealed containers. Remove seals and lids before use. Sealed containers can explode due to a buildup of pressure even after the oven has been turned off. Take care when microwaving liquids. Use a wide-mouthed container to allow bubbles to escape.
- Pierce the skin of such foods as potatoes, sausages, and fruit before cooking or they may explode.
To prevent sudden eruption of boiling liquid and possible scalding:
• Stir liquid prior to heating or reheating.
- It is advisable to insert a glass rod or similar utensil into the liquid while reheating.
- Let liquid stand for at least 20 seconds in the oven at the end of cooking time to prevent delayed eruptive boiling.
IMPORTANT INSTRUCTIONS
TO AVOID MISUSE BY CHILDREN:
WARNING
The appliance and its accessible parts become hot during use. Children less than 8 years of age should be kept away unless continuously supervised.
- This appliance can be used by children aged from 8 years and above and persons with reduced physical, sensory, or mental capabilities or lack of experience and knowledge if they have been given supervision or instruction concerning use of the appliance in a safe way and understand the hazards involved. Children should be supervised to ensure that they do not play with the appliance.
- Cleaning and user maintenance should not be made by children unless they are aged from 8 years and above and supervised.
- This appliance is intended to be used in household and similar applications such as: staff kitchen areas in shops, offices, and other working environments; farm houses; by clients in hotels, motels, and other residential environments; bed-and-breakfast type environments.
TO AVOID THE POSSIBILITY OF ELECTRIC SHOCK:
- If the power supply cord of this appliance is damaged, it must be replaced with a special cord. The exchange must be made by Wolf Factory Certified Service.
TO AVOID THE POSSIBILITY OF BURNS:
- Do not lean or swing on the oven door. Do not play with the oven or use it as a toy. Children should be taught all important safety instructions: use of pot holders, careful removal of food coverings, and paying special attention to packaging (e.g. self-heating materials) designed to make food crisp, as they may be extra hot.
WARNING
PROPOSITION 65 FOR CALIFORNIA RESIDENTS
Cancer and Reproductive Harm—www.P65Warnings.ca.gov
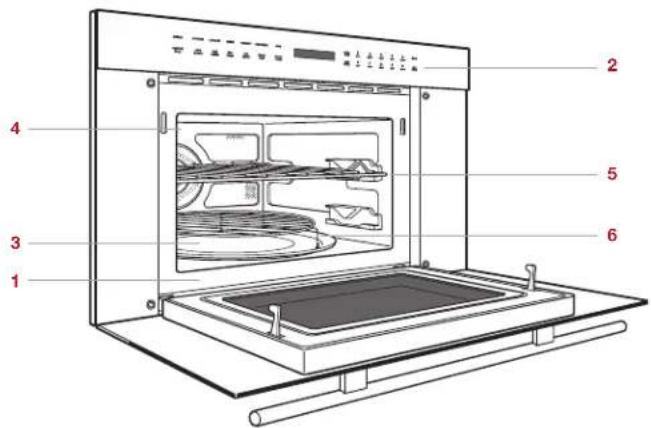
Speed Oven Features
FEATURES
| 1 | Product Rating Plate |
| 2 | Control Panel and Display |
| 3 | Turntable |
| 4 | Interior Lighting |
| 5 | Oven Rack (2)* |
| 6 | Oven Riser (2)* |
*Not used for microwave only cooking.
Getting Started
We know you are eager to start cooking, but before you do, please take some time to read this use and care guide. Whether you are an occasional cook or an expert chef, it will be to your benefit to familiarize yourself with the safety practices, features, operation, and care recommendations of your Wolf Speed Oven.
Clean the oven thoroughly with hot water and mild detergent. Rinse and dry with a soft cloth to remove any residual oil and grease left from the manufacturing process. Refer to Care Recommendations on page 20.
Speed Oven (SPO30TE/S/TH shown)
Control Panel
The control panel features touch controls and an interactive visual display. Refer to the illustration below.
CONTROL LOCK
The Control Lock feature prevents unwanted oven operation.
To Lock:
1 Touch Control Lock, then touch Start. "LOCK ON" appears on the control panel display.
To Unlock:
1 Touch Control Lock, then touch Start. "LOCK OFF" appears on the control panel display.
Oven Operation
CLOCK
The clock must be set prior to use and after a power outage.
Setting the Clock:
1 TouchStop/Clear.
2 Touch Timer/Clock once for 12-hour mode or twice for 24-hour mode.
3 Use the number pads to enter the time of day, then touch Start.
TIMER
The timer can be set for a maximum of 99 minutes and 99 seconds. Once a time is set, the countdown appears on the control panel display. The oven chimes, and "END" appears on the display when complete.
Setting the Timer:
1 TouchTimer/Clock.
2 Use the number pads to enter the timer duration.
3 Touch Start to begin.
4 Touch Stop/Clear to cancel.

other
| SETTINGS | POPCORN | BEVERAGE | REHEAT | GOVERNET | CONVECTION | BMOIL | |---|---|---|---|---|---|---| | CONTROL LOCK | AUTO DEFROST | MELT SOITEN | KEEP WARM | ADD MINUTE | MICRO BAKE | MICRO ROAST | | POWER LEVEL | 1 100" | 2 150" | 3 275" | 4 300" | 5 325" | START | | TINER CLOCK | 6 350" | 7 375" | 8 400" | 9 425" | 0 450" | STOP CLEAR | The chart displays a single bar representing the power level for each setting. The values are in milliohms (mm) and percentiles (percentiles).Control panel
Oven Operation
OVEN RACKS
To insert an oven rack, tilt the front of the rack upward and insert the back of the rack into the rack guides. Slide the rack back and angle the front of the rack downward to clear the rack stops. Continue to slide the rack back until completely inside the oven. Refer to the illustration below.
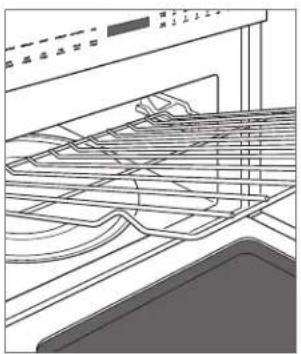
natural_image
Line drawing of a kitchen appliance interior showing shelves, grilles, and a sink (no text or symbols)Oven rack
Settings
The Settings feature allows the user to select individual preferences. Preferences must be reset after a power outage.
Touch 1 on the control panel to toggle up or 6 to toggle down to select preferences.
AUDIBLE SIGNAL
An audible signal chimes with every touch and upon cook time and timer completion.
To Eliminate the Signal:
1 TouchSettings.
2 Touch6.
3 Touch Start. "SOUND OFF" appears on the control panel display.
3 Touch Start. "SOUND ON" appears on the control panel display.
Settings
COOK TIME COMPLETION REMINDER
Upon completion, the oven chimes every ten seconds for the first minute; then every three minutes (for one hour) until Stop/Clear is touched.
To Eliminate the Reminder:
1 Touch Settings twice.
2 Touch6.
3 Touch Start. "REMIND SIGNAL OFF" appears on the control panel display.
To Restore the Reminder:
1 Touch Settings twice.
2 Touch1.
3 Touch Start. "REMIND SIGNAL ON" appears on the control panel display.
WEIGHT UNIT
For cooking modes where weight is required, the default unit of measure can be changed from pounds to kilograms.
To Change the Unit of Measure to Kilograms:
1 Touch Settings three times.
2 Touch6.
3 Touch Start. "KGS SET" appears on the control panel display.
To Change the Unit of Measure to Pounds:
1 Touch Settings three times.
2 Touch1.
3 Touch Start. "LBS SET" appears on the control panel display.
FACTORY SETTINGS
To Restore Factory Settings:
1 Touch Settings four times.
2 Touch Start. "FACTORY SETTINGS RESTORED" appears on the control panel display.
DEMONSTRATION MODE
Demonstration mode allows operation to be demonstrated without power to the speed oven.
To Enter Demonstration Mode:
1 Touch Settings five times.
2 Touch1.
3 Touch Start. "DEMO ON" appears on the control panel display. "DEMO" remains on the display.
To Exit Demonstration Mode:
1 Touch Settings five times.
2 Touch6.
3 Touch Start. "DEMO OFF" appears on the control panel display.
Manual Cooking
POWER LEVEL
The speed oven has ten preset power levels.
To Cook Manually at 100% Power:
1 Use the number pads to enter the desired cook time.
2 TouchStart.
3 The oven chimes and "END" appears on the control panel display when complete.
To cook manually at a power level less than 100%, touch Power Level, then use the number pads to select the desired power level. Refer to the chart below.
POWER LEVEL
| POWER LEVEL High 100% |
| POWER LEVEL, 9 90% |
| POWER LEVEL, 8 80% |
| POWER LEVEL, 7 Medium High 70% |
| POWER LEVEL, 6 60% |
| POWER LEVEL, 5 Medium 50% |
| POWER LEVEL, 4 40% |
| POWER LEVEL, 3 Medium Low | Defrost 30% |
| POWER LEVEL, 2 20% |
| POWER LEVEL, 1 Low 10% |
MULTIPLE SEQUENCE COOKING
The speed oven can be programmed for up to four automatic cooking sequences, switching between modes, temperatures, and power levels automatically (e.g. start at 100%, then switch to 50% power).
To Use Multiple Sequence Cooking:
1 Touch Power Level and enter the desired power level for the first cooking sequence (for 100%, touch Power Level a second time), then use the number pads to enter the desired cook time.
2 Touch Power Level, then touch 5, then use the number pads to enter a second cook time.
3 TouchStart.
ADD MINUTE
The Add Minute feature cooks for one minute at 100% by touching Add Minute. Touch multiple times to increase the cook time. Each touch increases the cook time by one minute. This feature cannot be used with Convection mode or Sensor Cooking.
Manual Cooking
KEEP WARM
The Keep Warm feature will keep food warm for up to 90 minutes.
To Use Keep Warm:
1 Touch Keep Warm.
2 Use the number pads to enter the desired keep warm time.
3 TouchStart.
4 Touch Stop/Clear to cancel.
POPCORN
The Popcorn feature has two options. Follow directions on the control panel display to select the desired option. Use only popcorn packaged for microwave ovens.
To Use Popcorn:
1 Touch Popcorn once for regular size packages or twice for snack size packages.
2 TouchStart.
BEVERAGE
The Beverage feature will reheat a beverage or prepare hot water for coffee or tea.
To Use Beverage:
1 TouchBeverage.
2 To reheat beverage: Touch 1, then touch 1 or 6 to select the amount in 12 cup increments, up to 2 cups.
For hot water: Touch 2, then touch 1 or 6 to select the amount in 1 cup increments, up to 6 cups.
3 TouchStart.
MELT/SOFTEN
The Melt/Soften feature will melt butter or chocolate and soften cream cheese or butter.
To Use Melt/Soften:
1 TouchMelt/Soften.
2 Melt butter: Touch 1, then touch 1 once for 2 tablespoons or twice for 12 cup.
Melt chocolate: Touch 2.
Soften cream cheese: Touch 3.
Soften butter: Touch 4.
3 TouchStart.
Manual Cooking
MANUAL CONVECTION
During convection cooking, hot air is circulated throughout the oven to brown and crisp foods quickly and evenly. To view the set temperature during cooking, touch Convection.
To Select Manual Convection:
1 Touch Convection if a temperature other than preset is desired, touch Convection again, then use the number pads to enter the temperature (e.g. 6 for 350^(175^) ).
2 Touch Start to begin preheat.
3 When preheat is complete, add food, enter the desired cook time, and touch Start.
BROIL
The Broil feature uses elements in the top of the oven cavity to provide direct heat to the top of foods for browning. Depending on the food, the high or low riser should be used on the turntable for best results using the Broil feature.
To Select Broil:
1 TouchBroil.
2 Use the number pads to enter the desired time.
3 TouchStart.
MICRO BAKE AND MICRO ROAST
The speed oven has two preset settings that make it easy to cook with both convection heat and microwave automatically. Microwave-safe or oven-safe bakeware may be used. With the exception of those foods that cook best by convection cooking alone, most foods are well suited to combination cooking using either Micro Bake or Micro Roast. Refer to the chart below.
The temperatures, which range from 100^ F ( 40^ C) to 450^ F ( 230^ C), can be changed; however, the power level cannot.
COMBINATION COOKING
SETTING TEMPERATURE POWER
Micro Bake 325°F (165°C) 10%
Micro Roast 300°F (150°C) 30%
To Select Combination Cooking:
1 Touch Micro Bake or Micro Roast. If a temperature other than the preset is desired, touch Micro Bake or Micro Roast again, then use the number pads to enter the temperature (e.g. 6 for 350°F (175°C)).
2 Touch Start to begin preheat.
3 When preheat is complete, add food, enter the desired cook time, and touch Start.
Sensor Cooking
GOURMET
The Gourmet feature detects moisture and humidity from food as it heats and automatically adjusts the cook time and power level. Fresh vegetables and poultry have two options. Follow directions on the control panel display to select the desired option. Refer to the Gourmet Guide on the following page.
To Select Gourmet:
1 Touch Gourmet, then use the number pads to select the desired food (e.g. 5 for baked potatoes).
2 TouchStart.
REHEAT
The Reheat feature uses a sensor to detect moisture and humidity from food as it reheats, and automatically adjusts the cook time and power level.
To Select Reheat:
1 TouchReheat.
2 TouchStart.
Gourmet Guide
NUMBER FOOD AMOUNT METHOD INSTRUCTIONS
| 1 Fresh Fruit and Vegetables—SoftBroccoli, Cauliflower,Cabbage, Brussels Sprouts,Spinach, and ZucchiniBaked Apples | 14-3 lb (115 g–1.4 kg)2–4 medium | Microwave Wash and place in a microwave-safe, non-metallic container. Cover with the lid or plastic wrap (pierce five times). After cooking, stir if possible. Let stand for 2–5 minutes, covered. | |
| 2 Fresh Vegetables—HardCarrots (sliced)Corn on the CobGreen BeansWinter Squash (diced)Winter Squash (halves) | 14-2 lb (115 g–.9 kg)2–4 pieces 14-2 lb (115 g–.9 kg) 14-2 lb (115 g–.9 kg)1–2 | Microwave Place in a microwave-safe, non-metallic container. Add 1–4 tablespoons (15–60 ml) water. Cover with the lid for tender vegetables. Use plastic wrap for tender-crisp vegetables. After cooking, stir if possible. Let stand for 2–5 minutes, covered. | |
| 3 Frozen Vegetables | 14-2 lb(115 g–.9 kg) | Microwave Place in a microwave-safe, non-metallic container. Do not add water. Cover with the lid or plastic wrap. After cooking, stir and let stand for 3 minutes, covered. | |
| 4 Frozen Entree 8 oz–3 lb | (227 g–1.4 kg) | Microwave Remove the contents from the package. Remove the outer wrapping and follow the package directions for covering. After cooking, let stand for 1–3 minutes, covered. | |
| 5 Baked Potatoes 1–6 medium Microwave Pierce each potato three times per side and place aroundthe perimeter of the turntable. After cooking, remove from the microwave, wrap in aluminum foil, and let stand for 5–10 minutes. | |||
| 6 Bacon 2–6 slices Microwave Place in a paper-towel-lined microwave-safe, non-metalliccontainer. Thick-cut bacon may require additional time to achieve the desired doneness. | |||
| 7 Hamburgers 2–4 patties | 14 lb (115 g) each | Broil and Microwave | Place burgers in a shallow oven-safe, glass container on a riser. |
| 8 Steaks 2 steaks | ^3/_4-1" (19–25) thick | Broil and Microwave | Place steaks in a shallow oven-safe, glass container on a riser. |
| 9 Ground Meat | 14-2 lb(115 g–.9 kg) | Microwave Place ground meat in a microwave-safe, non-metallic container and slightly separate the meat prior to cooking. Cover with plastic wrap (pierce five times). When the microwave stops, stir and chop the meat to break up large pieces. Cover and touch Start. After cooking, let stand for 2–3 minutes, covered. | |
Gourmet Guide
NUMBER FOOD AMOUNT METHOD INSTRUCTIONS
| 10 Chicken Pieces—Bone-InWing, Leg, Thigh, Breast 2–4 pieces | Broil and Microwave | Place chicken pieces in a shallow oven-safe, glass container on a high riser. After cooking, let stand for 5 minutes. The internal temperature should be at least 170^ ( 75^ ) for white meat and 180^ ( 80^ ) for dark meat. | |
| 11 Chicken Breasts—Boneless | 2–4 pieces | Broil and Microwave | Place chicken breasts in a shallow oven-safe, glass container on a high riser. After cooking, let stand for 5 minutes. The internal temperature should be at least 170^ ( 75^ ). |
| 12 Fish | ^1/_4-2 lb(115 g–.9 kg) | Microwave Arrange in a ring around a shallow microwave-safe, non-metallic container. Cover with plastic wrap (pierce five times). After cooking, let stand for 5 minutes, covered. | |
| 13 White Rice | ^1/_2-4 cups(95–512 g) | Microwave Place the rice into a microwave-safe, non-metallic container and add double the quantity of boiling water (e.g. 1 cup rice and 2 cups water). Cover with a lid or plastic wrap (pierce five times). After cooking, stir, cover, and let stand until all the liquid has been absorbed. | |
| 14 Cakes 1 cake | 9" pan | Convection and Microwave | Prepare according to package or recipe directions. Once preheat is complete, place in a 9" (229) oven-safe, glass container on the low riser. |
| 15 Cookies Up to 9 on a | 12" pan | Convection Prepare according to package or recipe directions and place on a 12" (305) pizza pan on the low riser. Cookies should be approximately 2" (51) for best results. | |
Defrost
AUTO DEFROST
The Auto Defrost feature uses preset settings to defrost select food items. Refer to the Auto Defrost Guide on the following page.
To Select Auto Defrost:
1 Touch Auto Defrost, then use the number pads to select the desired food (e.g. 3 for boneless poultry).
2 Use the number pads to enter the weight.
3 Touch Start. After a period of time, the oven will stop so food can be checked.
4 Open the door and turn food over.
5 Repeat until defrost is complete.
Auto Defrost Guide
NUMBER FOOD AMOUNT INSTRUCTIONS
| 1 Ground Meat | ^1/_2-2 lb (230 g–1.1 kg) | Remove any thawed pieces after each audible signal. Let stand for 5–10 minutes, covered. |
| 2 Steaks, Chops | ^1/_2-3 lb (230 g–1.4 kg) | After each audible signal, rearrange. If there are warm or thawed portions, shield with small flat pieces of aluminum foil. Remove any defrosted meat. Let stand for 10–15 minutes, covered. |
| 3 Boneless Poultry | ^1/_2-2 lb (230 g–.9 kg) | After each audible signal, rearrange. If there are warm or thawed portions, shield with small flat pieces of aluminum foil. Remove any defrosted meat. Let stand for 10–15 minutes, covered. |
| 4 Bone-in Poultry | ^1/_2-3 lb (230 g–1.4 kg) | After each audible signal, rearrange. If there are warm or thawed portions, shield with small flat pieces of aluminum foil. Remove any defrosted meat. Let stand for 10–15 minutes, covered. |
| 5 Roast 2–4 lb | (.9–1.8 kg) Start defrosting with the fat side down. After each audible signal, turn over and shield warm areas with aluminum foil. Let stand for 30-60 minutes, covered. | |
Care Recommendations
CLEANING
| Stainless Steel | Use a nonabrasive stainless steel cleaner and apply with a soft lint-free cloth. To bring out the natural luster, lightly wipe the surface with a water-dampened microfiber cloth followed by a dry polishing chamois. Always follow the grain of stainless steel. |
| Door Front Spray glass cleaner on a cloth to clean. | |
| Control Panel | Use a spray degreaser to remove fingerprints and food soil. Spray on a cloth before wiping the control panel.IMPORTANT NOTE: Do not spray cleaners directly on the control panel.To lock the control panel before cleaning, refer to page 9. |
| Interior | Wipe with a soft damp cloth. Do not use abrasive or harsh cleaners or scouring pads. For heavier soil, use baking soda or a mild soap; rinse thoroughly with hot water. Do not use chemical oven cleaners. |
| Oven Racks and Risers | Remove for cleaning. Wash in water with mild soap. For stubborn stains, use a mild cleanser and non-abrasive scouring sponge. The racks and risers are dishwasher-safe. |
| Turntable | Remove for cleaning. Wash in water with mild soap. For stubborn stains, use a mild cleanser and non-abrasive scouring sponge. The turntable is dishwasher-safe. |
| Waveguide Cover | Located on the inside top of the microwave interior. Carefully wipe with a soft damp cloth. Do not remove the waveguide cover. |
Troubleshooting
Oven does not operate.
- Verify power is on.
- Verify electrical power to the oven and home circuit breaker is on.
Food in the oven is not heating.
- Check the controls to verify the proper setting.
- The oven is in Demonstration mode. Refer to page 11 to cancel.
Time on the display counts down very rapidly.
- The oven is in Demonstration mode. Refer to page 11 to cancel.
The interior light does not work.
- Contact Wolf Factory Certified Service.
The touch controls will not operate.
- The control panel lock is on. Refer to page 9 to unlock.
The display flashes.
- Power outage. Touch Stop/Clear and reset the clock. If the oven was in use, reset the cooking function.
Radio or TV interference caused by the oven.
- Verify the oven is on a different electrical circuit, relocate the radio or TV as far away from the oven as possible, or check the position and signal of the antenna.
Service
- Maintain the quality built into your product by contacting Wolf Factory Certified Service. For the name of the nearest Wolf Factory Certified Service, check the contact and support section of our website, wolfappliance.com, or call Wolf Customer Care at 800-222-7820.
- When contacting service, you will need the model and serial number of your product. Both numbers are listed on the product rating plate. Refer to page 8 for rating plate location.
- For warranty purposes, you will also need the date of installation and name of your authorized Wolf dealer. This information should be recorded on page 3 of this guide.
Sub-Zero, Sub-Zero & Design, Sub-Zero & Snowflake Design, Dual Refrigeration, The Living Kitchen, Great American Kitchens The Fine Art of Kitchen Design, Wolf, Wolf & Design, Wolf Gourmet, W & Design, red colored knobs, Cove, and Cove & Design are registered trademarks and service marks of Sub-Zero Group, Inc. and its subsidiaries. All other trademarks are property of their respective owners in the United States and other countries.
Wolf Appliance Residential Limited Warranty
FOR RESIDENTIAL USE
FULL TWO YEAR WARRANTY\*
For two years from the date of original installation, this Wolf Appliance product warranty covers all parts and labor to repair or replace, under normal residential use, any part of the product that proves to be defective in materials or workmanship. All service provided by Wolf Appliance under the above warranty must be performed by Wolf factory certified service, unless otherwise specified by Wolf Appliance, Inc. Service will be provided during normal business hours.
LIMITED FIVE YEAR WARRANTY
For five years from the date of original installation, Wolf Appliance will repair or replace the following parts that prove to be defective in materials or workmanship: gas burners (excludes appearance), electric heating elements, blower motors (ventilation hoods), electronic control boards, magnetron tubes and induction generators. If the owner uses Wolf factory certified service, the service provider will repair or replace these parts with the owner paying for all other costs, including labor. If the owner uses non-certified service, the owner must contact Wolf Appliance, Inc. (using the information below) to receive repaired or replacement parts. Wolf Appliance will not reimburse the owner for parts purchased from non-certified service or other sources.
TERMS APPLICABLE TO EACH WARRANTY
The warranty applies only to products installed for normal residential use. The warranty applies only to products installed in any one of the fifty states of the United States, the District of Columbia or the ten provinces of Canada. This warranty does not cover any parts or labor to correct any defect caused by negligence, accident or improper use, maintenance, installation, service or repair.
THE REMEDIES DESCRIBED ABOVE FOR EACH WARRANTY ARE THE ONLY ONES THAT WOLF APPLIANCE, INC. WILL PROVIDE, EITHER UNDER THIS WARRANTY OR UNDER ANY WARRANTY ARISING BY OPERATION OF LAW. WOLF APPLIANCE, INC. WILL NOT BE RESPONSIBLE FOR ANY CONSEQUENTIAL OR INCIDENTAL DAMAGES ARISING FROM THE BREACH OF THIS WARRANTY OR ANY OTHER WARRANTY, WHETHER EXPRESS, IMPLIED OR STATUTORY.
Some states do not allow the exclusion or limitation of incidental or consequential damages, so the above limitation or exclusion may not apply to you. This warranty gives you specific legal rights and you may also have other legal rights that vary from state to state.
To receive parts and/or service and the name of Wolf factory certified service nearest you, contact Wolf Appliance, Inc., P.O. Box 44848, Madison, WI 53744; check the contact & support section of our website, wolfappliance.com, email us at customerservice@subzero.com or call 800-222-7820.
*Stainless steel (doors, panels, handles, product frames and interior surfaces) are covered by a limited 60-day parts and labor warranty for cosmetic defects.
*Replacement filters for ventilation hood recirculating kits are not covered by the product warranty.
WOLF
Contenido
natural_image
Line drawing of an oven interior with ventilation grilles and a control panel (no text or symbols)Rejilla del horno
Configuración
natural_image
Line drawing of an oven interior with ventilation grilles and a tray (no text or symbols)Grille du four
Settings (réglages)
KEEP WARM (GARDER AU CHAUD)
WOLF APPLIANCE, INC. P.O. BOX 44848 MADISON, WI 53744 WOLFAPPLIANCE.COM 800.222.7820
9021483 REV-A 12/2018