
CSO2450CMS - Oven WOLF - Free user manual and instructions
Find the device manual for free CSO2450CMS WOLF in PDF.

| Product Type | Steam and Convection Oven |
| Brand | Wolf |
| Model | CSO2450CMS |
| Width | 24 in (61 cm) |
| Cooking Modes | Steam, Convection, Moist Convection, Steam and Convection, Broil, Slow Roast, Bread and Pastry, Proof, Sous Vide, Reheat, Keep Warm, Gourmet, Gourmet+, Bake, Clean, Steam Clean |
| Temperature Range | 86 °F – 445 °F (30 °C – 230 °C) depending on mode |
| Control Panel | Color Touchscreen |
| Water Reservoir | Removable, capacity for 4 hours of continuous steam (24 in model) |
| Probe | Included, to measure internal food temperature |
| Programmable Functions | Timed cooking, delayed start, independent timer |
| Racks | 4 positions, full-extension racks (positions 1-3) and standard (position 4) |
| Lighting | LED interior oven light |
| Door | Removable for cleaning, with rest position |
| Cleaning | Steam Clean mode (30 min at 175 °F), automatic descaling |
| Water Hardness | Adjustable, test strip included |
| Available Languages | English, Spanish, French, Italian, German, Dutch, Chinese |
| Display Lock | Yes, for cleaning |
| Power Supply | 240 V / 60 Hz (standard estimate) |
| Weight | Approximately 45 kg (estimate) |
| Warranty | 2 years full, 5 years limited on certain parts |
Frequently Asked Questions - CSO2450CMS WOLF
User questions about CSO2450CMS WOLF
0 question about this device. Answer the ones you know or ask your own.
Ask a new question about this device
Download the instructions for your Oven in PDF format for free! Find your manual CSO2450CMS - WOLF and take your electronic device back in hand. On this page are published all the documents necessary for the use of your device. CSO2450CMS by WOLF.
USER MANUAL CSO2450CMS WOLF
Convection Steam Oven
Use and Care Guide
CLEANING, MAINTENANCE, AND MORE

Contents
3 Convection Steam Oven
4 Safety Precautions
6 Convection Steam Oven Features
7 Oven Operation
15 Care Recommendations
18 Troubleshooting
19 Wolf Warranty
Customer Care
The model and serial number are printed on the enclosed product registration card. Both numbers are also listed on the product rating plate. Refer to page 6 for rating plate location. For warranty purposes, you will also need the date of installation and name of your authorized Wolf dealer. Record this information below for future reference.
SERVICE INFORMATION
| Model Number |
| Serial Number |
| Date of Installation |
| Certified Service Name |
| Certified Service Number |
| Authorized Dealer |
| Dealer Number |
If your product ever needs attention, be sure to use a Wolf Factory Certified Service provider recommended by our Customer Care Center, or select one from our list of providers available at wolfappliance.com/locator. All Factory Certified Service providers are carefully selected and thoroughly trained by us.
Important Note
To ensure this product is installed and operated as safely and efficiently as possible, take note of the following types of highlighted information throughout this guide:
IMPORTANT NOTE highlights information that is especially important.
CAUTION
Indicates a situation where minor injury or product damage may occur if instructions are not followed.
WARNING
States a hazard that may cause serious injury or death if precautions are not followed.
IMPORTANT NOTE: Throughout this guide, dimensions in parentheses are millimeters unless otherwise specified.
IMPORTANT INSTRUCTIONS
GENERAL SAFETY PRECAUTIONS
- Read this guide carefully before using this appliance to reduce risk of fire, electric shock, or injury.
- This appliance must be properly installed and serviced by a qualified installer or service agency and grounded by a qualified technician.
- Clean only those parts listed in this guide.
- Do not use oven cleaners. No commercial oven cleaner or oven liner protective coating of any kind should be used in or around any part of the oven.
- Do not touch heating elements or interior surfaces of oven. Heating elements may be hot even though they are dark in color. Interior surfaces become hot enough to cause burns. During and after use, do not touch or let clothing or other flammable materials contact heating elements or interior surfaces of the oven until they have had sufficient time to cool. Other surfaces of the appliance may become hot enough to cause burns (for example, oven vent openings and surfaces near these openings, oven doors, and windows of oven doors).
-
Exercise caution when opening the oven door. Let hot air or steam escape before looking or reaching into the oven.
-
Be sure that the oven cool air intake and oven exhaust vent (located below the door) are unobstructed at all times.
- Always use dry pot holders when removing pans from this appliance. Wet or damp pot holders can cause steam burns. Do not use a towel or bulky cloth in place of pot holders.
- Position oven racks in the desired locations when the oven is cool. If a rack must be repositioned after the oven is already hot, be sure the pot holder does not contact a hot heating element in the oven.
- Do not repair or replace any part of this appliance unless specifically recommended in literature accompanying this appliance.
- Do not use aluminum foil to line any part of this appliance.
- Never use this appliance to warm or heat the room.
- Do not use water on grease fires. Smother the flame or use a dry chemical or foam-type extinguisher.
IMPORTANT INSTRUCTIONS
GENERAL SAFETY PRECAUTIONS
- Do not leave children alone or unattended in the area where this appliance is in use. Never allow children to sit or stand on the appliance.
- Do not store items of interest to children above or at the back of this appliance, as they could climb on the appliance to reach items and be injured.
- Do not heat unopened food containers, such as baby food jars and cans. Pressure build-up may cause the container to burst and cause injury.
- Do not store or use gasoline or other flammable vapors and liquids in the vicinity of this or any other appliance.
- Do not clean the oven gasket; rubbing or moving the gasket may compromise the door seal.
- Do not use a steam cleaner to clean this appliance.
- Wear proper apparel. Loose-fitting or hanging garments should never be worn while using this appliance.
- Do not use harsh abrasive cleaners or sharp metal scrapers to clean the oven door glass.
WARNING
PROPOSITION 65 FOR CALIFORNIA RESIDENTS
Cancer and Reproductive Harm—www.P65Warnings.ca.gov
CAUTION
Handleless Models
• Children aged 3 years and under must be kept away from the appliance.
• Children between 3 and 8 years of age must be kept away from the appliance unless they are continuously supervised.
- This appliance can be used by children aged from 8 years and above if they have been given instruction or are supervised.
• Children shall not play with the appliance.
• Children shall not carry out cleaning and user maintenance of the appliance without supervision.
- The responsibility thus lies with the supervisor.
SAVE THESE INSTRUCTIONS
Convection Steam Oven Features
FEATURES
| 1 | Product Rating Plate |
| 2 | Touchscreen |
| 3 | Adjustable Oven Racks |
| 4 | Convection Fan |
| 5 | Temperature Probe Receptacle |
| 6 | LED Lighting |
| 7 | Water Tank Access Door |
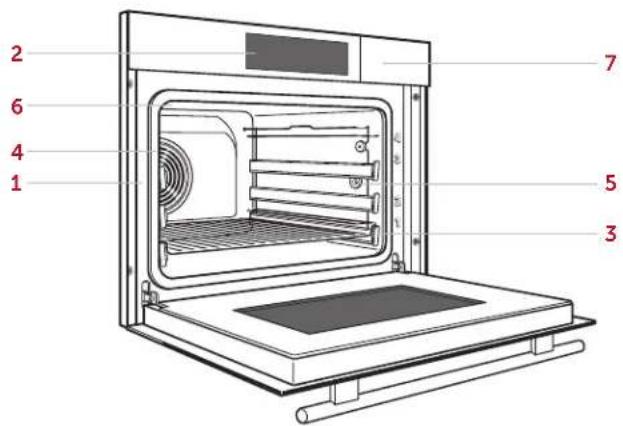
Convection Steam Oven (CSO2450TE/S/T shown)
Getting Started
We know you are eager to start cooking, but before you do, please take some time to read this use and care guide. Whether you are an occasional cook or an expert chef, it will be to your benefit to familiarize yourself with the safety practices, features, operation, and care recommendations of your Wolf Convection Steam Oven.
Prior to Use
Prior to use, use the test strip provided to determine the water hardness. The oven defaults to hard water.
Follow the steps below to ensure all residual oil from the manufacturing process has been removed.
Prior to Use:
1 Clean the oven thoroughly with hot water and a mild detergent.
2 Rinse and dry with a soft cloth.
3 Turn on kitchen ventilation. Some smoke and odor is normal.
4 Fill and install the water tank.
5 Select the desired language, date, clock, temperature units, and water hardness, then rinse the water system (plumbed models only), and initiate the burn-in process. The burn-in process takes approximately 30 minutes.
After Each Use:
1 Touch and hold

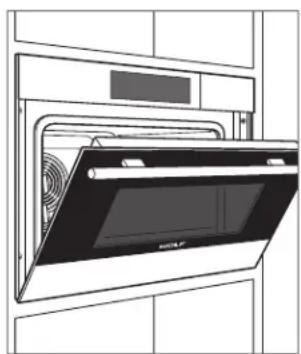
2 Open the door to the at-rest position and allow to cool. For handleless models, press and hold ✗. Refer to the illustration below.
3 Once cool, wipe the interior dry.
4 Close the door.
natural_image
Line drawing of an oven with a rack and fan, no text or symbols presentDoor at-rest position
Touchscreen
The touchscreen utilizes touch technology to select modes and other functions. Refer to the illustration below. To turn on the touchscreen, touch and hold for 2 seconds.
To reposition modes, press and hold the mode on the touchscreen, then move to the desired location. If an existing mode is in the desired location, it must be repositioned first.
Touch ← to go back or touch to return to the home screen.
Handleless Models
For handleless models, touch ✗ to open or close the door. An audible tone indicates the door is moving. The tone cannot be disabled. The door can be opened or closed manually at any time.
Extended Options
Touch to access the extended options, then touch the desired option. Follow the instructions on the touchscreen.
SETTING OPTIONS
Language Select: English, Spanish, French, Italian, German, Dutch, or Chinese.
Display Lock Lock touchscreen for cleaning.
Display Select brightness and standby screen.
Sound Select quiet mode, touch screen pitch, keypad volume, and feedback tones.
Individual Settings Select temperature units.
Water Hardness Select water hardness.
Assistance Functions Select water tank door, illumination, and preheat tone.
Date and Clock Set date and select 12 hour or 24 hour.
Appliance Information Access product information.
Factory Settings Reset to factory settings.
Service For service only.
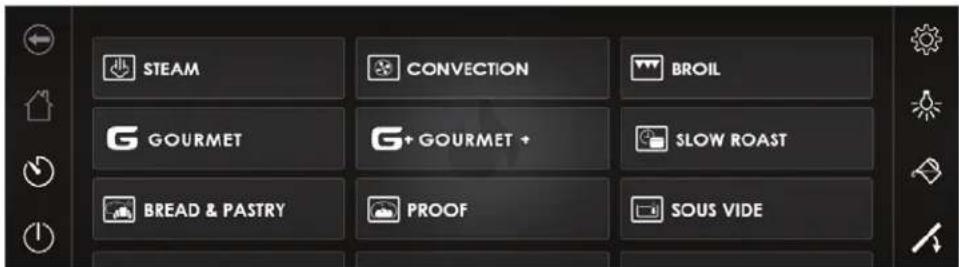
Home screen (handleless model shown)
Modes
Selecting a Mode:
1 Select the desired mode, then touch Ok.
2 Touch Start to select the preset temperature or touch the preset temperature and use the number pad to input the desired temperature.
3 Touch Set.
4 Touch Start.
5 Touch Stop to end operation. "The operation has finished. Do you want to proceed with a subsequent step?" appears on the touchscreen (not available for all modes).
Subsequent modes are intended to continue cooking with the previous operation or to brown the top of food. Touch Yes to add a subsequent step, or touch No to return to the home screen. To turn off the oven, touch and hold ⏻.
FAVORITES
Commonly used modes or foods can be saved for easy access. Up to 50 favorites can be stored at a time.
Creating a Favorite:
1 Select the desired mode and temperature.
2 Touch .
3 Use the keypad to enter a name.
4 Touch Set.
Modifying a Favorite:
1 Touch the desired Favorite.
2 To modify the name, touch the name field. To modify all other settings, touch Change.
3 Use the keypad to modify, then touch Set.
4 To delete a favorite, touch Delete.
Options
Timed Cook: Set a timed cook or delayed start.
Preheat: Pulses the oven light 3 times and provides a message on the touchscreen when preheat is complete (not available on all modes).
Food Probe Temperature: Set food probe temperature.
Auto Program
TIMED COOK
Timed Cook automatically turns the oven off at a specified time. The oven begins to heat immediately and turns off at the desired stop time. The clock must be set to the correct time to function properly. Use in any cooking mode except Gourmet+.
Setting Controls:
1 Select the desired cooking mode and temperature.
2 Touch Options.
3 Touch Timed Cook.
4 Enter the desired cooking duration, then touch Set.
5 Touch Ok, then touch Start.
6 The oven turns off automatically when the cook time is complete.
DELAYED START
Delayed start automatically turns the oven on and off at specified times. The oven remains idle until the desired start time and turns off at the desired stop time. The clock must be set to the correct time to function properly. Use in any cooking mode except Warm.
Setting Controls:
1 Select the desired cooking mode and temperature.
2 Touch Options.
3 Touch Timed Cook.
4 Enter the desired stop time and cooking duration, then touch Set.
5 Touch Ok, then touch Start.
6 The oven turns off automatically when the cook time is complete.
Oven Operation
WATER TANK
IMPORTANT NOTE: The unit needs minerals in the water to operate. Do not use demineralized, filtered, or distilled water. Use fresh, cold tap water. For a whole house water filtration system, use bottled drinking water.
Touch to open the water tank access door.
The water tank holds enough water for four hours of continuous steam for 24" models and two hours for 30" models.
When a non-plumbed oven is turned off, water is pumped back into the tank once the water temperature is below 175^ F ( 80^ C). If the tank needs to be filled during operation, limit the amount of water to less than two cups to prevent overflow when water is pumped back into the tank.
TIMER
The timer can be set for a maximum of 99 hours and 59 minutes. Once the timer is set, the countdown appears on the touchscreen. The timer is independent from the oven. Setting the timer does not affect cook time or stop time.
Setting Timer:
1 Touch

2 Use the keypad to enter the desired time.
3 Touch Start.
4 To stop or adjust the timer, touch the countdown timer on the touchscreen. Enter the desired time, then touch Start. To stop the timer, touch Stop.
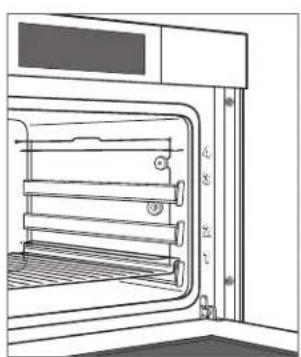
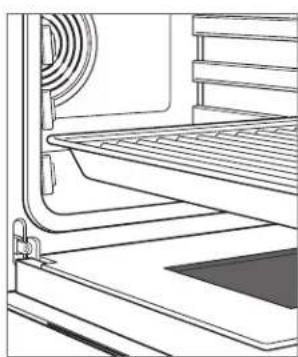
OVEN RACK POSITION
The oven racks can be placed in any of the four positions labeled on the front face of the oven. Refer to the illustration below. Rack positions 1–3 are full-extension and rack position 4 is standard. Verify the full-extension racks are pushed all the way back before closing the door.
OVEN PAN PLACEMENT
Insert the pans with the angled side toward the back. Refer to the illustration below.
IMPORTANT NOTE: Use the stainless steel pans for temperatures below 300°F (150°C). Use the enameled broiler pan for temperatures above 300°F (150°C).
natural_image
Technical line drawing of an oven with labeled parts (no text or symbols present)Oven rack position
natural_image
Line drawing of a kitchen appliance with a rack and ventilation system (no text or symbols)Oven pan placement
Oven Operation
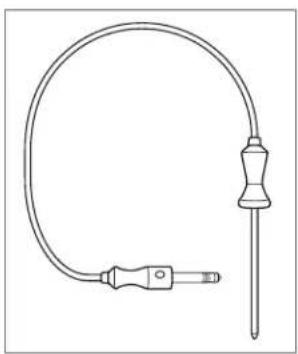
TEMPERATURE PROBE
Use only the black temperature probe shipped with this appliance. Refer to the illustration below. The temperature probe measures the internal temperature of food while cooking. It can be used with all cooking modes except Gourmet+, Warm, Proof, Reheat Humid, and Reheat Crispy. When the temperature probe is installed, the actual probe temperature is displayed.
IMPORTANT NOTE: The temperature probe receptacle is located on the right for 24" (60 cm) models and the left for 30" (76 cm) models.
CAUTION
Use only the probe shipped with this oven. Do not use a probe from any other appliance.
natural_image
Line drawing of a medical or laboratory probe device with a curved tube and connector (no text or symbols)Temperature probe
Setting controls:
1 Insert the probe into the thickest area of food.
2 Place the food in the oven and insert the connector into the receptacle. Refer to the illustration below.
3 Select the desired cooking mode.
4 Touch Options, then touch Probe Temperature.
5 Use the number pad to enter the desired temperature.
6 Touch Set.
The probe set point appears on the touchscreen next to the actual probe temperature. To adjust the probe temperature, repeat steps 4–6.
CAUTION
The probe and probe receptacle will be very hot. Handle with care.
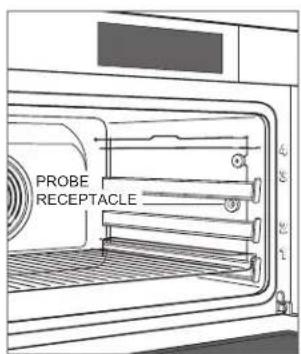
Probe receptacle location (24" model shown)
Cooking Modes
MODE ICON RANGE DESCRIPTION
| Steam | 86-210°F Uses steam only. Ideal for seafood, vegetables, and rice. | ||
| Convection | 90-445°F | Evenly cooks and browns food while reducing cook time. Ideal for multi-rack cooking. | |
| Convection Humid 90-445°F | Oven seals to retain moisture and uses convection. Ideal for quick breads and casseroles. | ||
| Convection Steam 180-445°F | Uses steam and convection. Ideal for maintaining moist interior while evenly browning and crisping. | ||
| Broil* | Low, Medium, High Uses broil element to intensely sear and brown food. | ||
| Slow Roast† | - | Automatically roasts food, optimizing to selected doneness and desired completion time. | |
| Bread & Pastry | 180-445°F Uses steam, then convection, for a tender interior and crisp exterior. | ||
| Proof | 77-104°F Oven maintains a consistent temperature that is ideal for proofing dough. | ||
| Sous Vide | 86-203°F Uses steam. For food sealed in bag and cooked to a precise temperature. | ||
| Reheat | 180-390°F Rehydrates and crisps food. | ||
| Warm | 140-210°F Uses convection to keep cooked, hot food warm. | ||
| Gourmet | - | Provides recommendations for cooking mode and rack position for select foods. Temperature and cook time are dependent on desired doneness. | |
| Gourmet+ - | Optimizes cook time, temperature, and humidity throughout the cooking cycle to automatically cook select foods. | ||
| Wellness 122-280°F | Uses steam and convection to warm towels, stones, and other items used for massage or relaxation. | ||
| Cleanse | 210°F Uses steam to cleanse items like baby bottles and canning jars. | ||
| Steam Clean | 176°F For routine oven cleaning, including steam cleaning and the descale cycle. | ||
*Allow to preheat for three minutes. † Probe required to automatically adjust cook time and temperature.
Cooking Modes
GOURMET
Gourmet provides a variety of quick and convenient meal preparations. Gourmet also provides recommendations for ideal rack positions and tips to ensure cooking confidence.
FOOD
| Baked Dishes and Gratins |
| Bakery Products |
| Dairy Products |
| Desserts |
| Eggs |
| Fish and Seafood |
| Meat |
| Poultry |
| Sides |
| Vegetables |
Setting Gourmet:
1 Touch
2 Touch the desired food.
3 Follow the instructions on the touchscreen.
4 Touch Set, then touch Start.

GOURMET+
Use Gourmet+ to prepare any of the foods listed below, fresh or refrigerated. Select the food and desired doneness, and the sensor automatically adjusts time, temperature, and humidity so no baking instructions are required.
FOOD
| Fresh Appetizers |
| Braided Bread |
| Bread |
| Gratin |
Setting Gourmet+:
1 Touch
2 Touch the desired food.
3 Follow the instructions on the touchscreen.
4 Touch Set, then touch Start.

Care Recommendations
DESCALE
Descale lasts approximately 45 minutes. Depending on water conditions, the oven may need to be descaled every 6–18 months. The duration between notifications is based on the water hardness specified in Extended Options. To adjust water hardness levels, refer to page 8.
Use only Durgol® Swiss Steamer descaling solution and follow the manufacturer instructions.
CAUTION
Failure to dilute the descaling solution before discarding may discolor the sink and drain.
Setting Descale:
1 Touch Steam Clean.
2 Touch Descale, then touch Ok.
3 Touch Start. The flame icon on the touchscreen fills as the water system automatically empties. The water tank access door opens automatically when the process is complete.
4 Remove the water tank. "Empty the water tank and fill with 16 oz (500 mL) of descaling solution." appears on the touchscreen.
5 Add the descaling solution to the water tank, install the tank, then close the access door.
6 After approximately thirty minutes, the water access door opens and "Empty the water tank and fill with 32 oz (1 L) of tap water" appears on the touchscreen.
7 Remove the water tank, turn on the sink faucet, and pour the water tank contents down the drain.
8 Fill the tank with warm water, then install the tank. Depending on the level of soil in the rinse water, the oven determines whether additional rinse cycles are necessary. Follow instructions on the touchscreen.
9 "Appliance rinsed. Discard the rinsing solution, and dry the oven interior and water tank" appears on the touchscreen when the rinse process is complete.
10 For non-plumbed models, fill and install the water tank, then close the access door. For plumbed models, install the water tank and close the access door.
11 "The process was done successfully" appears on the touchscreen when the process is complete. Touch Ok.
Care Recommendations
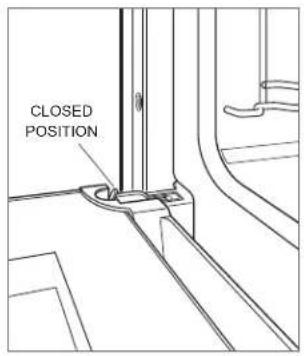
OVEN DOOR REMOVAL
The oven door can be removed for a thorough cleaning.
To remove, open the oven door completely. Rotate both hinge latches forward to the open position. Close the door to the at-rest position (press and hold ✗ for handle-less models), then lift up and out. Refer to the illustrations below.
To reinstall, insert door hinges into the frame openings. Open the oven door completely and rotate both hinge latches back to the closed position.
natural_image
Line drawing of an oven with a rack and ventilation system (no text or symbols)Door at-rest position
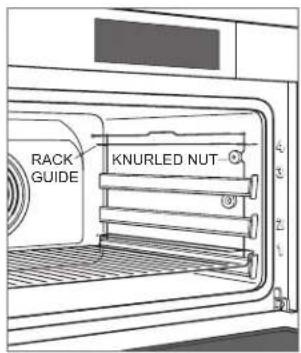
RACK GUIDE REMOVAL
To remove rack guides, unscrew the knurled nut on the front of the rack guide. Pull the rack guide to the side of the threaded stud and remove from the front. Refer to the illustration below.
FILTER (PLUMBED MODELS ONLY)
The filter can be removed for a thorough cleaning. Place the filter over the drain when finished cleaning. Refer to the illustration below.
Rack guide removal
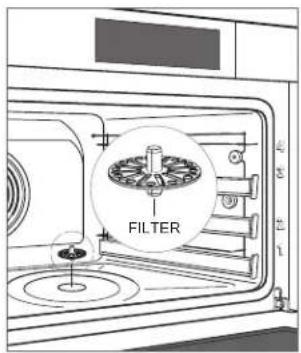
Filter location
Care Recommendations
CLEANING
| Stainless steel | Use a nonabrasive stainless steel cleaner and apply with a soft lint-free cloth. To bring out the natural luster, lightly wipe the surface with a water-dampened microfiber cloth followed by a dry polishing chamois. Always follow the grain of stainless steel. |
| Door front Spray glass cleaner on a cloth to clean. | |
| Touchscreen | Use a spray degreaser to remove fingerprints and food soil. Spray on a cloth before wiping the touch-screen. Do not spray cleaners directly onto the touchscreen. |
| Interior | For general cleaning, initiate Steam Clean mode at 175°F (80°C) for 30 minutes. This will loosen fat and cooking debris from the oven. Turn the oven off and wipe the interior with a cloth. Use a damp cloth and lemon juice to wipe away water and blue tarnish spots. |
| Rack guides | Remove and place on a flat surface near the sink. Clean with hot water and mild detergent or paste of baking soda and water. Do not immerse in water or use a degreaser. Towel dry. |
| Oven racks and stainless steel pans | The oven racks and stainless steel pans can be cleaned in the dishwasher. |
| Water tank | Water marks and calcium build-up can be removed using a standard descaling solution. Do not clean the water tank in the dishwasher. |
| Temperature probe | Wipe with a cloth and water. Mild detergent may be used for tough stains. Do not submerge the probe in water or clean in the dishwasher. |
Enameled broiler pan Clean with hot water and mild detergent or paste of baking soda and water.
Troubleshooting
OPERATION
Oven does not operate.
- Verify power is on.
- Verify electrical power to the oven and home circuit breaker is on.
E78 and F24 appear on the touchscreen.
- Pour water down the drain.
- Clean the drain filter.
Oven makes sounds during operation.
- The oven may emit switching and pumping sounds during operation. These sounds are normal.
Oven pans are difficult to remove.
- Some combinations of heat, moisture, and food placement may cause oven pans to warp. Pans will return to their original shape when cool.
Handleless door doesn't open/close automatically.
- Open and close the door manually, then touch ⚠️.
"Do Not Remove Water Tank" appears on the touchscreen.
- Water in the boiler is not pumped off until the water temperature drops below 175°F (80°C).
"Boiler Scaled Up, Please Descale!" appears on the touchscreen.
- Descale the oven. Refer to page 15.
"Appliance Blocked, Descaling Necessary" appears on the touchscreen.
- Descale the oven. Refer to page 15. If the message does not disappear after descaling, contact Wolf Factory Certified Service.
SERVICE
- Maintain the quality built into your product by contacting Wolf Factory Certified Service. For the name of the nearest Wolf Factory Certified Service, check the Product Support section of our website, wolfappliance.com, or call Wolf Customer Care at 800-222-7820.
- When contacting service, you will need the model and serial number of your product. Both numbers are listed on the product rating plate. Refer to page 6 for rating plate location.
- For warranty purposes, you will also need the date of installation and name of your authorized Wolf dealer. This information should be recorded on page 3.
Wolf Appliance Residential Limited Warranty
FOR RESIDENTIAL USE
FULL TWO YEAR WARRANTY\*
For two years from the date of original installation, this Wolf Appliance product warranty covers all parts and labor to repair or replace, under normal residential use, any part of the product that proves to be defective in materials or workmanship. All service provided by Wolf Appliance under the above warranty must be performed by Wolf Factory Certified Service, unless otherwise specified by Wolf Appliance, Inc. Service will be provided during normal business hours.
LIMITED FIVE YEAR WARRANTY
For five years from the date of original installation, Wolf Appliance will repair or replace the following parts that prove to be defective in materials or workmanship: gas burners (excludes appearance), electric heating elements, blower motors (ventilation hoods), electronic control boards, magnetron tubes and induction generators. If the owner uses Wolf Factory Certified Service, the service provider will repair or replace these parts with the owner paying for all other costs, including labor. If the owner uses non-certified service, the owner must contact Wolf Appliance, Inc. (using the information below) to receive repaired or replacement parts. Wolf Appliance will not reimburse the owner for parts purchased from non-certified service or other sources.
TERMS APPLICABLE TO EACH WARRANTY
The warranty applies only to products installed for normal residential use. The warranty applies only to products installed in any one of the fifty states of the United States, the District of Columbia or the ten provinces of Canada. This warranty does not cover any parts or labor to correct any defect caused by negligence, accident or improper use, maintenance, installation, service or repair.
THE REMEDIES DESCRIBED ABOVE FOR EACH WARRANTY ARE THE ONLY ONES THAT WOLF APPLIANCE, INC. WILL PROVIDE, EITHER UNDER THIS WARRANTY OR UNDER ANY WARRANTY ARISING BY OPERATION OF LAW. WOLF APPLIANCE, INC. WILL NOT BE RESPONSIBLE FOR ANY CONSEQUENTIAL OR INCIDENTAL DAMAGES ARISING FROM THE BREACH OF THIS WARRANTY OR ANY OTHER WARRANTY, WHETHER EXPRESS, IMPLIED OR STATUTORY.
Some states do not allow the exclusion or limitation of incidental or consequential damages, so the above limitation or exclusion may not apply to you. This warranty gives you specific legal rights and you may also have other legal rights that vary from state to state.
To receive parts and/or service and the name of Wolf Factory Certified Service nearest you, contact Wolf Appliance, Inc., P.O. Box 44848, Madison, WI 53744; check the Product Support section of our website, wolfappliance.com, email us at customerservice@subzero.com or call 800-222-7820.
*Stainless steel (doors, panels, handles, product frames and interior surfaces) are covered by a limited 60-day parts and labor warranty for cosmetic defects.
*Replacement filters for ventilation hood recirculating kits are not covered by the product warranty.

Contenido
natural_image
Line drawing of an oven with a mounted dish inside, showing airflow or ventilation (no text or symbols)natural_image
Technical line drawing of an oven with internal structure and mounting brackets (no text or symbols)natural_image
Line drawing of a kitchen interior showing a grater and stainless steel counter (no text or symbols)natural_image
Line drawing of a medical or laboratory probe device with a curved tube and connector (no text or symbols)Sonda de temperatura
natural_image
Line drawing of an open oven with fan and door, no text or symbols presentnatural_image
Line drawing of an oven with a mounted dish inside, showing airflow or ventilation (no text or symbols)natural_image
Technical line drawing of an oven with numbered components (no text or symbols)natural_image
Line drawing of a kitchen appliance with a grater and side panel (no text or symbols)natural_image
Line drawing of a medical or laboratory probe device with a curved tube and connector (no text or symbols)Sonde à coeur
natural_image
Line drawing of an open oven with a digital display and fan (no text or symbols)WOLF APPLIANCE, INC. P.O. BOX 44848 MADISON, WI 53744 WOLFAPPLIANCE.COM 800.222.7820
9052128 REV-B 5/2023


- Convection Steam Oven
- Use and Care Guide
- Contents
- Customer Care
- Important Note
- CAUTION
- WARNING
- IMPORTANT INSTRUCTIONS
- GENERAL SAFETY PRECAUTIONS
- PROPOSITION 65 FOR CALIFORNIA RESIDENTS
- Handleless Models
- SAVE THESE INSTRUCTIONS
- Convection Steam Oven Features
- Getting Started
- Prior to Use
- Prior to Use:
- After Each Use:
- Touchscreen
- Extended Options
- SETTING OPTIONS
- Modes
- Selecting a Mode:
- FAVORITES
- Creating a Favorite:
- Modifying a Favorite:
- Options
- Auto Program
- TIMED COOK
- Setting Controls:
- DELAYED START
- Oven Operation
- WATER TANK
- TIMER
- Setting Timer:
- OVEN RACK POSITION
- OVEN PAN PLACEMENT
- TEMPERATURE PROBE
- Cooking Modes
- GOURMET
- Setting Gourmet:
- GOURMET+
- Setting Gourmet+:
- Care Recommendations
- DESCALE
- Setting Descale:
- OVEN DOOR REMOVAL
- RACK GUIDE REMOVAL
- FILTER (PLUMBED MODELS ONLY)
- Troubleshooting
- OPERATION
- Oven does not operate.
- E78 and F24 appear on the touchscreen.
- Oven makes sounds during operation.
- Oven pans are difficult to remove.
- Handleless door doesn't open/close automatically.
- "Do Not Remove Water Tank" appears on the touchscreen.
- "Boiler Scaled Up, Please Descale!" appears on the touchscreen.
- "Appliance Blocked, Descaling Necessary" appears on the touchscreen.
- SERVICE
- Wolf Appliance Residential Limited Warranty
- FOR RESIDENTIAL USE
- FULL TWO YEAR WARRANTY\*
- LIMITED FIVE YEAR WARRANTY
- TERMS APPLICABLE TO EACH WARRANTY
- Contenido
Brand : WOLF
Model : CSO2450CMS
Category : Oven