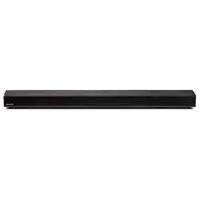
Cadence & Verse - Soundbar Martin Logan - Free user manual and instructions
Find the device manual for free Cadence & Verse Martin Logan in PDF.


| Product Type | Soundbar |
| Brand | Martin Logan |
| Model | Cadence & Verse |
| Frequency Response | 65-20,000 Hz (±2 dB 1/3 octave smoothed on channel axis) |
| Amplifier Power | 135 watts (peak 270 watts) combined across 9 amplifiers |
| Speakers | Nine 2.5-inch (6.4 cm) high-excursion composite cones |
| Enclosure Type | Sealed, non-resonant asymmetric chamber |
| Supported Audio Formats | Dolby Digital, DTS Digital Surround |
| Inputs | 4 HDMI, 2 optical SPDIF, 2 analog RCA stereo, Wi-Fi, Bluetooth |
| Outputs | HDMI ARC, 1 RCA subwoofer output, IR relay |
| Wireless Connectivity | Wi-Fi 2.4 and 5 GHz 802.11 a/b/g/n, Apple AirPlay, DTS Play-Fi, Bluetooth |
| Integrated Wireless Subwoofer | SWT-SB transmitter, receiver included |
| Room Correction | Anthem Room Correction (ARC) |
| Sound Modes | Night, Bass+, Normal |
| Dimensions (tabletop) | 8.9 × 117 × 12.7 cm (H×W×D) |
| Dimensions (wall mount) | 12.7 × 117 × 9.9 cm (H×W×D) |
| Weight | 5.4 kg |
| Power | 100-240 VAC, 50/60 Hz; max consumption 180 W, standby < 0.5 W |
| Remote Control Batteries | 2 AAA batteries |
| Maintenance | Clean with a dry cloth; do not use solvents |
| Safety | Dangerous voltage inside; do not open; repair by qualified technician only |
| Spare Parts / Reparability | No user-serviceable parts; contact authorized after-sales service |
Frequently Asked Questions - Cadence & Verse Martin Logan
User questions about Cadence & Verse Martin Logan
0 question about this device. Answer the ones you know or ask your own.
Ask a new question about this device
Download the instructions for your Soundbar in PDF format for free! Find your manual Cadence & Verse - Martin Logan and take your electronic device back in hand. On this page are published all the documents necessary for the use of your device. Cadence & Verse by Martin Logan.
USER MANUAL Cadence & Verse Martin Logan
Do Not Open! Risk of Electrical Shock. Voltages in this equipment are hazardous to life. No userserviceable parts inside. Refer all servicing to qualified service personnel. To prevent fire or shock hazard, do not expose this module to moisture.

The lightning bolt flash with arrowhead symbol within an equilateral triangle, is intended to alert the user to the presence
of potentially "dangerous voltage" within the product's enclosure that may be of sufficient magnitude to constitute a risk of electric shock to persons.

The exclamation point within an equi-lateral triangle is intended to alert the user to the presence of important
operating and maintenance (servicing) instructions in the literature accompanying the appliance.
CADENCE
Tested to comply with FCC standards. FOR HOME OR OFFICE USE
IMPORTANT SAFETY INSTRUCTIONS!
- Read these instructions.
- Keep these instructions.
- Heed all warnings.
- Follow all instructions.
- Do not use this apparatus near water.
- Clean only with dry cloth.
- Do not block any ventilation openings. Install in accordance with the manufacturer's instructions.
- Do not install near any heat sources such as radiators, heat registers, stoves, or other apparatus (including amplifiers) that produce heat.
- Do not defeat the safety purpose of the polarized or grounding-type plug. A polarized plug has two blades with one wider than the other. A grounding type plug has two blades and a third grounding prong. The wide blade or the third prong are provided for your safety. If the provided plug does not fit into your outlet, consult an electrician for replacement of the obsolete outlet.
- Protect the power cord from being walked on or pinched, particularly at plugs, convenience receptacles, and the point where they exit from the apparatus.

- Only use attachments/accessories specified by the manufacturer.
- Use only with the cart, stand, tripod, bracket, or table specified by the manufacturer, or sold with the apparatus. When a cart is used, use caution when moving the cart/apparatus combination to avoid injury from tip-over.
- Unplug this apparatus during lightning storms or when unused for long periods of time.
- Refer all servicing to qualified service personnel. Servicing is required when the apparatus has been damaged in any way, such as power-supply cord or plug is damaged, liquid has been spilled or objects have fallen into the apparatus, the apparatus has been exposed to rain or moisture, does not operate normally, or has been dropped.
- To completely disconnect this equipment from the AC mains, disconnect the power supply cord plug from the AC receptacle.
- The mains plug of the power supply cord shall remain readily accessible.
- CAUTION: Danger of explosion if battery is incorrectly replaced. Replace only with the same or equivalent type (AAA). Dispos of dead batteries in accordance with local regulation.
- To prevent overheating, do not cover the apparatus. Install in accordance with the manufacturer's instructions.
- No naked flame sources, such as candles, should be placed on the product.
- Do not expose this apparatus to dripping or splashing and ensure that no objects filled with liquids, such as vases, are placed on the apparatus.
- Batteries (battery pack or batteries installed) shall not be exposed to excessive heat such as sunshine, fire, or the like.
- For apparatus mounted to wall, the apparatus shall be installed on solid wood, bricks, concrete or solid wood columns and battens.
- DO NOT overload wall outlets or extension cords beyond their rated capacity as this can cause electric shock or fire.
- Minimum distances around the apparatus for sufficient ventilation.
- The ventilation should not be impeded by covering the ventilation openings with items, such as newspapers, tablecloths, curtains, etc.
- Do not ingest the battery, Chemical Burn Hazard.
- Keep new and used batteries away from children.
- If the battery compartment does not close securely, stop using the product and keep it away from children.
- If you think batteries might have been swallowed or placed inside any part of the body, seek immediate medical attention.
- The battery (battery or batteries or battery pack) shall not be exposed to excessive heat such as sunshine, fire or the like.
- Risk of leakage. Only use the specified type of Batteries. Never mix new and used batteries. Observe correct polarity. Remove batteries from products that are
not in use for extended periods of time. Store batteries in a dry place.
-
Do not recharge non-rechargeable batteries.
-
Avoid exposure to extreme heat or cold.
-
This equipment is a Class II or double insulated electrical appliance. It has been designed in such a way that it does not require a safety connection to electrical earth.

- Danger of explosion if battery is incorrectly replaced. Replace only with the same or equivalent type.
- (The remote control supplied with) This product contains a AAA battery. If the AAA battery is swallowed, it can cause severe internal burns in just 2 hours and can lead to death.
- Do not handle leaking or damaged AAA batteries.
-
THIS PRODUCT CONTAINS A AAA BATTERY. IF MISUSED OR ABUSED THIS CAN RESULT IN:
-
Smoke or gas hazard
- Heat hazard
- Fire hazard
- Explosion hazard
WARNING: This product is intended to be operated ONLY from the AC Voltages listed on the back panel or included power supply of the product. Operation from other voltages other than those indicated may cause irreversible damage to the product and void the product warranty. The use of AC Plug Adapters is cautioned because it can allow the product to be plugged into voltages in which the product was not designed to operate. If the product is equipped with a detachable power cord, use only the type provided with your product or by your local distributor and/or retailer. If you are unsure of the correct operational voltage, please contact your local distributor and/or retailer.
This device complies with Part 15 of the FCC Rules. Operation is subject to the following two conditions: (1) This device may not cause harmful interference, and (2) this device must accept any interference received, including interference that may cause undesired operation.
FEDERAL COMMUNICATIONS COMMISSION INTERFERENCE
STATEMENT: This equipment has been tested and found to comply with the limits for a Class B digital device, pursuant to part 15 of the FCC Rules. These limits are designed to provide reasonable protection against harmful interference in a residential installation. This equipment generates, uses and can radiate radio frequency energy and, if not installed and used in accordance with the instructions, may cause harmful interference to radio communications. However, there is no guarantee that interference will not occur in a particular installation. If this equipment does cause harmful interference to radio or television reception, which can be determined by turning the equipment off and on, the user is encouraged to try to correct the interference by one
or more of the following measures:
Reorient or relocate the receiving antenna.
- Increase the separation between the equipment and receiver.
- Connect the equipment into an outlet on a circuit different from that to which the receiver is connected.
- Consult the dealer or an experienced radio/TV technician for help.
Approved under the verification provision of FCC Part 15 as a Class B Digital Device.
Any changes or modifications not expressly approved by the grantee of this device could void the user's authority to operate the equipment.
RF EXPOSURE INFORMATION: This equipment complies with FCC/IC radiation exposure limits set forth for an uncontrolled environment and meets the FCC radio frequency (RF) Exposure Guidelines in Supplement C to OET65 and RSS-102 of the IC radio frequency (RF) Exposure rules. This equipment has very low levels of RF energy that are deemed to comply without testing of specific absorption ratio (SAR).
2. CAUTION
- comply with FCC RF exposure compliance requirement, separation distance of at least 20cm must be maintained between this product and all persons.
- This product and its antenna must not be co-located or operating in conjunction with any other antenna or transmitter.
- This transmitter must not be co-located or operating in conjunction with any other antenna or transmitter.
- Operations in the 5.15 - 5.25 GHz band are restricted to indoor usage only.
- For operation within 5.15 - 5.25 GHz / 5.25 - 5.35 GHz / 5.47 - 5.725 GHz frequency range, it is restricted to indoor environment.
- This device meets all the other requirements specified in Part 15E, Section 15.407 of the FCC Rules.
CONTAINS TRANSMITTER MODULE FCC ID: 2AAWQ-CAPRICA2L
CONTAINS FCC ID:MBBDMRS4
This product complies with Part 15 of the FCC Rules. Operation is subject to the following two conditions: (1) this product may not cause harmful interference, and (2) this product must accept any interference received, including interference that may cause undesired operation.
MartinLogan, Ltd.
2101 Delaware, Lawrence, KS
MODEL NUMBER:CADENCE
FCC ID: MBBCADENCE
IC Information (For Canadian customers)
MODEL NUMBER:CADENCE
IC NO:11657A-CADENCE
- PRODUCT CONTAINS TRANSMITTER MODULE IC: 11138A-CAPRICA2L CONTAINS IC: 11657A-DMRS4
This Class B digital apparatus complies with Canadian CAN ICES-3(B) / NMB-3(B). Operation is subject to the following two conditions: (1) this product may not cause harmful interference, and (2) this product must accept any interference received, including interference that may cause undesired operation.
2. CAUTION
To reduce potential radio interference to other users, the antenna type and its gain should be so chosen that the equivalent isotropically radiated power (e.i.r.p.) is not more than that permitted for successful communication. (i) the device for operation in the band 5,150-5,250 MHz is only for indoor use to reduce the potential for harmful interference to co-channel mobile satellite systems.(ii) high-power radars are allocated as primary users (i.e. priority users) of the bands 5,250-5,350 MHz and 5,650-5,850 MHz and that these radars could cause interference and/or damage to LE-LAN devices.
Radiation Exposure Statement: (ii) high-power radars are allocated as primary users (i.e. priority users) of the bands 5,250-5,350 MHz and 5,650-5,850 MHz and that these radars could cause interference and/or damage to LE-LAN devices. This
equipment complies with IC radiation exposure limits set forth for an uncontrolled environment. This equipment should be installed and operated with minimum distance 20cm between the radiator & your body.
- The maximum antenna gain permitted for devices in the bands 5,250 - 5,350 MHz and 5,470 - 5,725 MHz shall comply with the e.i.r.p. limits specified for point-to-point and non point-to-point operation as appropriate.
Caution: (i) The device operating in the band 5150-5250 MHz is only for indoor use to reduce the potential for harmful interference to co-channel mobile satellite systems; (ii) The maximum antenna gain permitted for devices in the bands 5250-5350 MHz and 5470-5725 MHz shall comply with the e.i.r.p. limit; and (iii) The maximum antenna gain permitted for devices in the band 5725-5825 MHz shall comply with the e.i.r.p. limits specified for point-to-point and non point-to-point operation as appropriate. (iv) Users should also be advised that high-power radars are allocated as primary users (i.e. priority users) of the bands 5250-5350 MHz and 5650-5850 MHz and that these radars could cause interference and/or damage to LE-LAN devices. CE: Hereby, MartinLogan, Ltd., declares that this CADENCE is in compliance with the essential requirements and other relevant provisions of:
1995/5/EC - R&TTE
2014/30/EU - EMC
2014/35/EU-LVD
2011/65/EU - ROHS2


WEEE NOTICE
Note: This mark applies only to countries within the European Union (EU) and Norway.
In accordance with the European Union WEEE (Waste Electrical and Electronic Equipment) directive 2002/96/EC effective August 13, 2005, we would like to notify you that this product may contain regulated materials which upon disposal, according to the WEEE directive, require special reuse and recycling processing. For this reason Martin Logan has arranged with our distributors in European Union member nations to collect and recycle this product at no cost to you. To find your local distributor please contact the dealer from whom you purchased this product, email info@martinlogan.com or visit the distributor locator at www.martinlogan.com.
Please note, only this product itself falls under the WEEE directive. When disposing of packaging and other related shipping materials we encourage you to recycle these items through the normal channels.

WARNING/CAUTION!
-
Hazardous voltages exist inside—do not remove cover.
Refer servicing to a qualified technician. -
To prevent fire or shock hazard, do not expose this module to moisture.
- Unplug speaker should any abnormal conditions occur.
- Turn speaker off before making or breaking any signal connections!
- The power cord should not be installed, removed, or left detached from the speaker while the other end is connected to an AC power source.
- No candles or other sources of open flame should be placed on the speaker.
- No liquids either in glasses or vases should be placed on speaker.
- Speaker should not be exposed to dripping or splashing liquids.
- The terminals marked with the lightning bolt symbol should be connected by an instructed person or by way of ready made terminals.
- The power cord should remain readily operable should any abnormal conditions occur.
- Any changes or modifications not expressly approved by the grantee of this device could void the user's authority to operate the equipment.
Apple and the Apple logo are trademarks of Apple Inc., registered in the U.S. and other countries. App Store is a service mark of Apple Inc.
For DTS patents, see http://patents.dts.com. Manufactured under license from DTS Licensing Limited. DTS, the Symbol, DTS in combination with the Symbol, and DTS Digital Surround are registered trademarks or trademarks of DTS, Inc. in the United States and/or other countries. © DTS, Inc. All Rights Reserved.
Manufactured under license from Dolby Laboratories. Dolby, Dolby Audio and the double-D symbol are trademarks of Dolby Laboratories.
Qualcomm aptX is a product of Qualcomm Technologies International, Ltd. Qualcomm is a trademark of Qualcomm Incorporated, registered in the United States and other countries, used with permission. aptX is a trademark of Qualcomm Technologies International, Ltd., registered in the United States and other countries, used with permission
The terms HDMI and HDMI High-Definition Multimedia Interface, and the HDMI Logo are trademarks or registered trademarks of HDMI Licensing LLC in the United States and other countries.
The Spotify software is subject to third party licenses found here: www.spotify.com/connect/third-party-licenses
The Bluetooth® word mark and logos are registered trademarks owned by Bluetooth SIG, Inc. and any use of such marks by MartinLogan, Ltd. is under license.
Windows is a registered trademark of Microsoft Corporation in the United States and other countries.
Other trademarks and trade names are those of their respective owners.
AirPlay, iPad, iPhone, and iPod touch are trademarks of Apple Inc., registered in the U.S. and other countries. iPad Air and iPad mini are trademarks of Apple Inc.
AirPlay works with iPhone, iPad, and iPod touch with iOS 4.3.3 or later, Mac with OS X Mountain Lion, and Mac and PC with iTunes 10.2.2 or later.
"Made for iPad" and "Made for iPhone" mean that an electronic accessory has been designed to connect specifically to iPad, or iPhone, respectively, and has been certified by the developer to meet Apple performance
standards. Apple is not responsible for the operation of this device or its compliance with safety and regulatory standards. Please note that the use of this accessory with iPhone or iPad may affect wireless performance.
Made for:
iPhone 6s
iPhone 6 Plus
iPhone 6
iPhone 5s
iPhone 5c
iPhone 5
- iPad mini 4
- iPad Air 2
- iPad mini 3
- iPad Air
Introduction and Overview. 8
Placement and Mounting 8
Location 8
Installing on a Flat Surface 8
On-Wall Installation 9
Connection 11
Power Connection 1
Signal Connection 12
Network Connection 13
Subwoofer Connection 13
IR Outputs. 14
An Introduction to Audio Connections. 16
Volume Behavior by Input 17
Control Panel. 18
Remote Control 18
Changing the Remote's Battery 19
Programming a Second Remote 19
Display 20
The Menu System. 21
Entering and Exiting the Menu 21
Navigating the Menu 21
Menu Options. 21
Installation 21
Subwoofer. 21
An Overview of the Menu Structure 22
Menu Options (continued) Bass Level 24
Surrounds 24
Stereo Mode 25
Bass Mode 25
Display 25
HDMI 25
Anthem Room Correction 26
Power Settings 27
Wireless Setup. 28
Learn Remote 28
Source Name. 29
Service 29
Surround Sound Decoding 30
Digital Inputs (HDMI and Optical) 30
Analog Input 30
DTS Play-Fi and Network Connection 31
Network Requirements 31
DTS Play-Fi App Requirements. 31
Wi-Fi Status LED. 31
Downloading the DTS PlayFi App. 31
Connecting to a Wireless Network: Acces Point Setup 31
Connecting to a Wireless Network: Wi-Fi Protected Setup (WPS) 32
Connecting to a Wired Network 33
Alternate Setup Without Play-Fi App. 33
Playing Audio Using Play-Fi. 34
Controlling Multiple Speakers. 34
Additional Play-Fi Features 35
How to use Connect. 35
Updates and Rebooting 35
Rebooting Your Soundbar 35
Soundbar Firmware Update 36
DTS Play-Fi Module Update 36
DTS Play-Fi App Update 36
ARCTM (Anthem Room Correction). 36
General Information 37
Warranty Information 37
Service 37
Serial Number. 37
Contacting Customer Service 37
Frequently Asked Questions 38
Troubleshooting. 39
Specifications 42
Dimensional Drawings. 43
Serial Number:
Record your serial number here for easy reference.
You will need this information when filling out your warranty registration. The serial number is located on the back of the sound bar and on the product carton.

wall mount installation template





INTRODUCTION AND OVERVIEW
Thank you—the MartinLogan owner, for loving what we do, and making it possible for us to do what we love.
MartinLogan's dedicated in-house engineering and design team developed the Cadence soundbar to deliver exceptional multi-channel performance from a single system that easily integrates and installs in a diverse variety of environments—whether table or wall mounted. The Cadence produces an enveloping field of richly detailed audio for both music and movies.
Advanced digital signal processing technology allows MartinLogan to replace five dedicated home theater speakers with a one piece solution capable of reproducing multi-channel recordings with unflinching accuracy, resolution, and detail—the inspiration behind every MartinLogan design. The Cadence reproduces front left, right, and center channels via the system's dedicated tweeters and woofers. Surround channels are simulated using sophisticated digital signal processing that directs sound from the system's tweeters and woofers throughout the room.
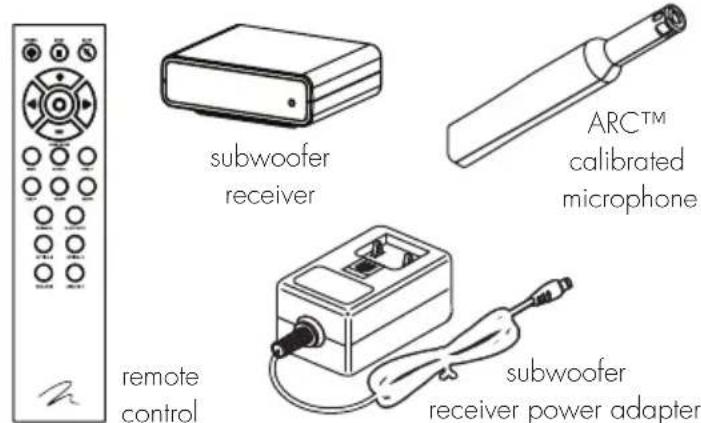
Additionally, for a fully authentic surround sound experience, the Cadence's built in subwooferwireless transmitter and subwoofer wireless receiver makes connecting a dedicated subwoofer as simple as the push of a button.
A suite of integrates wireless streaming technologies, including DTS Play-Fi™, Apple AirPlay™, and Bluetooth™, guarantees compatibility with wireless streaming applications.
Anthem® Room Correction (ARC) allows you to analyze the acoustic response of your listening environment and adjust output of the soundbar for optimal performance.
The simple remote control quickly adjusts volume and selects inputs. The remote also allows you to easily switch between three discrete acoustic modes—'Night' mode (to dial down the bass), 'Bass+' mode (for those moments requiring a little extra thunder), and a 'Normal' mode that restores normal levels.
PLACEMENT AND MOUNTING
LOCATION
We recommend locating the soundbar centered directly above or below your video display. The soundbar menu allows you to optimize acoustic performance for either 'on-wall' or 'on-shelf' installations. You will learn more about accessing these options in the "Controls" section of this manual.
INSTALLING ON A FLAT SURFACE
If you have a surface that provides a wide, level,
and stable platform (such as a table or audio/video rack), the soundbar can be placed directly on top.
When installing the system in this configuration, use the soundbar's menu system to choose 'Installation > Shelf Mount'.
Please note: This speaker is not magnetically shielded and should not be placed directly beneath or on top of a CRT television. The magnetic field will not affect plasma and LCD style televisions.
ON-WALL INSTALLATION
The soundbar can be mounted above or below a television with the feedback display and rear connection panels orientated towards the bottom or top of the soundbar (depending on your specific installation requirements). The information shown on the soundbar display can be flipped to match your installation orientation.
Note: These instructions assume the mounting surface is standard wood frame and sheetrock construction. If you wish to mount to another type of surface, consult a bonded contractor.
Note: When installing the system in this configuration, use the soundbar's menu system to choose 'Installation > Wall Mount'.
Required tools (not included):
- Stud finder
Level
Electric drill and drill bits - Phillips screwdriver
WARNING! We strongly recommend locating the wall bracket so at least one of the screw locations attaches to a stud. WARNING
To prevent injury, this apparatus must be securely attached to the floor/wall in accordance with the installation instructions.

Required hardware (included):
- (1) Installation template
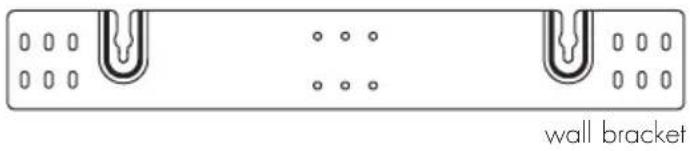
(1) Wall bracket
Required hardware (not included):
(5) Screws appropriate for mounting surface
(5) Sheet rock anchors (sized for screws)
- Locate mounting location using a level and the installation template (fig. 1).
2 Mark the three central pilot hole locations and remove the installation template (fig. 1).
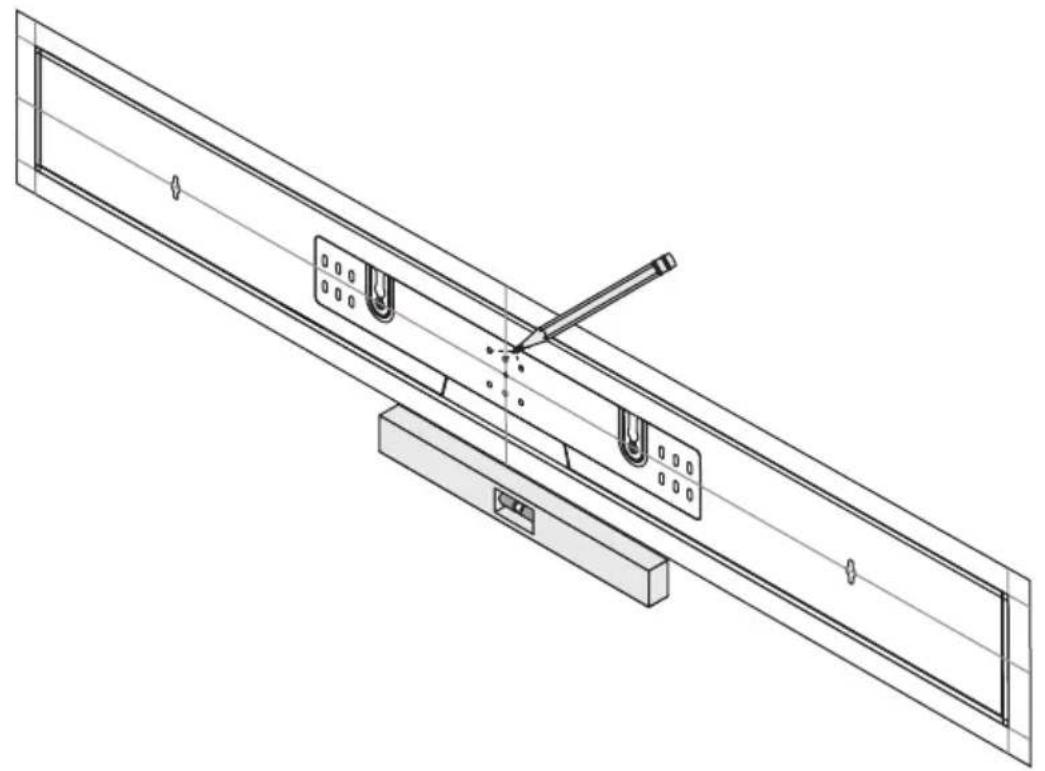
Fig. 1
3 Using a stud finder, determine if there is a wall stud directly behind one of the three center screw locations (fig. 2a).
If no stud is found: use the center most screw location and drill a pilot hole for the wall anchor. Install a wall anchor at this location. If a wall stud is found: drill a pilot hole into the stud.
4 Using a screw, attach the wall bracket to the wall. DO NOT tighten (fig. 2b).
5 Using a stud finder, determine if a wall stud is directly behind any of the remaining screw locations (fig. 2a).
If no stud is found: use the top and bottom center-most screw locations. If a wall stud is found: use the top and bottom screw locations with a stud behind them.
Use a level to square the wall bracket and mark the remaining pilot hole locations (fig. 2b).
6 Remove the wall bracket or pivot to access the remaining screw locations (fig. 2b).
If no stud is found: drill pilot holes and install wall anchors. If a wall stud is found: drill pilot holes into the stud.
7 Using the screws, attach the wall bracket to the wall. DO NOT fully tighten.
8 Use a level to square the wall bracket. Tighten all screws (fig. 2b).
9 Attach audio and power cables as needed. Refer to the 'Connection' section of this manual.
10 Move the soundbar into place and drop the shoulder bolts into the wall bracket keyholes. Before releasing, make sure the soundbar has
dropped fully into the keyholes and is held firmly in place (fig. 3).
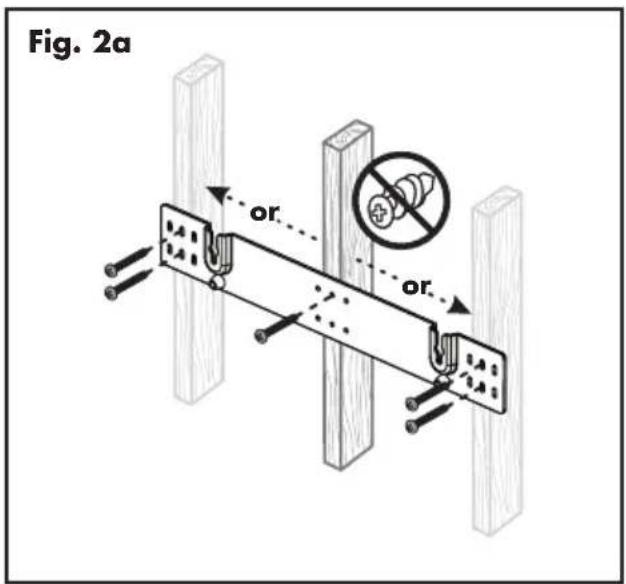
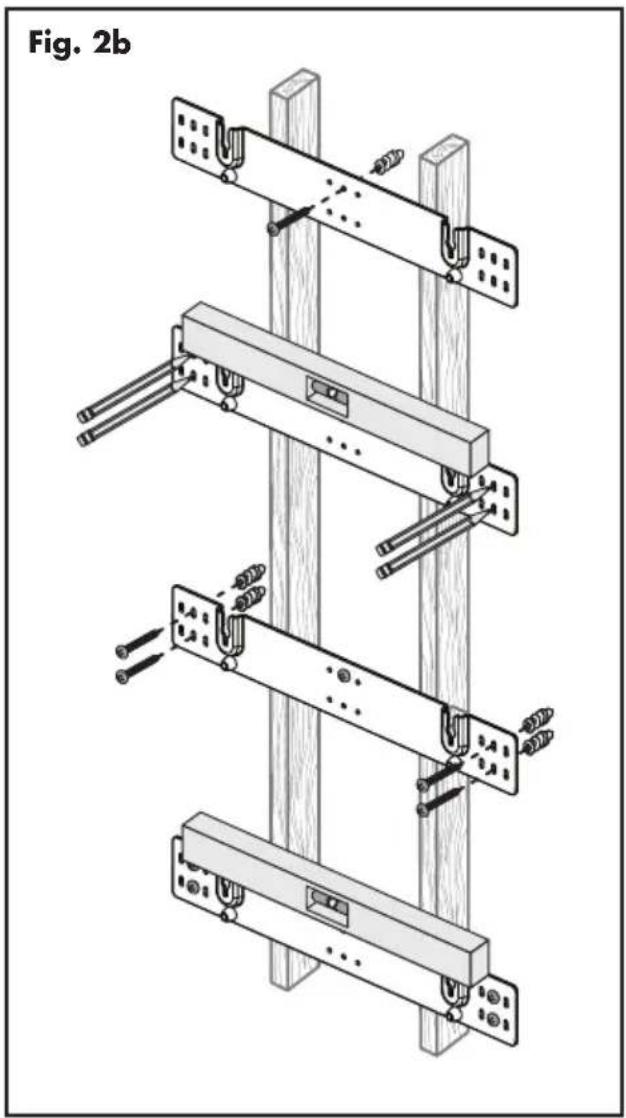
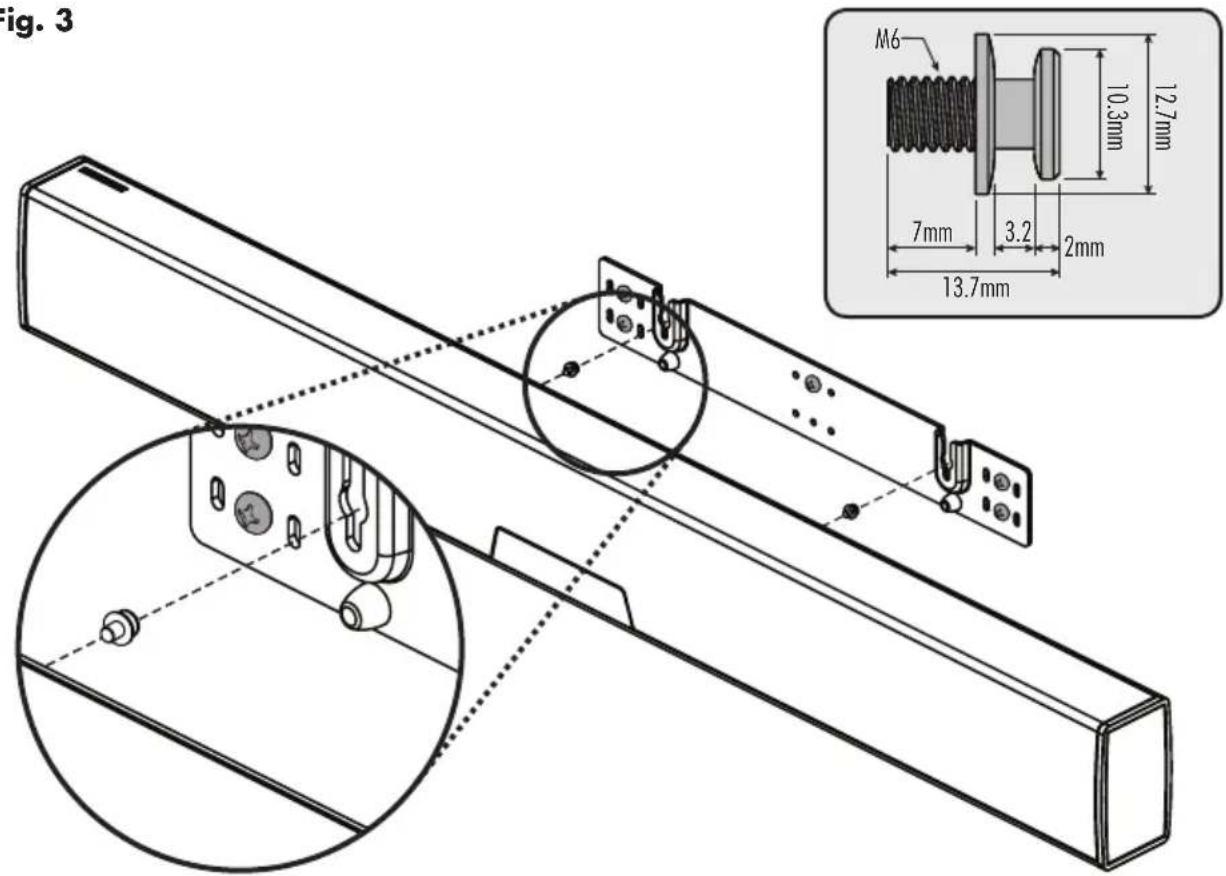
Fig. 3
CONNECTION
WARNING! Turn your soundbar off before making or breaking any signal connections! WARNING!

The power cord should not be installed, removed, or left detached from the soundbar while the other end is connected to an AC power source.
POWER CONNECTION
The power cord should be firmly inserted into the AC power receptacle on the rear connection panel of the soundbar, then to any convenient AC wall outlet. The soundbar also integrates a signal sensing power supply that automatically switches into standby mode after sensing no audio signal for approximately 20 minutes (this will only occur when the menu's power setting is set to 'Auto Standby').
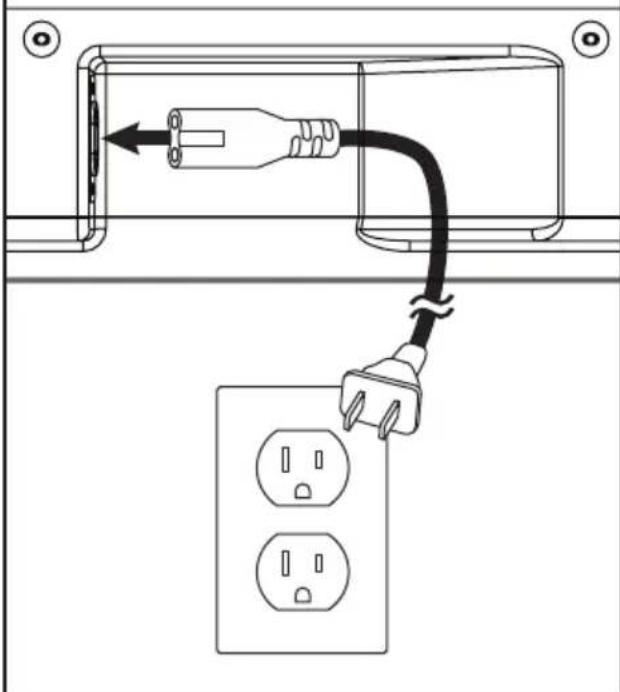
Fig. 4
If you remove your soundbar from the country of original sale, be certain that AC power supplied in any subsequent location is suitable before connecting and operating the soundbar. Substantially impaired performance or severe damage may occur to the soundbar if operation is attempted from an incorrect AC power source.
SIGNAL CONNECTION
When utilizing the soundbar to reproduce audio, a television's audio output should be defeated. Some televisions will allow you to turn off the internal speaker via the television's menu system. Other televisions may require you to turn the television's volume to "zero" or "mute".
Additionally, if you're connecting your television audio out using a digital optical connection your television may require you to turn on the digital optical output and configure the output for 5.1 surround sound. Please refer to your television's manual.
Connections are made at the signal input section on the rear electronics panel of the soundbar. Your soundbar features the following inputs:
- 3 × HDMI inputs (audio and video)
- 2 × Digital Optical inputs (audio only)
- 2 × Left/Right Analog (RCA) inputs (audio only)
Please note, if your soundbar is being used in an on-wall installation you may find it helpful to use 90° RCA adapters, 90° HDMI adapters, and/or low-profile HDMI cables when making signal connections.
When connecting your system, there are any variety of configurations that will work, and these methods will vary based on user preference.
Some users will choose to route all sources (such as DVD player, cable box, game console, media streamer, etc.) to their television via an HDMI or digital optical connection and use the television to switch between audio/video sources. The advantage of this connection method is that only one audio cable (either HDMI or digital optical cable) needs to connect between the television and the soundbar—and changing the input on your television will change the audio signal being sent to the soundbar (without having to change the input setting on the soundbar itself). Please note: many televisions are not capable of passing multi-channel encoded audio signals and will down-mix these signals to a 2-channel stereo mix before sending them to the television's HDMI or digital output.
Most users will want to run cables directly from the source components to the soundbar and run an HDMI cable from the soundbar to the TV to pass
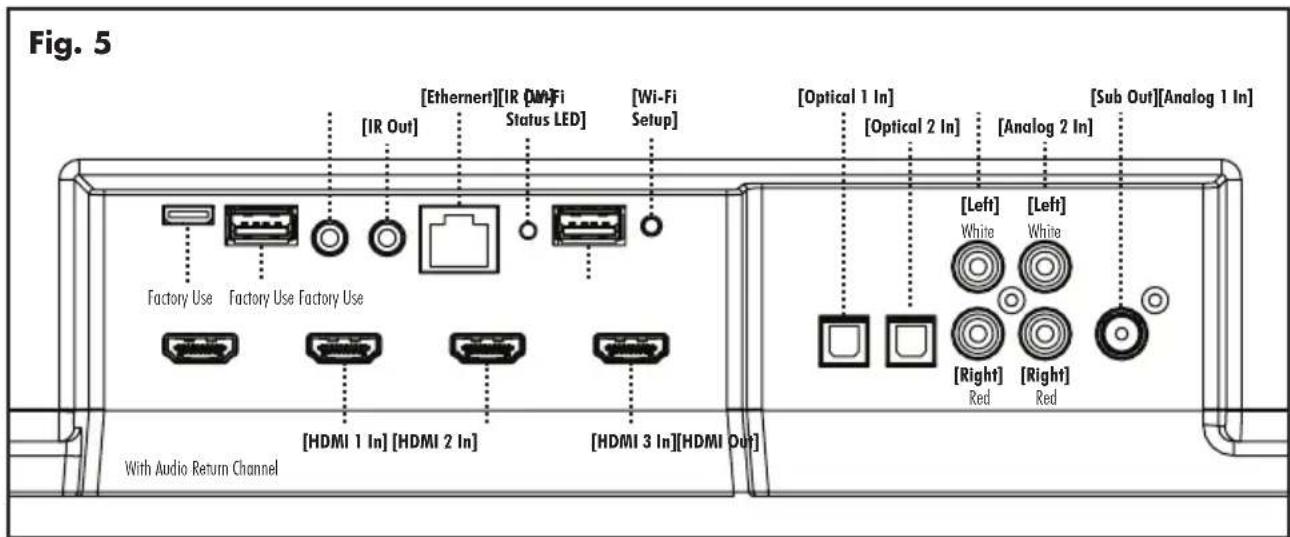
along the video signal. This allows the soundbar to receive multi-channel encoded material.
Depending on your number of sources, the TV may be used for switching some sources while the primary source devices may be directly connected to the soundbar for guaranteed multi-channel sound. The soundbar's HDMI ARC (Audio Return Channel) allows video to pass from the soundbar to the television and audio to pass from the television to the soundbar on the same HDMI cable. If you're using your television as the source, choose the soundbar's HDMI ARC input to hear any sounds originating from your television. Please note, not all televisions are equipped with HDMI Audio Return Channel technology.
A few important points to remember when connecting your soundbar:
- HDMI or digital optical will provide the highest audio fidelity when connecting to the soundbar.
- If your soundbar is not producing sound or surround sound from your Blu-ray player, DVD player, or other multi-channel audio capable source, you may need to set the player's digital audio output to "Bitsream" (also called "Raw", "Direct Digital", or "High Bit Rate"). If "PCM" is selected you'll lose the multi-channel encoded sound. Some players only require you to turn PCM off to configure for multi-channel encoded sound. Please refer to your player's manual.
- In a setup where HDMI is used to connect your audio/video source component(s) directly to your television, you will likely need to run an additional digital optical cable between the source component and your soundbar. This extra connection will allow for multi-channel encoded audio to reach the soundbar. Many televisions that receive audio/video source materials via HDMI do not pass multi-channel encoding when the audio is passed back out of the televisions digital optical output. Instead, televisions often pass a 2-channel mix of the sound, stripping out center, surround and sub
woofer channels from the mix. This is not true for all televisions manufactured today, but we have found the many television on the market work this way. Using an HDMI connection between the television and soundbar will maximize the potential of successfully passing a multi-channel encoded audio signal from the television to the soundbar.
- Audio-only sources capable of only stereo output (such as portable media player docks or CD player) will often connect directly to the soundbar via the analog input.
NETWORK CONNECTION
To stream audio to your soundbar via DTS Play-Fi or Apple AirPlay, a LAN (local area network) connection is required. This connection can be established using Wi-Fi or Ethernet. Refer to the DTS Play-Fi section of this manual for setup and usage details.
SUBWOOFER CONNECTION
You may choose to employ a separate subwoofer to reproduce the LFE (low frequency effects) channel information in multi-channel recordings and/or reinforce bass performance of stereo recordings. Any aftermarket home theater subwoofer can be connected via the soundbar's "LFE Out" RCA connection. We, of course, recommend using a superb MartinLogan subwoofer.
Additionally, this soundbar integrates a built-in subwoofer wireless transmitter and includes a subwoofer wireless receiver to simplify the connection and placement of a subwoofer within your room.
No Subwoofer
For systems not using a separate subwoofer, use the soundbar's menu system and choose "Subwoofer > No Sub". This sets the soundbar to reproduce the entire frequency range when playing content.
Wired Subwoofer Connection
Using a high-quality RCA style cable designed for subwoofer connection, connect "Sub Out" from the soundbar to the "LFE In/Sub In" on the subwoofer.
Use the soundbar's menu system and choose 'Subwoofer > Wired Sub'.
Reference your subwoofer's manual to learn how to properly adjust the sub's level and phase controls to achieve proper blending with the soundbar. The subwoofer's crossover should be set to "bypass", "LFE". For subwoofoers that do not have a "bypass" or "LFE" crossover setting, we recommend adjusting the crossover to its highest setting.
Wireless Subwoofer Connection
Use the soundbar's menu system and choose 'Subwoofer > Wireless Sub > Sync Subwoofer'. The soundbar will display 'Push and Hold Button'.
Press and hold the subwoofer wireless receiver's sync button. Connection is successful when the status light turns solid and the soundbar responds with 'Synced'.
Please note: If a link is not established the wireless receiver's LED will blink slowly and the soundbar will display 'Failed'. Power the soundbar on and off, unplug the wireless receiver and plug it back in, and repeat syncing.
Reference your subwoofer's manual to learn how to properly adjust the sub's level and phase controls. The subwoofer's crossover should be set to "bypass" or "LFE". For subwoofer that do not have a "bypass" or "LFE" crossover setting, we recommend adjusting the crossover to its highest setting.
Please note: The subwoofer wireless transmitter built in to this soundbar is not compatible with MartinLogan's SWT-1 or SWT-2 subwoofer wire
less technology. If your subwoofer has SwT-1 or SwT-2 technology built in you can still utilize the soundbar's wireless functionality by connecting the wireless subwoofer receiver to the LFE input on your subwoofer, or connecting an SwT-1 or SwT-2 transmitter to the Sub Out on the soundbar.
Please note: If you decide to no longer use wireless, turn off the soundbar's wireless transmitter by using the menu system and choosing 'Subwoofer > Wireless Subwoofer > Turn Wireless Sub Off' or 'Subwoofer > No Sub'. Doing this will turn off the transmitter and automatically set the soundbar for no sub.
WARNING! When operating wirelessly, the subwoofer may be susceptible to RF interference in the 2.4GHz bandwidth from microwave ovens and wireless devices such as Wi-Fi systems, video game consoles, cordless telephones, Bluetooth devices, and baby monitors. Generally, this issue (intermittent sound or slight popping noises) is easily resolved by physically separating problematic devices from one another—a distance as little as two feet will often alleviate the interference. In the case of microwave ovens, the interference will only occur when the microwave is operating.
IR OUTPUTS
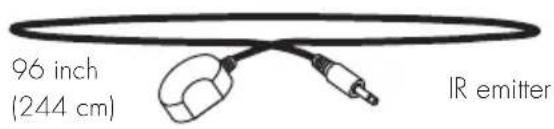
These jacks accept IR emitters with 3.5mm monostyle connectors. One IR emitter is included with the soundbar.
Plug the IR emitter into either of the soundbar's IR Out jacks and place the other end of the IR emitter over the IR sensor on another piece of equipment The use of an IR emitter allows the soundbar to pass IR signals from any remote control to a tethered device-allowing control of equipment in locations a remote would normally not reach.
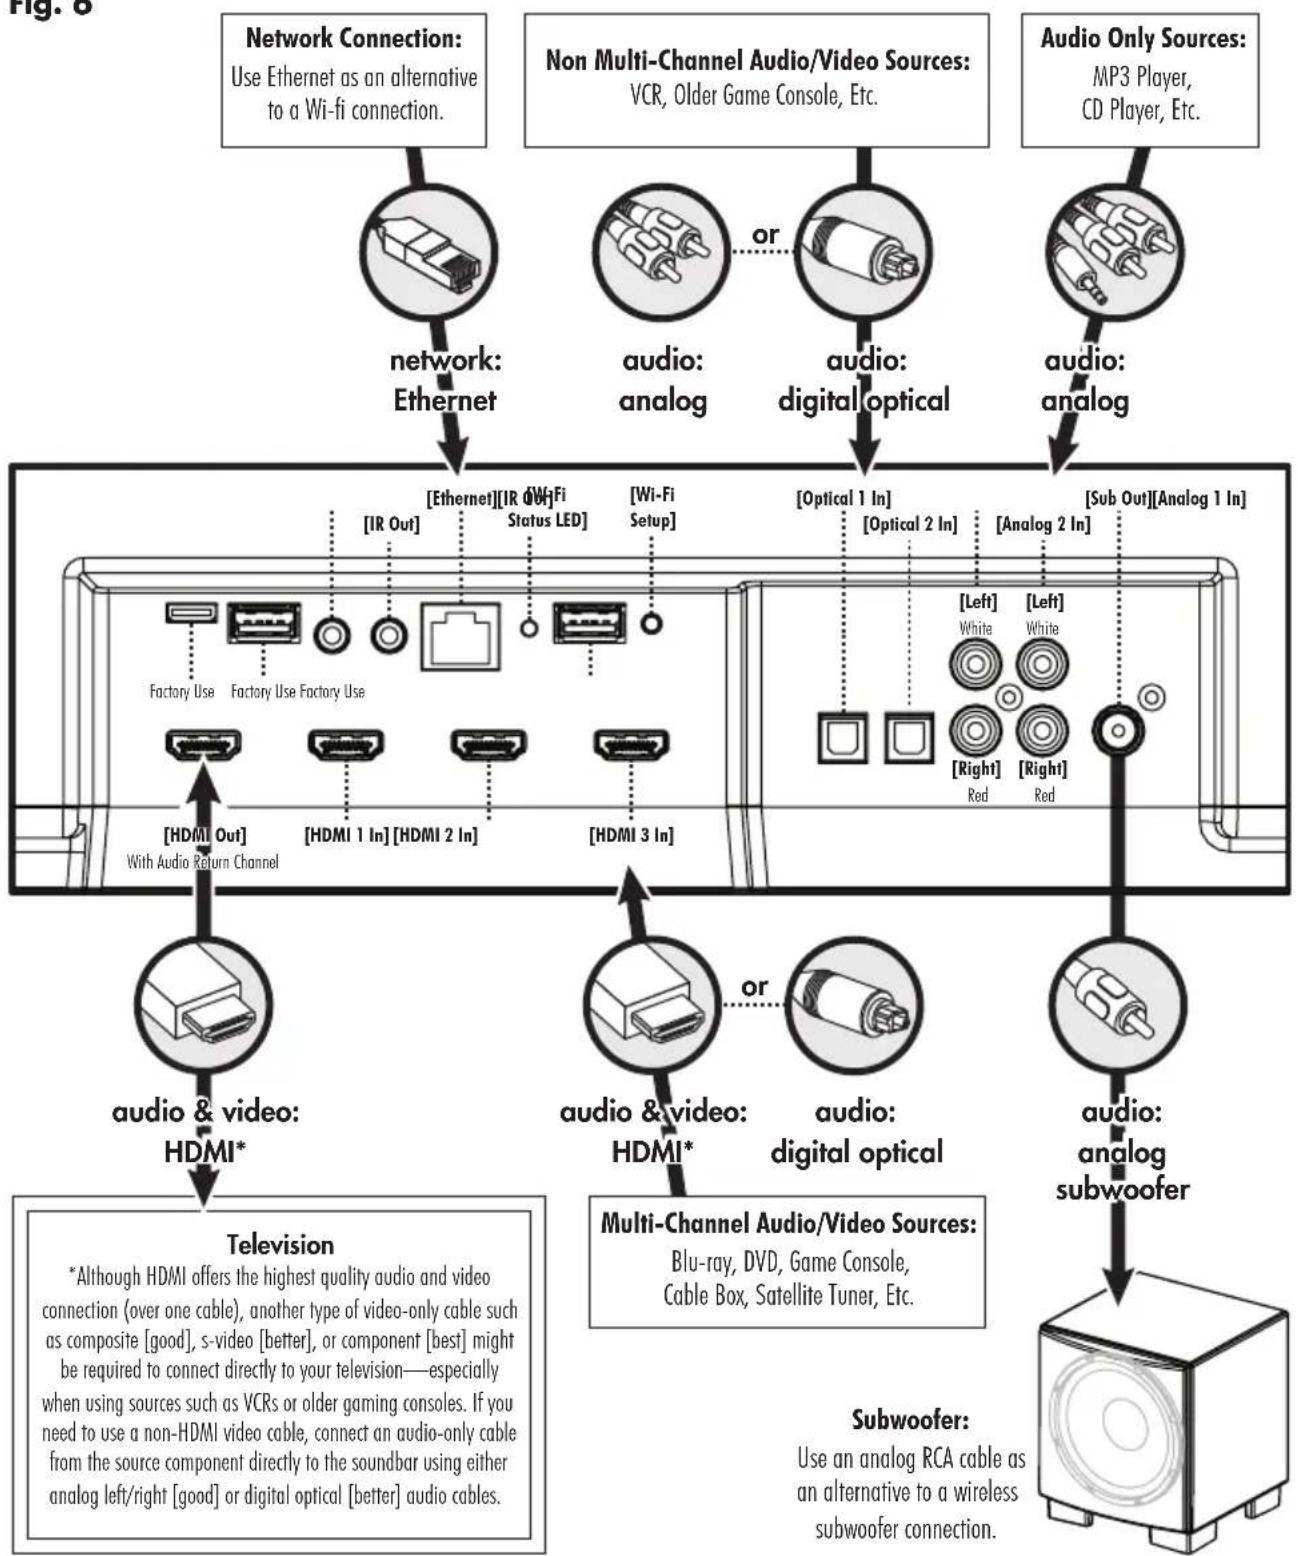
Fig. 6
AN INTRODUCTION TO AUDIO CONNECTIONS
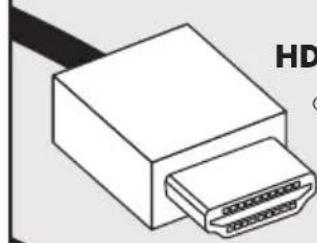
- HDMI: HDMI utilizes one cable to pass high-definition video signals and multichannel encoded digital audio between a source component and television or soundbar. Your soundbar is equipped with multiple inputs. These inputs should be used whenever possible for maximum fidelity.
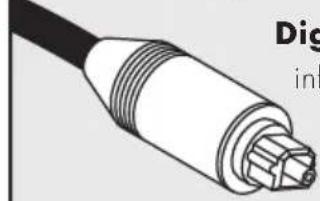
Digital Optical: Digital optical utilizes one cable to pass digital audio information (no video). A digital optical cable offers a high-quality digital connection and passes multi-channel encoded audio between a source component and an audio output device.
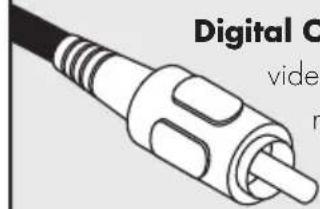
Digital Coaxial: Digital coaxial utilizes one cable to pass digital audio information (no video). A digital coaxial cable offers a high-quality digital connection and passes multichannel encoded audio between a source component and an audio output device. Please note: The 'RCA' style end of a digital coaxial cable is identical to those found on common left/right analog RCA cables. However, a cable designed specifically for digital coaxial connections should be employed—do
not use a standard left/right analog RCA style cable because it will likely not be up to the task of handling the high bit-rate necessary for a reliable digital connection.
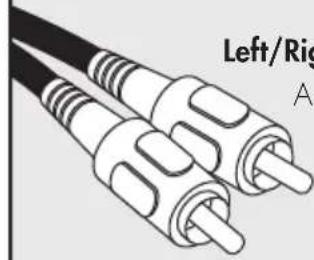
Left/Right Analog RCA: These cables are used to pass audio information (no video). An analog RCA cable can only pass a single channel of audio information between a source component and audio output device. To achieve two-channels of audio (left/right), you will find that analog RCA cables come bundled as a stereo pair (two connectors on each end). The Auxiliary input on this speaker can accept an analog stereo signal through a cable using a 3.5mm
stereo "headphone style" jack. If you are connecting this speaker to a device (such as a dock or CD player) with left/right RCA analog outputs, you will need a special cable with a 3.5mm 'headphone style' jack on one end and left/right RCA jacks on the other end.
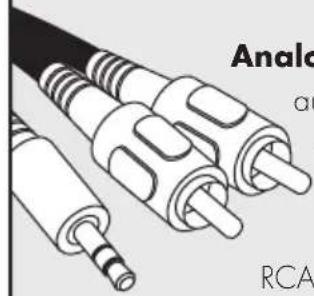
Analog Left/Right RCA to Stereo 3.5mm: Analog cables are used to pass audio information (no video). Older gaming consoles, portable media player docks, VCRs and similar source components (which are not capable of playing multi-channel encoded content) will often offer connection only through left/right analog RCA cables. To connect to these devices use a Left/Right RCA to stereo 3.5mm cable.
AN INTRODUCTION AUDIO STREAMING CONNECTIONS
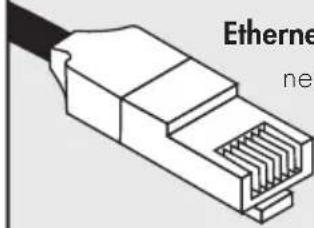
t: This cable allows you to physically connect a device to a LAN (local area work). When connected to a LAN, audio information can be sent to this speaker using various protocols (such as Play-Fi® or AirPlay). If a wireless (Wi-Fi) connection is used to connect to a LAN, there is no need to use an Ethernet connection. However, in some installations, a 'hard-wired' Ethernet connection may prove more desirable than a wireless connection.

Wi-Fi: This connection technology wirelessly connects a device to a LAN (local area network). When connected to a LAN, audio information can be sent to this speaker using various protocols (such as Play-Fi or AirPlay). If an Ethernet connection is used to connect
to a LAN, there is no need to use a Wi-Fi connection. In some installations a 'hard-wired' Ethernet connection may prove more desirable than a wireless connection.

Bluetooth: This wireless connection technology allows a wide variety of devices to connect to an audio output device and stream audio. Bluetooth establishes a connection directly with an audio output device and does not require either device to be connected to a LAN.
VOLUME BEHAVIOR BY INPUT
Depending on the input selected on your speaker, the volume will exhibit different behaviors.
SPEAKER INPUT VOLUME BEHAVIOR
| Wireless or Ethernet (using AirPlay or Play-Fi) | Volume on source device and speaker are synced and control each other. |
| HDMI, Digital Optical, Analog | Soundbar will control volume level for audio input from most sources.* |
| Bluetooth | Volume on Bluetooth device and volume on speaker are controlled separately.* |
- Devices connected via auxiliary and Bluetooth may have their own volume control which functions separately from the speaker's volume. If you are connecting a device which allows you to adjust its volume separately, we recommend that the volume on the device not be set to maximum. When set to its maximum
setting, the amplifier in the external device is likely to introduce elevated levels of distortion into the audio signal which, in turn, will be further amplified by the speaker. Find a volume between 50-75% of the device's maximum volume and use your speaker's volume control to adjust the final playback volume.
CONTROL PANEL
Your soundbar features seven buttons that control the following functions:
POWER/STANDBY: Turns the soundbar on/off.
INPUT: Cycles through the inputs. The order of inputs is: HDMI 1 > HDMI 2 > HDMI 3 > HDMI ARC > Bluetooth > Optical 1 > Optical 2 > Analog 1 > Analog 2.
VOL+/VOL-: Adjusts volume. When the menu is activated the volume buttons will function as up/down buttons.
MUTE: Mutes the soundbar. When muted, the soundbar will display 'Mute'. Pressing this button a second time or pressing either volume button will restore the previous volume setting.
ENTER/SELECT: When the menu is activated the this button allows you to select a menu item.
MENU: Activates the setup menu. When the menu is activated the menu button will take you back one level, the volume buttons will function as up/down, and the Enter/Select button will allow you to select a menu item. Exit the menu by pressing the Menu button.
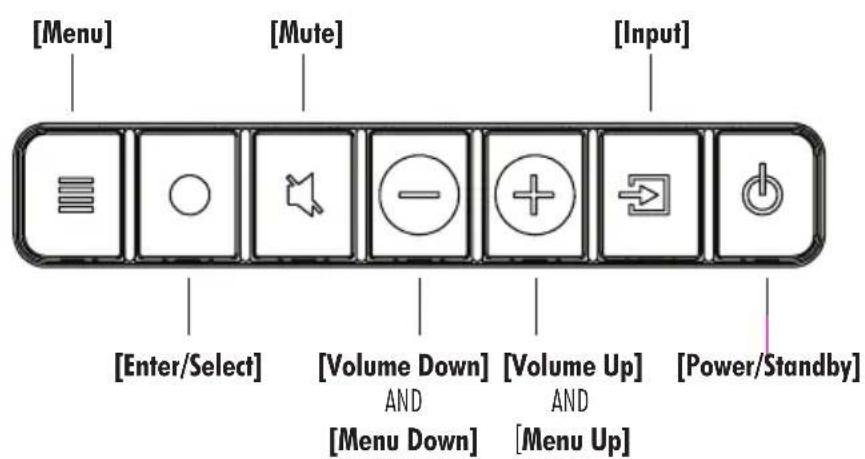
Fig. 8
REMOTE CONTROL
Your soundbar remote controls these functions:
POWER: Turns the soundbar on and off.
MENU: Enters and exits the soundbar menu.
MUTE: Mutes the soundbar. When muted, the soundbar will display 'MUTE'. Pressing this button a second time or pressing either volume button will restore the previous volume setting.
VOL+/VOL-: Adjusts volume level.
BASS MODE - NIGHT: Reduces bass output and compresses the dynamic range.
BASS MODE - BASS+: Increases bass output.
BASS MODE-NORMAL:Restores normal levels.
INPUT: Activates the selected input.
CHANGING THE REMOTE'S BATTERY
The remote control for your speaker uses two AAA type batteries. Access the battery compartment by using a Phillips screwdriver to remove the screw located on the bottom of the remote.
Caution! Danger of explosion if battery is incorrectly replaced. Replace only with the same or equivalent type.

PROGRAMMING A SECOND REMOTE
This soundbar can be programmed to respond to a second remote. See "The Menu System" section of this manual for programming instructions.
Please note: There may be remote controls that the soundbar cannot learn or that the soundbar cannot learn correctly. Due to the number of available remote controls, it is impossible to advise which will or will not work.
Please note: When learning from a second remote, you will likely find it does not have buttons that directly correspond with all available soundbar commands. Not all soundbar commands have to be programmed. Some remote controls offer 'function' buttons (F1, F2, etc.) that can be used to program unique soundbar commands such as 'NITE.MD' or 'OPTIC'.
Please note: Some remote controls offer discrete 'power on' and 'power off' buttons. Some offer only a single button to toggle power on and off. The learning function of the soundbar allows you to program for either scenario.
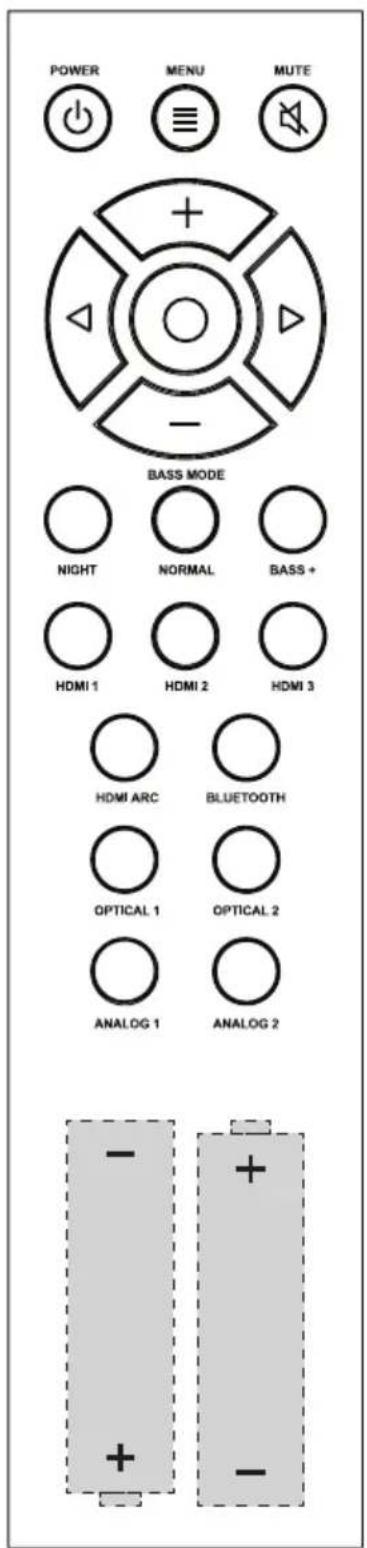
Fig. 9
DISPLAY
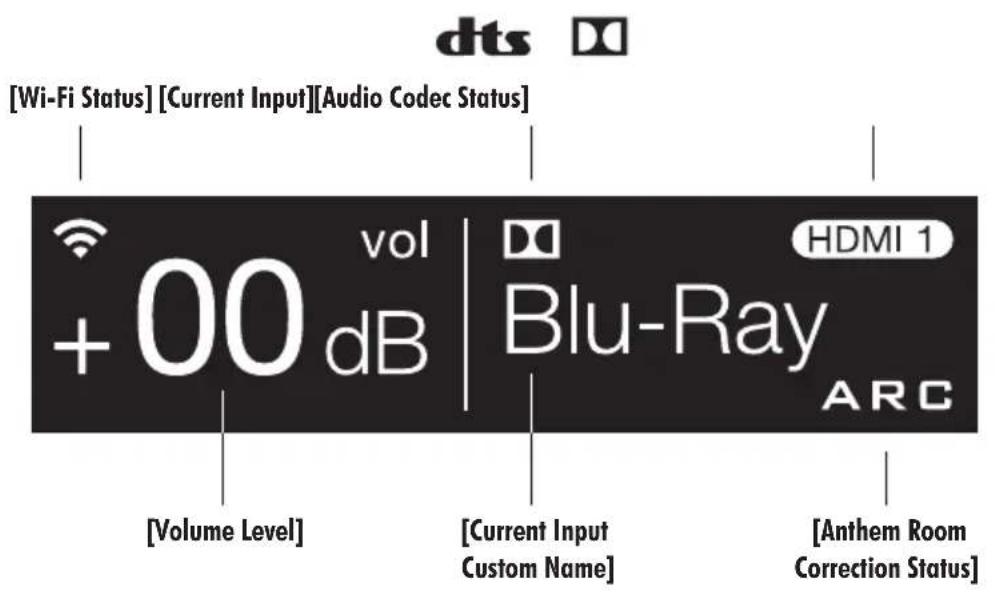
Fig. 10
Your soundbar displays the following information:
Wi-Fi Status: The Wi-Fi icon displays when a Wi-Fi connector is established. If the soundbar is configured to connect to a Wi-Fi network but unable to connect, the icon will change to an exclamation point.
Please note: The Wi-Fi Status LED on the soundbars connection panel provides more detailed feedback.
For information on Wi-Fi setup modes and detailed setup instructions, please refer to the "DTS Play-Fi and Network Connection" section of this manual.
Audio Codec Status: If an audio signal with surround sound encoding is detected this icon will indicate Dolby® Digital or DTS Digital SurroundTM.
Volume Level: Displays the current volume level.
Current Input: This icon indicates the input that is currently active using its standard input name. This field is not customizable.
Current Input Custom Name: This indicates the input that is currently active using its custom user defined name.
Anthem Room Correction Status: This icon indicates that Anthem Room Correction is active. This icon will not display if an Anthem Room Correction has been manually turned off or an adjustment curve has not been uploaded to the soundbar. For information on setting up ARC, please refer to the (ARCTM) Anthem Room Correction section of this manual.
THE MENU SYSTEM

Fig. 11
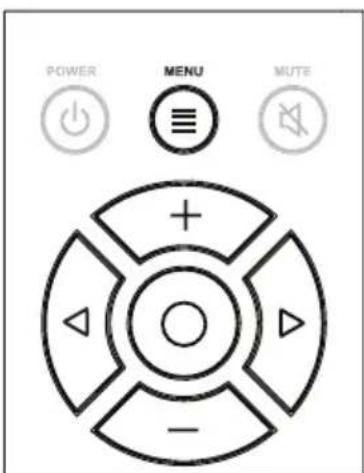
Fig. 12
ENTERING AND EXITING THE MENU
To access the menu from the remote, press 'Menu'. To exit the menu from the remote, press 'Menu' again. To access the menu from the control panel press the menu button. To exit, press the menu button again. The menu auto exits after 30 seconds.
NAVIGATING THE MENU**
The menu is navigated using the 'up/down/left/right/enter' navigation system. Up and Down are used to cycle through the menu and submenu options.
Right or Enter/Select are used to access a sub-. menu or to select an option. With the remote, left is used to exit a submenu and go back one level.
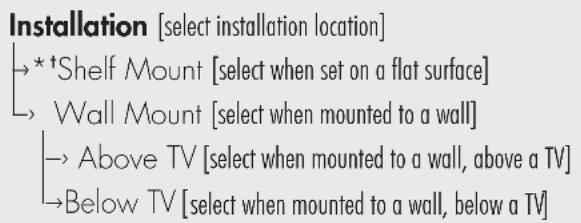
MENU OPTION: INSTALLATION
Installation: Enter the submenu by pressing the
enter button.
Installation > Shelf Mount: This option configures the soundbar's audio output to sound best in shelf mount installations. The direction of the display screen is also adjusted. Activate by pressing the enter button and the soundbar will respond with 'Saved'.
Installation > Wall Mount: Enter the submenu by pressing the enter button. The settings in this menu will adjust the soundbar for wall mount installation above or below a television.
Installation > Wall Mount > Above TV: This option configures the soundbar's audio output to sound best in wall mount installations above a television. The direction of the display screen is also adjusted. Activate by pressing the enter button and the soundbar will respond with 'Saved'.
Installation > Wall Mount > Below TV: This option configures the soundbar's audio output to sound best in wall mount installations below a television. The direction of the display screen is also adjusted. Activate by pressing the enter button and the soundbar will respond with 'Saved'.
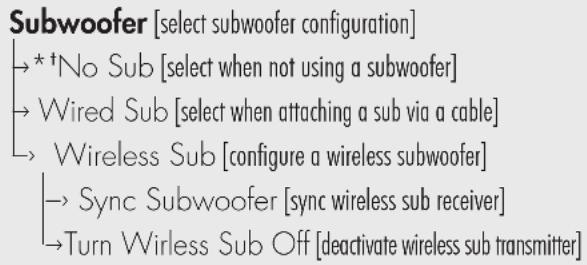
MENU OPTION: SUBWOOFER
Subwoofer: Enter the submenu by pressing the enter button. Here you may configure external subwoofer integration. Please note: When integrating
an external subwoofer, you must choose either a wireless connection or a wired connection. Your soundbar does not simultaneously output via both connections. The soundbar can connect to only one wireless subwoofer. However, it is possible to connect multiple wired subwoofoers if you utilize a 'Y' splitter attached to the subwoofer cable, or if your subwoofer offers an output designed to daisy chain multiple subs.
Subwoofer > No Sub: This option configures the soundbar to handle all bass information and will not output information via the subs wired or wireless subwoofer connections. Activate by pressing the enter button and the soundbar will respond with 'Saved'.
Subwoofer > Wired Sub: This option configures the soundbar to use an external subwoofer connected via a cable to the soundbar's Sub Out RCA connection.
AN OVERVIEW OF THE MENU STRUCTURE**

AN OVERVIEW OF THE MENU STRUCTURE (CONTINUED)
Learn Remote [learn remote codes for second remote control]
Up
→ Down
→ Left
Right
Enter
Bass Mode: Night
→ Bass Mode: Normal
Bass Mode: Bass+
Stereo Mode: Wide
→ Stereo Mode, Voice+
→ Stereo Mode: Normal
Power Toggle
PowerOn
Power Off
Menu
Input: HDMI 1
Input: HDMI 2
Input:HDMI3
Input: HDMI ARC
Input: Bluetooth
Source Name [assign custom names to inputs]
→HDMI
HDMI2
HDMI3
HDMIARC
Optical 1
Optical 2
Analog 1
→ Analog 2
*HOME: Factory default setting, home use.
+STORE:Factory default setting, retail store use.
Activate by pressing the enter button and the soundbar will respond with 'Saved'. With this option, the wireless sub transmitter is turned off. Reference your subwoofer's manual to learn how to properly adjust the sub's level and phase controls to achieve proper blending with the soundbar. The subwoofer's crossover should be set to "bypass" or "LFE". For subwoofer that do not have a "bypass" or "LFE" crossover setting, we recommend adjusting the crossover to its highest setting.
Subwoofer > Wireless Sub: Enter the submenu by pressing the enter button. Here you can sync the soundbar to the subwoofer wireless receiver (included with your soundbar). Reference your subwoofer's manual to learn how to properly adjust the sub's level and phase controls to achieve proper blending with the soundbar. The subwoofer's crossover should be set to "bypass" or "LFE". For subwoofer that do not have a "bypass" or "LFE" crossover setting, we recommend adjusting the crossover to its highest setting.
Subwoofer > Wireless Subwoofer > Sync Subwoofer: This option connects the soundbar to the Subwoofer Wireless Receiver. StartSyncing by pressing the enter button. The soundbar will display 'Push and Hold Button'. Press and hold the subwoofer wireless receiver's sync button. Connection is successful when the status light turns solid and the soundbar responds with 'Synced'.
Subwoofer > Wireless Sub > Turn Wireless Sub Off: This option configures the soundbar to handle all bass information and, when selected, will not output information via the wired or wireless subwoofer connections. Activate by pressing the enter button and the soundbar will respond with 'Off'. Activating this option performs the same function as 'Subwoofer > No Sub'.
MENU OPTION: BASS LEVEL
Bass Level: Enter the menu by pressing the
enter button. Here you can configure bass output by ± 10dB in increments of 2dB.
Bass Level > -10dB to +10dB: Using the up/down directional buttons, choose the desired bass level (from -10dB to +10dB). Bass level output will be automatically set to match the value currently displayed.
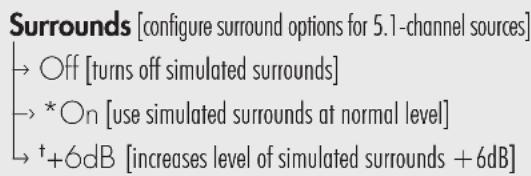
MENU OPTION: SURROUNDSD
Surrounds: Enter the submenu by pressing the enter button. This menu allows you to turn simulated surround channels on or off when the soundbar detects a multi-channel source.
Surrounds > Off: This option configures the soundbar (when it detects 5.1-channel encoded content) to down-mix to 3.1-channel output (left/center/right channels + subwoofer) and does not utilize simulated surround channels. All content originally intended for the surround channels is routed to the left/center/right channels. Activate by pressing the enter button and the soundbar will respond with 'Saved'.
Surrounds > On: This option configures the soundbar (when it detects 5.1-channel encoded content) to fully reproduce all 5.1-channels of information including simulated surround channels. Activate by pressing the enter button and the soundbar will respond with 'Saved'.
Surrounds > +6dB: This option configures the soundbar (when it detects 5.1-channel encoded content) to fully reproduce all 5.1-channels of information including simulated surround channels with 6dB of extra output. Activate by pressing the enter button and the soundbar will respond with 'Saved'.
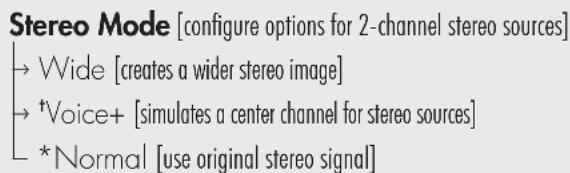
MENU OPTION:STEREO MODE
Stereo Mode: Enter the submenu by pressing the enter button. Here, you may set how the soundbar reproduces audio from 2-channel (stereo) sources.
Stereo Mode > Wide: This option configures the soundbar to create a wider stereo image. Activate by pressing the enter button, and the soundbar will respond with 'Saved'.
Stereo Mode > Voice+: This option configures the soundbar to reproduce the left and right channels with a simulated center channel. Activate by pressing the enter button and the soundbar will respond with 'Saved'.
Stereo Mode > Normal: This option configures the soundbar to reproduce the content using only the left and right channels. Activate by pressing the enter button and the soundbar will respond with 'Saved'.
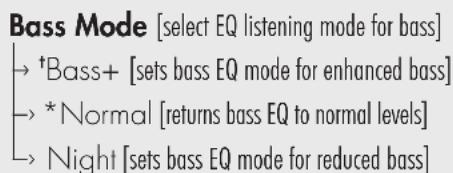
MENU OPTION: BASS MODE
Bass Mode: Enter the submenu by pressing the enter button. Here you may adjust the bass equalization of the soundbar. These options can also be activated directly from the soundbar's remote control.
Bass Mode > Bass+: This mode enhances bass output. Activate by pressing the enter button and the soundbar will respond with 'Saved'.
Bass Mode > Normal: This mode returns the bass to normal levels. Activate by pressing the enter button and the soundbar will respond with 'Saved'.
Bass Mode > Night: This mode decreases bass output. Activate by pressing the enter button and the soundbar will respond with 'Saved'.
MENU OPTION: DISPLAY
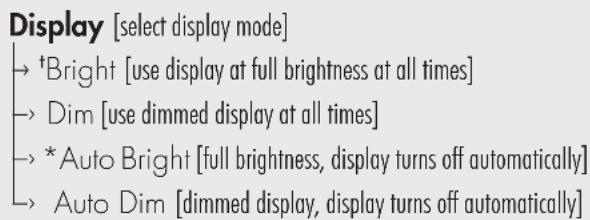
Display: Enter the submenu by pressing the enter button. The settings in this menu allow you to adjust the brightness of the display and configure the display to automatically turn on and off.
Display > Bright: This option configures the soundbar's display to be on at full brightness when the soundbar is on. Activate by pressing the enter button and the soundbar will respond with 'Saved'.
Display > Dim: This option configures the soundbar's display to be on at a reduced brightness when the soundbar is on. Activate by pressing the enter button and the soundbar will respond with 'Saved'.
Display > Auto Bright: This option configures the soundbar's display to be on at full brightness when a setting (such as volume or input) is changed. After a few seconds, the display will turn off. Activate by pressing the enter button and the soundbar will respond with 'Saved'.
Display > Auto Dim: This option configures the soundbar's display to be on at a reduced brightness when a setting (such as volume or input) is changed. After a few seconds the display will turn off. Activate by pressing the enter button and the soundbar will respond with 'Saved'.
MENU OPTION: HDMI
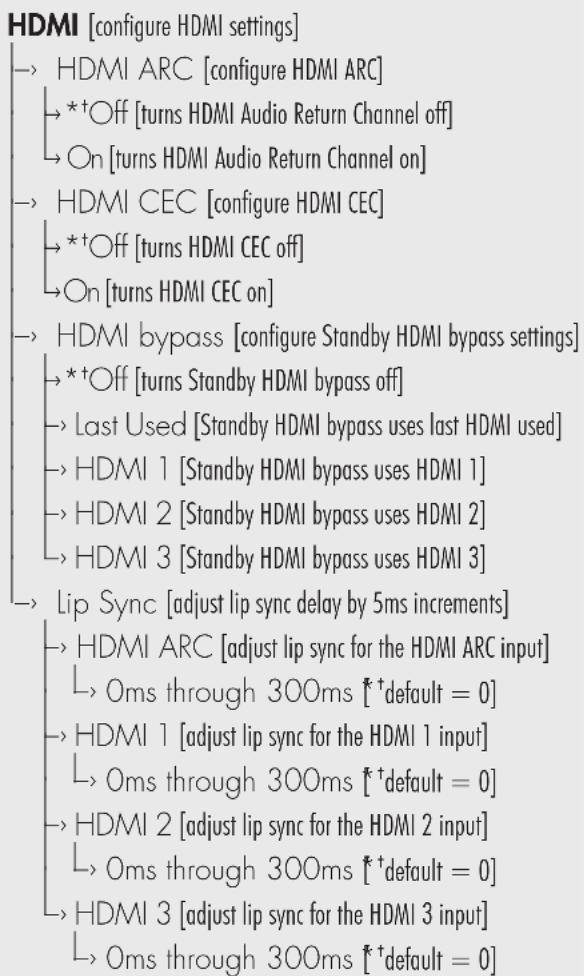
HDMI: Enter the menu by pressing the enter button. Here you may adjust HDMI related settings.
HDMI > HDMI ARC: [HDMI Audio Return Channel] Enter the submenu by pressing the enter button. Here you may turn HDMI Audio Return channel on and off. HDMI ARC allows you to use one cable to pass video information from your soundbar to your television and send audio information from your television to your
soundbar. This is useful if you have multiple sources hooked up to both your television and your soundbar and always want your soundbar to play audio.
HDMI > HDMI ARC > Off or On: This option turns the HDMI Audio Return Channel feature off or on. Activate by pressing the enter button and the soundbar will respond with 'Saved'.
HDMI > HDMI CEC: Enter the submenu by pressing the enter button. Here you may turn HDMI CEC on and off. HDMI CEC (Consumer Electronics Control) allows all compatible devices to be controlled by one remote control and exchange remote commands via the HDMI connection.
HDMI > HDMI CEC > Off or On: This option turns the Consumer Electronics Control feature off or on. Activate by pressing the enter button and the soundbar will respond with 'Saved'.
HDMI > HDMI Bypass: Enter the menu by pressing the enter button. Here you may choose the HDMI input to use with standby HDMI bypass. This feature allows the soundbar to send audio/video signals from HDMI connected sources to your television, even when you don't want to power on the soundbar and listen to audio through it.
HDMI > HDMI Bypass > Off: This option turns off the standby HDMI Bypass feature. When the soundbar is in standby it will not pass audio/video out of HDMI. Activate by pressing the enter button and the soundbar will respond with 'Saved'.
HDMI > HDMI Bypass > Last Used: This option turns on the standby HDMI Bypass feature and passes audio/video from the last HDMI input you used while the soundbar is in standby mode. Activate by pressing the enter button and the soundbar will respond with 'Saved'.
HDMI > HDMI Bypass > HDMI 1 or HDMI 2
or HDMI 3: This option turns on the standby HDMI Bypass feature and passes audio/video from the HDMI 1, HDMI 2, or HDMI 3 input while the soundbar is in standby mode. Activate by pressing the enter button and the soundbar will respond with 'Saved'.
HDMI > Lip Sync: Enter the submenu by pressing the enter button. Here you may adjust the audio/video sync for the HDMI inputs. Adjust this setting if the timing of the audio content does not match the video content.
HDMI > Lip Sync > HDMI ARC or HDMI 1 or HDMI 2 or HDMI 3: Enter the submenu by pressing the enter button. Here you choose which input you are adjusting lip sync for.
HDMI > Lip Sync > HDMI ARC or HDMI 1 or HDMI 2 or HDMI 3 > Oms to 300ms: Using the up/down directional buttons, choose the desired delay (from 0 milliseconds to 300 milliseconds). Adjust this setting until the audio and video from your HDMI sources are synchronized. If your audio and video from HDMI sources is already synchronized, leave this set to Oms. Lip sync will be automatically set to match the value currently displayed.
MENU: ANTHEM ROOM CORRECTION
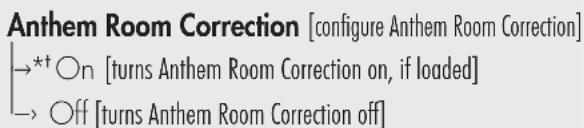
Anthem Room Correction: Enter the submenu by pressing the enter button. Here you may turn Anthem Room Correction on and off. Using proprietary processes, a microphone, and the power of your PC, the ARC system analyzes your soundbar's in-room sound, then computes the required correction to yield optimal performance within your acoustic environment.
Anthem Room Correction > Off or On: This option turns the Anthem Room Correction feature on or off. Activate by pressing the enter button and the soundbar will respond with 'Saved'. Please note, turn
ing ARC on and off only makes a difference if ARC corrections have not been loaded on the soundbar.
MENU OPTION: POWER SETTINGS
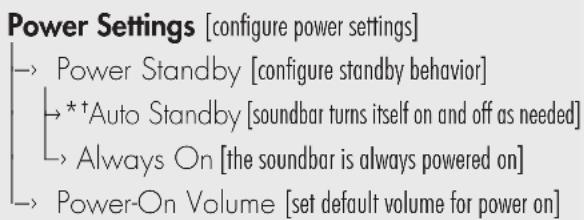
Power Settings: Enter the submenu by pressing the enter button. Here you may adjust the soundbar's power options.
Power Settings > Power Standby: Enter the submenu by pressing the enter button. Here you choose whether the subwoofer is always on or turns itself on and off automatically.
Power Settings > Power Standby > Auto
Standby: This option configures the soundbar to turn itself off after no audio signal is detected for approximately 20 minutes. When the soundbar detects an audio signal, it will immediately turn itself on. Activate by pressing the enter button and the soundbar will respond with 'Saved'. Please note: When set to Auto Standby, if the soundbar is manually turned off (using the power button on the control panel or remote control), the soundbar will not respond to an incoming audio signal and will not turn on automatically. In this situation, turn the soundbar on using the power button on the control panel or remote control and the soundbar will resume automatic power handling.
Power Settings > Power Standby
Always On: This option configures the soundbar to remain on at all times until it is manually turned off using the power button on the control panel or remote control. Activate by pressing the enter button and the soundbar will respond with 'Saved'.
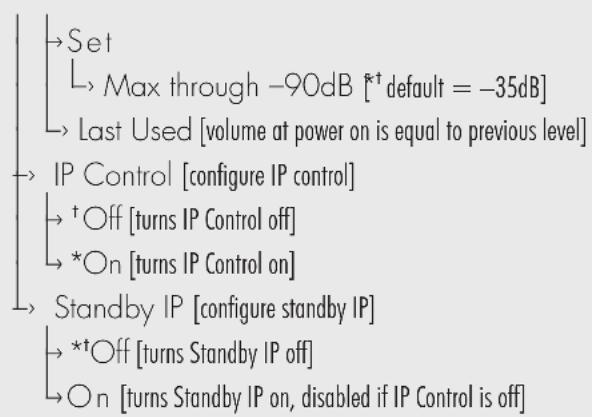
Power Settings > Power-On Volume: Enter the submenu by pressing the enter button. Here you can configure the default volume of the soundbar when it powers on or comes out of standby.
Power Settings > Power-On Volume > Set: Enter the submenu by pressing the enter button. Here you choose set the power-on volume.
Power Settings > Power-On Volume > Set > -90dB to +10dB: Using the up/down directional buttons, choose the desired volume level. Once set the soundbar will always be set to this level when it powers on or comes out of standby. The default level is -35dB.
Power Settings > Power-On Volume > Last Used: When Power Standby is set to "Last Used", the soundbar will power on or come out of standby at a volume level matching the volume setting when it was powered off or went into standby.
Power Settings > IP Control: Enter the submenu by pressing the enter button. Here you can turn IP Control off or on. IP Control allows the soundbar to respond to incoming IP commands from networked home control systems connected via Ethernet or Wi-Fi.
Power Settings > IP Control > Off or On: This option turns the IP Control feature off or on. Activate by pressing the enter button and the soundbar will respond with 'Saved'.
Power Settings > Standby IP: Enter the submenu by pressing the enter button. Here you can turn Standby IP off or on. This allows you to configure how the soundbar responds to incoming IP commands when it is in standby mode.
Power Settings > Standby IP > Off or On: This option turns the Standby IP feature off or on. Activate by pressing the enter button and the soundbar will respond with 'Saved'. When this setting is set to "Off" the soundbar will not respond to incoming IP command when it is powered off or in standby mode. If IP Control set to Off, Standby IP is disabled.
MENU OPTION: WIRELESS SETUP
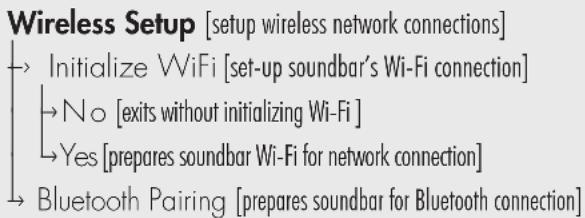
Wireless Setup: Enter the submenu by pressing the enter button. Here you may setup a Wi-Fi and Bluetooth connection.
Wireless Setup > Initialize WiFi: Enter the submenu by pressing the enter button.
Wi-Fi Setup > Initialize Wifi > No: Activate by pressing the enter button. Choosing this option will exit without resetting and initializing the Wi-Fi settings.
Wi-Fi Setup > Initialize WiFi >Yes: Activate by pressing the enter button. The soundbar will respond with 'Resetting' and will power off and back on. When the soundbar powers on it will automatically enter Access Point Setup mode. Please see "DTS Play-Fi and Network Section > Connection to a wireless network: Access Point Setup" section of this manual for more information. After a reset there is no way to recover previous network settings.
Wireless Setup > Bluetooth Pairing:
Activate by pressing the enter button. The soundbar will respond with 'Pairing Mode On'. The soundbar will remain in pairing mode for 5 minutes. Use your source device's Bluetooth setup menu to setup a Bluetooth connection.
MENU OPTION: LEARN REMOTE
Please note: There may be remotes that the soundbar cannot learn or that the soundbar can not learn correctly. Due to the number of available remotes, it is impossible to advise which remotes will or will not work.
Please note: When learning from a second remote, you will likely find it does not have buttons that directly correspond with all available soundbar commands.
Not all commands have to be programmed. Some remotes offer 'function' buttons (F1, F2, etc.) that can be used to program unique soundbar commands such as 'Bass Mode: Night' or 'Input: HDMI 1'.
Please note: Some remote controls offer discrete 'power on' and 'power off' buttons. Some offer a single button to toggle power on and off. The learning function of the soundbar allows you to program either scenario.
Learn Remote: Enter the menu by pressing the enter button. The settings in this menu program the soundbar to respond to a second remote control. The factory supplied remote control will always work with the soundbar, even if the soundbar is programmed to respond to a second remote. If you attempt to program a remote code from a second that is already programmed the soundbar will respond with "Failed".
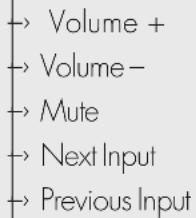
Using the up/down directional buttons, you can select and program the following commands:
Volume +
Volume -
Mute
Next Input
Previous Input
Up
Down
- Left
Right
Enter
- Bass Mode: Night
- Bass Mode: Normal
- Bass Mode: Bass+
- Stereo Mode: Wide
- Stereo Mode: Voice+
- Stereo Mode: Normal
Power Toggle
Power On
Power Off
- Menu
Input:HDMI
Input:HDMI2
Input:HDMI 3
Input: HDMI ARC
Input:Bluetooth
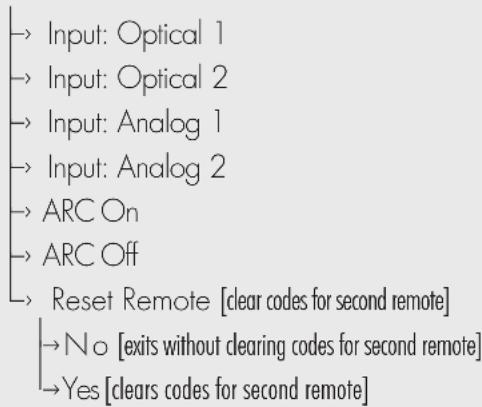
Input: Optical 1
Input: Optical 2
Input: Analog 1
Input: Analog 2
ARC On [Anthem Room Correction On]
ARC Off [Anthem Room Correction Off]
Choose the command you want to program and press the enter button. The soundbar will respond with 'Push Button'. Hold the second remote approximately 12 inches (30cm) from the soundbar and press the appropriate button four times. If the new command is learned successfully, the soundbar's display will display "Saved". If the new command is not learned, the soundbar will display "Failed". Repeat the process if learning fails.
Learn Remote > Reset Remote: Enter the submenu by pressing the enter button. Resetting will clear programming for the second remote. The Reset function requires confirmation.
Learn Remote > Reset Remote > No: Activate by pressing the enter button. Choosing this option will exit without erasing the remote programming.
Learn Remote > Reset Remote >Yes:
Activate by pressing the enter button. The soundbar will respond with 'Resetting'. After codes are reset, there is no way to recover the previous settings.
MENU OPTION: SOURCE NAME
Source Name: Enter the submenu by pressing the enter button. The settings in this menu will allow you to assign new names to display on the soundbar when changing inputs. For example, you can program the 'Optical 1' input to display 'DVD'.
Using the up/down directional buttons, you can select and program the following input names:
HDMI 1 Optical 1
HDMI 2 Optical 2
HDMI3 Analog1
- HDMI ARC - Analog 2
Choose the input name you want to reprogram and press the enter button. The soundbar display will display the current name. Pressing the up/down directional buttons will cycle through the available alpha-numeric characters. Pressing the left/right directional buttons will move to the next/previouspace. To finish programming an input name, use the left/right buttons to move all the way to the left or right.
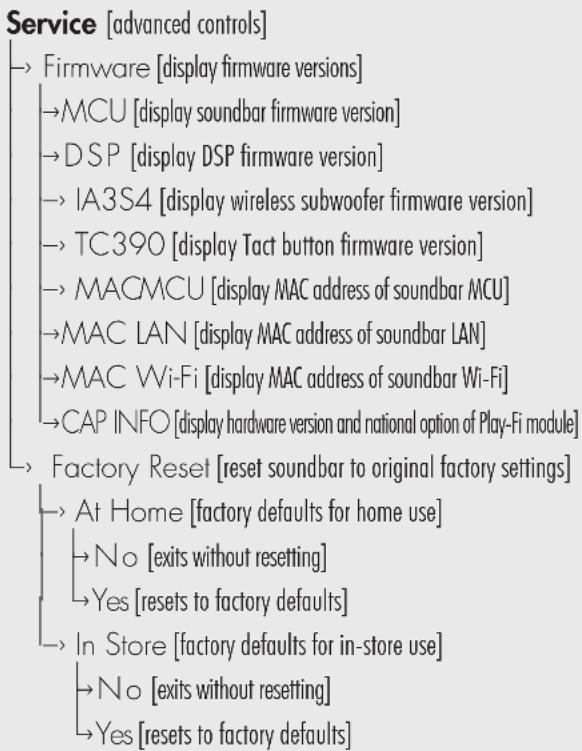
MENU OPTION: SERVICE
Service: Enter the submenu by pressing the enter button.
Service Firmware: Enter this submenu by pressing the enter button.
Service > Firmware > MCU: Pressing the enter button will display the current firmware version for the soundbar MCU (microcontroller unit).
Service > Firmware > DSP: Pressing the enter button will display the current firmware version for the soundbar's DSP module.
Service > Firmware > IA3S4: Pressing the enter button will display the current firmware version for the soundbar's Wireless subwoofer module.
Service > Firmware > TC390: Pressing the enter button will display the current firmware version for the soundbar's Tact button module.
Service > Firmware > MAC MCU: Pressing the enter button will display the current firmware ver
sion for the mac address of the soundbar's MCU.
Service > Firmware > MAC LAN: Pressing the enter button will display the current firmware version for the mac address of the soundbar's LAN.
Service > Firmware > MAC Wi-Fi: Pressing the enter button will display the current firmware version for the mac address of the soundbar's Wi-Fi.
Service > Firmware > CAP INFO: Pressing the enter button will display the current infomation for the soundbar's Play-Fi module.
Service > Factory Reset: Enter the menu by pressing the enter button. Resetting the soundbar will restore all settings to the factory defaults settings. This will erase all user-configured presets, Anthem Room Correction data, and Wi-Fi settings. This function requires confirmation to reduce risk of performing an accidental reset.
Service > Factory Reset > At Home: Enter the submenu by pressing the enter button.
Service > Factory Reset > At Home > No: Activate by pressing the enter button. Choosing this option will exit without performing a reset.
Service > Factory Reset > At Home > Yes: Activate by pressing the enter button. The soundbar will respond with 'Resetting'. Once complete, your soundbar will be reset to factory default Home settings. After a reset has been performed, there is no way to recover the previous settings.
Service > Factory Reset > In Store Enter the submenu by pressing the enter button.
Service >Factory Reset > In Store > No: Activate by pressing the enter button. Choosing this option will exit without performing a reset.
Service > Factory Reset > In Store > Yes: Activate by pressing the enter button. The soundbar will respond with 'Resetting'. Once complete, your soundbar will be reset to factory default Home settings. After a reset has been performed, there is no way to recover the previous settings.
DIGITAL INPUTS (HDMI AND OPTICAL)
This soundbar is capable of detecting and automatically decoding multi-channel audio formats, such as those found on DVD and Bluray movies.
When utilizing a digital connection, the soundbar can process the following formats: Dolby Digital, DTS Digital Surround™, and digital stereo.

DOLBY AUDIO


Digital Surround
ANALOG INPUT
Digitally encoded sound information cannot be transmitted to an analog input. This connection method is adequate for most devices that only offer two channels of output (such as VCRs, CD players, older game consoles, or portable media player docks). Although most surround sound capable devices, such as DVD and Blu-ray players, offer both analog and digital connections, the digital connection should always be employed. If a source device is connected via an analog left/right RCA connection, the 5.1-channel encoded audio content will not be sent to the soundbar.
DTS PLAY- FI圆 AND NETWORK CONNECTION
NETWORK REQUIREMENTS
You must have the following to connect your soundbar to your network:
- A wireless router.
- A high-speed internet connection for reliable playback of internet based music services.
- Have your network password ready before connecting the soundbar to your network.
TIP! If wireless connectivity is weak or not available, connect to your router with an Ethernet cable.
TIP! Your soundbar communicates with wireless networks that support 802.11g/n. For best performance, a network that supports 802.11n wireless technology is recommended. A network supporting 802.11b may be used, but it will effectively stream to only one device equipped with DTS PlayFi®. Your soundbar communicates over a 2.4 GHz wireless band, however, it can become slow in locations, such as apartments, where many routers are in operation. Consequently, your soundbar is capable of jumping onto a 5 GHz band on dual band wireless routers.
DTS PLAY- 圆 APP REQUIREMENTS
- An Android device running Android 2.2 or later.
An iOS device running iOS 6.0 or later. - A Windows® PC running Windows 7, 8 (32 and 64 bit), or later.
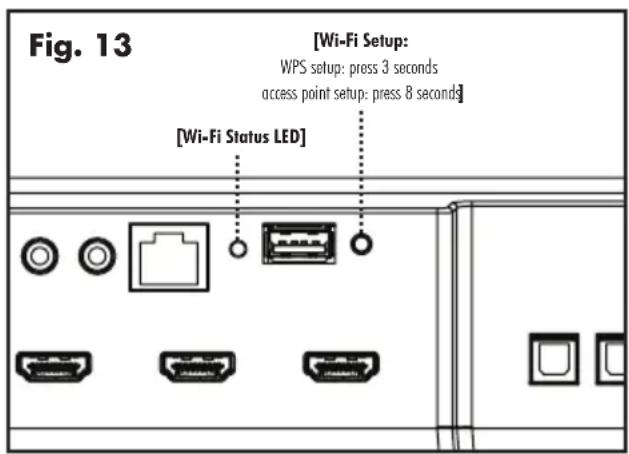
Wi-Fi STATUS LED
The Wi-Fi Status LED tells you what your soundbar is doing.
Rapid Blinking: booting up.
- Blinking: connecting to a wireless router.
- Slow Pulse: Access Point Setup Mode.
- Two Blinks: WPS (Wi-Fi Protected Setup) Mode.
Solid: wirelessly connected to a router.
- Off: connected to a router using an Ethernet connection.
DOWNLOADING THE DTS PLAY-FI APP
Android Device Users: Download the free DTS PlayFi app from Google Play or the Amazon App Store.
iOS Device Users: Download the free DTS Play-Fi app from the Apple App Store.
PC Users: Download and install the free DTS PlayFi program from https://playfi.com/appsWindows
CONNECTING TO A WIRELESS NETWORK: ACCESS POINT SETUP
Access Point Setup causes your soundbar to behave as if it were a wireless router. Using your mobile device or Wi-Fi capable PC, you connect directly to your soundbar using Wi-Fi, select your home wireless network, and enter the network password.
- For optimal setup conditions place your soundbar next to your wireless router. The soundbar can be moved to its final location after Wi-Fi setup.
- Plug in your soundbar and press the Power button.
- The Wi-Fi Status LED will start rapidly blinking for 20 seconds while your soundbar boots. If this is the first time your new soundbar is plugged in,
the Wi-Fi Status LED will start pulsing slowly. If the soundbar is already configured to connect to a Wi-Fi network, the LED will turn solid (connected) or blink rapidly (not connected).
-
Once the Wi-Fi Status LED starts pulsing slowly, your soundbar is in Access Point Mode and ready to connect to your wireless network. Note: If the soundbar's Wi-Fi Status LED is not pulsing slowly, press and hold the W-Fi Setup button for 8 seconds until you have heard two tones—one at 3 seconds and another at 8 seconds. You can also choose "Wireless Setup > From Play-Fi App" from the soundbar menu to enter Access Point Mode. After 20 seconds, the Wi-Fi Status LED will begin pulsing slowly to indicate Access Point mode is ready. At anytime you can press the button again to cancel the setup mode.
-
Launch the DTS PlayFi® app.
Android Device Users:
a) The app will automatically find your device and provide prompts for setup.
b) Touch the "Setup" button on the screen.
c) Enter the password for your wireless network; the app will connect your device to your network.
d) Once your device is connected, you will notice that the Wi-Fi Status LED on your soundbar will change from blinking to solid. This may take up to a minute. If, after a minute, the button continues to blink rapidly, setup failed and you should try again.
iOS Device Users:
Please note: When using an iOS device your soundbar can stream audio using either Apple AirPlay or DTS Play-Fi.
a) Make sure your iOS device's Wi-Fi is turned on and connected to your Wi-Fi network.
b) Open your iOS device's 'Settings' app and go to the 'Wi-Fi' menu. Your soundbar will
show up under the heading 'SET UP NEW AIRPLAY SPEAKER...'
c) Select your soundbar from the list. It will have "Play-Fi" in the name.
d) Once in the 'AirPlay Setup' menu you will be prompted to select your Wi-Fi network and name your soundbar (you will not need to enter your network password).
e) Once your soundbar is connected, you will notice that the Wi-Fi Status LED on your will change from blinking to solid. This may take up to a minute. If, after a minute, the LED continues to blink rapidly, setup failed and you should try again.
f) Your soundbar is now connected to your wireless network. Reconnect your iOS device to your wireless network.
PC Users:
a) The app will automatically find your device and provide prompts for set up. If the app does not prompt you to set up a new device, within the app go to the settings screen and click 'Setup Play-Fi Device'. Follow the on-screen instructions.
b) Click the "Set-up" button on the screen.
c) Select the speaker(s) you want to set up.
d) Enter the password for your wireless network; the app will connect your device to your network. You will notice the Wi-Fi Status LED will have changed from blinking to solid. This may take up to a minute. If, after a minute, the button continues to blink rapidly, setup failed and you should try again.
6 Your soundbar is now connected to your wireless network. Reconnect your mobile device or PC to your wireless network. You may re-name your device using the app.
CONNECTING TO A WIRELESS NETWORK: Wi-Fi PROTECTED SETUP (WPS)
Wi-Fi Protected Setup (WPS) is a feature found on most
wireless routers that allows your soundbar product to securely and automatically connect without needing to enter a password. WPS is not a standard feature on all routers, and only one wireless device can be set up at a time.
Check your router's owner's manual to see if WPS is an available feature, or look for a button on your router marked with the WPS logo (If your router does not have WPS, then use the Access Point Wireless Setup.
- For optimal setup conditions place your soundbar next to your wireless router. The soundbar can be moved to its final location after Wi-Fi setup
- Plug in your soundbar and press the Power button.
- The Wi-Fi Status LED will start rapidly blinking for 20 seconds while your soundbar boots. If this is the first time your new soundbar is plugged in, the Wi-Fi Status LED will start pulsing slowly. If the soundbar is already configured to connect to a Wi-Fi network, the LED will turn solid (connected) or blink rapidly (not connected).
- For 3 seconds, press the soundbar's Wi-Fi Setup Button until you hear a tone. After a few seconds the Wi-Fi Status LED will blink twice in continuous intervals to indicate WPS mode. You can also choose "Wireless Setup > Push Button Setup" from the soundbar menu to enter WPS Setup Mode. At any time you can press the Wi-Fi Setup button again to cancel the setup mode.
5 Now push the WPS button ( ) on your router. -
Once the Wi-Fi Status LED is solid (not blinking), this indicates your soundbar is connected to the wireless network. This may take up to a minute. If, after a minute, the button continues to blink rapidly, setup failed and you should try again.
-
Connect your mobile device or PC to the same network as your soundbar. Launch the DTS PlayFi® app. Upon launching, it will automatically detect your soundbar and should prompt you to name your soundbar.
CONNECTING TO A WIRED NETWORK
- Using an Ethernet cable, connect your soundbar to your router.
- Plug in your soundbar and press the Power button.
- The Wi-Fi Status LED will start rapidly blinking for about 20 seconds while your soundbar is booting up.
- The Wi-Fi Status LED turns off when the soundbar is connected via Ethernet.
- Connect your mobile device or PC to the same network as your soundbar. Launch the DTS Play-Fi app. Upon launching, it will automatically detect your soundbar and should prompt you to name your soundbar.
ALTERNATE SETUP WITHOUT PLAY-FI APP
If you do not want to install and use the DTS Play-Fi® app you can still setup the soundbar to work with iTunes and AirPlay.
Alternate Connection Method:
- To avoid a delayed wireless set up, place your soundbar in close proximity to your router during wireless set up.
- Plug in your soundbar and press the Power button. The Wi-Fi Status LED will start rapidly blinking for about 20 seconds while your soundbar is booting up. If your soundbar is not configured to connect to your network, it will continue to blink. If this is the first time
your soundbar is plugged in, the Wi-Fi Status LED will start pulsing slowly. If the soundbar is already configured to connect to a Wi-Fi network, the LED will turn solid (connected) or blink rapidly (not connected).
- Once the Wi-Fi Status LED starts pulsing slowly, your soundbar is in Access Point Mode and ready to connect to your wireless network. Note: If the Wi-Fi Status LED does not pulse slowly, press and hold the Wi-Fi Setup button for 8 seconds. You will hear two tones—one at 3 seconds and another at 8 seconds. You can also choose "Wireless Setup > From Play-Fi App" from the soundbar menu to enter Access Point Mode. After 20 seconds, the Wi-Fi Status LED will begin pulsing slowly to indicate Access Point mode is ready. At anytime you can press the button again to cancel the setup mode.
- Ensure that Wi-Fi is enabled on your computer. Go to your computer's Wi-Fi setup. Select the Wi-Fi network with "Play-Fi" in the name.
- Once your soundbar is selected as the Wi-Fi network, open your web browser and type
http://192.168.0.1/index.html in the address bar. You will see a web page from your soundbar.
- Click on 'Set Up'. A list of wireless networks will be displayed. Click on the wireless network you wish to connect to.
- Enter the password for your wireless network then click 'Next'.
- Enter a name for your soundbar and then click 'Next' to connect your soundbar to your network.
- Your soundbar will attempt to connect to your network. Once the Wi-Fi Status LED turns solid (not blinking), this indicates your soundbar is connected to your wireless network. If the Wi-Fi Status LED rapidly blinks, setup failed and should be tried again.
- Connect your Mac or PC to the same network as your soundbar. Open your music application, press the AirPlay icon, and choose your speaker from the list.
PLAYING AUDIO USING PLAY-Fi
Note: Future updates to the DTS Play-Fi application may change functionality.
- Launch the DTS PlayFi app on your mobile device or PC (located in the system tray).
-
Android and iOS Device Users: Within the Play-Fi app, select your music source. You can choose from your personal music library, Internet Radio, or from select internet music services. PC Users: Any audio content from your computer can be streamed using Play-Fi.
-
If you have more than one Play-Fi® speaker connected to your network, you will be prompted to select the speaker to which you want to stream.
CONTROLLING MULTIPLE SPEAKERS
If you have more than one Play-Fi speaker connected to your network, you can simultaneously stream the same audio to multiple speakers.
- Android and iOS Device Users: Within the app, press the Play-Fi logo in the lower corner
of the app. PC Users: open the Play-Fi program using the icon in your system tray.
- Select additional devices to play audio from. PC Users: The free version of the Windows app may not allow streaming to multiple speakers. An upgraded version of the DTS PlayFi app, with this capability, can be purchased from the DTS website.
Note: 8 Play-Fi speakers can be synced to play the same audio content at the same time. We recommend up to 32 Play-Fi speakers on a network for the best experience, but the only limit to connected devices is how many your router can support.
TIP! Primary and Secondary Speakers
When streaming audio content to multiple devices, you will be asked to assign them to two categories: primary and secondary devices. The DTS Play-Fi
module requires a primary device be selected. This maximizes synchronization between multiple devices simultaneously streaming the same content.
Select the DTS Play-Fi device with the strongest signal as your primary device. Secondary devices connect to your primary device, so if you disable your primary device, you will need to select a new primary device before audio resumes on your secondary devices.
ADDITIONAL PLAY-FI FEATURES
New versions of the Play-Fi app will add features not mentioned in this manual. Please refer to the app and related documentation for details on new and enhanced features such as streaming different audio content to multiple zones and grouping of two discrete speakers for stereo (left/right) playback.
How to use CONNECT
You'll need Spotify Premium to use Connect, see details overleaf.
- Add your new device to the same Wi-Fi network as your phone, tablet or PC (see product user instructions for details).
- Open the Spotify app on your phone, tablet or PC, and play any song.
-
If you're using the app on a phone - tap the song image in the bottom left of the screen. For tablet and PC move to step 4.
-
Tap the Connect icon

- Pick your device from the list. If you can't see it, just check it's connected to the same Wi-Fi network as your phone, tablet or PC.
All done! Happy listening.
Licenses
The Spotify Software is subject to third party licenses found here: www.spfoty.com/connect/third-party-licenses.
UPDATES AND REBOOTING
To completely reboot your soundbar, disconnect the power cord, wait 30 seconds, and plug it back
in. Press the power button to turn the soundbar on. This reboot will cycle the power off and on and force the soundbar to reconnect to your network.
SOUNDBAR FIRMWARE UPDATE
Your soundbar MCU may occasionally require firmware updates. Please check www.martinlogan.com for the latest firmware updates.
DTS PLAY-FI MODULE UPDATE
The DTS Play-Fi Caprica module within your soundbar will occasionally require a firmware update. If an
update is needed, the DTS PlayFi app will notify you and guide you through the update process.
DTS PLAY- 圆 APP UPDATE
If the DTS Play-Fi app on your mobile device or PC requires an update, you will be notified that an update is available and guided through the update process.
ARCTM (ANTHEM ROOM CORRECTION)
Even when the finest speakers are perfectly positioned, the room itself still has a dramatic impact on any system's sound, an impact more profound than that of any individual component. Various solutions have fallen in and out of favor over the years, but none has solved the problem of "the room." Until ARC.
Using proprietary processes and the power of your PC, the ARC system analyzes each speaker's inroom sound, then computes the required correction to yield optimal performance from every speaker. It's a process that takes approximately 15 minutes. Anthem's approach is a true audiophile solution to the problems of the room.
IMPORTANT! The listening space must be silent. A noisy computer fan, a dishwasher or microwave running, etc. can negatively affect ARC's measurements.
How to Use ARC Technology:
- Ensure that your soundbar is already connected to your home network and is powered on.
- Use the menu system to make sure the soundbar's Power Settings > IP Control is set to "On".
Download the latest Window's version of ARC-2 software from www.anthemav.com or "Anthem ARC Mobile" from the iTunes App Store and install it. Follow the on-screen instructions. - Window's only: Using the USB cable, connect the ARC microphone to a Windows PC. The USB cable and ARC microphone are provided with your soundbar.
- Look for the icon and launch the ARC program. Follow the prompts on your screen to
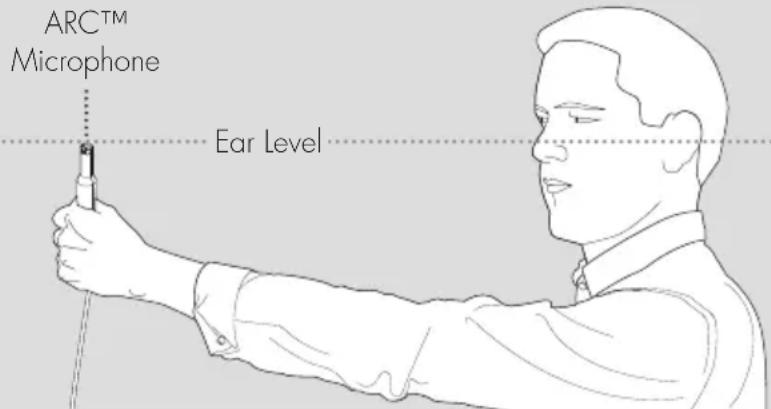
Fig. 14
successfully run the ARCTM software; the entire process should take approximately 15 minutes.
6. Hold the ARC microphone with your arm fully extended, the ARC microphone tip must point towards the ceiling and it must be positioned at ear level.
- For best results, hold the microphone in 5 positions around the room.
TIP! Once the ARC process is complete, the audio will be played back reflecting these corrections. To turn ARC correction on and off, use the menu and navigate to 'Anthem Room Correction'.
GENERAL INFORMATION
WARRANTY INFORMATION
Your soundbar is provided with an automatic Limited 90 Day Warranty coverage. You have the option, at no additional charge, to receive a Limited 2 Year Warranty coverage. For your convenience, MartinLogan offers online warranty registration at www.martinlogan.com.
MartinLogan may not honor warranty service claims unless we have a completed Warranty Registration card on file! If you did not receive a Certificate of Registration with your new soundbar, you cannot be assured of having received new units. If this is the case, please contact your authorized MartinLogan dealer.
SERVICE
Should you use your MartinLogan product in a country other than the one in which it was originally purchased, we ask that you note the following:
1 The appointed MartinLogan distributor for any given country is responsible for warranty servic
ing only on units distributed by or through it in that country in accordance with its applicable warranty.
2 Should a MartinLogan product require servicing in a country other than the one in which it was originally purchased, the end user may seek to have repairs performed by the nearest MartinLogan distributor, subject to that distributor's local servicing policies, but all cost of repairs (parts, labor, transportation) must be borne by the owner of the MartinLogan product.
3 If, after owning your speaker for six months, you relocate to a country other than the one in which you purchased your speaker, your warranty may be transferable. Contact MartinLogan for details.
SERIAL NUMBER
The serial number is located on back of the soundbar, near the connection panel. The serial number may also be found on the product carton.
CONTACTING CUSTOMER SERVICE
MartinLogan customer service is available Monday-Friday between the hours of 8am-5pm (central time) by calling (785) 749-0133 or by emailing service@martinlogan.com.
Frequently Asked Questions
Can my soundbar be used as a dedicated center channel?
No. The soundbar is designed to work as a 2-channel stereo or multi-channel surround sound playback device.
Why is my soundbar not reproducing multi-channel (surround sound) audio?
This could be caused by any number of things. Review the "Connection" section of this manual for a better understanding of recommended connection methods and possible options that might impact the soundbar's ability to receive multi-channel encoded audio from your television and other audio/video source components.
Will this soundbar decode Dolby® TrueHD or DTS-HD Master Audio™?
No. This soundbar will not decode Dolby TrueHD or DTS-HD Master Audio™. If your audio source (most likely a Blu-ray player) supports either of these formats, you should configure it to default to the Dolby Digital or DTS Digital Surround™ encoded sound track.
How do I connect the soundbar if my television does not have HDMI or digital optical outputs?
If your television has analog outputs these can be used instead. For a digital connection connect the digital audio output of your cable box (or DVD, Blu-ray, game console, etc.) directly to the soundbar using a HDMI or digital optical cable. A direct digital connection with a source component is always ideal
How do I clean my soundbar?
Use a dust free cloth (such as a micro fiber cloth) or a soft brush to remove dust from your speakers. Do not spray any kind of cleaning agent on or in close proximity to the drivers.
Can I use other cables other than those provided with the soundbar?
Cables included with the soundbar are intended to get you started. You may find it necessary to augment your system with additional cables or replace the included cables with cables of different length.
Can I mount this soundbar on the wall with a mounting bracket that pivots?
MartinLogan does not provide a pivoting wallbracket for this soundbar. Aftermarket options may exist, but we can not recommend or guarantee a specific brand or model.
Could you suggest a list of suitable electronics and cables ideal for MartinLogan speakers?
We have no favorites and use electronics and cables quite interchangeably. We would suggest trying a number of brands—and above all else—trust your ears. Dealers are always the best source for information when purchasing additional audio equipment.
Is there likely to be any interaction between my speakers and the television in my A/V system?
Yes, but only with CRT televisions. This soundbar is not magnetically shielded and should be kept at least 2 feet away from a CRT television. LCD and plasma televisions will not be affected.
How can I remove the grille cloth from the soundbar?
The soundbar grille cover is not removable.
TROUBLESHOOTING
I'm having trouble using the Play-Fi® app.
- For information on the DTS Play-Fi app, please visit: https://play-fi.com/faq
Soundbar does not turn on.
- Check that the soundbar's AC power cord is firmly attached to the AC Power In input and plugged into a working AC outlet.
The Wi-Fi Status LED does not light up.
- When connected to a network with an Ethernet cable, this light will turn off.
I am unable to connect my soundbar to my network.
- Verify that your wireless network is functioning.
- Your router's wireless signal may be weak on your soundbar may be out of the range of your Wi-Fi network. Move the soundbar closer to the router or use an Ethernet connection instead.
- Reboot your soundbar. Unplug the soundbar, wait 30 seconds, plug it back in, and press the Power button. This reboot will cycle the power off and on and force the soundbar to reconnect to your network.
- Reset your soundbar to factory settings. From the menu choose 'Service > Factory Reset > At Home > Yes'. The soundbar will respond with 'Resetting'. Once complete, your soundbar will be reset to factory default home settings. After a reset has been performed, there is no way to recover the previous user configured settings.
The Play-Fi app cannot find my soundbar.
-
If you are trying to setup your soundbar, verify the soundbar is fully powered on and in Access Point Mode (Wi-Fi Status LED is pulsing slowly). If the Wi-Fi Status LED does not pulse slowly, press and hold the Wi-Fi Setup button for 8 seconds. You will hear two tones—one at 3 seconds and another at 8 seconds.
-
Verify you are within the recommended range of your wireless router.
- Verify your mobile device or PC has its Wi-Fi enabled or is otherwise connected to your network.
- Verify there are no other apps running on your device that might impede wireless connectivity to your network.
- Restart your phone, tablet or PC.
- If you still can't find the soundbar on your network and are in an office environment, verify with your network administrator that no special permissions are enabled that would prevent external wireless devices from communicating with the network.
- If the soundbar is still not found, uninstall, re-download, and re-install the DTS Play-Fi® app on your mobile device or PC. Reboot the soundbar. Unplug the soundbar, wait 30 seconds, plug it back in, and press the Power button. This reboot will cycle the power off and on and force the soundbar to reconnect to your network.
The Play-Fi app reports "Play-Fi Devices Lost."
- Check that your device is powered on.
- Verify you have a strong network signal.
- Verify the network connection has not been lost.
- Check for other devices that might be causing heavy network traffic.
- Verify that your mobile device or PC has not left the range of your router.
- Verify that your mobile device or PC and your soundbar are connected to the same network.
- Verify that your soundbar's wireless streaming has not been taken over by another app.
- Exit and then restart the DTS Play-Fi app.
- Uninstall, re-download, and re-install the DTS Play-Fi app on your mobile device or PC.
- Reboot the soundbar. Unplug the soundbar, wait 30 seconds, plug it back in, and press the Power button. This reboot will cycle the power
off and on and force the soundbar to reconnect to your network.
No output from the soundbar
- Check that the soundbar is turned on.
- Check that the soundbar is not muted.
- Check that the soundbar's volume is not turned all the way down.
- Check that the soundbar is set to the proper input.
- Check that all system components are turned on and source material is playing.
- Turn the soundbar off and on using the remote control or the control power button.
- Unplug the sound bar, wait 30 seconds, and plug it back in.
- Check that all interconnecting cables are connected at both ends.
- If necessary, try connecting an alternate source component to make sure the original source component isn't the problem.
No surround sound
- Review the "Connection" section of this manual for a better understanding of recommended connection methods and possible options that might impact the soundbar's ability to receive multichannel encoded audio from your television and other audio/video source components.
Sound is coming from both my soundbar and my television
- When utilizing the soundbar to reproduce audio, the television's audio output should be defeated. Some televisions will allow you to turn off the internal speaker via the television's menu system. Other televisions may require you to turn the television's volume to "zero" or to "mute" the television.
The soundbar is too quiet even when the soundbar is turned up
- Check that the output on your television or other source components are not connected via
a variable level output. Sometimes this option may be configured in your source components menu. Please refer the manual for the source component in question.
Soundbar won't learn remote codes from aftermarket remote
- Review the "Menu Option: Learn" section of this manual.
- Hold the remote 12 inches (30 cm) from the soundbar during the learning process.
- Press the appropriate button on the second remote four times.
- If the soundbar has already learned a remote code and you are attempting to program the same code to a second function the soundbar will respond with "Fail".
- There may be remote controls that the soundbar cannot learn or that the soundbar can not learn correctly. Due to the number of available remote controls, it is impossible to advise which will or will not work.
- Check the user manual and/or manufacturer's web-site for your aftermarket remote to see if MartinLogan is supported. If so, instead of 'learning' with the soundbar, use the code provided by the manufacturer to program the aftermarket remote itself.
Soundbar remote won't work
- Replace the remote control's batteries with matching batteries.
- Make sure the batteries are installed in the proper orientation.
- If new batteries do not fix the problem, you may have a faulty remote. Call MartinLogan customer service at 785-749-0133 for details.
When using an aftermarket remote, the soundbar turns off when the television turns on
- Turn the television on. Manually press the Power button on the soundbar so that both
the soundbar and television are both on at the same time.
No sound coming from external sub
- Check that the external sub is turned on.
- Check that the soundbar is configured for a wired or wireless subwoofer connection. Refer to the "Subwoofer Connection" section of this manual.
- If utilizing a wired connection, check that the subwoofer cables are attached to the Sub Out connection on the soundbar and to the appropriate input on the subwoofer.
-
If utilizing a wireless connection, attempt to re-sync the wireless connection. Refer to the "Subwoofer Connection" section of this manual. If a sync attempt has failed, you may need to power down both the soundbar and subwoofer wireless receiver before trying to re-sync.
-
If utilizing a wireless connection, move the subwoofer closer to the soundbar.
- Turn the soundbar off and on using the remote control or control panel power button.
- Unplug the sound bar, wait 30 seconds, and plug it back in.
External sub is too quiet
- Turn up the volume on the subwoofer.
- Adjust the bass level setting in the soundbar menu system.
- Try moving the subwoofer to a different location in the listening room.
My soundbar is not behaving as expected.
- Turn the soundbar off and on using the remote control or control panel power button.
- Unplug the sound bar, wait 30 seconds, and plug it back in.
SPECIFICATIONS*
Frequency Response
65-20,000 Hz (± 2 dB 1/3 octave smoothing on channel axis)
Amplifier Power
135 Watts (270 Watts peak) combined total output across 9 amplifiers.
Full-Range Frequency Drivers
Nine 2.5 (6.4cm) high excursion composite cone. Non-resonant asymmetrical chamber format.
Cabinet
Sealed
Components.
DSP based preamplifier.
Decoding
Dolby® Digital, DTS Digital Surround™
Inputs.
(4x) HDMI, (2x) Optical SPDIF (digital optical), (2x) Analog stereo RCA, Wi-Fi, Bluetooth,
Outputs
HDMI ARC Out, (1x) Subwoofer Out via analog RCA, IR repeater
Wireless Connectivity
2.4 GHz and 5.0 GHz; 802.11 a/b/g/n
Wireless Input
Apple AirPlay, DTS Play-Fi®. Bluetooth
Wireless Subwoofer Output
Built-in SWT-SB Subwoofer Wireless Transmitter
AC Adaptor (SWT-SB Receiver)
(ICP12-090-0500D:Shenzhen Shi Ying Yuan Electronics Co.,Ltd,China)
Input: AC 100-240V, 50/60Hz
Output: DC 9V, 0.5A
Power Draw.
Max: 180 Watts, Standby: < 0.5 Watts
Remote Battery.
(2x) AAA
Weight.
12.7 lbs. (5.4 kg)
Dimensions (HxWxD), Table Mount .
3.5 × 46.1 × 5 (8.9cm× 117cm× 12.7cm)
Dimensions (HxWxD), Wall Mount.
5 × 46.1 × 3.9 (12.7cm× 117cm× 9.9cm)
DIMENSIONAL DRAWINGS WALL MOUNT CONFIGURATION
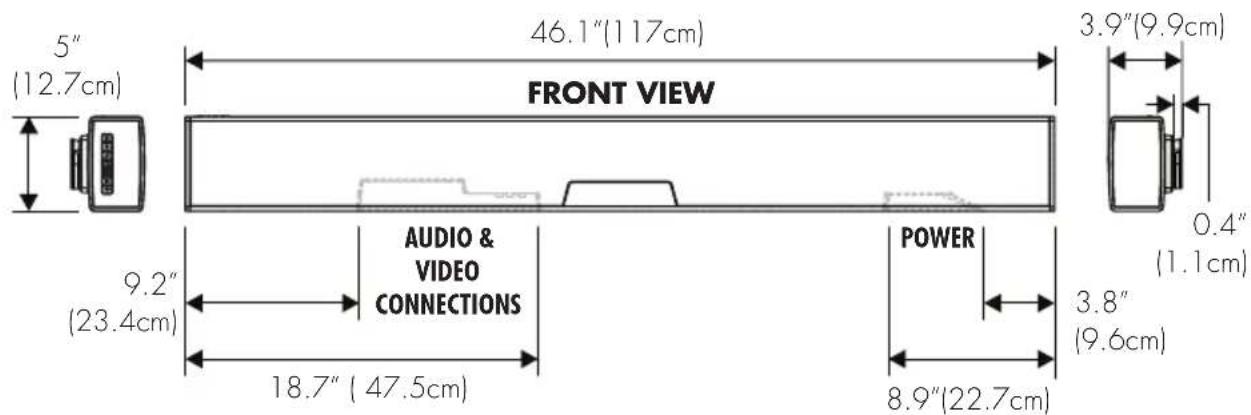
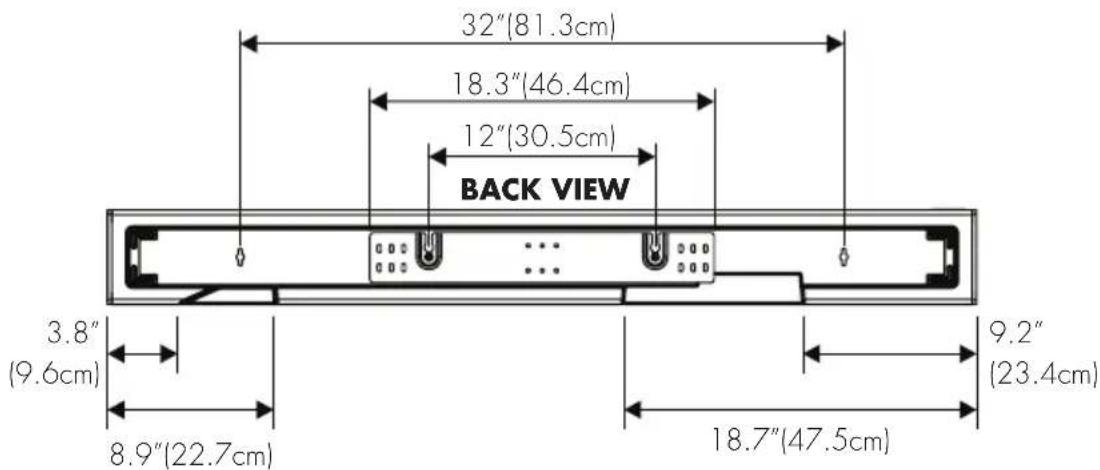
DIMENSIONAL DRAWINGS TABLE MOUNT CONFIGURATION
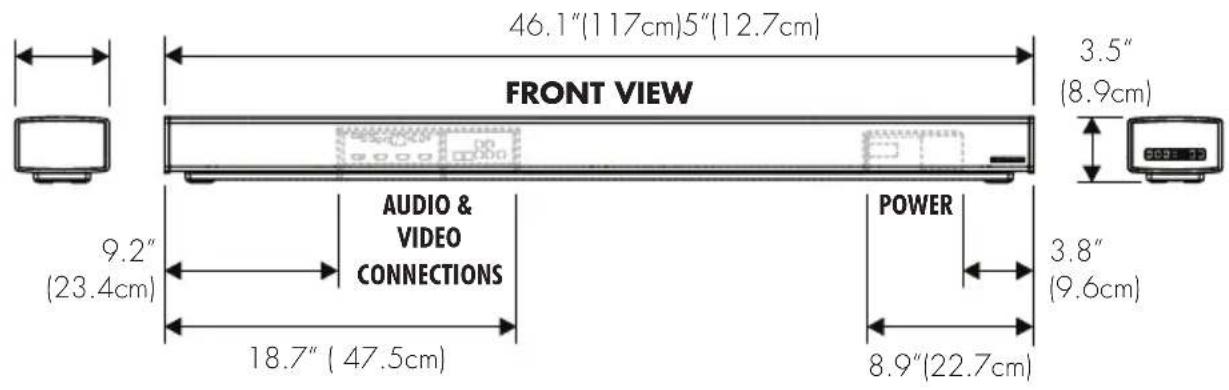
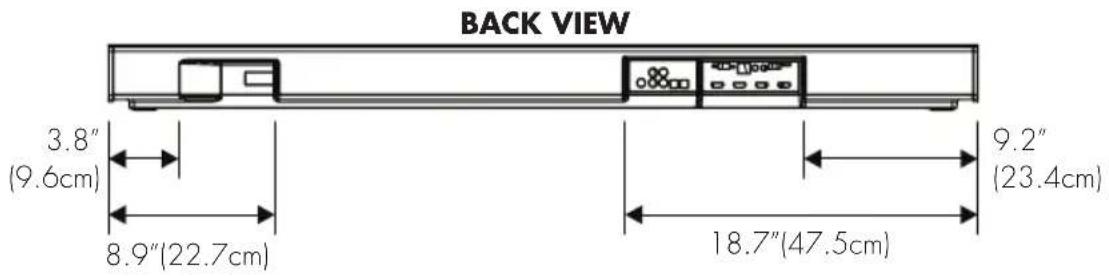
DIMENSIONAL DRAWINGS SUBWOOFER WIRELESS RECEIVER
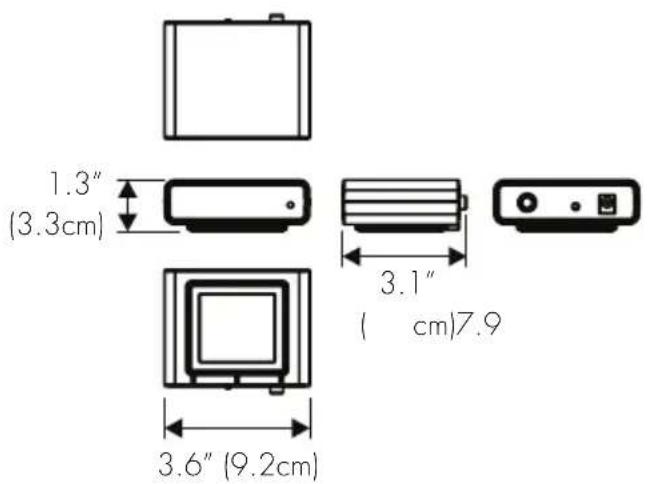

MARTINLOGAN
Lawrence, Kansas, USA tel 785.749.0133 fax 785.749.5320 www.martinlogan.com
Cadence
device could void the user's authority to operate the equipment.
Bass mode (mode graves) 71
Display (affichage) 71
HDMI 72
Anthem room correction. 73
Bass Mode - Bass+ (Mode graves - graves +):
5Lancez I'application DTS PlayFi MD
www.spotify.com/connect/third-party-licenses.
MISES À JOUR ET REDÉMARRAGE
REDÉMARRAGE DE LA BARRE DE SON

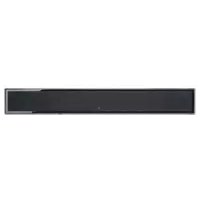
- CADENCE
- IMPORTANT SAFETY INSTRUCTIONS
- FEDERAL COMMUNICATIONS COMMISSION INTERFERENCE
- CAUTION
- CONTAINS TRANSMITTER MODULE FCC ID: 2AAWQ-CAPRICA2L
- CONTAINS FCC ID:MBBDMRS4
- MODEL NUMBER:CADENCE
- WEEE NOTICE
- WARNING/CAUTION
- MADE FOR
- INTRODUCTION AND OVERVIEW
- PLACEMENT AND MOUNTING
- LOCATION
- INSTALLING ON A FLAT SURFACE
- ON-WALL INSTALLATION
- REQUIRED TOOLS (NOT INCLUDED)
- REQUIRED HARDWARE (INCLUDED)
- REQUIRED HARDWARE (NOT INCLUDED)
- CONNECTION
- POWER CONNECTION
- SIGNAL CONNECTION
- NETWORK CONNECTION
- SUBWOOFER CONNECTION
- NO SUBWOOFER
- WIRED SUBWOOFER CONNECTION
- WIRELESS SUBWOOFER CONNECTION
- IR OUTPUTS
- AN INTRODUCTION TO AUDIO CONNECTIONS
- AN INTRODUCTION AUDIO STREAMING CONNECTIONS
- VOLUME BEHAVIOR BY INPUT
- CONTROL PANEL
- REMOTE CONTROL
- CHANGING THE REMOTE'S BATTERY
- PROGRAMMING A SECOND REMOTE
- DISPLAY
- THE MENU SYSTEM
- ENTERING AND EXITING THE MENU
- NAVIGATING THE MENU
- MENU OPTION: INSTALLATION
- MENU OPTION: SUBWOOFER
- AN OVERVIEW OF THE MENU STRUCTURE
- AN OVERVIEW OF THE MENU STRUCTURE (CONTINUED)
- MENU OPTION: BASS LEVEL
- MENU OPTION: SURROUNDSD
- MENU OPTION:STEREO MODE
- MENU OPTION: BASS MODE
- MENU OPTION: DISPLAY
- MENU OPTION: HDMI
- MENU: ANTHEM ROOM CORRECTION
- MENU OPTION: POWER SETTINGS
- POWER SETTINGS > POWER STANDBY > AUTO
- POWER SETTINGS > POWER STANDBY
- MENU OPTION: WIRELESS SETUP
- WIRELESS SETUP > BLUETOOTH PAIRING
- MENU OPTION: LEARN REMOTE
- LEARN REMOTE > RESET REMOTE >YES
- MENU OPTION: SOURCE NAME
- MENU OPTION: SERVICE
- DIGITAL INPUTS (HDMI AND OPTICAL)
- ANALOG INPUT
- DTS PLAY- FI圆 AND NETWORK CONNECTION
- NETWORK REQUIREMENTS
- DTS PLAY- 圆 APP REQUIREMENTS
- WI-FI STATUS LED
- DOWNLOADING THE DTS PLAY-FI APP
- CONNECTING TO A WIRELESS NETWORK: ACCESS POINT SETUP
- ANDROID DEVICE USERS
- IOS DEVICE USERS
- PC USERS
- CONNECTING TO A WIRELESS NETWORK: WI-FI PROTECTED SETUP (WPS)
- CONNECTING TO A WIRED NETWORK
- ALTERNATE SETUP WITHOUT PLAY-FI APP
- ALTERNATE CONNECTION METHOD
- PLAYING AUDIO USING PLAY-FI
- CONTROLLING MULTIPLE SPEAKERS
- TIP! PRIMARY AND SECONDARY SPEAKERS
- ADDITIONAL PLAY-FI FEATURES
- HOW TO USE CONNECT
- UPDATES AND REBOOTING
- SOUNDBAR FIRMWARE UPDATE
- DTS PLAY-FI MODULE UPDATE
- DTS PLAY- 圆 APP UPDATE
- ARCTM (ANTHEM ROOM CORRECTION)
- HOW TO USE ARC TECHNOLOGY
- GENERAL INFORMATION
- WARRANTY INFORMATION
- SERVICE
- SERIAL NUMBER
- CONTACTING CUSTOMER SERVICE
- FREQUENTLY ASKED QUESTIONS
- CAN MY SOUNDBAR BE USED AS A DEDICATED CENTER CHANNEL
- WHY IS MY SOUNDBAR NOT REPRODUCING MULTI-CHANNEL (SURROUND SOUND) AUDIO
- WILL THIS SOUNDBAR DECODE DOLBY® TRUEHD OR DTS-HD MASTER AUDIO™
- HOW DO I CONNECT THE SOUNDBAR IF MY TELEVISION DOES NOT HAVE HDMI OR DIGITAL OPTICAL OUTPUTS
- HOW DO I CLEAN MY SOUNDBAR
- CAN I USE OTHER CABLES OTHER THAN THOSE PROVIDED WITH THE SOUNDBAR
- CAN I MOUNT THIS SOUNDBAR ON THE WALL WITH A MOUNTING BRACKET THAT PIVOTS
- COULD YOU SUGGEST A LIST OF SUITABLE ELECTRONICS AND CABLES IDEAL FOR MARTINLOGAN SPEAKERS
- IS THERE LIKELY TO BE ANY INTERACTION BETWEEN MY SPEAKERS AND THE TELEVISION IN MY A/V SYSTEM
- HOW CAN I REMOVE THE GRILLE CLOTH FROM THE SOUNDBAR
- TROUBLESHOOTING
- I'M HAVING TROUBLE USING THE PLAY-FI® APP
- SOUNDBAR DOES NOT TURN ON
- THE WI-FI STATUS LED DOES NOT LIGHT UP
- I AM UNABLE TO CONNECT MY SOUNDBAR TO MY NETWORK
- THE PLAY-FI APP CANNOT FIND MY SOUNDBAR
- THE PLAY-FI APP REPORTS "PLAY-FI DEVICES LOST
- NO OUTPUT FROM THE SOUNDBAR
- NO SURROUND SOUND
- SOUND IS COMING FROM BOTH MY SOUNDBAR AND MY TELEVISION
- THE SOUNDBAR IS TOO QUIET EVEN WHEN THE SOUNDBAR IS TURNED UP
- SOUNDBAR WON'T LEARN REMOTE CODES FROM AFTERMARKET REMOTE
- SOUNDBAR REMOTE WON'T WORK
- WHEN USING AN AFTERMARKET REMOTE, THE SOUNDBAR TURNS OFF WHEN THE TELEVISION TURNS ON
- NO SOUND COMING FROM EXTERNAL SUB
- EXTERNAL SUB IS TOO QUIET
- MY SOUNDBAR IS NOT BEHAVING AS EXPECTED
- SPECIFICATIONS
- DIMENSIONAL DRAWINGS WALL MOUNT CONFIGURATION
- DIMENSIONAL DRAWINGS TABLE MOUNT CONFIGURATION
- DIMENSIONAL DRAWINGS SUBWOOFER WIRELESS RECEIVER
- MARTINLOGAN
- BASS MODE - BASS+ (MODE GRAVES - GRAVES +)
- MISES À JOUR ET REDÉMARRAGE
- REDÉMARRAGE DE LA BARRE DE SON
Brand : Martin Logan
Model : Cadence & Verse
Category : Soundbar