IPTV32SULP3FHD110DW - TV Sulpice - Free user manual and instructions
Find the device manual for free IPTV32SULP3FHD110DW Sulpice in PDF.
Download the instructions for your TV in PDF format for free! Find your manual IPTV32SULP3FHD110DW - Sulpice and take your electronic device back in hand. On this page are published all the documents necessary for the use of your device. IPTV32SULP3FHD110DW by Sulpice.
USER MANUAL IPTV32SULP3FHD110DW Sulpice
#BOOTCASTER_ACTUVÉ AVEC
Supported Video File Formats for USB Mode
Supported Picture File Formats for USB Mode
Supported Audio File Formats for USB Mode ...... 25 Supported Subtitle File Formats for USB Mode
CAUTION: TO REDUCE THE RISK OF ELECTRIC SHOCK DO NOT REMOVE COVER (OR BACK). NO USER-SERVICEABLE PARTS INSIDE. REFER SERVICING TO QUALIFIED SERVICE PERSONNEL. Note: Follow the on screen instructions for operating the related features. In extreme weather (storms, lightning) and long inactivity periods (going on holiday) disconnect the TV set from the mains. The mains plug is used to disconnect TV set from the mains and therefore it must remain readily operable. If the TV set is not disconnected electrically from the mains, the device will still draw power for all situations even if the TV is in standby mode or switched o. IMPORTANT - Please read these instructions fully before installing or operating
WARNING: Never let people (including
children) with reduced physical, sensory or mental capabilities or lack of experience and / or knowledge use electrical devices unsupervised.
- Use this TV set at an altitude of less than 2000 meters above the sea level, in dry locations and in regions with moderate or tropical climates.
- The TV set is intended for household and similar general use but may also be used in public places.
- For ventilation purposes, leave at least 5cm of free space around the TV.
- The ventilation should not be impeded by covering or blocking the ventilation openings with items, such as newspapers, table-cloths, curtains, etc.
- The power cord plug should be easily accessible. Do not place the TV, furniture, etc. on the power cord. A damaged power cord/plug can cause fire or give you an electric shock. Handle the power cord by the plug, do not unplug the TV by pulling the power cord. Never touch the power cord/plug with wet hands as this could cause a short circuit or electric shock. Never make a knot in the power cord or tie it with other cords. When damaged it must be replaced, this should only be done by qualified personnel.
- Do not expose the TV to dripping or splashing of liquids and do not place objects filled with liquids, such as vases, cups, etc. on or over the TV (e.g., on shelves above the unit).
- Do not expose the TV to direct sunlight or do not place open ames such as lit candles on the top of or near the TV.- 2 -
CLASS 1 LASER PRODUCT
WALL MOUNTING WARNINGS
- Read the instructions before mounting your TV on the wall.
The wall mount kit is optional. You can obtain from your local dealer, if not supplied with your TV.
not install the TV on a ceiling or on an inclined wall.
Use the specified wall mounting screws and other accessories.
Tig hten the wall mounting screws firmly to prevent the TV from fall. Do not over-tighten the screws. WARNING Apparatus connected to the protective earthing of the building installation through the MAINS con- nection or through other apparatus with a connec- tion to protective earthing – and to a television dist- ribution system using coaxial cable, may in some circumstances create a fire hazard. Connection to a television distribution system has therefore to be provided through a device providing electrical iso- lation below a certain frequency range (galvanic isolator, see EN 60728-11) Optional The Word ‘Optional’ is used in these instructions to mean a feature or function is only available on some models. Accessories Included
- Batteries: 2xAAA TV Control Switch & Operation
3. Volume / Info / Sources List selection and
Standby-On switch The Control button allows you to control the Volume / Programme / Source and Standby-On functions of the TV. To change volume: Increase the volume by pushing the button up. Decrease the volume by pushing the button down. To change channel: Press the middle of the button, the information banner will appear on the screen. Scroll through the stored channels by pushing the button up or down. To change source: Press the middle of the button twice(for the second time in total), the source list will appear on the screen. Scroll through the available sources by pushing the button up or down. To turn the TV o: Press the middle of the button down and hold it down for a few seconds, the TV will turn into standby mode. Notes:
- If you turn the TV off, this circle starts again beginning with the volume setting.
- Main menu OSD cannot be displayed via control button. Operation with the Remote Control Press the Menu button on your remote control to display main menu screen. Use the directional buttons to select a menu tab and press OK to enter. Use the directional buttons again to select or set an item. Press Return/Back or Menu button to quit a menu screen. Input Selection Once you have connected external systems to your TV, you can switch to dierent input sources. Press theEnglish - 4 - Source button on your remote control consecutively to select the dierent sources. Changing Channels and Volume You can change the channel and adjust the volume by using the Volume +/- and Programme +/- buttons on the remote. Inserting the Batteries into the Remote
- Remove the screw that secure the battery compartment cover on the back side of the remote control.
- Insert two size AAA batteries. Note the correct polarity (+ or -). Do not mix old and new batteries. Replace only with same or equivalent type.
- Place the cover back on.
- Screw the cover back on Angle of the remote control unit Use the remote control unit by pointing it towards the remote control sensor. Objects between the remote control unit and sensor may prevent proper operation. Cautions regarding the remote control unit
- Do not expose the remote control unit to shock. In addition, do not expose the remote control unit to liquids, and do not place in an area with high humidity.
- Do not install or place the remote control unit under direct sunlight. The heat may cause deformation of the unit.
- The remote control unit may not work properly if the remote control sensor of the TV is under direct sunlight or strong lighting. In such cases, change the angle of the lighting or the TV, or operate the remote control unit closer to the remote control sensor. Connect Power IMPORTANT: The TV set is designed to operate on 220-240V AC, 50 Hz socket. After unpacking, allow the TV set to reach the ambient room temperature before you connect the set to the mains. Plug the power cable to the mains socket outlet. Switching On/O To Switch the TV On Connect the power cord to a power source such as a wall socket (220-240V AC, 50 Hz). To switch on the TV from standby mode either:
- Press the Standby button, Programme +/- or a numeric button on the remote control.
- Press the side function switch on the TV until the TV comes on from standby. To Switch the TV O Press the Standby button on the remote control or press the side function switch on the TV until the TV switches into standby mode. To power down the TV completely, unplug the power cord from the mains socket. Note: When the TV is switched into standby mode, the standby LED can blink to indicate that features such as Standby Search, Over Air Download or Timer is active. The LED can also blink when you switch on the TV from standby mode.- 5 -
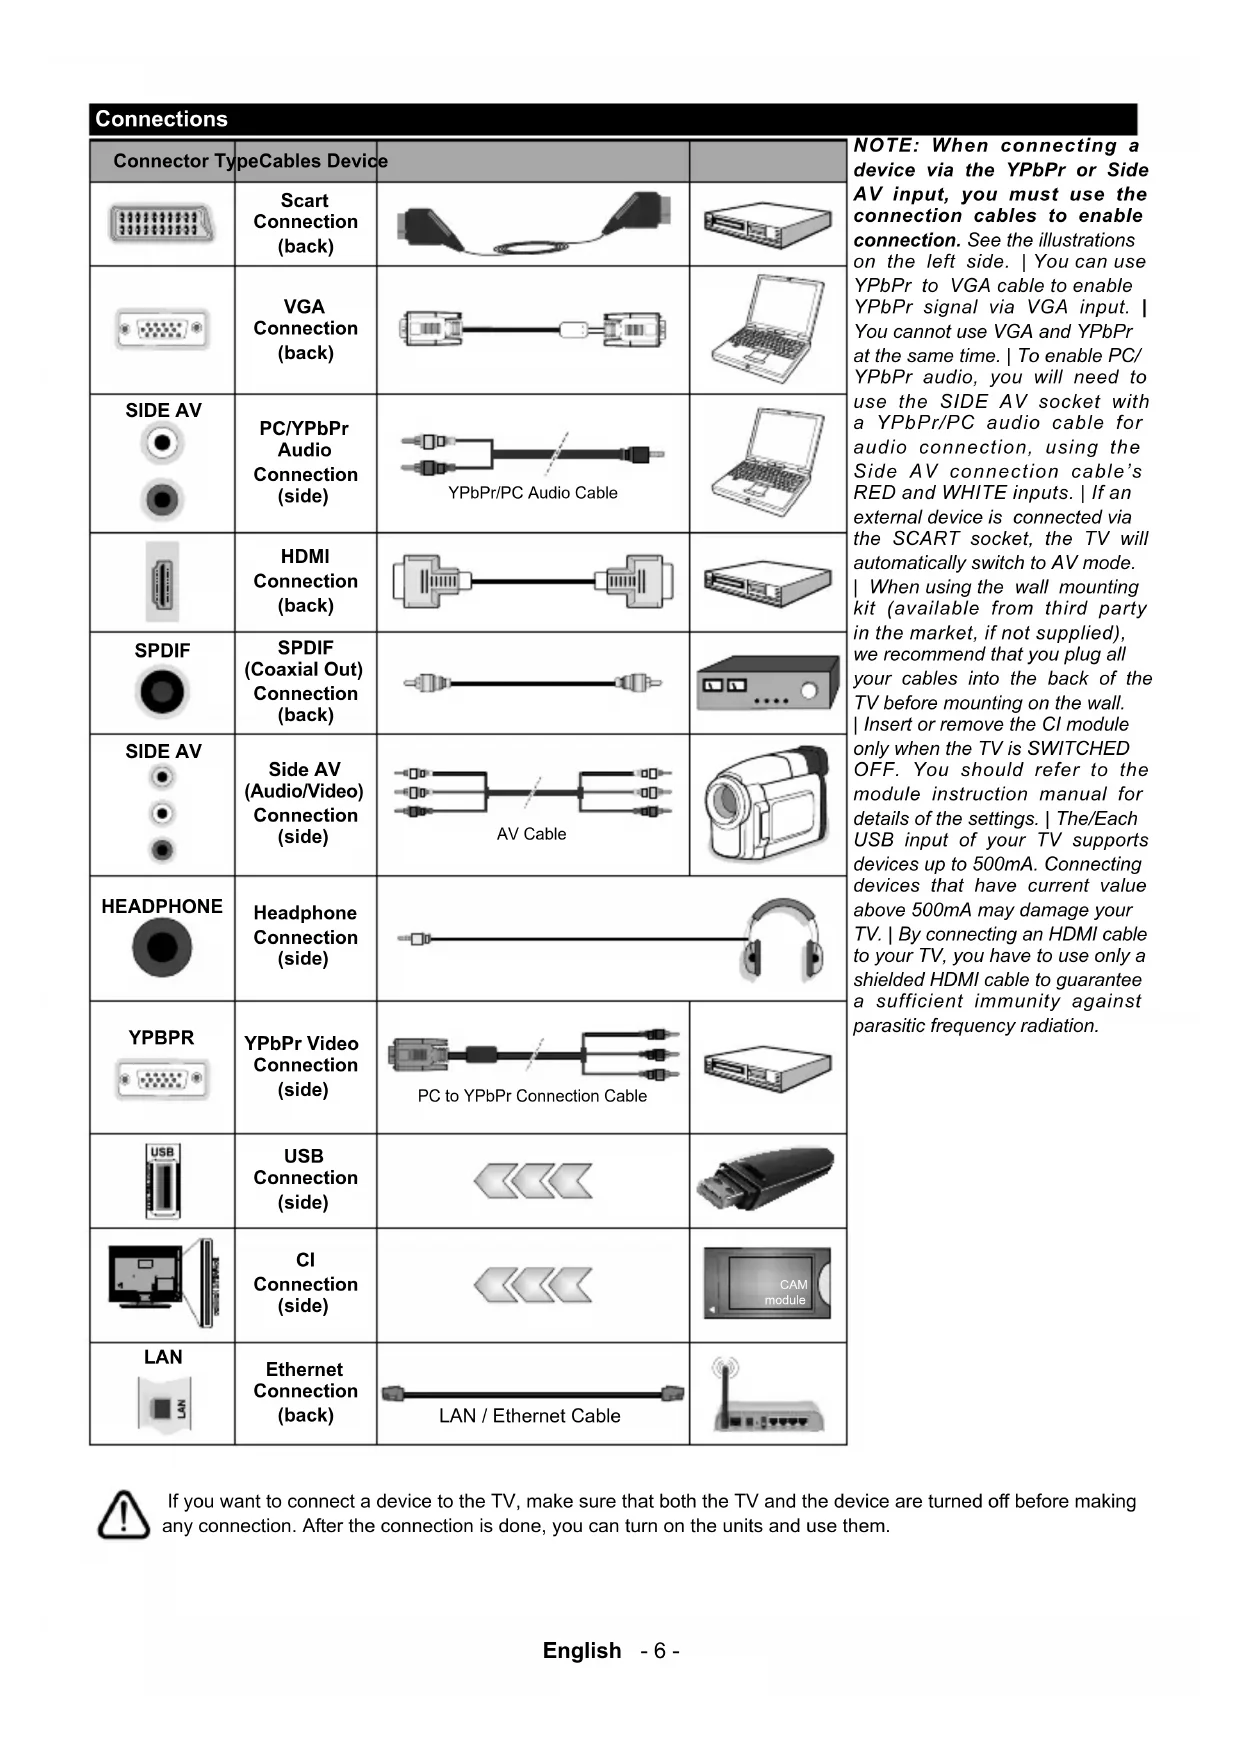
This button may have a default function depending on the model. However you can set a special function to this button by pressing on it for five seconds when on a desired source or channel. A confirmation message will be displayed on the screen. Now the MY BUTTON is associated with the selected function.English - 6 - Connections Connector Type Cables Device Scart Connection (back) VGA Connection (back) SIDE AV PC/YPbPr Audio Connection (side) YPbPr/PC Audio Cable HDMI Connection (back) SPDIF SPDIF (Coaxial Out) Connection (back) SIDE AV Side AV (Audio/Video) Connection (side) AV Cable HEADPHONE Headphone Connection (side) YPBPR YPbPr Video Connection (side) PC to YPbPr Connection Cable USB Connection (side)
Ethernet Connection (back) LAN / Ethernet Cable
NOTE: When connecting a device via the YPbPr or Side AV input, you must use the connection cables to enable connection. See the illustrations on the left side. | You can use YPbPr to VGA cable to enable YPbPr signal via VGA input. | You cannot use VGA and YPbPr at the same time. | To enable PC/ YPbPr audio, you will need to use the SIDE AV socket with a YPbPr/PC audio cable for audio connection, using the Side AV connection cable’s RED and WHITE inputs. | If an external device is connected via the SCART socket, the TV will automatically switch to AV mode. | When using the wall mounting kit (available from third party in the market, if not supplied), we recommend that you plug all your cables into the back of the TV before mounting on the wall. | Insert or remove the CI module only when the TV is SWITCHED OFF. You should refer to the module instruction manual for details of the settings. | The/Each USB input of your TV supports devices up to 500mA. Connecting devices that have current value above 500mA may damage your TV. | By connecting an HDMI cable to your TV, you have to use only a shielded HDMI cable to guarantee a sufficient immunity against parasitic frequency radiation. If you want to connect a device to the TV, make sure that both the TV and the device are turned o before making any connection. After the connection is done, you can turn on the units and use them.English - 7 -
About Hotel TV This TV is intended to be used in hospitality facilities like hotels for demonstrating TV channels, video and music content on demand, providing useful information on current issues such as News, Weather forecast etc., hospitality services and accessing internet through a simply interface. TV channels and the other provided contents are delivered using the internet protocol over the LAN connection. The content is configured and managed in PC environment via a specialized software. Actually it is not possible to enter or display the TV setting menus, as this may harm the pre-loaded software on the TV. In case of need only the authorised service personel should be able to access these menus. The menus are accessable by pressing a specified combination of the bottons on the remote. HOTEL TV POWER ON Hotel Mode On Essentially the TV should be in Hotel TV mode. If you don’t see the main opening screen, like shown on the template below, please contact the service department of the Hotel. Note: For further information on the installation and startup procedure of the IP Hotel TV system refer to “http://support. vestek.com.tr” or “http://vestelb2b.com/en”. You must log in by entering the user name and password provided below. (user name: iptv, password: vestel2004) How To Use The Hotel TV Interface The user interface of the Hotel TV consist of the following options.
To watch TV, highlight TV using directional buttons on the remote control and press the OK button. The TV will be switched into the TV source and the first channel on the active channel list will be displayed together with the channel list on the left side of the screen. Select the desired channel from the list using the directional buttons. Use Programme +/- or Numeric buttons to switch to another channel. Live TV channels(analogue, digital) and IPTV channels will be listed on the same channel list. Notes: Some channels on the channel list may be oered as pay-as-you-watch TV channels (pay channels). MOVIE To watch preloaded Movies on the connected servers of the Hotel, highlight MOVIE and press the OK button. On the next screen you should select the desired movie category, if defined. After selecting the desired Movie from the Hotel database, the CONFIRMATION screen will be displayed. You can watch the trailers if available, purchase and watch the selected movie. After highlighting the Purchase option and pressing the OK button, a confirmation message will be displayed along with the information on the selected movie regarding its name, price, duration etc. Highlight OK and press OK again to continue purchasing. Highlight Cancel and press the OK button to exit without purchasing. After purchasing, you will able to access the movie in the given period of time. Follow the on-screen instructions for exact informations.English - 8 - MUSIC To listen to the preloaded songs on the connected servers of the Hotel, highlight MUSIC and press the OK button. On the next screen you can select the desired music category, if defined. Then you can purchase and listen to the songs of the selected album of the selected artist. After selecting a song and pressing the OK button, a confirmation message will be displayed along with the information on the selected song/album regarding its artist name, price etc. After confirming the purchase by highlighting the Purchase option and pressing the OK button, you will be able to access the purchased song/album in the given period of time. Follow the on-screen instructions for exact informations. INFO Under this menu you can find informations on various issues under the titles such as News, Exchange Rates, World Clocks, Weather Forecast etc. You can also enter your comments about the Hotel and the service under the SURVEY title. Highlight INFO and press the OK button to access the info screen. SERVICES Under the SERVICES menu you can find available services provided by the Hotel such as Room Service, Wake Up Service and informations on hotel activities and billing data under the related titles. Press the Home button on the remote to return back to main opening screen. ADDITIONAL FEATURES HBBTV System (optional) HbbTV (Hybrid Broadcast Broadband TV) is a standard that seamlessly combines TV services delivered via broadcast with services delivered via broadband and also enables access to Internet only services for consumers using connected TV’s. Services delivered through HbbTV include traditional broadcast TV channels, catch-up services, video-on-demand, EPG, interactive advertising, personalisation, voting, games, social networking and other multimedia applications. HbbTV applications are available on channels where they are signalled by the broadcaster. The applications are generally launched with a small red button icon to notify the user that there is an HbbTV application on that channel. The user then should press the red button to open the application page. To close the application press the red button again. It should be noted that the operation and control of the applications may dier depending on the application. Using Audio Video Sharing Network Service (optional) The Audio Video Sharing standard allows you to view and play photos, music and videos stored in a compliant media server connected to the same network with your TV. Press Media Browser button on the remote, Media Browser menu screen will be displayed. Select the desired media type and press the OK button. On the next screen available media servers will be listed. Select the one you want to connect and press the OK button. You can browse the contents in the media server and play/display the desired media on your TV. Note: Trick mode and jump are not supported with the Audio Video Sharing function. Smart Center (optional) Smart Center is a mobile application running on iOS and Android platforms. With your handheld device, you can easily stream your favourite live shows and programmes from your TV. Also; you can use your tablet as a remote control for your TV and share media files. Note: Being able to use all functions of this application depends on the features of your TV. Install the Smart Center application onto your mobile device. Start the smart center application. You will see your TV’s name on your mobile device. If your TV’s name doesn’t appear on the list, wait a while and tap on the Refresh widget. Select your TV from the list.English - 9 - On the main screen you can find tabs to access various features. The application retrieves actual channel list from TV first when it starts. My Channels The programmes of first four channels from the channel list retrieved from the TV are shown. You can change the listed channels. Press on the channel thumbnail and hold. A list of channels will be displayed and you can choose your desired channel to be replaced.
You can watch content through the TV tab. In this mode you can navigate through the channel list retrieved from your TV and click on thumbnails to view the detail pages. Recordings (optional) You can view your active recordings(if available) and reminders through this tab. To delete any item, simply press on the delete icon found on each row. EPG You can view the broadcast schedules of selected channel lists through this tab. You can also navigate through channels by pressing on the selected channel on the EPG grid. Please note that updating / refreshing the EPG information may take a while depending on your network and web service quality. Note: Internet connection is required for WEB based EPG informations. Settings Configure the application to your liking. Detail Page To open detail page tap on a programme. On the detail page screen you can get detailed information of the programmes you select. There are “Details”, “Cast&Crew” and “Videos” tabs to find on this page. Details: This tab provides summary and information about the selected programme. Also there are links to facebook and twitter pages of the programme selected. Cast&Crew: Shows all the people contributed to the current programme. Videos: Provides videos on Youtube related to the selected programme. Note: For some functions an internet connection may be required. FollowMe TV Feature (if available) Tap on the FOLLOW ME TV widget located at the bottom left of the screen of your mobile device to change the layout for FollowMe TV feature. Tap the play icon to start streaming of the content from the TV to your mobile device. Available if your device is in your routers operation range. Notes: Note that only digital(DVB-T/C/S) SD channels are supported. Multilanguage audio support and subtitle on/o features are not functional. The streaming performance may change depending on the quality of your connection. Media Share Page To access the Media Share widget tap on the Up-arrow on the bottom left side of the screen. If the Media Share widget is pressed, a screen is displayed where you can select the media file type to share with your TV. Note: Not all image file formats are supported. This function will not work if Audio Video Sharing feature is not supported. Smart Remote Feature You can use your mobile device as a remote control for your TV once it has connected to the TV. To use smart remote’s full features tap on the Up-arrow on the bottom left side of the screen. Voice Recognation You can tap on the Microphone( ) widget and manage your application, giving voice commands such as “Volume Up/Down!”, “Programme Up/Down!”. Note: This feature is only for android based devices available.English - 10 - Keyboard Page The keyboard page can be opened in two ways; by pressing the Keyboard( ) widget on the application screen or automatically by receiving a command from the TV. Requirements
1. Mobile Device based on Android or iOS platform (Android OS 4.0 or higher; IOS 6 or higher version)
2. Smart Center app.(to be found on online application stores based on Android and iOS platforms)
3. USB storage device in FAT32 format (required for PVR feature, if available)
- For Android devices, Normal(mdpi), Large(hdpi) and Extra Large(xhdpi) screen sizes are supported. Devices with 3” or smaller screen sizes are not supported.
- For iOS devices, all screen sizes are supported.
- User interface of the Smart Center application is subject to change according to version installed on your device.
- The TV and the handheld device should be connected to the same network wirelessly. The TV’s IP number should be provided in order to be able to connect to it. If you don’t know the IP adress of your TV, please contact the service department of the Hotel. Smart Remote (optional) You can install a compatible Smart Remote application onto your handheld device in order to control your TV. Follow the instructions provided with the application to connect and learn more about using the application. Note: The TV and the handheld device should be connected to the same network wirelessly. The TV’s IP number should be provided in order to be able to connect to it. If you don’t know the IP adress of your TV, please contact the service department of the Hotel. Controlling With An External PC Scart Socket USB to USB cable Service Tool
You can control the product from an external PC via RS-232 (COM port) or LAN (Ethernet port) on the PC. For instance, system source can be changed by RS-232 from remote computer. When a command is sent from the PC to the product, the product operates according to the received command and sends a response message to the PC. Equipment/Tools:
- RS-232 (female) to RS-232(male) cable or LAN cable (connected via router)
- USB to RS-232(male) cable
- Notebook or PC which has USB or LAN portEnglish - 11 -
- Installed program on remote PC to send commands: In general, the RS-232 commands are sent for operating the implemented functions via serial port and utility. A suitable utility can be used such as described below. Connecting to the TV (LAN port) Download and install the PuTTY software from the following link first: http://www.putty.org/. Run the software and enter the TV’s IP address in the field Host Name. Enter “1986” as a default value in the field Port. Then select “Telnet” as Connection type and click the Open button. Note: Refer to the Connectivity section of this manual for information on connecting the TV to a network and displaying the IP address of the TV. Use the commands in the RS232/LAN Command Table.For example, if “GETVOLUME” command is entered, current volume level should be displayed on the putty window as shown in the pictures below. Another example; Volume level can be changed by using “VOLUME” command. After sending this command, you can verify the changes from the TV. The last example ; When “GETSOURCE” command is entered, current source should be displayed on the putty window as shown in the picture below.English - 12 - Connecting to the TV (RS232 port) Run the software and select Serial as Connection Type. Enter the TV’s serial port in the field Serial Line (in the following example it is COM4) and “115200” in the field Speed. Then click the Open button. (*) Figures and illustrations in this User Manual are provided for reference only and may dier from actual product appearance. Product design and specifications may be changed without notice.English - 13 - RS232/LAN Command Table AUDIO COMMANDS Command Description Parameter Return GETVOLUME Volume level information. no parameter #*volume level is … HEADPHONEVOLUME "Set headphone volume level." integer n (0 ≤ n ≤ 100) #*set headphone volume to n GETHEADPHONEVOLUME "Headphone volume level information." no parameter #*headphone volume is … GETMUTE Get mute value on/o. no parameter "#*MUTE OFF
#*You can NOT increase volume LEVEL further. Confirmed Max Volume Level is …" VOLUMEDOWN Decrease Volume Level by 1 step no parameter "#*volume LEVEL is decreased to ..
#*You can NOT decrease volume LEVEL further. Current Volume level is ... "English - 14 - SETHEADPHONEOUTPUT Set headphone output string n (headphone,lineout) "#*set headphone output to n
Command Description Parameter Return SETRC Enables/disables remote control commands. string-integer n (n = ON, n = OFF) set remote state On or set remote state OFF SETSOURCE Set source as enable/ disable. "string n, integer b (n = SCART1, n = SCART2, n = FAV, n = SVHS, n = HDMI1, n = HDMI2, n = HDMI3, n = HDMI4, n = YPBPR, n = VGA, n = SCART1S, n = SCART2S) (b = 1(enable), b = 0(disable))" "#*Selected source n #*Enable/Disable state : b" GETSOURCE Gets source. no parameter #*source is ... GETCOUNTRY Get country in channels state. no parameter #*COUNTRY IS : ... GETSWVERSION Returns the software version of tv. no parameter #*V... KEY Send key to Eclipse. string-integer n (n = 0, n = 1, ......, n = up, ......, n = menu, .....ext.) n key send to Eclipse RESET Reset the device. no parameter Reset process was successfully accomplished. You need to establish the connection again.English - 16 - STANDBY "Switch box to Standby mode. ( Attention: Television cannot be opened with standby command. You should open it with remote control. If you use STANDBY command, you will need to establish the connection again. Tv state :HARD- STANDBY )" no parameter "#*enterLowPowerMode() returns successfully.
#*enterLowPowerMode() returns unsuccessfully!
#*standby on" STARTFTI Start First Time Installation. no parameter #*FTI was initialising. CHANGELNG Change active language. "integer-integer x y x = language type (0 = System Language, 1 = Event Language, 2 = Primary Audio Language, 3 Secondary Audio Language, 4 = Primary Subtitle Language, 5 = Secondary Subtitle Language, 6 = Primary Teletext Language, 7 = Secondary Teletext Language) y = language (0 = Danish, 1 = German, 2 = Estonian, 3 = English, 4 = Spanish, 5 = Greek, 6 = French, 7 = Gaelic, 8 = Croatian, 9 = Italian, 10 = Latvian, 11 = Lithuanian, 12 = Hungarian, 13 = Dutch, 14 = Norwegian, 15 = Polish, 16 = Portuguese, 17 = Russian, 18 = Romanian, 19 = Albanian, 20 = Slovenian, 21 = Slovak, 22 = Serbian, 23 = Finnish, 24 = Swedish, 25 = Turkish, 26 = Czech, 27 = Ukranian, 28 = Bulgarian, 29 = Arabic, 30 = Persian, 31 = Hebrew , 32 = Belarussian, 33 = Macedonian, 34 = Montenegrin, 35 = Kazakh, 36 = Thai) Example: CHANGELNG 0 25 (To set system language to Turkish)
"#*Active language was changed
#*Country should be set only in the FTI mode (no channels state)" SETQUICKSTANDBY SETQUICKSTANDBY n, where n is one of (o, on). string-integer n (n = ON, n = OFF) "#*Set Quick Standby on
Send Message/Trigger notification int (key id (900<= id<=904)) #Message Sent in SUCCESS !!! DBOOTC Disable Bootcaster none #BOOTCASTER_DISABLED in SUCCESS !!! EBOOTC Enable Bootcaster none #BOOTCASTER_ENABLED in SUCCESS !!! RTVP Return TV Main Page none #Refresh Done in SUCCESS !!! GTSURL Get TV Portal URL none #StartUp url is .... SFTI Set FirstTimeInstallation string-string [system language (look at abbreviations) - txt language text (look at txt languages)] #System reinitialised !!! SDFTI Set Default FirstTimeInstallation (Returned default FTI settings. It is used to reset SFTI eect.) none #System will be reinitialised !!! SHM Set Hotel Mode int ( 1-enabled/ 2- disabled) #Hotel Mode is enabled/disabledEnglish - 21 - UNTP Update Date and Time none #Internet connection successful file_size=2048 #Date and Time is being updated from NTP Client
#No Internet Connection! Date and Time cannot be updated SNTP Set NTP Server IP string-int (“auto” / ntp server path - 0 ) #Auto : forced_ntpserver file deleted - SUCCESS !!
#Forced_ntpserver written - SUCCESS !! WAU SW Auto Upgrade int ( 1-enabled/ 2- disabled) #Auto Software Update Availability - ENABLED !! SRC Set Remote Control Code int (2/3/4) #Remote Control system Code set to ... GTNTP Get NTP Server IP none #”NTP server url is ... SMA Set mac address string-int ( ex: eth0- 00:09:df:86:34:25) #SetMacAdress Succesfull SSIP Set static IP address string-int ( ex: 192.168.0.15) #IP address setting Succesfull ATOF Auto TV O Mode int ( 0 <= mode <=8) #set auto tv o mode to ... STVCH Set TV Channel int ( index of channel)
- Please note that some of these commands may not be supported by your TV modelEnglish - 22 - HOTEL MODE The hotel mode is a special mode which restricts some operations of TV. This allows the customer to use the TV in special places such as hotels, prisons or hospitals. These restrictions are basically given below.
- The user cannot increase the volume above a specified limit. And can set fixed volume value.
- The user can enable headphone direct volume control.
- The user cannot reach some menus.
- The user cannot use the buttons on the TV.
- The user can limit the start-up source position.
- Last status can/cannot be used.
- Teletext can be disabled or enabled.
- NVRAM data (like service list and user preferences, etc.) can be copied to or from a USB device.
- Pin8 can/cannot be used. To enter hotel menu, press MENU/M-7-9-3-5 buttons consecutively.
1280x960 þ þ 1280x1024 þ þ 1400x1050 þ þ 1440x900 þ þ 1600x1200
PC Input Typical Display Modes The following table is an illustration of some of the typical video display modes. Your TV may not support all resolutions. Index Resolution Frequency
(X: Not Available, O: Available) In some cases a signal on the TV may not be displayed properly. The problem may be an inconsistency with standards from the source equipment (DVD, Set-top box, etc. ). If you do experience such a problem please contact your dealer and also the manufacturer of the source equipment. Wireless LAN Transmitter Specifications Frequency RangesMax Output Power2400 - 2483,5 MHz (CH1-CH13) < 100 mW5150 - 5250 MHz (CH36 - CH48) < 200 mW5250 - 5350 MHz (CH52 - CH64) < 200 mW5470 - 5725 MHz (CH100 - CH140) < 200 mW Country Restrictions This device is intended for home and oice use in all EU countries (and other countries following the relevant EU directive) without any limitation except for the countries mentioned below. Country RestrictionBulgariaGeneral authorization required for outdoor use and public serviceFrance In-door use only for 2454-2483.5 MHzItalyIf used outside of own premises, general authorization is requiredGreece In-door use only for 5470 MHz to 5725 MHz bandLuxembourgGeneral authorization required for network and service supply(not for spectrum)Norway Radio transmission is prohibited for the geographical area within a radius of 20 km from the centre of Ny-Ålesund Russian Fede-ration In-door use only The requirements for any country may change at any time. It’s recommended that user checks with local authorities for the current status of their national re- gulations for both 2.4 GHz and 5 GHz wireless LAN’s. Information for Users on Disposal of Old Equipment and Batteries [European Union only] Equipment bearing these symbols should not be disposed as general household waste. You should look for appropriate recycling facilities and systems for the disposal of these products. Notice: The sign Pb below the symbol for batteries indicates that this battery contains lead. Products BatteryA B C D E English
VESA WALL MOUNT MEASUREMENTS
VESA WALL MOUNT MEASUREMENTS
Hole Paern Sizes (mm) W H