
Bambini - Baby monitors ALBRECHT - Free user manual and instructions
Find the device manual for free Bambini ALBRECHT in PDF.
| Product Type | Baby monitor with PMR446 transceiver function |
| Brand | Albrecht |
| Model | Bambini |
| Dimensions (W x D x H) | 30 x 54 x 144 mm |
| Weight | approx. 108 g (with battery) |
| Power Supply | Li-Ion battery 950 mAh 3.7 V |
| Standby Time | up to 12 hours |
| Frequency Range | 446.00625 - 446.09375 MHz |
| PMR446 Channels | 8 |
| Baby Monitor Channels | 18 (preset channel/CTCTC combinations) |
| CTCSS Tones | 38 codes |
| Transmit Power | 500 mW |
| VOX Sensitivity | 4 levels + off |
| Intercom Function | Yes (timed transmission 20s/10s) |
| Out of Range Function | Automatic (AU) and manual (Pb) |
| LED Indicator | 3 white LEDs (night light or sound indication) |
| External Microphone | Yes, type BM1 included |
| LCD Display | Yes, with backlight |
| Connectors | Micro 2.5 mm, Headphone 3.5 mm |
| Hands-free Function (VOX) | Yes |
| Key Lock | Yes (press and hold M 3s) |
| Roger Beep | Yes (on/off) |
| Call Melody | 3 melodies or off |
| Warranty | 2 years |
| Operating Temperature | -20°C to +55°C |
| Maintenance | Clean with a soft dry cloth |
| Included Accessories | 2 charging bases, power adapters, BM1 external microphone, belt clips |
Frequently Asked Questions - Bambini ALBRECHT
User questions about Bambini ALBRECHT
0 question about this device. Answer the ones you know or ask your own.
Ask a new question about this device
Download the instructions for your Baby monitors in PDF format for free! Find your manual Bambini - ALBRECHT and take your electronic device back in hand. On this page are published all the documents necessary for the use of your device. Bambini by ALBRECHT.
USER MANUAL Bambini ALBRECHT
natural_image
Two Albrecht Bambini walkiehios with digital displays and control buttons (no visible text or symbols on the devices themselves)text_image
EAR. MIC.natural_image
Two Albrecht Bambini walkiehios with digital displays and control knobs (no visible text or symbols on the devices themselves)Manual
English
Introduction
The User Manual for this unit consists of two parts. The first part contains the manual for use as a baby monitor; the second part informs about advanced functions as normal PMR 446 transceiver. Here you also find the Safety Precautions and other legally binding information.
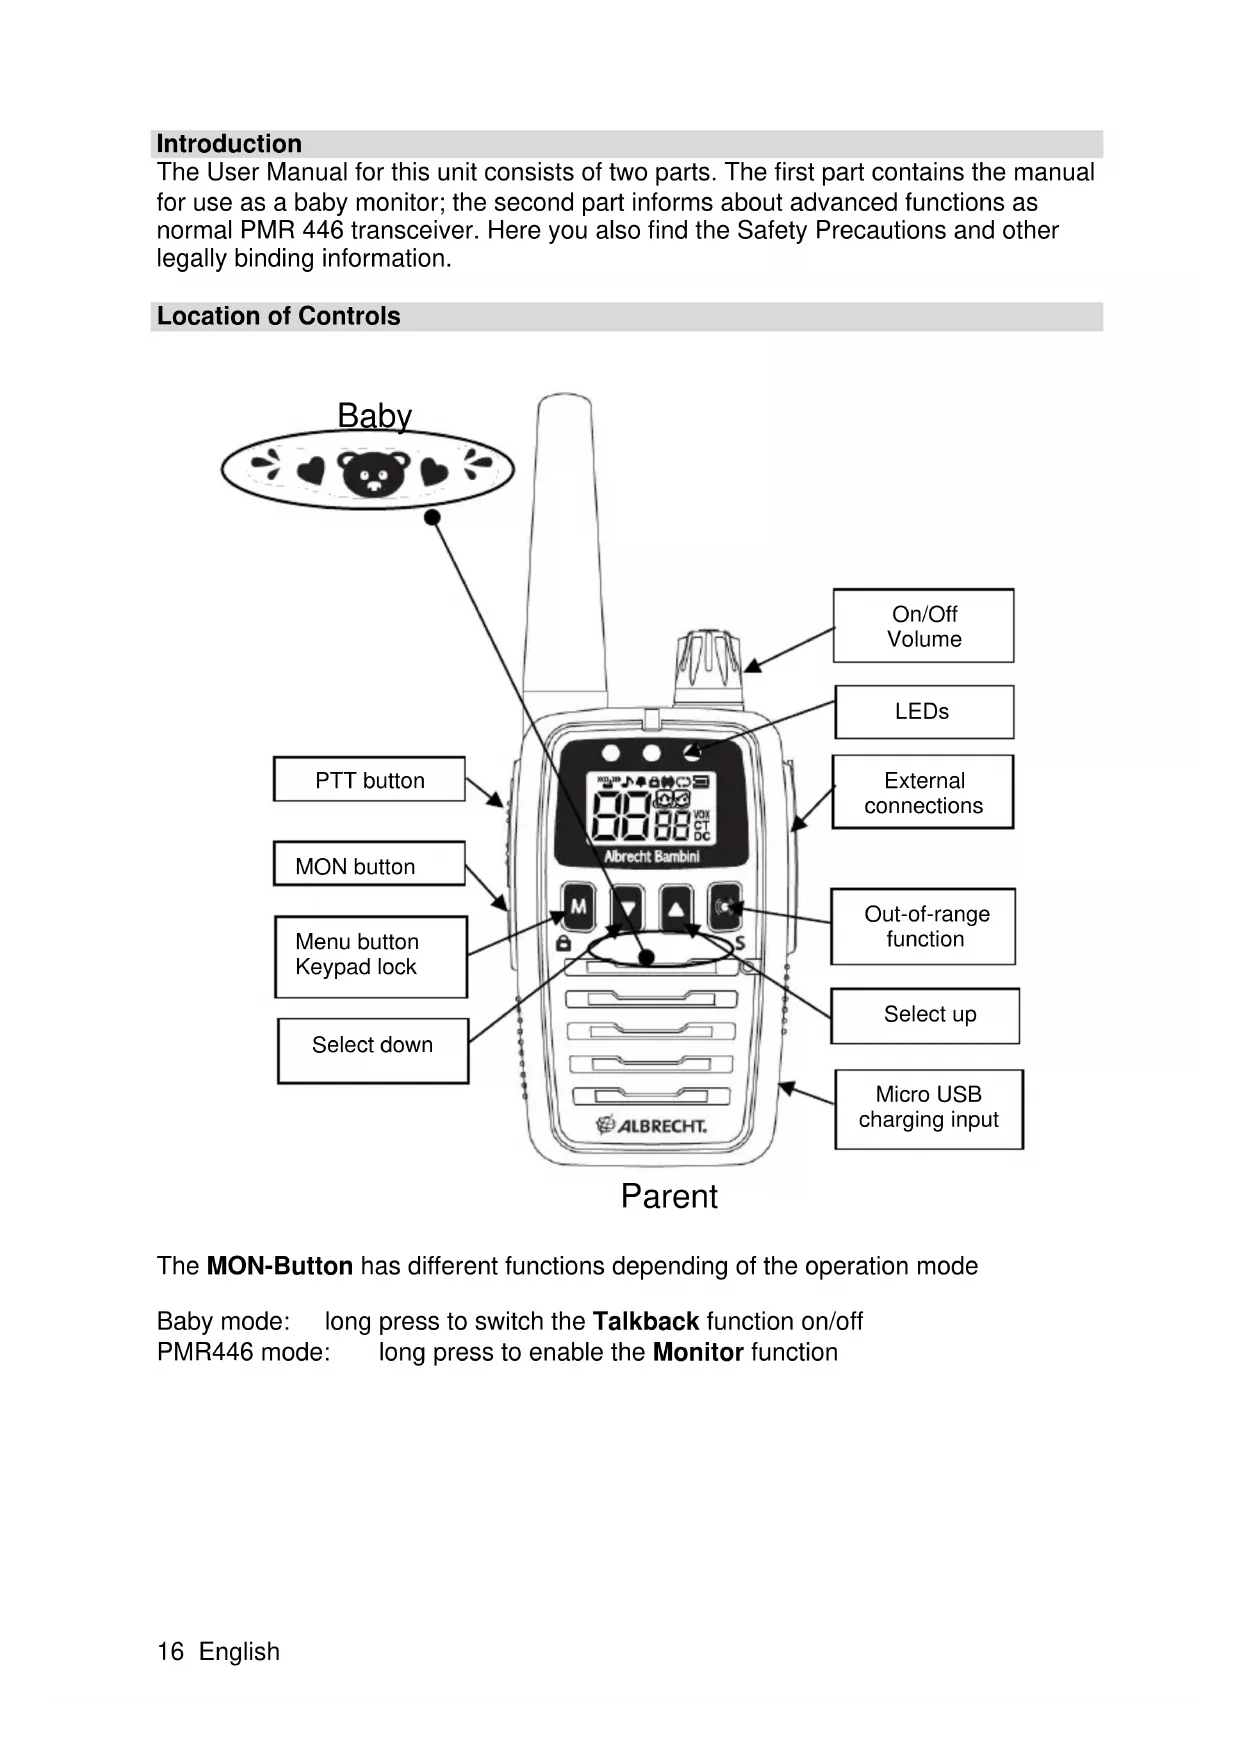
Location of Controls
text_image
Baby PTT button MON button Menu button Keypad lock Select down On/Off Volume LEDs External connections Out-of-range function Select up Micro USB charging input ParentThe MON-Button has different functions depending of the operation mode
Baby mode: long press to switch the Talkback function on/off PMR446 mode: long press to enable the Monitor function
text_image
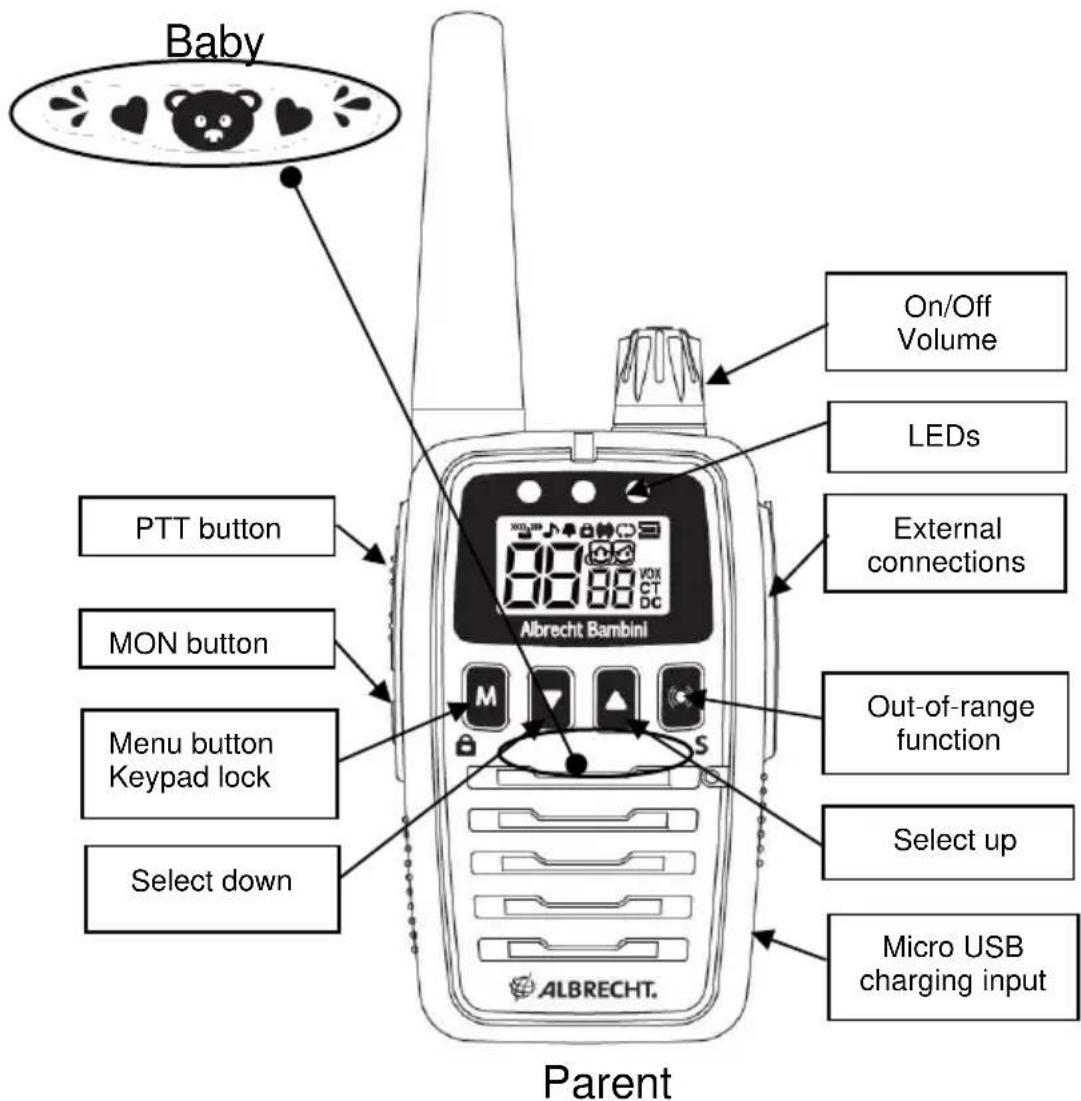
Albrecht BambiniIcons and Terms
 | Reception: listen via the speaker |
| Transmission: PTT is pressed or unit transmits in VOX mode | |
 | Roger Beep is activated |
| Key tones are activated | |
 | Keypad lock is activated |
| Out-of-range function is activated (automatic: AU, manual: Pb) | |
 | Auto scan: unit scans channels one by one |
| Battery level indicator: 3 bars = full, 1 bar = nearly exhausted (check during or right after transmission!) | |
 | Parent Icon: Parent Unit. Not displayed in PMR446 mode. |
 | Baby icon: Baby Unit. Not displayed in PMR446 mode. |
| VOX | Active VOX mode: unit transmits automatically (without pressing PTT) when detecting sounds |
| CT | CTCSS activated |
| DC | DCS activated |
Chapter 1: Baby Monitor Function Insert Battery
Before the first usage please charge each unit.
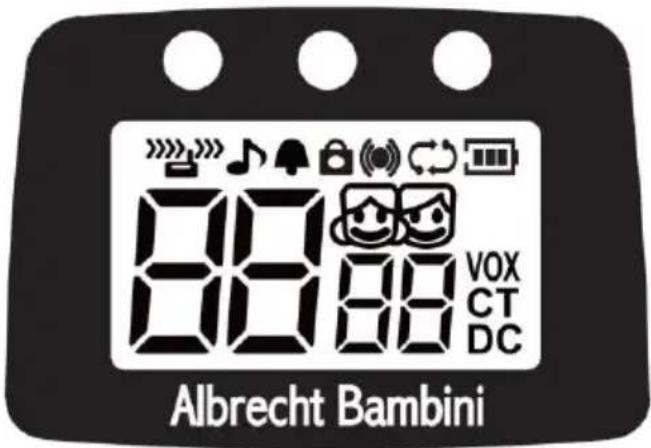
Remove the belt clip (pull spring and remove towards bottom) and open the battery compartment.
Carefully insert the connector of the Li-Ion battery into the socket in the battery compartment (the red wire has to be on the right side).
Put the battery pack into the device. The two wires should lie between the battery and the connector.
text_image
Black RedClose the lid
Please connect each charging cradle with one of the supplied AC adapters to a 230V wall outlet.
Place the device in the charging cradle. During charging, the Battery level indicator is shown animated.
Channel Number
The channel number must be the same for both units!
There are 18 possible settings, for the baby unit 01b to 18b and for the parent unit 01P to 18P. 1 to 18 stands for factory preset combinations of PMR446 radio channels and CTCSS tones. The numbers are only valid for this type of transceiver and there is no communication with other brand baby monitors.
Set Channel
- If the key lock is active, disable this first
- Press ▲/▼ to select a baby monitor channel.
- Press the PTT button to confirm or simply wait a few seconds.
The babysitter setup is completed.
This setting already includes the highest sensitivity setting for the baby unit and automatic out-of-range control between baby and parent unit.
Volume
- Turn the On/Off/Volume knob to set the volume.
The volume setting of the baby device is important in case you want to talk to the baby. Otherwise it is recommended to set the volume of the baby unit to a minimum at all times.
Set the volume level of the parent unit to the desired level.
Turning the Volume knob fully counterclockwise will turn the device off.
Set Baby Monitor Sensitivity
The VOX sensitivity can be set in 4 levels.
With initial installation the unit is set to level 4 (highest sensitivity)
• If the key lock is active, disable it first
- Short press the M button to access the VOX menu.
The display shows Uo, the current sensitivity setting is flashing on the right (01 to 04 or oF).
- Press ▲/▼ to select a level between 01 (low sensitivity) and 04 (high sensitivity) or oF (off).
- Short press the PTT button or simply wait 5 seconds to confirm the settings.
Talk Back Function
If your baby cries for a longer period without pause you may want to talk to your baby to calm it down. For this enable the Talk Back Function of the baby unit. This enables a time-out timer inside the baby unit. After 20 seconds of continuous transmission the transmitter is disabled for 10 seconds and the baby device is able to receive from the parent device.
To enable or disable the Talk Back Function:
- Long press the MON-button. The display briefly shows tb followed by the new state on or of
Be sure that the volume of the baby device is set to a reasonable level.
Usage of the Talk Back Function:
- Wait until the 20 seconds timeout-timer expires and the baby device pauses transmitting.
- Use the following 10 seconds to talk to your baby and calm it down by simply pressing the PTT button on the parent unit and talk to your baby.
As long as your baby is quiet, you can speak from the parent unit at any time.
Automatic Out-Of-Range Function
The automatic Out-Of-Range function is activated by default in babysitter mode and needs no further settings.
This function automatically checks every 60 seconds if baby and parent units are in communication range. The parent unit internally sends a range request, which is answered by the baby unit. In case there is no reply for more than 2 minutes, then both units are no longer communicating. This can be due to a dead spot, the batteries of the other unit being exhausted, the unit is turned off or there may be interferences on the used channel.
As long as a connection exists, the icon is constantly displayed. The icon flashes in case the communication is interrupted and 5 beep tones are audible on the parent unit every time a range request fails.
After 2 minutes the icon is displayed constantly again if the unit is again within the range of the other unit.
Activation and Deactivation of the Out-Of-Range Function
The out-of-range function can also be deactivated if not needed. Activation and deactivation must always be made at the unit, which shall control the other (in case of baby monitoring, this is always the parent's radio)
- Press the M button twice until OU is displayed left on the display. The current setting, AU, Pb or OF is flashing on the right side of the display.
- By ▲/▼ select AU to activate the automatic function (only available on the parent unit)
Select Pb (=Press button) to activate the manual out of range function on request - Select OF to disable the Out-Of-Range Function.
- Briefly press the PTT button or simply wait 5 seconds to confirm.
Manual Out-Of-Range Test
You can manually determine if the other unit is within range. The out-of-range function on the parent unit must be set to Pb
- Press the button and wait a few seconds. The baby unit answers your request and the parent unit plays a melody. Now you can be sure that you are within the communication range.
This test is also available with the out-of-range function deactivated on the baby unit!
LED lights
The Bambini devices have three white LEDs above the display. These can be used as night light. On the parent device they serve for the visual indication of noise from the baby.
Baby device
- Press the M button three times until FL is displayed left on the display. The current setting, OF or 01 to 03 is flashing on the right side of the display
- By pressing ▲/▼ select 01 to 03 to switch on 1 to 3 LEDs (only available on the baby unit)
Select OF to switch off all night light LEDs
Parent device
- Press the M button three times until FL is displayed left on the display. The current setting, AU or 01 to 03 is flashing on the right side of the display
- By pressing ▲/▼ change the setting
- Select AU to activate the automatic visual noise indication. If the baby cries a little bit, only 1 LED will light up. If it cries at a medium volume, 2 LEDs will light up. If the baby cries loudly, all 3 LEDs will be illuminated.
- Select 01, 02 or 03 if the visual noise indication will always show the same amount of LEDs. So if you select 01 and the baby cries loudly, the device will still only illuminate 1 LED.
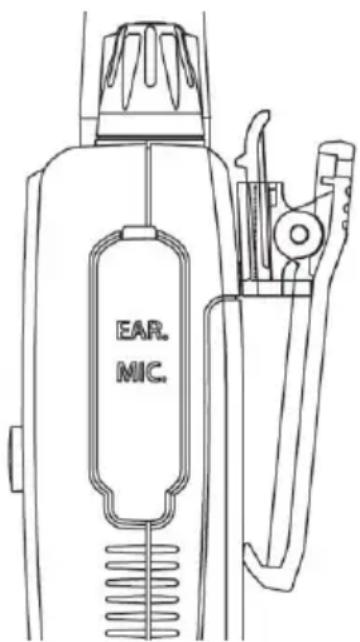
External Microphone
For the baby monitor function we supply an external microphone (type BM 1). We recommend to use it always in case of baby monitoring. This has the following advantages:
- It is more sensitive than the build-in microphone and therefore responds to a greater distance.
- It allows you to extend the distance between transceiver and baby crib – HF radiation is greatly reduced!
- It allows you to position the radio in optimum location to optimize the range, such as the windowsill or high up on a wardrobe.
text_image
EAR. MIC.Please locate the BM1 microphone in a position where the baby cannot reach it. Use the supplied sticky pad to safely attach the microphone. Flap the rubber cap of the EAR/MIC jack open and connect the microphone on the upper jack. Note: If the external microphone is connected no settings can be made on the radio!
Switch to Baby Monitor Mode
These tasks must only be done, if the radios were used as PMR446 radio before.
Baby Unit
- Hold the M-key down while turning on the device (right turn of the Volume knob)
- With the ▲/▼ select bA, The baby icon 😊 is shown.
• To store the setting, briefly press the PTT button
Parent Unit
- Hold the M-key down while turning on the device (right turn of the Volume knob)
- With the ▲/▼ select PA, The parent icon 🤨 is shown.
• To store the setting, briefly press the PTT button
Now the display shows the baby monitor channel (01 to 18) followed by b on the baby unit or P on the parent unit. In addition, the icon respective is shown.
Chapter 2: Changing to PMR446 Transceiver Operation
By default the units are set up as baby monitoring system. In order to switch to PMR446-operation please follow these steps.
- Hold the M-key down while turning on the device (right turn of the Volume knob)
- With the ▲/▼ select ro,
• To store the setting, briefly press the PTT button
Select PMR446 Channel
This radios provide 8 PMR 446 channels. Furthermore, you can individually set the coding via CTCSS tones separately for channels 1 to 8 among 38 possible codes. This code is displayed right from the channel number as a smaller 2-digit number between 01 and 38 or of.
Take care that all communicating units are set to the same channel and CTCSS tone.
Set Channel
- Press ▲/▼ to select the desired PMR446 channel.
Set CTCSS or DCS Codes
The additional CTCSS or DCS codes serve to avoid listening to other stations on the same channel.
Do not mistake this for safety from interception: it is always possible to intercept non-encrypted analog radio talk.
The CTCSS (continuous tone coded squelch signal) or DCS (digital coded squelch) tones are inaudible low frequency tones mixed into the microphone signal. On reception the unit checks if the set tone exists and only enables the speaker after detecting the correct code.
To set a CTCSS code:
- Press the M button once, 01 to 38 or offlash on the display to show the current state.
- Press ▲/▼ to select the desired code.
- Briefly press the PTT button or simply wait 5 seconds.
To set a DCS code:
- Press the M button twice, 01 to 83 or offlash on the display to show the current state.
- Press ▲/▼ to select the desired code.
- Briefly press the PTT button or simply wait 5 seconds.
It can only be either CTCSS or DCS active.
Transmit
- Press and hold the PTT button to transmit; release this button to receive.
Channel Scan
(Only available in PMR446 operation)
The channel scan searches all PMR446 channels for signals
- Long press the button to start scanning; press again to stop scanning. Scanning stops when a signal is detected. You can listen to the channel for 8 seconds until the scanning starts again.
- To disable long press the button again.
The Channel Scan is only available in PMR446 operation.
Call Melody
To select a call melody
- Press the M button seven times. The display shows C followed by the flashing current setting.
- Press ▲/▼ to select the call melody from 01 to 03 or of.
- Briefly press the PTT button or simply wait 5 seconds.
Call
- Briefly press the button.
- The unit transmits a call melody to all other units on this channel within your range. The call melody can be selected or disabled in the menu.
The Call function is only available in PMR446 operation.
Keypad Lock
All keys (except the PTT button and On/Off) can be locked to prevent accidentally pushing the buttons.
Lock keypad:
- Press and hold the M-button for approx. 3 seconds, until the lock icon 🔒 is displayed.
Unlock keypad:
- Press and hold the button again for approx. 3 seconds, until the lock icon turns off.
VOX – Hands-Free Function
This is the sensitivity setting for hands-free operation. The unit detects your voice, there is no need to press the PTT button. This is very useful if you have no free hand to press the PTT button; but it can be a problem on a motorbike or in a noisy environment. The hands-free function responds to noise and transmits without you knowing and possibly interrupting the channel.
The levels 1 to 4 correspond to the sensitivity like a baby monitor:
OF VOX off, normal control with PTT button (default)
1 low sensitivity
2 medium sensitivity
3 high sensitivity
4 highest sensitivity
Monitor Function
In order to check for very weak signals, the automatic squelch can be disabled. This is helpful at the edge of the range and communication is interrupted or if you just want to listen to what is happening on the channel.
To enable or disable the Monitor function long press the MON-Button (On the left side of the device below the PTT)
The Monitor Function is only available in PMR446 operation.
Roger Beep
The radio can send a tone sequence after releasing the PTT button.
- Press the M button five times until rb is shown on the display
- Press ▲/▼ to select on or oF
- Short press the PTT button or simply wait 5 seconds
If the Roger Beep is active, the icon is displayed.
The Roger Beep is only available in PMR446 operation.
Key Tone
A short beep tone is audible when a button is pressed. To switch the key tone:
- Press the M button six times until bP is shown on the display
- Press ▲/▼ to select on or oF
- Short press the PTT button or simply wait 5 seconds
If the Key Tone is active then the icon is displayed.
The Key Tone is only available in PMR446 operation.
Out-Of-Range Control in PMR 446 Mode
The out-of-range control is also available in PMR 446 mode:
Select between AU (automatic on), Pb (only manual out-of-range test) or OF for no out-of-range control.
Activation or deactivation of out-of-range control is set on the unit, which wants to check the range. Even if the remote unit has no out-of-range control activated you can check the range from your unit.
Select AU (automatic check every minute) or Pb (manual check).
In radio networks consisting of more than 2 equal units the out-of-range control does not really make sense because you cannot determine, which unit responds. For this reason there is no out-of-range control for several transceivers on the network.
Important Information
We are legally bound to include disposal and warranty information as well as EU declaration of conformity with the use instructions in different countries for every unit.
Please find this information on the following pages.
2-Year Warranty from Date of Purchase
The manufacturer/retailer guarantees this product for two years from date of purchase. This warranty includes all malfunctions caused by defective components or incorrect functions within the warranty period excluding wear and tear, such as exhausted batteries, scratches on the display, defective casing, broken antenna and defects due to external effects such as corrosion, overvoltage through improper external power supply or the use of unsuitable accessories. Defects due to unintended use are also excluded from the warranty.
Please keep the bill, manual and article number. Warranty claims need to be done with the dealer exclusively.
WEEE and Recycling
The European law does not allow for the disposal of old or defective electric or electronic devices with the household waste. Return your product to a municipal collection point for recycling to dispose of it. This system is financed by the industry and ensures environmentally responsible disposal and the recycling of valuable raw materials.

Battery Hints
If the devices are not used for longer time, it is recommended to disconnect the plug of the battery pack from the radio. Recharge the Li-Ion Batteries every six month when stored.
Frequency Table PMR 446
| Channel | Frequency (MHz) | Channel | Frequency (MHz) |
| 1 | 446.00625 | 5 | 446.05625 |
| 2 | 446.01875 | 6 | 446.06875 |
| 3 | 446.03125 | 7 | 446.08125 |
| 4 | 446.04375 | 8 | 446.09375 |
CTCSS Code Table
| No. | Freq. | No. | Freq. | No. | Freq. | No. | Freq. |
| 1 | 67.0 | 11 | 97.4 | 21 | 136.5 | 31 | 192.8 |
| 2 | 71.9 | 12 | 100.0 | 22 | 141.3 | 32 | 203.5 |
| 3 | 74.4 | 13 | 103.5 | 23 | 146.2 | 33 | 210.7 |
| 4 | 77.0 | 14 | 107.2 | 24 | 151.4 | 34 | 218.1 |
| 5 | 79.7 | 15 | 110.9 | 25 | 156.7 | 35 | 225.7 |
| 6 | 82.5 | 16 | 114.8 | 26 | 162.2 | 36 | 233.6 |
| 7 | 85.4 | 17 | 118.8 | 27 | 167.9 | 37 | 241.8 |
| 8 | 88.5 | 18 | 123.0 | 28 | 173.8 | 38 | 250.3 |
| 9 | 91.5 | 19 | 127.3 | 29 | 179.9 | OF | - |
| 10 | 94.8 | 20 | 131.8 | 30 | 186.2 |
Technical Data
• Frequency range: 446.00625 - 446.09375 MHz
• 8 PMR446 Channels
• 38 CTCSS tones
• 18 preset channel/CTCSS combinations for Baby monitoring
• Transmitting power: 500 mW
• VOX- sensitivity (4 levels)
- Battery pack: 950 mAh 3,7 V Li-Ion
• LC display with background illumination
- Stand By time: up to 12 hours
• Operating temperature range -20^ C to +55^ C
• Weight: appr.108 Gramm (including battery pack)
• Dimensions (LxWxH): 30 x 54 x 144 mm
- Connectors for audio accessories: Mic 2.5 mm, Headset 3.5 mm
• applied technical Standard EN 300 296-2
Service Address And Technical Hotline (for units sold in Germany)
Contact our service hotline by phone +49 (0) 6103 9481-66 (regular costs for German fixed network) or e-mail at service.alan-electronics.de
Conformity Declaration
CE Hereby, Alan Electronics GmbH declares that the radio equipment type Albrecht Bambini is in compliance with Directive 2014/53/EU. The full text of the EU declaration of conformity is available at the following internet address: www.alan-electronics.de
Technical data can be subject of changes without prior announcement.
© Alan Electronics GmbH, January 2017

ALBRECHT®
Interphone bébé Bambini
natural_image
Two Albrecht Bambini walkiehios with digital displays and control knobs (no visible text or symbols on the devices themselves)Guide d'utilisation
Français
Introduction
text_image
EAR. MIC.natural_image
Two Albrecht Bambini walkiehios with digital displays and control knobs (no visible text or symbols on the devices themselves)Manuale
Italiano
Introduzione
text_image
EAR. MIC.natural_image
Two Albrecht Bambini walkiehios with digital displays and control knobs (no visible text or symbols on the devices themselves)Manual
Español