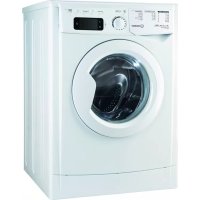
USER MANUAL EWE 61252 W EU INDESIT
Unpacking and levelling
Connecting the electricity and water supplies
The first wash cycle
Technical data
Care and maintenance, 4
Cutting off the water or electricity supply
Cleaning the washing machine
Cleaning the detergent dispenser drawer
Caring for the door and drum of your appliance
Cleaning the pump
Checking the water inlet hose
Precautions and tips, 5
General safety
Disposal
Description of the washing machine, 6-7
Control panel
Display
Running a wash cycle, 8
Wash cycles and options, 9
Table of wash cycles
Wash options
Detergents and laundry, 10
Detergent dispenser drawer
Preparing the laundry
Fast daily cycles
Special wash cycles
Load balancing system
Troubleshooting, 11
Service, 12

INDESIT
This instruction manual should be kept in a safe place for future reference. If the washing machine is sold, transferred, or moved, make sure that the instruction manual remains with the machine so that the new owner is able to familiarize themselves with its operation and features.
Read these instructions carefully: they contain vital information relating to the safe installation and operation of the appliance.
Unpacking and levelling
Unpacking
- Remove the washing machine from its packaging.
- Make sure that the washing machine has not been damaged during the transportation process. If it has been damaged, contact the retailer and do not proceed any further with the installation process.
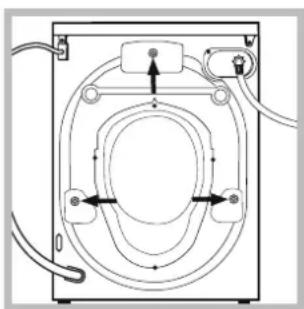
- Remove the 3 protective screws (used during transportation) and the rubber washer with the corresponding spacer, located on the rear part of the appliance (see figure).
- Close off the holes using the plastic plugs provided.
- Keep all the parts in a safe place: you will need them again if the washing machine needs to be moved to another location.
Packaging materials should not be used as toys for children.
Levelling
- Install the washing machine on a flat sturdy floor, without resting it up against walls, furniture cabinets, or anything else.
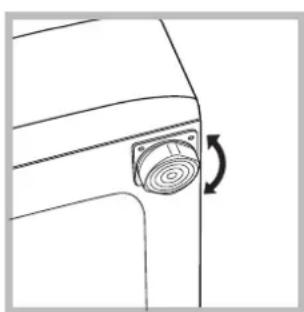
- If the floor is not perfectly level, compensate for any unevenness by tightening or loosening the adjustable front feet (see figure); the angle of inclination, measured in relation to the worktop, must not exceed 2°.
Levelling the machine correctly will provide it with stability, help to avoid vibrations and excessive noise and prevent it from shifting while it is operating. If it is placed on carpet or a rug, adjust the feet in such a way as to allow a sufficient ventilation space underneath the washing machine.
Connecting the electricity and water supplies
Connecting the water inlet hose
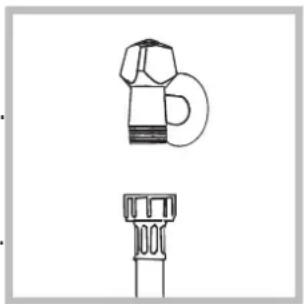
- Connect the supply pipe by screwing it to a cold water tap using a 3/4 threaded connection (see figure). Before performing the connection, allow the water to run freely until it is perfectly clear.
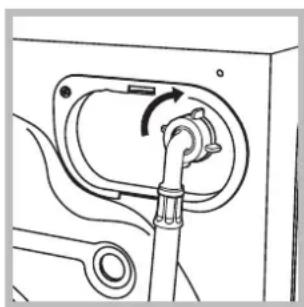
- Connect the inlet hose to the washing machine by screwing it onto the corresponding water inlet of the appliance, which is situated on the top right-hand side of the rear part of the appliance (see figure).
- Make sure that the hose is not folded over or bent.
! The water pressure at the tap must fall within the values indicated in the Technical details table (see next page). If the inlet hose is not long enough, contact a specialised shop or an authorised technician. ! Never use second-hand hoses. ! Use the ones supplied with the machine.
Connecting the drain hose
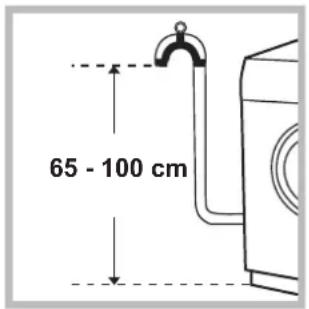
Connect the drain hose, without bending it, to a drainage duct or a wall drain located at a height between 65 and 100 cm from the floor;
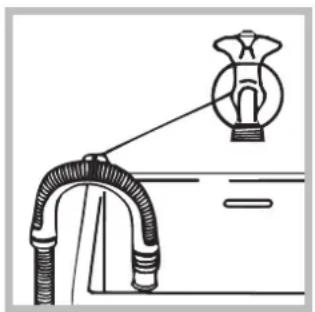
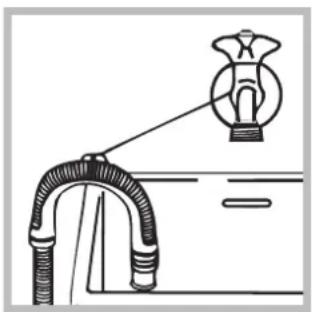
Alternatively, place the drain hose over the edge of a washbasin or bathtub, by fastening the guide (which can be purchased at the technical assistance centre) to the tap (see figure). The free end of the hose should not be underwater.
! We advise against the use of hose extensions; if it is absolutely necessary, the extension must have the same diameter as the original hose and must not exceed 150 cm in length.
Electrical connections
Before plugging the appliance into the electricity socket, make sure that:
- the socket is earthed and complies with applicable laws;
- the socket is able to withstand the maximum power load of the appliance as indicated in the Technical data table (see opposite);
- the power supply voltage falls within the values indicated in the Technical data table (see opposite).
- the socket is compatible with the plug of the washing machine. If this is not the case, replace the socket or the plug.
! The washing machine must not be installed outdoors, even in covered areas. It is extremely dangerous to leave the appliance exposed to rain, storms and other weather conditions.
! When the washing machine has been installed, the electricity socket must be within easy reach.
! Do not use extension cords or multiple sockets. ! The cable should not be bent or compressed. ! The power supply cable must only be replaced by authorised technicians.
Warning! The company shall not be held responsible in the event that these regulations are not respected.
The first wash cycle
Once the appliance has been installed, and before you use it for the first time, run a wash cycle with detergent and no laundry, using the wash cycle "Auto Clean" (see "Cleaning the washing machine").
| Technical data |
| Model | EWE 61252 |
| Dimensions | width 59.5 cm
height 85 cm
depth 51,7 cm |
| Capacity | from 1 to 6 kg |
| Electrical connections | please refer to the technical data plate fixed to the machine |
| Water connection with all | maximum pressure
1 MPa (10 bar)
minimum pressure
0.05 MPa (0.5 bar)
drum capacity 46 litres |
| Spin speed | up to 1200 rotations per minut |
| Test wash cycles in accordance with re-gulations 1061/2010 and 1015/2010 | Programme 15:
Eco Cotton 60°C.
Programme 15:
Eco Cotton 40°C. |
| CE | This appliance conforms to the following EC Directives:
- EMC - 2014/30/EU dated 03/05/89 (Electromagnetic Compatibility)
- 2012/19/EU - WEEE
- LVD - 2014/35/EU (Low Voltage) |
Cutting off the water and electricity supplies
- Turn off the water tap after every wash cycle. This will limit wear on the hydraulic system inside the washing machine and help to prevent leaks.
- Unplug the washing machine when cleaning it and during all maintenance work.
Cleaning the washing machine
- The outer parts and rubber components of the appliance can be cleaned using a soft cloth soaked in lukewarm soapy water. Do not use solvents or abrasives. The washing machine has a programme for its internal parts that must be run with no load in the drum.
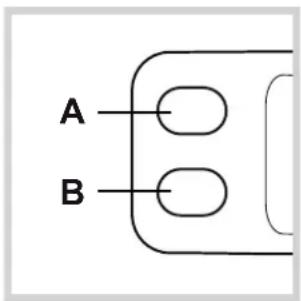
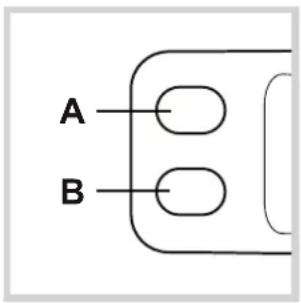
For maximum performance you may want to use either the detergent (i.e. a quantity 10% the quantity specified for lightly-soiled garments) or special additives to clean the washing machine. We recommend running a cleaning programme every 40 wash cycles. To start the programme press buttons A and B simultaneously for 5 seconds (see figure). The programme will start automatically and will last approximately 70 minutes.
Cleaning the detergent dispenser drawer
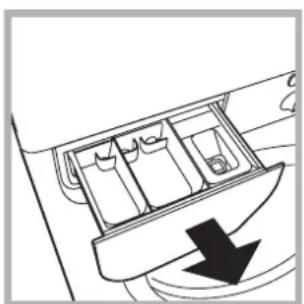
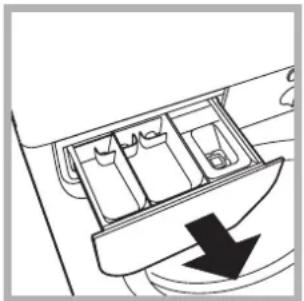
Remove the dispenser by raising it and pulling it out (see figure).
Wash it under running water; this operation should be repeated frequently.
Caring for the door and drum of your appliance
- Always leave the porthole door ajar in order to prevent unpleasant odours from forming.
Cleaning the pump
The washing machine is fitted with a self-cleaning pump which does not require any maintenance. Sometimes, small items (such as coins or buttons) may fall into the pre-chamber which protects the pump, situated in its bottom part.
! Make sure the wash cycle has finished and unplug the appliance.
"Auto Clean"
To access the pre-chamber:
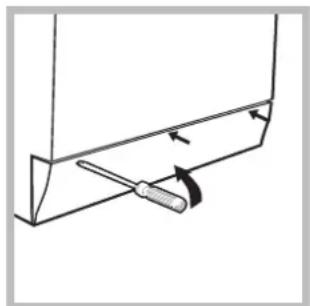
- using a screwdriver, remove the cover panel on the lower front part of the washing machine (see figure);
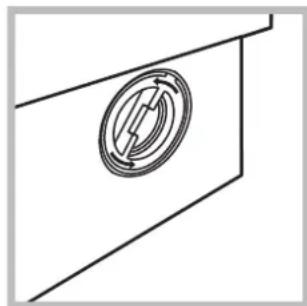
- unscrew the lid by rotating it anticlockwise (see figure): a little water may trickle out. This is perfectly normal;
- Clean the inside thoroughly;
- Screw the lid back on;
- Reposition the panel, making sure the hooks are securely in place before you push it onto the appliance.
Checking the water inlet hose
Check the inlet hose at least once a year. If there are any cracks, it should be replaced immediately: during the wash cycles, water pressure is very strong and a cracked hose could easily split open.
Never use second-hand hoses.
This washing machine was designed and constructed in accordance with international safety regulations. The following information is provided for safety reasons and must therefore be read carefully.
The appliance it must be separately collected. Consumers should contact their local authority or retailer for information concerning the correct disposal of their old appliance.
General safety
- This appliance was designed for domestic use only.
- This appliance can be used by children aged from 8 years and above and persons with reduced physical, sensory or mental capabilities or lack of experience and knowledge if they have been given supervision or instruction concerning use of the appliance in a safe way and understand the hazards involved. Children shall not play with the appliance. Cleaning and user maintenance shall not be made by children without supervision.
- Do not touch the machine when barefoot or with wet or damp hands or feet.
- Do not pull on the power supply cable when unplugging the appliance from the electricity socket. Hold the plug and pull.
- Do not open the detergent dispenser drawer while the machine is in operation.
- Do not touch the drained water as it may reach extremely high temperatures.
- Never force the porthole door. This could damage the safety lock mechanism designed to prevent accidental opening.
- If the appliance breaks down, do not under any circumstances access the internal mechanisms in an attempt to repair it yourself.
- Always keep children well away from the appliance while it is operating.
- The door can become quite hot during the wash cycle.
- If the appliance has to be moved, work in a group of two or three people and handle it with the utmost care. Never try to do this alone, because the appliance is very heavy. Before loading laundry into the washing machine, make sure the drum is empty.
Disposal
- Disposing of the packaging materials: observe local regulations so that the packaging may be re-used.
- The European Directive 2012/19/EU - WEEE on Waste Electrical and Electronic Equipment, requires that old household electrical appliances must not be disposed of in the normal unsorted municipal waste stream. Old appliances must be collected separately in order to optimise the recovery and recycling of the materials they contain and reduce the impact on human health and the environment.
The crossed out "wheeled bin" symbol on the product reminds you of your obligation, that when you dispose of
Description of the washing machine
Control panel
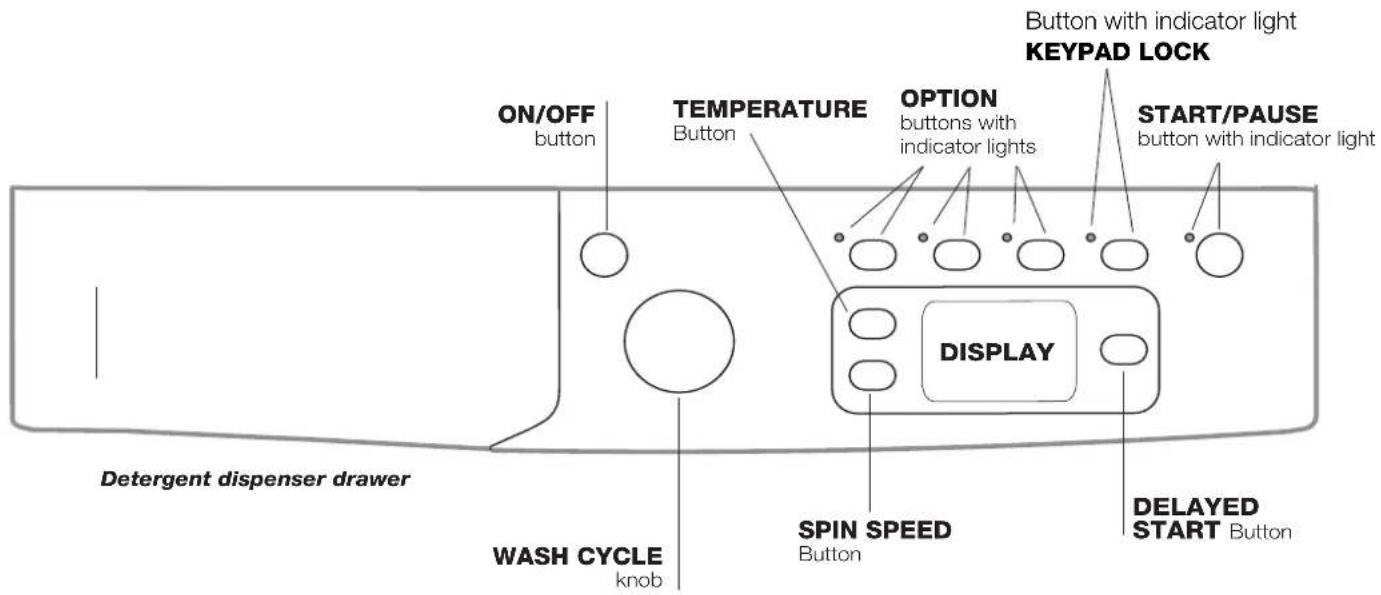
Detergent dispenser drawer: used to dispense detergents and washing additives (see "Detergents and laundry").
ON/OFF button press this briefly to switch the machine on or off. The START/PAUSE indicator light, which flashes slowly in a green colour shows that the machine is switched on. To switch off the washing machine during the wash cycle, press and hold the button for approximately 2 seconds; if the button is pressed briefly or accidentally the machine will not switch off. If the machine is switched off during a wash cycle, this wash cycle will be cancelled.
WASH CYCLE knob: used to set the desired wash cycle (see "Table of wash cycles").
OPTION buttons with indicator light: used to select the available options. The indicator light corresponding to the selected option will remain lit.
Button with indicator light KEYPAD LOCK: This option locks the control panel (except for the ON/OFF button) in order to prevent both children from changing the washing-machine settings while in operation and any involuntary starting. Press it for at least 2 seconds to enable/disable it.
SPIN button: press to reduce or completely exclude the spin cycle - the value is indicated on the display.
TEMPERATURE button: to decrease or completely exclude the temperature: the value will be shown on the display.
DELAYED START button: press to set a delayed start time for the selected wash cycle. The delay time will be shown on the display.
START/PAUSE button with indicator light: when the green indicator light flashes slowly, press the button to start a wash cycle. Once the cycle has begun the indicator light will remain lit in a fixed manner. To pause the wash cycle, press the button again; the indicator light will flash in an orange colour. If the symbol is not illuminated, the door may be opened (wait approximately 3 minutes). To start the wash cycle from the point at which it was interrupted, press the button again.
Standby mode
This washing machine, in compliance with new energy saving regulations, is fitted with an automatic standby system which is enabled after about 30 minutes if no activity is detected. Press the ON-OFF button briefly and wait for the machine to start up again.
Consumption in off-mode: 0.5 W
Consumption in Left-on: 8 W
Display
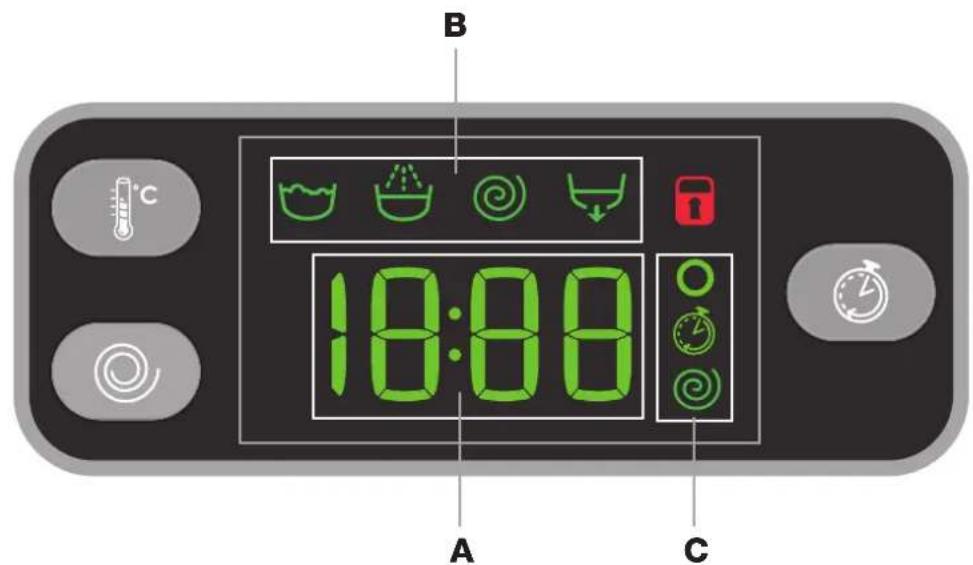

The display is useful when programming the machine and provides a great deal of information.
The duration of the available programmes and the remaining time of a running cycle appear in section A; if the DELAY START option has been set, the countdown to the start of the selected programme will appear. Pressing the relative button, the machine automatically displays the maximum temperature and spin speed values set for the selected cycle, or the most recently-used settings if they are compatible with the selected cycle.
The "programme phases" relative to the selected programme and the "programme phase" of the running programme appear in section B:
Wash Rinse Spin Drain
The icons corresponding to "temperature" , "Programmed start" and "spin" appear in section c from top to bottom: If the symbol lights up, the display will visualise the set "temperature" value.
When a "delayed start" has been set, the symbol lights up.
If the symbol lights up, the display will visualise the set "spin" value.
Door locked symbol
The lit symbol indicates that the door is locked. To prevent any damage, wait until the symbol turns off before opening the door.
To open the door while a cycle is in progress, press the START/PAUSE button; if the DOOR LOCKED symbol is switched off the door may be opened (wait approximately 3 minutes).
- SWITCH THE MACHINE ON. Press the button; the START/PAUSE indicator light will flash slowly in a green colour.
- LOAD THE LAUNDRY. Open the porthole door. Load the laundry, making sure you do not exceed the maximum load value indicated in the table of programmes on the following page.
- MEASURE OUT THE DETERGENT. Pull out the detergent dispenser drawer and pour the detergent into the relevant compartments as described in "Detergents and laundry".
- CLOSE THE DOOR.
- SELECT THE WASH CYCLE. Set the WASH CYCLE knob to the desired programme; a temperature and spin speed is set for each wash cycle; these may be adjusted. The duration of the cycle will appear on the display.
- CUSTOMISE THE WASH CYCLE. Use the relevant buttons:
Modifying the temperature and/or spin speed. The machine automatically displays the maximum temperature and spin speed values set for the selected cycle, or the most recently-used settings if they are compatible with the selected cycle. The temperature can be decreased by pressing the button, until the cold wash "OFF" setting is reached. The spin speed may be progressively reduced by pressing the button, until it is completely excluded (the "OFF" setting). If these buttons are pressed again, the maximum values are restored.
!Exception: if the 4 programme is selected, the temperature can be increased up to a value of 60°C
Setting a delayed start.
To set a delayed start for the selected programme, press the corresponding button repeatedly until the required delay period has been reached. When this option is enabled, the symbol lights up on the display. To remove the delayed start option, press the button until the text "OFF" appears on the display.
Modifying the cycle settings.
- Press the button to enable the option; the indicator light corresponding to the button will switch on.
- Press the button again to disable the option; the indicator light will switch off.
! If the selected option is not compatible with the programmed wash cycle, the indicator light will flash and the option will not be activated.
! If the selected option is not compatible with another option which has been selected previously, the indicator light corresponding to the first option selected will flash and only the second option will be activated; the indicator light corresponding to the enabled option will remain lit.
! The options may affect the recommended load value and/or the duration of the cycle.
- START THE PROGRAMME. Press the START/PAUSE button. The corresponding indicator light will become green, remaining lit in a fixed manner, and the door will be locked (the DOOR LOCKED symbol will be on). To change a wash cycle while it is in progress, pause the washing machine using the START/PAUSE button (the START/PAUSE indicator light will flash slowly in an orange colour); then select the desired cycle and press the START/PAUSE button again.
To open the door while a cycle is in progress, press the START/PAUSE button; if the DOOR LOCKED symbol is switched off, the door may be opened (wait approximately 3 minutes). Press the START/PAUSE button again to restart the wash cycle from the point at which it was interrupted.
- THE END OF THE WASH CYCLE. This will be indicated by the text "END" on the display; when the DOOR LOCKED symbol switches off, the door may be opened (wait approximately 3 minutes). Open the door, unload the laundry and switch off the machine.
! If you wish to cancel a cycle which has already begun, press and hold the button. The cycle will be stopped and the machine will switch off.
Table of wash cycles
| Wash cycles | Description of the wash cycle | Max.temp.(°C) | Max.speed(rpm) | Detergents | Max. load (kg) | Residual dampness % | Energy consumption kWh | Total water ht | Cycle duration |
| Pre-wash Wash | Fabric softener |
| EVERYDAY FAST |
| 1 Colour Mix 59' | | 40° 1000 - | | | ● | ● | 6 | --- | 59' | | |
| 2 Cotton 59' | | 60° 1000 - | | | ● | ● | 6 | --- | 59' | | |
| 3 Cotton 45' | | 40° 1200 - | | | ● | ● | 3 | --- | 45' | | |
| 4 Synthetics 59' (3) | | 40° (Max. 60°) | 1000 - | | ● | ● | 3 | 44 | 0,50 39 | 59' | |
| 5 Mix 30' | | 30° | 800 | - | ● | ● | 3 | 70 | 0,17 31 | 30' | |
| 6 Express 20' | | 20° | 800 | - | ● | ● | 3 | --- | 20' | | |
| Special & Partial |
| 7 Gym Kit | | 40° | 600 | - | ● | ● | 3 | --- | ** | | |
| 8 Sport Shoes | | 30° | 600 | - | ● | ● | Max. 2 pairs | --- | ** | | |
| 9 Baby: Heavily soiled delicate colours. | | 40° | 800 | - | ● | ● | 2 | --- | ** | | |
| 10 Rinse | | - | 1200 - | - | | ● | 6 | --- | ** | | |
| 11 Spin + Drain | | - | 1200 - | - | - | | 6 | --- | ** | | |
| 11 Only Drain * | | - | OFF | - | - | - | 6 | --- | ** | | |
| Dedicated |
| 12 Duvet: for down-stuffed garments. | | 30° | 1000 | - | ● | ● | 1,5 | --- | ** | | |
| 13 Wool: for wool, cashmere, etc. | | 40° 800 | | - | ● | ● | 1,5 | --- | ** | | |
| 14 Silk/Curtains: for garments in silk and viscose, lingerie. | | 30° | 0 | - | ● | ● | 1 | --- | ** | | |
| 15 Eco Cotton 60° (1): heavily soiled whites and resistant colours. | | 60° | 1200 | - | ● | ● | 6 | 53 | 0,93 | 50,0 | 200' |
| 15 Eco Cotton 40° (2): lightly soiled whites and delicate colours. | | 40° | 1200 | - | ● | ● | 6 | 53 | 0,85 76 | 180' | |
| 16 Cotton with prewash: extremely soiled whites. | | 90° | 1200 | ● | ● | ● | 6 | --- | ** | | |
- If you select programme 11 and exclude the spin cycle, the machine will drain only. ** The duration of the wash cycle can be checked on the display.
The length of cycle shown on the display or in this booklet is an estimation only and is calculated assuming standard working conditions. The actual duration can vary according to factors such as water temperature and pressure, the amount of detergent used, the amount and type of load inserted, load balancing and any wash options selected.
1) Test wash cycle in compliance with regulations 1061/2010: set wash cycle 15 with a temperature of 60°C.
This cycle is designed for cotton loads with a normal soil level and is the most efficient in terms of both electricity and water consumption; it should be used for garments which can be washed at 60°C. The actual washing temperature may differ from the indicated value.
2) Test wash cycle in compliance with regulations 1061/2010: set wash cycle 15 with a temperature of 40°C.
This cycle is designed for cotton loads with a normal soil level and is the most efficient in terms of both electricity and water consumption; it should be used for garments which can be washed at 40°C. The actual washing temperature may differ from the indicated value.
For all Test Institutes:
2) Long wash cycle for cottons: set wash cycle 15 with a temperature of 40°C.
3) Long programme for synthetics: set programme 4, then select the "Extra Wash" option.
Wash options
- If the selected option is not compatible with the programmed wash cycle, the indicator light will flash and the option will not be activated.
- If the selected option is not compatible with another option which has been selected previously, the indicator light corresponding to the first option selected will flash and only the second option will be activated; the indicator light corresponding to the enabled option will remain lit.
Enable the Extra Wash* option for very dirty items, where compatible. Press this option to let the cycle automatically readjust all wash parameters through a longer lasting cycle. The option always leaves the temperature unchanged, while the spin cycle is automatically brought back to maximum levels. The user can set the spin cycle back to the desired value at any time.

By selecting this option, the efficiency of the rinse is increased and optimal detergent removal is guaranteed. It is particularly useful for sensitive skin.
Energy Saver
The option washes cotton and synthetic items, saving energy and helping the environment. Energy saving is due to a cold wash cycle, while an enhanced mechanical action and optimised water use make it possible to reach the desired result. Recommended for slightly soiled garments. Use of liquid detergent recommended.
Detergents and laundry
GB
Detergent dispenser drawer
Good washing results also depend on the correct dose of detergent: adding too much detergent will not necessarily result in a more efficient wash, and may in fact cause build up on the inside of your appliance and contribute to environmental pollution.
Do not use hand washing detergents because these create too much foam. ! Use powder detergent for white cotton garments, for prewashing, and for washing at temperatures over 60°C ! Follow the instructions given on the detergent packaging.
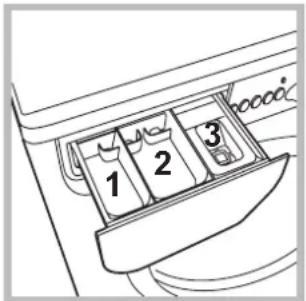
Open the detergent dispenser and pour in the detergent or washing additive, as follows.
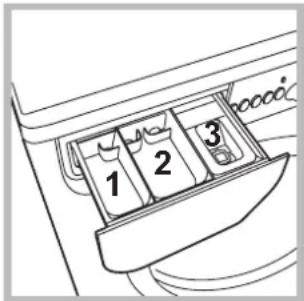
compartment 1: Pre-wash detergent (powder) compartment 2: Detergent for the wash cycle (powder or liquid)
Liquid detergent should only be poured in immediately prior to the start of the wash cycle.
compartment 3:Additives (fabric softeners, etc.) The fabric softener should not overflow the grid.
Note: If a "tablet detergent" is used, always follow the manufacturer's instructions.
Preparing the laundry
- Divide the laundry according to:
- the type of fabric/the symbol on the label
- the colours: separate coloured garments from whites.
- Empty all garment pockets and check the buttons.
- Do not exceed the values listed in the "Table of wash cycles", which refer to the weight of the laundry when dry.
How much does your laundry weigh?
1 sheet 400-500 g 1 pillow case 150-200 g 1 tablecloth 400-500 g 1 bathrobe 900-1200 g 1 towel 150-250 g
Fast daily cycles
A complete set of fast programmes to wash the most commonly used fabrics - even with a full load - and to remove the most frequent daily dirt in less than 1 hour. Colour Mix 59: to wash mixed and coloured items together. Cotton 59': cycle designed to wash cotton garments - mainly white items. It can be used with powder detergent too. Cotton 45': short cycle designed to wash delicate cotton items. Synthetics 59': specific for synthetic items. If the dirt is difficult to remove, the temperature can be increased up to 60° and powder detergent can be used too.
Mix 30': short cycle designed to wash a mixed load of cotton and synthetic fabrics - white and coloured items together.
Express 20': this programme refreshes your items, making them perfumed again in just 20 minutes.
Special wash cycles
Gym Kit: cycle suitable to wash all sports items together, including gym towels, while respecting their fibres (follow the instructions in the garment labels).
Sport Shoes: is for washing sports shoes; for best results, do not wash more than 2 pairs simultaneously.
We recommend fastening any strings before introducing the shoes into the drum.
Baby: cycle designed for dirt typical of children's garments in that it effectively removes any traces of residual detergent.
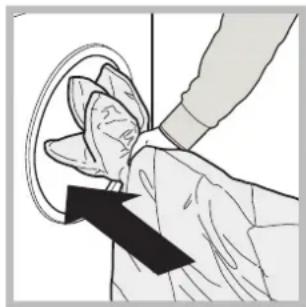
Duvet: to wash single duvets (the weight of which should not exceed 1.5 kg), cushions or clothes padded with goose down such as puffa jackets, use the special wash cycle number 12. We recommend that duvets are placed in the drum with their edges folded inwards (see figure) and that no more than 3/4 of the total volume of the drum is used. To achieve the best results, we recommend that a liquid detergent is used and placed inside the detergent dispenser drawer.
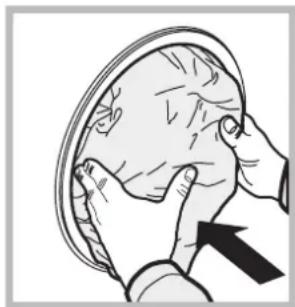
Wool: all wool garments can be washed using programme 13, even those carrying the "hand-wash only" label. For best results, use special detergents and do not exceed 1.5 kg of laundry.
Silk: use special wash cycle 14 to wash all silk garments. We recommend the use of special detergent which has been designed to wash delicate clothes.
Curtains: fold curtains and place them in a pillow case or mesh bag. Use wash cycle 14.
Load balancing system
Before every spin cycle, to avoid excessive vibrations and to distribute the load in a uniform manner, the drum rotates continuously at a speed which is slightly greater than the washing rotation speed. If, after several attempts, the load is not balanced correctly, the machine spins at a reduced spin speed. If the load is excessively unbalanced, the washing machine performs the distribution process instead of spinning. To encourage improved load distribution and balance, we recommend small and large garments are mixed in the load.
Your washing machine could fail to work. Before contacting the Technical Assistance Centre (see "Assistance"), make sure that the problem cannot be solved easily using the following list.
Problem:
Possible causes / Solutions:
The washing machine does not switch on.
The wash cycle does not start.
- The appliance is not plugged into the socket fully, or is not making contact.
- There is no power in the house.
- The washing machine door is not closed properly.
- The ON/OFF button has not been pressed.
- The START/PAUSE button has not been pressed.
- The water tap has not been opened.
- A delayed start has been set.
The washing machine does not take in water ("H2O" will flash on the display).
- The water inlet hose is not connected to the tap. The hose is bent.
- The water tap has not been opened.
- There is no water supply in the house. The pressure is too low.
- The START/PAUSE button has not been pressed.
The washing machine continuously takes in and drains water.
- The drain hose is not fitted at a height between 65 and 100 cm from the floor (see "Installation").
- The free end of the hose is under water (see "Installation").
- The wall drainage system is not fitted with a breather pipe.
If the problem persists even after these checks, turn off the water tap, switch the appliance off and contact the Assistance Service. If the dwelling is on one of the upper floors of a building, there may be problems relating to water drainage, causing the washing machine to fill with water and drain continuously. Special anti-draining valves are available in shops and help to avoid this inconvenience.
The washing machine does not drain or spin.
- The wash cycle does not include draining: some wash cycles require the drain phase to be started manually.
- The drain hose is bent (see "Installation").
- The drainage duct is clogged.
The washing machine vibrates a lot during the spin cycle.
- The drum was not unlocked correctly during installation (see "Installation").
- The washing machine is not level (see "Installation").
- The washing machine is trapped between cabinets and walls (see "Installation").
The washing machine leaks.
- The water inlet hose is not screwed on properly (see "Installation").
- The detergent dispenser drawer is blocked (for cleaning instructions, see "Care and maintenance").
- The drain hose is not fixed properly (see "Installation").
The "option" indicator lights and the "start/pause" indicator light flash and an error code appears on the display (e.g.: F-01, F-.).
- Switch off the machine and unplug it, wait for approximately 1 minute and then switch it back on again.
If the problem persists, contact the Technical Assistance Service.
There is too much foam.
- The detergent is not suitable for machine washing (it should display the text "for washing machines" or "hand and machine wash", or the like).
- Too much detergent was used.
Before calling for Assistance:
- Check whether you can solve the problem alone (see "Troubleshooting");
- Restart the programme to check whether the problem has been solved;
- If this is not the case, contact an authorised Technical Assistance Centre using the telephone number provided on the guarantee certificate.
! Always request the assistance of authorised technicians.
the type of problem; the appliance model (Mod.); the serial number (S/N).
This information can be found on the data plate applied to the rear of the washing machine, and can also be found on the front of the appliance by opening the door.
German
Installation, 14-15
NOBbpxHOCT, He T86Ba Da HaBnUba 2°.
ToHOTO HNBELIpaHe N03BOJRAMaUNHaTa Da 6bDe Cta6BnHa N Da Ce N36rBaT Bn6paunTe, WymbT IN PpeMeCTBaHeto N NO BpeMe Ha pa6ota. Korato HactnKata e MOKET NIN KINIM, perylnpaTte Taka KpaueTaTa, Ye NOD nepaNHaTa MaUNHa Da OCTaHE DOCTaTBuHO MRCTO 3a BEHTnlaCnY.
XnDpaBnHn n eJeKtpnueckn Bpb3Kn
Cbbp3BaHe Ha Mapkya KbM BOOpnpoBHaTa Mpeka
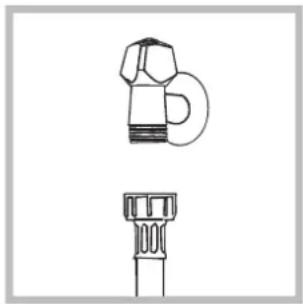
- CbpxkTe 3axpaHbuaaMapkyu, KaTO rO 3aBnEte KbM KpaHa 3a cTuDeHaTa BODa C HApaiHnk C ra3oBa pe36a 3/4 (BuX queypama). IpeDn Da ro CBpKTe, n3ToUeTe BOdAta, DOKaTO ce N36nCTpn.
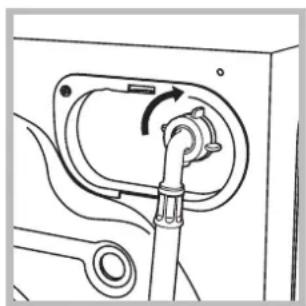
- CbpxKeTe Mapkya 3a CTydeHaTa BOda KbM NepaHata MaunHa, KATO 3aBneTe KbM CnEuaJIHHa Uyep, pa3noJoxeH OT 3aHaTc TpaHa, rope BdACHO (BuX fueypama).
- Bhimaba Te Mapkya da He ce nperebba n npitncka.
!HaIraHHeToNoBODOnpOBoHnHaTaMpeKa Tpa6Ba Da 6bJe B rpaHnCnTe, yKa3aHn B Ta6nCnAta,TexHnYeCKn DaHHN"(6X. cneDeBaUama cmpaHuca). !AkoDbJxHnHaTaHa3axpaHbauJa Mapkyu He e DoctaTbUHa, ce OobpHeTe KbM CneuaJIuN3IpaH MaRa3IN NJIu KbM OTOpN3IpaH TexHInK. !Hukora He n3noi3BaITe Beue ynoTpe6BaH Mapkyu. !N3noJI3BaIte Te3n,KoETO ca doCTaBeHc nepaHaTa MaUNHa.
Cbbp3BaHe Ha Mapkyua 3a Mpbchata Boda
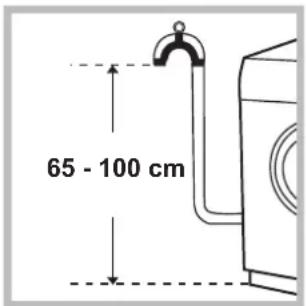
CbpxTe Mapkya 3a Mpbchata Boda,6e3 Da IopereBbATE,KbM KaHaIN3auOHHATA Tpb6a INN KbM Tpb6ata 3a OTBeXdaHe BCTeHaT, pa3noI OKe Hn Ha BnCOUnHa MeKdy 65 n 100 cmOT noDa,nnr oNoDppeTa Hpb6a Ha MNBkata Nn BaHata,
KaTo aTepHaTnBa OKaYeTe OTXoDnHn Mapkyu 3a BOnaTa B KpaHa MmBkata Nn BaHaTa, Cbbp3BaKn BOdaua (MOxTe Da rO nOlyuHTe OT Baunr cepBn3eH ueHTbp) KbM KpaHa (Bx. fNrgpa). Cbo6oDnHnT KpaHa
Mapkyua 3a Mpbchata Boda He Tpr6Ba da 6bde NOTOEN BBB BOdaTa.
! He ce npenopbUba n3noJ3BaHeTo Ha yIbJIxNITeHN MapKyu. Ako e Heo6xoJIMO, yIbJIxNITeJrT Tp8Ba Da IMa CbIa NJaAMetbp KaTO opuINHaJIHnI Na He HAdBnJaBa 150 cm.
Electrical connection
Before connecting the device to the mains, check that:
- The grounding contacts comply with the applicable standards;
- The contact can withstand the maximum power of the device, as indicated in the technical data table (see the relevant page); the supply voltage is within the limits indicated in the technical data table (see the relevant page);
- The contact is suitable for the device's plug. Otherwise, replace the plug or the contact.
The device must not be installed outdoors, under a canopy, or in a damp place, as it is very dangerous to leave it exposed to atmospheric conditions.
For the installed device, the electrical contact must be easily accessible.
Do not use adapters or extension cords. The cable must not be bent or pinched. The supply cable must be replaced only by an authorized technician. Attention! The manufacturer declines all responsibility in case these norms are not followed.
Operation
Starting and stopping, including the first start-up, is done by pressing the button, without setting a program, in automatic cleaning mode (see cleaning of the device).
Technical data
| Моden | EWE 61252 |
| Раимери | ширINA 59,5 cm
ВисочINA 85 cm
ДылбочINA 51,7 cm |
| Вмост immост | от 1 до 6 кг. |
| Ельстриеско
Зхранвае | Виж tabелкatinga c
харakтөрисөнITE,
поставена на машина |
| Зхранвае с
вoda | мakсимално наляганe
1 MPa (10 bar)
minimално наляганe
0,05 MPa (0,5 bar)
обem на kaiza на 46 latра |
| Сkopост на
центroфуragata | do 1200 оборotinga/Minhyta |
| Пэрорами
за поверка
сыласно
PerlamenteN№ 1061/2010
и №
1015/2010 на
Комисята | пэрорama 15;
Еко памук 60°C.
пэрорama 15;
Еко памук 40°C. |
| CE | пэралнatable машина
сьOTВETCTBa Na Следнite
Еврoneйский ДИректув:
- EMC - 2014/30/EU
(эа[elektropогенITA
сьВмост immost)
- LVD - 2014/35/EU (эа
ниско нарөжени)
- 2012/19/EU - WEEE |
Water supply connection and electrical protection disconnection
Close the water tap after each use. In this way, the hydraulic installation of the device is protected and the risk of electric shock is limited. - Disconnect the device from the electrical supply when cleaning the device during work on the surface.
Cleaning the device
The external parts and the removable parts can be cleaned with a cloth dampened with water and soap. Do not use solvents or abrasive products. - The device has an automatic cleaning program for the internal parts, which must be performed with an absolutely empty drum.
Pour the detergent (10% of the recommended amount for lightly soiled laundry) into the detergent drawer. Additional detergents for laundry can be used in combination with the washing program. It is recommended to run the washing program every 40 washes. To activate the program, press buttons A and B simultaneously for 5 seconds (see figure). The program will activate automatically and will last about 70 minutes.
Cleaning the detergent drawer
Remove the drawer by pulling it out and lifting it up (see figure).
Rinse it under warm water. This cleaning should be done frequently.
Door gasket cleaning
Leave the door open to prevent the formation of unpleasant odors.
How to perform a wash cycle
BG
- 1. TURNING ON THE WASHER. Press the power button; the indicator light START/PAUSE will light up in green. 2. LOADING THE LAUNDRY. Open the door. Load the laundry, making sure not to exceed the maximum load capacity, especially for the programs indicated on the following page.
- 3. ADDING DETERGENT. Pull out the drawer and pour the detergent into the appropriate compartments, as explained in "Detergents and laundry aids". 4. CLOSING THE DOOR. 5. SELECTING THE PROGRAM. Set the desired program with the PROGRAM knob, which is associated with a specific temperature and spin speed that can be changed. The display shows the duration of the selected cycle. 6. SETTING THE CYCLE PARAMETERS. Press the corresponding buttons:

Temperature and/or spin speed adjustment.
The machine automatically sets the maximum temperature and spin speed allowed for the selected program, or the last selected parameters if they are compatible with the current program. Pressing the temperature button gradually decreases the temperature down to cold "OFF". Pressing the spin speed button gradually decreases the spin speed down to the final exclusion "OFF". Subsequent presses of the buttons return to the maximum allowed values. Note: with the selection of the program, the temperature can be increased up to 60°

Delayed start.
To set a delayed start for the selected program, press the corresponding button until the desired time is reached. When this function is active, the display shows the symbol for delayed start. To cancel the delayed start, press the button until the display shows the word OFF.
Changing the cycle characteristics.
- Press the button to activate the washing function.
- Press the button again to deactivate the light indicator.
If the selected function is not compatible with the set program, the light indicator will start to flash and the function will not be activated.
If the selected function is not compatible with another previously set function, the light indicator corresponding to the first selected function will flash and only the second one will be activated, while the indicator of
the activated function will light up.
The functions can change the duration of the cycle depending on the selected program.
- STARTING THE PROGRAM. Press the START/PAUSE button. The corresponding indicator will start to light continuously in green and the door will be locked (the door lock symbol lights up). To change the program while the cycle is in progress, set the washing machine to pause mode by pressing the START/PAUSE button (the START/PAUSE indicator will start to flash in orange), then select the desired cycle and press the START/PAUSE button again.
To open the door during a washing cycle, press the START/PAUSE button. If the door lock symbol is not lit, it will be possible to open the door (wait about 3 minutes). Press the START/PAUSE button again to resume the program from the point where it was interrupted.
- END OF PROGRAM. It is indicated by the "END" message on the display and when the door lock symbol goes off, the door can be opened (wait about 3 minutes). Open the door, remove the laundry and switch off the washing machine.
If you wish to cancel a cycle that has already started, press the cycle button repeatedly until the washing machine switches off.
Program table
| Погама | Описанце на порoramата | М配电. Tempepatура (℃) | М配电. сокорст (обороть в минута) | П配电ини петарати | З配电�аде м配电 (к) | Овънгов 办хост % | Разда наenerгия кWh | Бухsprakтentно на вдат it | Проблажment
на чька |
| Предл-разе | Оснobи оразе | Омени тител |
| EVERYDAY FAST |
| 1 | Смесено центо 59' | 40° 1000 - | | | ● | ● | 6 | --- | 59' | | |
| 2 | Памуж 59' | 60° 1000 - | | | ● | ● | 6 | --- | 59' | | |
| 3 | Памуж 45' | 40° 1200 - | | | ● | ● | 3 | --- | 45' | | |
| 4 | Сиntetedка 59' (3) | 40° (Max. 60°) | 1000 - | | ● | ● | 3 | 44 | 0,50 | 39 | 59' |
| 5 | Смесено пале 30' | 30° | 800 | - | ● | ● | 3 | 70 | 0,17 | 31 | 30' |
| 6 | Експrec 20' | 20° | 800 | - | ● | ● | 3 | --- | 20' | | |
| Special & Partial |
| 7 | Сportно obлесло | 40° | 600 | - | ● | ● | 3 | --- | ** | | |
| 8 | Сportно obувки | 30° | 600 | - | ● | ● | (М配电.2
чфanta.) | --- | ** | | |
| 9 | Бebe | 40° 800 | - | | ● | ● | 2 | --- | ** | | |
| 10 | Изпалakвае | - | 1200 | - | | ● | 6 | --- | ** | | |
| 11 | Цentralфуга + Изомпвае | - | 1200 | - | - | | 6 | --- | ** | | |
| 11 | Само Источвае на ворatable * | - | OFF | - | - | - | 6 | --- | ** | | |
| Dedicated |
| 12 | Пухеняяета и завики: 3a дөрөns и завики, полалатэн
С тьши рх. | 30° 1000 - | | | ● | ● | 1,5 | --- | ** | | |
| 13 | Вынени тьkanи: 3a вына, кашир и.T.H. | 40° 800 | - | | ● | ● | 1,5 | --- | ** | | |
| 14 | Корпina/Перета: 3a дөрөns ot корпina, вискоэа, Фию belpo. 30° | 0 | - | ● | ● | ● | 1 | --- | ** | | |
| 15 | Ек Памуж 60°C (1): Белиnicцовни, усточни, синлно замьр
с otherwise 1200 - | | | ● | ● | ● | 6 | 53 | 0,93 | 50,0 | 200' |
| 15 | Ек Памуж 40°C (2): Белиnicцовни, несточни, малко пьрпсни. | 90° 1200 | | ● | ● | ● | 6 | 53 | 0,85 | 76 | 180' |
| 16 | Памуж "П procedрaine": Бели, Изк nullүлүлүлүлүлүлүлүлүлүлүлүлүлүлүлүлүлүлүлүлүлүлүлүлүлүлүлүлүлүлүлүлүлүлүлүлүлүлүлүлүлүлүлүлүлүлүлүлүлүлүl | | | | | | 6 | --- | ** | | |
*With the selection of program 11 and the switching off of the centrifuge, the water will only be drained. **The duration of the washing cycle can be controlled.
The duration of the cycle, shown on the display or in the manual, is approximately calculated based on standard conditions. The actual duration may vary depending on many factors such as the temperature and hardness of the water at the inlet, the temperature of the environment and the humidity, the amount of laundry, the type and fabric of the laundry, and the selected options.
1) Program for checking according to standard 1061/2010: set program 15 with a temperature of 60°C. This cycle is for cotton laundry, normally soiled, and is the most effective in terms of a combination of time and water consumption. It is suitable for laundry that can be washed at 60°C. 2) Program for checking according to standard 1061/2010: set program 15 with a temperature of 40°C. This cycle is suitable for cotton laundry, normally soiled, and is the most effective in terms of a combination of energy and water consumption. It is suitable for laundry that can be washed at 40°C.
For all test institutes:
2) Select the program for washing; Set program 15 with temperature 40°C 3) Select the program for spinning: Set program 4, and then select the Extra Wash option
Functions for washing
-If the selected function is not compatible with the set program, the indicator light will start blinking and the function will not activate. -If the selected function is not compatible with another previously set function, the indicator corresponding to the first selected function will blink and only the second one will activate, while the indicator of the activated function will light up.
For heavily soiled laundry, activate the Extra Wash* option, if it is compatible. With the selection of this option, the cycle automatically adjusts all washing parameters, switching to a more intensive cycle. Extra rinse
The temperature is not increased, while the centrifuge automatically adjusts the spin speed to the maximum degree. The heating element can be preset to the desired degree.

Additional rinsing
Selecting this option increases the effectiveness of rinsing and guarantees maximum removal of detergent residues. Suitable for particularly sensitive to detergent residues fabrics.
Energy Saver
This option allows washing of cotton and synthetic laundry at reduced energy consumption, respectively, in an environmentally friendly manner. The washing is performed with cold water, while through more intensive mechanical action and optimized water consumption, the desired result is still achieved.
It is intended for lightly soiled laundry. It is recommended to use liquid detergent.
Detergents and rinsing agents for washing
Recommendations for detergents
Good washing results depend on the correct dosing of detergents. With overdosing, not only is it not more effective, but it also leads to the formation of foam on the inside of the washing machine and to the pollution of the environment.
!Do not use detergents for hand washing, as they create too much foam. !Use powder detergents for white cotton fabrics for pre-washing and for washing at temperatures above 60°C !Make sure you follow the instructions indicated on the detergent packaging.
This technical manual describes the preparation and use of the products for spraying and the products for spraying according to the following.
Section 1: Product for spraying (powder) Section 2: Product for spraying (liquid)
The product is used before switching on the machine.
Section 3: Spraying products (the sprayer and the sprayer must not be removed from the tank.
Warning: In case of use of "powder product for tablets" it is recommended to follow the manufacturer's instructions.
Preparation of the spray
Distribute the spray according to: - TYPE OF FABRICS/SYMBOL ON THE LABEL - COLORS: Separate light and dark colors. - Check the compatibility with the fabric. Do not exceed the indicated values in the "program" table for dry spray.
How much product for spraying?
1 load 400-500g 1 cap 150-200g 1 cover 400-500g 1 load 900-1200g 1 brick 150-250g
The washing machine does not turn on.
Possible causes / Measures to eliminate them:
- The plug is not connected to the electrical contact or is not well connected, to make good contact. There is power in the socket.
The start button is not pressed.
The door is not closed properly. - The ON/OFF button is not pressed. - The START/PAUSE button is not pressed. The water tap is not open. A delay has been set that has been activated on the start time.
The washing machine does not fill with water (on the display is shown the symbol "H2O"
The tap for the cold water is not connected to the tap. The taps are blocked. The water tap is not open. - There is no water in the water supply pipe. - The pressure is insufficient. - The START/PAUSE button has not been pressed.
The washing machine continuously drains and fills.
The tap for the hot water is not installed between 65 and 100 cm from the floor (see "Installation"). The hot water tap is immersed in water (see "Installation"). The drain hose in the wall has a siphon.
If after these checks the problem is not resolved, close the water tap, unplug the washing machine and call the service. If the appliance is installed on the top floor of a building, the pressure of the cold water may be low, due to which the washing machine continuously fills and drains. To avoid this inconvenience, non-return valves are offered in the trade network.
The washing machine does not drain or spin.
- The program does not provide for draining: with some programs it must be performed manually. The tap for the hot water is blocked (see "Installation"). The drain hose is clogged.
The washing machine takes too long to spin.
- The drain hose is not properly connected (see "Installation"). - The washing machine is not leveled (see "Installation"). - The washing machine is touching furniture or the wall (see "Installation").
The washing machine leaks.
The tap for the cold water is not well connected (see "Installation"). - The detergent drawer is clogged (for its cleaning see "Maintenance and cleaning"). The tap for the hot water is not fixed well (see "Installation").
The "ON/OFF" indicator light and the "START/PAUSE" indicator light flash and display an error code (e.g., F-01, F-...).
- 1 minute after switching on again. If the malfunction cannot be eliminated, contact the service department.
Too much foam is formed.
- The detergent is not for automatic washing machines (it should have an inscription "for automatic washing machines", "for hand and automatic washing machines" or a similar inscription). - The dosage was too large.
Service maintenance
Please contact the technical service:
- You can try to solve the problem yourself (see "Problems and Measures for their Elimination"); enter the program again to check if the malfunction has been eliminated; in the opposite case, contact the authorized technical service at the phone number indicated on the warranty card.
Never use the services of unauthorized technicians.
Please provide:
The type of problem; - The model of the machine (Mod.); - The serial number (S/N).
This information is on the manufacturer's plate, located on the rear side of the machine and in the front part, after opening the door.

Italian
Summary
Causes / Possible solutions: