
HIM 50 K.A IX2 - Oven INDESIT - Free user manual and instructions
Find the device manual for free HIM 50 K.A IX2 INDESIT in PDF.

| Product type | Built-in oven (cooker with hob) |
| Brand | Indesit |
| Model | HIM 50 K.A IX2 |
| Dimensions (W x H x D) | 43.5 x 32 x 40 cm |
| Oven capacity | 56 L |
| Maximum power consumption | 8450 W |
| Supply voltage | 230 V / 400 V ~ 3N 50/60 Hz |
| Connection type | Terminal block with H05RR-F cable (depending on installation) |
| Cooking programs | Traditional, Multi-cooking, Top heat, Grill, Gratin |
| Temperature range | 60 °C to MAX (except grill recommended MAX, gratin max 200 °C) |
| Cooking type | Natural and forced convection (multi-cooking) |
| Oven light | 25 W lamp, E14 base, replaceable |
| Cleaning | Manual cleaning, removable door, no steam cleaner |
| Removable door | Yes, with levers on hinges |
| Included accessories | Grid, drip tray, sliding guides |
| Energy class | Not directly specified, complies with directive 2002/40/EC |
| Energy consumption | Multi-cooking: according to EN 50304 standard |
| Safety | Child lock not mentioned, automatic stop via programmer |
| Repairability | Bulb and door replaceable, technical assistance required for others |
| Weight | Not specified in the manual |
Frequently Asked Questions - HIM 50 K.A IX2 INDESIT
User questions about HIM 50 K.A IX2 INDESIT
0 question about this device. Answer the ones you know or ask your own.
Ask a new question about this device
Download the instructions for your Oven in PDF format for free! Find your manual HIM 50 K.A IX2 - INDESIT and take your electronic device back in hand. On this page are published all the documents necessary for the use of your device. HIM 50 K.A IX2 by INDESIT.
USER MANUAL HIM 50 K.A IX2 INDESIT
Operating Instructions COOKER AND OVEN
Contents
Operating Instructions, 1
Description of the appliance-Overall view, 2
Description of the appliance-Control Panel, 3
Installation, 4
Start-up and use.7
Cooking modes, 7
Using the hob,9
Precautions and tips, 11
Care and maintenance,12
FR
Français
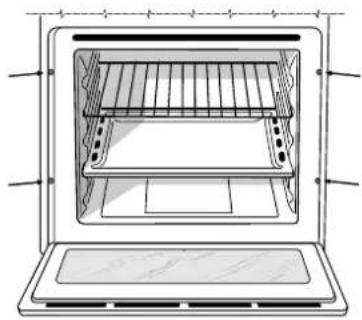
Description of the appliance Overall view
- Control panel
2.Sliding grill rack
3.DRIPPING pan
4.GUIDE RAILS for the sliding racks
5.position 5
6.position 4
7.position 3
8.position 2
9.position 1
FR
Description of the appliance Control panel
- Electric HOTPLATE control knob
- ELECTRIC HOTPLATE indicator light
- OVEN CONTROL knob
- Electronic cooking programmer*
5.THERMOSTAT knob -
THERMOSTAT indicator light
-
Only on certain models
NL
Before placing your new appliance into operation please read these operating instructions carefully. They contain important information for safe use, for installation and for care of the appliance.
Please keep these operating instructions for future reference. Pass them on to possible new owners of the appliance.
Positioning
! Keep packaging material out of the reach of children. It can become a choking or suffocation hazard (see Precautions and tips).
The appliance must be installed by a qualified person in compliance with the instructions provided. Incorrect installation may cause harm to persons, animals or may damage property.
Fitting the appliance
Use the appropriate cabinet to ensure that the appliance functions properly.
The panels adjacent to the oven must be made of heat-resistant material.
Cabinets with a veneer exterior must be assembled with glues which can withstand temperatures of up to 100^ .
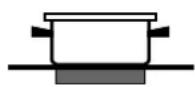
- To install the oven under the counter (see diagram) and in a kitchen unit, the cabinet must have the following dimensions:
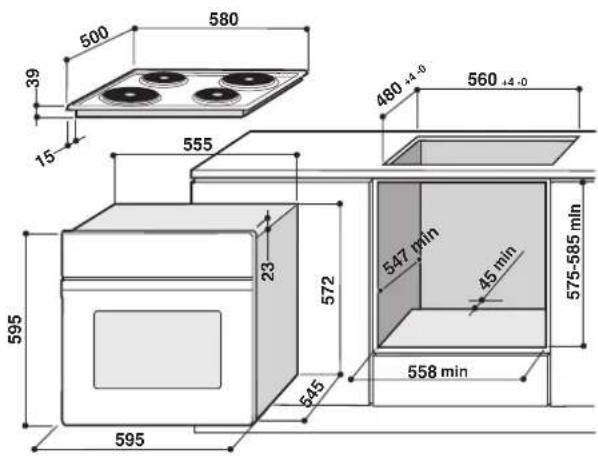
The appliance must not come into contact with electrical parts once it has been installed. The consumption indications on the data plate have been calculated for this type of installation.
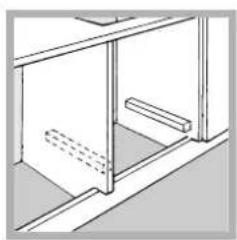
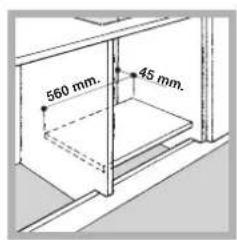
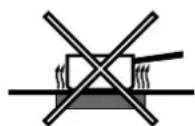
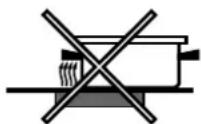
Ventilation
To ensure good ventilation, the back panel of the cabinet must be removed. It is advisable to install the oven so that it rests on two strips of wood, or on a completely flat surface with an opening of at least 45 × 560 mm (see diagrams).
Centring and fastening
Secure the appliance to the cabinet by opening the oven door and putting 4 screws into the 4 holes of the outer frame.
All parts which ensure the safe operation of the appliance must not be removable without the aid of a tool.
Electrical connections
The cooker must be connected to the mains electricity supply. It is designed to operate with alternating current at the voltage and frequency indicated on the data plate (see the following page).
The hob is connected to the cooker using a special connector.
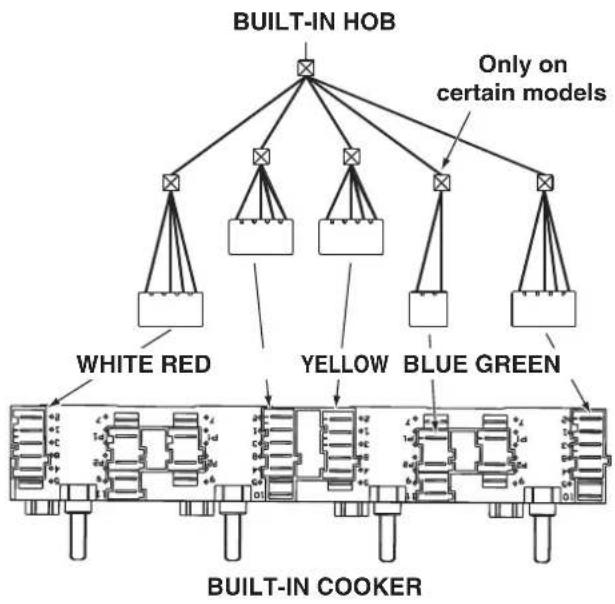
Replace the metal protection after performing all the necessary hob connections. If the hob is removed from its position, the red cap which was originally protecting the red connector must be replaced.
Fitting the power supply cable
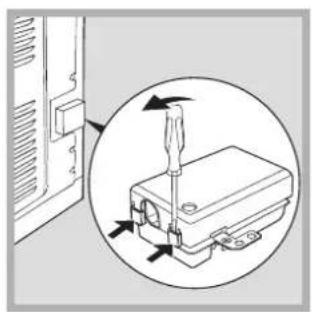
-
Open the terminal board by inserting a screwdriver into the side tabs of the cover. Use the screwdriver as a lever by pushing it down to open the cover (see diagram).
-
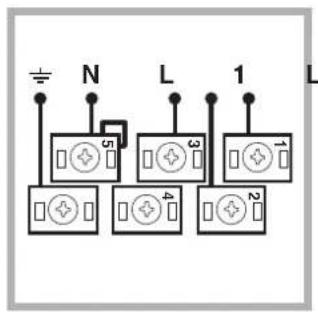
Install the power supply cable by loosening the cable clamp screw and the wire contact screws L-N- Connect the wires to the corresponding terminals: the Blue wire to the terminal marked (N), the Brown wire to the terminal marked (L) and the Yellow Green wire to the terminal marked
The terminal board is designed for a 400V three-phase connection (see diagrams below).
400V 3N~H05RR-F
5x2.5 CEI-UNEL 35363
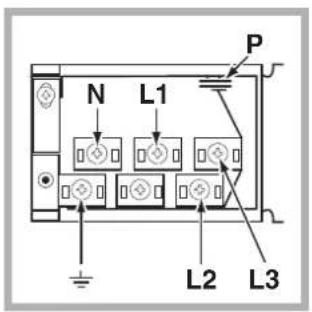
If the electrical system has other characteristics (see diagrams below), carry out the electrical connection using the connection supports provided in the box P.
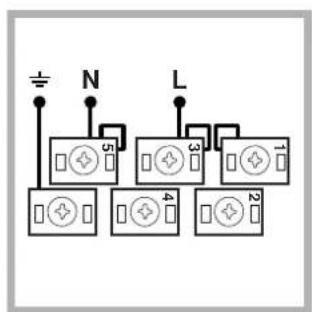
230V ~H05RR-F 3x4 CEI-UNEL 35363
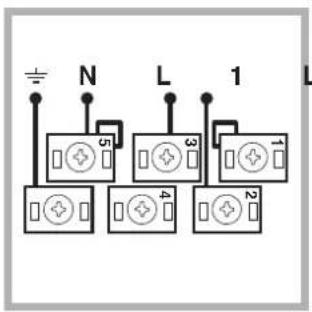
400V 2N~H05RR-F 4x4 CEI-UNEL 35363 2
- Secure the power supply cable by fastening the clamp screw.
- Close the cover of the terminal board.
Connecting the supply cable to the mains
Install a standardised plug corresponding to the load indicated on the data plate (see side).
The appliance must be directly connected to the mains using an omnipolar circuit-breaker with a minimum contact opening of 3mm installed between the appliance and the mains, suitable for the load indicated and complying with current electrical regulations (the earthing wire must not be interrupted by the circuit-breaker). The supply cable must not come into contact with surfaces with temperatures higher than 50^ .
The installer must ensure that the correct electrical connection has been made and that it is compliant with safety regulations.
Before connecting to the power supply, make sure that:
The appliance is earthed and the plug is compliant with the law.
The socket can withstand the maximum power of the appliance, which is indicated on the data plate (see below).
The voltage must be in the range between the values indicated on the data plate (see below).
- The socket is compatible with the plug of the appliance. If the socket is incompatible with the plug, ask an authorised technician to replace it. Do not use extension cords or multiple sockets.
! Once the appliance has been installed, the power supply cable and the electrical socket must be easily accessible.
The cable must not be bent or compressed.
The cable must be checked regularly and replaced by authorised technicians only (see Assistance).
! The manufacturer declines any liability should these safety measures not be observed.
| DATA PLATE | |
| Dimensions | width 43.5 cm height 32 cm depth 40 cm |
| Volume lt. 56 | |
| Electrical connections | voltage: 230V/400V~ 3N 50/60Hz maximum power absorbed 8450W |
| ENERGY LABEL | Directive 2002/40/EC on the label of electric ovens. Standard EN 50304 Energy consumption for Forced convection heating mode: Multi-cooking Declared energy consumption for Natural convection Class heating mode: Convection |
| CE | This appliance conforms to the following European Economic Community directives: - 2006/95/EEC of 12/12/06 (Low Voltage) and subsequent amendments; - 2004/108/EEC of 15/12/04 (Electromagnetic Compatibility) and subsequent amendments; - 93/68/EEC of 22/07/93 and subsequent amendments. - 2002/96/EC and subsequent amendments. |
GB
! The first time you use your appliance, heat the empty oven with its door closed at its maximum temperature for at least half an hour. Ensure that the room is well ventilated before switching the oven off and opening the oven door. The appliance may produce a slightly unpleasant odour caused by the burning away of protective substances used during the manufacturing process.
Starting the oven
- Select the desired cooking mode by turning the SELECTOR knob.
- Select the desired temperature with the THERMOSTAT knob. See the Cooking advice table for cooking modes and the suggested cooking temperatures (see Cooking Modes).
- When preheating is finished, the THERMOSTAT indicator light will stay on: place the food in the oven.
-
You may do the following during cooking:
-
change the cooking mode by turning the SELECTOR knob.
-
change the temperature by turning the THERMOSTAT knob.
- stop cooking by turning the SELECTOR knob to the "0" position.
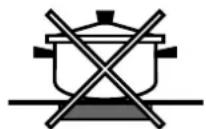
! Never put objects directly on the oven bottom to avoid damaging the enamel coating.
! Always place cookware on the rack(s) provided.
Cooling ventilation
In order to cool down the external temperature of the oven, some models are fitted with a cooling fan that blows out air between the control panel and the oven door.
Once the cooking has been completed, the cooling fan remains on until the oven has cooled down sufficiently.
Oven light
It goes on when selecting with the SELECTOR knob. It stays on when a cooking mode is selected.
Cooking modes
! A temperature value can be set for all cooking modes between 60^ and Max, except for
- GRILL (recommended: set only to MAX power level);
- GRATIN (recommended: do not exceed 200^ ).

CONVECTION OVEN mode
Both the top and bottom heating elements will come on. With this traditional cooking mode, it is best to use one cooking rack only; if more than one rack is used, the heat will be distributed unevenly.

MULTI-COOKING mode
All the heating elements (top and bottom), as well as the fan, will come on. Since the heat remains constant throughout the oven, the air cooks and browns food uniformly. A maximum of two racks may be used at the same time.

TOP OVEN mode
The top heating element comes on. This mode can be used to brown food at the end of cooking.

GRILL mode
The top heating element comes on. The extremely high and direct temperature of the grill makes it possible to brown the surface of meats and roasts while locking in the juices to keep them tender. The grill is also highly recommended for dishes that require a high temperature on the surface: such as beef steaks, veal, rib steak, filets, hamburgers etc... Some grilling examples are included in the "Practical Cooking Advice" paragraph. Always cook in this mode with the oven door closed.

GRATIN mode
The top heating element, as well as the fan, will come on. This combination of features increases the effectiveness of the unidirectional thermal radiation of the heating elements through forced circulation of the air throughout the oven. This helps prevent food from burning on the surface, allowing the heat to penetrate right into the food. Always cook in this mode with the oven door closed.
Practical cooking advice
! Do not place racks in position 1 and 5 during fan-assisted cooking. Excessive direct heat can burn temperature sensitive foods.
! In the GRILL and GRATIN cooking modes, place the dripping pan in position 1 to collect cooking residues (fat and/or grease).
MULTI-COOKING
- Use position 2 and 4, placing the food that requires more heat on 2.
- Place the dripping pan on the bottom and the rack on top.
GRILL
-
Insert the rack in position 3 or 4. Place the food in the centre of the rack.
-
We recommend that you set the maximum power level. The top heating element is regulated by a thermostat and may not always be on.
PIZZA
- For best results when cooking pizza, use the MULTI-COOKING mode.
- Use a light aluminium pizza pan. Place it on the rack provided. For a crispy crust, do not use the dripping pan (prevents crust from forming by extending cooking time).
- If the pizza has a lot of toppings, we recommend adding the mozzarella cheese on top of the pizza halfway through the cooking process.
Cooking advice table
| Cooking modes | Foods | Weight (in kg) | Rack position | Pre-heating time (min) | Recommended temperature | Cooking time (minutes) |
| Convection Oven | Duck | 1 | 3 | 15 | 200 | 65-75 |
| Roast veal or beef | 1 | 3 | 15 | 200 | 70-75 | |
| Pork roast | 1 | 3 | 15 | 200 | 70-80 | |
| Biscuits (short pastry) | - | 3 | 15 | 180 | 15-20 | |
| Tarts | 1 | 3 | 15 | 180 | 30-35 | |
| Multi-cooking | Pizza (on 2 racks) | 1 | 2 and 4 | 15 | 230 | 15-20 |
| Lasagne | 1 | 3 | 10 | 180 | 30-35 | |
| Lamb | 1 | 2 | 10 | 180 | 40-45 | |
| Roast chicken + potatoes | 1+1 | 2 and 4 | 15 | 200 | 60-70 | |
| Mackerel | 1 | 2 | 10 | 180 | 30-35 | |
| Plum cake | 1 | 2 | 10 | 170 | 40-50 | |
| Cream puffs (on 2 racks) | 0.5 | 2 and 4 | 10 | 190 | 20-25 | |
| Biscuits (on 2 racks) | 0.5 | 2 and 4 | 10 | 180 | 10-15 | |
| Sponge cake (on 1 rack) | 0.5 | 2 | 10 | 170 | 15-20 | |
| Sponge cake (on 2 racks) | 1 | 2 and 4 | 10 | 170 | 20-25 | |
| Savoury pies | 1.5 | 3 | 15 | 200 | 25-30 | |
| Top oven | Browning food to perfect cooking | - 3/4 15 220 - | ||||
| Grill | Soles and cuttlefish | 1 | 4 | 5 | Max | 8-10 |
| Squid and prawn kebabs | 1 | 4 | 5 | Max | 6-8 | |
| Cod filet | 1 | 4 | 5 | Max | 10 | |
| Grilled vegetables | 1 | 3 or 4 | 5 | Max | 10-15 | |
| Veal steak | 1 | 4 | 5 | Max | 15-20 | |
| Cutlets | 1 | 4 | 5 | Max | 15-20 | |
| Hamburgers | 1 | 4 | 5 | Max | 7-10 | |
| Mackerels | 1 | 4 | 5 | Max | 15-20 | |
| Toasts | 4 | 4 | 5 | Max | 2-3 | |
| Gratin | Grilled chicken | 1.5 | 2 | 5 | 200 | 55-60 |
| Cuttlefish | 1.5 | 2 | 5 | 200 | 30-35 | |
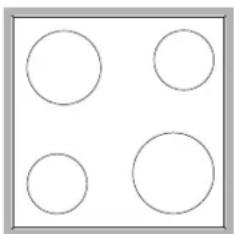
Type of hob
The oven is combined with a hob that can be made up of two types of heating elements: cast-iron electric plates (see diagram 1) or glass ceramic hobs (see diagram 2).
Switching on the glass ceramic hob
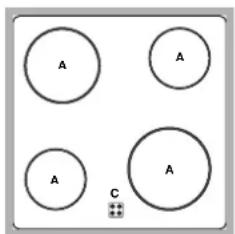
Traditional cooking zones
Traditional cooking zones are made up of circular heating elements. They turn red approximately ten seconds after they have been turned on. Each cooking zone is fitted with a control knob allowing you to select from 6 different temperature settings from a minimum of 1 to a maximum of 6.
Residual heat indicator lights*
The indicator lights (C) indicate that the temperature of the corresponding cooking zones have exceeded 60^ , even after the heating element has been switched off.
Recommended power levels for various types of cooking:
| Setting | Setting |
| 0 | Off |
| 1 | Cooking vegetables, fish |
| 2 | Cooking potatoes (using steam) soups, chickpeas, beans. |
| 3 | Continuing the cooking of large quantities of food, minestrone. |
| 4 | For roasting (average) |
| 5 | For roasting (above average) |
| 6 | For browning and reaching a boil in a short time |
Practical advice on using the glass ceramic hob
! The glue that is applied on the gaskets leaves some traces of grease on the glass. Before using the appliance, we recommend you eliminate these with a special non-abrasive cleaning product. During the first few hours of use there may be a smell of rubber which will disappear very quickly.
To obtain the best results with your hob:
- Use flat-bottomed pans to ensure that they adhere to the cooking zone perfectly.

Always use pans with a diameter that is large enough to cover the hotplate fully, in order to use all the available heat.
- Make sure that the bottom of the cookware is always dry and clean to guarantee correct adherence and long life, not only for the cooking zones but also for the cookware itself.
- Avoid using the same cookware that is used on gas burners: the heat concentration on gas burners may deform the base of the pan, causing it not to adhere correctly.
- Never leave a cooking zone on without cookware on it because as it heats up and rapidly reaches the maximum level, it could damage the heating elements.
GB
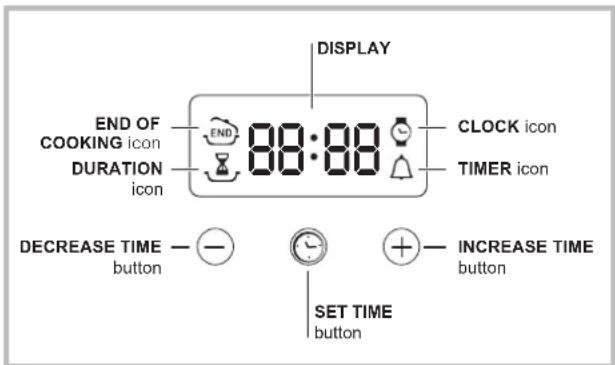
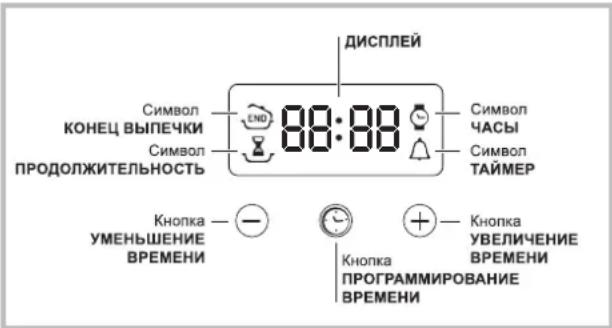
Setting the clock
The clock may be set when the oven is switched off or when it is switched on, provided that a the end time of a cooking cycle has not been programmed previously.
After the appliance has been connected to the
mains, or after a blackout, the icon and the four numerical digits on the DISPLAY will begin to flash.
- Press the button several times until the icon and the four digits on the display begin to flash.
- Use the "+" and "-" buttons to adjust the time; if you press and hold either button, the display will scroll through the values more quickly, making it quicker and easier to set the desired value.
- Wait for 10 seconds or press the button again to finalise the setting.
Setting the timer
This function does not interrupt cooking and does not affect the oven; it is simply used to activate the buzzer when the set amount of time has elapsed.
- Press the button several times until the icon and the three digits on the display begin to flash.
- Use the "+" and "-" buttons to set the desired time; if you press and hold either button, the display will scroll through the values more quickly, making it quicker and easier to set the value.
- Wait for 10 seconds or press the button again to finalise the setting.
The display will then show the time as it counts down. When this period of time has elapsed the buzzer will be activated.
Programming cooking
! A cooking mode must be selected before programming can take place.
Programming the cooking duration
- Press the button several times until the Z icon and the three digits on the DISPLAY begin to flash.
- Use the "+" and "-" buttons to set the desired duration; if you press and hold either button, the display will scroll through the values more quickly, making it quicker and easier to set the value.
- Wait for 10 seconds or press the button again to finalise the setting.
- When the set time has elapsed, the text END appears on the DISPLAY, the oven will stop cooking and a buzzer sounds.
- For example: it is 9:00 a.m. and a time of 1 hour and 15 minutes is programmed. The programme will stop automatically at 10:15 a.m.
Setting the end time for a cooking mode
! A cooking duration must be set before the cooking end time can be scheduled.
- Follow steps 1 to 3 to set the duration as detailed above.
- Next, press the button until the icon and the four digits on the DISPLAY begin to flash.
- use the "+" and "-" buttons to adjust the cooking end time; if you press and hold either button, the display will scroll through the values more quickly, making it quicker and easier to set the desired value.
- Wait for 10 seconds or press the button again to finalise the setting.
- When the set time has elapsed, the text END appears on the DISPLAY, the oven will stop cooking and a buzzer sounds.
Programming has been set when the and buttons are illuminated. The DISPLAY shows the cooking end time and the cooking duration alternately.
Cancelling a programme
To cancel a programme:
- press the button until the icon corresponding to the setting you wish to cancel and the digits on the display are no longer flashing. Press the "-" button until the digits 00:00 appear on the display.
- Press and hold the "+" and "-" buttons; this will cancel all the settings selected previously, including timer settings.
! The appliance was designed and manufactured in compliance with international safety standards. The following warnings are provided for safety reasons and must be read carefully.
General safety
- The appliance was designed for domestic use inside the home and is not intended for commercial or industrial use.
- The appliance must not be installed outdoors, even in covered areas. It is extremely dangerous to leave the appliance exposed to rain and storms.
- When handling the appliance, always use the handles provided on the sides of the oven.
- Do not touch the appliance with bare feet or with wet or moist hands and feet.
- The appliance must be used by adults only for the preparation of food, in accordance with the instructions outlined in this booklet. Any other use of the appliance (e.g. for heating the room) constitutes improper use and is dangerous. The manufacturer may not be held liable for any damage resulting from improper, incorrect and unreasonable use of the appliance.
- When the appliance is in use, the heating elements and some parts of the oven door become extremely hot. Make sure you don't touch them and keep children well away.
- Ensure that the power supply cable of other electrical appliances does not come into contact with the hot parts of the oven.
- The openings used for ventilation and dispersion of heat must never be covered.
- Always grip the oven door handle in the centre: the ends may be hot.
Always use oven gloves to place cookware in the oven or when removing it. - Do not use aluminium foil to line the bottom of the oven.
- Do not place flammable materials in the oven: if the appliance is switched on by mistake, it could catch fire.
Always make sure the knobs are in the "●"/"○" position when the appliance is not in use. - When unplugging the appliance always pull the plug from the mains socket, do not pull on the cable.
- Never carry out any cleaning or maintenance work without having unplugged the plug from the mains.
- In the case of a malfunction, under no circumstances should you attempt to repair the appliance yourself. Repairs carried out by inexperienced persons may cause injury or further malfunctioning of the appliance. Contact a Service Centre (see Assistance).
-
Do not rest heavy objects on the open oven door.
-
The glass ceramic hob is resistant to mechanical shocks, but it may crack (or even break) if hit with a sharp object such as a tool. If this happens, disconnect the appliance from the electricity mains immediately and contact a Service Centre.
- Remember that the temperature of the cooking zones remains relatively high for at least thirty minutes after they have been switched off.
- Keep any object that could melt away from the hob, for example plastic and aluminium objects, or products with a high sugar content. Keep plastic or aluminium objects away from the hob: if you forget them on surfaces that are still hot, they may cause serious damage to the hob.
- The appliance should not be operated by people (including children) with reduced physical, sensory or mental capacities, by inexperienced individuals or by anyone who is not familiar with the product. These individuals should, at the very least, be supervised by someone who assumes responsibility for their safety or receive preliminary instructions relating to the operation of the appliance.
- Do not let children play with the appliance.
Disposal
- Observe local environmental standards when disposing packaging material for recycling purposes. Observe existing legislation when disposing of the old appliance.
- The European Directive 2002/96/EC on Waste Electrical and Electronic Equipment (WEEE), requires that old household electrical appliances must not be disposed of in the normal unsorted municipal waste stream. Old appliances must be collected separately in order to optimise the recovery and recycling of the materials they contain and reduce the impact on human health and the environment. The crossed out "wheeled bin" symbol on the product reminds you of your obligation, that when you dispose of the appliance it must be separately collected.
Consumers should contact their local authority or retailer for information concerning the correct disposal of their old appliance.
Respecting and conserving the environment
- By using the appliance in the hours between late afternoon and early morning, you can help reduce the work load placed on electrical companies.
Always keep the oven door closed when using the GRILL mode to attain best results and to save energy (approximately 10% ). - Regularly check the door seals and wipe clean to ensure they are free of debris so that they stick properly to the door and do not allow heat to disperse.
GB
Switching the appliance off
Disconnect your appliance from the electricity supply before carrying out any work on it.
Cleaning the appliance
- The stainless-steel or enamel-coated external parts as well as the rubber seals may be cleaned using a sponge that has been soaked in lukewarm water and neutral soap. If these stains are difficult to remove, use only specialised products. After cleaning, rinse and dry thoroughly. Do not use abrasive powders or corrosive substances.
- Ideally, the inside of the oven should be cleaned after each use, when it is still lukewarm. Use hot water and detergent, rinse and dry with a soft cloth. Do not use abrasive products.
- The accessories can be washed like everyday crockery (even in your dishwasher).
! Never use steam cleaners or pressure cleaners on the appliance.
Cleaning the oven door
Clean the glass part of the oven door using a sponge and a non-abrasive cleaning product, then dry thoroughly with a soft cloth. Do not use rough abrasive material or sharp metal scrapers as these could scratch the surface and cause the glass to crack. To clean more thoroughly, you can remove the oven door.
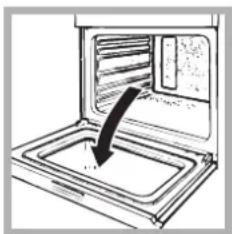
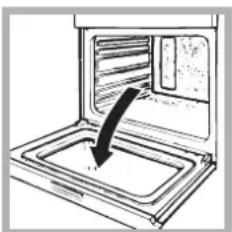
- Open the oven door fully (see diagram).
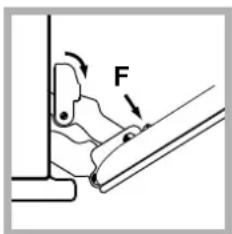
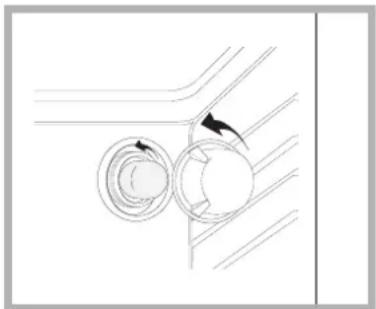
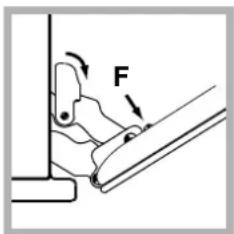
- lift up and turn the small levers situated on the two hinges; (see diagram).
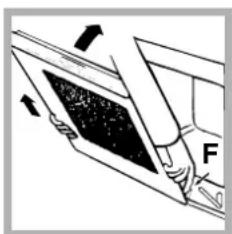
- Grip the door on the two external sides and close it approximately half way. Unlock the door by pressing on the clamps F, then pull the door towards you lifting it out of its seat (see diagram).
To replace the door, reverse this sequence.
Inspecting the seals
Check the door seals around the oven periodically. If the seals are damaged, please contact your nearest After-sales Service Centre (see Assistance). We recommend not using the oven until the seals have been replaced.
Replacing the light bulb
To replace the oven light bulb:
- Remove the glass cover of the lamp-holder.
- Remove the light bulb and replace it with a similar one: Wattage 25 W, cap E 14.
- Replace the glass cover (see diagram).
Assistance
Communicating:
- appliance model (Mod.)
- serial number (S/N)
This information is found on the data plate located on the appliance and/or on the packaging.
Papaoiake tsepioxcs payeipepaTOc
Ta TnapaooiaKa 3epmuavtka oToixiea atotaleouvtai aTIO AVIOTAOEIG KUKAIKcKcKai yivovta KOKKVEc MVO pTea ITO ePIKcE 6ekadec 6eutepoAETIWv aTIO TO avamua touc KaTe PEPIOXn mayepaatoC dAtheEVA xeiipntnpio TOUT EITIPTEI TNY ETTIAOyn 6 diaopetikwv 3epuokpaoWv, aTIO mEAaxiOn TmN 1 EWC mApEyiOn 6.
Evdeiktika WTAKIA UTOAeITIOeVnG ePOTNTaC*
Ta evdikia qwakia C) deixvou n avioxyn wny
yapeipatoe ivai o eia oepokpaia yayaupepn T60°C, kai tto aonpo tou eepavnikou otoxiou.
Pnoteivoueva Etnieba 1oXuoc yia biapopouc tounos ayepaTOC:
PporpaMbl npiroTOBJIeHnA
!IЯBcex nporpaMM MoKHO 3aJaTb TeMnepaTpy O T 60^ do MAKC Kpome:
- ΓΡΙΝΙβ (peKOMeHdyeTcγycTaHaBJIbBaTb TɔJIbKO MAKC. TemnepaTyPy);
ПОДРУМЯНВАHNE(peKOMeHnyeTcH npeBbIwA Tb TemnepaTy p 200°C).
Pporpamma HAFPEB CBEPXY
Bknoaetc BepxHn HArpeBaTeNbHbIe NEmeHT.3Ta cyHKUma MoKeT 6bITb NcNoIb3ObaHa dIra DOBOdKn roTOBbIX 6JIHOJ.
PporpMaΓPNJb
BkHIOaEcBepxHn HArpeBaTeIbHbI 3JeMeHT. 3HaHTeJIbHaN TeMnepaTpya PpAmoro DeIcTBNr rPnI N03BOJnE TOnyUHTb 6blCTpoe O6pa3OBaHne KopoQn Ha NOBepXHOCTN pOdyKTA, KOtopa npEnrTCTByET BbIXOy COKOB IN CoXpaHReT IPOdyKT HexhBIM N COUYBM BHyTpN. NcNoIb3oBAHne fYHKmN rPnIB B OOC6EHOctn peKOMeHnyETcN IIN 6JIoD, DJIr npIrTOBHeHn KOTopbIX Tpe6yeTcR BbcOKaR IOBepxHOCTH NEMpePaTyPA: TeJIyBuNX IN TOBjXbNX 6nΦWTeKCoB, aHTpeKOToB, Bblpe3Kn, ram6yprepob n T.D. B NaparpaFe «IpaKaTNUeCKNe COBeTbI No npIrTOBHeHIO» npIrBOJaTcN HeKOToPbI npIMepbl NcNoIb3oBAHn DxyOBOrO uKaΦa. FOrTOBbTe 6JIoDa c 3akpbITOn DBepue DxyOBOrO uKaΦa.
Iporpamma GRATIN (IopymaHbHne)
Bknouaetc BepxHn HarpBeBaTeNbHbI 3JeMeHT n BepTe. CoeTaet OJHOHaPnPaBneHoe BblJeHne Jkapa c npHyDnteBHOuPKyIaUe BO3dyxa BHytpn DxyOBO rKaΦa. 3To npenrTCTByeT o6ropaHIO NOBepxHocTN pOdyKTOB, NOBIIwa npOHkaHOuyo CnOCo6HoCTb Jkapa. FOTOBTe 6JIHOa c 3AkpyTOB DBepeN DxyOBO rKaΦa.
PpakTuYeckne COBeTbI no npuroToBHeHIO
!B pexnme BeHTnJInpyeMOro npiroToBJIeHn He nCnoJIb3yIte 1-bi n 5-bi ypoBHn: OHn NODBepraOTc nprMOMy BO3DeNCTBIO rOprrero BO3Dyxa, KOToPbIM MoKeT CKeYb DeJIHKaTHbIe npOdyKTbl.
!Pn nncnoJb3oBaHnn yHKuI IPNJIb n IOpYMaHNBAHNE nomecTnte npOTnBeHb Ha ypoBeH 1 dnn c6opaxKIOKocTei, BblJeIeMOrO npN Jkapke (cok n/nnxnp).
OJHOBPEMEHHOE INPIFOTOBNEHNE
- NcnoIb3yIOCTc 2-0n n 4-bi npOBHn, Ha 2-0n NOMeuaIOCTc npOdyKtbl, Tpe6yIOuNe 6oJee HHTehCNBHO zoapa.
- YctahOBtne npontBeHb cH3y, a peWetKy cbepxy.
PnIb
- YcTaHOBnTe peWteKny Ha ypoBeHb 3 nnn 4, NOMeCTnTe npOdyKTbI B ueHTppeWetKn.
- PeKOMeHnyeTcB BbIbpaTb MaKcImaJIbHyo MoUHocTb DyXOBKn. He 6ecNOKoITecb, ecnBepxHni 3JIeMeHT He oCTaETcra NOCTOHHo BKJIOueHHbIM: erpaboYnpabJIaTeTcR TepMOCTaTOM.
NIIU4A
IcnoJb3yIte npOTnBEH n3 JERKOro aIIOHMnHna, yctaHaBnBaeraero Ha npUraHoucyOpeWetky. PnncNoJIb3OBaHHnpOTnBEH BpemBaIneKu ydInnHerTc,TO 3aTpYdHReT noIyuHHe xpyctAe nnucbl.
Bcnyae BbIeNKn NnCblc C6nbHoh HauHHKo peKOMeHdyETcnoIOXnTb Ha nUcNy cbip MOuapePnBa BcepeINHe BbIeNKn.
Ta6nua npirotoBneHn
*IMeetcTOnbkoBHeKoToPbIXMoJeJx
3JIeKtpoHbI TaMep npOprpaMMnpoBaHna BbIneQKn
RS
ПрорразмнюВане уасов
!AcbMOHOHaCTponTBKaK npN BbIKIOHHeHHOM DxyOBOM 1kaQy,TakN npN BkIOHcHOM,npN yCIOBn YTO He 6blIO 3aHaHO BpEmo OKOHaHn BIneKn. Pocne NODKIOUeHn K 3NEKtpueecko ceTn nnn Nocne OTKIOUeHn 3NEKTPo3Hepm,HaHT MrrTaB NKoHa u YeIbpe UΦpbHa DA INCNPIEE.
- Haxmnte Heckonbko pa3 KhoNky ydepKuBaHte Do Tex nop, noka Ha DnCpJIeE He 3aMuaTe NKoHa Yetbipe Lcnpobblx 3HaueHnra;
- npn nOmoU "+"" perynpyETcBpemr; npn ux ydepKuBAHm UΦpbl MeHraOTc8 bICTpee, yTO o6IerYaet yCTaHOBky.
- nooxnTe 10 cek. nHn Haxmnte cHOBa Ha KhoNky
npoJoxKTeJIbHOCTN BblneyKn
- HaxMnte HeckoIbko pa3 KhoIky Do Tex nop, noka Ha DCNJIEE He 3aMURAeT CnMBOJ TpN cHpOBBle 3HaueHnra;
- npn nomoosn " ^+ n "-" perynpuyetc Bpem; npn
nx ydepknBaHm ncpbMeHaOTc8 bictpee,TO 06nneryaeT yctaHOBky.
- NOOxKnTe 10 cek. Hn HaKMnTe cHOBa Ha KhoNky DnA qNKcnpoBaHn yCTaHOBKn.
- no nCTeHm 3aHaHHoro BpeMeHn Ha dncnnee noka3bBaetc Hndncb END (KOHEL), u dyxoboi kkaΦ 3aBepwaet npuroTOBHeHne co 3BykoBbIM cnHaJOM. Ira ee octahOBKn HaxMnte JIO6yI KHOKNK.
-Примет:В9.00 Bbl nporpamMpyeTe Bblneky,Ha KOTopyIO nOtpe6yEtc1 yac 15 MmHyT. PnroTOBJIeHHe ABtOMaTHueckn 3aBepWntcR B 10:15.
Iopraok nporpaMMnpoBaHn OOKHaHn BbIneKn
!3anporpammmipoBaTbOKOHuaHne BblneKMOxHO TOJbKO NocHe HAcTpOuKN ee IpoDoJXknteJbHOCTN.
- BbINOHNHe ONEpaCn CnyHKTa 1 no nyHKT 3, B KOtOpbIX ONNCbIAeTc npraDOK nporpamMnpoBaHn npoDoJknteHbHocTu;
- 3aTeM HaxMMTe HeCKoJIbKO pa3 KHOIky Do Tex nop, Noka Ha INCPIEe He 3aMURAeT CmBOJ ENu YeTbipe UcΦPOBbIX 3HaueHnra;
- npn nOmoi "+n" -" peryynpyeTcBpeM OKOHuaHnroTObKn; npn nx ydepXnBaHm cNpbl MeHJOTc 6bIcTpee, yTo oBnery aet ycTaHObky.
- NOOxKdTe 10 cek. Hn HaKMnTe cHOBa Ha KhoNky DnA qKcnpoBaHn yTaHoBKn.
- no nCTeHn 3aHaHHoro BpeMeHn Ha dncnnee noka3bBaetc HAdncb END (KOHEU), u dyxOBoi WkaΦ 3aBepwaet npiroTOBHeHne co 3ByKOBbIM cHrHaON. Ira ee oCTaHOBKn HaxMnte NIO6yH KhoNky.
BknHueHHbI cMBOJbI nNkKa3bIBaHO, YTO npOn3BeHeO npOrpMaMMpoBaHne. Ha INCJIEE nonepemEHNOka3bIBaEtc BpeMg OKOHuaHn I npoONKNTeJIbHOCTb BblNeuKn.
-Примет:В9:00 Bby nporpaMMpyeTe npoJOnKInTeIbHocTb 1 yac.B 12:30 nlaHpyeTc3aBepWHTb cIKn.ПрогpMa aBTOMaTnueckn 3anyckaetcB 11:30.
OTmeHa nporpaMMpoBaHn
PoprOk OTMeHbI 3anporpaMMnPOBaHHOro 3HaueHnA:
HaKIMaTb Ha KHOKy Do Tex nop, noka Ha dncJIee He HauHET MraTb CmBOJ yCTaHOBKN, KOToPbI HxKHO OTMeHNrB, nUΦpbl. HaKIMaTb Ha KHOky "-" Do Tex nop, noka Ha dncJIee He noBaTcra UΦpbl 00:00.
- ODHOBpeMeHHo HaKaTb N yDepeKuBaTb KHOPIKn " ^+ "N -" TAKIM 6pa30M OTmeHryOTc Bce 3aDaHHbIe ycTaHOBKn, BKIOUyAra TaMep.
!N3dJIne cnpoekTnpoBaHO uN3roToBJeHO B COOTBeTCTBmC MEXKdyHapOdHbIMN HOpMaTnBaMn NO 6e30NaChocTn. Heo6xoJIMO BHMaTeJbHo npouHTaTb HactoJUe npeDynpexKDeHnA, CoCTaBNeHHbIe B CeJax BaWei 6e30NaChocTn.
06uhe npabnla 6e3onacnoctn
JaHHe n3dJeIne npedHa3HaayaeTc Jn HEnpOeCCNOHaJIbHOro NcNoJIb30BaHnB DOMaUHnx ycNoBnX.
3anpeaaetc yctaHaBnBaTb n3JeIne Ha yNue, daKe noi HabecOM, TAK KaK Bo3eICTBHe Ha Hero DoxkJr rpo3blraBnEeTc4ype3BbUaHNo ONaChbIM.
Дляпелемшенииндениьсегдаберпесьзсецальные руки,pacnoonoхнысбokовduyxoboroшkaф.
He npikacatbcK n3deJIOBnAkhbIMn pykam, 6ocNKOMnnCmOKpbIMnHoramn.
I3dJIHe npEHa3HauYeHO IINpIroTOBJeHnI HsueBbIX npOyKTOB, MoXeT6bITb HCNoJIb3OBaHO TObKO B3PocJIbIM NlUcAMN B COOTBeTCTBm CHHCTpyKUnA M, pNUEBeEHbIMN B DaHHOM TexHueCKOM pykoBoDCTBe. JIObOE dpyrOe erO HCNoJIb3OBaHne (HaNPmep: OTOnJIeHne NOMEeHnE) cHTaETcRe HeHaNDLeXaUMM CJIeDOBaTeJbHO ONaCHbIM. POnI3BOInTeJIb He HeCet OTBETCTBeHHOCTH 3a BO3MOxHbIM yUpe6, Bb13BaHHbI HeHaNDLeXaUMM, HEPpaBnIbHBiM IN Hepa3ymHbIM NCNoJIb3OBaHnEM N3dJIInr.
Bnpocecce 3Kcnnyataunn H3deJnHaRpeBaTeIbHbIe 3JeMeHTb I HeKOToPbIe YacTn DBepuI dyXOBKn NOBepraIoTc CnIbHOMy HarpeBy. Heo6xOIMO npoRBJIbTb OCTpOxHOCTb BO n36ExKaHne KOHTaKTOB c 3TNMI qACTaMn H he pa3peuTaTb DeTm npn6JInxKaTbc K dyXOBKe.
-ИЗбетаиткakаняпpoBOIOB элКТрОПТАнHЯДpyrHx 6bITOBbIX элКТрОПРиБОрВ K rOрЧИМ YacTЯM dYxOBOrO shkaФa.
He 3akpbBaTe BeHTnJIaIOHbIe peWetKn IOBepCTna paccenBaHnTena.
- Bepntecb 3a pyky DBepuB B UeHTpe: c 60koB OHa MOKeT 6blr ropraeu.
BcerdaHaedeBaTe KxOHHbIe BapeKKn, KOrDa cTaNTE nnBbIHMaete 6nOda n3 dYxOBKn.
-He noKpbBaIe IHO duXOBoro uKaΦaΦoJbRoI.
-He xpaHnTe B dyXOBOM uKaΦy Bo3ropaEmbIX npedMeTOB. npi CnyaHOM BKIOueHm N3deJIINr TaKne MaTePnAbI MOrY T 3arOpetbcra.
Bcerda npoBepaIte, yTo6bI pyKoAaTKn HaxOaJInbc B noIOKeHH " 一 ^ 一 / 一 ^ 一 , KOrDa n3DeJIne He NcNoJIb3yETcra.
- He TaHnTe 3a CeTeBOu WHyp IJN OTOCoEInHeHHa BUNIK N3DeJIINr H3 CeTeBOu PO3eTKU, BO3bMUTecb 3a BUNKy pyKoI.
- Npeq nauon uNTKn nn TExHueckoro 06cnyKBaHnN u3dennBcerDa BbHMaTe wTeNCeNBHyO BuNKy u3 CeTeBOu po3eTKn.
Bcnyae HncnpabHocn KaTeOpueckn 3anpeaaetcnoKpbibatb BHyTpEHnE MexaHn3MbI N3dennC cJeIbIOx camoCToTeJbHorO peMOHTa.ObpaauTecb LcHtp
TexnueckoorOobnykubHnA (cm.TexobcyxueaHue).
He cTabe Te TaKeIbe IpeMeTbHa OTKpbTyIO DBepuy LyXOBORO uKaΦa
CTeKIOkepAMuecka BapOHaY naHeJIy yCTOnuBa K MExAHueCKIM yIapaM,TeH He MeHee OHa MoKeT TpeCHyTb (NJIN DaJKe pa36ntbc) npu yIape ocTpblm npedMeTOM nnnnHCTpyMeHTOM.B 3tOM cnyae He3ameJInTeJIbHOOTcoEINHTe N3deJIne OTcETN 3JIekTpONHTAHn I o6paITneCb B LcHTp texHnueckoro 06CNYKBAHn.
- TomHHTe, yTo TemnepaTpa KOHΦopOK OCTaETcOueHb BbICOKoB TteEHe TpuUcaTN MmHyT NocJe Hx BbIKJIOUeHn.
-ДеркиTe Ha 6e3oNaChOMpacToHmOTBapOuHoI naHEnIIO6bIpeMMeTbI, KOToPbIE MOryT pacNnABNTbcra,Ha npImEep,IIaCtMaCCa,AnOMHmHnn H3dJIyHn3 caxapa.ObpaauIte oco6oe BHMaHne Ha yNaKOBouHbIe MaTePnaJIbI,NOJIN3TNHeHOByIO nn aJIOMMHNEByIO INeHKy:ecnIOCTaBnTB 3TN MaTePnaJIbI Ha eue ropayen nIITeNoBepxHocTn,OHNMOrY T cepBe3HO NOBepDnTB BapOuyIO NaHeJIb.
YTNn3aun
- YHnTuKeHne yNaKOBouhBix MaTePnaIaOB: co6nIOdaIte MeCTHbIe HopMaTnBbI NO yTNJIu3aUu yNaKOBouhBix MaTePnaIaOB.
CorgnacHo EbponeckoI NipeKtne 2002/96/CE KacaTeNbHO yTNIN3aunn 3JIeKtpOnHbIX n 3JIeKTPnuecknx 3JIeKTPonpnpOBoB 3JIeKTPonpnpOpbl He DOJIKHbI BbIbpaCbBaTbcB MecTe C 06bUHbIM rOpOcKIM Mycopom. BbIbeDeHHbIe n3 CTPOr npN6opbl DOJIKHbI CObnapTbc OTDJeNBHO IIN OITMMN3aunn IN x yTNIN3aunn IN pekyepaunn COCTABNIAUx IN MaTePnaNoB, a TaKke IJNA 6e3ONacHocTn OKpyKaIOuSei CpeDbI N 3DopOBb. CmBOJ 3auepkHytaRyMycOpHa J KOp3NHKA, IMeOuINcR Ha BCex pN6opax, CnykNT HAnOMnHaHHeM O bX OTDeJBHOYTNIN3aunn. 3a 6Oone NoDPo6HOH INΦOpMaqune O npabINbHOY TININ3aunn 6bITOBbIX 3JIeKTPonpnpOBoB NOlb3OBaTeHN MOyT 6OpATnTBcRI B CNEuaNbHyIO roCydapCTBeHHyO opraHn3aunIO INB MAra3HN.
3KoHOMn 3JekTpo3Heprn n OxpaHa OKpykaOuien Cpebl
- EcIn Bbl 6ydeTe NoJIb3OBAbTcBd yXOBbIM WkaΦom BeuepOM Ndo paHrero Ytpa, 3To NOMoKET COKpaNTb Harpy3Ky Notpe6JIeHnI 3JIeKTPo3HeprnN 3JIeKTPoCTAHUAMN.
- PekomeHnyetcBcerda roTOBtB BpeKmme TPNb c 3akpyToI DBepuee: 3TO Heo6xOIMo DnA 3HaHTeJbHOH 3KOHOOMN 3NeKtpo3Heprn (npMepHo 10%), a TaKke dJa LyuXnx pe3yIbTaTob npiroTOBneHna.
CoepKTe yIIOHTHeHn B NcnpabHOM nYCTOM COCTOHN, npOBepaIte, YTObI OHN IIOTHo pPJIeTAN K DBepe n He npOnyckan yTeuek TeIIa.
OTKnIOUeHne 3JeKtpoNTaHHa
Ipeed hauanom kakoi-nio onepaun no 06cnykmbaHIO nnuNCTke OTcoeHNHTe N3deJne OT cTeN 3JIeKTPoNTaHn.
UncTkau3dennna
!He nCnoB3yIe npoBbIe YnCTTne arperaTbI nn arperaTbI NOB BbICOKIM DaBnEHNEM DnY NcCTKn 13dJIIN.
HapyKbIe 3MaJInpoBaHbIe 3JIeMeHTbI JIN DeTAln H3 HEPKaBeOJeu CTAJN, a TAKKe pe3HHOBBle yNJIOTHEHMOXHO IPOITpA TbY6KOJ, CMOUeHHoB B TeNIO BoJe NIN B PaCTBOpe HeNTpaNBHOro MOUcero cpeCTBa. JIy YdaJIeHmO OcO60 TpyNbIX PAnEOJB3yIte CneuHaNbHbIe YIcTAAUe CpeCTBa, IMeOUINEcB IpoDAxe. Iocne YIcTKn peKOMeHNyETc TuaTeNbHO yJaIITb OCaTkn MOUcero cpeCTBa BNaXHo TpIKNo N BbICyWNTb dYxOBky. He nCNoJIb3yIte abpa3INBHe InpoUKN nn Koppo3nHbIe BeIecTBA.
CneDyeT npOn3BODnTB BHyTpEHHIO YnCTky DxyoBOrO uKaΦa nocNe KaKDoRo erO NcNoJIb3OBaHnR, He DoXnDaRC b erO NoHOrO oxJaXeHnR. NcNoJIb3yIte TEnNyHO BDOy N MoOuSe cpeCDBO, ONoIOChnTe I npOTpNTe MmKoTprnKoN. N36eraIte NcNoJIb3OBaHnA 6pa3NBbIX CpeCDTB.
CbeMHbIe DeTaII M0XHO JIeKO BbIMbITb KaK IIO6yIO dpYrO NocSyDy, TaKe B NocCyDoMOeHOn MaWInHe.
!HkoTa He nCnoB3yTe npoBbIe uCTaue arperaTbI INn arperaTbI NOd BbICOKIM daBJIeHHeM dJa YnCTKn N3JeJIA.
YnctkaDbepzbl
ДлчNTK nCTeKna DBepuH nCnONb3yHTe Hea6pa3NBhIe ry6Kn n UcNCTaIue CpeAcTBa, 3aTeM BblTpIne HacyxO mRKO TpRkn. He nCNoJIb3yHTe TBepDle abpa3NBHbIe MaTePnaJIb IINn OCTpIe MeTaNIIueckne CKpe6Kn, KOToPbe MOrY nOcApanaTb NOBepXHOCTb n pa36nTb CTeKIO. Dlner 6oJee TuaTeJIbHOH uCtTK MoKHO CHrTb DBepUy dYxOBKn.
- NonHocTbIO OTKpoIe TBepuy DxyOBKn (CM.CxEmY);
- npn nmoos OTBepTKN NOHMNTe N nobepHnte WNoHNKn F Ha DByx wapHnpax (CM. cxEmy);
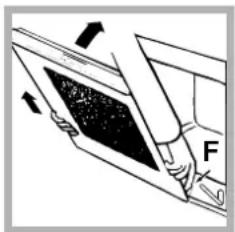
- BO3bMNTecb 3a DBepCy pykamcDByxCtOpOH, nlaBHO 3akpoTte ee, Ho He NOJHOCTBIO. 3aTeM NOTAHTE DBepCy Ha Ce6r, CHImaee C neTeJIb (CM.CXEmy). Dnay YCTaHOBKn DBepCuHa MeCTo BblIOJHNTe BblweOncaHHbIe OepaUM B o6paTHOM
nopraKe.
PpOBepka yNnOThHn
Perynphno npOBepnTe coCToHne yNIOtheHnBOKpyr DBepbI dYxOBO rkaFa. B cnlyae NobpeXDeHn yNIOtheHn OpaaunTecb B6nnkaiu N LcHTp TexHuueckoro 06cnyKNaHn (cm.TexHuueckoe 06cnyKueaHue).He peKOMeHdyETcNoJIb3OBAtbcra dYxOBko n NobpeXDeHHbIM yNIOtheHnem.
3aMeHa JAmNoUcKn
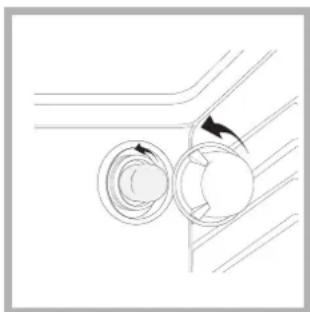
3aMeHa JAmNoUKN B DxyXOBOM Wkafoy:
1.OTBnHTnTe
CTeKnHHyo KpbIiKy nlafoHa JAmNoUkN;
2. BbIKpyTnTe NaMNoKy n 3aMeHnTe ee Ha HOByo TaKOrO Je Tnna: MoUHocTb 25 BT, pe3b6a E 14.
3. BoccaTaHOBnte KpbIkwy Ha MeCTO (CM
cxemy).
CepBnchoe 6cbnyxmbaHne
!HnKOrda He oBaTaTecb K HeynoJIHOMOeHHbIM TexHnKaM.
Pn 6paueHn B CHTp CepBnchoro OcbnykBaHn Heo6xOaMo coo6uNTb:
TIN HENCnpaBHOCTN;
- Moelb u3denna (Mo.)
- HomepTex.nacnopTa (cepHbI Ng)
3Tn daHHbIe Bbl HaJeTe Ha nacnopTHoN Ta6nUKe, paCNOJIOXKeHHoH Ha 3dEJIIN.
