
FR3171MUU - Deep fryer Atag - Free user manual and instructions
Find the device manual for free FR3171MUU Atag in PDF.

| Product type | Built-in deep fryer |
| Brand | Atag |
| Model | FR3171MUU |
| Power supply | 220-240 V, 2200 W, 16 A, grounded |
| Oil capacity | 3 to 3.5 litres |
| Frying capacity | Up to 750 g of fries |
| Temperature range | 140 °C to 180 °C |
| Cold zone | Yes, collects waste, max temperature 70 °C |
| Emulsion zone | Yes, prevents splashes |
| Tank | Stainless steel, 5 functional zones |
| Heating element | Foldable, with draining position |
| Lid handle | Removable and adjustable |
| Indicators | On/Off (ON), temperature reached |
| Safety | Overheating safety device, automatic shut-off |
| Cleaning tank and basket | Dishwasher safe |
| Cleaning heating element | Damp cloth, avoid damaging the thermostat |
| Exterior material | Stainless steel |
| Installation | Built-in, do not place near a gas burner |
| Electrical connection | Cable H05RNF 3x1 mm², bipolar switch 3 mm |
| Warranty | Use ATAG spare parts, approved after-sales service |
Frequently Asked Questions - FR3171MUU Atag
User questions about FR3171MUU Atag
0 question about this device. Answer the ones you know or ask your own.
Ask a new question about this device
Download the instructions for your Deep fryer in PDF format for free! Find your manual FR3171MUU - Atag and take your electronic device back in hand. On this page are published all the documents necessary for the use of your device. FR3171MUU by Atag.
USER MANUAL FR3171MUU Atag
Instructions for use. GB 3-13
Installation guide . GB 14-19
Installatic NL 14-19
DE
Instructions for use. GB 3-13
Installation guide GB 14-19
Installation. NL 14-19
FR
Instructions for use. GB 3-13
Installation guide GB 14-19
Instructions for use
Preface GB3
Your deep-frying pan . GB 4
Introduction. GB 5
Safety. GB 6-8
Before you start using the deep-frying pan . GB 9
Use GB 10-12
Maintenance. GB 13
Installation guide
Installation Instructions GB 14-18
Appendix . GB 19
NL
Installatic NL 14-19
FR
This user manual offers you a quick introduction to the various possibilities this appliance offers. You will also find information on safety issues and maintenance. The manual also contains environmental tips and guidelines for saving energy.
Store the user manual and the installation guide in a safe place. This will ensure that any subsequent users also benefit from this deep-frying pan.
Happy cooking!
Pictograms used

important information
FR3171M

The stainless steel reservoir is an important part of the deep-frying pan. Its special form guarantees optimum use of the cool zone and safety for the user. The large immersion zone prevents boiling cooking oil from bubbling over if ice or water particles come into contact with the oil. This happens when products that are frozen or that contain much water are lowered into the hot oil.
The reservoir consists of 5 zones:
The reservoir bottom
An 11mm deep groove runs around the bottom of the reservoir. This is the cool zone where the food debris is collected.
The cool zone
The oil layer underneath the heating element does not move. At the highest setting the cool zone reaches a maximum temperature of 70^ .
The hot zone
The reservoir may hold approximately 3 litres of oil, making it possible to fry 750 grams of chips in one go without a noticeable drop in oil temperature.
Theimmersonzone
With its volume of approximately 5 litres, the immersion zone prevents the oil from splattering.
The drainage and recovery zone
This is the zone where the splattering oil is contained. The sloping curves lead the drops of oil back into frying reservoir.
Overheating protection

In the event of a problem, the power supply is immediately cut off. The power supply is not automatically resumed. Contact the service department to have the safety component repaired.
Safety instructions
This appliance has been designed for household use exclusively. In order to avoid any damage, it is important that you follow the instructions in the user manual. If this appliance is used for any other purpose, the guarantee will expire. Following is an overview of a number of important safety instructions. Read them care fully.

WARNING: The appliance and its accessible parts become hot during use. Care should be taken to avoid touching heating elements.
Children less than 8 years of age shall be kept away unless continuously supervised.
This appliance can be used by children aged from 8 years and above and persons with reduced physical, sensory or mental capabilities or lack of experience and knowledge if they have been given supervision or instruction concerning use of the appliance in a safe way and understand the hazards involved.
If the safety instructions and warnings are not heeded, the manufacturer can not be held liable for any consequential damage.
- Service and maintenance may only be carried out by an ATAG authorized service organization.
- Only parts may be used that have been supplied by ATAG. Read the guarantee.
- Make sure that the cable does not jam.
- Never leave the appliance unattended when in use.
- In the event of the oil or fat catching fire, place the lid on the appliance to extinguish the flame.
- Switch off the appliance if the oil or fat catches fire. Also switch off the extractor hood. If you cannot do so with the switch on the appliance, switch off the fuse in the meter cabinet instead.
- Check if you have switched off the appliance if you have finished using it. The button should indicate zero.

- Never put paper or any other combustible items on the appliance.
- Make sure that there is no open fire close by. The oil is hot and highly combustible.
- Always keep the deep-frying pan clean. This is important for both hygienic and safety reasons.
- When heating the appliance, spilled food and fat will cause smoke and could even cause a fire.
- Read the guidelines in this manual and follow them.
- The power circuit should be fitted with a bipolar switch with a contact distance of at least 3mm .
Safety instructions installation
- Make sure that the plug remains accessible after you have installed the deep-frying pan.
- The appliance is not intended to be operated by means of an external timer or separate remote-control system.
- If the power cable is damaged, it should be replaced by an equivalent cable (H05RNF 3 × 1mm^2 ). The replacement cable is available from the service department.
-
The deep-frying pan is powered by 2200W , requiring a 16 A fuse.
-
The deep-frying pan should be earthed.
- There should be at least 5cm of free space between the bottom side of the deep-frying pan and the underlying surface of the kitchen unit.
- Only use the appliance if it has been built in.
- Only switch on the appliance with the lid open if the reservoir has been filled with frying fat. Switching on an empty deep-frying pan will cause the element to overheat.
- Never switch on the heating element if it is in an up ward position.
- Highly combustible objects near the element could catch fire.
- Always make sure that no cables can come into contact with hot fat or the hot deep-frying pan.
Safety instructions

Keep the deep-frying pan clean.
- After you have used the deep-frying pan 6 to 10 times, clean it as described in 'how to keep your deep-frying pan clean'.
A dirty deep-frying pan increases the risk of fire.
Replace the fat if it:
- has turned dark and viscous;
- gives off an unpleasant smell or if it froths;
- starts to steam at temperatures below 170^ .
Contaminated frying fat spoils the taste and is highly combustible.
Heat food sufficiently.
- The heating times for food depend on a number of factors, e.g. the original temperature, the quantity and the type of dish.
Any germs that might be present in the food will only be killed if the food is heated properly.

The first time that you use your deep-frying pan, it will give off an unpleasant smell and produce some smoke. To avoid this as much as possible, first clean the reservoir, the basket and the heating element with warm water and washing-up liquid.
- Fill the reservoir with three litres of water and add a drop of washing-up liquid.
- Bring the water to the boil and keep it boiling for about 10 minutes.
- Carefully take the reservoir out of the deep-frying pan and pour the water out.
- Rinse the reservoir with clean water.
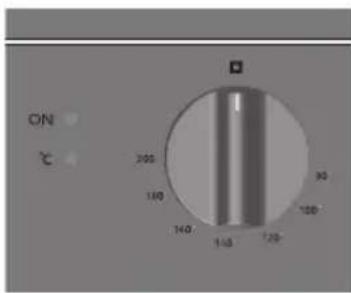
Set the temperature desired and wait until the oil has reached this tem perature. The light next to the temperature indicator reaches "oC" and turns off. The deep-frying pan automatically keeps the oil at the right temperature.
Attention:
Dry moist foodstuffs first to avoid excessive frothing of the oil.
Replace the oil when it turns light brown or when the food fried does not become crisp (even with the right temperature set).
Do not forget to return the control button to 0 after you have finished frying. The light next to "ON" turns off.
To avoid the risk of fire, first remove any bits of batter that remain in the oil before you start frying again.
Fill the reservoir until the oil level is between the minimum (3 litres) and maximum (3.5 litres) indication lines on the reservoir wall.
Attention:
The element that has been switched on should always be immersed in cooking oil or fat. This means that you should never melt hard chunks of fat directly on the element.
Attention:
First melt animal of vegetable fat before you pour it into the deep-frying pan.
If you use fat instead of oil, start by pricking holes into the congealed fat with a knife or fork before switching on the deep-frying pan. This avoids splattering should the congealed fat contain an air bubble. Be careful when doing this so as not to damage the temperature sensors on the heating element.
The ideal frying temperature lies between 140^ and 180^ . Higher temperatures have a negative impact on the oil quality. At lower temperatures foodstuffs have a tendency to soak up the oil or fat.
Please note that the frying time is dependent on how thick the pieces of food are. Therefore choose a temperature that allows the food to be cooked thoroughly without causing it to burn on the outside.
The following table serves as an indication. You may adjust the temperatures according to the quantity that needs to be fried and to personal taste.
Turn the control button to 0 after you have finished.
Temp. in ^ C
Potato dishes
Chips,frozen 180
Chips, freshly pre-cooked 170
Chips, fresh 180
Sliced potatoes, fresh 180
Potato croquets,
frozen, pre-cooked 170
Frying 170
Potato croquets,
freshly pre-cooked 170
Frying 180
Meat
Cutlet 180
Chicken drumstick,breaded,
2 pcs each 180
Chicken leg, 2 pcs each 180
Fish
Fish fingers 180
Fillet of plaice 170
Calamares,frozen 180
Various
Doughnut balls 180
Bananas in batter 180
Vegetables in batter 180
Avoid dust and dirt falling into the deep-frying pan and close the lid on the pan after use. By changing its position the handgrip is kept clear of the fat. To do so:
- Push the two bars of the handgrip together.
- Shove the handgrip out of the hinge.
- Turn the grip round and fasten it.
- Flip the handgrip inwards. Attention: the concave side of the handgrip should face upwards to avoid it falling into the frying fat.
The lid may be placed on the deep-frying pan.
Make sure that the handgrip is back into the original operating position before you start deep-frying again.

Rest position
Operating position
Switch off the deep-frying pan and let it cool down.
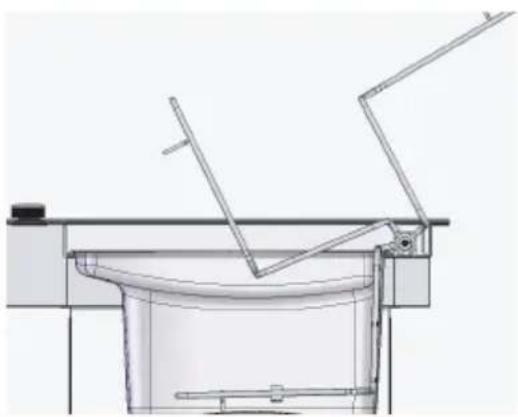
The deep-frying pan can be disassembled for easy cleaning. A "drainage" setting allows for fastening the heating element during cleaning.
Hinge with drainage setting
The hinge, which enables the flipping aside of the heating element during cleaning, has been fitted with a stainless steel locking system. By shifting this lock to the right, the heating element is left 'hanging' over the frying pan, while the oil or fat runs back into the reservoir.
Outside
Clean the outside with cleaning agents for glass or stainless steel. Do not use any scouring sponges or abrasives.
The reservoir and the basket may be cleaned with the rest of the washing-up. Both may be cleaned in the dishwasher.
The heating element
Clean the heating element with a damp cloth. Be careful not to damage the thermostat!
Built-in dimensions
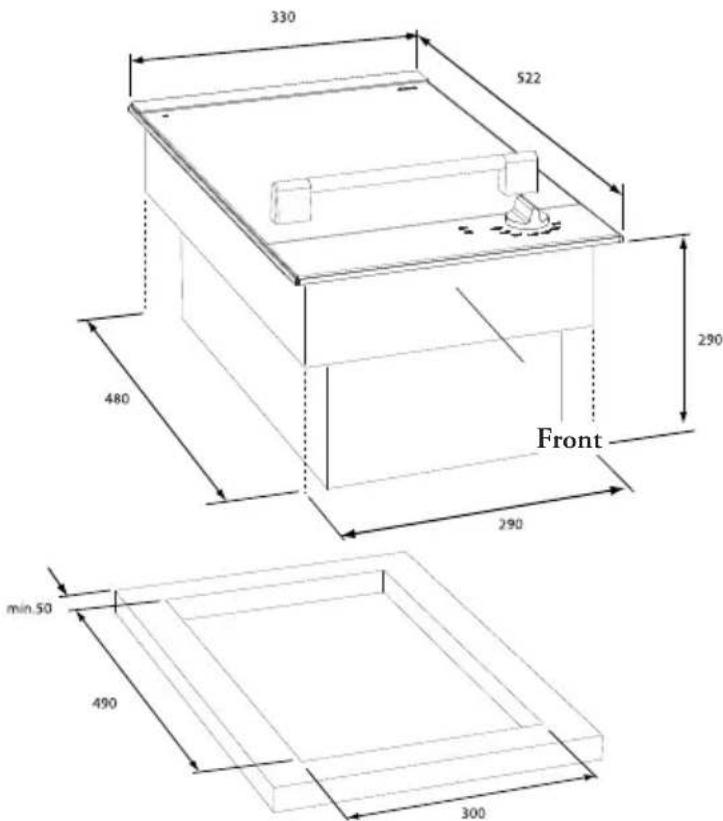
Fitted-unit situation with space
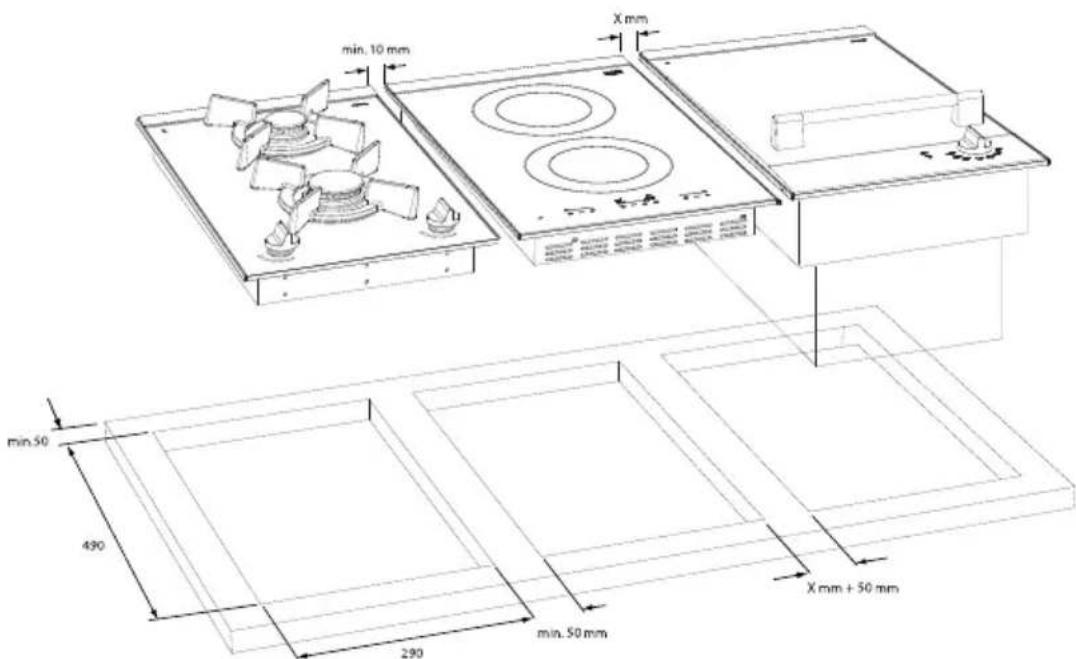
Do not build in the deep-frying pan next to a gas burner! If you wish to place the two appliances independent of each other in the worktop, make sure that there is at least 10mm of space between them. This corresponds with a distance between the cut-outs of at least 50~mm .
Coupling example 1
Teppan Yaki or deep-frying pan to the side.
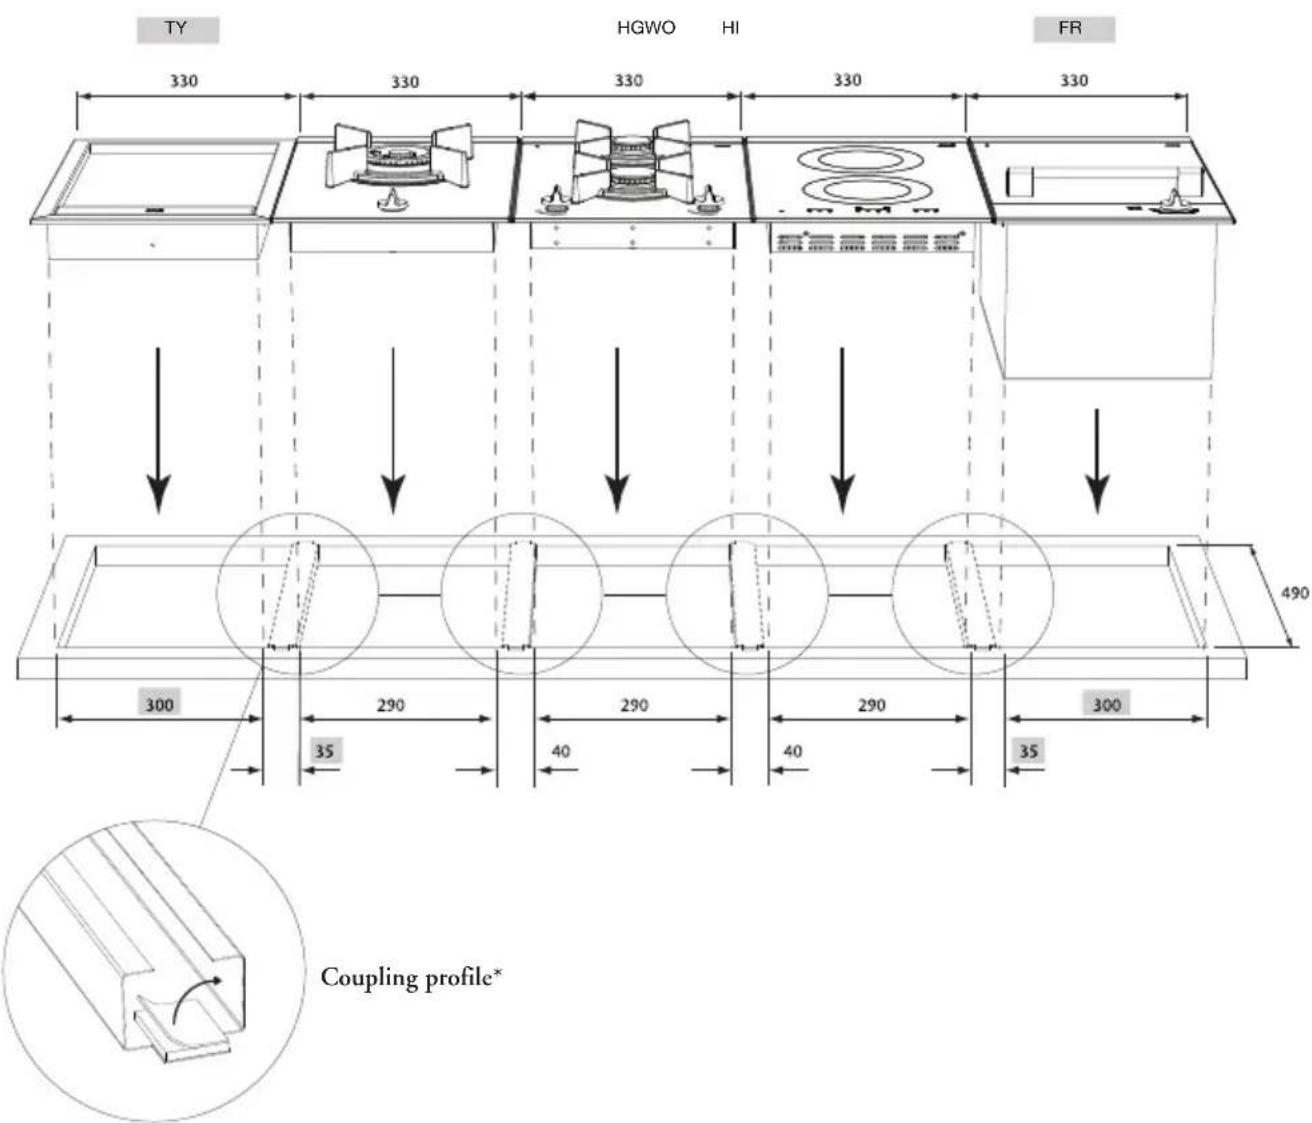
Do not build in the deep-frying pan next to a gas burner!
Coupling example 2
Teppan Yaki or deep-frying pan among other appliances.
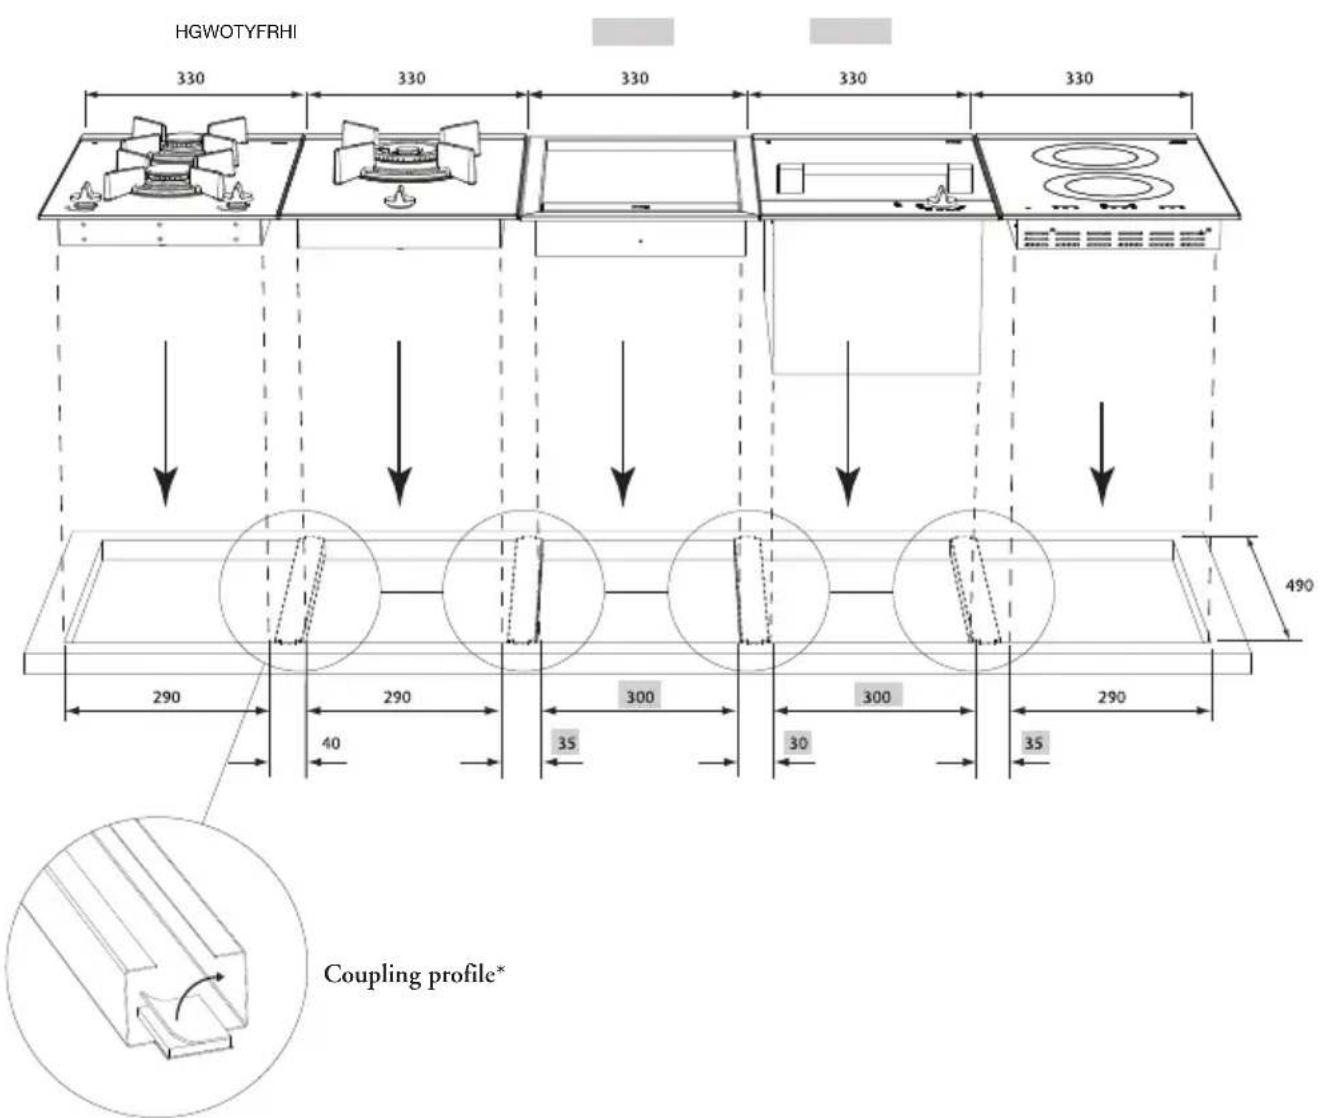
Do not build in the deep-frying pan next to a gas burner!

- Check that the kitchen unit and the cut-out meet the dimension requirements.
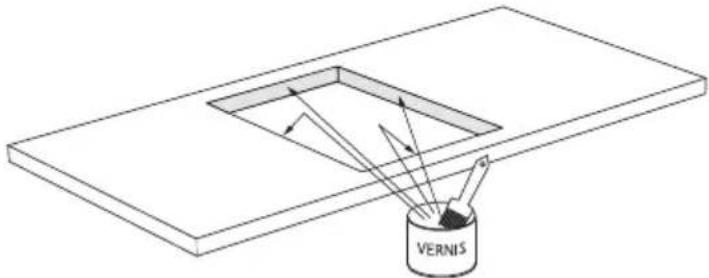
- If necessary, treat the sawn ends of synthetic or wooden worktops with sealing varnish, to prevent swelling of the worktop by moisture.
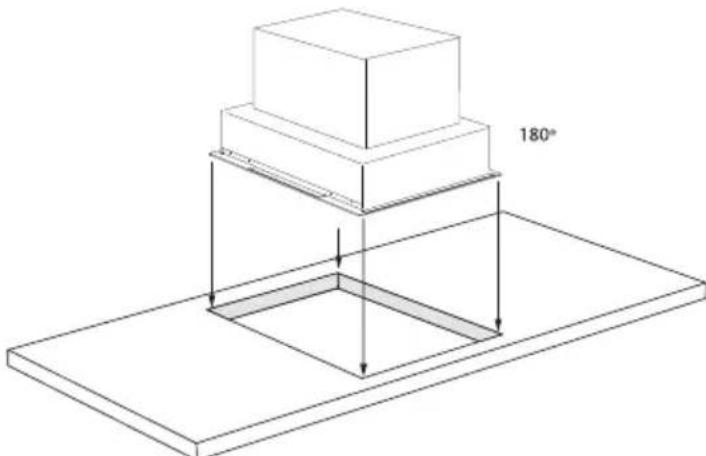
- Turn the appliance upside down and place it on the worktop.
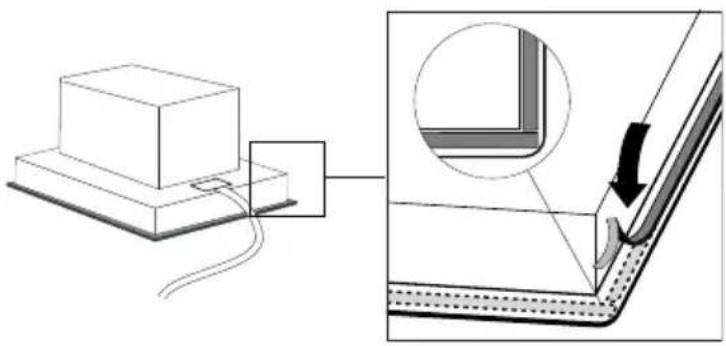
- Remove the protective foil from the sealing tape and tape the strip in the groove of the aluminium profiles or on the edge of the deep-frying pan. Do not tape the sealing strip along the corners. Instead, cut 4 pieces that fit tightly together in the corners.
5.
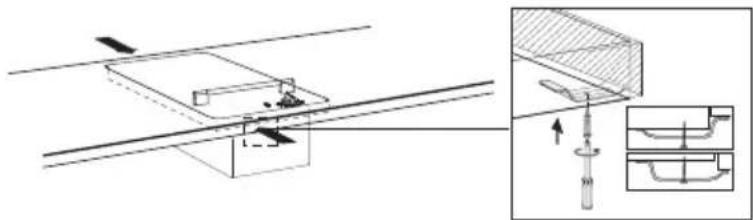
Turn the appliance over and place it in the cut-out.
-
Attach the deep-frying pan using the mounting brackets supplied. For worktops up to 40mm in thickness, place filler blocks between the brackets and the worktop. The screws should be screwed into the threaded holes.
-
Connect the appliance to the mains.

The packaging of this appliance is recyclable. It could have been made from:
cardboard;
polythene foil (PE);
- CFK-free polystyrene (PS-hard foam).
These materials should be disposed of in a responsible manner, in accordance with official regulations.
To draw attention to the fact that the segregated processing of electric household appliances is compulsory, this appliance carries the symbol of a crossed-out dustbin.
This means that at the end of its working life, the appliance may not be disposed of as household refuse but must be handed in at a special refuse collection centre run by the local authority or must be given to a dealer providing this service.
Segregated processing of household appliances such as this deep-frying pan, avoids any negative effects on the environment and public health that might otherwise occur. This process also enables the recovery of the materials used in the production of this appliance, thus realising considerable savings in terms of raw materials and energy.

Plak hier het toestel-identificatieplaatje
Placez ici la plaque d'identification de l'appareil
Kleben Sie hier das Gerätotypenschild ein
Stick the appliance identification card here
Dit plaatje bevindt zich aan de bovenzijde van het toestel.
Cette plaque se trouve sur le dessus de l'appareil.
Dieses Schild befindet sich an der Oberseite des Gerätes.
This card is located on the top of the appliance.
Plak hier het ombouw-identificatieplaatje (indien van toepassing)
Placez ici la plaque d'identification relative à la conversion (en cas d'application)
Kleben Sie hier das Umbautypenschild ein (wenn zutreffend)
Stick the conversion identification card here (where applicable)
Dit plaatje bevindt zich in de ombouwset (indien van toepassing).
Cette plaque se trouve dans le jeu de conversion (en cas d'application).
Dieses Schild befindet sich im Umbausatz (wenn zutreffend).
This card is supplied with the conversion kit (where applicable).
Houd, wannier u contact opneemt met de serviceafdeling, het complete typenummer bij de hand. If you contact the service department, please have the complete type number on hand. Lorsque vous prenez contact avec le service après-vente, assurez-vous d'avoir le numero complet sous la main. Halten Sie, wenn Sie mit der Serviceabteilung Kontakt aufnehmen, die komplette Typennummer bereit.
Adressen en telefonnummers van de serviceorganisatie vindt u op de garantiekaart. Les adresses et les numeros de telephone du service après-vente se trouvent sur la carte de garantie. Adressen und Telefonnummern der Kundendienstorganisation finden Sie auf der Garantiekarte. You will find the addresses and phone numbers of the service organisation on the guarantee card.