
MC690 - Sewing machine JATA - Free user manual and instructions
Find the device manual for free MC690 JATA in PDF.
| Product type | Domestic sewing machine |
| Brand | Jata |
| Model | MC690 |
| Dimensions (L x W x H) | Approximately 40 x 20 x 30 cm |
| Weight | Approximately 7 kg |
| Power supply | 220-240 V, 50-60 Hz, 60 W |
| Stitch types | Straight stitch, simple zigzag, multiple zigzag, shell stitch, blind stitch, automatic buttonhole |
| Stitch selector | Rotary, multiple positions |
| Stitch length and width | Continuously adjustable |
| Reverse | Yes, dedicated button |
| Bobbin winder | Integrated, with automatic stop |
| Thread tension | Adjustable by dial |
| Included presser feet | Universal foot, sliding buttonhole foot |
| Included accessories | Bobbins, seam ripper, felt pad, set of needles |
| Lighting | 15 W bulb, replaceable |
| Free arm | Yes, for sewing sleeves |
| Extension table | Retractable, doubles as accessory box |
| Maintenance and cleaning | Clean the feed dogs and shuttle race with a brush and soft cloth |
| Safety | Unplug before maintenance; do not use with damaged cord |
| Spare parts and repairability | Standard needles, bobbins, 15 W bulb; repair by authorized center |
| Warranty | Consult the dealer |
Frequently Asked Questions - MC690 JATA
User questions about MC690 JATA
0 question about this device. Answer the ones you know or ask your own.
Ask a new question about this device
Download the instructions for your Sewing machine in PDF format for free! Find your manual MC690 - JATA and take your electronic device back in hand. On this page are published all the documents necessary for the use of your device. MC690 by JATA.
USER MANUAL MC690 JATA
IMPORTANT SAFETY INSTRUCTIONS
When using an electrical appliance, basic safety precautions should always be followed, including the followings:
Read all instructions before using this appliance.
DANGER—To reduce the risk of electric shock:
- An appliance should never be left unattended when plugged in. Always unplug this sewing machine from the electric outlet immediately after using and before cleaning.
- Always unplug before replacing a sewing machine bulb. Replace bulb with same type rated 15 Watts.
WARNING—To reduce the risk of burns, fire, electric shock, or injury to persons:
- Do not allow to be used as a toy. Close attention is necessary when this sewing machine is used by or near children.
- Use this appliance only for its intended use as described in this owner's manual. Use only attachments recommended by the manufacturer as contained in this owner's manual.
- Never operate this sewing machine if it has a damaged cord or plug, if it is not working properly, if it has been dropped or damaged, or dropped into water. Return this sewing machine to the nearest authorized dealers or service center for examination, repair, electrical or mechanical adjustment,
- Never operate the appliance with any air opening blocked. Keep ventilation openings of this sewing machine and foot controller free from accumulation of lint. dust and loose cloth.
- Never drop or insert any object into any opening.
- Do not use outdoors.
- Do not operate where aerosol (spray) products are being used or where oxygen is being administered.
- To disconnect, turn all controls to the off ("O") position, then remove plug from'outlet.
- Do not unplug by pulling on cord. To unplug, grasp the plug, not the cord.
10 Keep fingers away from all moving parts. Special care is required around the sewing machine needle. - Always use the proper needle plate. The wrong plate can cause the needle to break.
- Do not use bent needles.
- Do not pull or push fabric while stitching. It may deflect the needle causing it to break.
- Switch this sewing machine off ("O") when making any adjustment in the needle area, such as threading the needle, changing the needle, threading the bobbin or changing the presser foot, and the like.
- Always unplug this sewing machine from the electrical outlet when removing covers, lubricating, or when making any other adjustments mentioned in this owner's manual.
SAVE THESE INSTRUCTIONS
The design and specifications are subject to change without a prior notice.
Names of Parts 2
Standard Accessories 2
SECTION 2. GETTING READY TO SEW
Connecting Machine to Power Supply 4
Reverse Stitch Control 4
Presser Foot Lifter 4
Changing Presser Foot 6
Extension Table 6
6
Changing Needle 8
Selecting Needle and Thread 8
Bobbin winding 12
- Removing bobbin case 10
Bobbin winding 12
Inserting bobbin 14
Threading the Machine 16
- Threading the machine 16
- Drawing up bobbin thread 18
Adjusting the Needle Thread Tension 20
Balanced tension 20
Tension is too tight 20
Tension is too loose 20
SECTION 3. BASIC SEWING
StraightStitch 22
Turn a Square Corner 22
Basic Zigzag 24
OvercastingStitch 24
Multiple Zigzag Stitch 24
Blind Hem Stitch 26
SECTION 4. DECORATIVE STITCHES
Shell Tuck 26
SECTION 5- BUTTONHOLES
Buttonhole 28
Cored Buttonhole 28
SECTION 6. CARE OF YOUR MACHINE
Cleaning the Feed Dog 30
Cleaning the Hook Race Area 30
Replacing the Light Bulb 32
Troubleshooting 34
SECCION 1.NOMBLE DE LAS PARTES
- This appliance is not intended for use by persons (including children) with Reduced physical, sensory or mental capabilities, or lack of experience and knowledge, unless they have been given supervision or instruction concerning use of the appliance by a person responsible for their safety.
- Children should be supervised to ensure that they do not play with the appliance.
3.If the supply cord is damaged, it must be replaced by the manufacturer or its Service agent or a similarly qualified person in order to avoid a hazard.
WEEE:

Correct disposal of this product
This marking indicates that this product should not be disposed with other household wastes throughout the EU. To prevent possible harm to the environment or human health from uncontrolled waste disposal, recycle it responsibly to promote the sustainable reuse of material resources. To return your used device, please use the return and collection systems or contact the retailer where the product was purchased. They can take this product for environmental safe recycling.

SECTION 1. NAMES OF PARTS
Names of Parts
① Stitch selector
② Bobbinwinderstopper
③ Bobbinwinder spindle
④ Bobbin winding tension disk
⑤ Thread take-up lever
⑥ Upper thread guide
⑦ Thread tension dial
⑧ Needle
⑨ Needle plate
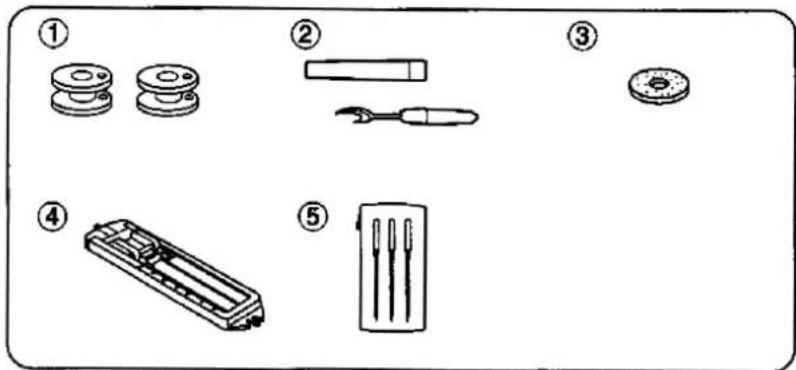
10 Extension table
,11 Presser foot
,12 Reverse stitch control
,13 Carrying handle
,14 Spool pin
0,15 Handwheel
,16 Power switch
O,17 Machine socket
O,18 Free-arm
,19 Presser foot lifter
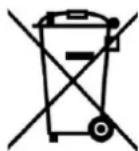
Standard Accessories
① Bobbin
② Seam ripper
③ Felt
④ Sliding buttonhole foot
⑤ Need le set
SECCION 1. NOMBRE DE LAS PARTES
① Stitch selector:
② Needle thread tension:
③ Presser foot:
1 to 5
Sliding buttonhole foot
1

6

12
3
Starting to sew
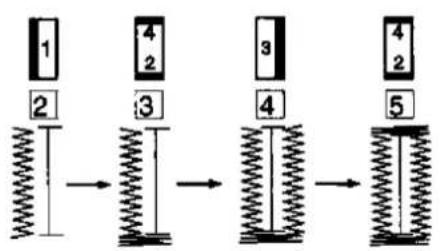
□,1Attach the buttonhole foot Carefully mark the buttonhole length on the fabric. Place the fabric under the foot, with the button hole marking running toward you. Move the slider (A) toward you so the top mark (C) on the slider aligns with the start mark (B). Lower the presser foot
□,2Set the stitch selector at. Sew forward until you reach the front mark of your buttonhole. Stop sewing at a left stitch.
3Set the stitch selector at, Sew four (4) to six (6) stitches. Stop sewing at a right stitch.
4Set the stitch selector at. Sew until you return to the start mark of the buttonhole. Stop sewing at a right stitch.
4 5Set the stitch selector at . Sew four (4) to six (6) stitches. Stop sewing at a left stitch.
□,6Remove the fabric and place a pin just before the bartack at each end to prevent cutting bartacks. Cut the opening with the buttonhole opener.
NOTE:
When sewing a buttonhole at the edge of a fabric, set the sliding buttonhole foot as
illustrated and sew in reverse 3-3
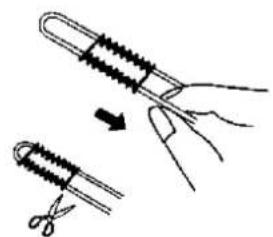
Coreded Buttonhole
□,1With the buttonhole foot raised, hook the filler cord on the spur at the back of the buttonhole foot.
Bring the ends toward you under the buttonhole foot, clearing the front end.
Hook the filler cord into the forks on the front of the buttonhole foot to hold them tight.
① Spur
② Forks
2Sew the buttonhole over the cord in the same procedure as above,
Remove the fabric from the machine and cut the sewing threads only.
,3Pull the left end of the filler cord to tighten it.
Thread the end through a darning needle, draw to the wrong side of the fabric and cut.
Turn off the power switch and/or unplug the machine before cleaning the machine.
Do not dismantle the machine other than as explained in this section.
Cleaning the Feed Dog
□,1Remove the needle and the presser foot.
Remove the needle plate set screw and remove the needle plate.
□,2With a brush, clean out dust and lint clogging the feed dog teeth.
Reset the needle plate.
Cleaning the Hook Race Area
To dismantle hook race unit:
1 Raise the needle to its highest position and open the hook cover.
,2Open the hinged latch of bobbin case and take it out
of the machine.
Open the hook race ring holders and remove the hook race ring.
Remove the hook.
Clean the hook race with a brush and a soft dry cloth.
① Bobbin case
② Hook race ring holders
③ Hook race ring
④ Hook
⑤ Hook race
To assemble hook race unit:
3Hold the hook by the center pin and fit it carefully back into the hook race forming a perfect circle with the shuttle driver.
Attach the hook race ring making sure the bottom pin fits into the notch.
Lock the hook race ring by turning the holders back into position, insert the bobbin case.
⑥ Pin
SECCION 6. CUIDADO DE LA MAQUINA
Nota:
I Apague e! interruptor o desconnecte laquina antes de limpar laquina.
As the light bulb could be HOT. protect your fingers when you handle it.
Unplug the machine.
Remove the setscrew and face cover.
-Turn the bulb counterclockwise to remove.
-Replace with a new bulb and turn it clockwise.
NOTE:
Do not store the machine in a high-humidity area, near a heat radiator or in direct sunlight.
Clean the outside of the machine with a soft cloth and mild soap.
Cambiando la bombilla
CUIDADO:
| Condition | Cause | Reference |
| The needle thread breaks. | 1. The needle thread is not threaded properly,2. The needle thread tension is too tight,3. The needle is bent or blunt,4- The needle is incorrectly inserted.5. The needle thread and the bobbin thread are not set properly under the presser foot at the beginning of sewing.6. The threads are not drawn to the rear after finishing sewing.7. The thread is too heavy, or too fine for the needle. | Page 16Page 20Page 8Page 8Page 22Page 22Page 8 |
| The bobbin thread breaks. | 1. The bobbin thread is not threaded properly in the bobbin case and shuttle.2. Lint has collected in the shuttle area.3. The bobbin is damaged and doesn't turn smoothly. | Page 14Page 30Change the bobbin |
| The needle breaks. | 1. The needle is incorrectly inserted.2. The needle is bent or blunt.3. The needle clamp screw is loose.4. The needle thread tension is too tight.5. The threads are not drawn to the rear after the finishing sewing.6. The needle is too fine for the fabric being sewn. | Page 8Page 8Page 8Page 20Page 22Page 8 |
| Skipped stitches | 1. The needle is incorrectly inserted.2. The needle is bent or blunt.3. The needle and/or threads are not suitable for the work being sewn.4. The needle thread is not threaded properly.5. The wrong needle is being used. | Page 8Page 8Page 8Page 16Change the needle |
| Seam puckering | 1. The needle thread tension is too tight.2. The needle thread is not threaded properly.3. The needle is too heavy for the fabric being sewn. | Page 20Page 16Page 8 |
| The fabric is not Fed. | 1. The feed dog is packed with lint. | Page 30 |
| The machine does not run. | 1. The machine is not plugged in.2. A thread is caught in the shuttle race.3. The push-clutch is disengaged. | Page 4Page 30Page 12 |
| The machine is noisy. | 1. There is thread caught in the hook race.2. Lint has built up in the shuttle or the shuttle race. | Page 30Page 30 |

- IMPORTANT SAFETY INSTRUCTIONS
- SAVE THESE INSTRUCTIONS
- SECTION 2. GETTING READY TO SEW
- SECTION 3. BASIC SEWING
- SECTION 4. DECORATIVE STITCHES
- SECTION 5- BUTTONHOLES
- SECTION 6. CARE OF YOUR MACHINE
- SECCION 1.NOMBLE DE LAS PARTES
- WEEE:
- Correct disposal of this product
- SECTION 1. NAMES OF PARTS
- Names of Parts
- Standard Accessories
- SECCION 1. NOMBRE DE LAS PARTES
- Starting to sew
- NOTE:
- Coreded Buttonhole
- Cleaning the Feed Dog
- Cleaning the Hook Race Area
- To dismantle hook race unit:
- To assemble hook race unit:
- SECCION 6. CUIDADO DE LA MAQUINA
- Nota:
- Cambiando la bombilla
- CUIDADO:
Brand : JATA
Model : MC690
Category : Sewing machine