
Solid OL900 - Sewing machine JATA - Free user manual and instructions
Find the device manual for free Solid OL900 JATA in PDF.


| Product Type | Overlock sewing machine |
| Brand | JATA |
| Model | Solid OL900 |
| Max Speed | 1200 stitches per minute |
| Seam Width | 3.0 – 6.7 mm (adjustable) |
| Stitch Length | F (≈1 mm) – 4 mm (adjustable) |
| Number of Threads | 2, 3, or 4 |
| Needle System | EL X 705, Cat. Nr. 2020 |
| Needle Sizes | 80/11, 90/14 |
| Sewing Foot Type | Clip-on, lift height 4.5 mm |
| Differential Feed | Adjustable ratio 0.5 – 2.0 |
| Dimensions (L×H×W) | 395 × 360 × 375 mm |
| Weight | 6.5 kg |
| Power Supply | 110-240 V AC, polarized plug |
| Lubrication | Manual (oil points behind looper cover) |
| Sewing Light Bulb | 15 W max, replaceable |
| Safety Features | Auto power cut when looper cover opens, polarized plug |
| Included Accessories | 3 needles, screwdrivers (large/small), tweezers, cleaning brush, lower knife, 4 thread unreeling discs, mechanical oil, machine cover, lint box, foot control |
| Special Accessories (Optional) | Blindstitch foot, gimp foot, elastic tape foot, shirring foot, cording foot, bead foot, lace foot |
| Intended Use | Household overlock sewing |
Frequently Asked Questions - Solid OL900 JATA
User questions about Solid OL900 JATA
0 question about this device. Answer the ones you know or ask your own.
Ask a new question about this device
Download the instructions for your Sewing machine in PDF format for free! Find your manual Solid OL900 - JATA and take your electronic device back in hand. On this page are published all the documents necessary for the use of your device. Solid OL900 by JATA.
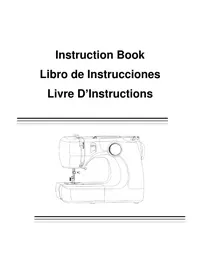
USER MANUAL Solid OL900 JATA
SOLID
overlock 900
Mod. OL900
MANUAL DE INSTRUÇÕES
Important safety instructions
This sewing machine is intended for household use only. Read all instructions before using and follow all the basic safety precautions detailed bellow:
DANGER
To reduce the risk of electric shock:
- An appliance should never be left unattended when plugged in. Always unplug this appliance from the electric outlet immediately after using and before cleaning.
• Always unplug before replacing the bulb with same type rated 15 watts.
WARNING
To reduce the risk of burns, fire, electric shock, or injury to persons:
Operate sewing machine only when mounted in sewing machine table, case, and the like.
- This appliance is not intended for use by persons (including children) with reduced physical, sensory or mental capabilities, or lack of experience and knowledge, unless they have been given supervision or instruction concerning use of the appliances by a person responsible for their safety.
- Use this appliance only for its intended use as described in this manual. Use only attachments recommend
ded by the manufacturer as contained in this manual.
- Never operate this appliance if it has a damaged cord or plug, if it is not working properly, if it has been dropped or damaged, or dropped into water. Return the appliance to the nearest authorized dealer or service center for examination, repair, electrical or mechanical adjustment.
- Never operate the appliance with any air openings blocked. Keep ventilation openings of the sewing machine and foot controller free from the accumulation of lint, dust, and loose cloth.
- Never drop or insert any object into any opening.
- Do not use outdoors.
- Do not operate where aerosol (spray) products are being used or where oxygen is being administered.
- To disconnect, turn all controls to the off ("0") position, then remove plug from outlet.
- Do not unplug by pulling on cord. To unplug, grasp the plug, not the cord.
- Keep fingers away from all moving parts. Special care is required around the sewing machine needle.
• Always use the proper needle plate. The wrong plate can cause the needle to break. - Do not use bent needles.
- Do not pull or push fabric while stitching. It may deflect the needle causing it to break.
- Unplug the sewing machine when making any adjustments in the needle area, such as threading needle, changing needle, threading bobbin, or changing presser foot, etc.
- Always unplug sewing machine from the electrical outlet when removing covers, lubricating, or when making any other user servicing adjustments mentioned in the instruction manual.
SAVE THESE INSTRUCTIONS
• Dispose the appliance according to the local garbage regulations.
- Dispose the batteries according to the local garbage regulation.
- Never throw it away to the rubbish. So you will help to the improvement of the environment.
PROTECCÃO DO MEIO AMBIENTE
natural_image
Simple line drawing of a rectangular frame with a label pointing to the top-right corner (no text or symbols on the frame itself)



Para insertar la aguja(s)

Precaución:
natural_image
Line drawing of a sewing machine needle stitching fabric (no text or symbols)12. ENHEBRADO DE LA MAQUINA




natural_image
Line drawing of hands operating a mechanical device with numbered parts (no text or symbols)


natural_image
Illustration of hands operating a sewing machine needle (no text or symbols visible)MANUAL DE INSTRUCCIONES • INSTRUCTION MANUAL • MANUAL DE INSTRUÇÕES

MANUAL DE INSTRUCCIONES • INSTRUCTION MANUAL • MANUAL DE INSTRUÇÕES


natural_image
Illustration of a sewing machine needle stitching fabric (no text or symbols)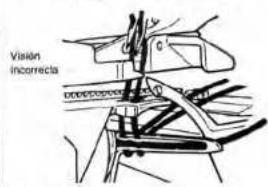
13. COMO CAMBIAR LOS HILOS/METODO DEL NUDO

17. ARRASTRE
20. COSTURA CON BRAZO LIBRE (TRABAJO EN TUBULAR)
natural_image
Three-step line drawing showing a sewing machine being adjusted for a component, with no visible text or symbols.21. SOBREORILLADO STANDARD Y PUNTO PARA RIBETEADO ENRROLLADO
23 COLOCACION DE LA TENSION SUGERIDA
1) Doble Cadeneta
natural_image
Technical line drawing of a mechanical assembly with gears and tubing (no text or symbols)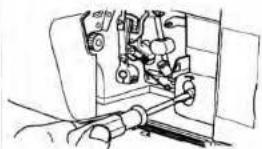
natural_image
Line drawing of a mechanical assembly with gears and a tool (no text or symbols)natural_image
Technical line drawing of a mechanical assembly with no visible text or symbolsnatural_image
Two black-and-white photos showing hands in gowns and curtains, no visible text or symbols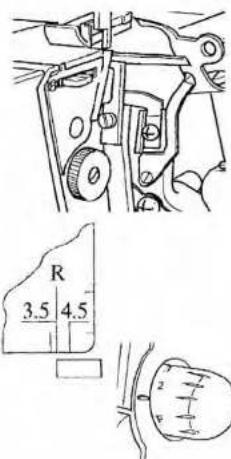
Note:
natural_image
Mechanical assembly diagram showing a tool interacting with a component (no text or symbols visible)
natural_image
Illustration of hands operating a mechanical device with a tool (no text or symbols visible)
natural_image
Close-up of a mechanical component with a pointed tip and curved wire, no visible text or symbols25. VARIACIONES DE PUNTADA Y TECNICAS DE COSTURA
natural_image
Close-up of a textured surface with parallel grooves and ridges (no text or symbols visible)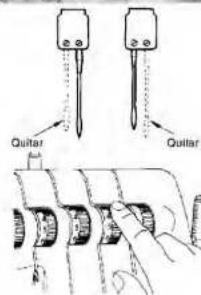
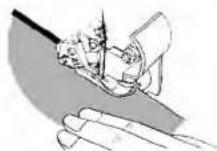

natural_image
Illustration of a microscope with a human eye visible above (no text or symbols present)


natural_image
Technical line drawing of a textile machine with spools and clamps (no text or labels)
natural_image
Technical line drawing of mechanical components and a surface (no text or symbols)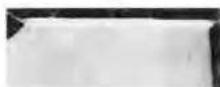
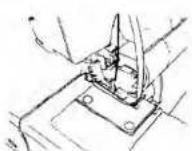


26. MANTENIMIENTO DE LA MAQUINA
natural_image
Line drawing of a mechanical assembly with no visible text or symbols
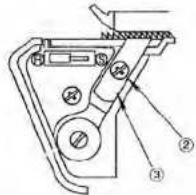
27 ACCESORIOS OPCIONALES
Adjusting the seam width
Adjusting the stitch length
Adjusting the thread tension
Bead sewing foot
Blind stitch foot
Changing the light bulb (sawing light)
Changing the lower knife
Changing the needle
Changing the sewing foot
Cleaning rubber feet
Cleaning the machine
Connecting foot control
Cording foot
Differential feed
Elastic tape sewing foot
Encaging/disengaging the upper knife
Folded 2-thread rolled hem
Folded 3-thread rolled hem
Free arm
Gimp sewing foot
Lace sewing foot
Lint box
Looper cover
Lubricating the machine
Machine cover
Machine maintenance
Mains switch
Mounting the converter
Needle position
Program summary
Setting the slide lever for stitch width stitch finger
Sewing foot lift
Sewing foot pressure
Sewing problems and their solutions
Shirring foot
Special accessories
Specifications
Thread spool stand
Page
Telescopic thread guide 10
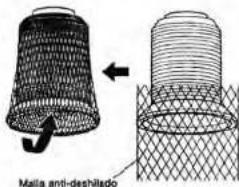
Thread spool net 10
Thread unreeling disc 10
Threading/guide wires 12
Threading upper overedge looper (pink) 13
Threading lower overedge looper (yellow) 14 - 15
Threading right needle A (green) 16
Threading left needle B (blue) 17
Thread reel change on threaded machine 18
Thread chain cutter 19
Thread table for 2-, 3- and 4-thread overedge seam 55
2-needle 3-thread overedge closing seam 43
2-thread overedge seam FLATLOCE (wide, narrow) 39
2-thread serging seam (wide, narrow) 40
2-thread rolled hem 41
3-thread overedge seam(wide, narrow) 34
3-thread serging seam(wide, narrow) 35
3-thread decorative seam sering FLATLOCK (wide, narrow) 36
3-thread rolled hem 37
4-thread queredge seam 32-33
MANUAL DE INSTRUCCIONES • INSTRUCTION MANUAL • MANUAL DE INSTRUÇÕES

MANUAL DE INSTRUCCIONES • INSTRUCTION MANUAL • MANUAL DE INSTRUÇÕES
Simple, up-to-date sewing
Congratulations! You have bought a high-quality product that provides unique advantages. Your new 853/854 can take any material in its stride and will sew, trim and neaten up for you in one operation.
Your hobbylock features the very latest in design and technology, and it is just as easy to use as this instruction manual is to follow.
If you now take a little time to study the instruction manual, nothing can go amiss.
It is certainly time well spent, since it is the only way to find out just what your machine can do and put it to full use.
If you have any further questions – just ask your dealer. He is happy to be of serice with any help or advice.
So, now let's get started! We wish you many enjoyable hours creating your very own fashion ideas.


natural_image
Hand placing a small object into a white rectangular block (no text or symbols visible)Accessory box
Pull accessory box 11 to the left and remove the accessories.

natural_image
Assorted office supplies including a calculator, pen, and film reels arranged on a dark surface (no text or symbols visible)Accessories
The following accessories are included with the machine:
1 Overedge needles system EL X 705, cat. Nr. 2020
2 Screwdriver (large)
3 Screwdriver (small)
4 Pair of tweezers
5 Cleaning brush
6 Lower knife
7 Thread unreeling discs (4x)
8 Mechanical oil

natural_image
Transparent plastic bag with a blurred interior (no visible text or symbols)Machine Cover
The machine cover protects the machine against dust and dirt. After each use push in telescopic thread guide 21. Thread spool stand 24 with or without thread spool must be pushed against the machine as far as it will go. The machine cover can now be placed in position.
MANUAL DE INSTRUCCIONES • INSTRUCTION MANUAL • MANUAL DE INSTRUÇÕES

MANUAL DE INSTRUCCIONES • INSTRUCTION MANUAL • MANUAL DE INSTRUÇÕES

natural_image
Close-up of hands using a medical or laboratory instrument to test blood pressure (no visible text or symbols)
natural_image
Close-up of a white electronic device with ventilation slots and a button labeled 'ON' and 'OFF' (no readable text beyond labels)OPERATING INSTRUCTIONS
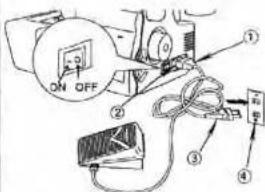
Connecting the foot control
Insert the plugs of the foot control into machine socket 27 and the power source respectively. Sewing speed is regulated by applying pressure to the foot control. In addition, sewing speed can be set by means of the bed slide adjuster at the top and of the foot control.
Position ▶ = half speed
Mains switch
The sewing light lights up when mains
switch 28 is switched on,
The machine is now ready for operation.
* 0 * = OFF
"1" = ON
Position ← = full speed
Notes on safety
This appliance has a polarized plug (one blade wider than the other). To reduce the risk of electric shock, this plug is intended to fit in a polarized outlet only one way. If the plug does not fit fully in the outlet, reverse the plug. If it still does not fit, contact a qualified electrician to install the proper outlet. Do not modify the plug in any way.
Foot control sewing machine, foot controller type AE 033 has to be used.


natural_image
Hand holding a white paper or scroll with a ruler, next to a machine component labeled 'B54' (no readable text beyond label)
natural_image
Close-up of a sewing machine needle stitching fabric, with hands operating the part (no visible text or symbols)Press against the lower part of the container until the lower tabs snap into the lower slots of the looper cover. For removal of the lint box, use the reverse sequence.
Lint box
Insert the upper tabs of lint box 34 into the upper slots of looper cover 7.

natural_image
Close-up of a hand operating a sewing machine (no visible text or symbols)Looper cover
Slide looper cover 7 as far as it will go to the right and swing it downwards. Individual threading paths are displayed in colour on the inside of the machine, as well as the threading method of the over-edge looper. In addition, the mounting procedure for the converter and the three most common stitch types are shown symbolically.
Note: For safety reasons, as soon as the looper cover is opened, the power supply to the machine is interrupted, i.e. the machine will not operate.
MANUAL DE INSTRUCCIONES • INSTRUCTION MANUAL • MANUAL DE INSTRUÇÕES

MANUAL DE INSTRUCCIONES • INSTRUCTION MANUAL • MANUAL DE INSTRUÇÕES
natural_image
Hand operating a mechanical device with internal components (no visible text or symbols)Thread spool stand
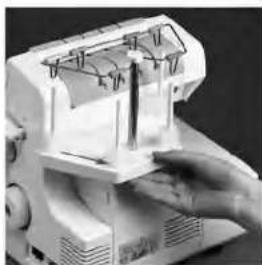
Before the thread spools are set in place, thread spool stand 24 must be pulled as far as it will go to the back.
natural_image
Close-up of a hand operating a sewing machine with spools and threads (no visible text or symbols)Telescopic thread guide
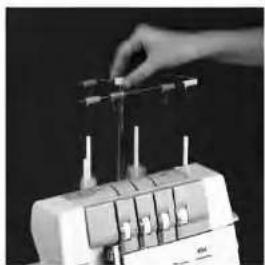
Extend telescopic thread guide 21 upwards.
To ensure optimum thread take-off, the two upper telescopes must be rotated slowly until their locking balls are heard to lock into place.

natural_image
Close-up of hands holding a small metallic object (no visible text or symbols)Thread unreeling disc
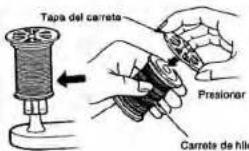
The thread unreeling disc included in the accessories is intended for use with smaller thread spools. Insert the thread unreeling disc into the thread spool and place them both on the cone adapter of the thread spool pin.


natural_image
Close-up of a sewing machine with two small electronic components and wiring (no visible text or symbols)Needle position
As shown in the illustration, up to two needles can be inserted into the needle holder. Retaining screw A belongs to the right overedge needle, retaining screw B to the left overedge needle.

In this instructions manual the various needle positions are shown in a schematic drawing of the needle holder. See the above examples.
Note: If both the left and right overedge needles have been inserted, the left needle will be somewhat higher than the right needle.
natural_image
Simple line drawing of two vertical cylindrical objects with arrows pointing upward (no text or symbols)Changing the needle Switch off at the mains switch.
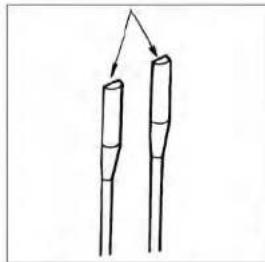
Overedge needles for system EL X 705, cat. Nr. 2020 are required for this machine. Lower the sewing foot with the sewing foot lift and turn the handwheel until the needle is at its highest point.

natural_image
Close-up of mechanical components with no visible text or symbolsLoosen the needle fastening screw (without removing it completely) with the small sorowdriver included in the accessories and remove the needle in a downward motion. Insert a new needle into the needle holder with the flat side to the rear and relighten the respective fastening screw.
MANUAL DE INSTRUCCIONES • INSTRUCTION MANUAL • MANUAL DE INSTRUÇÕES

MANUAL DE INSTRUCCIONES • INSTRUCTION MANUAL • MANUAL DE INSTRUÇÕES

Threading
A colour-coded threading diagram for quick reference is to be found behind the looper cover, i.e. inside the machine.
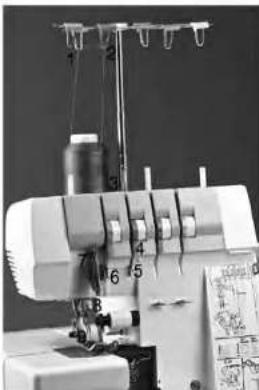
Thread the individual threads-as shown -following steps 1 to 4.

The colour markings are applicable as follows:
-
Upper overedge looper=pink
-
Lever overedge looper=yellow
-
Right needle-green
-
Left needle=blue

natural_image
Close-up of a sewing machine with multiple spools and a stand (no visible text or symbols)Threading/guide wires
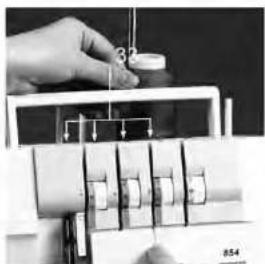
Place the thread spools on spool pins 25. Use cone adapters 26 only with conical spools. Further notes on the thread spool net and thread unreeling disc are to be found on page 10. Insert the threads through the guide wires 20 from back to front according to the colour coding.
natural_image
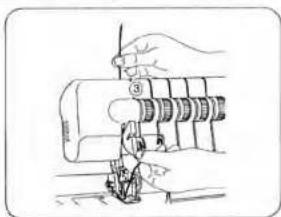
Close-up of a hand operating a sewing machine with mechanical components (no visible text or symbols)Lift carrying handle 3. Insert the threads beneath the handle and through rear guides 33 by pulling down with both hands until the yarn slips under the guide wire. Now pull the thread between the tension discs and press it down until it is lodged between the latter. Return the carrying handle to its closed position.

Threading/upper overedge looper (pink)
Thread by following steps 1 to 9. Note: To facilitate threading use the tweezers included in the accessory box.

natural_image
Close-up of a sewing machine with numbered parts (1-9) and no visible text or symbols on the body.
Insert the thread along the path marked in pink through guides 5 to 8.
natural_image
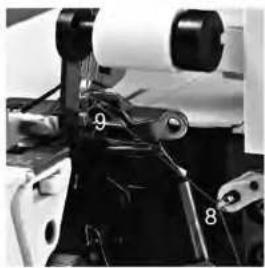
Close-up of mechanical components with numbered parts (8 and 9) and no visible text or symbolsInsert the thread from the front through the eye in upper overedge looper 9, pull about 10 cm of thread through the looper and lay it to the left underneath the sewing foot.
MANUAL DE INSTRUCCIONES • INSTRUCTION MANUAL • MANUAL DE INSTRUÇÕES

MANUAL DE INSTRUCCIONES • INSTRUCTION MANUAL • MANUAL DE INSTRUÇÕES

natural_image
Interior view of an electronic device with visible wiring and components (no readable text or symbols)Threading the lower overedge looper (yellow)
Turn the handwheel in the direction of the arrow until overedge looper 15 is positioned at the extreme right.

natural_image
Interior view of a sewing machine with numbered components and spools (no visible text or symbols)Insert the thread by following steps 1 to 10.
Note: To facilitate threading, use the tweezers included in the accessory box.

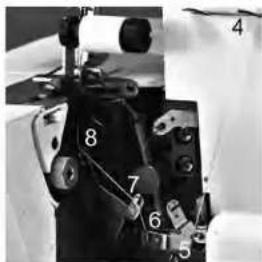
Insert the thread along the path marked in yellow through guides 4 to 8.
The diagrams to be found behind the looper cover illustrate the principles of threading.
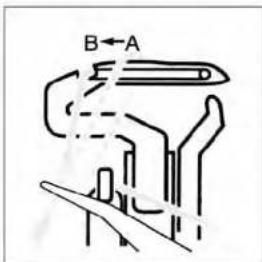
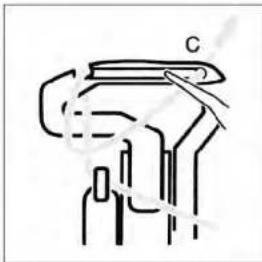
Lay the thread from back to front over the right-hand side of the looper. Carefully pull the thread to the left and slightly down until it slips into notch B (=threading point 9) of the looper.
natural_image
Pure mechanical diagram showing a hand operating a component with no text or symbolsInsert thread from the front through the eye of lower overedge looper C (= threading point 10). The thread must run along the groove in the looper.

Pull about 10 cm or thread through the looper and lay it to the left underneath the sewing foot.
MANUAL DE INSTRUCCIONES • INSTRUCTION MANUAL • MANUAL DE INSTRUÇÕES

MANUAL DE INSTRUCCIONES • INSTRUCTION MANUAL • MANUAL DE INSTRUÇÕES
natural_image
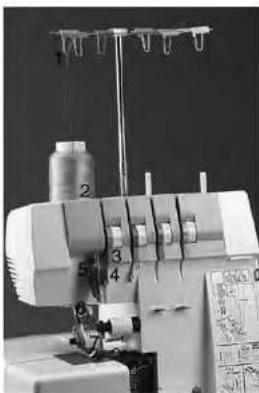
Close-up of a sewing machine needle with spool, no visible text or symbolsThreading /right needle A (green) Insert the thread by following steps 1 to 9.

natural_image
Close-up of a sewing machine needle and fabric (no visible text or symbols)
natural_image
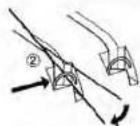
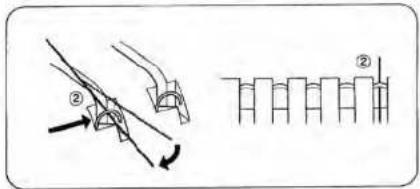
Close-up of a sewing machine needle and clasp mechanism (no visible text or symbols)Note: The thread must run through the upper slot in guide 7.
Pull about 10 cm of thread through the looper and lay it to the left underneath the sewing foot.
Note: To facilitate threading of the needle eye, use the tweezers included in the accessory box and lower the sewing foot.

Threading/left needle B (blue)
Thread the left needle B by following steps 1 to 7.
natural_image
Close-up of a sewing machine with spool and thread, no visible text or symbols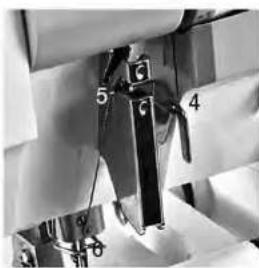
natural_image
Close-up of a sewing machine needle and clasp mechanism (no visible text or symbols)Note: The thread must run through the lower slot in guide 5.

natural_image
Close-up of a sewing machine needle and clamping mechanism (no visible text or symbols)Pull about 10 cm of thread through the needle eye and lay it to the left underneath the cowing foot.
Note: To facilitate threading of the needle eye, use the tweezers included in the accessory box and lower the sewing foot.
MANUAL DE INSTRUCCIONES • INSTRUCTION MANUAL • MANUAL DE INSTRUÇÕES

MANUAL DE INSTRUCCIONES • INSTRUCTION MANUAL • MANUAL DE INSTRUÇÕES

Important note on threading:

The thread must also be removed from the needle(s) if the looper threads break. Re-insert the looper thread first, then re-thread the needle(s).
The needle threads must always be inserted last in order to avoid mistakes with the left looper thread and thread breakage or missed stitches.
Thread reel change on threaded machine
Cut the threads close to the thread spool and set the new thread reels in place. Tie together the threads still in the machine and the new threads, and pull the threads out of the needles. Set all the thread tensions to -5. Now pull on the needle threads until the knots are about 15 cm past the last thread guide before the needles. Cut the knots off and pull the threads through the respective needle eyes. The looper threads can be pulled continuously past the looper eye and laid to the left underneath the sewing foot.
Important notice to the chapter "Sewing foot lift"
Once the thread chain has been formed, the sewing foot lift does not need to be raised any further as long as one continues working with the same thread and sewing foot. If you wish to work on another garment, then it is sufficient to lift up the front part of the presser foot slightly with your thumb. The slide the garment under the raised part of the sewing foot. When the pedal is activated, the garment is then automatically taken up by the feed dog and transported on further.


natural_image
Close-up of a hand operating a sewing machine (no visible text or symbols)Sewing foot lift
The sewing foot can be raised and lowered with sewing foot lift 32. The maximum vertical lift of 6 mm for the sewing foot for particularly thick fabrics can be achieved by also depressing the sewing foot lift towards the back.

natural_image
Close-up of a sewing machine needle with a cloth, mounted on a flat surface (no visible text or symbols)Thread chain cutter
After finishing a seam, continue to sew a thread chain of 15–20 cm. Pull the thread chain towards the front over thread chain cutter 23. The thread chain will thus be cut.

natural_image
Close-up of a hand operating a sewing machine with visible circuit lines (no text or symbols)Changing the sewing foot Switch off at the mains switch
To remove: Raise the needle(s) to the highest position and lift the sewing foot. Press the white lever at the rear of the sewing foot holder. The sewing foot will be released automatically from the holder and can be removed to the left. To do this, lift the spring slightly.
To insert: Lift the spring slightly and insert the sewing foot under the holder so that when the sewing foot lever is lowered, the pin of the foot locks into the sewing foot holder.
Check: Please lift the sewing foot lever to ensure that the sewing foot is properly locked into place.
MANUAL DE INSTRUCCIONES • INSTRUCTION MANUAL • MANUAL DE INSTRUÇÕES

MANUAL DE INSTRUCCIONES • INSTRUCTION MANUAL • MANUAL DE INSTRUÇÕES

natural_image
Close-up of a hand operating a mechanical device with a cylindrical component (no visible text or symbols)Disengaging the upper knife Switch off at the mains switch
Raise upper knife 19 to its uppermost position by rotating the handwheel. Detach the lint box and open the looper covet. Now slide the holder of the movable upper knife fully towards the right.

natural_image
Close-up of a gloved hand holding a cylindrical electronic component (no visible text or symbols)Turn the head of the upper knife away from you until the upper knife locks into a horizontal position.

natural_image
Close-up of hands operating a cylindrical mechanical device with a black component, no visible text or symbolsEngaging the upper knife
Slide the holder of the movable upper knife towards the right and swing the knife back until it locks into its working position. Close the looper cover and re-attach the lint box.


natural_image
Close-up of an electronic device with visible circuitry and components (no readable text or symbols)Mounting the converter Switch off at the mains switch
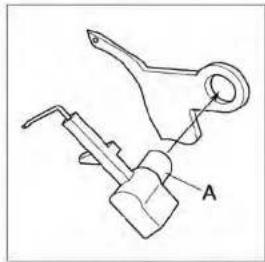
The converter must be mounted for all 2-thread seems and the 2-needle, 3-thread overedge closing seam. Detach the lint box and open the looper cover, Converter 6 is located in the front of the machine housing. Pull it out.
Rotate the handwheel until the upper overedge looper is positioned to the right of the movable upper knife.
natural_image
Technical line drawing of a mechanical clamp or tool with labeled component A (no text or symbols present)Insert hub A of the converter into the aperture of the upper overedge lopper.

natural_image
Line drawing of a mechanical device with a handle and lever (no text or symbols)Rotate the converter towards the left and press the upper part slightly to the rear so that the tip of the converter locks into the eye of the looper.
The converter can be removed by following these directions in reverse order.
MANUAL DE INSTRUCCIONES • INSTRUCTION MANUAL • MANUAL DE INSTRUÇÕES

MANUAL DE INSTRUCCIONES • INSTRUCTION MANUAL • MANUAL DE INSTRUÇÕES
natural_image
Close-up of a hand using a sewing machine to cut fabric (no visible text or symbols)Adjusting sesm width
Switch off at the mains switch
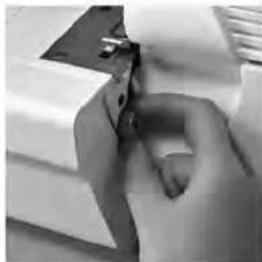
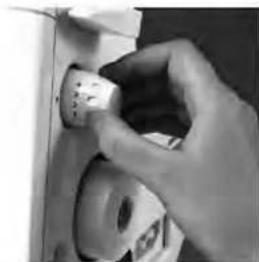
Detach the lint box. The seam width can be continuously adjusted as desired from 3.0 mm to 4.5 mm by turning seam width adjustment knob 17. The seam width can be more easily adjusted if the upper knife holder is pushed slightly to the right.
natural_image
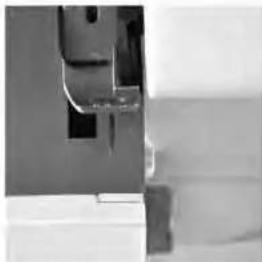
Close-up of a mechanical component with no visible text or symbolsThe adjustments are marked on the needle plate. R is the seam width adjustment for rolled seams.

Note: The seam width adjustments between 3.0 mm and 4.5 mm apply to the right needle only. For the left needle, the set value is increased by 2.2 mm, i.e. the seam width can be continuously adjusted from 5.2 mm to 6.7 mm.


Adjusting the stitch length
The stitch length can be set as desired from F(△1mm) to 4 mm by turning stitch length adjustment knob 31.
For most sewing work, the stitch length adjustment knob should be set at 3 mm. When working with close-knit fabrics, set the adjustment knob to 4 mm.
natural_image
Close-up of a hand inserting a small white plug into a wall socket (no text or symbols visible)
natural_image
Close-up of a hand using a sewing machine to press fabric (no visible text or symbols)Sewing foot pressure
The machine's factory-set sewing foot pressure is suitable for medium-heavy fabrics.
The sewing foot pressure does not need to be changed for most fabrics. If lighter—or heavier fabrics are sewn, it may however become necessary to reset the pressure.
In this event, insert the small screwdriver from the accessory box into set screw 22 for adjusting the sewing foot pressure. The pressure is adjusted by turning the set screw to the left or right. For light-weight fabrics: reduce pressure by turning the set screw to the left. For heavyweight fabrics: increase pressure by turning the set screw to the right.
Note: Turn the set screw to the right until it strikes against the top lid. Then turn the screw back to the left, rotating it 6 times. Now the standard sewing foot pressure is set.
MANUAL DE INSTRUCCIONES • INSTRUCTION MANUAL • MANUAL DE INSTRUÇÕES


natural_image
Close-up of a sewing machine needle with labeled parts A and B (no additional text or symbols visible)Differential feed
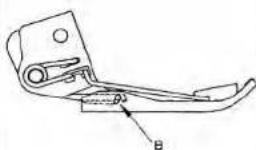
The differential feed consists of two feed dogs (A+B), arranged one behind the other, which move the workpiece. Adjustment lever 30 regulates the movement of the front feed don(A), and thus the amount of fabric to be fed through. It can be adjusted within the range 0.5 and 2.0.
The standard adjustment is 1.0, by which the front feed dog (A) moves synchronously with the rear feed dog(B), i.e., the front and rear feed dogs both move the same amount of fabric.
Note: The effectiveness of the differential feed also depends on the stitch length selected and the type of fabric used.

natural_image
Close-up of a mechanical component with a circular dial and handle (no visible text or symbols)
natural_image
Close-up of a textured surface with a white wavy edge and label 'A' and 'B' (no readable text or symbols)If differential feed adjustment lever 30 is set to 0.5, the front feed dog moves half as fast as the rear feed dog, i.e. the front feed dog feeds through only half as much fabric as the rear feed dog.
As a result, the fabric is stretched.
This prevents the seam from becoming gathered when sewing very delicate fabrics such as silk and taffeta. The result is a smooth seam (A).
Fashionable touches can also be introduced in this way, such as the wave effect when using rib knit (B).

MANUAL DE INSTRUCCIONES • INSTRUCTION MANUAL • MANUAL DE INSTRUÇÕES

natural_image
Close-up of a mechanical device with a dial and handle (no visible text or symbols)Set differential feed adjustment lever 30 to 2.0 so that the front feed dog moves twice as fast as the rear feed dog, i.e., the front feed dog feeds through twice as much fabric as the rear feed dog.
As a result, the fabric is gathered.

natural_image
Close-up of a textured fabric with labeled sections C and D, showing layered patterns (no text or symbols beyond labels)This prevents the seam from becoming stretched when sewing knitted fabrics such as Jersey and rid stitch goods. The result is a smooth seam (C).
Fashionable touches can also be introduced in this way, such as the gather effect when using very delicate fabrics (D).
The following table indicates possible settings for the differential feed. However, you should always perform a sewing test on your fabric before starting work.
| Fabric type/Effects | Differential feed setting | ||
| gather ≥ 2.0 c | normal ≥ 1.0 c | stretch ≥ 0.5 c | |
| Very thin fabrics: silk, satin, poplin, taffeta, lining fabrics. | ● | ● | |
| normal fabrics: lightweight cotton, medium cotton,line cord, thermal fabrics. | ● | ||
| thin knitted fabrics: Jersey, polo fabric, tricot,line knitwear and cuffs. | ● | ● | |
| thick knitted fabrics: sweatshirt fabric, thick cuffs,knitwear. | ● | ||
| Stretch-wave effect: medium-and lightweight knittedfabrics, Jersey, knitwear, frilled edges on sleeves and neckopenings, skirt hems, set tight stitch length. | ● | ||
| Crimping: Frills made from thin fabrics and lace,seam allowances in circular cut-outs, curves on blouses,shirts, skirts, round pockets, flape and lapels, gatheringor slightly easing sleeve (shoulder) curves,sewing sleeves onto cuffs or wristbands. | ● | ||
MANUAL DE INSTRUCCIONES • INSTRUCTION MANUAL • MANUAL DE INSTRUÇÕES

MANUAL DE INSTRUCCIONES • INSTRUCTION MANUAL • MANUAL DE INSTRUÇÕES

natural_image
Close-up of hands operating a sewing machine (no visible text or symbols)Sewing with the free arm
Detach the work support
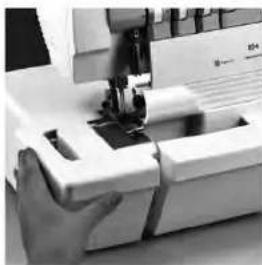
Remove the lint box and pull detachable work support 10 towards the left.
Reattach the lint box.

natural_image
Close-up of a mechanical device with gears and a handle, possibly a valve or pump, against a plain background (no visible text or symbols)The free arm is particularly useful for sewing tubular items such as trouser legs and sleeves. Insert the article over the free arm.
natural_image
Close-up of a sewing machine needle stitching fabric (no visible text or symbols)Reattaching the work support
Position the detachable work support so that it is level with the machine cover, then slide it to the right until it locks into Position.


natural_image
Close-up of mechanical components with no visible text or symbols
natural_image
Close-up of a mechanical component with circular features and a metallic top (no visible text or symbols)Stitch finger A will be pushed forward. All standard overlock seams can be sewn with this adjustment.
Setting the slide lever for the stitch width stitch finger
For standard overlock seams:
Set the slide lever for stitch finger 18 to position S.

natural_image
Close-up of a mechanical device with circular components and a metallic clip (no visible text or symbols)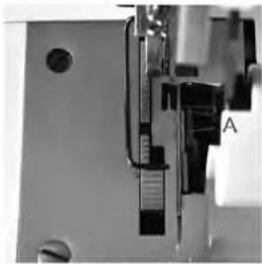
natural_image
Close-up of a mechanical component with labeled section A (no readable text or symbols)For rolled hems
Set the slide lever for stitch finger 18 to position R.
Stitch finger A will be pushed backward. All rolled hems can be sewn with this adjustment.
Program summary
| Program | Application |  |
| 4-thread overedge seam | Sewing together any material, especially elastic fabrics, with simultaneous serging. |  |
| 3-thread overedge seam (wide) | Serging tightly-woven (easily frayed) fabrics |  |
| 3-thread-overedge seam (narrow) | Serging lightweight (easily-frayed) fabrics |  |
| 3-thread serging seam (wide) | Serging tightly-woven (non-fraying) fabrics |  |
| 3-thread serging seam (narrow) | Serging lightweight (easily-frayed) fabrics |  |
| 3-thread decorative seam (wide) FLATLOCK | Serging medium-heavy fabrics. As flatlock seam for sewing together stretch fabrics and as a decorative finished edge. |  |
| 3-thread decorative seam (narrow) FLATLOCK | Serging medium-heavy fabrics. As flatlock seam for sewing together stretch fabrics and as a decorative finished edge. |  |
| 3-thread rotec hem | Serging medium-heavy fabrics. Decorative finished edges. |  |
| Thread tensionThe setting are for medium-heavyfabrics and normal polyester yarn. | Stitchlength | Stitch-width | Positionof slide leverfor stitchfinger | Converter■=with□=with-out | |||
| blue | green | pink | yellow | ||||
| N | -2 | -2 | -1 | 3 | 3.5 | S | □ |
| N | -2 | -1 | 3 | 3.5 | S | □ | |
| N | -2 | -1 | 3 | 3.5 | S | □ | |
| N | -5 | +3.5 | 3 | 3.5 | S | □ | |
| N | -5 | +4 | 3 | 3.5 | S | □ | |
| -4.5 | N | +2 | 3 | 3.5 | S | □ | |
| -4.5 | N | +2 | 3 | 3.5 | S | □ | |
| -1 | +2 | -1 | F | R | R | □ | |
Program summary
| Programs | Application |  |
| Folded 3-thread rolled hem | Serging lightweight to medium-heavy fabrics. Decorative finished edges. |  |
| 2-thread overedge seam (wide) FLATLOCK | Serging medium-heavy fabrics. As flatlock seam for sewing together stretch fabrics. |  |
| 2-thread overedge seam ( narrow) FLATLOCK | Serging lightweight fabrics. As flatlock seam for sewing together stretch fabrics. |  |
| 2-thread serging seam (wide) | Serging lightweight fabrics. |  |
| 2-thread serging seam ( narrow) | Serging lightweight fabrics. |  |
| 2-thread rolled hem | Serging very lightweight fabrics. Decorative finished edges. |  |
| Folded 2-thread rolled hem | Serging very lightweight fabrics. Decorative finished edges. |  |
| 2-needle, 3-thread overedge closing seam | Serving together and simultaneous serging of lightweight, high-stretch fabrics. |  |
| Thread tensionThe setting are for medium-heavy fabrics and normal polyester yarn. | Stitch length | Stitch-width | Position of slide lever for stitch finger | Converter■=with□=with-out | |||
| blue | green | pink | yellow | ||||
| -2 | N | +3 | F | R | R | □ | |
| -4 | +2.5 | 3 | 3.5 | S | ■ | ||
| -4 | +2 | 3 | 3.5 | S | ■ | ||
| N | -3.5 | 3 | 3.5 | S | ■ | ||
| N | -3.5 | 3 | 3.5 | S | ■ | ||
| -4 | +1 | F | R | R | ■ | ||
| -1 | -2 | F | R | R | ■ | ||
| -1 | -2 | -4 | 3 | 3.5 | S | ■ | |
MANUAL DE INSTRUCCIONES • INSTRUCTION MANUAL • MANUAL DE INSTRUÇÕES


natural_image
Close-up of industrial machinery components with no visible text or symbolsAdjusting the thread tension
The following pages contain directions for setting tread tensions for all programs. Adjust the tension by turning the tensioning wheel until the dot marker is at the desired setting.
The settings for adjusting thread tension are recommendations. Fabric type, yarn quality and needle gauge will influence seam results. For this reason it is always best to sew a test seam to check the interlocking of threads. It may be necessary to correct the thread tension settings.
Tip: When testing, it is a good idea to use thread colours corresponding to the individual thread tensions, e.g. thread the upper overedge looper with pink yarn, the lower overedge looper with yellow yarn, etc.
Note: All further settings required for individual programs (needle position, stitch length, stitch width, etc.) are to be found in the program summary on pages 28 to 31.

4-thread overedge seam
| blue | green | pink | yellow |
| N | -2 | -2 | -1 |
If all tensions are optimally set, the two-looper threads will be interlocked at the very edge of the fabric.

MANUAL DE INSTRUCCIONES • INSTRUCTION MANUAL • MANUAL DE INSTRUÇÕES

The left needle thread (blue) is too loose. Increase the tension of the blue thread.

The right needle thread (green) is too loose. Increase the tension of the green thread.

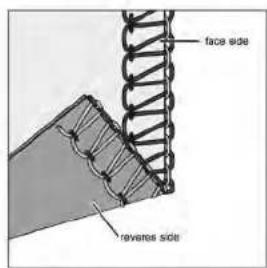
The upper looper thread (pink) is visible on the reverse side of the fabric.
Increase the tension of the pink thread and/or reduce the tension of the yellow thread.

The lower looper thread (yellow) is visible on the face side of the fabric. Increase the tension of the yellow thread and/or reduce the tension of the pink thread.
MANUAL DE INSTRUCCIONES • INSTRUCTION MANUAL • MANUAL DE INSTRUÇÕES

MANUAL DE INSTRUCCIONES • INSTRUCTION MANUAL • MANUAL DE INSTRUÇÕES
3-thread overedge seam

The needle thread is too loose.
| wide | blue | green | pink | yellow |
| N | -2 | -1 |
Increase the tension of respective needle thread.
| narrow | blue | green | pink | yellow |
| N | -2 | -1 |
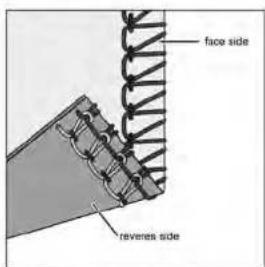
The upper looper thread (pink) is visible on the reverse side of the fabric.

The lower looper thread (yellow) is visible on the face side of the fabric.
Increase the tension of the pink thread and/or reduce the tension of the yellow thread.
Increase the tension of the yellow thread and/or reduce the tension of the pink thread.

3-thread serging seam
| wide | blue | green | pink | yellow |
| N | -5 | +3.5 |

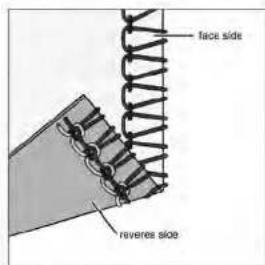
The needle thread is too loose. Increase the tension of the respective needle thread.
| narrow | blue | green | pink | yellow |
| N | -5 | +4 |
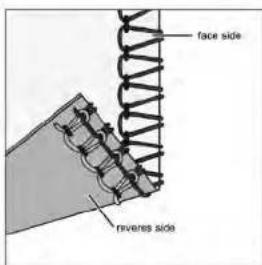
The upper looper thread (pink) is only partly looped around the edge of the fabric.
Reduce the tension of the pink thread and for increase the tension of the yellow thread.

The lower looper thread (yellow) is visible on the face side of the fabric. Increase the tension of the yellow thread and/or reduce the tension of the pink thread.
MANUAL DE INSTRUCCIONES • INSTRUCTION MANUAL • MANUAL DE INSTRUÇÕES

MANUAL DE INSTRUCCIONES • INSTRUCTION MANUAL • MANUAL DE INSTRUÇÕES
3-thread decorative seam serging. FLATLOCK
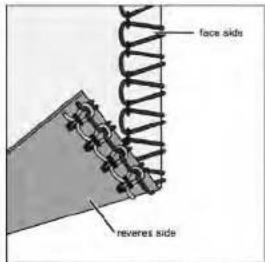
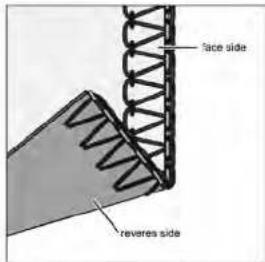
The needle thread is too light.
| wide | blue | green | pink | yellow |
| -4.5 | N | +2 |
| narrow | blue | green | pink | yellow |
| -4.5 | N | +2 |

The upper looper thread (pink) is visible on the reverse side of the fabric
Increase the tension of the pink thread.

The lower looper thread (yellow) is too loose.
Increase the tension of the yellow thread.


3-thread rolled hem
| blue | green | pink | yellow |
| -1 | +2 | -1 |
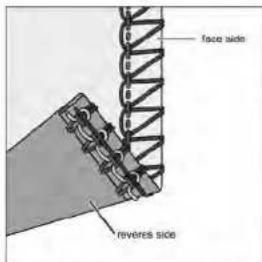
The right needle thread (green) is too loose.
Increase the tension of the green thread.
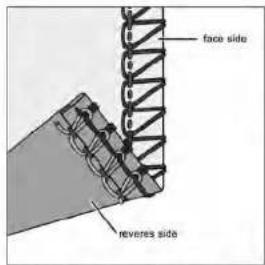
The upper looper thread (pink) is visible on the reverse side of the fabric.
Increase the tension of the pink thread and/or reduce the tension of the yellow thread.

The lower looper thread (yellow) is visible on the face side of the fabric.
Increase the tension of the yellow thread and/or reduce the tension of the pink thread.
MANUAL DE INSTRUCCIONES • INSTRUCTION MANUAL • MANUAL DE INSTRUÇÕES

MANUAL DE INSTRUCCIONES • INSTRUCTION MANUAL • MANUAL DE INSTRUÇÕES

Folded 3-thread rolled hem
| blue | green | pink | yellow |
| -2 | N | +3 |
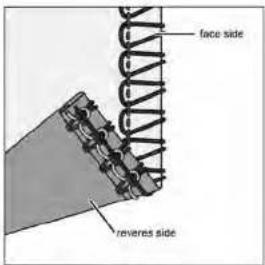
The right needle thread (green) is too loose.
Increase the tension of the green thread.
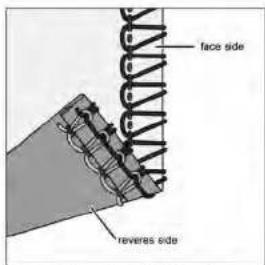
The upper looper thread (pink) only partly loops around the edge of the fabric.
Reduce the tension of the pink thread and/or increase the tension of the yellow thread.
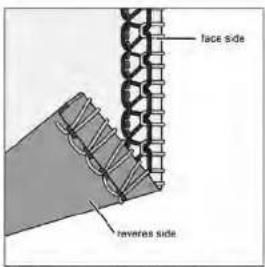
The lower looper thread (yellow) is visible on face side of the fabric.
Increase the tension of the yellow thread and/or reduce the tension of the pink thread.

2-thread overdge seam, FLATLOCK
| wide | blue | green | pink | yellow |
| -4 | +2.5 |
| narrow | blue | green | pink | yellow |
| -4 | +2 |

Note: Attach the converter (see page 21) for sewing 2-thread overedge seams (FLATLOCK).

The needle thread is too loose or the lower looper thread (yellow) is too tight. Increase the tension of the respective needle thread and /or reduce the tension of the yellow thread.
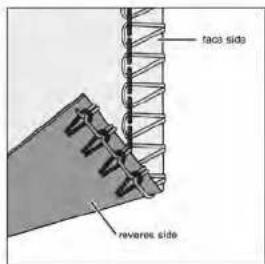
The lower looper thread (yellow) is visible on the reverse side of the fabric. Increase the tension of the yellow thread and/or reduce the respective needle thread tension.
MANUAL DE INSTRUCCIONES • INSTRUCTION MANUAL • MANUAL DE INSTRUÇÕES

MANUAL DE INSTRUCCIONES • INSTRUCTION MANUAL • MANUAL DE INSTRUÇÕES

2-thread serging seam
| wide | blue | green | pink | yellow |
| N | -3.5 |
| narrow | blue | green | pink | yellow |
| N | -3.5 |
Note: Attach the converter (see page 21) for sewing 2-thread serging seams (FLATLOCK).

The needle thread is too loose.
Increase the tension of the respective needle thread and/or reduce the tension of the yellow thread.

The lower looper thread (yellow) is too loose.
Increase the tension of the yellow thread.

2-thread rolled hem
| blue | green | pink | yellow |
| -4 | +1 |
Note: Attach the converter (seep page 21) for sewing 2-thread rolled hems.
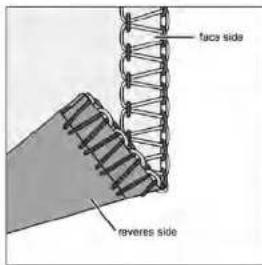


The right needle thread (green) is too light.
Reduce the tension of the green thread and/or increase the tension of the yellow thread.
The lower looper thread (yellow) is too light.
Reduce the tension of the yellow thread and/or increase the tension of the green thread.
MANUAL DE INSTRUCCIONES • INSTRUCTION MANUAL • MANUAL DE INSTRUÇÕES

MANUAL DE INSTRUCCIONES • INSTRUCTION MANUAL • MANUAL DE INSTRUÇÕES

Folded 2-thread rolled hem
| blue | green | pink | yellow |
| -1 | -2 |
Note: Attach the converter (see page 21) for sewing 2-thread rolled hems.
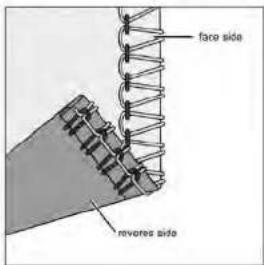
The right needle thread (green) is too loose.
increase the tension of the green thread and/or reduce the tension of the yellow thread.

The lower looper thread (yellow) is too tight.
Reduce the tension of the yellow thread and/or increase the tension of the green thread.


2-needle, 3-thread overedge closing Seam
| blue | green | pink | yellow |
| -1 | -2 | -4 |

The left needle thread (blue) is too loose. Increase the tension of the blue thread.
Note: Attach the converter(see page 21) for sewing 2-needle, 3-thread overedge Closing seams.

The right needle thread (green) is too loose.
Increase the tension of the green thread.

The lower looper thread (yellow) is too light.
Reduce the tension of the yellow thread.
MANUAL DE INSTRUCCIONES • INSTRUCTION MANUAL • MANUAL DE INSTRUÇÕES

MANUAL DE INSTRUCCIONES • INSTRUCTION MANUAL • MANUAL DE INSTRUÇÕES

natural_image
Close-up of a mechanical device with mounted components and a cylindrical component (no visible text or symbols)Machine maintenance Cleaning the machine Switch off at the mains switch
Detach the lint box open the looper cover. Disengage the upper knife and remove the sewing foot.
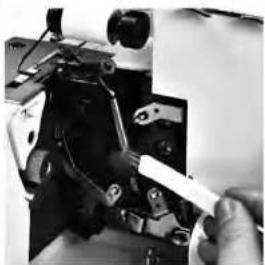
natural_image
Close-up of a hand using a tool to adjust or install electronic components (no visible text or symbols)Use the lint brush from the accessories to remove lint from the needle plate, the upper and lower knives and looper area.
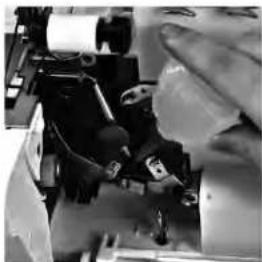
natural_image
Close-up of a person operating a mechanical device with visible gears and components (no text or symbols)Lubricating the machine Switch off at the mains switch
The point shown above should be lubricated with the oil from the accessories every time the machine is cleaned. One or two drops of sewing machine oil are sufficient. All other parts are manufactured from special material and do not require lubrication.
Cleaning the rubber feet
Clean the machine's rubber feet from time to time with rubbing alcohol. This ensures good stability.

Changing the lower knife
Switch off at the mains switch
Removal: Detach the lint box and open the looper cover. Disengage the upper knife and move the needle(s) to the uppermost position. Use the large screw-driver from the accessories to loosen lower knife retaining screw A. Remove the screw and the lower knife.
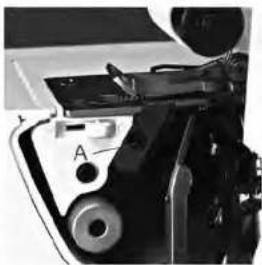
natural_image
Close-up of a mechanical device with labeled components (A and A') and no visible text or symbols beyond labels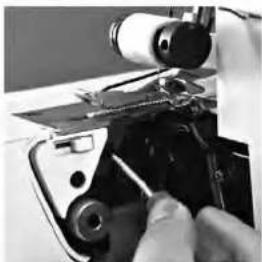
natural_image
Close-up of a sewing machine needle being sewn into a black plastic component (no visible text or symbols)Insertion: Insert a new lower knife into the recess provided and tighten the retaining screw. Engage the upper knife and close the looper cover.
MANUAL DE INSTRUCCIONES • INSTRUCTION MANUAL • MANUAL DE INSTRUÇÕES


natural_image
Close-up of a hand using a sewing machine to adjust or install a component (no visible text or symbols)Changing the light bulb (sewing light) Switch off at the mains switch
Use the large screwdrivet from the accessories to loosen the retaining screw of sewing light cover 13 until the latter can be removed.

natural_image
Close-up of a hand holding an electronic device with visible wiring and components (no text or symbols)Push the bulb into the socket, give it a half-turn in a counter-clockwise direction and remove it.

natural_image
Close-up of a robotic arm with hands adjusting the internal components (no visible text or symbols)Insert a new bulb (max. 15 Watt) into the socket and rotate it until the two cams of the bulb lock in. Push the bulb into the socket, thereby rotating it in a clockwise direction until it is firmly in place. Replace the sewing lamp cover ana tighten the retaining screw.

MANUAL DE INSTRUCCIONES • INSTRUCTION MANUAL • MANUAL DE INSTRUÇÕES

natural_image
Black-and-white photo of a young boy holding a LEGO building (no visible text or symbols)Special accessories
On the following pages you will find descriptions of all sewing feet available as special accessories to help you to get the best from your 853/854. By using these sewing feet, you can perform various sewing steps in one, thus saving time and ensuring perfect sewing results.
The special accessories can be purchased from your dealer.
| Special accessory | Order No |
| Blindstitch sewing foot | 93-415 506-23/000 |
| Gimp thread sewing foot | 93-415 507-00/000 |
| Elastic tape sewing foot | 93-415 506-21/000 |
| Shirring foot | 93-415 506-20/000 |
| Cording foot | 93-415 506-22/000 |
| Bead sdwing foot | 93-415 506-24/000 |
| Lace sewing foot | 93-415 507-69/000 |
MANUAL DE INSTRUCCIONES • INSTRUCTION MANUAL • MANUAL DE INSTRUÇÕES

MANUAL DE INSTRUCCIONES • INSTRUCTION MANUAL • MANUAL DE INSTRUÇÕES

natural_image
Close-up of a textured surface with a small ruler or measurement tape (no visible text or symbols)Blindstitch foot
The blindstitch foot is ideal for professional sewing of invisible seams on medium-heavy and thick fabrics. The seam is trimmed, serged and "blind" stitched in a single operation.
Setting the machine
Remove the left needle. Set your machine to 3-thread overedge seam (narrow) and select stitch length 4.
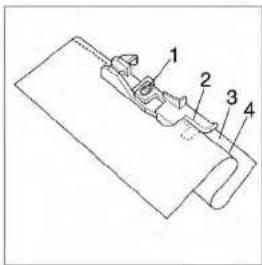
Working:
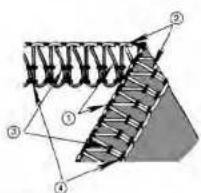
Raise the needle to its uppermost position and insert the blindstitch foot. Fold the seam inwards. Now fold the seam once again outwards so that the edge protrudes approx. 1cm . Position the seam under the sewing foot so that the folded seam part 3 lies beneath edge guide 2. Crease 4 must thereby run along the edge of guide 2.

natural_image
Simple line drawing of a mechanical or electrical component with no text or symbolsLoosen set screw 1 and adjust edge guide 2 so that upon penetration only one thread of the upper fabric is caught by the needle. Sew a test seam.

Gimp sewing foot
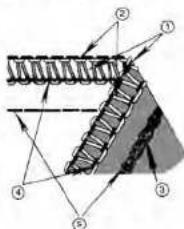
This sewing foot is used for sewing in gimp threads (cords, synthetic threads) up to a thickness of 1.0 mm. It creates a wavelike hem finish in delicate fabrics e.g. for evening dresses and bridal gowns or curtains
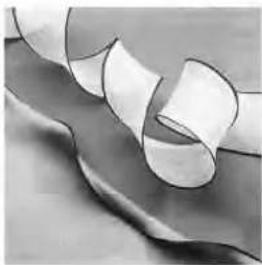
natural_image
Close-up of a metallic ribbon or sheet metal with interlocking bands, no visible text or symbolsSetting the machine
Set your machine to folded 3-thread rolled hem.

Working
Raise the needle to its uppermost position and insert the gimp sawing foot. Insert the gimp thread into guide 1 and pull it through hole 2 into lateral guide 3. Then lay the thread under guides 4 and 5 so that it projects approx, 10cm towards the back. Hold the gimp thread in place with a few stitches, the lay the fabric under the sewing foot and continue sewing (the face side of the fabric should be upwards). Sew a test seam.
Note: The wave effect can be accentuated by setting the differential feed to 0.5 and cutting your workpiece diagonal to the threading.
MANUAL DE INSTRUCCIONES • INSTRUCTION MANUAL • MANUAL DE INSTRUÇÕES

MANUAL DE INSTRUCCIONES • INSTRUCTION MANUAL • MANUAL DE INSTRUÇÕES

natural_image
Close-up of a dark fabric with horizontal striations and a vertical seam on the right side (no text or symbols visible)Elastic tape sewing foot
This sewing foot is used for sewing on elastic tape. In the same operation, the fabric is trimmed and serged, and also gathered by the contracting elastic tape.
Setting the machine
Set your machine to 4-thread overedge seam. The seam width is determined by the width of the elastic tape.
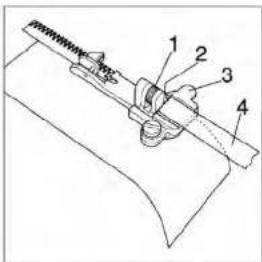
Working
Raise the needle to its uppermost position and insert the elastic tape sewing foot. Loosen screw 1 so that brake 3 at opening 2 is opened by approx. 2mm. Insert elastic tape 4 into opening 2 and pull it beneath the sewing foot so that it protrudes approx. 10 cm behind the latter. Re-tighten screw 1. The more the screw is tightened, the greater the pressure brake 3 exerts on the elastic tape and thus the greater the gather effect. Sew a test seam.

natural_image
Close-up of a dark fabric with visible folds and texture (no text or symbols)The next step is normally to stitch the elastic tape towards the left with one of your machine's elastic (expandable) stitches (see figure).
Sewing on a non-elastic tape prevents stretching of the seams (e.g. shoulder seams) in stretch fabrics.
Loosen screw 1 until the non-elastic tape can pass through opening 2 without hindrance.

Shirring foot
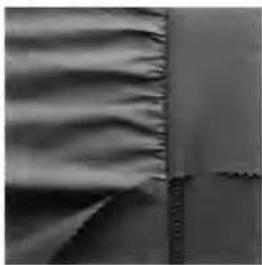
The shining loot enables two fabrics to be sewn together, whereby the bottom ply is automatically gathered. It is ideal for children's wear, as well as attaching gathered valances for curtains, table linen or tiered skirts.
natural_image
Close-up of a textured surface with layered patterns and a vertical seam (no text or symbols visible)Setting the machine
Set your machine to 4-thead overedge seam and the differential feed to 2.

natural_image
Technical line drawing of a mechanical component with spring and base plate (no text or symbols)Working
Raise the needle to its uppermost position and insert the shirring foot. Lift the sewing foot and insert the fabric ply to be shirred (face side up). Insert the second fabric ply (face side down) under the sewing foot to that plate 1 lies between the two plies. Lower the sewing foot and sew the two fabric plies together. Sew a test seam.
Note: The degree of shirring can be changed by adjusting the differential feed.
MANUAL DE INSTRUCCIONES • INSTRUCTION MANUAL • MANUAL DE INSTRUÇÕES

MANUAL DE INSTRUCCIONES • INSTRUCTION MANUAL • MANUAL DE INSTRUÇÕES

natural_image
Black-and-white sketch of a landscape with palm trees and a river, no text or symbols presentCording foot
This sewing foot allows you to sew together two fabric plies, with a cording tape between them, in one operation. Ideal for casual wear, sports bags and upholstery covers.

natural_image
Technical line drawing of a mechanical component with spring and base plate (no text or symbols)Setting the machine
Set your machine to 4-thread overedge seam and seam width 4.5 mm.
Working
Raise the needle to its uppermost position and insert the cording foot. Place the two fabric plies on top of one another (face side to face side) and insert the cording tape between the two plies. Position the workpiece beneath the cording foot, ensuring that the cording (piping) runs through groove 1 in the foot. Sew a test seam.

Bead sewing foot
This sewing foot is used for sewing on beads, sequins, strass bands, lead and ordinary cords.

natural_image
Vertical column of metallic spheres on a dark background (no text or symbols)Setting the machine
Set your machine to 3-thread overedge seam (narrow or wide depending on bea size). Stitch length should be between 3 and 4
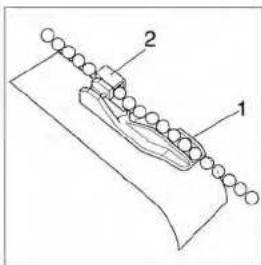
Working
Raise the needle to its uppermost position and insert the bead sewing foot. Insert the string of beads into guide 1 and beneath guide 2 approx. 5 cm behind the sewing foot. Hold the beads in place with a few stitches, then lay the fabric face up under the sewing foot and sew the beads onto the solvage.
natural_image
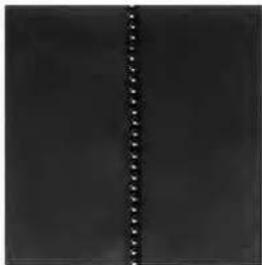
Vertical dotted line on a dark background, no text or symbols presentNoet: For sewing on lead beading, we recommend threading the two overedge loopers with bulk thread and correcting the tension if necessary.
If you wish to sew the beading into the fabric as shown to the left, the needle thread tension must be loose (approx.-5). Lay the material reverse side to reverse side and guide the crease past the upper the while sewing. Pull the fabric apart; the beading is now in top
Sew a test seam.
MANUAL DE INSTRUCCIONES • INSTRUCTION MANUAL • MANUAL DE INSTRUÇÕES


natural_image
Black-and-white floral pattern with lace trim and dot holes, no visible text or symbolsLace sewing foot
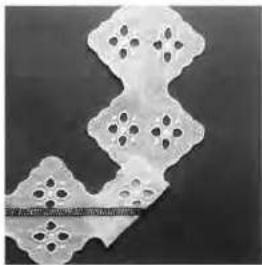
The lace sewing foot enables you to sew lace and wide bands together or onto another workpiece.

Setting the machine
Set your machine to 3-thread overedge seam (narrow) and select a stitch length between 1.5 and 2.0.
Working
Raise the needle to its uppermost position and insert the lace sewing foot. Use the large screwdriver from the accessories to loosen screw 1 and adjust guide 2 so that the needle penetrates the lace as close to the edge as possible. Tighten screw 1. Lay the lace onto the fabric, lace side to face side, at a distance of 1.5 to 2.0 cm (depending on seam allowance) away from the selvedge and sew ti on.
natural_image
Microscopic view of a porous, interconnected biological or material structure with circular voids (no text or symbols visible)When sewing two lace workpieces together, the two halves must be guided flush along edge guide 3.

MANUAL DE INSTRUCCIONES • INSTRUCTION MANUAL • MANUAL DE INSTRUÇÕES
| Thread chart for 2-, 3- and 4-thread overedge seams | ||
| Fabric | Thread | Stitch length |
| Lightweight fabrics:Organdy, light-knit fabric,taffeta, silk, lining fabrics | Cotton No. 50 – 70Synthetic yarn No. 70 –140 | 2.0 – 4.0 mm |
| Medium-heavy fabrics:Cotton, tricol, linen,dress materials | Cotton No. 40 – 60Synthetic yarn No. 70 –140 | 2.0 – 4.0 mm |
| Heavy fabrics:Tweed, suit materials,denim, heavy cloth | Cotton No. 30 – 50Synthetic yarn No. 70 –140 | 2.0 – 4.0 mm |
| Knitwear: | Cotton No. 40 – 60Synthetic yarn No. 70 –140 | 2.0 – 4.0 mm |
| 2 or 3-thread relied hems | Polyester yarn No. 120 – 140Mercerized yarn(bluk thread) | 1.0 – 2.0 mm |
Sewing problems and their solutions
These machines have been developed for ease of operation and no difficult adjustments must be made. Sewing problems of the kind described below may occur due to minor adjustment and operating errors. They can be easily corrected by following the instructions.
| Problem | Cause | Solution |
| Needle breakage | Needle bent or point damagedNeedle not fully insertedMaterial was pulled too firmly | Insert new needle (see page 11).Insert needle correctly (see page 11).Do not pull material during sewing |
| Thread breakage | Incorrectly threadedThread has caughtThread tension too tightNeedle not fully insertedIncorrect needle used | Thread correctly (see pages 12-18).Check whether thread catches at real stand etc.Correct tension (see pages 32-43).Insert needle correctly (see page 11).Use needle system EL X 705. |
| Skipped stitches | Needle bent or point damagedNeedle not fully insertedIncorrect needle usedIncorrectly threaded | Insert new needle (see page 11).Insert needle correctly (see page11).Use needle system EL X 705 Thread correctly (see pages 12-15). |
| Incorrect stitch formation | Incorrect setting of thread tensions | Reset thread tensions (see pages 32-43). |
| The 3- or 4-thread overedge seam has an irregular appearance and the upper loope thread has not interlocked in the seam. | The converter is attached. | Converter must be detached. |
| Problem | Cause | Solution |
| Machine will not operate, although mains switch is on | Power supply interrupted | Close looper cover (see page 9). |
| Fabric not neatly trimmed | Sewing lint between upper and lower knifeLower knife is blunt | Clean knivesReplace lower knife (see page 45). |
| Puckered seams | Thread tension too lightIncorrect setting of differential feedThread has caught due to incorrect threading | Reduce thread tension.Re-adjust diffential feed (see pages 24,25).Thread correctly (see pages 12–18). |
| Workpiece not fed through evenly | Stitches too shortSewing foot pressure too low for heavy fabricsSewing foot pressure to high for lightweight fabrics | Increase stitch length (see page 23).Increase sewing foot pressure (see page 23).Reduce sewing foot pressure (see page 23). |
| Specifications: | |
| Max. Sowing speed | 1200 stitches per minute |
| Seam width | 3 - 6.7 mm |
| Stitch length | F (± 1mm) - 4 mm |
| Sewing foot | clip on |
| Lubrication | manual |
| Sewing foot height | 4.5 mm |
| Overedge stroke | 1.5 mm |
| Needle system | EL X 705, Cat. No. 2020 |
| Needle size | 80/11, 90/14 |
| Number of threads | 2, 3, 4 |
| Dimensions (length × height × width) | 395 × 360 × 375mm |
| Weight | 6.5 kg |
| Contents of cardboard box | |
| 1 machine | |
| 1 foot control | |
| 1 instruction manual/guarantee certificate | |
| 1 lint box | |
| 1 machine cover | |
- SOLID
- overlock 900
- Important safety instructions
- DANGER
- To reduce the risk of electric shock:
- WARNING
- To reduce the risk of burns, fire, electric shock, or injury to persons:
- SAVE THESE INSTRUCTIONS
- PROTECCÃO DO MEIO AMBIENTE
- Para insertar la aguja(s)
- ENHEBRADO DE LA MAQUINA
- COMO CAMBIAR LOS HILOS/METODO DEL NUDO
- ARRASTRE
- COSTURA CON BRAZO LIBRE (TRABAJO EN TUBULAR)
- SOBREORILLADO STANDARD Y PUNTO PARA RIBETEADO ENRROLLADO
- COLOCACION DE LA TENSION SUGERIDA
- 1) Doble Cadeneta
- VARIACIONES DE PUNTADA Y TECNICAS DE COSTURA
- MANTENIMIENTO DE LA MAQUINA
- ACCESORIOS OPCIONALES
- Simple, up-to-date sewing
- Accessory box
- Accessories
- Machine Cover
- OPERATING INSTRUCTIONS
- Notes on safety
- Thread reel change on threaded machine
- Important notice to the chapter "Sewing foot lift"
- Differential feed
- Adjusting the thread tension
- Blindstitch foot
- Setting the machine
- Working:
- Gimp sewing foot
- Working
- Elastic tape sewing foot
- Shirring foot
- Cording foot
- Bead sewing foot
- Lace sewing foot
- Sewing problems and their solutions
Brand : JATA
Model : Solid OL900
Category : Sewing machine