Laureato 80189D52A43452A - Watch Girard-Perregaux - Free user manual and instructions
Find the device manual for free Laureato 80189D52A43452A Girard-Perregaux in PDF.
User questions about Laureato 80189D52A43452A Girard-Perregaux
0 question about this device. Answer the ones you know or ask your own.
Ask a new question about this device
Download the instructions for your Watch in PDF format for free! Find your manual Laureato 80189D52A43452A - Girard-Perregaux and take your electronic device back in hand. On this page are published all the documents necessary for the use of your device. Laureato 80189D52A43452A by Girard-Perregaux.
USER MANUAL Laureato 80189D52A43452A Girard-Perregaux
INDICATEUR JOUR NUIT 28
INDICATEUR DES PHASES DE LUNE 29
BI-RETRO 31
CALENDRIER COMPLET 34
CALENDRIER ANNUEL ET EQUATION DU TEMPS 37
CALENDRIER PERPÉTUEL 40
INDICATEUR JOUR NUIT
Introduction
You are now the proud owner of a Girard-Perregaux watch, and we would like to thank you for your choice.
Our expert watchmakers and craftsmen have mastered all the expertise required to create exceptional pieces, from traditional watchmaking to the latest cutting-edge technologies.
Our uninterrupted history spanning more than two centuries, our dozens of watch patents and our never-ending quest for innovation make our Brand one of the most prestigious names in Swiss Haute Horlogerie.
Our heritage is our most precious asset, and we are proud to count you as one of its guardians.
We invite you to consult the user guide and hope you enjoy your Girard-Perregaux watch.

INTERNATIONAL WARRANTY
The international warranty below is applicable to all Girard-Perregaux watches sold by Girard-Perregaux brand authorized dealers and submitted for repair or inspection under warranty in all countries.
Only Girard-Perregaux authorized Repair Centers are authorized to provide the service set out by the international warranty, in accordance with Girard-Perregaux's instructions. Any service, repairs or other operations on your watch not performed by a Girard-Perregaux authorized Repair Center shall render the international warranty void.
We guarantee your watch against any lack of conformity and against any defect due to the materials used for a period of two years from the purchase date. If during this period your timepiece were to exhibit one of these defects, we are committed to repairing it free of charge. Once the warranty period has expired, repairs will be invoiced for parts and labor.
To be entitled to this warranty, you must submit a copy of the warranty certificate, properly completed, dated, stamped and signed by an authorized dealer or distributor. You are therefore advised to keep the Girard-Perregaux international warranty certificate safe, as it is the only document validating the warranty.
If need be, we recommend giving the watch to be inspected or repaired to one of our exclusive distributors or authorized dealers, who will send it to our nearest authorized Repair Center. You can also send your watch directly to one of our authorized Repair Centers.
If posting your watch, we recommend packaging it very carefully and sending by secure mail, to prevent any incident in transit.
Girard-Perregaux can under no circumstances guarantee the authenticity of Girard-Perregaux products acquired outside its official distribution and authorized dealer network.
This warranty entitles you to specific aforementioned rights, which may be supplemented by other rights varying between countries.
The warranty does not cover:
Battery, leather, rubber and fabric straps;
The consequences of wear and normal aging of the watch (in particular scratches, scoring, etc.);
Damage caused deliberately, or resulting from incorrect handling, negligence or an accident;
Damage resulting from abnormal use or misuse (in particular impacts or crushing);
Watches with the identification number or any other identification mark deliberately removed or altered;
Loss and theft;
Damage caused by natural events such as fire, natural catastrophes and acts of war;
Any defect resulting from the addition of one or more accessories not issued from the manufacture Girard-Perregaux will automatically lead to the end of the warranty.

PRECAUTIONS FOR USE AND CARE
Your watch has been manufactured with the greatest care, and will provide years of service if you take the following precautions:
1. Precautions for use and care
- Never activate the crown or push buttons of your watch in water. If your watch has a screw-down crown, make sure that it never comes into contact with water when its crown is unscrewed:
Avoid thermal shocks and exposing your watch to extreme temperatures, below 0^ or above 60^ (sauna, baths, etc.); - Never use corrosive or chemical products to clean your watch;
- Avoid contact with certain chemical substances (petrol, thinners, perfumes, cleaning products, glues, paints, etc.), to prevent any damage to your watch and its leather strap;
Avoid exposing your watch to a powerful magnetic field (magnets, loudspeaker, etc.); - Avoid violent impacts;
Avoid leaving your watch immobile for long periods of time. Only regular wear prevents the oils contained in the movement from congealing; - Never attempt to open the case of your watch yourself;
- Rinse your watch with fresh water after bathing in the sea; avoid bathing with a leather strap to prevent accelerated wear.
2. Maintenance service
Therefore, to ensure that your watch continues, after years of use, to provide the accuracy you can rightly expect, Girard-Perregaux recommends entrusting your watch to one of its authorized Repair Centers every 2 to 3 years for the necessary inspections.
WATER-RESISTANCE PRECAUTIONS
Your watch has undergone numerous water-resistance tests in our workshops, depending on the required protection level, to ensure you can enjoy the following activities:
| ACTIVITIES / DEGREE OF WATER-RESISTANCE | 3 atm - 3 bar 30 m - 100 ft | 5 atm - 5 bar 50 m - 165 ft | 10 atm - 10 bar 100 m - 330 ft | 50 atm - 50 bar 500 m - 1650 ft |
| Rain, splashing | yes | yes | yes | yes |
| Shower, bath, surface water sports | no | yes | yes | yes |
| Swimming, snorkeling | no | no | yes | yes |
| Scuba diving | no | no | no | yes |

1. Water-resistance precautions
Your watch has been rigorously checked and will retain its water-resistance if you take the following precautions:
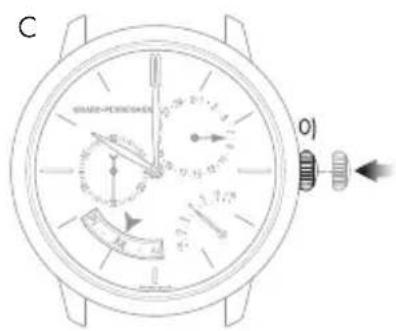
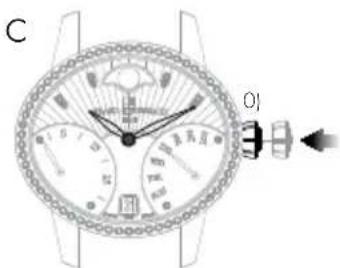
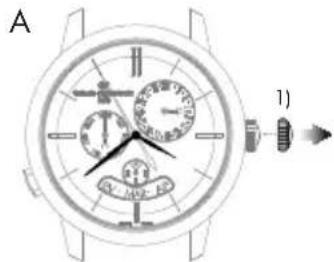
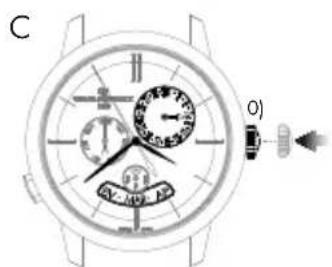
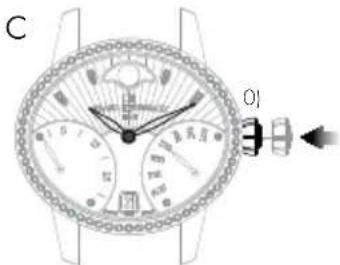
- Ensure that the crown and the push buttons on your watch are in their initial position - position 0 - to prevent any damage to the mechanism. To do this, press the crown against the case.
If your watch is equipped with a screw-down crown, ensure that it is locked after any adjustment and before use in an aquatic environment. To do this, screw the crown in a clockwise direction, whilst keeping it pressed against the case of your watch. - Never activate the crown or push buttons of your watch under water, if the watch is in contact with water or when it is wet.
2. Water-resistance test
The water-resistance of your watch is ensured by a sophisticated system of seals. These are subject to the damaging effects of a range of external factors (perspiration, changes in temperature, ultraviolet rays, salt or chlorinated water, dust, etc.). For this reason, and to ensure the seals can carry out their role perfectly, Girard-Perregaux recommends entrusting your watch to one of its authorized Girard-Perregaux Repair Centers every 2 to 3 years for the necessary water-resistance inspections.
USERGUIDE
SETTINGS
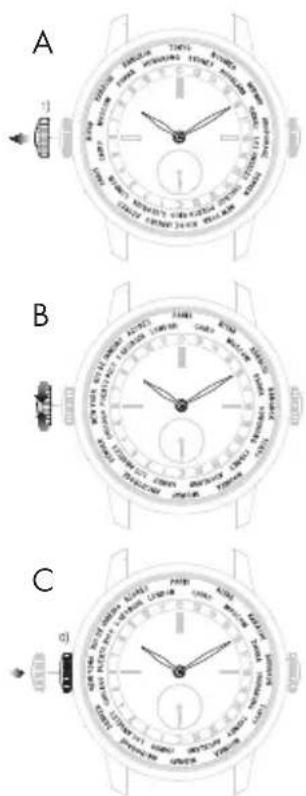
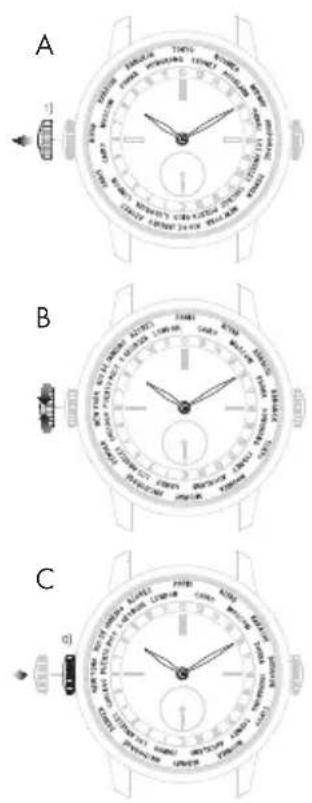
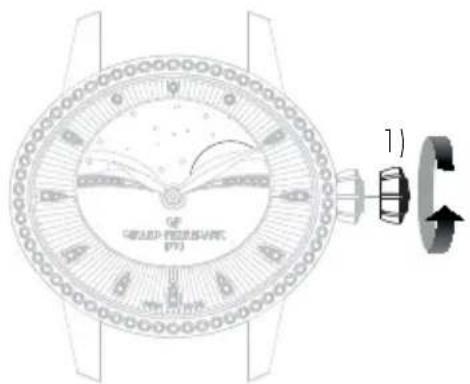
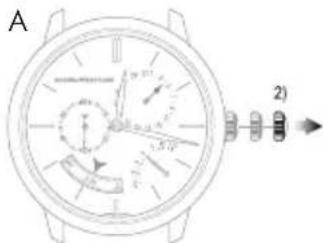
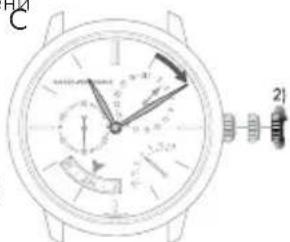
CROWN
Introduction
The crown is a component allowing the adjustment of different watch functions, such as setting the time, manual winding and on certain models, setting the day or the date.
Simple crown
Setting
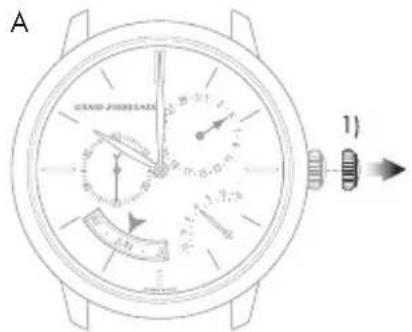
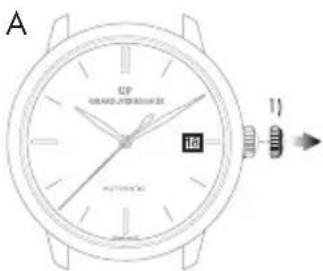
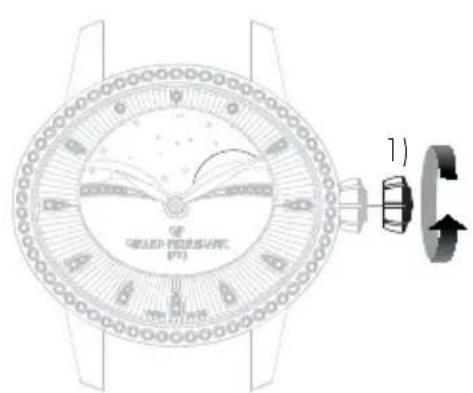
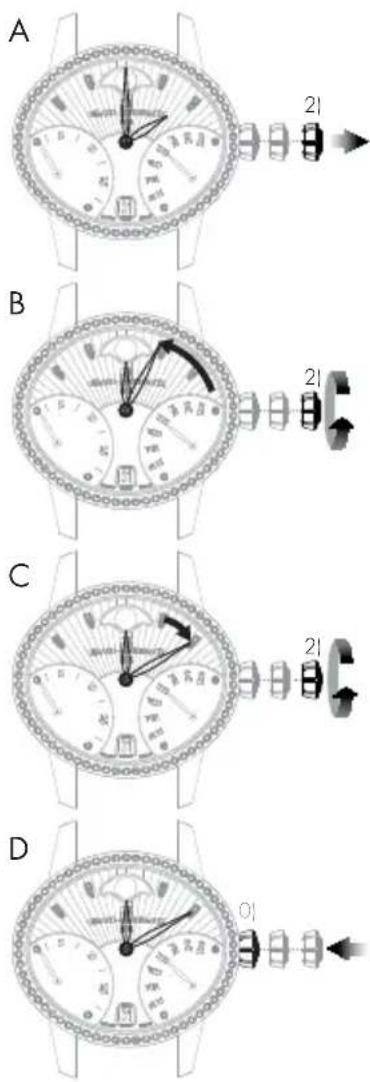
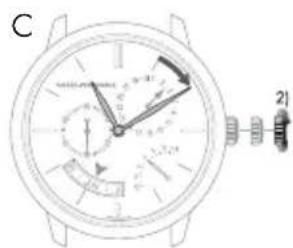
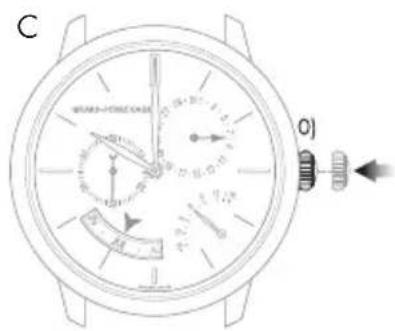
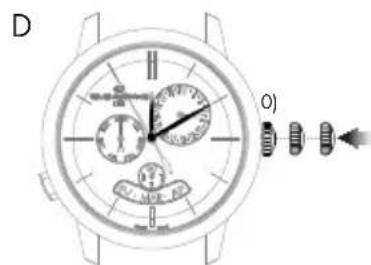
A. Pull out the crown to go on to different settings.
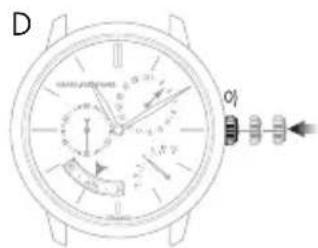
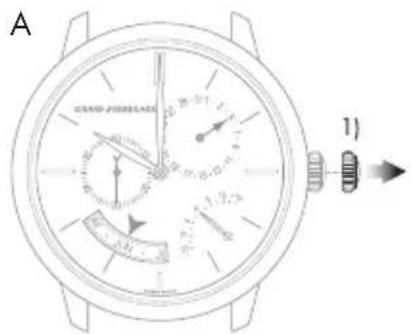
B. To assure its water-resistance, it is important that the crown is pushed back into position O) once you have finished using it. To do this, press the crown against the case as illustrated opposite.
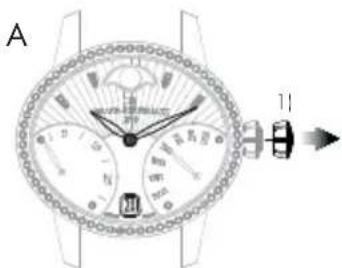
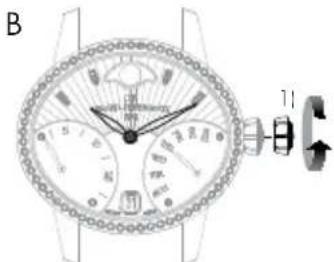
Screw-down crown
The screw-down crown ensures perfect water-resistance to the depth for which the model was designed.
Setting
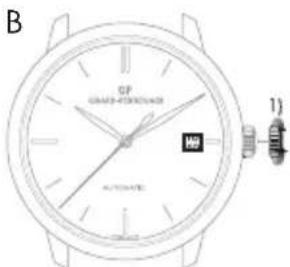
A. Unscrew the crown to go on to different settings. To do this, turn the crown counterclockwise.
B. To assure its water-resistance, it is important that the crown is pushed back into position 0) once you have finished using it. To do this, screw the crown in clockwise while pressing it against the case, as illustrated opposite.

WINDING
Introduction
Winding allows the movement to store up the energy necessary for your watch to function well.
Mechanical movements manufactured and produced at the manufacture Girard-Perregaux can be manual or automatic depending on the model of your watch.
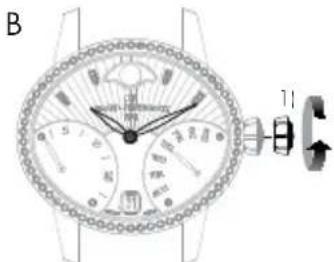
Manual winding mechanical movement
This type of movement means that to function normally, your watch needs to be regularly wound. Depending on the model and the power reserve of your watch, it can go between 30 to 60 hours between two windings.
Setting
To wind your watch, turn the crown clockwise when it is in position O) or O') when it is a screw-down crown. As soon as it starts to resist, it means the mechanism is sufficiently wound.
Warning: Do not force if the resistance increases, the movement mechanism could be damaged.
Automatic mechanical movement
This term means that your watch automatically stores up energy as you wear it on your wrist. Indeed, your daily movement allows the oscillating mass to carry out rotating movements which, thanks to a clockwork system, reproduce an energy to the movement and allows it to automatically wind itself. Daily wear is enough to assure the power reserve necessary for your watch to function well without it being necessary to wind it.
If your watch has not been worn for several consecutive days, it has to be manually wound. To do this, please refer to the paragraph above 'Manual winding mechanical movement'.
Quartz movement
Quartz watches are battery-powered and do not need to be wound. The battery must be replaced periodically, approximately every 2 years. To have the battery replaced, contact an approved Girard-Perregaux Repair Centre.

Recycling
New or spent batteries must not be disposed of with household waste. These components must be taken to a collection point specifically designed for recycling electrical and electronic equipment and batteries. By ensuring that these products are correctly and appropriately disposed of, you are helping to prevent any potentially harmful effects on the environment and on human health. Recycling materials will help protect natural resources.
| Part Name | Hazardous Substances | |||||
| Lead (Pb) | Mercury (Hg) | Cadmium (Cd) | Hexavalent Chromium (Cr (VI)) | Polybrominated biphenyls (PBB) | Polybrominated diphenyl ethers (PBDE) | |
| Brass components (main plate and bridges) | X | O | O | O | O | |
0

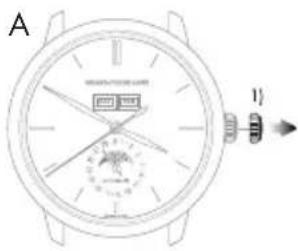
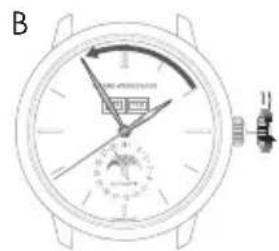
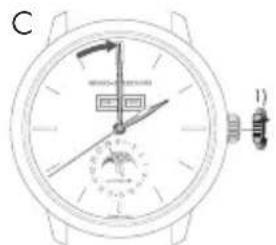
PRACTICAL FUNCTIONS
HOUR AND MINUTE
Introduction
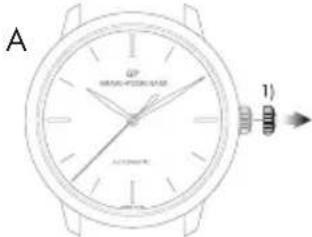
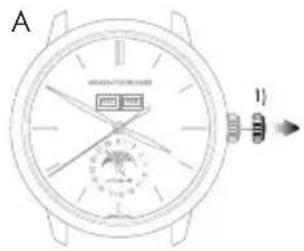
Setting the time of your watch is completed via the crown. This could be in two or three positions, depending on the model of your watch.
2 position crown
3 position crown
0) Movement manual winding position (crown not pulled out).
1) Time setting position (crown pulled out).
0) Movement manual winding position (crown not pulled out).
1) Date setting position (crown half pulled out).
2) Time setting position (crown fully pulled out).

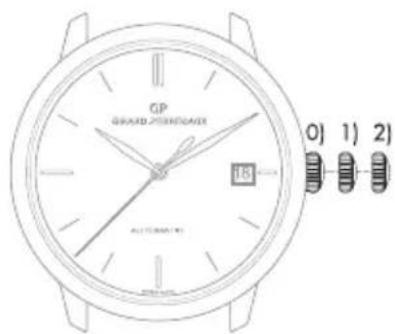
If your watch has a date indicator, make sure that the hands are in the date change position, i.e. at midnight rather than midday. Use midnight as a reference for the date and day change to ensure you are positioned at the right time of day.
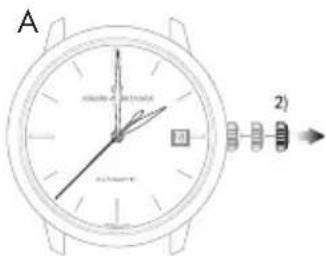
Setting
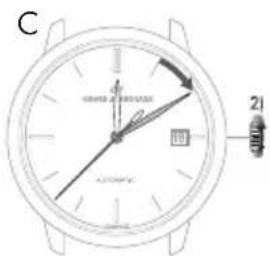
A. Pull your crown out to the time setting position. On watches with a seconds indicator, the seconds hand will stop.
B. Turn your crown clockwise so as to indicate the selected time minus 5 minutes.
C. Slowly move the minute hand forward clockwise, stopping it exactly at the selected minute.
D. At the desired time, push the crown back against the case, in position 0). The watch will restart immediately.
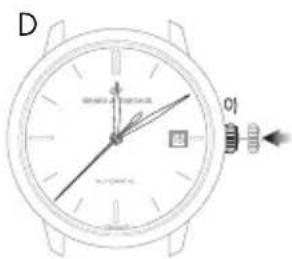
Warning: After making any setting, always return the crown to its original position against the case, in position 0), to preserve the water-resistance of your watch and prevent any damage to the mechanism. To do so, refer to the chapter "Crown".

Retrograde display
The retrograde hour and minute hands move from 6 to 6 o'clock (left to right) and from 0 to 60 minutes (left to right) respectively, before returning immediately to their starting point and beginning their journey once more.
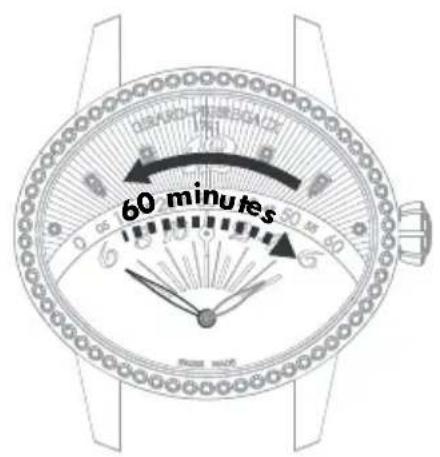
Hour hand Minute hand
Setting
A. Pull your crown out to the time setting position.
B. Rotate the crown until the required time, less 5 minutes, is displayed.
C. Slowly move the minute hand forward clockwise, stopping it exactly at the selected minute.
D. At the desired time, push the crown back against the case, in position O). The watch will restart immediately.
Warning: After making any setting, always return the crown to its original position against the case, in position 0), to preserve the water-resistance of your watch and prevent any damage to the mechanism. To do so, refer to the chapter "Crown".

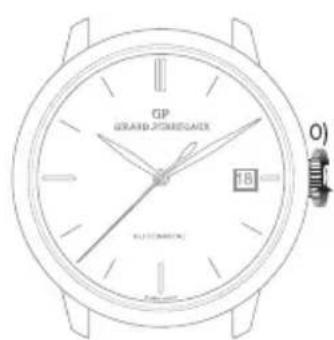
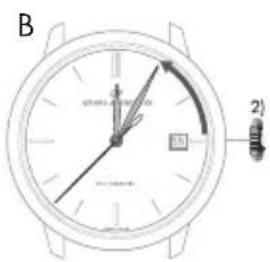
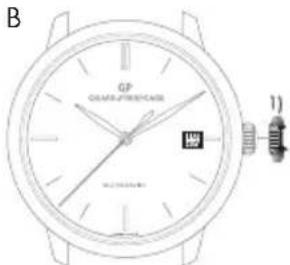
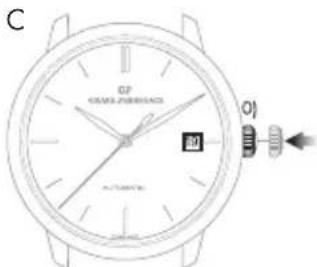
DATE
Introduction
The date indication shows the number of the day in the month.
This function enables rapid date setting for your watch without altering the time. The indication of the date is synchronized with the hour and minute hands. In any case, you need to correct the date display for any month not lasting 31 days, for a single date.
Warning: Do not perform this operation between 8 PM and 8 AM as the date change mechanism is engaged, and the mechanism could become damaged.
Setting
Window display date
A.Pull out the crown of your watch into the date setting position, in position 1).
B. Turn the crown clockwise until the desired date appears in the window. According to the model, the crown may be turned in the opposite direction.
C. At the desired date, push the crown back against the case, in position 0).
Warning: After making any setting, always return the crown to its original position against the case, in position 0), to preserve the water-resistance of your watch and prevent any damage to the mechanism. To do so, refer to chapter "Crown".
Hand display date
If your watch has a hand display date, you can correct it via the corrector, found on the case of your watch.

Press on the corrector, with the help of the little tool delivered with your watch, until the date hand indicates the desired date. One press on the corrector corresponds to one day forward.

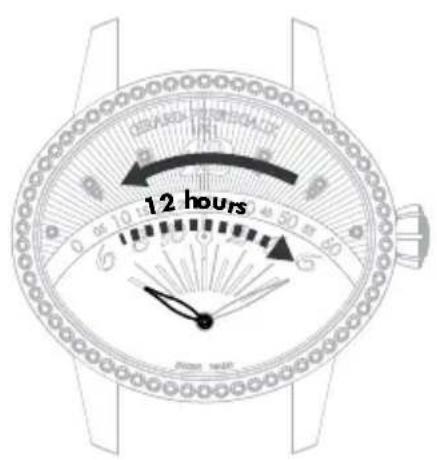
POWER RESERVE INDICATOR
Introduction
This indicator allows you to know the status of your watch power in real time, or how long your watch can work for before it will need to be wound again.
Reading
The power reserve status of your watch is indicated by a little hand moving along a graded arc.
Setting
The power reserve indicator is synchronized with the movement, so it does not need to be set.
Stop soon Full
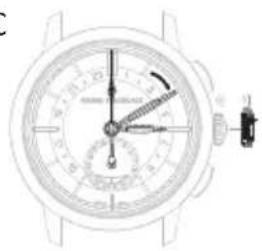
SECOND TIME ZONE
Introduction
This function, which is highly valued by travellers, is used to display two time zones simultaneously: The reference time or «home time», and the local time.
Reading
The reference time («home time») is displayed on the central 24-hour graduated disc. As usual, the local time is read on the external graduated scale.
Setting
Reference time («home time») hours and minutes
Before every setting, make sure the position of the hands corresponds to the date changing at midnight and not at midday. Use midnight as an approximate reference for the date jump to ensure you are positioned at the right time of day.
Warning: The date hand only follows the local hour hand (set using the push Buttons at 2 o'clock and 4 o'clock).
A. Pull the crown of your watch out to the time setting position, in position 1). The seconds hand will stop.
B. Turn the crown clockwise so as to indicate the selected time minus 5 minutes. This setting simultaneously moves the reference (‘home time’) hour and minute hands and the local hour hand.

C. Slowly move the minute hand forward in a clockwise direction, stopping it exactly at the selected minute.
D. At the desired time, push the crown back against the case, in position 0); the watch will restart immediately.
Warning: After making any setting, always return the crown to its original position against the case, in position 0), to preserve the water-resistance of your watch and prevent any damage to the mechanism. To do so, refer to chapter "Crown".
Date change by hand
Press on the corrector a) located at 8 o'clock using the small tool supplied with your watch, until the date hand indicates the desired date. One press on the corrector corresponds to one day forward.
Warning: Between 11PM and midnight, a date correction using corrector a) will only enable the date to be moved forward by one day. However, this action will not damage your mechanism.
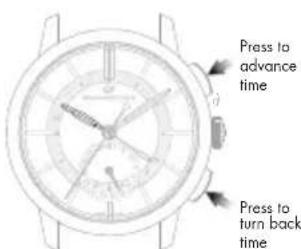
Second time zone (local time)
The push Buttons located at 2 o'clock and 4 o'clock can be used to move the second time zone hour hand forwards or backwards (local time). Press once to move the time forwards or backwards one hour.
C
D

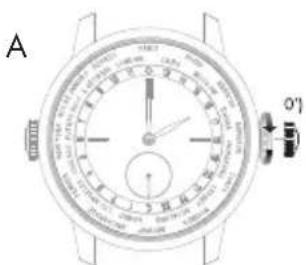
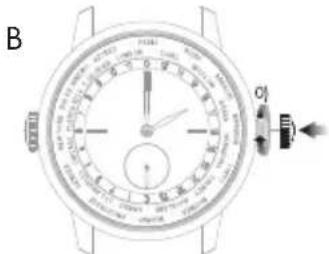
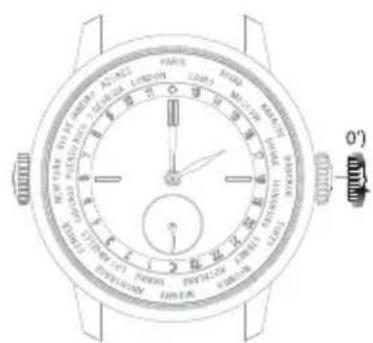
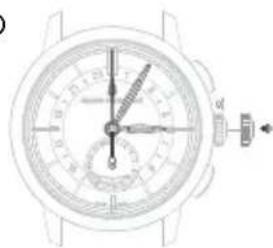
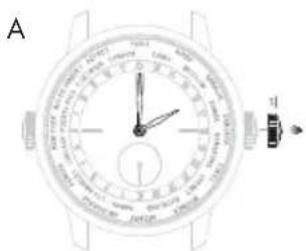
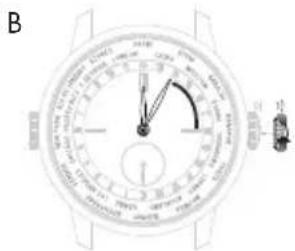
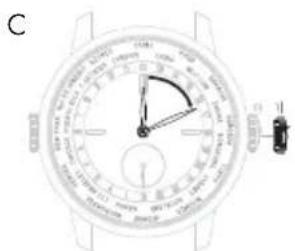
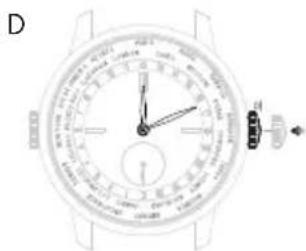
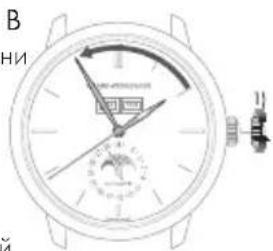
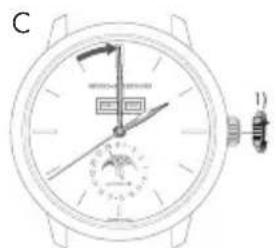
WORLD TIME INDICATOR
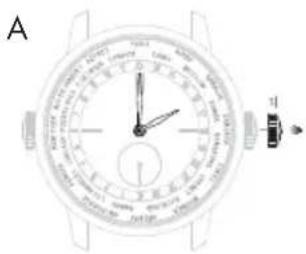
Introduction
This function tells you the local time in 24 of the world's major cities, at the same time as your own. The rim of your watch's dial is equipped with a "24 hour" rotating disc synchronised with the hour hand, and a second rotating disc bearing the names of these cities. The time in each time zone can be read on the 24 hour disc opposite the corresponding reference city.
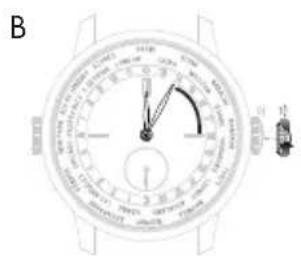
Setting
Hour and minute
A. Unscrew and pull out the watch crown to the time-setting position, in position 1). The seconds hand will stop.
B. Rotate the crown until the required time, less 5 minutes, is displayed.
C. Slowly move the minute hand forward clockwise, stopping it exactly at the selected minute.
D. At the desired time, screw the crown back against the case, in position O); the watch will restart immediately.

Warning: After making any setting, always screw the crown back into its original position against the case, in position 0), to preserve the water resistance of your watch and prevent any damage to the mechanism.
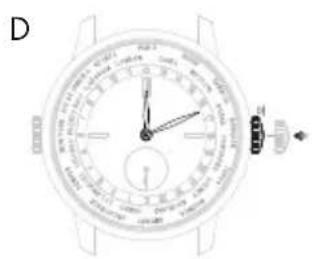
Note that the "24 hour" disc is synchronised with the hour and minute hands. It does not need to be set.

City ring
A. Unscrew the crown at 9 o'clock in position 1).
B. Turn the crown to 12 o'clock for the city corresponding to the time zone of your location.
C. When the desired time zone is correctly set to 12 o'clock, screw the crown back against the case, in position O).
Warning: After making any setting, always screw the crown back into its original position against the case, in position 0), to preserve the water-resistance of your watch and prevent any damage to the mechanism.
Winter time / Summer time
The summer time system was adopted by certain countries for energy saving purposes. It consists of adding one hour to the legal time during the summer months.
The 1966 WW.TC watch does not take the summer time change into account, because it is not adopted by all countries (Japan, China, Taiwan, etc.). So a difference of one hour should be taken into account during this period.
24 time zones
The twenty-four time zones, each covering 15^ longitude (i.e. an hour each) and with the Greenwich Meridian as the origin, form the basis for Universal Time measurement (UT). While the hour indication depends on the time zone, the minute indication, unlike local time, is the same regardless of the zone.
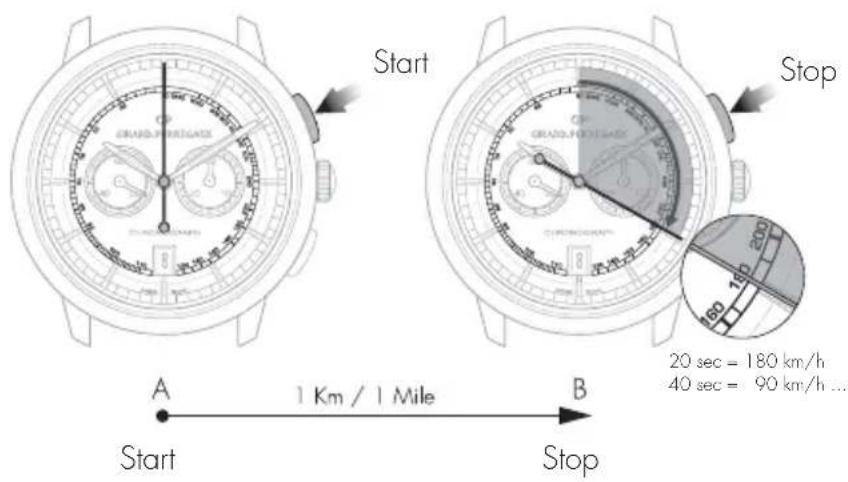
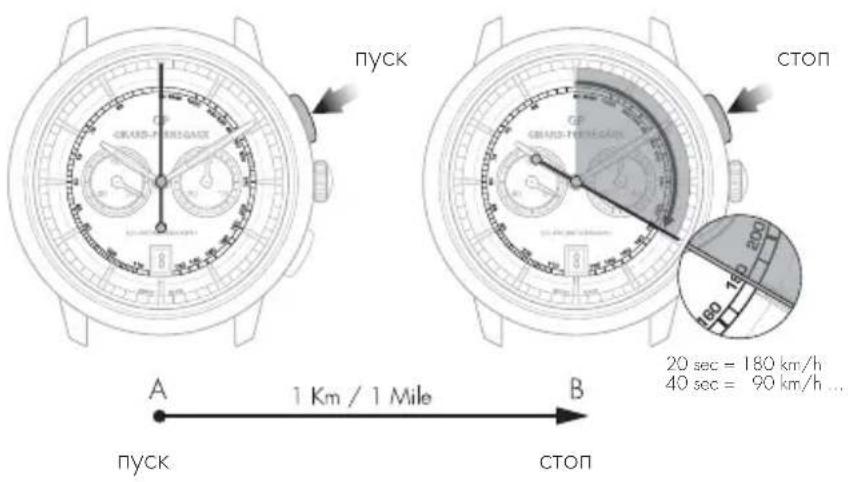
TACHOMETRIC SCALE
Introduction
This function measures an average speed over a given distance.
Reading
Let us take a road with 2 markers A and B set one kilometer (or mile) apart. Start your chronograph as your car passes marker A, then stop it as it passes marker B. Then read the average speed in kilometers/hour or miles/hour on the tachometer scale at the tip of the chronograph center seconds hand.

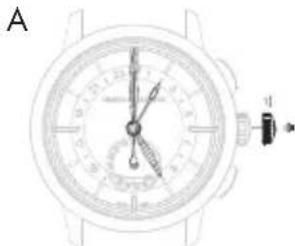
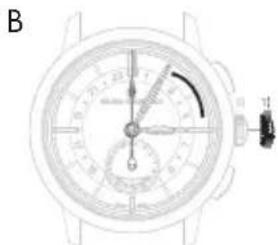
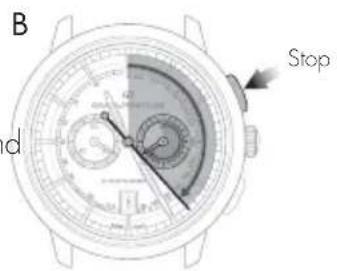
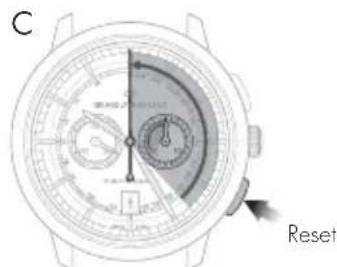
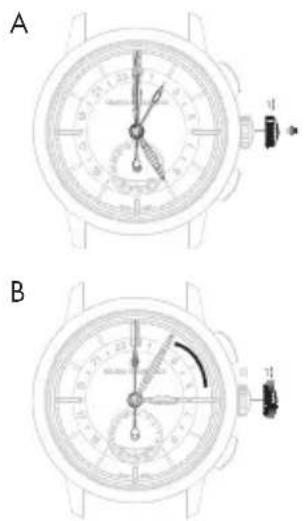
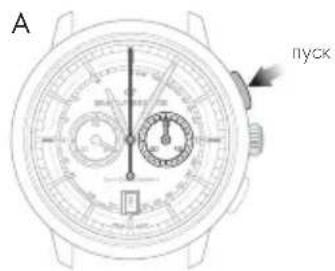
CHRONOGRAPH
Introduction
The chronograph seconds are displayed by a large center hand. The minute, and possibly the hour, are generally displayed by 1 or 2 small counters.
The seconds hand and the counters are interconnected.
On certain models, minute timing may also be indicated by a center hand pointing to the dial's graduated rim.
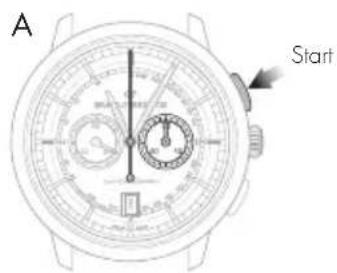
Setting
A. Press your watch's push button at 2 o'clock: The center seconds hand will start.
B. Press the same push button at 2 o'clock again: the center seconds hand will stop.
C. Press your watch's push-button at 4 o'clock: The center seconds and the counter hands will return to zero.
Warning: While the second hand is working, never reset to zero to prevent damage to the mechanism. Always check the second hand has stopped before resetting to zero.
ASTRONOMIC FUNCTIONS
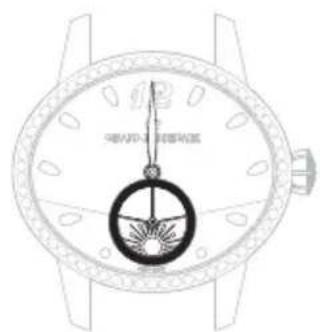
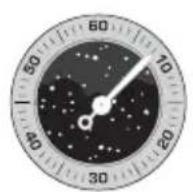
DAY/NIGHT INDICATOR
Introduction
The day/night indicator uses a system of discs representing the sun and moon to indicate whether it is day or night. The special window depicts the night sky, in which the shape of the moon and sun changes as the day advances.
Reading
When setting the time, take into account the day/night indication, as this is synchronised with the hour and minute indications. For example, at midnight, the moon should appear at 6 o'clock, while at midday the sun should appear at 6 o'clock.
Midday Midnight

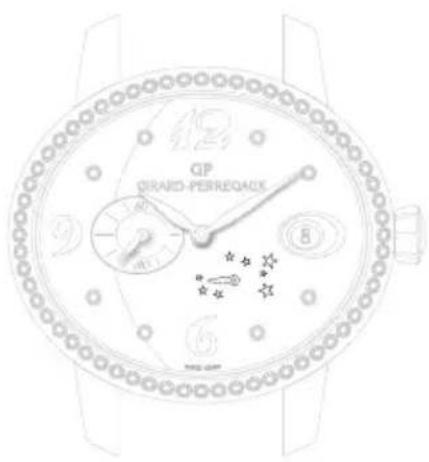
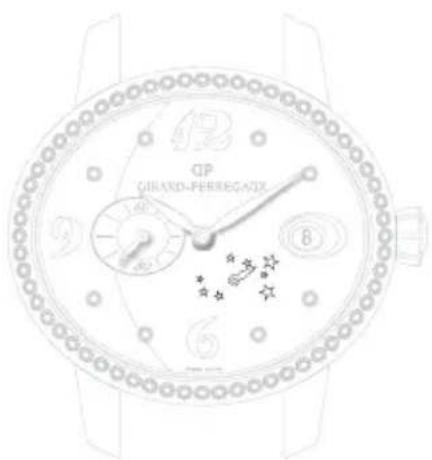
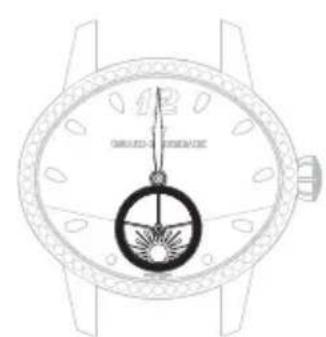
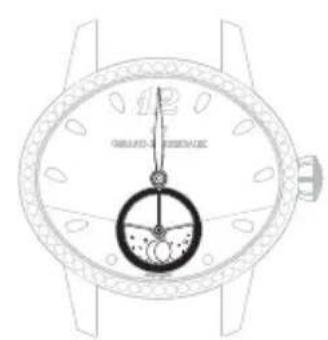
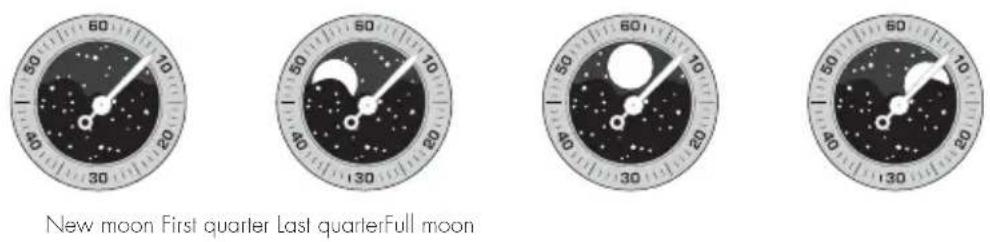
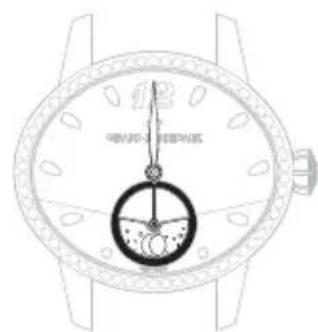
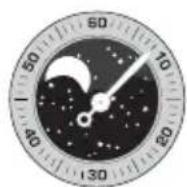
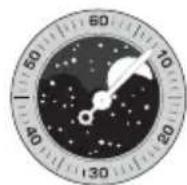
MOON PHASES INDICATOR
Introduction
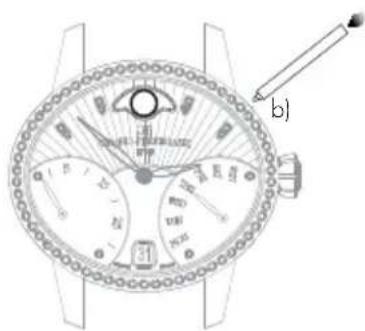
Moon phases indication allows the reproduction of the moon cycle (new moon, first quarter, full moon, final quarter) by means of a disc or a window. The moon phases indicator offers a representation of the sky in which the form of the moon is shown at its different stages throughout the lunar month.
Reading
A disc, with two moons placed in a starry sky, turns in a window.
At the start of each moon phase, one of the two moons appears in the left-hand section of the window; it initially appears as a slim crescent, emerging from behind the rounded edge, then gradually grows over the course of the days.
In the middle of the lunar month, the moon appears in the middle of the window in its full form. It then starts to gradually disappear behind the second rounded cover on the right.
Setting
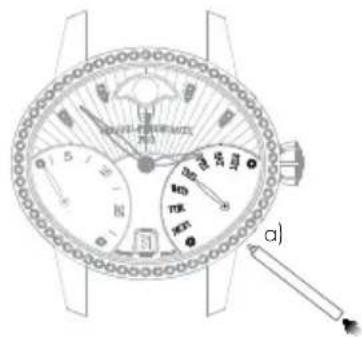
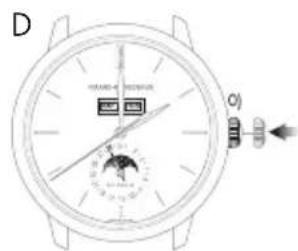
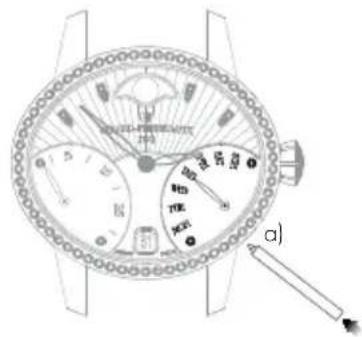
For watches with a corrector, press on the corrector a), using the little tool supplied with your watch, until the desired moon phase is displayed. One press on the corrector corresponds to one day forward.
Warning: Do not correct the moon phases indicator when the mechanism changing the date is engaged, between 3 PM and 3 AM, as this could damage the mechanism. To be sure, use midnight as a reference for the date and day change to ensure you are positioned at the right time of day.
For watches without a corrector, pull the crown into position 1) and turn it clockwise until the desired moon phase is displayed.
Warning: After making any setting, always return the crown to its original position against the case, in position 0), to preserve the water-resistance of your watch and prevent any damage to the mechanism. To do so, refer to the chapter entitled "Crown".

*Corrector with variable position according to the model

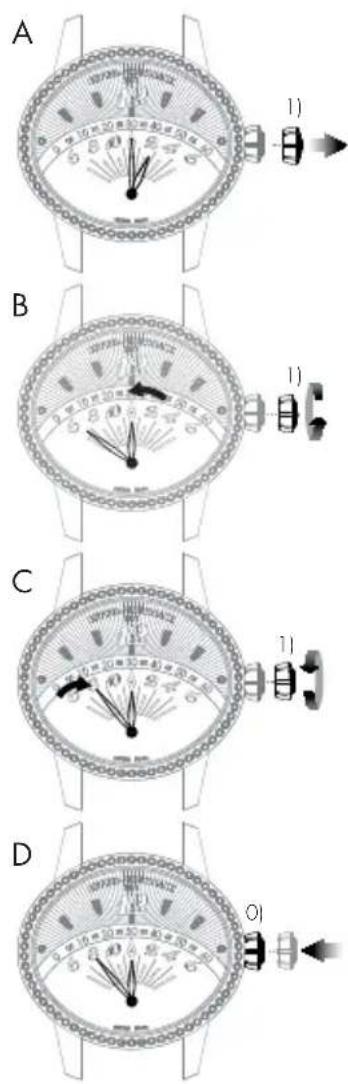
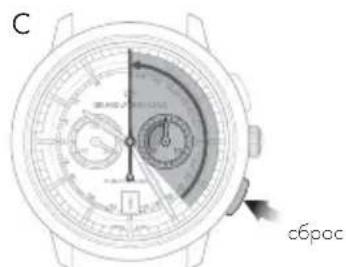
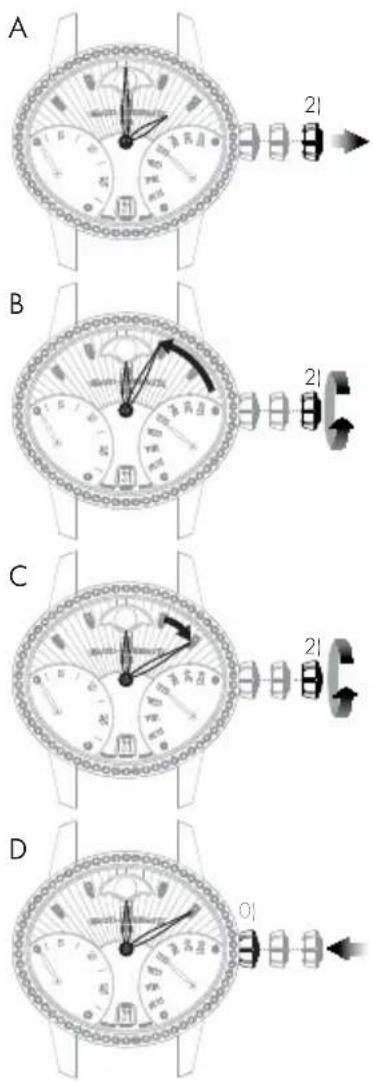
BI-RETRO
Introduction
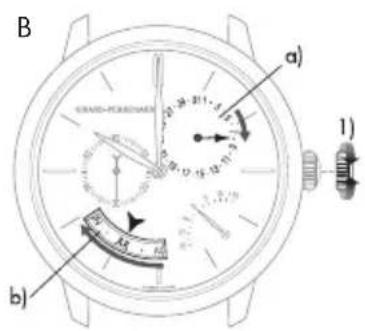
The retrograde seconds and day of the week hands move from 0 to 30 (up to down) and from MON to SUN (down to up) respectively before returning immediately to their starting point and beginning their journey once more.
Setting
Hour and minute
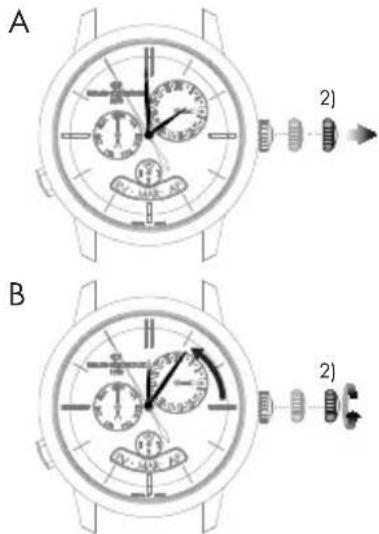
A. Pull out the crown of your watch into the hour setting position, in position 2).
B. Rotate the crown until the required time, less 5 minutes, is displayed.
C. Slowly move the minute hand forward clockwise, stopping it exactly at the selected minute.
D. At the desired time, push the crown back against the case, in position 0). The watch will restart immediately.
Warning: After making any setting, always return the crown to its original position against the case, in position 0), to preserve the water-resistance of your watch and prevent any damage to the mechanism. To do so, refer to the chapter "Crown".

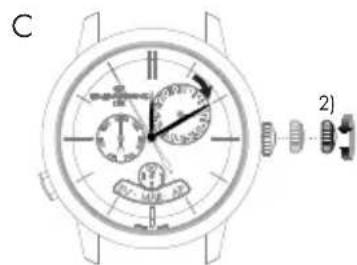
Date
A.Pull out the crown of your watch into the date setting position, in position 1].
B. Turn the crown clockwise until the desired date appears in the window.
C. At the desired date, push the crown back against the case, in position 0].
Warning: After making any setting, always return the crown to its original position against the case, in position 0), to preserve the water-resistance of your watch and prevent any damage to the mechanism. To do so, refer to chapter "Crown".

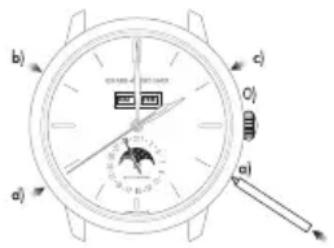
Day of the week
The day can be corrected by pressing on the corrector a), positioned at 4.30, using a small tool delivered with your watch. One press on the corrector corresponds to one day forward.
Warning: Do not change the day of the week between 19:00 and 1:00, when the date-change mechanism is being activated, as this could damage the movement.
Moon phases
Press corrector b), positioned at 14.30, using the small tool supplied with your watch, until the desired moon phase is displayed. One press on the corrector corresponds to one day forward.
Warning: Do not correct the moon phase indicator between 7:00 PM and 1:00 AM, when the date-change mechanism is being activated, as this could damage the movement. To be sure, use midnight as a reference for the date and day change to ensure you are positioned at the right time of day.
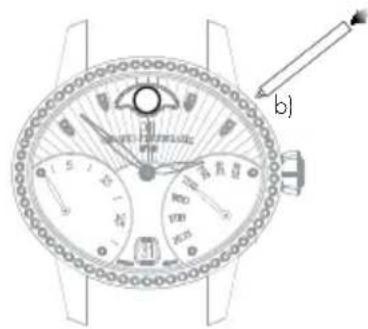
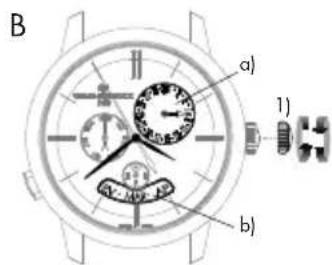
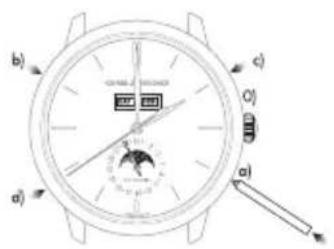
FULLCALENDAR
Introduction
As well as showing the hours and the minutes, the watchmaking complication "Full calendar" also clearly displays the date, the day of the week, the month and indicates moon phases.
Warning: Do not correct the calendar or the moon phases indicator when the mechanism changing the date is engaged, between 3 PM and 8 PM, as this could damage the mechanism. To be sure, use midnight as a reference for the date and day change to ensure you are positioned at the right time of day.

Setting
Hour and minute
Before every setting, make sure the position of the hands corresponds to the date changing at midnight and not at midday. To be sure, use midnight as a reference for the date and day change to ensure you are positioned at the right time of day.
A. Pull your crown out to the time setting position, in position 1). The seconds hand will stop.
B. Turn your crown clockwise so as to indicate the selected time minus 5 minutes.
C. Slowly move the minute hand forward clockwise, stopping it exactly at the selected minute.
D. At the desired time, push the crown back against the case, in position O1. The watch will restart immediately.
Warning: After making any setting, always return the crown to its original position against the case, in position 0), to preserve the water-resistance of your watch and prevent any damage to the mechanism. To do so, refer to the chapter "Crown".
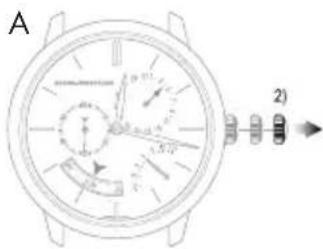
Date change by hand
Press on the corrector a) located at 4 o'clock using the small tool supplied with your watch, until the date hand indicates the desired date. One press on the corrector corresponds to one day forward.
Warning: Going from the 31^st to the 1^st leads to a change in the month indicated (continuing to the next month).
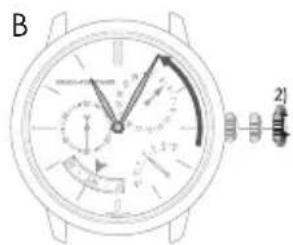
Day of the week
Press on the corrector b) (located at 10 o'clock) using a small tool delivered with your watch, until the desired day of the week appears in the window.
Month
Press on the corrector c) (located at 2 o'clock) using a small tool delivered with your watch, until the desired month appears in the window.
Warning: Do not perform this operation if the date or calendar display is between the 30^th and the 2^nd , as the month change mechanism is engaged, as you risk damaging the mechanism.
Moon phases
Press on the corrector d) (located at 8 o'clock) using a small tool delivered with your watch, until the desired moon phase appears. One press on the corrector corresponds to one day forward.

ANNUALCALENDAR AND EQUATION OF TIME
Introduction
Unlike a conventional calendar mechanism, your annual calendar only requires date correction for February in non-leap years, i.e. 3 corrections in total in a 4-year cycle.
Setting
Hour and minute
Before every setting, make sure the position of the hands corresponds to the date changing at midnight and not at midday. Use midnight as an approximate reference for the date jump to ensure you are positioned at the right time of day.
A. Pull out the crown of your watch into the hour setting position, in position 2). The seconds hand will stop.
B. Turn your crown clockwise so as to indicate the selected time minus 5 minutes.
C. Slowly move the minute hand forward, stopping it exactly at the selected minute.
D. At the desired time, push the crown back against the case, in position 0); the watch will restart immediately.
Warning: After making any setting, always return the crown to its original position against the case, in position 0), to preserve the water-resistance of your watch and prevent any damage to the mechanism. To do so, refer to the chapter "Crown".
Date and month
Warning: Before making any correction, ensure that the time display is between 9:30 AM and 8:30 PM. Outside this range, any rotation of the stem in position 1) will have no effect. Use midnight as a reference for the date and day change to ensure you are positioned at the right time of day.
A. Turn the crown of your watch into the date setting position, in position 1).
B. Turn the crown until the day hand a) indicates the desired date. The crown can be turned in both directions. The month disc b) is synchronized with the date hand, so it does not need to be changed.
C. At the desired date, push the crown back against the case, in position 0); the watch will restart immediately.
Warning: After making any setting, always return the crown to its original position against the case, in position 0), to preserve the water-resistance of your watch and prevent any damage to the mechanism. To do so, refer to chapter "Crown".
Warning: For months with 30 days, the date takes approximately 4 hours 30 minutes to jump to the first day of the next month, passing through the 31^st . For February, the date takes approximately 7 hours 30 minutes to jump to the March 1^st , passing through the 30^th and 31^st .


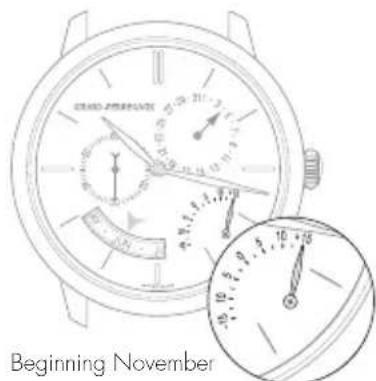
Equation of time
Introduction
The Earth's orbit around the sun is not perfectly circular. As with most of the celestial bodies in our solar system, its trajectory is elliptical. In addition, the Earth's axis is tilted in relation to the orbit's plane. A consequence of this irregular trajectory is that the length of the solar day - the interval between the times at which the sun twice passes the meridian at a given location - varies according to the season. The 24-hour day used for civil time is calculated using the average duration of the solar day.
Reading
The equation of time function indicates the difference between the mean time and the solar time. This difference is indicated by a little hand which moves along a graduated arc. It can extend to between approximately +14 and -16 minutes for certain dates at the start of February and November respectively.
Setting
The equation of time indicator is synchronized with the calendar readings, and therefore does not require adjustment.

PERPETUALCALENDAR
Introduction
The perpetual calendar indicates the date, day and month, taking into account the different lengths of the months in the Gregorian calendar, including leap years. Its "mechanical memory" therefore counts 1461 days, or four years.
Please note that this type of mechanism cannot take non-standard common years into account (years which are not leap years as they can be divided by 100 but not by 400, such as 2100).
Setting
Before making any correction, ensure that the time display is between 1:00 PM and 8:30 PM. Outside this range, any rotation of the stem in position 1) will have no effect. Use midnight as an approximate reference for the date jump to ensure you are positioned at the right time of day. Adjustment outside the hours of 1:00 PM and 8:30 PM will not cause any damage to the mechanism.

Hour and minute
Before every setting, make sure the position of the hands corresponds to the date changing at midnight and not at midday. Use midnight as an approximate reference for the date jump to ensure you are positioned at the right time of day.
A. Pull out the crown of your watch into the hour setting position, in position 2). The seconds hand will stop.
B. Rotate the crown until the required time, less 5 minutes, is displayed.
C. Slowly move the minute hand forward clockwise, stopping it exactly at the selected minute.
D. At the desired time, push the crown back against the case, in position 0); the watch will restart immediately.
Warning: After making any setting, always return the crown to its original position against the case, in position 0), to preserve the water-resistance of your watch and prevent any damage to the mechanism. To do so, refer to chapter "Crown".
Date and month
A.Pull out the crown of your watch into the date setting position, in position 1).
B. Turn the crown until the day hand a) indicates the desired date. The crown can be turned in both directions. The month disc b) is synchronized with the date hand, so it does not need to be changed.
C. At the desired date, push the crown back against the case, in position O); the watch will restart immediately.
Warning: After making any setting, always return the crown to its original position against the case, in position 0), to preserve the water-resistance of your watch and prevent any damage to the mechanism. To do so, refer to chapter "Crown".
Warning: For months with 30 days, the date takes approximately 4 hours 30 minutes to jump to the first day of the next month, passing through the 31^st . For the month of February, the date takes approximately 7 hours 30 minutes to jump to the first of March in a leap year, passing through the 30^th and 31^st , and approximately 12 hours in a common year, passing through the 29^th , 30^th and 31^st .

Day of the week
The day of the week is corrected by pressing the push-button at 8 o'clock. One press on the push- button corresponds to one day forward.
Please note that the push-button can be activated at any time of day without any risk of damage.
Leap year indicator
The leap year indicator is synchronised with the month disc, which is in turn synchronised with the date hand. It does not need to be set.
DEUTSCH
INHALT
INTERNATIONALE GARANTIE 91
HnKauaHa DaTbI BOKoWKe
A. BbIyHHTe rOIOBky hAcOB B nOIOXeHHe dIy yCTaHOBKn dAtb (nONoxHHe 1).
B. Bpaaate ronobky no yacoboi ctpenke do tex nop, noka B okouke He NOBHTc HxHAR daT (B 3abncmoCTn OT MOeJIH HanpabHeHne BpaeeHnra roNOBKn MoKeT 6bIb pa3HbM).
C. Iocne yctaHOBKn HxHOn DaTb npnxMITE rOIOBky K KopnyCy, BepHyB ee B noJoxeHne O.
BHHMaHHe! KaXdbi pa3 nocne HactpoKn BO3BpaaJte rONOBky B nepBOHaHbHoe nONoXeHne, npxab ee K Kopnyc B noNoXeHne 0, yTo6b coXpaHtB BOIOCToKoCTb Baunx qacob n36ExaTb nobpeJeHnMexAHn3Ma. IITrTOrO O3HaKoMbTeCb c pa3dIeNOM 3abOHNaR rONOBka>.
CtpenoyHnHnKaunDatbl
B yacax co ctpenoyho nHnkauee daTbe ee hactpoika ocyuaceTBnraetc npn nooyn Koppektopa ha o6patnoi ctopohe kopnyca yocob.
Haxmaite Ha Khonky-koppeKtop npn nomou npinooxehoro K yacam nhtpymeHa do Tex nop, noka cTpenka kanehdapr He 6ydet Yka3bBaTb HxHyO daty. Odno haxatne Ha KHonky-koppeKtop COOTBETCTByet nepexoNy Bneped Ha OdHH LyHHb IeHb.

YKA3ATEJIb 3APACA XOДA
BVeDHeHne
TOT yka3aTeB no3BoJraR BIO6oM oMeH BPemHOnpeJeNt b CoToHne 3abOda MexAHn3Ma Baux HacOB NIN Bpema, OCTAOUeecr DO CNeDyIOUero 3abOda.
CHTbIBAHHe NOKa3AHn
3anac xoana yacob yka3bBaetc nnoMoU MO ManeHko CTpeKN, DnKyuueCn KpyroBou kkanec deHeHHaM.
Hactpoika
Hnkaa 3ana cna CnHXPOH3npoBaHa C MexAHN3MOM, NO3TOMy OHa He Tpe6yeT HactpoKn.

KOHEL 3BOOa NONHbN 3BOO
BTOPOUYACOBON
BBeDHeHne
ФункиIMeETOCO6OE3HauHHeIpyTeWecTBeHHNKOB,TAKKAK OHa NO3BOJrEOTHOBpeMeHNOOTo6paxaTbDbaYacobxNORca:3TANOHoe (ДOMaUHee)IMeCTHOB Bpem.
CHTbBAHHe NOKa3AHN
3TANOHoe (DOMaunHee) Bpemr yka3bBaetc Hau cHTpaBHom uhepe6nate c 24-uaCobOu shko. To kacaetc MeCTHO RpeMeH, To OHO yka3bBaetc Hau TpaHUNOHo 12-uaCobOu shkane, KOtopa HaHeceHa No BHeHemy KpaIO uHep6nata.
Hactpoika
3TANOHHbIyacbIMnHytb(《DOMaWHeeBpemra
Ipepe npoBeHnem HactpoKu y6eNTecb, 70 noJoxHe cTpeLok COOTBcTByET n3MeHnIO DaTb B nonHOy, a He B nonJeH. 706bI y6eHTbcra B npabInbHom BbOpe BpemeHn cyTOk, onpeJeNte nonHOy, bpaaor cTpeJIKN OKA He npOn3OuTe CMeHa daTb.
BHHMaHHe! Ctpenka yka3aTeNa DaTb CnEpyet TOnbKO 3a CtpenKoMecTHoro BpemeHn (HaCtpoNka OcyuEcTBnErc npi NMOUKN KHOJOK, paCNOJIOXeHHbIX y OTMeTOK 24aca> n 44aca').
A. BbTnHte rONOBky yacOB B noNoXeHne dny yCTaHOBKn BpeMeHN (noNoXeHne 1). CekyHnHa aCtpeIka oCTaHOBNTcR.
B. Bpaaute ronobky no yacoboy ctpenke do tex nop, noka ctpenka He OKaketc B noIoxehn 3a 5 MInHyT do Tpe6yemoro yaca. Ppi BbnoHenn HactpoKn ctpenk 3tanOHoro (DOMaHero) I MeCTHO BpemeHN nepemeuaOTc oNHOpeMeHHO.

C. Tenepb MeDneHNO Bpaaute 3aBOnHyIO rOIOBky no hAcobOu CTpeIke, UTo6b ToHO yCTAHOBNTMnHyTHyIO CTpeNkY Ha BB6paHHo MNHyTe.
D. Поссе установки Вьбразноу са спжмITE roNoBky K Kopnycy, БерHyBee B noNoxKeHne 0; уасы Totac Bo3o6HOBrt CBOI xOJ.
BHHMaHHe! Nocne BbONHeHn IIO6bx HAcTpoek BCerda BO3BpaaAnTe 3ABOHyo roNoBky B hCxOHOe nOKeHne (0) nIIOTHo npnxHMaIte ee K KopnyCy aCoB, yTO6b oEecNeyTB BOHOENpOHuaemocb n He DOyCTnTB NOBpeXJdHm MEXAHIN3Ma. BoJe e NoPb6Ho CMOTpIe B pa3Dene «3abOHNaR TOnOBKa>.
CtpeNoHra HndnKaun DaTbI
Haxmaite Ha Khonky-KopkeTOp (a), pacnoonxeHHyO y OTMeTKI 8 cacoB, nCnolb3y r CneunabHbN INCTpyMeHT, npnaRaIOuINcK Yacam, noka CTpeNk aKeHapr He yKaXeT Ha TeKyUO DaTy. Ondo Haxatne Ha Khonky-KoppeTOp COOTBeTCTByET NepexOdy CTpeKN DaTb HA OOnH DeH Bnepei.
BHHMaHHe! BInIePbane Mekdy 23.00 n 00.00 HacTpoKa DaTbI npn NOMOuN KHOKN-KoppeKToPa (a) MoKeT BbINOJIrTaCra ToJIbKO Ha OIN DeHb BnePeJ. OHaKo, 3To DeIcTBHe HIKOUM O6pa3OM He BpeNT YacOBOMy MexAHN3My.
BtopoI yacoboi noC (MeCThoe Bpem)
KhONKn, pacnoonoxeHHbIe y OTMeTOK 2 qaca> n4 qaca>, no3BOJrOT nepeboHtB Bneped nn Ha3aH acobyO cTpeNkY BTOPO rACOBORo NOrca (MeCTHOBVPemeh). OndHO Haxatne Ha KhoNky COOTBETCTBYET nepexOdy Ha oINH aC Bneped nn Ha3ad.
C
D
ФУHKUЯ BCEMUNPHO BPEMEHIN
BBeDHeH
Данногфункглno3BOJЯETОpeDEDINbMeCTHoeBpeM824KpynHbIX ropoaMnpoOHOBpeMeHHO C MeCThBM BpeMeHem B BaWem ropoe.ДЯЗTOROHaBHeHNeчactuФep6Iata paCNOXeH BpaUOuNcR 24-ACOBOnDnCK,CNHxPOHN3NPOBAHHb C YACOBONCTPEKOK, a TAKKe BTOPOn DnCK, Ha KOTOpBHaHeceHb H3BaHnra rOpoOB.BpeM8KaxDom YACOBOM NORCE CHTbIBaETcHb24-YacOBOM DnCKe HAnpOTNB Heo6xOIMOro ropoJa.
Hactpoika
YacbIMNHHyTbI
A. Otkpytne n BbTnHte 3aBODHyIO rONOBky y OTMeTKN «3 Yaca» B noJoxeHne Iy yCTaHOBKn BpeMeHH (noJoxeHne 1). CekyHnHaO CTpeKo OCTaHOBNTcR.
B.CnOMOJIbIO 3aBOJHOI rONOBKN yCTaHOBNTe CTpeJIKN TAKIM O6pa3OM, YTO6bOHNI NOKa3bIbAJIH Ha 5 MInHyT MeHbIe Bb6paHHOro BpemeH.
C. Tenepb MeIeHNO BpaaIte 3aBODHyIO rONOBky NO HAcOBn CTpeNke, YTo6bTOUHO yCTAHOBNTb MInHyTHyIO CTpeNKy HA BBbpaHNO MNHyTe.
D. Iocne yctaHOBKn Bb6paHHoro BpeMeHn npxMnte 3abOHyIO rONOBky K KopnyCy H3ABHTnte eB hCXoHOM NOXKeHN (NOXKeHne O); qacbl TOtAc BO306HOBRT CBOI XOD.
BHHMaHHe! KaXdbi pa3 nocne Hactpoyn Bo3bpaaante ronOBky B nepBOHaaybHoe nooKeHne, npKab ee K Kopnycy, (nooKeHne 0), yTo6b coxpaHnTb BOHOepoHuaemocTB Baux xacob n36exatb nobpeJdeHmexAH3Ma.
O6paTHe BnMaHne, 24-ocobon nck cnHxpoHn3npoBaH cacobon mHyTHOH CTpeKAMn. CneOBaTeNbHO, erO HAcTPOKa He Tpe6yETc.

HACKC H3BAHNAIROPOIOB
A. OtkpyTHTe 3aBODHyTOJNOBky y OTMeTKn «9acOB» B noJnoKeHne 1].
B. Bpaosra 3aBOHyIO rONOBky, yCTaHOBnTe HAnpoTnB OTMeTKN «12HacOB» H03BaHne rOpOda, COOTBeTCTByIOuero YacOBomy Norcy, B KOTOpOM Bn HaxoDITecb.
C. KOrda Heo6xOaMbI yacOBn noAe BCTaHET HAnpoTnB OTMeTKN 12 yacOB》,npnxMnte roNoBky K KopnyCy,BepHyB ee B noNoXeHne O.
BHHMaHHe! KaXdbi pa3 noCne HacTpaKn BO3BpaaAte rONOBky B nepBOHaHbHoe noLoXeHne, npxkAB ee K Kopnyc (noLoXeHne 0), YTO6bl coXpaHnTB BOHOHePOnHuaemocTb BaXnx Yacob N36ExaTb NOBpeXdHnMexAHN3Ma.
JETHeeBpeM/3mMHeeBpeM
B ueJx 3neproc6epexeHn HeKOTOpbI cTpaHbI nepeuHn Ha pexm nTeHero BpeMeHn, npN KOTOpOM B BeceHHe-JeTHn nepNoD KO BpeMeHn DaHHoro Yacoboro NoCa Io6abTcra OOnH yac.
Baun yacb1 1966 WW.TC He yuHTbBAOT nepexoHa JIeTHee Bpemr, TAK KAK B HeKOTOpbIX cTpaHax (HaNPmep, B JnoHn, KITae, Ha TaIbaHe n T. d.) noobhny nepexoH He ocuyecTBnEetcra. CneobateBHO, B TeueHne nepnoaJeTHero BpemeHH Heo6xOIMO yuHTbBAT pa3HnUy B OINH ac.
24 yacobbix nora
KaXbI n3 24 hAcOBbIX NORcOB COOTBETCTByet 15^ rpaDycam DnTOrb (TaKIM o6pa3OM, B KAXDOM CNeIyIOUeM CeKTOpe BpEmr OTNnaeTCRA Ha 1 yac). OTCuET HauHaeTcC rPnHBNUCKOro MEpuINaHa, KOtOpB rBnAeTcR INCXoHNbIM npn ONpeIeHEN yHNBepcaIbHoro BpemeHn (U.T.). 3NaueHnY hACOB pa3NIHAIOTcB 3ABNCMOCTn OT hAcOBOro NORCa, HO 3NaueHn MInHyT OCTAIOTcOOnHAKOBbIM BO BCEX NORcAX.
TAXIMETPNUECKA JUKAJA
BBeDHe
HnHg yHKnna No3Bolrae H3MePntb CpeHIO CKoPoCTb Ha OTepe3Ke Nyt, paBHOM OdnHomy KInlometpy.
CHTbIBAHHe NOKa3AHN
Paccmotpim OTpe3OK nytn, ha KOTOpOM DBA dOPOXHbIX cTOn6Nka, A n B, paCnoJoxeHb B ODHOM KINOMetpe npyr ot npyra. B MOMENT, kOrda Baw aBTOMOBnB npoe3xqAET cTOn6Nk A, 3anyctnte xpohorpaΦ n octahOBnTE ero B MOMENT npoe3nda cTOn6Nka B. Ha TaxImetpuhecko shkane, paCnoJoxeHHo BOKpyr OKOHeuHOCTn cekyHdHoi CTpeKN xpOHorpaΦ, BbyvNDITE cpeHIO CKOpoctB KM/ucnB MmIax/Yac.

XPOHOΓPAΦ
BVeDHeHne
HnHKaIgN3MepeHHbIX cekyHIOcUeCTBnRETCpN NOMOuIeHTpaJIbHOI cekyHIO CTpeJIKX pOHORpa. HnHKaIgMNHyT N, B HeKOTOpBX CNYaRax, YacOB OboHNO OcyUeCTBnRETCpN NOMOuONHOHOIN DBYX MAJIbX ChETNKOB.
Iyck, octaHObKa n O6HyJIeHHe NOKa3AHn CHTUKNOB HENOCpeDCTBeHHO CBra3aHbC NyCKOM, OCTaHOBKO n O6HyJIeHHeM NOKa3AHn CEHTpaJIbHOI CeKYHHOI cTpeKn XPOHorpaΦa.
B HeKOTOpbIX MoJEnX OTCuET MInHy TMOKe TAKKe OcyUeCTBnTbCn Pn NOMOu paCNoIoxEHHo B UeHTpe CTpeKN, YKa3bBAIOSeH Ha 1Kany Ha BHeUHEm o6oKe uΦep6nata.
Hactpoika
A. Haxmte Ha KHONky, HaxoJyIOcB NOJoxeHN «2 yaca»: cekyHdHa CTpeKka xpoHorpaΦa npxOoNT B DnXeHne.
B. Eue pa3 HaxmTe Ha Ty Xe KhONky: cekyHdHa Ctpenka xpoHorpaΦa OCTAHABNBAETCA.
C. Haxmte Ha KhoNky, HaxoJyIOc B noJoxeHn «4 yaca': cekyHnHa CTpeKa n CTpeKN ChETHKnOB XPOHOpaΦa BO3BpaIaOTc K HyneBOI OTMeTke.
BnHmAHne! HkoIgHa He o6HyJnIe NOKa3AHn XPOHorpaΦa, ecnn cekyHdHa CTpeIka HaxoIITcB DvIXeHn, NOCKoJIbKy 3TO MOKeT pINBeCTN K NOBpeXJeHNIO MEXAHn3Ma. Bcerda CneIte 3a Tem, YTObI nepeD o6HyNeHem NOKa3AHn CEkyHdHa CTpeIka 6bla OCTaHOBHeHa.
ACTPOHOMNueCKNEФYHKUIN
YKA3ATEJIb BPEMEHn CYTOK (DEHb/HOUb)
BVeJeHne
IINIKAUIN BpemeHn CYTOK NcONb3yeTcR DNCKOBu yka3aTeNb C n3o6paXeHNEM ConHua n Lyhbl. Ha fOHe He6a B OKoUke yka3aTeNBA COOTBETCTBUN CO BpemeHem CYTOK NOABnIOTcR DNCKN Lyhbl nn ConHua.
CHTbBAHHe NOKa3AHN
Bo BpeM yCTAHOBKn TOUHOro BpeMeH, yuHTbBaIte yKa3aHnJeHb/Houh, TAK KAK OHn CINHXPOHn3NPOBAHc yKa3aHnem Yacob MmHyT. HanpImep, ToUHO B nonHOy JyHa DoJXHa NORBnTbcr y OTMeKn 06:00, BTO BpeM kak ConHue DoJxHo OKa3aTbcr y EToi Xe OTMeKn ToUHO B noJIdeHb.
Ponndenb Ponnnoy

INHДИКATOPФА3blЛУнbl
BBeDHe
HnKATOp 03bI NyhI NO3BOJAE T BOCpOu3BecT NIKI ETORO CNYTHNka 3emnn (HOBOyHne, nepBar HeBepTb, noHOnyHne, nocJeHNr qETBept) npn nOMoUcNCTeMb C OTo6paXeHNm NOKa3AHn Ha DnCKe nnB OKoWKe. B cneuaJIbHom OKoWKe BOCpOu3BeDeH φpaMent He6a, H a KOTOPOM LyHHbI DNCK npINHMaet pa3InHyIO fOpMy IIO Mepe TeueHnry LyHHoro Mecra.
CHTbBAHHe IOKa3AHN
Bokwke BpaaaetcNCK, ykpaewHHbI DByMa N3o6paXeHnMn JyHbHa 3Be3HOM He6e.
B haane kaxdo rnyhoro zikna oH3 dByx n3o6paxeHn otKpbBaetcB3rJy B neBoi qactn OKoSKa; B cAmom hauane OHO cKpbBaETc 3a OkpyTNO 3acNoHKo N IMeET BnD TOHKOrO cepNa, a 3aTeM pactet no Mepe DvXeHn BpeMeHN.
B cepedne lyHHoro uKna nonHocTbO oKpbIoe n3obpaxeHne Lyhbl HaxoNTcB C cepednHe okouka. 3aTeM OHO HauHaeT noCTeneHNO yMeHbWATbcR, cKpbBaRc3a pacnoLoXeHNo cnPaba BTOPOkpyrno 3acNoHkoN.
HOBOyHNE NepBae YETBeptb NoCneHnry YETBeptbNoHNOyHne
HactpoKa
IЯ qacob c KoppeKTOpOM haxmaite KhoNky-KoppeKTop a) npnaraembIM K hacam nHCTpyMeHTOM do tex nop, noka b OKoUke He noBntc Tekyuzaa a3a lyhbl. Ondo haxatne KhoNkn-KoppeKTopa COOTBeTCTByet nepexOdy Ha oIN dEhb Bnepei.
BnmaHne!Bo n36exaHne noBpexdeHmexAHm3Ma He yCTAHABnBAute 4y LyhB INHTepBaTe MEXdy 15.00 do 03.00. TTo6bHe nepenyTaB BpeMeHHo npomexyTOK, pyKOBOCTByTEcB nepeXODM DaTb B paHOne nOlyHOuH, TaK BcCMoxete rapaHTnpOBaT npabINbHOCTb Bb6paHHORO BpeMeHN dHaCTpoKn.
Iyra yacob 6e3 KoppeKTopa BbTAHnTe 3aBODHyIO rONOBky B noNOxehne I) n BpaaaiTe ee do tex nop, noka b OKoUke He nOABNTcRA TeKUgA a3a NHybl.
BHHMaHHe! KaJbI pa3 noCne HAcTPOKn Bcerda Bo3BpaaAte rONoBky B nepBOHaJbHoe nONoXeHne, npxab ee K KopnyCy B noNoXeHne 0), To6bI coXpaHnTB BOHOENpOHuaemocb Baunx qacob n36exaTb NOpeXeHnMEXAHN3Ma. Ia TTO O3HAKOmbTeCb C pa3dELOM 3aBOHNaRrONoBka>.
C KoppeKTopoM Be3 KoppeKTopa

*MeCTOHAXOXJEHNEKOPPEKTOPa 3aBNCUT OT MoeJI

BI-RETRO
BveeHne
PetporpaHaa cekyHdH a cTeKa DnHaTc o OT mETKn O MNHTo OTmETKn 30 MnHyT (CBepx y Bn3), a petporpaHaa cTeKa, yKa3bBaIOuaa deHb Heenn,-OT PH (MON) K BC (SUN) (CH3y BBepx), noka kaxda MRHOBeHHO He BO3BpauaetcBA CBOIO HCxOHyTOky, C KOTopoB IO3O6HOBJIeT CBOI XoJ.
Hactpoika
Yacbi MNHyTbi
A. BbIaHInTe rOIOBky yacOB B NOIOXeHne dYcTaHOBKn BpeMeHN (nonoxeHne 2).
B.CnOMOJIIO 3aBOJHOI rOJOBKYNCTAHOBNTe CTPENK TAKIM O6pa3OM,HTo6bOHN NOKa3bAJIH Na 5 MNHYT MeHbWe TOCHOR BpemeH.
C. MeDneHNO BpaaIte MNHyTHyIO CTpeKv B HApBaNHeHH NO HaCOBOI CTpeKe N OCTaHOBnTE ee ToHNo HA Bb6paHHO MNHyTe.
D. Nocne yctahOBKn Bb6paHoro Yaca npKMMte rONOBky K Kopncy, BepHyB ee B noJoxKeHne O).Yacbl TOTHAC BO3O6HOBRT CBOI XoJ.
BHHMaHHe! KaXbI pa3 nocne hactpoiKn Bcerda Bo3BaPauaTe rONOBky B nepBOHaunbHoe noLoXeHne, npKxab ee K Kopny CB noLoXeHne 0, yTo6b coXPaHnTB BOOCToIKoCTb Baunx Yacob N36ExaTb NObpexJeHn MEXAHN3Ma. Ira 3TOrO O3HakOMbTEcB c pa3dJenOM 3ABODHAR rONOBKa
Data
A. BbyHHTe roIOBky yacOB b NOIOXeHne dIy yCTaHOBKn DaTbI (NOIOXeHne I).
B. Bpaaute e no yacobon ctpenke, noka b okowke He noarntc Tekyua daTata.
C. NocJIe yCTaHOBKn Heo6xOIMOn DaTbI npXMMTe rOIOBky K Kopnycy, BepHyB ee B noIOKeHne 0).
BHHMaHHe! KaXdbi pa3 nocne hactpoKn Bcerda Bo3bpaaate rOIOBky B nepBOHaayabHoe nooKeHne, npKab ee K KopnyCy B nooKeHne 0, yTo6bl coxpaHHT bOdoCTOkoctb Baunx YacOB n36eKaTb nobpeJeHn MexAHN3Ma. Ipy 3TOrO O3HakombTeCc pa3dEJOM 3ABODHra rOIOBka>.

Hb Hedein
YCTAHOBKa DnH HeDEn BbINONHReTc HaxaTneM Ha paCNOJoxeHHyO y OTMeTKN «04:30» KhoNky-koppeKTop (a) c NOMOsbIO IHCTpyMeHTa, npnaIarIOUeROc K BaIIM YacAM. OdHO HaxaTne Ha KhoNky-koppeKTop COOTBETCTByET nepexOyD CTpeKN DaTb Ha Odn DeH Bnepei.
BHHMaHHe! 3aPepaaetc BbINONHrB yCTAHOBky dHr HeDenn B npomexyToK BpeMeHN c 19:00 do 01:00, TAK KAK B ETO BpempaBOTaET MexAHN3M CmEhbl NOKa3AHn DaTb, MMOXHO NOBpeNTb YacOBoMEXAHN3M.
Φa3a ΜγHbI
Haxma Te Knonky-koppeKTop b) B noOxehn 14 cob 30 MHyT npnaeMbIM K acam HCTpyMeHtOM do tex nop, noka B OKoIke He noBntc Tekya a 3a ahyb.. Odno haxatne Ha KHonky-koppeKTop COOTBeTCTByet nepexody cptelki Da tHa OOnn Deh Bnepei.
BHHMaHHe! 3aIpeaetcBbINHHTb KoppeKtnpOBky a3bI NyhB b npomexytoK BpemeH c 19:00 do 01:00, TAK KAK B ETO Bpempa6oTaET MexAHn3M CMeHb NOKa3AHN DaTb, IN MOXHO NOBpeHb YacOBoi MexAHn3M. UTo6bI He nepenyTb BpemEHNO npomexytoK, pyKOBOCTbYteCb NepEXOOM DaTb B paHOne nOlyHOn, TAK BblcmoxTe rapaHTnpOBaTb npabInbHOctb Bb6paHnO BpemeH dHaCTpoKn.
ПОЛный KALEHДAPb
BVeDHeHne
Cnoxha yacobar yHKnna, H3bBaemr KaneHapem, no3B0nraT o6ecneuHb nerKo CHTbBAeMyIO INdkaunIO He TOnbKO YACOB MInHyT, HO N DaTbI, Dn Hn HeDenn, Mecaa n aas lyhbl.
BnHmAHne! Yto6bI n36exaTb NOBpeXeHnM MExAHN3Ma, He KOppeKTHpyTe NOKa3AHN KaHeHapB npomexyTke ot 15.00 do 08.00, nockoJIbky B 3TO BpeM MEXAHN3M CMeHb I DaTb I Φa3bl NyHb npHXOHTB DeiCTBne. Yto6bI He nepenyTaB BpeMeHHo NpOMexyTOK, pyKOBoDcByuTEcb NepEXODm DaTb B paHOne nOlyHOH, TaK Bb CMOxete rapaHTnpOBaTb IpabINbHOCTb Bb6paHHOro BpeMeHN dIra HAcTpOKn.

Hactpoika
Yacbl MmHyTbI
Ipepe npoBeHnem HAcToPouKn yBeDntecb, yTO noLoXeHne CTepeLOK COOTBeTCTByet N3MeHeHIO DaTb B nonHOy, a He B noJeHb. YTo6b He nepenyTaB BpeMeHHo npomexyTok, pyKOBoDcTByInTeCb nepExoOM daTb B paOne nOlyHOn, TaK Bb cMOxete rapaHTnpOBaTb npaBnBHOctb Bb6paHoro BpeMeHN dJa HAcToPouKn.
A. BbIaHInTe roIOBky yacob B noIOXeHne IyCTaHOBKn BpeMeHN (noIOXeHne 1). CekyHdHa cTpeJIka OCTaHOBHTcR.
B. Bpaaute ronobky no yacoboy ctpenke do tex nop, noka ctpenka He OKaxetcB NOJoxehn 3a 5 MInyT do Tpe6yemoro hca.
C. MedneHNO Bpaaate MNHyTHyIO CTpeNky B HApapBHeHN NO YacOBoN CTpeNke N OCTaHOBnTe ee TOuHO HA Bb6paHNo MNHyTe.
D. Iocne yctAHOBKn Bb6paHoro qaca npKmnte rONOBky K Kopncy, BepHyB ee B NOJoxKeHne O; YacbTOTcAC BO306HOBRT CBOI XOJ.
BHHMaHHe! KaXdbi pa3 nocne HactpoKn BO3Bpaaate RoNOBky B nepBOHaHbHoe noLoxKeHne, npKab ee K KopnyCy B noLoxKeHne 0,HTo6b coXpAHnTB BOOCTOaKoCTb Baunx yacob N36exaTb NobpeJeHn MExaHN3Ma. Ira 3TOrO O3HaKoMbTeCb c pa3denom 3abOJaHra roNOBka>.
Ctpenoyna Hndnkaunna DaTbI
HaxmaTe Ha KhoNky-KoppeKTop (a) B noLoXeHHn 4 haca》 npinaraembIM K hacam nHcTpymentom Do Tex nop, noka cTpeJka DaTb He yKaXeT HxHoe 3HaueHne. OdHO Haxatne Ha KhoNky-KoppeKTop COOTBETCTByet nepexOyD CTpeKN DaTb Ha OHn DeHb BnpeI.
BHHMaHHe! NepexoJ ot 3auehenra 31K 3auehenIO 1 O3haeT cMeHy MecaHa Ha HndkaTope Mecau (nepexoK cnedyUoemy Mecau).
HnHeenn
HaKImaIte Ha KhoNky-KoppeKTop (b) B noLoXeHn «10acOB» npInaraeMbIM K hAcAM HCTpyMeHTOM do tex nop, nOKA B OKoUke He NoBNTcR HyxHbI DeHb HeDeHn.
Mecra
Haxmaite Ha KhoKy-KopkeTOp (c) B nonoKeHHN 2 aaca] npnaraembIM K qacam HnctpyMeHTOM do Tex nop, noka B OKoUke He noaBtca HyxHb Mecau.
BnmaHne! 36Kb H36KbTb NOBpeXdEHHaMEXAHN3Ma, He HAcTpaNBaTe NOKa3AHn MeCya, cNINOKa3AHn DaTb nn KaHeHapra HaxOJaTc Meky 3HaueHnMn 30> n 2, NockoIbky B 3TO BpeMmexAHN3M CMeHb MeCya npxOaNT B DeiCTBne.
Φa3a ΜyHbI
Haxmaite Ha KhoKy-KoppeKTop (d) B nonoxhen 8 acob] npnaraembIM K qacam HcTpyMeHTOM do Tex nop, noka B okoKe He noBntcH yxHa a3a lyh. Ondo Haxatne Ha KhoKy-KoppeKtop COOTBeCTByet nepexOdy BnepeHa OOnn LyHHb DeHb.

TOIOBOIKAJIENDApNΦYHKUryPABHEHnBPEMeHN
BVeDHeHne
B OTNIUHne OT KNaCCnueCKOro MexAHn3Ma KaIeHdApR, RoIOBOI KaIeHdApb Tpe6yET HAcTPOuKN DaTb ToJIbKO B KOHcE ΦEBpAII HeBnCOKOCHO rOJa, T. e., BCero Tpr pa3a B TeueHHe 4-JeTHero BnCOKOCHO uKJna.
HactpoKa
Yacbi MHHyTbi
Ipepe npoBeHnem HactpoKu y6eHntecb, 70 noNoxHe nCTpeNOK COOTBcTByET N3MeHEnIO DaTb B NOHOb, a He B NoJDeHb. 706bI y6eHtbcB PpABInbHOM BblOpe BpeMeHN CyTOk, ONpeDenTe NOHOb, BpaAaR CTpeKN Ioka He npOn3OuET CMeHa DaTb.
A. BbyTnHte rONOBky yacob B noNoXeHne dny yCTaHOBKn BpeMeHn (noNoXeHne 2). CekyHnHa cTpeNk aOCTaHOBHTc.
B. BpaaTe rnoBky no yacoboy cTpenke do tex nop, noka cTpenka He OKaKeTcB NonoKeHn 3a 5 MInyT do Tpe6yemoro yaca.
C. MeDneHNO BpaaIte MNHyTHyIO CTpeKy B HappaBHeHH No YacOBoN CTpeKe N OCTAHOBITE ee TOHHO BA Bb6paHHO MNHYTe.
D. Iocne yctAHOBKn Bb6paHoro Yaca npKMMte rONOBky K Kopncy, BepHyB ee B NIOXKeHne O; Yacbl TOTcAC BO3O6HOBRT CBOI XOD.
BHHMaHHe! KaKbI pa3 nocne HacTpoKn BO3BpaaTe rONOBky nepBOHaJIbHoe noLoXeHne, npxab ee K KopnyCy B noLoXeHne 0, yTo6b coXpAHHT bOdoCToIKoCTb Baunx qacob n36exaTb NObpexJeHH MExAHn3Ma. IINr 3TOrO O3HaKOMbTEcB c pa3dEnom «3aBoiHa rONOBka>.


Data Meca
BnmaHne! Npei npoBeHeHem HAcTpoKu y6eIntecb, YTo yacOBa CTpeKa HaxOHTcB nPOMexyTke MExdy OTMeKoN 9 uacob 30 MNHTN OTMekoN 20 acob 30 MNHT. BHe yka3aHHoro noNoxehna BpaueHne WtOKa B NoNoXeHN1 He 6ydt MeTb HnKAKOrO eΦeKTA. TObbl HAcTPOB TaCbHa npabInbHyIO NOOBHy CYTOK, CneITte 3a CMeHO DaTb B OKoUKE: OHa npOnCXoDNT OKONo NOnyHOuN.
A. BbIyHInTe rONOBky yacob b noJoxeHne Iry yCTaHOBKn dAtb (nonoXeHne 1).
B. BpaaTe rONOBky Do Tex nop, noka cTpeNka KaneHapra (a) He ykaxeT HyxHyIO DaTy. rONOBky MoXHO Bpaatb B DByx HnnpabneHnx. Ncck MecaeB (b) CnHXPOH3npoBaH CO cTpeNoHbIM INHdkoTOpOM DaTb, NOrTomy OH He Tpe6yET HAcTPOKn.
C. Пocне установки HeobxOIMoI datb npnxMITE roOBky K Kopnycy, BepHyB ee B noIoXeHne 0); Yacbl TOTcAC BO3O6HOBRT CBOI XOD.
BnmaHne! KaJb pa3 nocne hactpoKn BO3Baaate ronOBky B nepBOHaayabHOe nooxehne, npXAB ee K KopnyCy B nooXeHne 0, TTo6bl coxpaHT bOIOCTOkoCTb Baunx YacOB n 36exatb nobpeXdeHmexAHN3Ma. JIy 3TOrO O3HaKOMbTEcB c pa3dEnom «3aBOHna rONOBka>.
Bnmae! B meaax, hacntbtaiox 30 dnei nepexo da tki nepbomy ncy cneiyooero Meca npocxodnt B teuehne np6n3ntelho 4 acob 30 mHyT, MHyra nCno 31.B febpane nepexo da bK nepbomy mapTa npocxodnt B teuehne np6n3ntelho 7 acob 30 mHyT, MHyra nCna 30' n 31'.