BBQ Island Videro G4SL - Barbecue Rösle - Free user manual and instructions
Find the device manual for free BBQ Island Videro G4SL Rösle in PDF.
| Product Type | Gas BBQ on cart, BBQ island |
| Brand | Rösle |
| Model | BBQ Island Videro G4SL |
| Reference | 25321 (black/stainless steel), 25322 (stainless steel) |
| Dimensions (L x D x H) | 154 x 60 x 118 cm |
| Approximate weight | 70 kg |
| Main cooking surface | 3150 cm² (70 x 45 cm) |
| Warming zone | 1120 cm² (70 x 16 cm) |
| Main burners | 4 × 3.5 kW stainless steel |
| Side burner | 1 × 3.0 kW integrated |
| Primezone (infrared burner) | 3.5 kW |
| Total power | 20.5 kW |
| Gas supply | Butane (G30) or Propane (G31), 30 or 50 mbar depending on country |
| Max gas bottle | 11 kg (in storage compartment) |
| Main burner ignition | Jet-Flame piezoelectric system |
| Primezone ignition | Electronic (AA battery) |
| Grid material | Enameled cast iron |
| Combustion chamber | Porcelain enameled steel |
| Lid | With glass insert and thermometer |
| Knob lighting | LED on batteries (4 × AA) |
| USB port | Yes, for grid lighting |
| Castors | 4 swivel castors with brake |
| Work height | 90 cm |
| Thermometer temperature range | 60°C to 350°C |
| Maintenance | Regular cleaning of grease tray, grids, and burners |
| Safety | Gas shut-off, leak check, no lighter fluid |
| Warranty | 2 years |
Frequently Asked Questions - BBQ Island Videro G4SL Rösle
User questions about BBQ Island Videro G4SL Rösle
0 question about this device. Answer the ones you know or ask your own.
Ask a new question about this device
Download the instructions for your Barbecue in PDF format for free! Find your manual BBQ Island Videro G4SL - Rösle and take your electronic device back in hand. On this page are published all the documents necessary for the use of your device. BBQ Island Videro G4SL by Rösle.
USER MANUAL BBQ Island Videro G4SL Rösle
BBQ Island Videro G4-SL BBQ Kitchen Videro G4-SK
The installation manual for assembly can be found in the separate supplement. Read the instructions before using the appliance. Please keep the instructions in a safe place so that you can refer to them in detail at any time. Use outdoors only.
All the advantages at a glance: 27
IMPORTANT SAFETY INSTRUCTIONS. 28
Gas cylinder safety instructions. 29
Guidance on potential dangers when using gas....29
Maximum size of gas cylinder 30
Fitting the hose and gas pressure regulator. 30
Gas-tightness test. 31
Important operating instructions 32
The Videro G4-SL in detail 33
The Videro G4-SK in detail 34
Starting up the grill before barbecuing for the
first time 35
"Seasoning" process 35
Lighting the burners 35
Jet Flame igniter system. 35
Lighting manually. 35
Turning off the burners 35
Lighting the side burner 36
Primezone 36
Using / Starting up the Primezone in the side table36
Back Burner (G4-SK) 37
Using, starting up the back burner (G4-SK) 37
Starting up the water tap 38
Easy steps to becoming a barbecue expert....39
Cooking with the RÖSLE grill. 40
Barbecuing methods 40
Direct barbecuing with the lid closed 40
Indirect barbecuing with the lid closed 40
After use 41
When is the meat/food cooked through? 41
Cooking times. 41
Maintenance, cleaning and storage 43
Tips for extending the service life 44
Troubleshooting 45
Guarantee 46
Disposal 47
Handling batteries. 47
Important information on disposal: 47
Service and contact. 47
Technical data. 48
Accessories 49
Dear RÖSLE customer,
Thank you for choosing the high-quality RÖSLE grill. A good choice. And a good decision for a long-lasting, quality product. So that you can enjoy it for many years to come, please read the following product information, tips for best use and recommendations regarding care and safety.
All the advantages at a glance:
- Cooking area: Videro G4-SL, Videro G4-SK: 45 × 70 cm = 3,150 cm^2
- Stainless steel burners, each with 3.5kW
- Lid thermometer
- Lid with glass insert for viewing the cooking compartment
- Illuminated control knob
- Jet Flame igniter system
- Integrated side burner with 3.0kW
- Extra-hot Primezone
Storage compartment for gas cylinders up to 11kg and accessories - Comfortable working height of 90 cm
- USB port for optional LED grate lighting
- Lockable castors make the grill easy to manoeuvre
- Firebox made from porcelain-enamelled steel
- Sturdy grates made of enamelled cast iron for hard-wearing and long service
Optional equipment for Videro G4-SK:
- Integrated Back Burner with 3.2kW
- Sink with tap
IMPORTANT SAFETY INSTRUCTIONS
Please pay close attention to the guidance set out below in order to exclude any safety risks, prevent damage to the appliance and contribute to protecting the environment. Please read all safety instructions carefully before assembling and using the grill and keep this manual for future reference. Always follow all warnings and guidance in these operating instructions. The manufacturer accepts no liability for damage resulting from incorrect handling and/or failure to observe the safety precautions. All of the directions given in this instruction manual are to be followed precisely as described. In these instructions, the appliance is referred to as a grill.
Please take note of the following pictograms:

Caution - danger! Where you find this sign in the instructions, we ask you to take particular care.

Warning - hot surfaces! Risk of skin burns from hot surfaces. Always wear protective gloves (DIN EN 407)!

Important operating instructions and explanations which require particular attention and which refer to special functions or useful tips.
Failure to adhere to these safety instructions and precautions may lead to serious injury or damage from fire or explosion.
Safety first!
Everyone who operates the appliance must be familiar with the lighting procedure. Children must not be allowed to operate the grill. The assembly instructions must be followed precisely. Incorrect assembly may have dangerous consequences. The appliance must be kept well clear of combustible materials when in use.

Never bend over the open grill. Always keep at least 30~cm away from the igniter opening when lighting the grill. Keep your face, hair, loose clothing, etc. well clear.
Intended use:
This gas grill may be used for cooking food that is suitable for barbecuing using butane/propane gas. Any other use is not allowed and may be dangerous. Use of the grill as a fireplace is prohibited. The grill is approved for private use only.
ATTENTION: Accessible parts may be very hot. Keep away from children!


NEVER LEAVE THE GRILL UNATTENDED WHEN IN USE!

If you smell gas:
- Turn off the gas supply at the cylinder.
- Extinguish all naked flames and turn the control knobs to the position "· OFF".
- Open the lid.
- Stand well back from the appliance and immediately call the fire service if the smell of gas persists.
Escaping gas can cause fires or explosions. This can result in serious personal injury, fatal accidents and damage to property.
Exercise caution when handling gas cylinders!
Only gas cylinders with a maximum gross weight of 11kg may be placed on the cylinder stand provided - see assembly instructions. The maximum length of the gas hose must not exceed 1.5 metres.
Make sure that there are no leaking joints:
- Every time before starting up the appliance and whenever the gas cylinder has been replaced, carry out the "gas-tightness test".
After use turn off the gas supply at the cylinder.
Gas cylinders must not be exposed to temperatures above 50^ and must never be stored in enclosed spaces or cellars/basements. Always observe and follow the safety instructions marked on the gas cylinders used.
Gas cylinder safety instructions
- Always turn off the valve on the cylinder before disconnecting the cylinder from the appliance.
- When replacing the gas cylinder, keep it well away from possible sources of ignition.
- Never store and replace gas cylinders in enclosed spaces, but in well ventilated rooms/areas.
- The gas cylinder must always be fitted upright, and transported and stored with the safety cap fitted.
- You can place the gas cylinder either in the casing or on non-flammable flat ground beside your gas grill.
- Never expose gas cylinders to excessive heat.
- Never attempt any DIY modifications to a gas cylinder connector. Consult the manufacturer or an authorised specialist retailer.
- Have the gas cylinder checked every 10 years at an authorised dealer. The inspection data is imprinted on the cylinder.
- The gas has a similar smell to natural gas. You should be able to recognise that smell.
The gas is heavier than air. That means that escaping gas may collect in low level locations and not disperse. - Handle "empty" gas cylinders just as carefully as full ones.
- Always fit the safety cap on the gas cylinder when transporting it. For advice on the proper transportation of gas cylinders, contact your specialist gas appliance retailer.
- If the grill is to be kept indoors over winter, it is imperative that the gas cylinder is removed. It should always be stored outdoors in a well ventilated location to which children or third parties do not have access.
Guidance on potential dangers when using gas

There is an increased risk of fire when barbecuing.
Only use the grill outdoors on a firm and secure surface. Never stand the grill on surfaces made of combustible materials when in use. Do not move the appliance while it is in use.
Always have a fire extinguisher ready in case of an accident, fat fire or mishap (Class F).
Every time before starting up the appliance and whenever the gas cylinder has been replaced, carry out the "gas-tightness test" according to instructions.

- When replacing the gas cylinder, make sure that all gas valve control knobs are set to the position "OFF" and the gas supply is turned off on the gas cylinder. The gas hose and the gas pressure regulator must be properly fitted (according to the enclosed assembly instructions).
- If you suspect any components are leaking, turn off the gas supply on the gas cylinder and then turn the gas valve control knobs to the position "OFF". Have the components that carry gas inspected by a gas appliance specialist.
- After finishing barbecuing, first turn off the gas supply on the gas cylinder. Then always turn the gas valve control knobs to the position "OFF" and check whether the flames have been extinguished.
-
The storage or supply of full or empty gas cylinders in the immediate vicinity of the grill is not permitted.
-
Never light the gas grill when the hood/lid is closed.
- Never bend over the grill when lighting it.
- Do not make any technical changes or modifications of any kind to the gas controls, the lighter, the burner or other parts of the grill.
If you suspect a malfunction, call in a qualified specialist. - Ensure that the air vents of the gas cylinder installation area are not sealed.

Do not use lighting fluids. The appliance has an integral self-lighting mechanism.

CAUTION! Children and pets should not be allowed near the grill unsupervised.
Always wear barbecue gloves for your own protection.
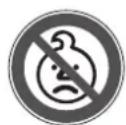
Maximum size of gas cylinder
When placed in the cylinder holder:
Videro G4-SL, G4-SK
Fitting the hose and gas pressure regulator
The gas pressure regulator must comply with the current version of standards EN 16436 or EN 16129, as well as national regulations.
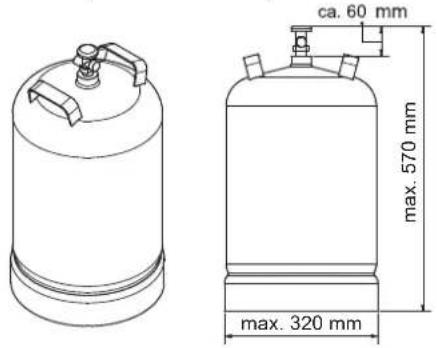
A) Attaching the hose connector - for Germany, Austria and Switzerland
The individual components of the multiple connector are attached by a 1/4'' BSP external thread. The hose and pressure regulator are connected to the gas rail connection with the aid of a spanner.

Ensure that the connectors are firmly mounted and gas-tight.
B) Fitting the hose
for BE, DK, ES, FI, NL, NO, SE, FR, GB, IE, IT, LU
The appliance is supplied with a universal adaptor for connecting the gas hose including the gas pressure regulator (not included in scope of delivery) to the gas rail.

- Connect the universal adapter to the 1/4'' BSP external thread.
- Tighten the universal adapter using a spanner.

Ensure that the connectors are firmly mounted and gas-tight.
Use suitable hose clips or crimp clamps to fix the hose to the adaptor and tighten the clips/clamps securely. Once you have fitted and checked the hose/pressure regulator
B)
connection to the gas grill, turn on the gas cylinder and check the connections for leaks. Make sure that you keep well away from any possible sources of ignition during this process.
- Keep the gas hose and the electrical power cord away from hot parts.
- Avoid twisting the gas hose unnecessarily.
- Always check the gas hose for cracks, pinches, wear and other damage before using the grill. If the gas hose shows signs of damage or wear, it must be replaced immediately.
- Replace the gas hose if damaged or when required by national statutory regulations.
Gas-tightness test

Never use a naked flame to check for leaks at the gas connections. If you smell gas, turn off the gas cylinder immediately.
Every time before starting up the appliance and whenever the gas cylinder has been replaced, carry out the "gas-tightness test" according to instructions.
Do not use damaged gas cylinders. Dented or rusty gas cylinders or gas cylinders with damaged valves are potentially dangerous and should be replaced immediately with a fully intact cylinder.

- Firmly connect all gas-conveying components.
- Turn all control knobs to "● OFF".
- Open the valve at the gas cylinder.
- Apply a soap-and-water solution made by mixing water with a proportion of detergent or a leak loca- tor spray to all gas connections (gas cylinder, gas pressure regulator, gas hose connections).
- If soap bubbles appear, it means that there is a leak at that point.
IMPORTANT: The grill must not be used until all leaks have been eliminated.
- In this case close valve at the gas cylinder.
- Eliminate the leaks by tightening the connections, if possible, or replacing any defective parts.
- Repeat leak test.
- If you smell gas and cannot find any leaking joints on the grill, turn off the gas cylinder, detach the hose and immediately contact your supplier or the shop where you bought the appliance.
Important operating instructions
The ability of the user to correctly assemble and safely use the grill can be impaired by the consumption of alcohol, drugs and/or prescription or non-prescription drugs. This appliance is not intended to be used by people (including children) with limited physical, sensory or mental capabilities or without the necessary experience and/or knowledge unless they are supervised by a person responsible for their safety or are instructed by such a person on how the appliance is to be used.
- Do not use this grill until all components have been properly assembled and the gas-tightness test has been carried out. Incorrect assembly can be dangerous. Please pay strict attention to the assembly instructions.
- Only use this grill in the open in a well ventilated but sheltered place with firm, flat surface.
- The RÖSLE grill is not intended for assembly or use in or on caravans, camper vans, food trucks and/or boats.
- Do not move the grill over high ledges/steps or very uneven surfaces and only move the grill after it has cooled down.
- Do not use the grill in garages, buildings, walkways between buildings or any other such enclosed space. Otherwise poisonous vapours may collect that could cause serious or even fatal injuries.
- Never operate the grill underneath combustible roofs canopies, etc. Whenever using this grill, make sure it is at least 1.5m away from any combustible or heat-sensitive materials.
- Keep the grilling surface free from flammable gases and liquids (e.g. fuel, alcohol, etc.) and other combustible materials. Ignoring this instruction may result in shooting flames and/or explosions.
- Make sure that the slots at the back of the firebox and lid are always clear. Do not use lava stones or charcoal on this grill.
- Never leave the grill unsupervised when in use.
This grill gets very hot and, when in operation, should only be taken hold of at the points necessary for operation. When the grill is alight, only hold the grill lid by the handle provided. When using the grill, do not wear garments with loose hanging sleeves or made from easily flammable materials. Watch out for your face, hair, etc. - Do not place the protective cover over the grill until it has completely cooled down.
- Only genuine manufacturer's spare parts may be used.
- To protect the food being barbecued and the grill, the temperature should not be allowed to exceed 350^ / 662^ . Grill parts may warp at higher temperatures. Some (chemical/poisonous) by-products produced when barbecuing, especially if the appliance is not used properly, can be harmful to health. These could lead to cancer, problems with pregnancy and other consequences.
- The manufacturer accepts no liability whatsoever for damage caused by incorrect, careless or negligent use or use other than intended. The manufacturer accepts no responsibility whatsoever for damage occurring during use of the appliance or for complaints from third parties.

CAUTION! Risk of fire from excess fat!
Before use, check all processes that lead to the fat catcher as well as the fat catcher for accumulated fat. Remove excess fat to prevent fat fires.
- Remove excess fat from the grill to prevent fat fires, as provided for by the routine servicing operations. That also includes the Flavorizer and fat drawer.
- If a fat fire occurs, take the food out of the flames and close the lid until the flames subside. Close the gas supply at the cylinder and leave the lid closed until the fire has been extinguished.
- In the case of thick flames, attempt to extinguish the fire where possible. Check the information on the fire extinguisher. Do not pour water into the grill to suppress flames.
- Never line the cooking compartment and the fat catcher tray with foil or sand. This prevents the fat from passing through and draining off. It may cause a fat fire. Instead, you should use drip trays to catch the juices running out of the meat.
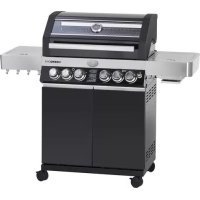
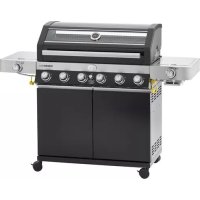
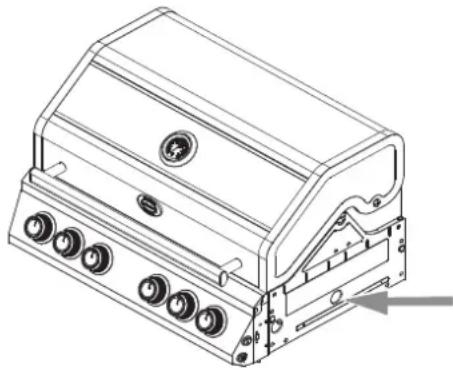
The Videro G4-SL in detail


| Controls | |||
| 1 Lid | thermometer 10 Shelf | ||
| 2 Lid | with glass insert 11 Castors with brake | ||
| 3 Primezone 12 Control knob, side burner | |||
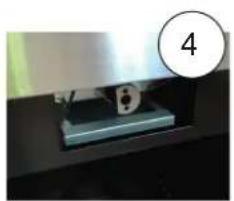
| 4 Fat | catcher tray, Primezone 13 USB port | ||
| 5 Igniter, Primezone 14 Battery compartment for lighting | |||
| 6 | Main burner control knob with Jet Flame ign-niter system | 15 Gas cylinder holder | |
| 7 Control knob, Primezone 16 Switch for control knob | lighting | ||
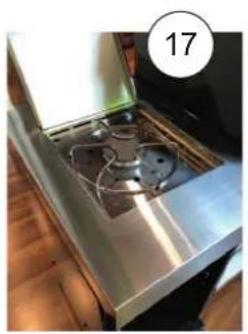
| 8 Storage space 17 Integral side burner | |||
| 9 Fat catcher tray with drip tray | |||
The Videro G4-SK in detail

| Controls | |||
| 1 Lid | thermometer 12 Control knob, side burner | ||
| 2 Lid | with glass insert 13 USB port | ||
| 3 Primezone 14 Battery compartment for lighting | |||
| 4 Fat | catcher tray, Primezone 15 Gas cylinder holder | ||
| 5 Igniter, Primezone & Back Burner 16 Switch for control knob lighting | |||
| 6 | Main burner control knob with Jet Flame igniter system | 17 Integral side burner | |
| 7 Control knob, Primezone 18 Control knob, back burner | |||
| 8 Storage space with rack 19 Tap | |||
| 9 Fat | catcher tray with drip tray 20 Sink | ||
| 10 Shelf 21 Back burner | |||
| 11 Castors with brake | |||
Starting up the grill before barbecuing for the first time
Ensure that all previous points are observed and a gas-tight connection is established at the gas grill. Before you use the appliance for the first time, we recommend that you "season" it to remove any residues from the production process.
"Seasoning" process
- Before seasoning the appliance, please remove any stickers on the lid window and the side burner.
- If you do not do so, the stickers may melt when the appliance heats up and will then be very difficult to remove.
- Take out the grates and grill plates and wash them with a mild detergent.
- Refit the components.
- Switch the grill on, start all main burners and allow it to heat up at a temperature of 230^ with the lid down for approx. 30 minutes.
- After the seasoning phase, switch the appliance off.
Lighting the burners
Jet Flame igniter system
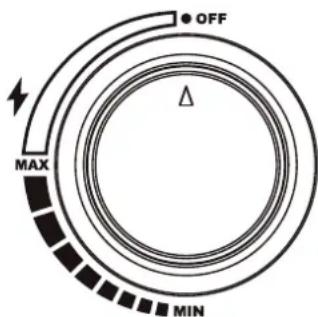
When the burner control is turned to the lighting position you will hear a click from the Jet Flame igniter system.
Lighting procedure:
- Open the lid before lighting the grill.
- Before starting the lighting procedure, all control knobs must be set to the position "OFF".
- Open the valve at the gas cylinder.
- Press the right-hand control 6 inwards and turn it slowly anti-clockwise to the "MAX" position or until you hear the click of the Jet Flame ignition system. That initiates the ignition spark.
- If the burner does not light immediately, turn the control knob back to " OFF", wait 1 minute to allow the accumulated gas to disperse and then repeat the lighting procedure.
- Repeat the process until all the burners are lit or until you have lit all the burners you wish to use.
- You can now use the control knob to adjust the flame to suit your particular requirements. For the lowest setting, you turn the control anti-clockwise to "MIN".
- If you do not succeed in lighting the grill, refer to the section headed "Troubleshooting" on page 45.
Lighting manually
- In exceptional cases, the grill can also be lit with a match.
- To do so, use a match that is at least 90mm long and insert the burning match through the lighting hole on the right.
Turning off the burners
Press in the control knob (gas valve) for the burner concerned and turn it clockwise to " OFF".

Always turn off the gas supply at the cylinder after barbecuing.
Lighting the side burner
- Open the side burner lid before lighting the side burner.
- Before starting the lighting procedure, the control knob must be set to the position " OFF".
- Open the valve at the gas cylinder if you have not already done so.
- Press the control knob 12 inwards and turn it anti-clockwise to the position "MAX". That initiates the ignition spark.
- If the burner does not light immediately, turn the control knob back to " OFF", wait 1 minute to allow the accumulated gas to disperse and then repeat the lighting procedure.
- In exceptional cases, use a match to light the burner if the igniter does not produce a spark.
- You can now use the control knob to adjust the flame to suit your particular requirements. For the lowest setting, you turn the control anti-clockwise to "MIN".
- If you do not succeed in lighting the grill, refer to the section headed "Troubleshooting" on page 45.
Primezone
The Primezone with an infrared gas burner is ideal for flash frying, e.g. steaks, in order to obtain a crispy texture at approx. 800^ surface temperature.

The gas grill should be positioned so that the Primezone is sheltered from the wind where possible as strong winds may effect its performance.
Never use the grate of the Primezone as a tray for grilled food. Liquids and grease drop into the ceramics and clog up which may impair the function.
Never bend over the open grill. Always keep at least 30~cm away from the igniter opening when lighting the Primezone.
The infrared gas burner generates very intensive heat. Do not leave grilled food on the burner unattended as it may burn quickly. Leave the lid of the grill open when using the infrared gas burner at a high flame. This allows better monitoring of the grilled food in order to avoid burning.
Using / Starting up the Primezone in the side table
- Open the lid of the Primezone before lighting it.
-
The Primezone has a grate which can be used at two different heights.
-
The lower position can be used like a normal gas cooker and is suitable for preparing sauces, soups, etc.
The recommended diameter for pots and pans is 25 to 30cm .
The higher position is ideal for frying meat. Please insert accordingly before lighting the Primezone.

Lower position Upper position

The lid of the Primezone can only be closed when the grate is in the lower position.
- Turn on the valve on the gas cylinder.
- Press the control knob 7 inwards and turn it anti-clockwise to the position "MAX".
- Now light the Primezone by pressing the electronic igniter 5. Keep this pressed until the igniter lights up.
-
Use a match to light the burner if the igniter does not produce a spark.
-
For the lowest setting, you turn the control knob anti-clockwise to "MIN".
- You can now use the control knob to adjust the flame to suit your particular requirements.
- Operate the grill with the lid open for 5 minutes or until the ceramic burner is red.
- Place meat or other items for barbecuing on the grill and grill according to the recipe.
- Continue to grill depending on your taste and desired cooking level at high, medium or low temperature and turn the food often. Alternatively, place the food from the Primezone onto the main grill area, close the lid and slow cook at 120 - 160^ .

Do not close the lid of the side burners if the grill is still in use or even hot.
Do not adjust the grate if it is hot or in use.
Do NOT use the side burners for frying as cooking with oil may lead to dangerous situations.
The infrared burner is equipped with a fat catcher tray. This can only absorb a small amount of the dripping grease.
To avoid grease fires, the fat catcher tray must be cleaned after each use.
Back Burner (G4-SK)
The Videro G4-SK model has an infrared back burner. This burner is ideal for the slow and even cooking of roasts, whole chickens or turkeys in conjunction with the so-called rotisserie. With the steady rotation of the spit and additional heat source, the juice from the food is distributed and ensures a crispy outer shell. This way you achieve the perfect cooking result every time.
When using the back burner, ensure that there is a fireproof drip tray filled with water under the food in order to catch the dripping fat.
Using, starting up the back burner (G4-SK)
- Open the lid of the grill.
- Remove the warming rack.
- Before starting the lighting procedure, the control knob must be set to the position "· OFF".
- Open the valve at the gas cylinder if you have not already done so.
- Press the control knob 18 inwards and turn it anti-clockwise to the position "MAX".
- Now light the back burner by pressing the electronic igniter 5. Hold it down until the burner starts up.
- If the burner does not light immediately, turn the control knob 18 back to " OFF", wait 1 minute to allow the accumulated gas to disperse and then repeat the lighting procedure.
- In exceptional cases, use a match to light the burner if the igniter does not produce a spark.
- Control the flame by turning the control knob anti-clockwise towards "MIN".
- Operate the grill with the lid open for 5 minutes or until the ceramic burner is red.
- Position chicken or other food together with the rotisserie on the grill and cook according to recipe.
During the preparation stage ensure that your food is secured in the middle of the spit and balance it on the grill using the weight. For whole chickens or turkeys, you should tie the legs or wings to the body to avoid burning.
- Position a catcher tray filled with liquid under the food in order to catch the juices.
- Cook the meat with the lid closed according to the type of meat.
Observe the care notices on page 43.
Protection of the Primezone and Back Burner
The two burners are designed for a long life. However, some measures are necessary in order to avoid cracks in the ceramic burner surfaces which may impair the function of the burner.
- The ceramic burners must never come into direct contact with water. Hence why no water should be poured onto the grill to extinguish flames. If the ceramics or the inside of a burner become wet when the grill is switched off, the ceramics may break when the grill is used again due to the pressure of the steam.
- Keep cold water (rain, lawn sprinkler, garden hose, etc.) away from the ceramic burners.
- If the ceramics are wet, remove the burners from the grill. Set down in reverse order so that the water can run off. Allow them to fully dry indoors.
- Never allow the ceramic burners to come into contact with or touch hard objects. Exercise caution when removing and inserting the grate. If an object were to fall onto the ceramic surface, it would probably crack it.
Significant temperature differences (winter barbecuing) may cause cracks in the ceramic surfaces. - There is a danger of oxygen deficiency in the case of poor ventilation, which causes flashbacks. If this happens repeatedly, the ceramic surface cracks. This is why no more than 75% of the barbecuing area should be covered with solid metal (i.e. by sheet metal or a large pan).
Damage arising due to noncompliance with these measures is not covered under the warranty.
Control knob lighting
The illuminated control knobs facilitate orientation at the control knob in poor lighting conditions.
- Insert the 4 AA batteries - 1.5 V into the battery compartment 14 inside the storage compartment.
- Open the doors on the front as shown in the diagram of the appliance overview on page 33. Ensure correct polarity of each battery.
- Close the battery compartment lid.
- To switch on the lighting press button 16 (P. 33) on the operating panel.
- The lighting does not switch off automatically.
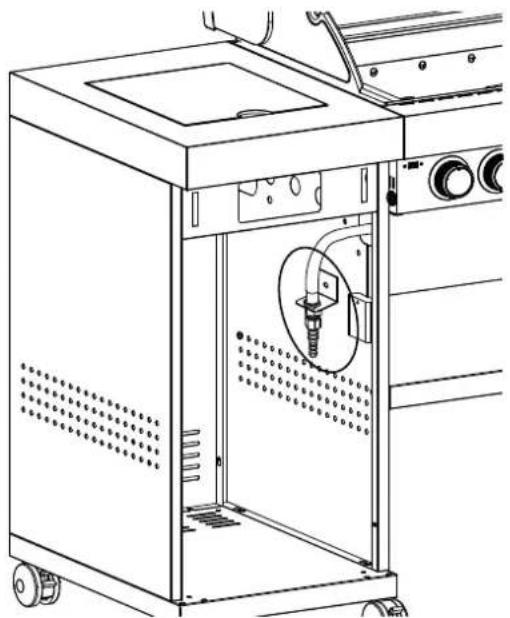
Starting up the water tap
- Read the safety and assembly notices on the separate supplementary sheet from the manufacturer.
- The tap supplied has a 12 connection thread and is supplied with cold water.
- Screw on the 12 adapter for plug coupling A (not included in scope of supply). Ensure that the connection is screwed hand-tight and do not use a pliers or spanner.
- Use a drinking water rubber hose with KTW approval for the water supply.
Cut off the water supply over the winter months and drain the tap and hoses completely in order to avoid frost damage.

Easy steps to becoming a barbecue expert
- Read the recipe and follow the specific instructions on the following pages.
- Before use, check the catcher tray for accumulated fat. Remove excess fat to prevent fat fires.
- Clean your grill regularly. Observe the instructions for use of the cleaning agent manufacturer.
- Preheat the grill with the lid closed for approx. 15 minutes on the MAX setting. Do not try to save time by placing food on the barbecue too soon, before it has reached the right temperature.
- Always put out the burner after barbecuing. Turn off the gas supply at the cylinder.
- Use a barbecue turner or tongs, but not a fork. Piercing with a fork will allow juices, and therefore flavour, to escape and the food will dry out.
- Check the food fits onto the grill before closing the lid. Ideally there should be a gap of approx. 2 cm between individual food items.
- Do not keep opening the lid to look at the food. Every time the lid is lifted, heat is lost, i.e. the food will take longer to be ready to be served.
- Only turn the food over once unless the recipe says otherwise.
- Never flatten food such as e. g. burgers. Doing this squeezes the juice out of the meat and dries the food.
If you baste the food lightly with oil it will brown evenly and not stick to the cooking grate.

Wash your hands and the implements thoroughly with hot water and detergent before and after handling fresh meat, fish or poultry. Alternatively you could use disposable gloves. Never put cooked food on the same plate on which you have had raw food.
- Do not defrost food for barbecuing at room temperature, but rather in a refrigerator.
- You will obtain the best results if the food is not completely cold (i.e. not taken directly from the refrigerator) when placed on the barbecue. Remove it from the refrigerator a little while beforehand (about 1 hour) so that it is at room temperature for cooking, provided that the food is not classified as sensitive.
- In the barbecuing instructions on page 42 you will find a list of recommended cooking times.
Cooking with the RÖSLE grill
Barbecuing methods
Preheating
Light the burners as described above, close the lid, turn the gas control knobs to "MAX" and preheat the gas grill for 15 minutes.
Protecting the cooking surface
It is advisable to apply a thin coat of fat to the cooking surface before using the grill on each occasion. You can apply a little cooking oil to the cooking surface with a long-handled brush. In that way you can help prevent food residues sticking to the surface.
Leaping flames
When you cook meat over an open fire, you have to expect the flames shoot up. That is caused by the natural meat juices dripping onto the flame diffuser.
Barbecuing very fatty meat or at very high temperatures can also cause the flames to shoot up. You have to keep the shooting flames under control as otherwise the food will burn or a fat fire will occur.
Preventing leaping flames
- Remove excess fat from meat and poultry before placing it on the grill.
- It is recommended to cook very fatty meat on a barbecue tray.
- Barbecue on a lower heat.
- Avoid marinades containing large quantities of oil.
Direct barbecuing with the lid closed
With the direct method, the food is cooked directly over the burners. Food that requires less than 25 minutes to cook is cooked by the
direct method. To be cooked through evenly the food should be turned once halfway through the cooking time. These are e. g. steaks, chops, kebabs and vegetables. Keep the lid closed. Every time the lid is lifted, heat is lost, i.e. the food will take longer to cook.
Indirect barbecuing with the lid closed
For indirect barbecuing, the lid is closed and only the two outer burners are lit. Place a fat catcher tray in the middle under the grate and position the food above it. In that way, the food is not cooked directly but by the convection throughout the cooking compartment produced by the closed lid.
This produces air circulation inside the gas grill that cooks the food indirectly.
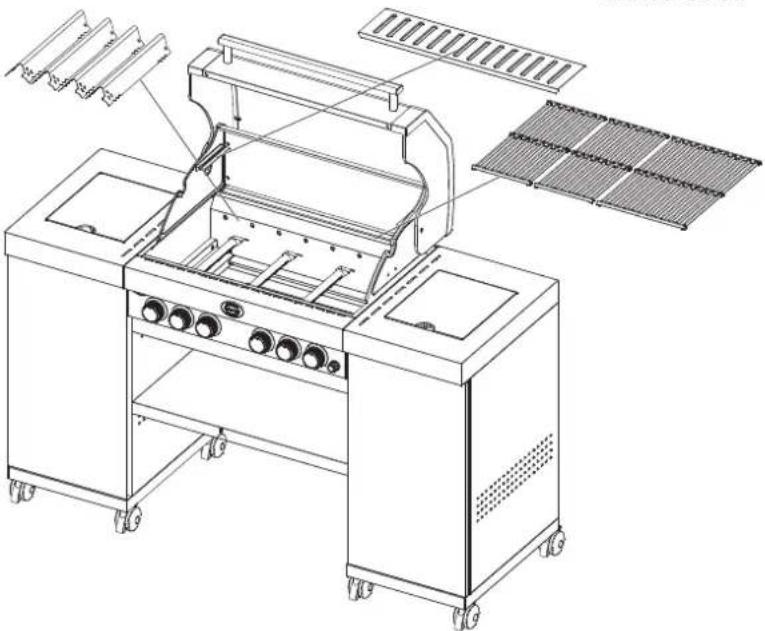
Fig.: Videro G4-SL

Fig.: Videro G4-SK
After use
When you have finished barbecuing, leave your gas grill alight for another 5 minutes to burn off excess fat and juices, etc. that could otherwise clog up the burner jets.
To prepare the appliance for the next time it is used, turn the control knobs to the position " OFF" and clean fat and food residues off the cooking surface with a long-handled brush.

Some parts may be very hot. Wear barbecue gloves to protect your hands.
Turn off the gas supply at the cylinder.
When the grill has completely cooled down, clean it and put it away.
When is the meat/food cooked through?
Check the temperature. Barbecuing is affected by many factors such as the thickness and initial temperature of the food, environmental factors, etc. If in doubt, use a thermometer to check the core temperature. Do not necessarily trust fixed cooking times. If using a roasting or steak thermometer, follow the manufacturer's instructions for use.
- When using a meat thermometer, you should leave it in the meat for a few seconds before reading off the temperature.
- For steaks, hamburgers and also roasts, etc., insert the thermometer into the thickest part of the food from the side so that the tip is in the centre of the food. When doing so, make sure that the thermometer is not touching any bone.
- To check the temperature of poultry, insert the thermometer into the thickest part of the breast or the leg. Take care not to touch the bones. If the poultry is cooked through, the breast should have a core temperature of 75^ , the leg 80^ .
- Take the roast meat or poultry off the barbecue about 5 minutes before it reaches the desired core temperature. Leave it to rest for about 10-15 minutes before cutting it so that the juices run back into the meat. The meat will continue to cook and it will also be easier to cut.
Cooking times
The following information for pieces, thickness, weight and grilling times are for guidance only and not binding. Grilling times are influenced by height, wind, outside temperature and the desired way the food is to be done.
Grill steaks, fish fillets, boneless chicken pieces and vegetables using the direct method for the time shown in the table or according to taste and turn the food once halfway through cooking.
Grill joints, poultry with bones, whole fish and thick cuts using the indirect method using the times shown in the table as a guide. Alternatively a roasting thermometer can be used that shows the desired temperature. Grill times for beef are for medium, unless otherwise stated.

Meat that is not properly cooked through can cause serious health hazards.
The approximate cooking times originate from various sources and relate to meat at fridge temperature. If you work with higher barbecue temperatures, we recommend that you do not apply barbecue sauce to the meat until the last 15 to 30 minutes of cooking time so as to prevent excessive browning or burning.
| Food Thickness/Weight Barbecuing time Temperature | |||
| Beef | |||
| Steak: New York, Porterhouse, rib, T-Bone or fillet | 2 cm thick 4 - 6 with direct, high heat | ||
| 4 cm thick 10 - 14 min. with direct, high heat | |||
| 4 cm thick | 6-8 min. | Sear and then barbecue for 8 - 10 minutes on indirect heat at high setting | |
| 5 cm thick 14 - 18 min. with direct, high heat. | |||
| 5 cm thick | 6-8 min. | Sear and then barbecue for 8 - 10 minutes at high setting | |
| Flank steak 500 g to 700 g, | 2 cm thick | 8 - 10 min. with direct, | high heat |
| Pork | |||
| Chops, with our without bones | 2 cm thick | 6-8 min. | with direct, high heat |
| 2.5 cm thick | 8-10 min. | with direct, medium heat | |
| Spare ribs, suckling pigs | 0.45 kg-0.90 kg | 3-4 min. | with direct, low heat |
| Ribs, spare ribs | 0.9 kg-1.35 kg | 3-6 hrs. | with direct, low heat |
| Country style ribs with bones | 1.36 kg-1.81 kg | 1.5-2 hrs. | with direct, medium heat |
| Poultry | |||
| Boneless, skinless chicken breast | 170 g-230 g | 8-12 min. | with direct, medium heat |
| Boneless, skinless chicken thighs | 120 g | 8-10 min. | with direct, high heat |
| Chicken breast with bones | 280 g - 350 g 30 - 40 min. | Medium heat | |
| Chicken drumsticks | 30-40 min. | Medium heat | |
| Chicken wings | 50 g - 80 g 18 - 20 min. with direct, medium heat | ||
| Whole chicken | 1.2 kg-1.8 kg | 45-90 min. | Medium heat |
| Whole turkey, without stuffing | 4.5 kg-5.5 kg | 2.5-3.5 hrs. | Low heat |
| 5.5 kg - 7.0 kg 3.5 - 4.5 hrs. Lowheat | |||
| Fish and seafood | |||
| Fish fillets or pieces | per 1 cm | 3-5 min. | with direct, high heat |
| Per 2.5 cm | 8-10 min. | with direct, high heat | |
| Whole fish | 500 g | 15 - 20 min. Medium heat | |
| 1.5 kg 30 - 45 min. Medium heat | |||
| Vegetables | |||
| Corn on the cob | 10-15 min. | with direct, medium heat | |
| Mushrooms Shitake or button / Portabella | 8 - 10 min. 10 - 15 min. | with direct, medium heat / Medium heat | |
| Halved onions / Sliced | 1.0 cm thick | 8 - 10 min. 35 - 40 min. | with direct, medium heat / Medium heat |
| Potatoes: Whole / Sliced | 1.0 cm thick | 12 - 14 min. 45 - 60 min. | with direct, medium heat / Medium heat |
Maintenance, cleaning and storage
Cleaning the fat catcher tray
The drip tray and the fat catcher tray must be cleaned on a regular basis!
If the grill is used a lot, more frequent cleaning may be required. Adapt your care plan according to usage.
If they are not, accumulated fat and oil could cause a fire in the grill.

Your guarantee does not cover damage caused by a fire started by fat and oil residues.
- Remove the drain funnel together with fat catcher tray.
- Never line the cooking compartment and fat catcher tray with foil or sand.
- Remove the excess fat, clean the fat catcher tray and cooking compartment with warm soapy water and rinse them with clear water.
Cleaning the cooking compartment / areas
If the cooking area is dirty: Heat up the grill for approx. 10 - 15 minutes at full power. Then leave it to cool down. Ensure that the grill has cooled down completely before you start with the thorough cleaning. If necessary, observe the specifications of the cleaning agent manufacturer.
- Never use abrasive stainless steel polish, oven cleaners, abrasive cleaning agents (kitchen cleaners), acid cleaning agents or scouring pads for cleaning the grill.
- Clean the outer casing with a mild detergent and water. Thoroughly rinse with clean water and dry the surfaces.
- Do not allow any water or cleaner to get into the burner jets.
- To clean the grate simply loosen the deposits using the RÖSLE barbecue cleaning brush or a soft stainless steel brush. Then wipe over with a damp cloth.
After the grill has been thoroughly cleaned, always dry it out by heating it up.
Cleaning the burners
Especially after long periods of use, the burners can become clogged with excess fat, juices and marinades and surface corrosion may set in.
If that happens, remove the burners.
- Remove the burners according to instructions
- Clean them with hot water and detergent.
- Make sure that the burner jets are clear.
- Rinse them with water, dry them and put them back in the grill.
- Light them immediately to prevent rusting and erosion.
- Apply a little oil if the grill is not to be used for an extended period.
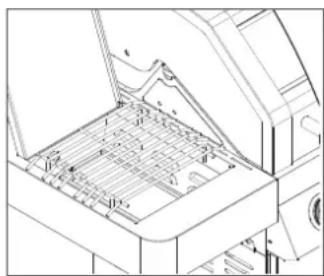
Removing the burners
- Make sure that the grill is switched off and has cooled down completely.
-
Make sure that all control knobs are set to "OFF" and the gas cylinder is turned off as well.
-
Close the gas supply and lift out the grates.
- Identify which main burner is defective. Start from the right.
- Remove the safety clip on the right from the burner.
- Remove the main burner.
- Remove the link between the two main burners.
- Repeat step 3 from right to left until you have discovered the defective burner.

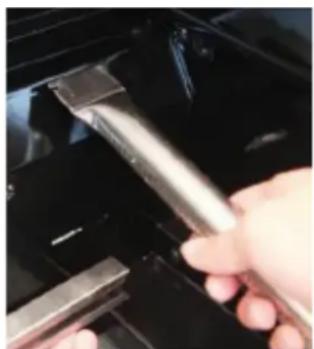

- Replace the defective burner with a new one.
- Reassemble the remaining burners and links in reverse order.
Winter
Over the winter months the grill should be stored in a dry, protected place.
Clean and dry the grates and rub some sunflower oil into them to prevent rusting. Wrap them in paper and store them in a dry and well-ventilated place.
- If you have any questions or are uncertain about anything, seek advice from your gas appliance supplier or sales point.
- Regularly oil the metal parts (e.g. hinge).
Videro G4-SK model:
-
Cut off the water supply and drain the tap and hoses completely in order to avoid frost damage.
-
After an extended storage period you should check the gas hose carefully, particularly for cracks, kinks, bite marks and other damage. If the gas hose is damaged, it must be replaced at once.
- Check all gas valves, burner pipes and joints for any faults.
- Check the proper fastening of all gas-conveying parts.
- When you first use the gas grill again at the start of the barbecue season or after an extended period, carefully read through the instructions for use again.
- Check that all burners are correctly attached.
- Check whether there is gas in the cylinder.
- Turn all control knobs to "OFF" and connect the gas cylinder. Before use, make sure that all grates and hotplates have been cleaned.
- Check the gas grill for any leaks using a soap-and-water solution or leak locator spray.
If you follow those tips, your RÖSLE gas grill will give you many years of reliable service.
Tips for extending the service life
With any outdoor appliance made of steel, occasional spots of rust on the surface are to be expected. If you always keep your grill covered over, clean and dry then you will already have gone a long way towards preventing rust.
A few tips:
- The cooking surfaces (including heat distributors) should be kept clean and dry after barbecuing, especially after barbecuing with marinades. They contain salt and attack the surface.
- You should rub a little oil into the surfaces of the grates after use.
- Do not leave your grill standing out in the rain unprotected. To ensure a long life for your grill, we recommend that once the grill has cooled down you protect it from the elements with a suitable RÖSLE cover. To prevent the build up of moisture, remove the cover after it has rained.
- Do not store your grill when wet. Carefully dry it first.
- Regularly remove the protective hood, both in summer and winter, so that the grill is aired out and any accumulated moisture can be dispersed.
- Slight surface rusting can easily be removed with a cloth soaked in white wine vinegar or with a commercial rust remover.
- Chipped enamel can be treated with touching-up paint to cover over the bare metal exposed.
- Check that the screw fixings are tight and that the wheels are firmly attached and turn freely.
Troubleshooting
| Problem Solution | |
| Appliance does not light, no flame, burner fault | Check whether the gas supply is turned on at the gas cylinder. Make sure that there is enough gas in the cylinder. Is there a kink in the gas hose? Straighten out the hose. Check whether sparks are jumping across from the electrode to the burner. Is it possible to light the burner with a long match? Check the igniter system. |
| Grill does not function properly | STOP, turn off the gas cylinder and turn all control knobs to "● OFF". DO NOT smoke. Check all gas joints. Wait 3 minutes to allow the accumulated gas to disperse and then repeat the lighting procedure. |
| The burners are not properly fitted over the outlets: Fit burners exactly over the outlets. Gas pipe is blocked: Remove the gas hose from the gas grill. Turn on the gas cylinder just for a second to remove any blockage from the hose. Turn off the gas cylinder again after a second and reconnect the gas hose to the gas grill. Blocked outlets: Remove the burners as described above. Check the gas valve outlets and use a thin metal wire to remove any residues that might be causing a blockage. Place burner over the outlets again and check whether the burner is now functioning properly. Check the burner regularly in order to ensure that it is free of insects and spiders which may block the gas system or impair the gas flow. Make sure that the Venturi tubes of the burner are cleaned carefully so that there are no more obstacles. We recommend a tube brush for cleaning the Venturi tubes. | |
| No spark • The distance between the burner and the electrode should not be more than 5-8 mm. If necessary, clean electrode and readjust it. | |
| Uneven burner flame pattern | Have the burners been cleaned? Clean the burners. Remove all residues. Do not allow any water or cleaner to get into the burner jets. |
| Flash flames occur • You may not have sufficiently preheated the grill. Preheat the grill for approx. 15 minutes with all burners lit. Clean the grill grates, fat catcher tray, etc. so that all fat deposits are removed. | |
| Food burns on the grate | Your grill temperature is too low. Wait a few minutes before turning the food so it has time to cook properly. |
| Leak • Turn off the gas cylinder. Ventilate the area so that any accumulated gas can completely disperse. Check all gas joints. If there is a leak, stand the gas cylinder upright in an open space. Keep well away from any gas or liquid escaping from the cylinder. Keep the gas cylinder at least 20 metres away from sources of ignition, electrical appliances, flashing lights, machinery, motors or engines. Ensure maximum air circulation to allow the accumulated gas to disperse. | |
| The Primezone (op-tional) "flares up" when in use. The burner makes a loud "whoosh" noise, followed by a continuous hiss and then stops heating. | Ceramic surface overloaded with drippings and deposits. Connections are blocked. Burner overheats due to inadequate ventilation (the grill area is largely covered with pans or pots). Cracks or ruptures in the ceramic surface. Sealing of ceramic surface is not airtight. Switch off burner and allow to cool down for at least 2 minutes. Start up burner again and operate at high flame for at least five minutes or until the ceramic surfaces heat evenly. Ensure that no more than 75% of the grill area is covered with pots and pans or accessories. Switch off burner and allow to cool down for at least 2 minutes, then restart it. Allow burner to cool down and carefully check it for cracks. If there are cracks, contact an au-thorised dealer to order a replacement Primezone. |
| Other problems not listed here | Contact your specialist retailer. E-mail us at reclamation@roesle.de |
| Danger! | Do not line the bottom funnel with aluminium foil. Is the bottom funnel "dirty", whereby the fats cannot drain off into the fat catcher tray? Clean the bottom funnel. |
| Appliance fire • If a fire starts in the appliance, turn off the gas cylinder. Use a wet cloth to put out the fire. • If the gas cylinder is on fire or if you cannot reach or turn off the switch, call the fire service immediately. • Direct a garden hose at the centre of the gas cylinder to cool it down but never extinguish the flames with water. As long as the gas is burning, it cannot form pools and explode. • Evacuate the area. Notice: Most fires in gas grills occur because fat and oil has accumulated or because the gas connections have not been regularly and properly checked. Remember to follow the manufacturer's instructions regarding cleaning and connecting the gas fittings. Insects Spiders and insects may occasionally make cobwebs or nests in the burner pipes. That may inhibit the flow of gas and cause a fire. This is known as flash-back and can cause serious damage to the gas grill and endanger the surrounding area. We recommend that the burner pipes are regularly inspected and cleaned. | |
Guarantee
From development to full-scale production all RÖSLE products undergo many stages of design and testing. Only high-quality raw materials and components as well as the most up-to-date quality assurance procedures are used in production and assembly. Only in this way can we guarantee the high quality expected by RÖSLE customers and many years of enjoyment from the product.
Should it nevertheless happen that a product unexpectedly fails to meet those requirements, we provide a 2-year guarantee.
It is a condition of the guarantee that the product is assembled and used in accordance with the instructions in this manual. RÖSLE has the right to ask for proof of purchase (so you should keep your invoice or sales receipt safe).
The limited warranty only applies to repairs or replacement of parts that are shown to have been damaged through normal use. Where RÖSLE confirms the damage and accepts the claim, RÖSLE will either repair or replace the part(s) concerned at no charge. If you need to return a damaged part, postage is to be paid to RÖSLE in advance so that RÖSLE can send the repaired or new part back to you free of charge.
This limited warranty does not extend to failures or operating difficulties due to accident, abuse, misuse, alterations, incorrect usage, fat fire, force majeure, deliberate damage, incorrect assembly or bad maintenance or servicing. In addition, the warranty is void if normal maintenance and cleaning is not regularly undertaken. In the same way this warranty does not cover deterioration or damage due to extreme weather conditions such as hail, earthquakes or hurricanes, as well as corrosion or changes to the colour due to heat exposure or abrasive or chemical cleaning agents, chipping on porcelain-coated parts and components, which are used for the installation of the gas grill, as well as the impact of salt air.
The guarantee becomes null and void if spare parts from other manufacturers are installed.
The applicable implied guarantees of merchantability and fitness are limited to the warranty periods as expressly set out in this warranty. In certain jurisdictions such limitations regarding the period of validity of an implied warranty are not allowed, therefore these restrictions will not apply to you.
RösLE accepts no liability for any exceptional, indirect or consequential damage. In certain jurisdictions the exclusion or restriction regarding secondary or consequential damage is not permitted, therefore these restrictions or exclusions will not apply to you.
Liability cannot be accepted for damage arising from the use of RÖSLE products on those of other manufacturers as a result of incorrect operation, assembly or misadventure, for example.
No person or company is authorised by RÖSLE to undertake any obligation or liability in its name in relation to the sale, assembly, use, dismantling, return or replacement of its products. Such representations are not binding on RÖSLE.
Disposal

Your new appliance was protected in transit by the materials it was packed in. All of the packing materials used are environmentally friendly and re-usable. Please help to make a contribution by disposing of the packing responsibly. Your dealer or your local recycling facility will be able to inform you about the available disposal methods.

Do not allow children to play with the packing or parts of it.
Risk of suffocation from foil and other packing materials
Used appliances are not worthless scrap. Valuable raw materials can be recovered by recycling the product in an ecologically responsible manner. Ask your municipal or local authority about the possibilities for proper and ecological recycling of the appliance. The materials are recyclable as indicated by their identifi cation marks.
Handling batteries

Make sure that batteries do not get into the hands of children. Children might put batteries in their mouth and swallow them. That could cause serious damage to their health. In such cases, seek medical advice immediately.
For that reason, keep batteries and remote controls where small children cannot reach them.
Normal batteries must not be recharged, reactivated by other means, taken apart, heated up or thrown on an open fire (risk of explosion).
Replace batteries promptly when they start to become weak. Clean battery contacts and appliance contacts before inserting the batteries.
If the batteries are not inserted correctly there is a risk of explosion.
Do not attempt to recharge batteries, take them apart, heat them to a temperature of over 100^ or burn them.
Dispose of used batteries immediately. When replacing the batteries, use only batteries of the correct type and model number.
Caution!
Do not expose batteries to extreme conditions. Do not place them on radiators or expose them to direct sunlight.
Leaking or damaged batteries can cause acid burns if they come into contact with the skin.
In such cases, you should use suitable protective gloves. Clean the battery compartment with a dry cloth.
Important information on disposal:
Batteries may contain poisons that are harmful to health and the environment.
Batteries are subject to the European Directive 2006/66/EC. They must not be disposed of together with normal household waste.
Please check on the local regulations in your area regarding separate disposal of batteries as proper disposal protects people and the environment against the potential negative consequences.
This symbol is displayed on batteries containing harmful substances:

Service and contact
Our customer support is available from Monday to Friday between 8 am and 6 pm to address any questions you may have, receive suggestions or deal with complaints. Have the following documents and details ready when making contact:
Proof of purchase (receipt)
- Photos of the suspected fault
- Serial number of product
| Model Videro G4-SL Videro G4-SK | ||
| Black / Stainless steel Stainless steel | ||
| Product No. 25321 / 25322 25323 | ||
| Equipment | ||
| Fire bowl Porcelain enamelled | ||
| Lid thermometer | ✓60 ° - 350 °C (± 10 °C) | ✓60 ° - 350 °C (± 10 °C) |
| Grate Cast iron, enamelled Cast iron, enamelled | ||
| Heat distributor Steel, enamelled Steel, enamelled | ||
| Fat catcher tray Stainless steel Stainless steel | ||
| Lightweight wheels with brake | ✓ | ✓ |
| Barbecue specifications | ||
| Barbecue area size in cm² 3150 3150 | ||
| Barbecue area size in cm | 70 x 45 | 70 x 45 |
| Hotplate in cm² | 1120 | 1120 |
| Hotplate in cm | 70 x 16 | 70 x 16 |
| Dimensions and weight | ||
| Width in cm | 154 | 193.7 |
| Depth in cm | 60 | 63.5 |
| Height with lid closed in cm | 118 | 118 |
| Working height of grate in cm | 90 | 90 |
| Approx. weight in kg | 70 | 85 |
| Country code AT, CH, DE | ||
| Article number | 25321 / 25322 25323 | |
| Category | I3 B/P(50) | |
| Gas type | Butane (G30)/Propane (G31): 50 mbar | |
| Side burner nozzle in mm 0.75 0.75 | ||
| Main burner nozzle / Primezone in mm | 0.81 | 0.81 |
| Country code BE, DK, ES, FI, NL, NO, SE, FR, GB, IE, IT, LU | ||
| Article number | ||
| Category | I3 B/P(30) | |
| Gas type | Butane (G30)/Propane (G31): 30 mbar | |
| Side burner nozzle in mm 0.88 0.88 | ||
| Main burner nozzle / Primezone in mm | 0.92 | 0.92 |
| Burner unit | ||
| CE | 0359-18 | |
| Main burner | 4 | 4 |
| Side burner output in kW | 3.0 | 3.0 |
| Primezone output in kW | 3.5 | 3.5 |
| Back Burner output in kW | - | 3.2 |
| Main burner output in kW | 4 x 3.5 | 4 x 3.5 |
| Total output in kW | 20.5 | 23.7 |
| Overall consumption g/h | 1489 | 1721 |
| Ignition system for main burner | Jet Flame piezo-electric ignition | |
| Ignition system for Primezone | Electronic igniter | |
| Ignition system for side burner | Jet Flame piezo-electric ignition | |
| Ignition system for Back Burner Electronic igniter | ||
| Max. gas cylinder capacity in kg (in storage compartment) | 11 | |
| LED battery for lighting | 4 x 1.5V DC - Type AA R6 | |
| Battery for ignition for Primezone, Back Burner (G4-SK) | 1 x 1.5V DC - Type AA R6 | |
Subject to errors and technical amendments.
The dimensions stated are approximate figures.
Accessories
The following barbecue accessories are available for the grill. Details of other accessories can be found at www.roesle-bbgq.de.
Appliance accessories
| 25618 Cover for Videro G4-SL |
| 25619 Cover for Videro G4-SK |
| 25031 Barbecue gloves, leather |
| 25311 Barbecue tray, Videro G3/G4 |
Grill accessories
| 25050 Barbecue slice |
| 25053 Barbecue cleaning brush |
| 25054 Barbecue tongs, 40 cm |
| 25056 Barbecue basting brush, round |
| 25057 Barbecue fish slice |
| 25063 Barbecue spatula |
| 25061 Barbecue tongs, curved |
| 25064 Barbecue tweezers |
| 25065 Fish bone tongs |
| 25058 Marinade syringe, 50 ml |
| 25060 Barbecue poultry shears | |
| 25066 Gourmet thermometer | |
| 25086 BBQ core temperature sen-sor | |
| 25070 Roast/Rib rack | |
| 25072 Rack with spit skewers (set of 4) | |
| 25079 Spit skewers (set of 4) | |
| 25078 Chicken roaster | |
| 25077 Cedar wood aroma board (set of 2) | |
| 25071 Fish rack |
Table des matieres
Indications important 56
Procedure "schoonbranden" 83
De Videro G4-SL in detail


De Videro G4-SK in detail

Procedure "schoonbranden"
Gentile cliente RÖSLE,
We wish you long lasting service from your new RÖSLE Grill. Your RÖSLE-Team