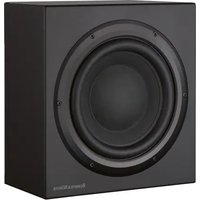
DB3D - Subwoofer BOWERS & WILKINS - Free user manual and instructions
Find the device manual for free DB3D BOWERS & WILKINS in PDF.
| Product Type | Active subwoofer |
| Brand | Bowers & Wilkins |
| Model | DB3D |
| Speakers | Two speakers in push-push configuration |
| Audio inputs | Stereo RCA Phono (unbalanced) and stereo XLR (balanced) |
| Wireless connectivity | Bluetooth for setup and control via app |
| Control app | Bowers & Wilkins DB Subwoofers for iOS (10+) and Android (5+) |
| Low-pass filter | Adjustable frequency and slope, presets for Bowers & Wilkins speakers |
| Equalization | Automatic Room EQ, input EQ (Movie, Music, Flat or custom 5-band) |
| Level adjustment | Yes, via app |
| Standby mode | Automatic after 20 minutes of inactivity or manual via button or 12V trigger |
| Power supply | Mains, power cable included |
| Feet supplied | Spikes, decoupling feet, rubber pads |
| Grilles | Magnetic, removable, cloth-covered |
| Reset | By triple quick press on the standby button |
| Maintenance | Soft lint-free cloth, avoid abrasive, acidic or alkaline products |
| Remote controls | 12V trigger input (2 × 3.5 mm jack) and RS-232 for automation systems |
| Light indicator | Green: on; red: standby; flashing red: overload |
| Use with two subwoofers | Recommended to improve stereo separation and smooth room modes |
| Burn-in period | Approximately 1 week for temperature, 15 hours for suspensions |
Frequently Asked Questions - DB3D BOWERS & WILKINS
User questions about DB3D BOWERS & WILKINS
0 question about this device. Answer the ones you know or ask your own.
Ask a new question about this device
Download the instructions for your Subwoofer in PDF format for free! Find your manual DB3D - BOWERS & WILKINS and take your electronic device back in hand. On this page are published all the documents necessary for the use of your device. DB3D by BOWERS & WILKINS.
USER MANUAL DB3D BOWERS & WILKINS
DB Series Subwoofers
Welcome to Bowers & Wilkins and the DB Series subwoofers.
Thank you for choosing Bowers & Wilkins. When John Bowers first established our company he did so in the belief that imaginative design, innovative engineering and advanced technology were keys that could unlock the enjoyment of audio in the home. His belief is one that we continue to share and it inspires every product we design.
Before connecting and operating this mains powered apparatus, please read carefully and observe the Important Safety Instructions in the accompanying leaflet.
This manual covers all DB Series subwoofers.


bowers-wilkins.com
1. Carton Contents
- DB Series subwoofer
- Power cable(s)
- Speaker grilles
- Spike, decoupling and rubber feet
- Literature pack
2. Introduction
Your DB Series subwoofer is an extremely high performance product that will reward thoughtful installation. We suggest that you take some time to read this manual before you begin.
DB Series subwoofers can be used for low frequency applications in both conventional stereo and home theatre systems. They incorporate a comprehensive set of features that enhance versatility and enable performance to be finely tuned to the listening room, listening position and programme material. These features are briefly described in the following paragraphs:
Set Up and Control
DB Series subwoofers can be set up and controlled only via the Bluetooth connected Bowers & Wilkins DB Subwoofers app for iOS and Android devices.
Before you begin installing your subwoofer, please download and install the DB Subwoofers app on your iOS or Android device. It is not possible to set up or use a DB Series subwoofer without the app.
Note: The DB Subwoofers app requires iOS version 10 and Android version 5 or later. Bluetooth must be switched on in the iOS or Android settings.
Room Equalisation
DB Series subwoofers can automatically optimise their performance to match the acoustic characteristics of the listening environment.
Multiple Inputs
DB Series subwoofers provide RCA Phono and balanced XLR stereo analogue inputs. The inputs can be connected simultaneously and configured independently for different system applications.
Level Adjustment
DB Series subwoofers incorporate both level adjustment and trim adjustment. The trim adjustment enables optimum matching of different source output levels so that the subwoofer volume level matches that of the main speakers for all inputs.
Low Pass Filter Set up
DB Series subwoofers provide low pass filter options for stereo configurations for both RCA and XLR connections. When using mono (LFE) connections the bass management functions of the source equipment should be employed. For stereo installations the low pass filter characteristics can be matched to either specific Bowers & Wilkins main speakers or to alternative manufacturer's main speaker specifications.
Input EQ
DB Series subwoofers provide optional equalisation presets designed to suit music and movie programme material. Custom equalisation via a five band equaliser is also provided.
3. Installing your Subwoofer
3.1 Before You Begin
Please follow the unpacking instructions printed on the outer carton.
Your DB Series subwoofer is heavy and should be unpacked by two people working together close to its final installed position.
Note: Due to the dual driver design of the DB1D, DB2D, and DB3D subwoofers we do not recommend that they are suitable for installation within custom built furniture. If furniture installation is necessary, multiple DB4S subwoofers are likely to offer a more satisfactory solution. In any case, built-in furniture must be structurally adequate to support the weight of the subwoofer or subwoofers and provide at least 20cm (8 inches) clearance around the subwoofer sides, back, and top.
3.2 Positioning
DB Series subwoofers are more versatile than most subwoofers in terms of positioning thanks to their Room EQ optimisation system that can compensate for less than ideal positioning.
Best results however will be obtained if your DB Series subwoofer is placed between the left and right speakers or in the vicinity of one of them. Placing a subwoofer to the side, but still to the front of the listeners is an acceptable compromise if domestic considerations dictate, however the subwoofer should not be located behind the listening position.
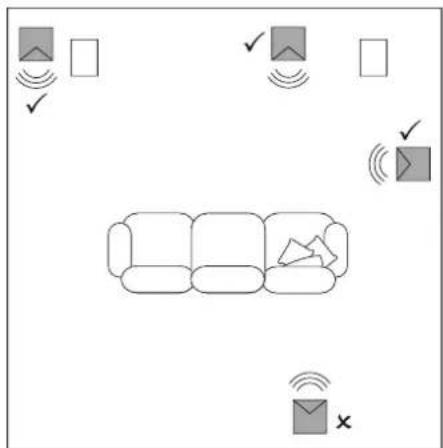
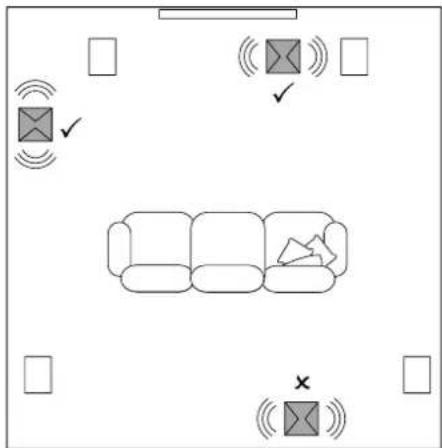
If two subwoofers are to be used it is best to position one near the left speaker and one near the right speaker. Diagrams 1a and 1b illustrates subwoofer positioning.
Note: DB1D, DB2D and DB3D models should be orientated with their twin drivers facing sideways. The DB4S should be orientated with its single driver facing outwards into the room.
Note: Using two subwoofers in a single installation can improve performance by maintaining stereo separation to the lowest frequencies, averaging the effects of low frequency room resonances and enabling a higher maximum volume level. In the case of two subwoofers used in a conventional stereo system, stereo separation will only be improved if each subwoofer is located close to the appropriate main speaker.
Note: Like all speakers, the proximity of room boundaries affects the sound of a subwoofer. Bass volume increases as more boundaries come into proximity. The more boost gained from the room, the lower the volume can be set and the less hard the subwoofer has to work.
Once you have positioned your subwoofer, its performance can be optimised using the Room EQ function. This is described in Section 4.
Diagram 1a
DB4S positioning in a stereo (2.1) system
flowchart
graph TD
    A["Input"] --> B{Signal}
    B -->|Yes| C["Check"]
    B -->|No| D["Error"]
    C --> E["Access"]
    D --> F["Error"]
    E --> G["Display"]
    F --> H["Display"]
    G --> I["User Interface"]
    H --> J["User Interface"]
    I --> K["User Interface"]
    J --> L["User Interface"]
Diagram 1b
DB1D, DB2D and DB3D positioning in a home theatre (5.1) system
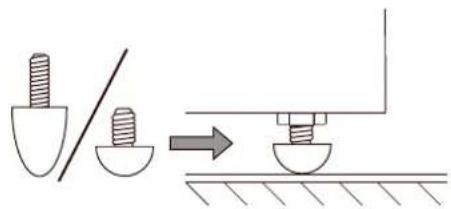
3.3 Subwoofer Foot Options

DB Series subwoofers must not be without one of the foot options fitted.
DB Series subwoofers can be fitted with either decoupling, rubber or spike feet. Use of the different foot types is described in the following paragraphs:
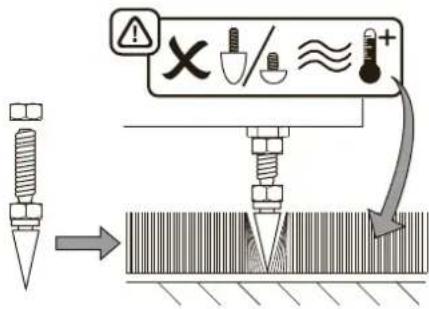
- The spike feet are intended for use on carpeted floors. The spikes pierce the carpet and rest on the floor beneath both to protect the carpet from indentation and to provide the subwoofer with a solid foundation.
- The decoupling feet are intended to be used on suspended wooden floors. The rubber material of the foot provides a degree of de-coupling between the floor and subwoofer.
- The rubber feet are intended for use on non-carpeted solid floors where spike feet might cause damage the surface.

Due to the underside location of abwoofer heat-sink, rubber or uppling feet should not be used on ted floors.
In order for feet to be fitted to the subwoofer it must first be turned upside-down. Take care not to damage the drive units when handling the subwoofer, and ensure when upside-down that the subwoofer rests on a surface that will not damage its finish.
Fit the feet by screwing one into each of the four screw holes in the subwoofer underside. In the case of spike feet, initially screw the lock nuts fully onto the thread before screwing the feet into the subwoofer. The lock nut should then be used to raise the subwoofer above the carpet pile and to enable adjustment to minimise rocking.
Note: It is particularly important on the DB1D, DB2D and DB3D to raise the subwoofer above the carpet pile to ensure that cooling air can flow around the subwoofer amplifier heat-sink panel.
Diagrams 2a and 2b illustrate the use of each foot type.
Once the feet are fitted, the subwoofer can be turned back on to its feet. Take care not to allow the entire weight of the subwoofer to rest at an angle on one or two feet.

Never slide the subwoofer across the on its feet. It must be lifted if it is moved.
If the subwoofer rocks when placed on the floor in its final position on spike feet, or the thickness of carpet means that the spike points do not reach the floor beneath, adjust the feet until the subwoofer is supported firmly without rocking and is well clear of the carpet pile. When adjustment is complete, tighten all the lock nuts against the underside of the subwoofer using a 10mm spanner.
3.4 Subwoofer Grilles
Your DB Series subwoofer is supplied with optional fabric covered grilles (a single grille in the case of the DB4S). The subwoofer can be used with or without grilles fitted. The grilles are attached magnetically.
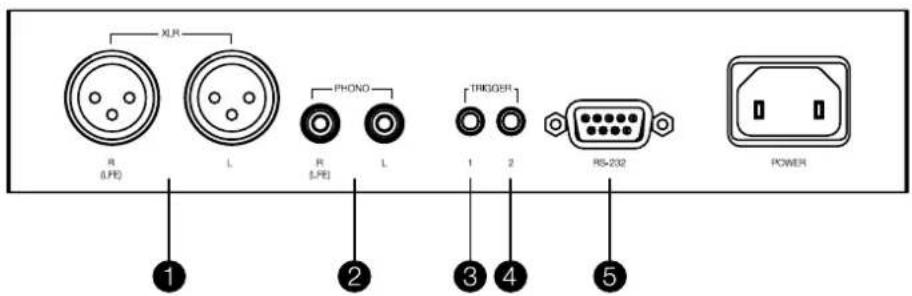
3.5 Connections
DB Series subwoofers require connection to a mains power supply and an input signal. Connectors for optional 12V trigger and RS232 control are also provided. Diagram 3 illustrates the DB Series subwoofer connection panel.
Mains Power
A variety of different power cables may be packed with your subwoofer. Use the cable appropriate for the mains socket in your territory. The subwoofer will switch on in operational mode, with its standby button indicator illuminated green, as soon as it is connected to mains power.
Note: The standby button is located on the front panel of the DB1D, DB2D and DB3D, and on the rear panel of the DB4S.
If the subwoofer remains unused for more than 20 minutes it will automatically switch to standby mode with the indicator illuminated red.
Signal Connections
DB Series subwoofers provide stereo RCA Phono and stereo balanced XLR inputs. It is possible to use the Phono and XLR sockets as independently selectable inputs. This enables your subwoofer to be integrated with two different audio systems: a home theatre system and a conventional stereo system for example. Input selection is managed via the DB Subwoofers app.
1 - XLR inputs
The balanced XLR inputs are intended for use with preamplifiers or audio-visual processors that provide balanced stereo outputs.
Diagram 2a
Using spike feet
Note: Balanced connection, where negative, positive and ground signals are carried on separate wires, is common in professional and some high-end domestic audio equipment. Balanced connection is inherently more resistant to interference and noise than unbalanced connection.
2 - RCA Phono inputs
The unbalanced RCA Phono inputs are intended for use with preamplifiers or audio-visual processors that provide only unbalanced stereo outputs.
Note: If your preamplifier or audio-visual processor provides only a mono subwoofer output, it can be connected to just one of the subwoofer input sockets.
Control Connections
In addition to mains and signal input sockets the DB Series subwoofer connection panel carries the following optional control interface sockets:
3 - 12V Trigger 1: 3.5mm jack socket
The Trigger 1 socket enables wired remote control of the subwoofer switch on and standby functions.
4 - 12V Trigger 2: 3.5mm jack socket
The Trigger 2 socket enables wired remote control of subwoofer input selection.
5 - RS-232: 9-pin D connector
The RS232 interface enables subwoofers to be incorporated in remote control home automation systems. Your Bowers & Wilkins retailer will be able to provide more information on RS232 based home automation systems.
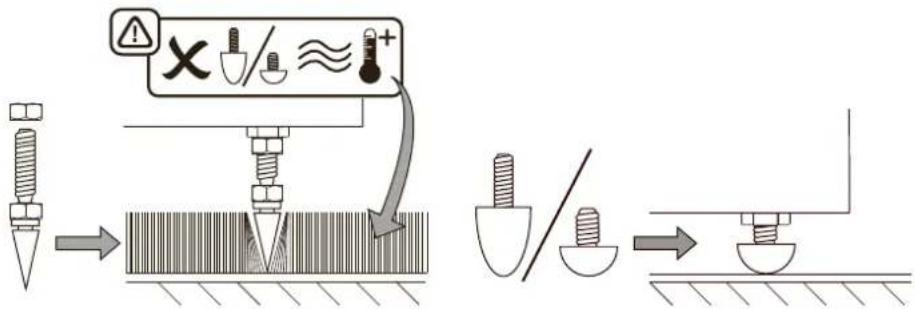
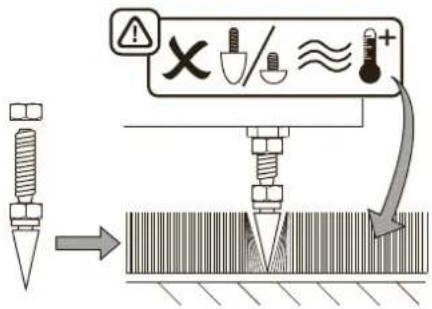
Diagram 3
DB subwoofer connection panel

4. Set Up and Control
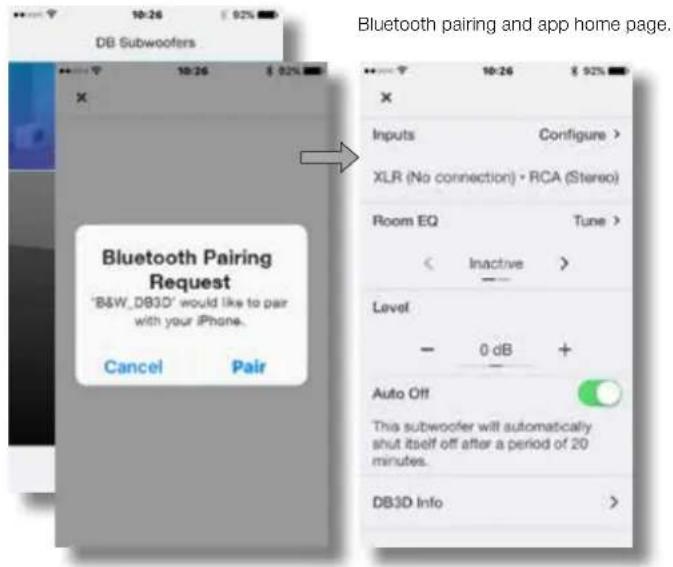
Your DB Series subwoofer can only be set up and controlled using the DB Subwoofers app. If you have not already downloaded and installed the app on your iOS or Android device please do so now. Bluetooth must be enabled on the device in order for it to connect to the subwoofer.
Note: The DB Subwoofers app requires iOS version 10 and Android version 5 or later. Bluetooth must be switched on in the iOS or Android settings.
When your DB subwoofer is connected to signal cables and mains power it will switch on in operational mode with its standby indicator illuminating green. To begin the set up procedure follow the steps below:
- Launch the DB Subwoofers app and confirm Bluetooth pairing. When pairing is complete the app will display the app home page.
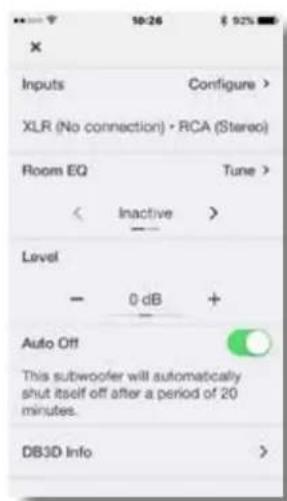
- The home page provides subwoofer level adjustment, product information, auto-standby options and access to the Room EQ optimisation procedure. Using Room EQ is not mandatory, however doing so will ensure that your subwoofer performs optimally in your room.
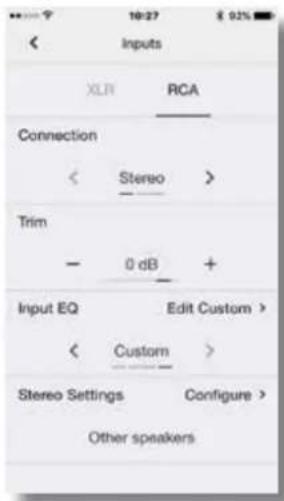
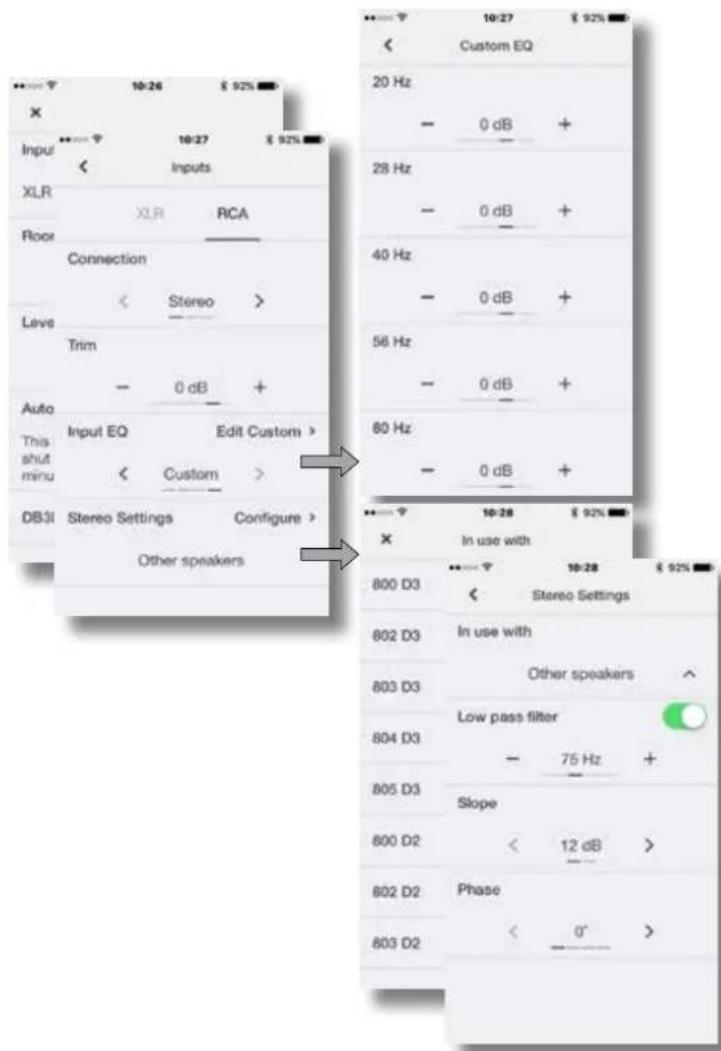
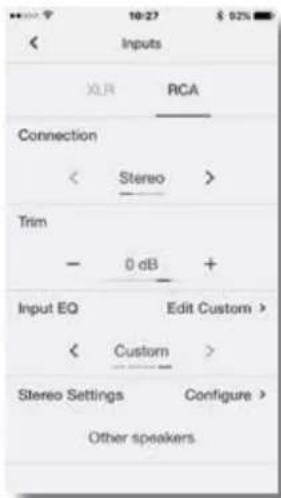
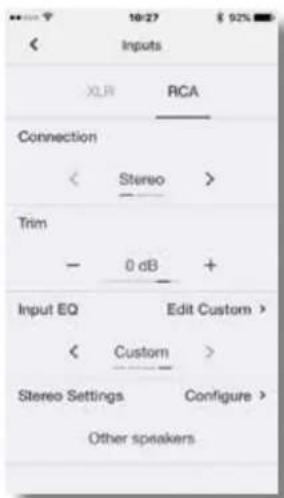
4.1 Input Set up
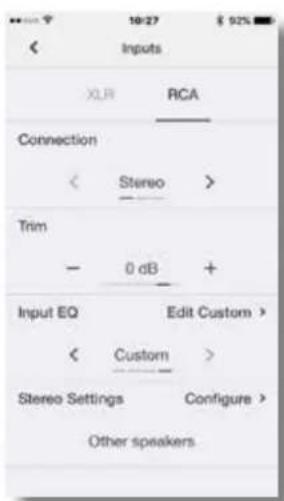
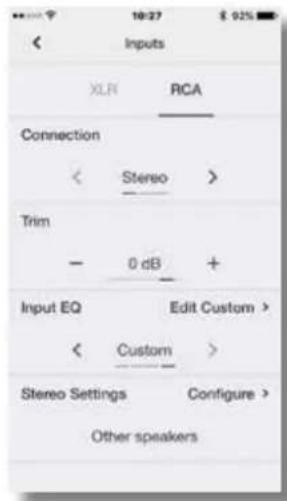
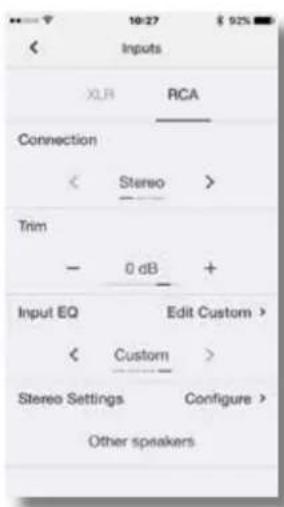
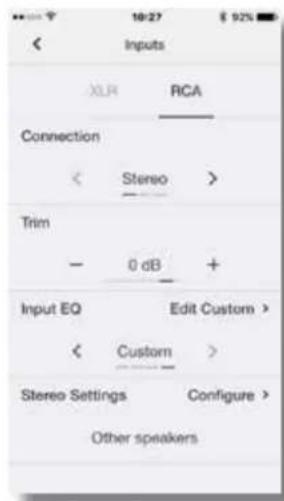
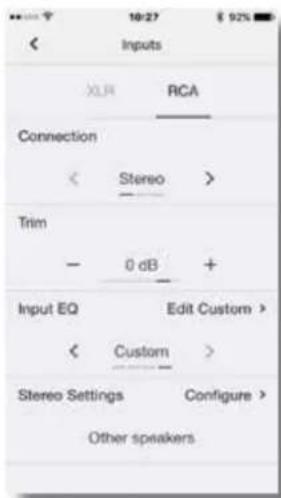
- Selecting the Input option from the app home page will open a configuration page that enables the Phono and XLR inputs to be independently set up. Selecting one of the inputs also makes it active.
Note: The set up options available for the XLR and Phono inputs are the same.
Note: Settings are input specific. Different settings can be selected for each input.
Note: If two subwoofers are used in one system the input settings should be the same for both.
- The input set up options are described in the following paragraphs:
- Connection: None, Stereo, LFE. If your subwoofer is to be used for the low frequency effects channel in a home theatre system select LFE. If your subwoofer is to be used for low frequency enhancement of stereo speakers select Stereo. If the input is not connected select None.
- Trim: Input sensitivity. Begin with the input sensitivity set to 0dB. If, in use, the subwoofer level adjustment on the app home page doesn't provide a suitable range the level trim can be adjusted.
- Input EQ: Flat (no EQ), Music, Movie, Custom. Select Flat to apply no input EQ. Select Music to apply an input EQ character appropriate for music programme. Select Movie to apply an input EQ character appropriate for movie programme. If the Custom Input EQ option is selected the app will display a five band EQ page that enables a custom equalisation curve to be applied to the input signal.
Input Options. Custom input EQ.

Stereo Settings: low pass filter selection or configuration.
- StereoSettings: Configure.
The Stereo Settings option is available only if the Stereo input connection option is selected. In this case, selecting Configure will open a page that enables either the subwoofer's low pass input filter to be set appropriately for specific Bowers & Wilkins main speaker models, or enables a custom low-pass input filter to be specified.
- Use of a custom low pass filter is appropriate when either the main speakers are unlisted Bowers & Wilkins models, or are from an alternative manufacturer. In either case, the low pass filter should be configured to match the main speaker's published low frequency characteristics. Bowers & Wilkins or the alternative speaker manufacturer will be able to assist with the appropriate information if necessary.
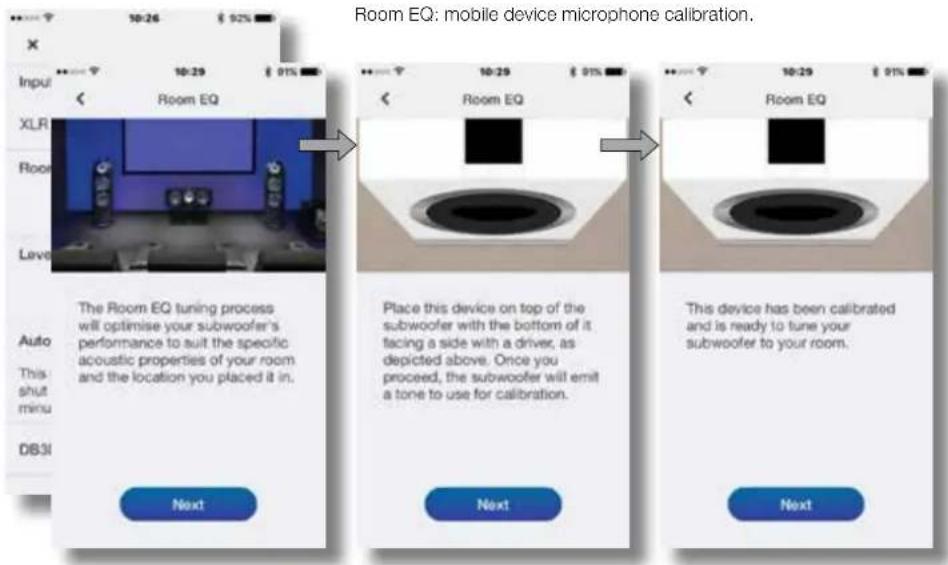
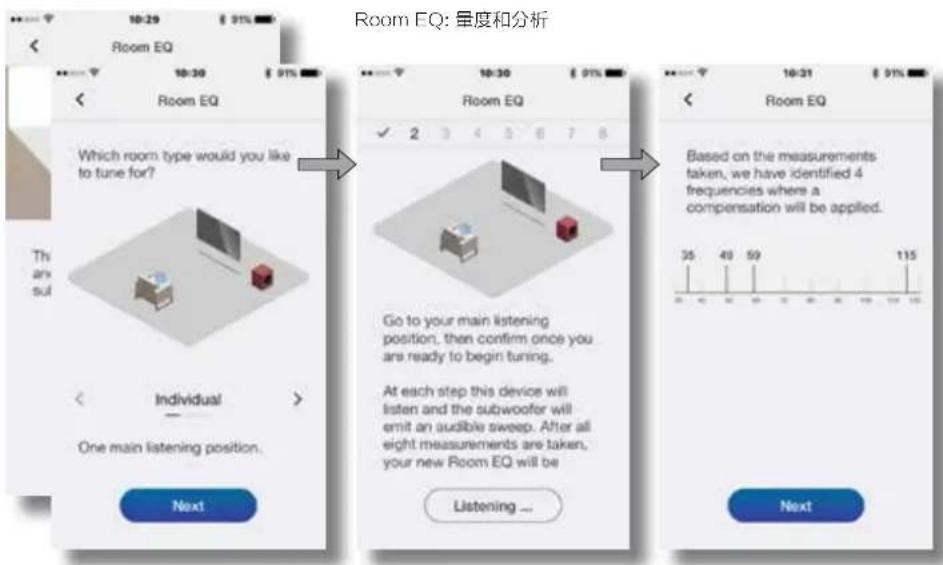
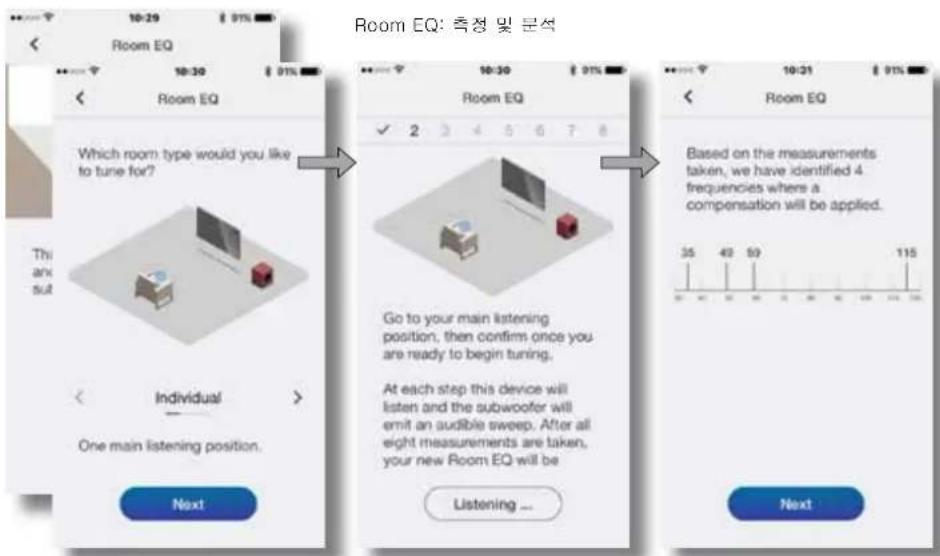
4.2 Room Equalisation
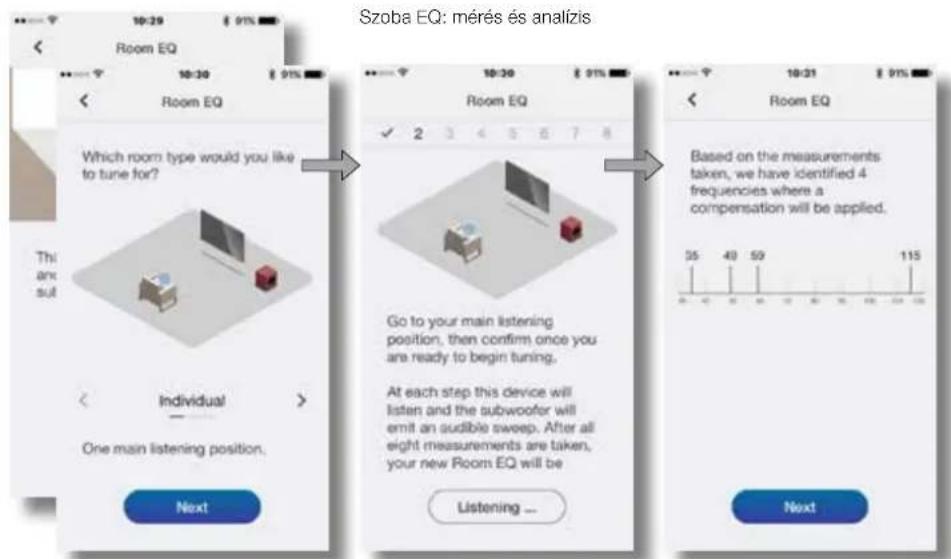
Note: If two subwoofers are to be set up, the Room EQ procedure must be carried out separately for each one.
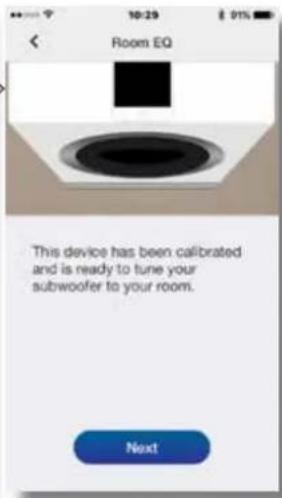
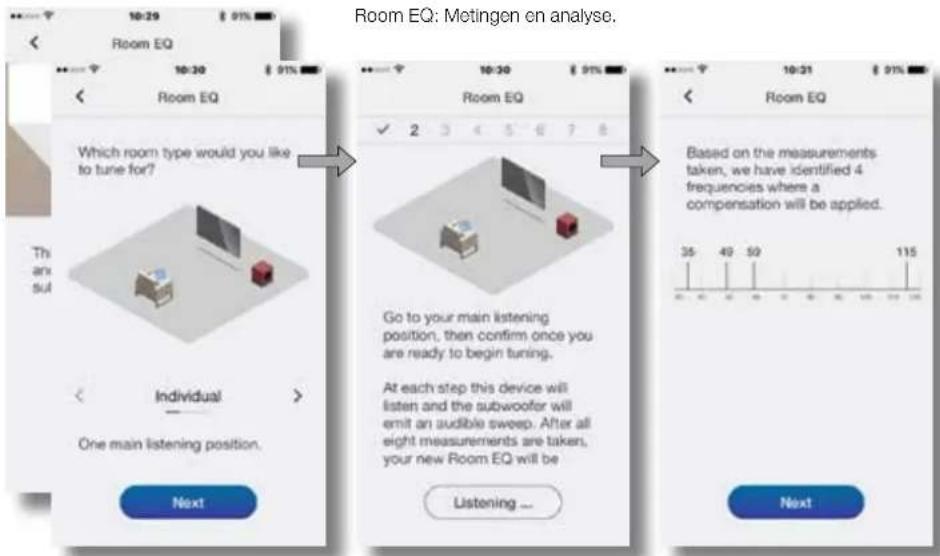
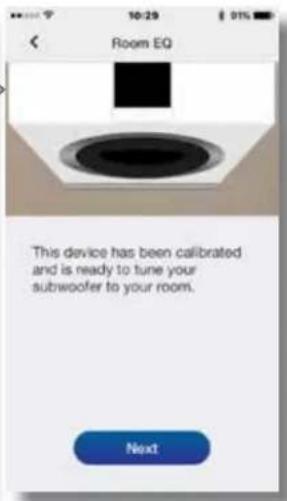
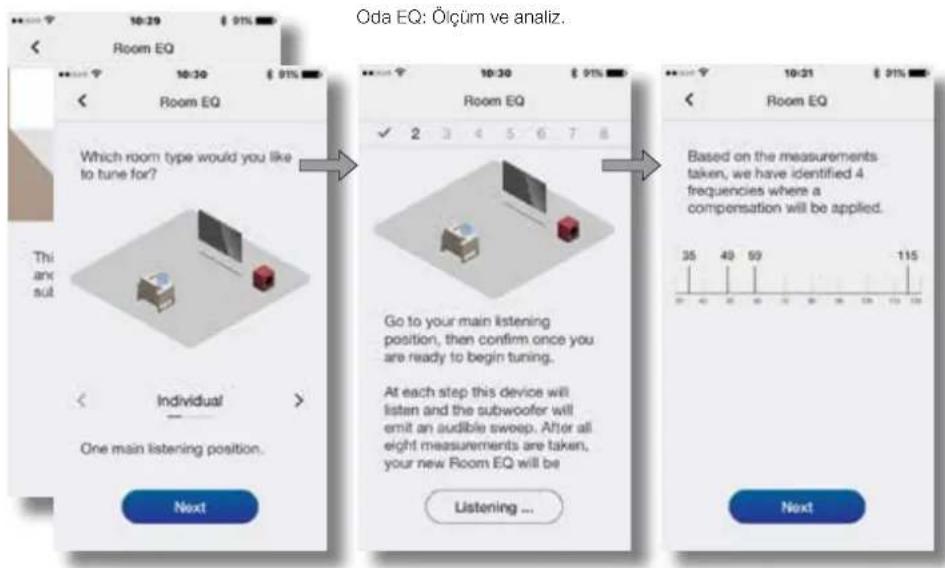
- To begin the Room EQ procedure select Tune on home page. Room EQ employs the microphone in your mobile device to analyse the performance of the subwoofer in your room, and the initial requirement is for the mobile device microphone to be calibrated. This is done by placing the mobile device in close proximity to one of the subwoofer drive units while the subwoofer generates a test signal.
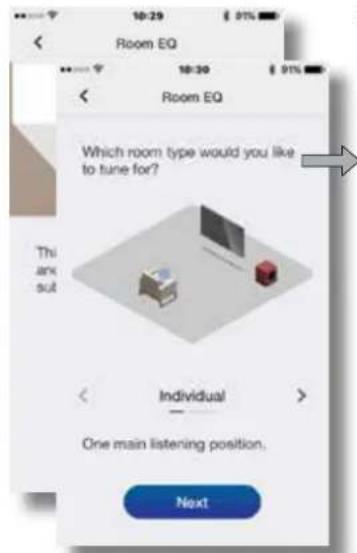
Note: Due to microphone incompatibilities, Room EQ is not available with all Android mobile devices. A list of authorised devices can be found in the support section of the Bowers & Wilkins website. - With the mobile device microphone calibrated, the Room EQ procedure provides options for the subwoofer optimisation to be targeted at a single listening position, a listening area appropriate to two or three listeners, or targeted generally throughout the room. Choose your preferred option and select Next.
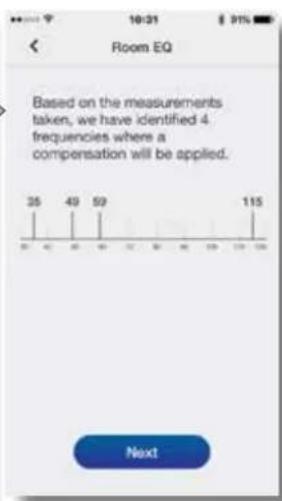
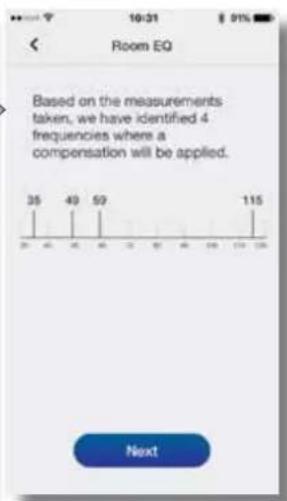
- The subwoofer will generate a series of eight separate test signals and use the mobile device microphone to measure the sound in the room and automatically apply an optimal EQ curve. If the Group or Room listening options were selected the app will ask you to move to different positions as the eight measurements are taken.
- When the measurements are complete the results will be displayed. Room EQ will then be complete. On selecting Next the app will return to the home page.
If your DB subwoofer is moved within the listening room or if large items of furniture are introduced, the Room EQ procedure should be repeated.

5. Subwoofers In Use
Once your subwoofer has been set up it is ready for use. In normal daily use little adjustment should be necessary, however you may wish to adjust the subwoofer volume level, use an alternative input EQ, or select the other input.
- To adjust subwoofer volume use the level control on the app home page.
- To select an alternative Input EQ select from the input set up page.
- To select the alternative input select the alternative tab on the input set up page.
To switch your subwoofer to standby mode press the standby button. The button indicator will illuminate red.
Please remember that your DB Series subwoofer is capable of volume levels that have the potential to cause nuisance. If in any doubt, reduce the volume.
Note: If a DB subwoofer is overloaded its standby indicator will flash red.
The performance of your subwoofer may change subtly during the initial listening period. If it has been stored in a cold environment, the damping compounds and suspension materials of the drive units will take some time to recover their correct mechanical properties. The drive unit suspension will also loosen up during the first hours of use. The time taken for the speaker to achieve its intended performance will vary depending on previous storage conditions and how it is used. As a guide, allow up to a week for the temperature effects to stabilise and 15 hours of average use for the mechanical parts to attain their intended design characteristics.
6. Default Reset
To return your subwoofer to its default settings, press standby button three times in quick succession. When the default reset is complete the subwoofer will switch off. Press the standby button or launch the app to switch on.
Note: It will be necessary following a default reset operation to instruct previously connected mobile devices to "forget" and re-connect to your DB Series subwoofer.
7. Cleaning
Wipe surfaces with a clean lint-free cloth. If you wish to use a cleaning agent, apply it onto the cleaning cloth, not directly onto the subwoofer. Test a small area first, as some cleaning products may damage some of the surfaces. Avoid products that are abrasive, or contain acid, alkali or antibacterial agents.
8. Support
Should you require further help or advice for DB Series subwoofers please visit the support site here.
Home page
Input set up page
bowers-wilkins.fr
4. Configuration et pilotage
bowers-wilkins.de
1. Lieferumfang
Abbildung 2b
Abbildung 3
bowers-wilkins.com
Imagem 3
bowers-wilkins.com
bowers-wilkins.com
flowchart
graph TD
    A["Pinning Tool"] --> B["Reinforced Plate"]
    B --> C["Actuator with Sensor & Check Valve"]
    C --> D["Final Assembly with Hammer and Lamp"]
Afbeelding 3
4. Instellingen en besturing
bowers-wilkins.com
1. Obsah balení
3.3 Varianty nožiček subwooferu


5. Subwoofer v provozu
1b ábra
bowers-wilkins.com
flowchart
graph TD
    A["Access"] --> B{Decision}
    B -->|Yes| C["Check"]
    B -->|No| D["Error"]
    C --> E["Action"]
    D --> F["Feedback"]
    E --> G["Car with sofa icon"]
    F --> H["Car with arrow icon"]
    G --> I["Car with speech bubble"]
    H --> J["Car with X"]
flowchart
graph TD
    A["Tool Position"] --> B["Stress Application"]
    B --> C["Assembly Step"]
    C --> D["Final Assembly"]
Rysunek 3


bowers-wilkins.com

bar
| Measurement | Value | |---|---| | 35 | 115 | | 40 | 115 | | 59 | 115 | | Next | (no label visible on chart)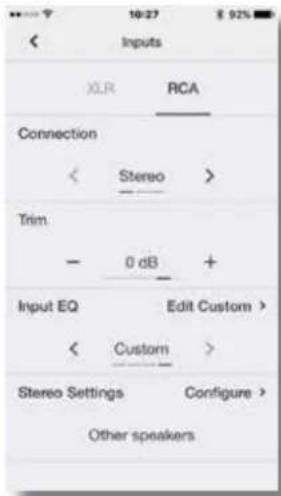

bowers-wilkins.com
1. Kutu İçeriği
Şekil 3
bowers-wilkins.com
1. 同梱品
flowchart
graph TD
    A["Phone icon"] --> B{Signal Reception}
    B -->|Yes| C["Phone icon with 'X' signal"]
    B -->|No| D["Phone icon with '✓' signal"]
    C --> E["Phone icon with '✓' notification"]
    D --> F["Phone icon with '✓' notification"]
    E --> G["Phone icon with 'X' message"]
    F --> H["Phone icon with 'X' message"]
3.3 サブウーファーの脚のオプション

4. 設定およびコントロール
bowers-wilkins.com
1. 装箱内容
3.3 超低音支脚选项

4. 安装和控制
bowers-wilkins.com
1. 装箱內容
3.3 超低音支腳選項

4. 安装和控制
輸入選項 自定輸入EQ
立體聲設定:低通輸入濾波器選擇或配置
- 立體聲設置:配置。
5. 超低音的使用
輸入設置頁面
bowers-wilkins.com
1. 포장 내용률
3.3 서브우퍼 피트 옵션

4-12V Trigger 2-3.5mm
다이어그램 3
DB 서브우퍼 연결 페널
4. 설정 및 컨트롤
4.1 입력 설정
5. 서브우퍼 사용
입력 설정 페이지