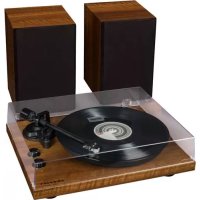
C62 - Turntable Crosley - Free user manual and instructions
Find the device manual for free C62 Crosley in PDF.



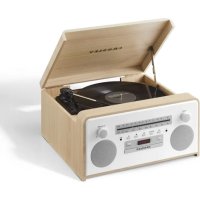
| Product type | Vinyl turntable with built-in speakers, Bluetooth and phono/line preamp |
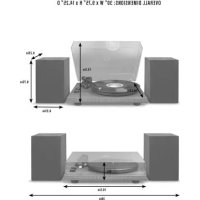
| Dimensions (cover closed) | 418 x 123 x 346 mm (16.46 x 4.84 x 13.62 in) |
| Weight | 9.4 kg (21.69 lb) |
| Power supply | 15 V DC, 2.4 A power adapter |
| Power consumption | 70 W |
| Speeds | 33 1/3 and 45 rpm |
| Speed variation | +1.5% |
| Wow and flutter | Less than 0.15% |
| Signal-to-noise ratio | 72 dB |
| Recommended tracking force | 3.5 ± 0.5 g (original cartridge) |
| Stylus (needle) | Crosley NP-5, response 20 Hz – 20 kHz |
| Outputs | RCA (Phono/Line switchable), speaker terminals (8 Ω, 10 W x 2) |
| Bluetooth | Version 4.2, wireless audio reception |
| Built-in speakers | 2 x 10 W (8 Ω) |
| Ground terminal input | Yes, for hum reduction |
| Included in the package | Cover, platter, slip mat, 45 rpm adapter, counterweight, pulley, alignment protractor, speaker wire (x2), power adapter |
| Maintenance and cleaning | Clean the stylus with a soft brush from back to front. Use a slightly damp microfiber cloth for the housing. Avoid alcohol or benzene. |
| Safety | Polarized plug, do not use near water, do not block ventilation openings, unplug during storms or prolonged non-use. |
| Spare parts and repairability | Replacement stylus: Crosley NP-5. For other parts, contact Crosley customer service. |
Frequently Asked Questions - C62 Crosley
User questions about C62 Crosley
0 question about this device. Answer the ones you know or ask your own.
Ask a new question about this device
Download the instructions for your Turntable in PDF format for free! Find your manual C62 - Crosley and take your electronic device back in hand. On this page are published all the documents necessary for the use of your device. C62 by Crosley.
USER MANUAL C62 Crosley
natural_image
Line drawing of a vintage radio or instrument with open lid and base unit (no text or symbols)Safety Instructions
Read and understand this entire manual before using this product. Keep these instructions for future reference.
- Do not use this product near water.
- This product should be operated only by the type of power source indicated on the marking label or in this instruction manual.
- Do not defeat the safety purpose of the polarized plug. A polarized plug has two blades with one blade wider than the other. This plug will fit into the power outlet only one way. If you are unable to insert the plug fully into the outlet try reversing the plug. If the plug should still fail to fit, contact your electrician.
- Protect the power cord from being walked on or pinched particularly at plugs, convenience receptacles, and the point where they exit from the product.
- Do not overload wall outlets, extension cords, or integral convenience receptacles as this can result in a risk of fire or electric shock.
- Never push objects of any kind into this product through openings as they may touch dangerous voltage points or short-out parts that could result in a fire or electric shock. Never spill liquid of any kind on the product.
- Do not attempt to service this product yourself as opening or removing covers may expose you to dangerous voltage or other hazards. Refer all servicing to qualified service personnel.
- Changes or modifications to this unit not expressly approved by the party responsible for compliance could void the user's authority to operate the equipment.
- Do not use attachments not recommended by the product manufacturer as they may cause hazards.
- A product and cart combination should be moved with care. Quick stops, excessive force, and uneven surfaces may cause the product and cart combination to overturn.
- Slots and openings in the cabinet are provided for ventilation and to ensure reliable operation of the product and to protect it from overheating. Do not block or cover these openings.
- Unplug the product during lightning storm or when unused for long periods of time.
Items in this package
Before throwing away any packaging materials, please check thoroughly and make sure you find the following items that come along with this package:
- Turntable
- Turntable Lid
- Turntable Slip Mat
- Turntable Platter
- 45 RPM adapter
- Tonearm Counterweight
- Drive Belt
• Cartridge Alignment Protractor - Power Adaptor
- Speakers
- Speaker Wire x 2
Please contact Crosley customer service if there is any accessory missing from the package. Retain the original packaging materials for exchange or return purposes.
Specifications
Crosley C62A
Power AC power adaptor, DC output 15 V 2.4A
Power Consumption 70W
Speaker 8Ω 10W x 2
Turntable Speed 33 ^1/_3 , 45 RPM
Speed Variance +1.5%
Wow and Flutter < 0.15%
Signal to Noise 72 dB
Downforce Range 3.0-6.0g
Effective Tonearm Length 8.6" (218.5mm)
Overhang 0.73"
Product Dimensions(W x H x D) 16.46" x 4.84" x 13.62", with lid open 16.46" x 15.55" x 16.14"
Weight 21.69 lbs
Needle: Crosley NP-5
Frequency Response 20Hz - 20 kHz
Channel Balance <2.5dB
Channel Separation >18dB
Output Voltage 2.5mV
Recommended Load Resistance 47k Ω
Amplifier connection MM -input
Recommended Tracking Pressure 3.5±0.5g
Weight 0.18oz
Note:
- Design and specifications are subject to change without notice.
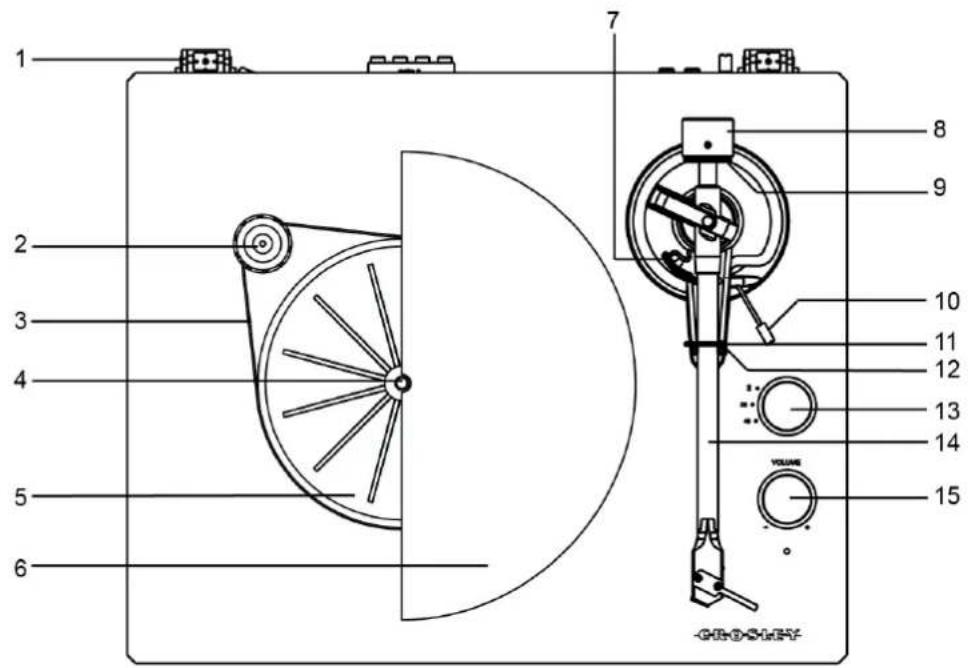
Product Description

natural_image
Simple diagram of a rectangular device with two circular holes and a labeled dimension line (16), no text or symbols present.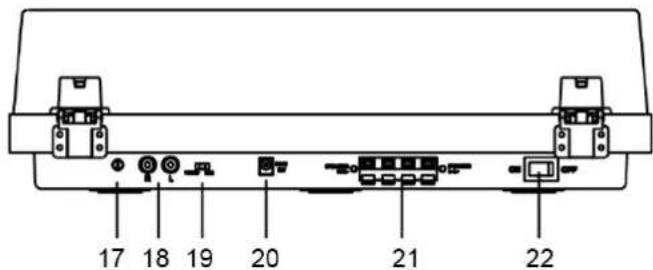

natural_image
Simple diagram of a rectangular frame with two circular holes and a vertical line labeled '16' at the bottom (no text or symbols beyond the number)- Hinge
- Drive Pulley
- Drive Belt
- Turntable Spindle
- Turntable Hub
- Turntable Platter
- Tonearm Lift
- Tonearm Counterweight
- Downforce Scale Dial
- Cue Lever
-
Hold Down Clip
-
Tonearm Rest
- Function Knob
- Tonearm
- Volume Knob
- Speakers
- Ground Connector
- RCA Jacks
- Phono/Line Switch
- Power Jack
- Speaker Output Terminals
- Power Switch
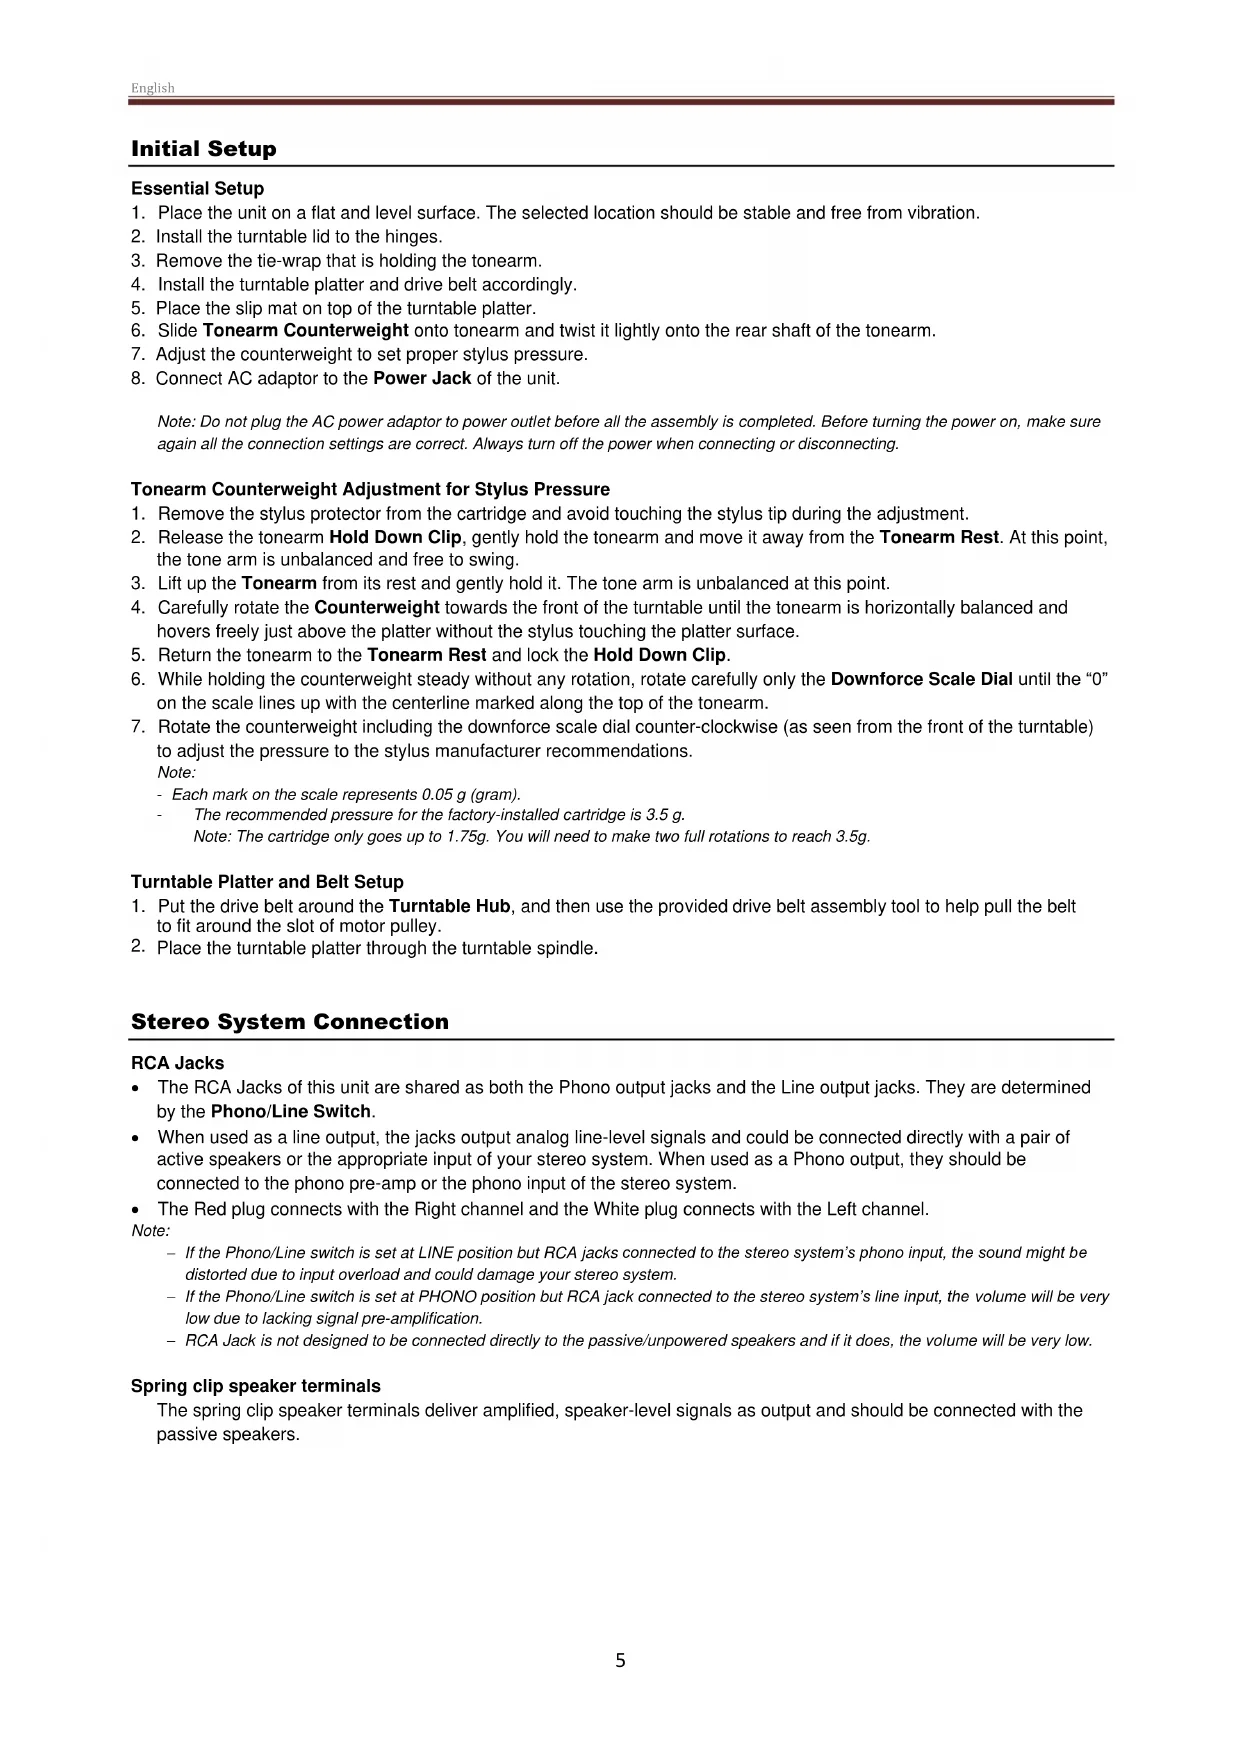
Initial Setup
Essential Setup
- Place the unit on a flat and level surface. The selected location should be stable and free from vibration.
- Install the turntable lid to the hinges.
- Remove the tie-wrap that is holding the tonearm.
- Install the turntable platter and drive belt accordingly.
- Place the slip mat on top of the turntable platter.
- Slide Tonearm Counterweight onto tonearm and twist it lightly onto the rear shaft of the tonearm.
- Adjust the counterweight to set proper stylus pressure.
- Connect AC adaptor to the Power Jack of the unit.
Note: Do not plug the AC power adaptor to power outlet before all the assembly is completed. Before turning the power on, make sure again all the connection settings are correct. Always turn off the power when connecting or disconnecting.
Tonearm Counterweight Adjustment for Stylus Pressure
- Remove the stylus protector from the cartridge and avoid touching the stylus tip during the adjustment.
- Release the tonearm Hold Down Clip, gently hold the tonearm and move it away from the Tonearm Rest. At this point, the tone arm is unbalanced and free to swing.
- Lift up the Tonearm from its rest and gently hold it. The tone arm is unbalanced at this point.
- Carefully rotate the Counterweight towards the front of the turntable until the tonearm is horizontally balanced and hovers freely just above the platter without the stylus touching the platter surface.
- Return the tonearm to the Tonearm Rest and lock the Hold Down Clip.
- While holding the counterweight steady without any rotation, rotate carefully only the Downforce Scale Dial until the "0" on the scale lines up with the centerline marked along the top of the tonearm.
- Rotate the counterweight including the downforce scale dial counter-clockwise (as seen from the front of the turntable) to adjust the pressure to the stylus manufacturer recommendations.
Note: - Each mark on the scale represents 0.05 g (gram).
- The recommended pressure for the factory-installed cartridge is 3.5 g.
Note: The cartridge only goes up to 1.75g. You will need to make two full rotations to reach 3.5g.
Turntable Platter and Belt Setup
- Put the drive belt around the Turntable Hub, and then use the provided drive belt assembly tool to help pull the belt to fit around the slot of motor pulley.
- Place the turntable platter through the turntable spindle.
Stereo System Connection
RCA Jacks
- The RCA Jacks of this unit are shared as both the Phono output jacks and the Line output jacks. They are determined by the Phono/Line Switch.
- When used as a line output, the jacks output analog line-level signals and could be connected directly with a pair of active speakers or the appropriate input of your stereo system. When used as a Phono output, they should be connected to the phono pre-amp or the phono input of the stereo system.
- The Red plug connects with the Right channel and the White plug connects with the Left channel.
Note:
- If the Phono/Line switch is set at LINE position but RCA jacks connected to the stereo system's phono input, the sound might be distorted due to input overload and could damage your stereo system.
- If the Phono/Line switch is set at PHONO position but RCA jack connected to the stereo system's line input, the volume will be very low due to lacking signal pre-amplification.
- RCA Jack is not designed to be connected directly to the passive/unpowered speakers and if it does, the volume will be very low.
Spring clip speaker terminals
The spring clip speaker terminals deliver amplified, speaker-level signals as output and should be connected with the passive speakers.
Bluetooth Operation
- Turn the Function Knob to Bluetooth mode 8, you will hear an activation sound from the unit.
- Turn on the Bluetooth feature of your audio device, search for "Crosley C62" and pair.
- Once your device is successfully paired with the unit, you will hear a short confirmation sound from the unit.
- Play and stream music from your device to the unit.
Note: Bluetooth version - *4.2*
Turntable Operation
- Press the Power Switch to turn on the power.
- Set the Function Knob accordingly.
- Place the record on the turntable. Use the 45 RPM Adapter if necessary.
- Remove the stylus protector from the stylus assembly.
Note: To avoid stylus damage, make certain the included stylus guard is in place whenever the turntable is being moved or cleaned. - Release the tonearm Hold Down Clip.
Note: when the turntable is not in use, remember to lock back hold down clip. - Use the Cue Lever to lift up the tonearm.
- Gently move the tonearm over the record where play is desired to begin. Set the Cue Lever back to the down position, the tonearm will descend slowly onto the record and begin to playback.
- When the record is finished playing, use the Cue Lever again to raise the tonearm and then return it to the Tonearm Rest. Release the lever to let the tonearm sit back at its rest. To suspend the playback, repeat the same steps.
- Lock the Hold Down Clip to secure the tonearm.
Needle Replacement
Removing Needle
- Gently pull down the front edge of the needle.
- Pull needle forward.
- Pull out and remove.

natural_image
Three-step diagram showing a mechanical component being folded or disassembled, with arrows indicating the process (no text or symbols present)Installing Needle
- Position the needle with its tip facing down.
- Line up the back of the needle with the cartridge.
- Insert the needle with its front end at a downward angle and gently lift the front of the needle upward until it snaps into place.

Turntable Maintenance
- Do not touch the stylus tip with your fingers. Avoid bumping the stylus on the turntable mat or a record's edge.
- Clean the stylus frequently with a soft brush with a back-to-front motion only.
- Clean the records to get rid of dust or grease with a record cleaning brush and record cleaning solution.
- Clean the turntable lid and turntable cabinet with a slightly damped microfiber cloth.
Note: Do not use cleanser that contains alcohol, benzene or any other harsh chemicals, which might damage the paint and finish of the turntable.
** Crosley offers a product line of different cleaning accessories. Please ask your retailer or check out our website www.crosleyradio.com for more cleaning product information.
Troubleshooting
There is no power
• Power adaptor is not connected correctly.
- No power at the power outlet.
Power is on, but the platter does not turn
- Turntable's drive belt is not installed or has slipped off.
Turntable is spinning, but there is no sound, or sound not loud enough
• Stylus protector is still on.
- Tone arm is lift up by the lever.
Record sounds too fast or too slow.
- Wrong speed selected for the record.
Strong hum on phono input
- The cable is not grounded correctly.
FCC Statements
NOTE: This equipment has been tested and found to comply with the limits for a Class B digital device, pursuant to part 15 of the FCC Rules. These limits are designed to provide reasonable protection against harmful interference in a residential installation. This equipment generates uses and can radiate radio frequency energy and, if not installed and used in accordance with the instructions, may cause harmful interference to radio communications. However, there is no guarantee that interference will not occur in a particular installation. If this equipment does cause harmful interference to radio or television reception, which can be determined by turning the equipment off and on, the user is encouraged to try to correct the interference by one or more of the following measures:
- Reorient or relocate the receiving antenna.
- Increase the separation between the equipment and receiver.
-Connect the equipment into an outlet on a circuit different from that to which the receiver is connected.
-Consult the dealer or an experienced radio/TV technician for help
Changes or modifications not expressly approved by the party responsible for compliance could void the user's authority to operate the equipment.
This device complies with Part 15 of the FCC Rules. Operation is subject to the following two conditions:
(1) This device may not cause harmful interference, and
(2) this device must accept any interference received, including interference that may cause undesired operation.
CROSLEY®
C62A
Tocadiscos C62
natural_image
Line drawing of a vintage radio or instrument with open lid and base unit (no text or symbols)natural_image
Simple diagram of a rectangular device with two circular holes and a labeled dimension line (16), no text or symbols present.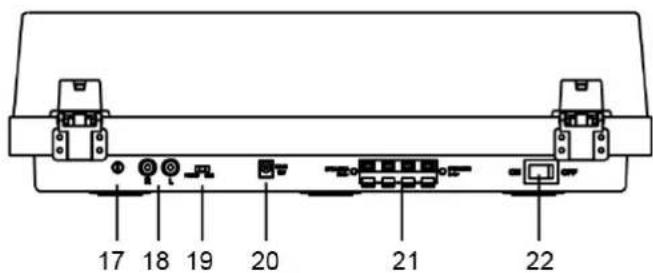

natural_image
Simple diagram of a rectangular frame with two circular holes and a vertical line labeled '16' (no text or symbols beyond the number)natural_image
Three-step diagram showing a mechanical component being folded or disassembled, with arrows indicating motion (no text or symbols present)Instalar la aguja
natural_image
Line drawing of a vintage radio or instrument with open lid and base unit (no text or symbols)natural_image
Simple diagram of a rectangular frame with two circular holes and a vertical line labeled '16' at the bottom (no text or symbols beyond the number)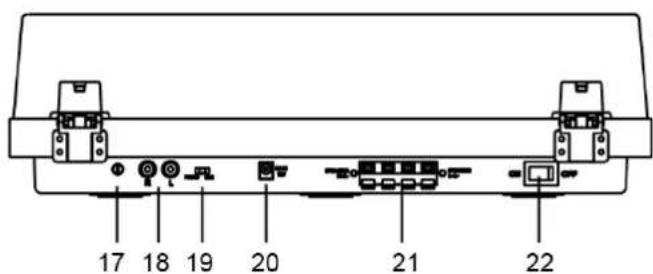

natural_image
Simple diagram of a rectangular frame with two circular holes and a vertical line labeled '16' (no text or symbols beyond the number)natural_image
Three-step diagram showing a mechanical component being folded or disassembled, with arrows indicating the process (no text or symbols present)

- Safety Instructions
- Items in this package
- Specifications
- Crosley C62A
- Needle: Crosley NP-5
- Product Description
- Initial Setup
- Essential Setup
- Tonearm Counterweight Adjustment for Stylus Pressure
- Turntable Platter and Belt Setup
- Stereo System Connection
- RCA Jacks
- Spring clip speaker terminals
- Bluetooth Operation
- Turntable Operation
- Needle Replacement
- Removing Needle
- Installing Needle
- Turntable Maintenance
- Troubleshooting
- There is no power
- Power is on, but the platter does not turn
- Turntable is spinning, but there is no sound, or sound not loud enough
- Record sounds too fast or too slow.
- Strong hum on phono input
- FCC Statements
- CROSLEY®
- Instalar la aguja
Brand : Crosley
Model : C62
Category : Turntable