
AM071KNQDEH - Air-conditioner SAMSUNG - Free user manual and instructions
Find the device manual for free AM071KNQDEH SAMSUNG in PDF.

User questions about AM071KNQDEH SAMSUNG
0 question about this device. Answer the ones you know or ask your own.
Ask a new question about this device
Download the instructions for your Air-conditioner in PDF format for free! Find your manual AM071KNQDEH - SAMSUNG and take your electronic device back in hand. On this page are published all the documents necessary for the use of your device. AM071KNQDEH by SAMSUNG.
USER MANUAL AM071KNQDEH SAMSUNG
- Thank you for purchasing this Samsung air conditioner.
- Before operating this unit, please read this user manual carefully and retain it for future reference.

Contents
Safety Information 4
Safety Information 4
At a Glance 12
Indoor Unit Overview 12
Display
Remote Control Overview 13
Replacing batteries
Storing the remote control
Basic Operation 15
Operation Modes 15
Auto
Cool
Dry
Fan
Heat
Turning the air conditioner on
Selecting the operation mode
Adjusting the temperature
Selecting the fan speed
Selecting air flow direction
Advanced Operation 19
Setting the On or Off timer 19
Using the good'sleep Function 21
Using the Turbo Function 23
Controlling Indoor Units 24
2 English
Cleaning and Maintenance 25
Cleaning the Air Conditioner 25
Cleaning the exterior
Disassembling the air filter
Cleaning the air filter
Reassembling the air filter
Maintaining the Air Conditioner 27
Appendix 29
Troubleshooting 29
Operation Ranges 31
Technical specification 32
Correct Disposal of This Product (Waste Electrical & Electronic Equipment)
(Applicable in countries with separate collection systems)
This marking on the product, accessories or literature indicates that the product and its electronic accessories (e.g. charger, headset, USB cable) should not be disposed of with other household waste at the end of their working life. To prevent possible harm to the environment or human health from uncontrolled waste disposal, please separate these items from other types of waste and recycle them responsibly to promote the sustainable reuse of material resources.
Household users should contact either the retailer where they purchased this product, or their local government office, for details of where and how they can take these items for environmentally safe recycling.
Business users should contact their supplier and check the terms and conditions of the purchase contract. This product and its electronic accessories should not be mixed with other commercial wastes for disposal.

Safety Information
Before using your new air conditioner, please read this manual thoroughly to ensure that you know how to safely and efficiently operate the extensive features and functions of your new appliance.
Because the following operating instructions cover various models, the characteristics of your air conditioner may differ slightly from those described in this manual. If you have any questions, call your nearest contact centre or find help and information online at www.samsung.com.

WARNING
Hazards or unsafe practices that may result in severe personal injury or death.

CAUTION
Hazards or unsafe practices that may result in minor personal injury or property damage.

Follow directions. Do NOT attempt

Make sure the machine is grounded to prevent electric shock.

Cut off the power supply. Do NOT disassemble.
FOR INSTALLATION

WARNING

Use the power line with the power specifications of the product or higher and use the power line for this appliance only. In addition, do not use an extension line.
- Extending the power line may result in electric shock or fire.
- Do not use an electric transformer. This may result in electric shock or fire.
- If the voltage/frequency/rated current condition is different, it may cause fire.
4 English
The installation of this appliance must be performed by a qualified technician or service company.
- Failing to do so may result in electric shock, fire, explosion, problems with the product, or injury and may also void warranty on the installed product.
Install an Isolation Switch next to the Air Conditioner (but not on the panels of the Air Conditioner) and circuit breaker dedicated to the air conditioner.
- Failing to do so may result in electric shock or fire.
Fix the outdoor unit firmly so that the electric part of the outdoor unit is not exposed.
- Failing to do so may result in electric shock, fire, explosion, or problems with the product.

Do not install this appliance near a heater, or inflammable material. Do not install this appliance in a humid, oily or dusty location, in a location exposed to direct sunlight and water (rain drops). Do not install this appliance in a location where gas may leak.
- This may result in electric shock or fire.
Never install the outdoor unit in a location such as on a high external wall where it could fall.
- If the outdoor unit falls, it may result in injury, death or property damage.

This appliance must be properly grounded. Do not ground the appliance to a gas pipe, plastic water pipe, or telephone line.
- Failure to do so may result in electric shock, fire, an explosion, or other problems with the product.
- Make sure to use a socket-outlet with ground.


Safety Information

CAUTION

lease cover the air conditioner with PE BAG after installation, and remove it when you start to run air conditioner.
Install your appliance on a level and hard floor that can support its weight.
- Failing to do so may result in abnormal vibrations, noise, or problems with the product.
Install the drain hose properly so that water drains correctly.
- Failing to do so may result in water overflowing and property damage. Avoid adding drain to waste pipes as odours may arise in the future.
When installing the outdoor unit, make sure to connect the drain hose so that draining is performed correctly.
- The water generated during the heating operation in the outdoor unit may overflow and result in property damage. In particular, in winter, if a block of ice falls, it may result in injury, death or property damage.
FOR POWER SUPPLY

WARNING

When the circuit breaker is damaged, contact your nearest service centre.

o not pull or excessively bend the power line. Do not twist or tie the power line. Do not hook the power line over a metal object, place a heavy object on the power line, insert the power line between objects, or push the power line into the space behind the appliance.
- This may result in electric shock or fire.
6 English

CAUTION

when not using the air conditioner for a long period of time or during a thunder/lightning storm, cut the power at the circuit breaker.
- Failing to do so may result in electric shock or fire.
FOR USING

WARNING

the appliance is flooded, please contact your nearest service centre.
- Failing to do so may result in electric shock or fire.
If the appliance generates a strange noise, a burning smell or smoke, cut off the power supply immediately and contact the nearest service centre.
- Failing to do so may result in electric shock or fire.
In the event of a gas leak (such as propane gas, LP gas, etc.), ventilate immediately without touching the power line. Do not touch the appliance or power line.
- Do not use a ventilating fan.
- A spark may result in an explosion or fire.
To reinstall the air conditioner, please contact your nearest service centre.
- Failing to do so may result in problems with the product, water leakage, electric shock, or fire.
- Delivery service for the product is not provided. If you reinstall the product in another location, additional construction expenses and an installation fee will be charged.
- Especially, when you wish to install the product in an unusual location such as in an industrial area or near the seaside where it is exposed to salt in the air, please contact your nearest service centre.
Safety Information

o not touch the circuit breaker with wet hands.
- This may result in electric shock.
Do not turn the air conditioner off with the circuit breaker while it is operating.
- Turning the air conditioner off and then on again with the circuit breaker may cause a spark and result in electric shock or fire.
After unpacking the air conditioner, keep all packaging materials well out of the reach of children, as packaging materials can be dangerous to children.
- If a child places a bag over its head, it may result in suffocation.
Do not touch the front panel with your hands or fingers during the heating operation.
- This may result in electric shock or burns.
Do not insert your fingers or foreign substances into the air inlet/ outlet of the air conditioner.
- Take special care that children do not injure themselves by inserting their fingers into the product.
Do not strike or pull the air conditioner with excessive force.
- This may result in fire, injury, or problems with the product.
Do not place an object near the outdoor unit that allows children to climb onto the machine.
- This may result in children seriously injuring themselves.
Do not use this air conditioner for long periods of time in badly ventilated locations or near infirm people.
- Since this may be dangerous due to a lack of oxygen, open a window at least once an hour.

If any foreign substance such as water has entered the appliance, cut the power by unplugging the power plug and turning the circuit breaker off and then contact your nearest service centre.
- Failing to do so may result in electric shock or fire.

do not attempt to repair, disassemble, or modify the appliance to yourself.
- Do not use any fuse (such as copper, steel wire, etc.) other than the standard fuse.
- Failing to do so may result in electric shock, fire, problems with the product, or injury.

CAUTION

not place objects or devices under the indoor unit.
- Water dripping from the indoor unit may result in fire or property damage.
Check that the installation frame of the outdoor unit is not broken at least once a year.
- Failing to do so may result in injury, death or property damage.
Max current is measured according to IEC standard for safety and current is measured according to ISO standard for energy efficiency.

to not stand on top of the appliance or place objects (such as laundry, lighted candles, lighted cigarettes, dishes, chemicals, metal objects, etc.) on the appliance.
- This may result in electric shock, fire, problems with the product, or injury.
Do not operate the appliance with wet hands.
- This may result in electric shock.
Safety Information
Do not spray volatile material such as insecticide onto the surface of the appliance.
- As well as being harmful to humans, it may also result in electric shock, fire or problems with the product.
Do not drink the water from the air conditioner.
- The water may be harmful to humans.
Do not apply a strong impact to the remote control and do not disassemble the remote control.
Do not touch the pipes connected with the product.
- This may result in burns or injury.
Do not use this air conditioner to preserve precision equipment, food, animals, plants or cosmetics, or for any other unusual purposes.
- This may result in property damage.
Avoid directly exposing humans, animals or plants to the air flow from the air conditioner for long periods of time.
- This may result in harm to humans, animals or plants.
This appliance is not intended for use by persons (including children) with reduced physical, sensory or mental capabilities, or lack of experience and knowledge, without supervision or instruction concerning use of the appliance by a person responsible for their safety. Children should be supervised to ensure that they do not play with the appliance.
FOR CLEANING

WARNING

o not clean the appliance by spraying water directly onto it. Do not use benzene, thinner, alcohol or acetone to clean the appliance.
- This may result in discolouration, deformation, damage, electric shock or fire.
Before cleaning or performing maintenance, cut off the power supply and wait until the fan stops.
- Failing to do so may result in electric shock or fire.

CAUTION

ke care when cleaning the surface of the heat exchanger of the outdoor unit since it has sharp edges.
- This should be done by a qualified technician. Please contact your installer or service centre.

o not clean the inside of the air conditioner by yourself.
- For cleaning inside the appliance, contact your nearest service centre.
- When cleaning the filter, refer to the descriptions in the 'Cleaning at a Glance' section.
- Failing to do so may result in damage, electric shock or fire.
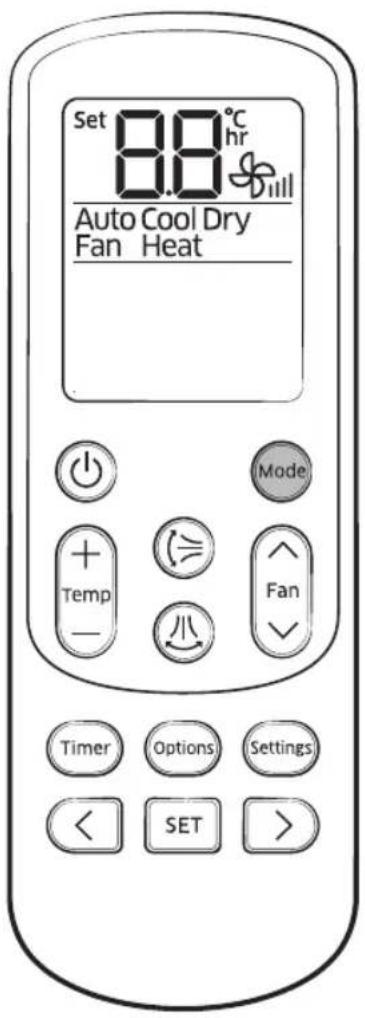
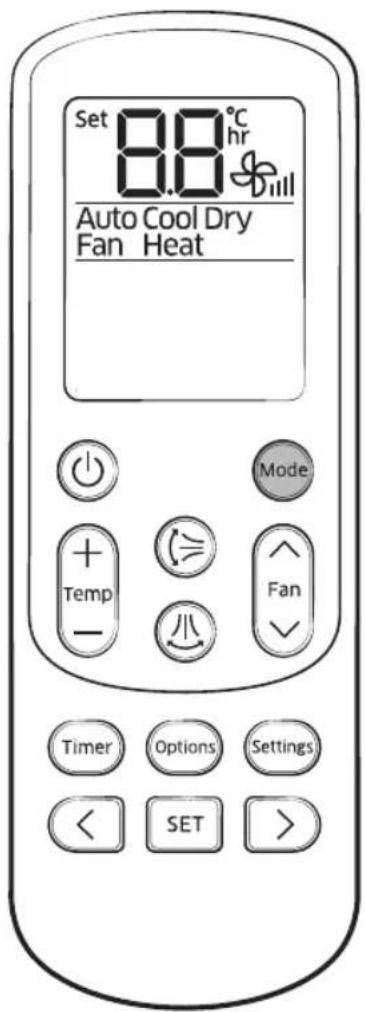
Indoor Unit Overview
The actual product may differ slightly from the image depicted below.
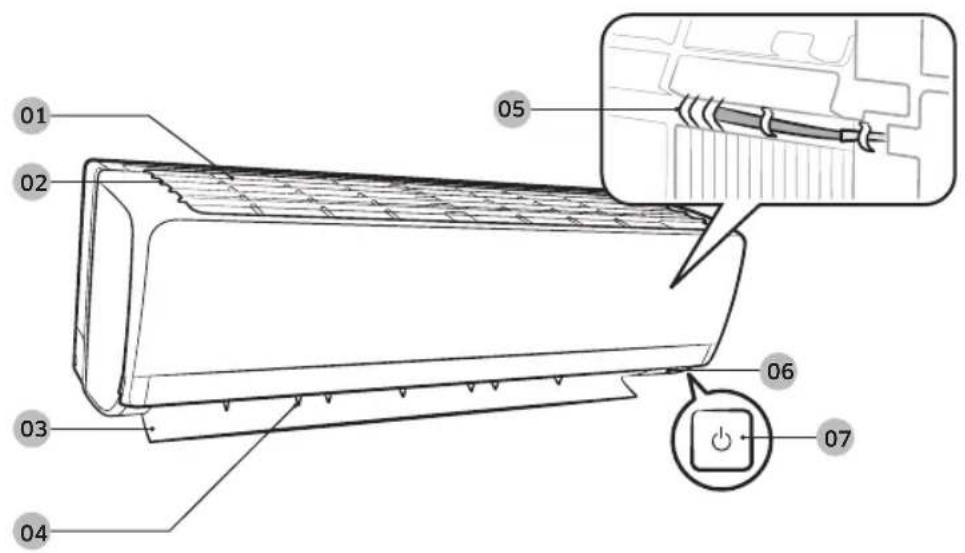
01 Air intake
02 Air filter(under the panel)
03 Air flow blade (up and down)
04 Air flow blade (left and right)
05 Room temperature sensor
06 Display
07 Power button / Remote control receiver
Display
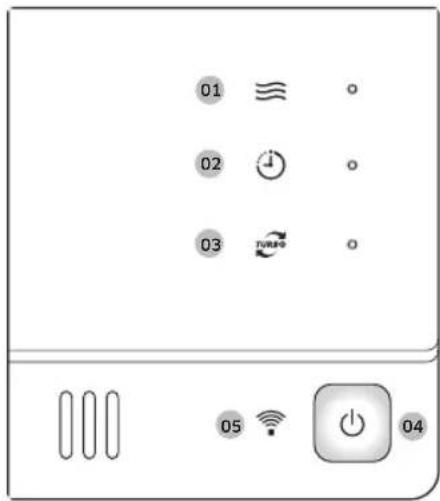
01 Operation indicator
02 Timer indicator
03 Turbo indicator
04 Power button
05 Remote controller receiver
12 English
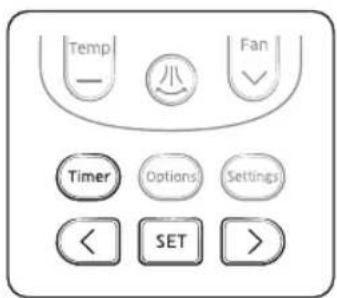
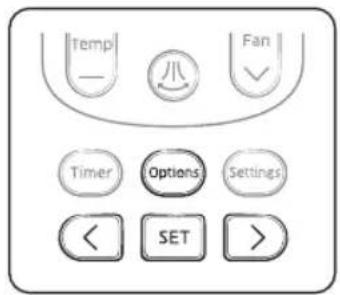
Remote Control Overview
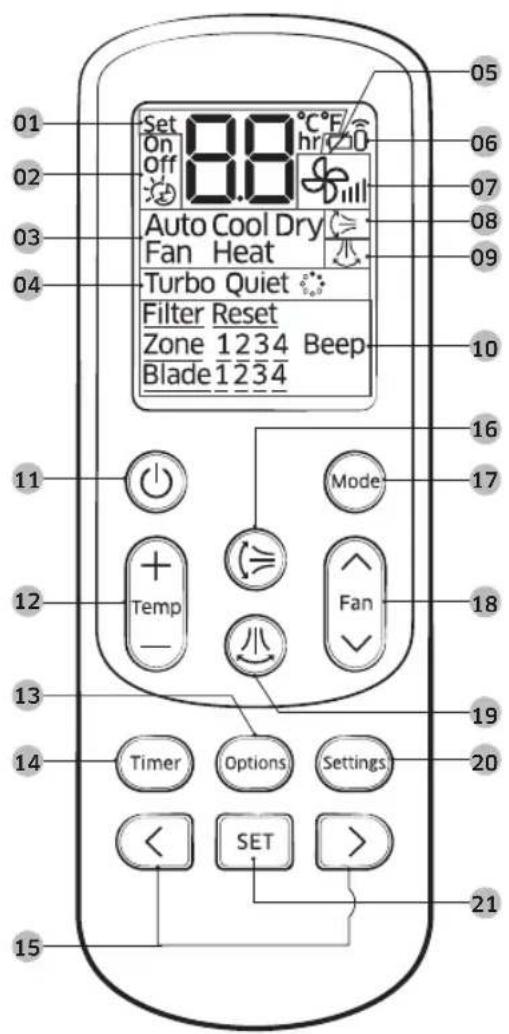
01 Set temperature indicator
02 Timer option indicator
03 Operation mode indicator
04 Options indicator
05 Low battery indicator
06 Transmit indicator
07 Fan speed indicator
08 Vertical air swing indicator
09 Horizontal air swing indicator

NOTE
- This function is not available in this model.
10 Settings indicator
11 Power button
12 Temperature button
13 Options button
14 Timer button
15 Direction button/Selection button
16 Vertical air swing button
17 Mode button
18 Fan speed button
19 Horizontal air swing button

NOTE
- This function is not available in this model.
20 Settings button
21 SET button

NOTE
- The air conditioner may not be operated by the remote control if the controller is placed close to strong light such as a fluorescent lamp or neon sign. In this case, use the remote control right in front of the remote control receiver of the indoor unit.
- If other electrical products are operated by the remote control, call your nearest service center.
To silence the beep sound, press the Settings , or Settings (Beep) blinking SET button. When you press the Settings , or Settings (Beep) blinking SET button again, the beep sound will be active again.
Remote Control Overview
Replacing batteries
When the icon appears in the remote control display, replace the batteries with new ones. Two 1.5V AAA type batteries are required.
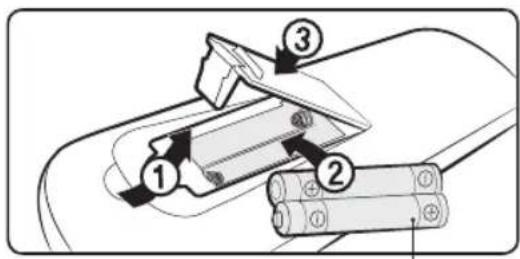
two 1.5V AAA type batteries
Correct disposal of batteries in this product
(Applicable in countries with separate collection systems)
This marking on the battery, manual or packaging indicates that the batteries in this product should not be disposed of with other household waste at the end of their working life. Where marked, the chemical symbols Hg, Cd or Pb indicate that the battery contains mercury, cadmium or lead above the reference levels in EC Directive 2006/66. If batteries are not properly disposed of, these substances can cause harm to human health or the environment.
To protect natural resources and to promote material reuse, please separate batteries from other types of waste and recycle them through your local, free battery return system.
Storing the remote control
If the remote control will not be used for an extended period of time, store it in the remote control holder with the batteries removed.
CAUTION
- Make sure that water does not come into the remote control.

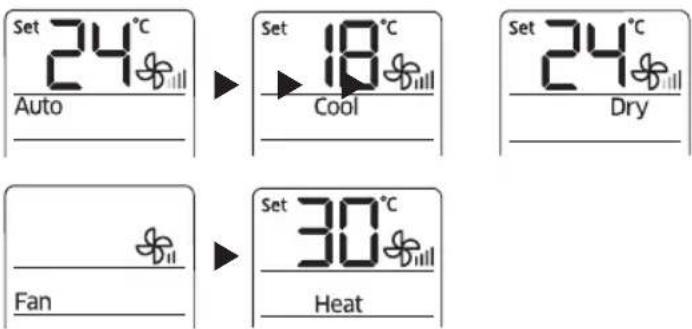
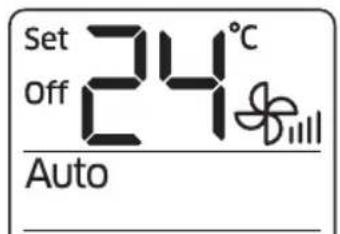
Operation Modes
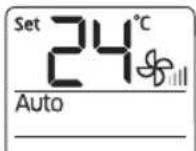
Auto
In Auto mode, the air conditioner will automatically adjust the temperature and fan speed to maintain your fresh environment.
- When the indoor temperature is too high, the powerful cool breeze is generated and when the indoor room becomes cool enough, the soft breeze is generated.
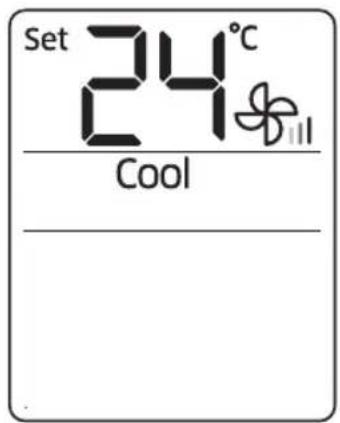
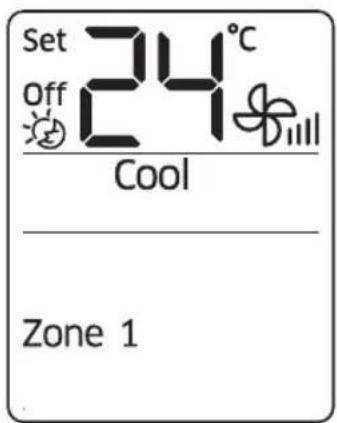
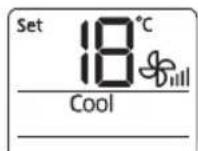
Cool
The Cool mode is frequently used and you can freely control the temperature, fan speed, and air flow direction in Cool mode.
- When you select the Heat mode while the Cool mode is on, the Cool mode is cancelled.
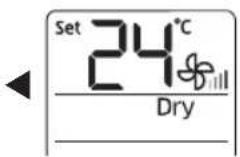
Dry
The air conditioner in Dry mode acts like a dehumidifier by removing moisture from the indoor air. The Dry mode will provide you with fresh air even on a rainy day.
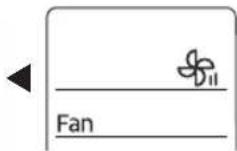
Fan
The Fan mode provides you with a breeze just like a fan to make fresh environment for you.
Operation Modes
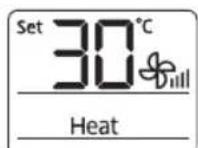
Heat
In Heat mode, you can warm your room even in fall and winter.
The fan may not commence immediately to avoid generating a cold breeze.
- In Heat mode, defrost operation may be performed to remove the frost formed on the outdoor unit. (When the frost is removed by the defrost operation in Heat mode, steam is generated from the outdoor unit.)
- If you stop operating the air conditioner after heating operation, the fan will operate for some time to cool the indoor unit.
- When you select the Cool mode while the Heat mode is on, the Heat mode is cancelled.
NC
NOTE
-
When the outdoor temperature is relatively low and the humidity is relatively high in Heat mode, the outdoor unit's heating capacity may decrease due to the frost formed on the outdoor heat exchanger. The defrost operation removes the frost formed on the heat exchanger of the outdoor unit for 5 to 12 minutes. During the defrost operation, the indoor unit does not generate breeze in order to prevent cold breeze blowing out.
-
The interval between defrost operations can decrease depending on the amount of the frost formed on the outdoor unit.
- The interval between defrost operations can also decrease depending on the humidity level in the air.
Basic Operation

Turning the air conditioner on
Press the button to operate the air conditioner.
Selecting the operation mode
Press the button to select an operation mode.
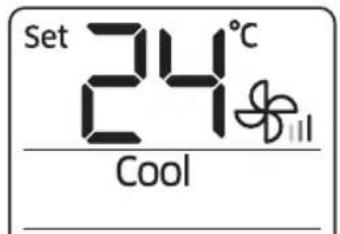
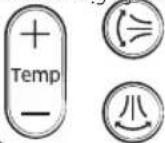
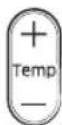
Adjusting the temperature
Press the button to adjust the temperature.
| Mode Temperature control |
| Auto/Cool/ Dry Adjust by 1 °C between 18 °C and 30 °C. |
| Heat Adjust by 1 °C between 16 °C and 30 °C. |
| Fan Temperature cannot be adjusted. |
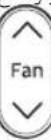
Selecting the fan speed
Press the button to adjust the fan speed.
| Mode Available fan speeds | |
| Auto/Dry | (Auto) |
| Cool/Heat | (Auto), (Low), (Med), (High) |
| Fan | (Low), (Med), (High) |

Basic Operation
Remote control display
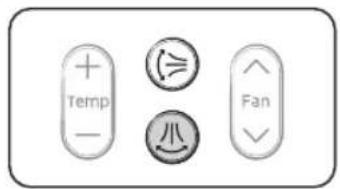
Selecting air flow direction
Keep the air flow in a constant direction by stopping the movements of the vertical and horizontal air flow blades. In operation
NOTE
- If you adjust the vertical air flow blade manually, it may not close completely when you turn off the air conditioner.
Horizontal air flow (manual)
Keep the horizontal air flow in a constant direction by changing the directions of the horizontal air flow blades manually.
NOTE
- Although you press the button, this function does not work.
CAUTI
- To prevent personal injury, make sure that you change the directions of the horizontal air flow blades after stopping the movements of the vertical air flow blade.
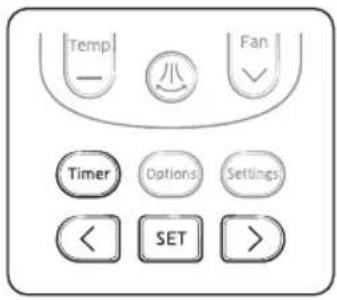
Setting the On or Off timer
You can set the air conditioner to be turned on or off automatically at the desired time.
Remote control display
Setting the On timer
When the air conditioner is turned off:
-
Press the Timer button to select (On).
-
The (On) indicator will keep blinking and you can set the time.
-
Press the OK button to set the time.
-
You can set the time in half hour intervals from 30 minutes (0.5 on the display) to 3 in hour intervals from 3 to 24 hours.
The time can be set from minimum 30 minutes to maximum 24 hours. -
Press the button to complete the On timer setting.
-
The (On) indicator and the set time of the timer will be displayed on the remote control display.
- On timer setting will be cancelled if you don't press the SET button within 10 seconds after setting the time. Therefore, check for the (On) indicator on the remote control display.
| Cancel | Press the Timer button ▶select (On) ▶press the < or button ▶set the timer to 80 ▶ press the SET button |
| Additional options available in the On timer | |
| Mode | Select the mode in the following order: (Auto) ▷ (Cool) ▷ (Dry) ▷ (Fan) and ▷ (Heat). |
| Temp | You can adjust the temperature after timer setting is completed. Temperature adjustment is only available in Auto, Cool, Dry, and Heat modes. In Fan mode, the temperature cannot be adjusted. |
NOTE
- When On timer setting is completed, the setting will be displayed for 3 seconds, and then only the (On) indicator will remain on the remote control display.
- You cannot set the Fan speed when setting the On timer.
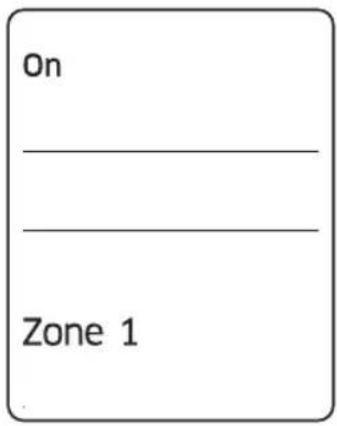
Setting the On or Off timer
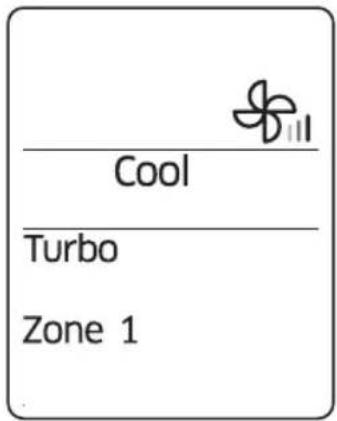
Zone 1
Remote control display
Setting the Off timer
When the air conditioner is turned on:
- Press the button to select (Off).
The (Off) indicator will keep blinking and you can set the time.
-
Press the button to set the time.
-
You can set the time in half hour intervals from 30 minutes (0.5 on the display) to 3 hours and in hour intervals from 3 to 24 hours.
The time can be set from minimum 30 minutes to maximum 24 hours. -
Press the button to complete the Off timer setting.
-
The (Off) indicator and the set time of the timer will be displayed on the remote control display.
- Off timer setting will be cancelled if you don't press the SET button within 10 seconds after setting the time.
Therefore, check for the (Off) indicator on the remote control display.
| Cancel | Press the Timer button ▷ select (Off) ▷ press the < or button ▷ set the timer to 88 ▷ press the SET button |
NOTE
- Only the latest timer setting will be applied between the Off timer and good'sleep off timer functions.
| Combining On timer and Off timer | |
| When the air conditioner is turned off When the air conditioner is turned on | |
| When the set time on On timer is less than that on Off timer e.g. On timer: 3 hours, Off timer: 5 hours • The air conditioner will be turned on after 3 hours from the moment you have set the timer and the air conditioner will remain on for 2 hours and then be turned off automatically. | When the set time on On timer is greater than that on Off timer e.g. On timer: 3 hours, Off timer: 1 hour • The air conditioner will be turned off after 1 hour from the moment you have set the timer and will be automatically turned on after 2 hours from the moment it was turned off. |
NOTE
- The set times for the On timer and the Off timer should be different from each other.
- After the On timer or the Off timer is set, the setting can be cancelled by pressing the button.
20 English
Using the good'sleep Function
Remote control display
When the air conditioner is operating in Cool mode;
-
Press the button to select .
-
The ( ) indicator will keep blinking and you can set the time.
-
Press the OK button to set the time.
-
You can set the time in half hour intervals from 30 minutes (0.5 on the display) to 3 hours and in hour intervals from 3 to 12 hours.
-
The time can be set from minimum 30 minutes to maximum 12 hours.
-
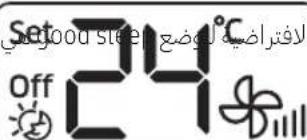
The default time value for the good'sleep mode is 8 hours.
-
Press the button to complete the good'sleep mode setting.
-
The ( ) indicator and the set time of the good'sleep mode will be displayed on the remote control display.
-
The good'sleep mode will be cancelled if you don't press the SET button within 10 seconds after setting the time. Therefore, check for the ( ) indicator on the remote control display.
| Cancel | Press the timer button ▷select (选□)press the <or button ▷set the timer to 00 ▷press the SET button |
| Additional options available in good'sleep mode | |
| Temp | The temperature can be adjusted by 1 °C (1 °F) within the range of 18 °C (65 °F) to 30 °C (86 °F). |
Using the good'sleep Function
For a comfortable sleep, the air conditioner will operate in order of 'Fall asleep▶ Sound sleep▶ Wake up' stages.
- Fall asleep mode: Provides you with comfortable environment for a good sleep by rapid cooling and hypnagogue expedition breeze.
- Sound sleep mode: The sound sleep mode adjusts temperature and air flow in waves to maintain healthy skin temperature while it aids deep sleep. According to the change of good'sleep operation hours, the sound sleep hour can increase or decrease.
- Wake up from good'sleep mode: Provides you with the air flow that adjusts your body temperature to wake you up in a fresh status.
NOTE
- In good'sleep mode, the air conditioner will operate in Cool + ( ) mode for first 30 minutes. The fan speed and air flow direction will be adjusted automatically in good'sleep mode.
- Recommended set temperature is between 25^ (77°F) and 27^ (81°F) and the value 26^ (79°F) is the most ideal temperature.
- If the set temperature is too low, you may feel cold while sleeping or catch a cold.
- Optimal operation time in good'sleep mode is 8 hours. Therefore, if the time is set too short or long, you may not feel as comfortable as you want.
- If the good'sleep mode is set over 5 hours, The Wake up stage will begin when 1 hour is remaining in the operation time and the air conditioner will stop automatically.
- When the On timer and the good'sleep mode are set simultaneously, the air conditioner will only apply the function that was set later.
- While the good'sleep mode is operating, the mode can be set additionally by pressing the button.
- If you press the Options button and select the Turbo/Quiet function, the good'sleep mode will be cancelled and the selected mode will begin operation.
- If you press the Mode button, the good'sleep mode will be cancelled and the selected mode will begin operation.
Using the Turbo Function
You can set the Turbo function to provide fast and powerful cooling.
When the air conditioner is operating in Cool mode;
- Press the button.
- Press the button until the (Turbo) indicator starts blinking.
-
Press the SET button to set the Turbo function.
-
The (Turbo) indicator will be displayed on the remote control display and Turbo function will operate for 30 minutes.
| Cancel | Press the ( options ) button ▷ press the ,< or > ( options ) to make the ( Turbo ) indicator blink and press the SET button. |
NOTE
- Turbo function is available in Cool or Heat mode.
- If the Turbo function is selected while the Quiet function is on, the Quiet function will be cancelled.
- The temperature and fan speed cannot be adjusted.
Remote control display

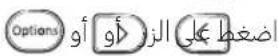
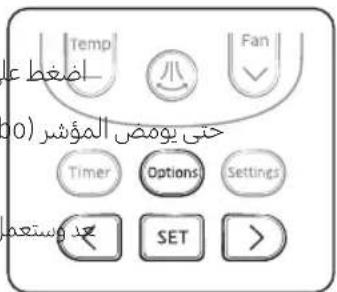
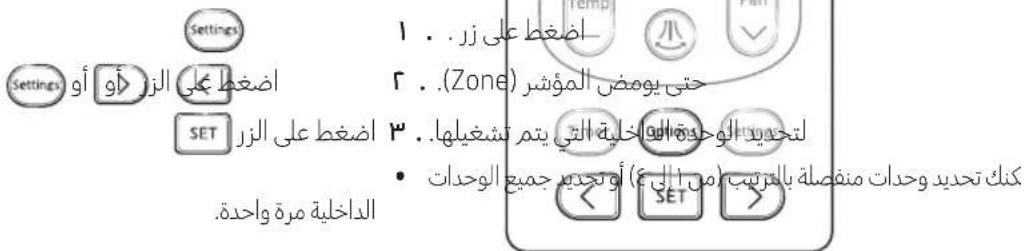
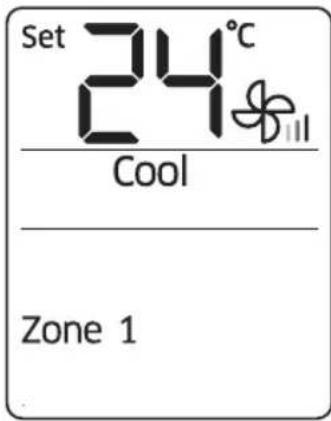
Controlling Indoor Units
You can individually select and operate indoor units among 4 indoor units.
When the air conditioner is turned on:
- Press the button.
- Press the < or button until the (Zone) indicator starts blinking.
-
Press the SET button to select the indoor unit to operate.
-
You can select individual units in order of 1 to 4 or select all indoor units at one time.
Zone 1
Remote control display
Cleaning tareaAclonditioner
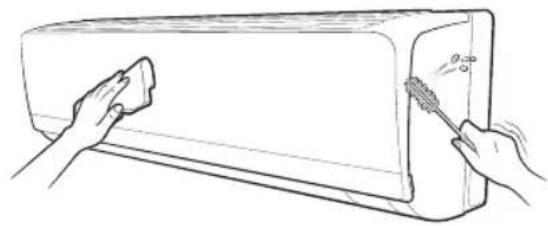
Cleaning the exterior
Wipe the surface of the unit with a slightly wet or dry cloth when needed.
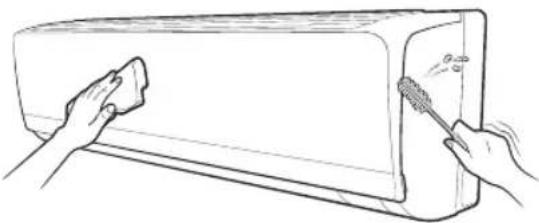
NOTE
- Do not use sulphuric acid, hydrochloric acid, or organic solvents (such as thinner, kerosene, and acetone) to clean the surfaces.
- Do not put any stickers on it as this can damage the surface of the air conditioner.
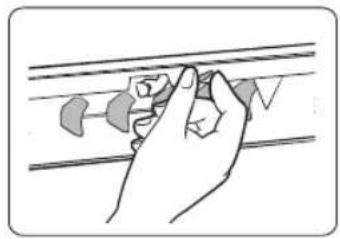
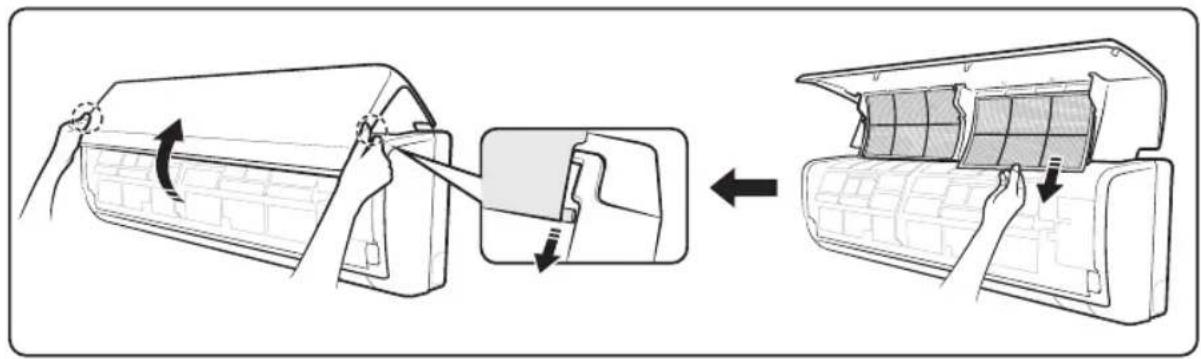
Disassembling the air filter
- Remove the front panel.
Tightly grab both sides of the front panel and lift up the panel to open. Then slide the panel towards you for removal. - Grab the handle and lift it up. Then, pull the air filter towards you.
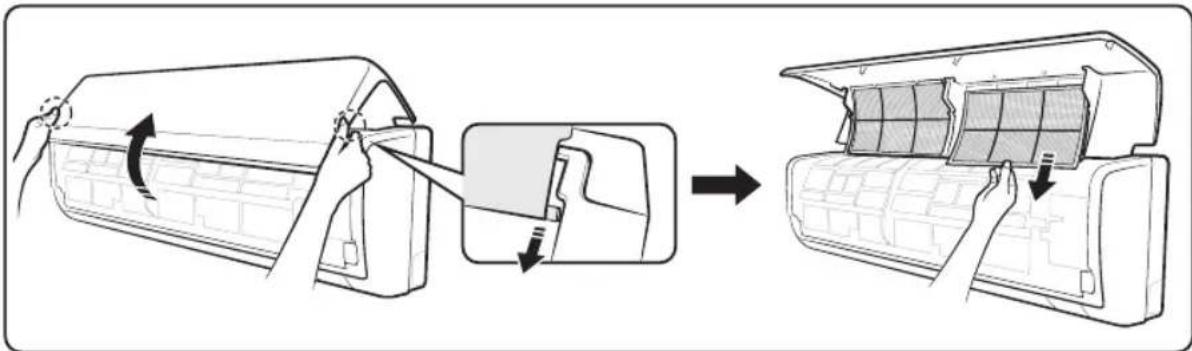
Cleaning the Air Conditioner
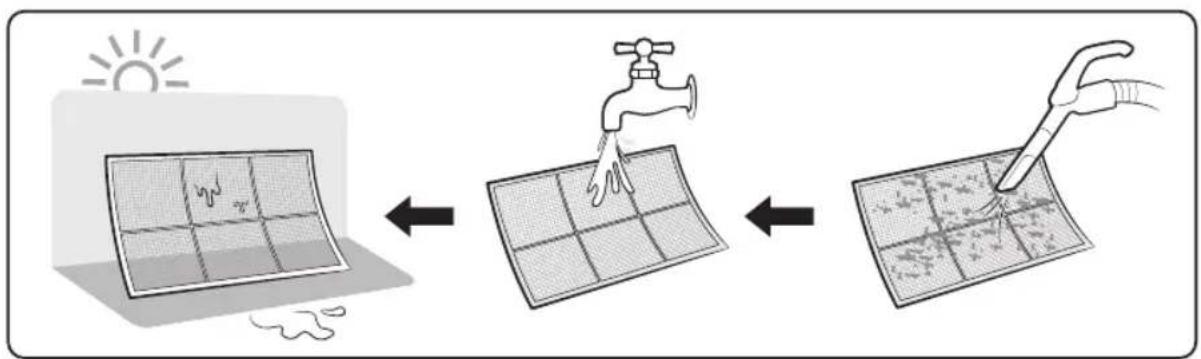
Cleaning the air filter
Clean the air filter with a vacuum cleaner or soft brush. If dust is too heavy, then rinse it with running water and dry it in a ventilated area.
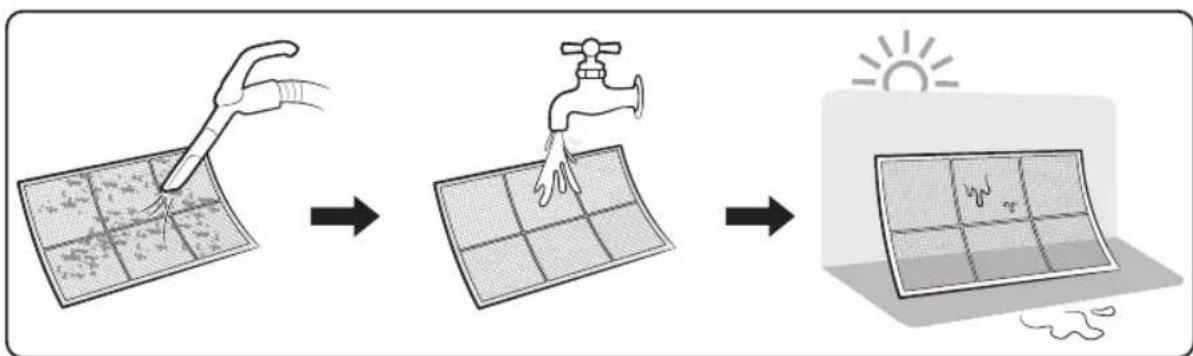
NOTE
- Clean the air filter once every two weeks.
- Spray water or use a vacuum cleaner to remove dust.
After removing dust, dry the air filter completely. - Avoid direct sunlight. Failure to do so may deform the air filter. - If the air filter is dried in a confined (or humid) area, odours may generate. If it occurs, re-clean and dry it in a well-ventilated area.
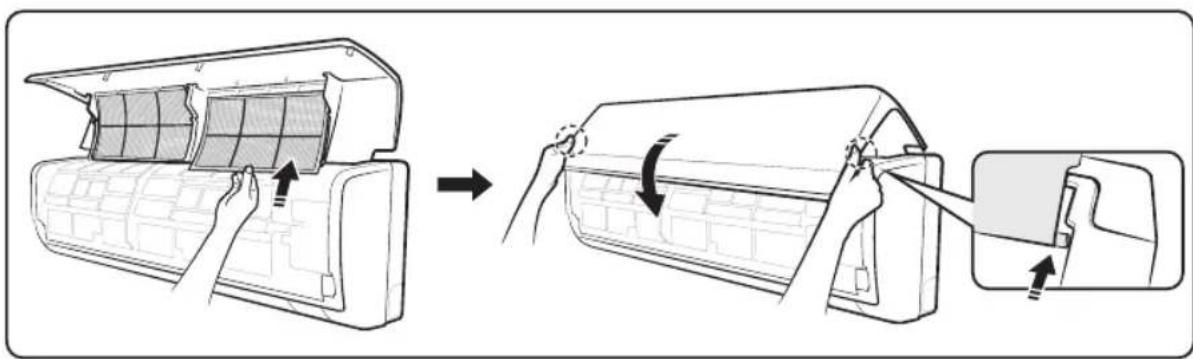
Reassembling the air filter
- Insert the air filter back in its original position.
- Close the front panel.
Maintaining the Air Conditioner
If the air conditioner will not be used for an extended period of time, dry the air conditioner to maintain in best conditions.
- Dry the air conditioner thoroughly by operating in Fan mode for 3 to 4 hours and disconnect the power plug. There may be internal damage if moisture is left in components.
- Before using the air conditioner again, dry the inner components of the air conditioner again by running in Fan mode for 3 to 4 hours. This helps remove odours that may have generated from dampness.
Periodical checks
Refer to the following chart to maintain the air conditioner properly.
| Type Descrip | Every 4 months | Once a year | ||
| Indoor unit | Clean the air filter (1). | ● | ||
| Clean the condensate drain pan (2). | ● | |||
| Thoroughly clean the heat exchanger (2). | ● | |||
| Clean the condensate drain pipe (2). | ● | |||
| Replace the remote control batteries (1). | ● | |||
| Outdoor unit | Clean the heat exchanger on the outside of the unit (2). | ● | ||
| Clean the heat exchanger on the inside of the unit (2). | ● | |||
| Clean the electric components with jets of air (2). | ● | |||
| Verify that all the electric components are firmly tightened (2). | ● | |||
| Clean the fan (2). | ● | |||
| Verify that all the fan assembly is firmly tightened (2). | ● | |||
| Clean the condensate drain pan (2). | ● | |||

NOTE
- The checks and maintenance operations described above are essential to guarantee the efficiency of the air conditioner. The frequency of these operations may vary depending on the characteristics of the area, the amount of dust, etc.
a. The above mentioned operations should be performed more frequently if the area of installation is very dusty.
b. These operations must always be performed by qualified personnel. For more detailed information refer to Installation Manual.
Maintaining the Air Conditioner
Internal protections via the unit control system
This internal protection operates if an internal fault occurs in the air conditioner.
| Type Description | |
| Against cold air | The internal fan will be off against cold air when the heat pump is heating. |
| De-ice cycle | The internal fan will be off against cold air when the heat pump is heating. |
| Anti-protection of internal battery | The compressor will be off to protect internal battery when the air conditioner operates in Cool mode. |
| Protect compressor | The air conditioner does not start operating immediately to protect the compressor of the outdoor unit after it has been started. |
NOTE
- If the heat pump is operating in Heat mode, the de-ice cycle is actuated to remove frost from an outdoor unit that may have deposited at low temperatures.
- The internal fan is switched off automatically and restarted only after the de-ice cycle is completed.
- When the de-ice cycle is operating, it may generate strange sound. It is normal operation for product safety.
Troubleshooting
Refer to the following chart if the air conditioner operates abnormally. This may save time and unnecessary expenses.
| Problem Solution | |
| The air conditioner does not operate immediately after it has been restarted. | ·Because of the protective mechanism, the appliance does not start operating immediately to keep the unit from overloading. The air conditioner will start in 3 minutes. |
| The air conditioner does not work at all. | ·Check that the power plug is properly connected. Insert the power plug into the wall socket correctly. ·Check if the circuit breaker is switched off. ·Check if there is a power failure. ·Check your fuse. Make sure it is not blown out. |
| The temperature does not change. | ·Check if you selected Fan mode. Press the Mode button on the remote control to select another mode. |
| The cool (or warm) air does not come out of the air conditioner. | ·Check if the set temperature is higher (lower) than the current temperature. Press the + or Temo button on the remote control to change the set temperature. Press the Temperature + or - button to increase or decrease the temperature. ·Check if the air filter is blocked by dirt. Clean the air filter every two weeks. ·Check if the air conditioner has just been turned on. If so, wait for 3 minutes. |
| The fan speed does not change. | ·Check if you selected Auto or Dry mode. The air conditioner automatically adjusts the fan speed to Auto in Auto/Dry mode. |
Troubleshooting
| Problem Solution | |
| Timer function is not set. | Check if you press the and SET button on the remote control after you have set the time. |
| Odours permeate in the room during operation. | Check if the appliance is running in a smoky area or if there is a smell entering from outside. Operate the air conditioner in Fan mode or open the windows to air out the room. |
| The air conditioner makes a bubbling sound. | A bubbling sound may be heard when the refrigerant is circulating through the compressor. Let the air conditioner operate in the selected mode. |
| Water is dripping from the air flow blades. | Check if the air conditioner has been cooling for an extended period of time with the air flow blades pointed downwards. Condensation may generate due to the difference in temperature. |
| Remote control is not working. | Check if your batteries are depleted. Make sure batteries are correctly installed. Make sure nothing is blocking your remote control sensor. Check that there are strong lighting apparatus near the air conditioner. Strong light that comes from fluorescent bulbs or neon signs may interrupt the electric waves. |
Operation Ranges
The table below indicates the temperature and humidity ranges the air conditioner can be operated within. Refer to the table for efficient use.
| MODE | OPERATIONAL TEMPERATURE | INDOOR HUMIDITY | IF OUT OF CONDITIONS | |
| INDOOR OUTDOOR | ||||
| Cool 18 °C to 32 °C | Depends on the specifications of the outdoor unit. | 80 % or less | Condensation may occur on the indoor unit with risk to have either water blow off or drops on the floor. | |
| Heat 27 °C or less - | Internal protection triggers and the air conditioner will stop. | |||
| Dry 18 °C to 32 °C 80 % or less | Condensation may occur on the indoor unit with risk to have either water blow off or drops on the floor. | |||

NOTE
- The standardized temperature for heating is 7^ . If the outdoor temperature drops to 0^ or below, the heating capacity can be reduced depending on the temperature condition.
- If the cooling operation is used at over 32^ C (indoor temperature), it does not cool at its full capacity.
Technical specification
| MODEL AM022KNQDEH/TR AM028KNQDEH/TR AM036KNQDEH/TR | |||||||
| CLIMATES CLASS | T1 | T3 | T1 | T3 | T1 | T3 | |
| RATED VOLTAGE & FREQUENCY 220 - 240 V~50Hz 220 - 240 V~50Hz 220 - 240 V~50Hz | |||||||
| RATED CURRENT | COOLING 0.20 | 0.20 0.22 0 | 22 0.23 0.23 | ||||
| HEATING (H1) 0 | 20 0.22 0.23 | ||||||
| RATED POWER INPUT | COOLING 32 32 | 38 38 | 42 42 | ||||
| HEATING (H1) | 35 | 39 | 42 | ||||
| EER | COOLING | - | - | - | - | - | - |
| HEATING (H1) | - | - | - | ||||
| NETWEIGHT | 8.5 | 9.0 | 9.0 | ||||
| DIMENSIONS OF THE UNIT [WxHxD] | 820x285x227 | 820x285x227 | 820x285x227 | ||||
| COUNTRY OF ORIGIN | MADE IN THAILAND | MADE IN THAILAND | MADE IN THAILAND | ||||
| MODEL | AM022KNTDEH/TR | AM028KNTDEH/TR | AM036KNTDEH/TR | ||||
| CLIMATES CLASS | T1 | T3 | T1 | T3 | T1 | T3 | |
| RATED VOLTAGE & FREQUENCY 220 - 240 V~50Hz 220 - 240 V~50Hz 220 - 240 V~50Hz | |||||||
| RATED CURRENT | COOLING 0,20 | 0.20 0.22 0 | 22 0.23 0.23 | ||||
| HEATING (H1) 0 | 20 0.22 0.23 | ||||||
| RATED POWER INPUT | COOLING 32 32 | 38 | 38 42 42 | ||||
| HEATING (H1) | 35 | 39 | 42 | ||||
| EER | COOLING | - | - | - | - | - | - |
| HEATING (H1) | - | - | - | ||||
| NETWEIGHT | 8.0 | 8.5 | 8.5 | ||||
| DIMENSIONS OF THE UNIT [WxHxD] | 820x285x227 | 820x285x227 | 820x285x227 | ||||
| COUNTRY OF ORIGIN | MADE IN THAILAND | MADE IN THAILAND | MADE IN THAILAND | ||||
| MODEL AM045KNQDEH | /TR AM056KNQDEH/TR | AM071KNQDEH/TR | |||||
| CLIMATES CLASS | T1 | T3 | T1 | T3 | T1 | T3 | |
| RATED VOLTAGE & FREQUENCY 220 | -240 V~50Hz 220 - 240 V~50Hz 220 - 240 V~50Hz | ||||||
| RATED CURRENT | COOLING 0.27 | 0.27 0.27 0.27 0.28 | |||||
| HEATING (H1) 0 | 27 0.27 0.28 | ||||||
| RATED POWER INPUT | COOLING 47 | 47 48 48 51 51 | |||||
| HEATING (H1) | 47 | 48 | 53 | ||||
| EER | COOLING | - | - | - | - | - | - |
| HEATING (H1) | - | - | - | ||||
| NETWEIGHT | 12.5 | 12.5 | 12.5 | ||||
| DIMENSIONS OF THE UNIT [WxHxD] | 820x285x227 | 820x285x227 | 820x285x227 | ||||
| COUNTRY OF ORIGIN | MADE IN THAILAND MADE IN THAILAND MADE IN THAILAND MADE IN THAILAND | ||||||
| MODEL | AM045KNTDEH/TR | AM056KNTDEH/TR | AM071KNTDEH/TR | ||||
| CLIMATES CLASS | T1 | T3 | T1 | T3 | T1 | T3 | |
| RATED VOLTAGE & FREQUENCY 220 | -240 V~50Hz 220 - 240 V~50Hz 220 - 240 V~50Hz | ||||||
| RATED CURRENT | COOLING 0.17 | 0.27 0.27 0.27 0.28 | |||||
| HEATING (H1) 0 | 27 0.27 0.28 | ||||||
| RATED POWER INPUT | COOLING 47 | 47 48 48 51 51 | |||||
| HEATING (H1 ) | 47 | 48 | 53 | ||||
| EER | COOLING | - | - | - | - | - | - |
| HEATING (H1) | - | - | - | ||||
| NETWEIGHT | 12.0 | 12.0 | 12.0 | ||||
| DIMENSIONS OF THE UNIT [WxHxD] | 820x285x227 | 820x285x227 | 820x285x227 | ||||
| COUNTRY OF ORIGIN | MADE IN THAILAND MADE IN THAILAND MADE IN THAILAND MADE IN THAILAND | ||||||
SAMSUNG
QUESTIONS OR COMMENTS?
| COUNTRY CALL OR VISIT US ONLINE AT | ||
| U.A.E 800-SAMSUNG (800 - 726 7864) | www.samsung.com/ae/support (English) www.samsung.com/ae_ar/support (Arabic) | |
| OMAN 800-SAMSUNG (800 - 726 7864) | ||
| KUWAIT 183-CALL (183-2255) | ||
| BAHRAIN 8000-GSAM (8000-4726) | ||
| QATAR 800-CALL (800-2255) | ||
| EGYPT 08000-7267864 /16580 www.samsung.com/eg/support | ||
| ALGERIA 3004 www.samsung.com/n_africa/support | ||
| PAKISTAN 0800-Samsung (72678) www.samsung.com/pk/support | ||
| TUNISIA | 80 1000 12 | www.samsung.com/n_africa/support |
| JORDAN | 0800-22273 06 5777444 | www.samsung.com/levant www.samsung.com/levant/support |
| SYRIA 962 5777444 | ||
| Lebanon | 961 1484 999 1299 | |
| Iraq | 964 77 261 72220 964 75 118 92525 | |
| IRAN | 021-8255 | www.samsung.com/iran/support |
| MOROCCO | 080 100 22 55 | www.samsung.com/n_africa/support |
| SAUDI ARABIA | 8002473457 (800 24/7 HELP) | www.samsung.com/sa/home www.samsung.com/sa_en |
| TURKEY | 444 77 11 | www.samsung.com/tr/support |
| RUSSIA | 8-800-555-55-55 (VIP care 8-800-555-55-88) | www.samsung.com/ru/support |
| GEORGIA | 0-800-555-555 www.samsung.com/support | |
| ARMENIA | 0-800-05-555 www.samsung.com/support | |
| AZERBAIJAN | 0-88-555-55-55 | www.samsung.com/support |
| KAZAKHSTAN | 8-10-800-500-55-500 (GSM: 7799, VIP care 7700) | www.samsung.com/kz_ru/support |
| UZBEKISTAN | 00-800-500-55-500 (GSM: 7799) | www.samsung.com/support |
| KYRGYZSTAN | 00-800-500-55-500 (GSM: 9977) | www.samsung.com/support |
| TAJIKISTAN | 8-10-800-500-55-500 | www.samsung.com/support |
| MONGOLIA | +7-495-363-17-00 | www.samsung.com/support |
| UKRAINE | 0-800-502-000 | www.samsung.com/ua/support (Ukrainian) www.samsung.com/ua_ru/support (Russian) |
| BELARUS | 810-800-500-55-500 www.samsung.com/support | |
| MOLDOVA | 0-800-614-40 www.samsung.com/support | |
| INDONESIA | 021-56997777 8001128888 | www.samsung.com/id/support |

Climatiseur
Guide d'utilisation
AM***KNTD**/AM***KNQD**
QUESTIONS OU COMMENTAIES?
| PAYS APPELEZ-NOUS OU RENDEZ-VOUS EN LIGNE SUR | ||
| U.A.E 800-SAMSUNG (800 - 726 7864) | www.samsung.com/ae/support (English) www.samsung.com/ae_ar/support (Arabic) | |
| OMAN 800-SAMSUNG (800 - 726 7864) | ||
| KUWAIT 183-CALL (183-2255) | ||
| BAHRAIN 8000-GSAM (8000-4726) | ||
| QATAR 800-CALL (800-2255) | ||
| EGYPT 08000-7267864 /16580 www.samsung.com/eg/support | ||
| ALGERIA 3004 www.samsung.com/n_africa/support | ||
| PAKISTAN 0800-Samsung (72678) www.samsung.com/pk/support | ||
| TUNISIA 80 1000 12 www.samsung.com/n_africa/support | ||
| JORDAN | 0800-22273 06 5777444 | www.samsung.com/levant www.samsung.com/levant/support |
| SYRIA | 962 5777444 | |
| Lebanon | 961 1484 999 1299 | |
| Iraq | 964 77 261 72220 964 75 118 92525 | |
| IRAN | 021-8255 | www.samsung.com/iran/support |
| MOROCCO | 080 100 22 55 | www.samsung.com/n_africa/support |
| SAUDI ARABIA | 8002473457 (800 24/7 HELP) | www.samsung.com/sa/home www.samsung.com/sa_en |
| TURKEY | 444 77 11 | www.samsung.com/tr/support |
| RUSSIA | 8-800-555-55-55 (VIP care 8-800-555-55-88) | www.samsung.com/ru/support |
| GEORGIA | 0-800-555-555 | www.samsung.com/support |
| ARMENIA | 0-800-05-555 www.samsung.com/support | |
| AZERBAIJAN 0-88-555-55-55 | www.samsung.com/support | |
| KAZAKHSTAN | 8-10-800-500-55-500 (GSM: 7799, VIP care 7700) | www.samsung.com/kz_ru/support |
| UZBEKISTAN | 00-800-500-55-500 (GSM: 7799) | www.samsung.com/support |
| KYRGYZSTAN | 00-800-500-55-500 (GSM: 9977) | www.samsung.com/support |
| TAJIKISTAN | 8-10-800-500-55-500 | www.samsung.com/support |
| MONGOLIA | +7-495-363-17-00 | www.samsung.com/support |
| UKRAINE 0-800-502-000 | www.samsung.com/ua/support (Ukrainian) www.samsung.com/ua_ru/support (Russian) | |
| BELARUS | 810-800-500-55-500 www.samsung.com/support | |
| MOLDOVA | 0-800-614-40 | www.samsung.com/support |
| INDONESIA | 021-56997777 8001128888 | www.samsung.com/id/support |

Klima
Kullanim Kilavuzu
AM***KNTD**/AM***KNQD**
313 Moo 1 Sukhaphiban 8 Rd. Sriracha Industry Park
T.Bung A.Sriracha Chonburi Thailand 20230
LVD:
NEMKO Gaustadalleen 30, NO-0373 Oslo, Norway
TÜV-SUD Ridlerstr. 65 D - 80339 München, Germany
EMC:
SEC EMC Lab. 129, Samsung-ro, Yeongtong-gu, Suwon-si, Gyeonggi-do, 16677 Korea
SEQAL Blackbushe Business Park Saxony WayYateley,Hants GU46 6GG,UK
NEMKO Gaustadalleen 30, NO-0373 Oslo, Norway
KTR 42-27, Jungbu-daero 2517 beon-gil, Yangji-myeon, Cheoin-gu, Yongin-si, Gyeonggi-do, Korea
lg( x - 1) < 0

.

. 1

uJU
gio gj yolalgo go bgy jy w
[{\rho }_{\text{差}} = \frac{\varepsilon }{2}]
.
.
glaesdo
.
UeS84


.aa aaii gJgabwgljgll
·
.4uSj wsi jIgJl Jc Jlaal lJs gJgJgJg
(1glll 0s o l>gl c 45j y jn s) 1glll 0s o jy jy jc ag aag g.
.
11 11 11 11 11 11 11 11 11 11
gglgla
jLgJUcK
aJg. JzssuAullaIgogfJzssnnooJgJgJL1sKp
aJyJz0jgfo gfo jgfo Jgfo Jgfo Jgfo Jgfo
k.4g. (jlll) 0aJg
jIb

.
g j 1 g o j y b s s k o j j j j j d 0j 0j 0j 0j 0j 0j 0j
-
KlaaJy
oogolg jlc oogolaloglglg.
.0gol 11w gA ksswbl o

jg
JLg

Jalalloglo


Jolaloo
du
Jzw dic lglljlg aS j 4aoll lglgll So aB
.ajg Jaoaag aog aigw o aol jlgjll
glco
aaljslw
JLW JKbOaI aI I 100000000000000000000000000000
-
Jaaal 1g jieic Jw y d c aolal wgo Jlaa aol
aalac aai jgbrj 1s gjj 1g j.
1
J 1 J
aIbJdgoogaa


.4oJ 50 Jy jyj yj yj yj yj yj yj yj

g dJg.4b g 1g.0a2g.0a2g 1g JI JI JI JI JI JI JI JI JI JI JI JI JI JI JI JI JI JI JI JI JI JI JI JI JI JI JI JI JI JI JI JI JI JI JI JI JI JI JI JI JI JI JI JI JI JI JI JI JI JI J

.
U

/4yJgIgIgIgIgIgIgIgIgIgIgIgIgIgIgIgIgIgIgIgIgIgIgIgIgIgIgIgIgIgIgIgIgIgIgIgIgIgIgIgIgIgIgIgIgIgIgIgIgIgIg
.
.
aIbI JgJgJgJgJgJgJgJgJgJgJgJgJgJgJgJgJgJgJgJgJgJgJgJgJgJgJgJgJgJgJgJgJgJgJgJgJgJgJgJgJgJgJgJgJg
.
Jg Jlll jI g Jg Jg Jg Jg Jg Jg Jg Jg Jg Jg Jg Jg Jg Jg Jg Jg Jg Jg Jg Jg Jg Jg Jg Jg Jg Jg Jg Jg Jg Jg
.4g8u>90p3
.
.
g>ugwgldu
glclalw
cluU aol
jokglll kssla llo 1s
aclio aobios sduclj kO gauall uysu dgg 1gll agell g>gal lall jy bbl w no yal g. .doJskpUyBjI
7U
Jlalloglo
.
C
.1 1
J 1
.
I 1 k y f 1 1 1 1 1 1 1 1 1 1 1 1 1 1 1 1 1 1 1 1 1 1 1 1 1
Jabgogl 1 g
.1JlllaloccljIgIyolloJlA>glU J
.
.1JL 1JL 1JL JJ 1JL JJ
a>aa aaaa
jglgaofoJ
.4b jolgll p1dsswly dww gI cIgll 0 So Jc bddy
.
JgJl Jc s00001 JbU 2a aJzI IJgll o o bI y
.
gAaggl AaJrJdIy f Cgll no aalgb at Jol Igll oosu w J.aaJt aljagss gssn no s
2gJyUJ,uuuSll uai juaui blau Juyuui Jusds


e j j 11 J 11 J 11 J 11 J 11 J 11 J 11 J 11 J 11 J 11 J 11 J 11 J 11 J 11 J 11 J 11 J 11 J 11 J 11 J 11 J 11 J 11 J 11 J 11 J 11 J 11

.>gwgl
.

(S)loga
wlljaaai
gj>gawg
.
4

.

.

JL JJI Lc o>lg o aioo Lw no s 5ig a jg lll d>gl b| .pIc
-
KlaaJy
J (IEC) aJgll aaggr gll aJgll Jgll Jgll Jgll Jgll Jgll Jgll Jgll Jgll Jgll Jgll Jgll Jgll Jgll Jgll Jgll Jgll Jgll Jgll Jgll Jgll Jgll Jgll Jgll Jgll Jgll Jgll Jgll Jgll Jgll Jgll Jgll Jgll Jgll J
.aaJll 0eLck J (ISO)

jllgclalggawgl JwJz0) 1g jgJgJgJgJgJgJgJg
Jslwog>glg>gwi gArygSdoaog>JJsGg.
9 U

Jalaloglo
.
.
.1gll kso bws jc aahsall Joo 100 all slgall pr
i j 1jwyl oJlOgS Jc
1,2,3,4 1,3,4,5
.
.
JlloJIiJgKd .JIwJy
.45g Jgljg jc acll jge Jc dawb
.
.
glgglgaaebylgl aeglllalagllgglgdo
.4aLgJrJgJgJJgJgJtJtJt
KlaaJy
Joo 10000000000000000000000000000000000000000000
.
.
gJyJxJzIeJ 1000000000000000000000000000000000000000000000
1y 1y 1y 1y 1y 1y 1y 1y 1y 1y 1y 1y 1y 1y 1y 1y 1y 1y 1y 1y 1y 1y 1y 1y 1y 1y 1y 1y 1y
JgJgJgJgJgJgJgJgJgJgJgJgJgJgJgJgJgJgJgJgJgJgJgJgJgJgJgJgJgJgJgJgJgJgJgJgJgJgJgJgJgJgJgJg
JgJb aegc pcc no sll Jlbl 1j0 jn y n Jg
#
j
gI cIbI I gI jJiJI pI JgA JIaI clll JgJgJgJgJg
g>gladljgds
g>ugwgl auljgsdo
.
.
4w
g>gs>gljbi a>jlalldg>gljcrjllbaw sic jjIg. .ds
J J Joo aabwogu .do
jSgU
J 1 J 1 J 1 J 1 J 1
#
.
aolc ojbi" aoi
"abll
.
a|Jl|0>gl lc aolc oj
Jawll aogall oagall jadab aJy Jaiio elgal aSogd

aolc ajbi
LgH,0, x_ = 2
gogll oHepgol psswol Coot gogll sucg .Heat
Set
Auto Cool Dry Fan Heat
Jxjw, xie jy Jxw y fglg 0 Jxw


goggl aewel aagbll aegwlg aaglls
all u


yjll jzjjg


Jll Jg
gllkll
cglgll So Jcs
Jg
Jg 1


aJrll aJb
- 1000
m = 311
SET
jocoll jgeoacawol jce (Off) wgoogg no gaojulcagllb
m = 311
gl<jjbcb(Off) (0ff)
c
jjbczol 88 jcagall bol


1 + u1 - 1 = ( 1 + u) u1 < 1 = u
m - 1 0 ;
12x - 1 > 0 ②
m - 1 0 ;
m - 1 0 ;
m - 1 0 ;
m - 1 0 ;
m - 1 0 ;
m - 1 0 ;
m - 1 0 ;
1
12x - 1 > 0 ②
1
m - 1 0 ;
m - 1 0 ;
12x - 1 > 0 ②
ab>sl0
Jusillagcogocjusllgalsalabgaallagil
jllbcduydlccll jkoy,duwulglgogglwulccgo bwo sic
UJ20
g jwll gdo nabgl bao cagall scljgubu
good'sleep
j0 < a < j1 即 j0 < j1
good'sleep gogll bfo Jlsoy SET jll Jc b
aLg good'sleep gagll abaa ai sill cagll ()jgoj
a1 = 2,an + 1 = n2 + n3
jIg1. jL SET jll Jbdoai l| good'sleep gogll cll a
100 100
gjjbcbsol()dd 1jclbsol
SETjjjcbb#d 100jcagallb#
c
1.
.

WJ(a)
aLL 0 aacaa cll aai g
11. i> j> 3> a> g> i> o> b> d> g> b> o>
.
Cool
Zone 1

a3 = a1 + 2 = 70, b_3 = 72
good'sleepg
g(cagj870)agio a>1A jy(cagj891)agio a>1Jaaaδj>1a
( C0 C1 C2 ) ( C0 C1 C2) ( C0 C1 C_2)
good'sleep aagoll
aacp gai jaljallgagglgll Jaaas
alj gblaaaull aawll 1234567890 good'sleepgogll no Jaiy
.
a>gall acw baw aww. gll dnnnlll ()+Cool gogll cglgll kLo Jao, good'sleep gogll
good'sleepgogll jxw sic lglalgl gol
aJgagagagagagagagagagagagagagagagagagagagagagagagagagagagagagagagagagagagagagagagagagagagagagagagagagagagagagagagagagagagagagagagagagagagagagagagagagagagagagag
Cgjv9) afo 7
a aesio abgaaol 1jall a cksis
jul jgl gdlgdlal algall good'sleep glall
.4jlosd>Jluyzawy
aleo aclwjgblabawdll gagll gckall jy,aleo o c yjdoal good'sleep gagll baoa al
glll 8o Joo aol oog Joo
jso labw w gll aagbgl Juey yglg kO pgaaw,lo good'sleep gogll Jueaill ao go lao all
Opns) jll bc bcl Jlgo good'sleep gogll Jxw clw
Juswog good'sleep gagll aqW,Quiet/Turbo aBg yg g (optio) jll Jc bdoa oai 1
.
Sssssssssssssssssssssssssssssssssssssssssssssssssssssssssssssssssssssssssssssssssssssssssssssssss
Turbo abgol
.
CooIgollglgllloL

.Turbo aagbI SET JJI Ic baoI.
JcAs>llgAulLeJC(Turbo) gall kaw · aagj 1
g>g<cbéolg
SET jll bcdo(100) (Turbo)
ab>sl0
Cool
. Heat g! Cool g!
Quiet gogll JwLul Turbo aagll
Quiet
Zone 1
S_ OBC = 12 · CO · BC = 12 × CD × 5

a|lll|g
a1s|11 c>g gjll jno Jaoio KwIg a1s|c>g y
juaillglgll So jgLoaic
设 jc cs sl 与 jl 相等
aaiai
e gell s
Jb
gJgJgJgJgJgJgJgJgJgJgJgJgJgJgJgJgJgJgJgJgJgJgJgJgJgJgJgJgJgJgJgJgJgJgJgJgJgJgJgJgJgJgJgJgJgJgJgJgJgJg
ab>la 1
(1gssllg jssgssllg 2lall aaoo Jio) agaell lalall g ef yglkglqglll aao > g ef lauyssll aao > pssw
| g( x) - g^ ( x) | = | x0 - x1| < | x|
glgll 0o

- aololj
golplou>glw wul
. ploulgei
glls
glgllj0a
aobio g 10olally lglwclg aovs arjll cils Isg .aocl oawg gl ayos so plxswly cglgll wjo abi
ab>sl0
1 1
.ajjalljylg
Jolllglg
-clgllwJsw
a dabw scl, uus cgs > all> g. aqjg jg jw saq (d) aolso aobio Jls eagll wwo aaoj all> g
glglljwroBssla
- 心 4a = 9c
a2 < a1 .
UJ26
aIbJdQf aLc bIeU dAoxy Og Cgll Jo algb oxlglgll So psswol
a 1
Fan gog y dgsy jg sfo gall aol aligkall aag, sfo gall so palsal .
S
.
| مُّلَهِ وَعَدْهِ الَسَنْفَةَ | شَيرشَيرَ | \( ε \) | \( λ \) | \( λ \) | |
| \( ● \) | .(1)\( ε \) | \( .(1) \)\( ε \) | \( .(1) \) | ||
| \( ● \) | .(1)\( δ \) | \( .(1) \)\( δ \) | \( .(1) \) | ||
| \( ● \) | .(1)\( J \) | \( .(1) \)\( J \) | \( .(1) \) | ||
| \( ● \) | .(1)\( δ \) | \( .(1) \)\( δ \) | \( .(1) \) | ||
| \( ● \) | .(1)\( δ \) | \( .(1) \)\( δ \) | \( .(1) \) | ||
| \( ● \) | .(1)\( δ \) | \( .(1) \)\( δ \) | \( .(1) \) | ||
| \( ● \) | .(1)\( δ \) | \( .(1) \)\( δ \) | \( .(1) \) | ||
| .(1)\( δ \) | \( .(1) \)\( δ \) | \( .(1) \) | |||
| \( ● \) | .(1)\( δ \) | \( .(1) \)\( δ \) | \( .(1) \) | ||
| .(1)\( δ \) | \( .(1) \)\( δ \) | \( .(1) \) \( .(1) \) | |||
| \( ● \) | \( .(1) \) | \( .(1) \) | \( .(1) \) | ||
| \( .(1) \) | \( .(1) \) | \( .(1) \) | |||
| \( ● \) | \( .(1) \) | \( .(1) \) | \( .(1) \) | ||
| \( .(1) \) | \( .(1) \) | \( .(1) \) |
ab>sl0
yj yio jy g g g sso cieug.qlgell So ocles glawag oolgallg jao
UJ Jlog,juall aosg,aolal olaaw
jss jsc JScJcJy aagall oJg yol pall .a. jslly aLo sall
"wJll JgJ, Jlaal no yol. lgo y oLcIy Iogos Oog b.
0>glpplpa jbsjoc aIlaIaI
ggll 1000