 — Light therapy — Mode d'emploi PDF")
LIFE P66074 (MD 43289) - Light therapy MEDION - Free user manual and instructions
Find the device manual for free LIFE P66074 (MD 43289) MEDION in PDF.

| Product type | Light alarm (light therapy) |
| Brand | MEDION |
| Model | LIFE P66074 (MD 43289) |
| Dimensions (L × H) | Approx. 11.6 × 24 cm |
| Weight | Not specified (approx. 500 g with adapter) |
| Power supply | 230 V~50 Hz AC adapter, output 5 V / 1.5 A |
| Backup battery | Lithium CR2032 3 V (not included) |
| Main functions | Progressive light alarm, FM radio, dual alarm, ambient night light, snooze function, sleep timer, nap timer |
| FM radio | Band 87.5 - 108 MHz, 10 presets |
| Auxiliary audio input | LINE IN (3.5 mm jack) |
| USB charging port | DC 5 V, 500 mA max (for mobile devices only) |
| Brightness adjustment | 10 levels (L01-L10) + OFF mode |
| Display | Time, temperature, date, alternating |
| Material | Plastic |
| Maintenance and cleaning | Soft, dry cloth; avoid solvents |
| Safety | Use only the supplied adapter; do not expose to moisture; keep out of reach of children |
| Spare parts / repairability | Specific adapter (model HKP06-0501500dG); CR2032 battery; repair only by authorized service center |
| General information | CE compliant; for domestic use only |
Frequently Asked Questions - LIFE P66074 (MD 43289) MEDION
User questions about LIFE P66074 (MD 43289) MEDION
0 question about this device. Answer the ones you know or ask your own.
Ask a new question about this device
Download the instructions for your Light therapy in PDF format for free! Find your manual LIFE P66074 (MD 43289) - MEDION and take your electronic device back in hand. On this page are published all the documents necessary for the use of your device. LIFE P66074 (MD 43289) by MEDION.
USER MANUAL LIFE P66074 (MD 43289) MEDION
Situation: 25/07/2016
- About these instructions 77
1.1. Symbols and key words used in these instructions.. 77
-
Proper use
-
Safety information 79
3.1. Dangers for children and people with reduced ability to operate machinery. 79
3.2. Operating safety. 79
3.3. Set-up location/environment 81
3.4. Handling batteries.. 82
3.5. Repairs 84
EN
-
Package contents
-
Overview of the device.. 85
5.1. Rear 86
- Initial operation and use 87
6.1. Inserting the backup battery .87
6.2. Connecting the device 87
6.3. Connecting devices via LINE-IN 87
6.4. Charging external devices via USB cable 88
6.5. Setting the light 88
6.6. Mood light 88
- Setting the device 88
7.1. Setting the date and time 89
7.2. Display date 89
7.3.Alternating display 89
7.4.Summer time 90
7.5. Alarm function 90
7.6. Display illumination 92
7.7. NAP timer 92
- Automatic switch-off 92
8.1. Activate the SLEEP function 92
- Radio operation 92
9.1. Switching the radio on and off 92
9.2. Volume setting 92
9.3. Manual station search 93
9.4. Storing stations 93
9.5. Preset station selector 93
- Cleaning 93
- Disposal 94
- Technical data 94
- Declaration of conformity 95
- Legal notice 96
1. About these instructions

Read the safety instructions carefully before use. Note the warnings on the device and in the operating instructions.
Always keep the operating instructions close to hand. If you sell the device or give it away, please ensure that you also pass on these instructions.
1.1. Symbols and key words used in these instructions
| ! | DANGER! Warning of immediate mortal danger! |
| ! | WARNING! Warning of possible risk of fatal injury and/or serious irreversible injuries! |
| ! | CAUTION! Warning: risk of minor or moderate injuries! |
| i | NOTICE! Please follow the guidelines to avoid property damage! Additional information on using the device! |
| i | NOTICE! Please follow the instructions in the operating instructions! |
2. Proper use
Your clock radio is designed to play back music and sound radio programmes, is suitable for connection to portable CD or MP3 players and can also be used to charge mobile devices via its USB connection. It features an alarm function. The device is intended only for indoor use.
- The device is intended for private use only and not for industrial/commercial use.
Please note that we shall not be liable in cases of improper use:
- Do not modify the device without our consent and do not use any auxiliary equipment that we have not approved or supplied.
- Use only spare parts and accessories that we have supplied or approved.
- Heed all the information in these operating instructions, especially the safety information. Any other use is deemed improper and can cause personal injury or property damage.
- Do not use the device in areas where there is a risk of explosion, e.g. tank systems, fuel storage depots, or areas in which solvents are being used. It is also not permitted to use this device in areas where the air is contaminated with fine particles (e.g. flour dust or sawdust).
- Do not expose the device to any extreme conditions. The following should be avoided:
-High levels of humidity or moisture
-Extremely high or low temperatures
-Direct sunlight
-Naked flames
3. Safety information
3.1. Dangers for children and people with reduced ability to operate machinery
These devices may be used by children over the age of 8 and by persons with reduced physical, sensory or mental abilities or by those without experience and/or knowledge, if they are supervised or have been instructed in the safe use of the device and have understood the potential risks.
- Keep the device and its accessories out of the reach of children.
Children must not be allowed to play with the device. - Cleaning and user maintenance must not be carried out by children, unless they are aged 8 or over and are supervised.
Children younger than 8 should be kept away from the device and the mains cable.

DANGER! Risk of suffocation!
Packaging film can be swallowed or used improperly. Therefore, there is a risk of suffocation!
- Keep packaging material such as plastic film or plastic bags away from children.
3.2. Operating safety

WARNING! Risk of electric shock!
Risk of injury from electric shock due to live parts. They pose a risk of electric shock or fire if an unintentional short circuit occurs.
- Do not place liquid-filled containers, such as vases, on or near to the device, and protect all the parts from drips or splashes. The container may tip over and the liquid may impair the electrical safety of the
product.
- Never open the housing of the device and never insert any objects through the slots and openings into the device.
In the event of damage to the mains adapter, power cable or the device itself or if liquids or foreign bodies get into the device, unplug the device immediately.
Unplug the device if you are away for a long period or if there is a thunderstorm.
3.2.1. Power supply

WARNING! Risk of electric shock!
Risk of injury from electric shock due to live parts.
- Only connect the mains adapter to a properly installed safety socket (230 V~ 50 Hz) that is easy to reach and close to the place where you have set up the device. Always keep the power socket free of obstructions so that the plug can be pulled out easily.
Even when the mains switch is off, some components of the device are live.
In order to disconnect the power to your device or to completely isolate the device from voltage sources, remove the mains plug from the mains socket.
3.2.2. Mains adapter
Use only the supplied mains adapter from Hung Kay Industrial Co., Ltd., model: HKP06-0501500dG.
If the housing of the mains adapter or the power cable is damaged, the mains adapter must be disposed of and replaced with a new mains adapter of the same type.
The mains adapter may only be used in dry rooms.
3.3. Set-up location/environment
In the first few hours of use, new devices can give off a typical, unavoidable but totally harmless smell, which wears off with time. We recommend that you ventilate the room at regular intervals to counteract the smell. We have taken appropriate measures during the development of this product to ensure that levels are well below legal limits.

WARNING!
Risk of electric shock!
Major changes in temperature or fluctuations in humidity can cause moisture to build up within the product due to condensation – this can cause an electrical short circuit.
After transporting the device, wait until it has reached ambient temperature before switching it on.

NOTICE!
Risk of damage to the device!
Unsuitable environmental conditions could cause damage to the device.
Use the device only in dry rooms.
- Set up and operate all the components on a stable, level and vibration-free surface to prevent the product from falling.
When setting up the device, make sure that
- there is a sufficient gap to other objects and the ventilation slots are not covered to ensure that there is always sufficient ventilation;
- the device and mains adapter are not exposed to direct sources of heat (e.g. radiators);
- the device and the mains adapter are not left in direct sunlight;
-
contact with moisture, water or splashes is avoided, and that no liquid-filled objects (for example, vases) are placed on or near the device;
-
the device is not exposed to dripping or sprayed water;
- the device is not placed close to magnetic fields (e.g. television sets or other loudspeakers);
- naked flames, such as lit candles, are not placed near the device;
- the mains cable is not taut or bent.
3.3.1. Electromagnetic compatibility
- Keep the device at a distance of at least one metre from high-frequency and magnetic interference sources (televisions, other loudspeakers, mobile or cordless telephones, etc.) to prevent malfunctions.
3.3.2. In the event of a malfunction caused by an electrostatic charge.
- If the device is malfunctioning, it may be due to an electrostatic discharge. If this occurs, pull the plug from the socket and remove the battery.
- Replace the battery after approx. three minutes and restart the device. This will reset the device.
3.4. Handling batteries
This device is battery-operated. Please note the following:
- Keep new and used batteries out of the reach of children. Risk of chemical burns if batteries are swallowed.

WARNING! Risk of chemical burns!
This device contains a button cell battery. If this battery is swallowed, it can cause serious internal chemical burns within two hours which may prove fatal.
-
Seek medical help immediately if you think that batteries may have been swallowed or secreted in any part of the body.
-
Stop using the device and keep it away from children if the battery compartment can no longer be closed securely.
- Before inserting the batteries, check that the contacts in the device and on the batteries are clean and, if necessary, clean them.
- Always use new batteries of the same type. Never use old and new batteries together.
- Pay attention to the polarity (+/-) when inserting the batteries.
- There is a risk of explosion if batteries are replaced incorrectly! Replace the batteries only with the same or equivalent type.
- Never try to recharge non-rechargeable batteries. There is a risk of explosion!
- Never expose the batteries to excessive heat (such as direct sunlight, fire or similar).
- Store batteries in a cool, dry place. Strong direct heat can damage batteries. Therefore, keep the product away from strong heat sources.
- Never short-circuit batteries.
- Never throw batteries into a fire.
- Remove leaking batteries from the device immediately. Clean the contacts before inserting a new battery. There is a risk of skin irritations from battery acid!
- Always remove flat batteries from the device.
- If the device is not going to be used for long periods, remove the batteries.
3.5. Repairs

WARNING! Risk of electric shock!
There is a risk of electric shock due to live parts.
Before using the device for the first time and after each use, check the device and the mains cable for damage.
- Do not use the device if the device or mains adapter are visibly damaged.
If you discover any damage or experience any technical problems, have the device repaired exclusively by a qualified technician.
If a repair is necessary, contact only our authorised service partner.
4. Package contents
Please check your purchase to ensure all items are included and contact us within 14 days of purchase if the delivery is incomplete:
When unpacking, ensure that the following parts are included:
Light alarm clock with mains adapter
-Operating instructions and warranty documents

DANGER! Risk of suffocation!
Packaging film can be swallowed or used improperly. Therefore, there is a risk of suffocation!
- Keep packaging material such as plastic film or plastic bags away from children.
5. Overview of the device
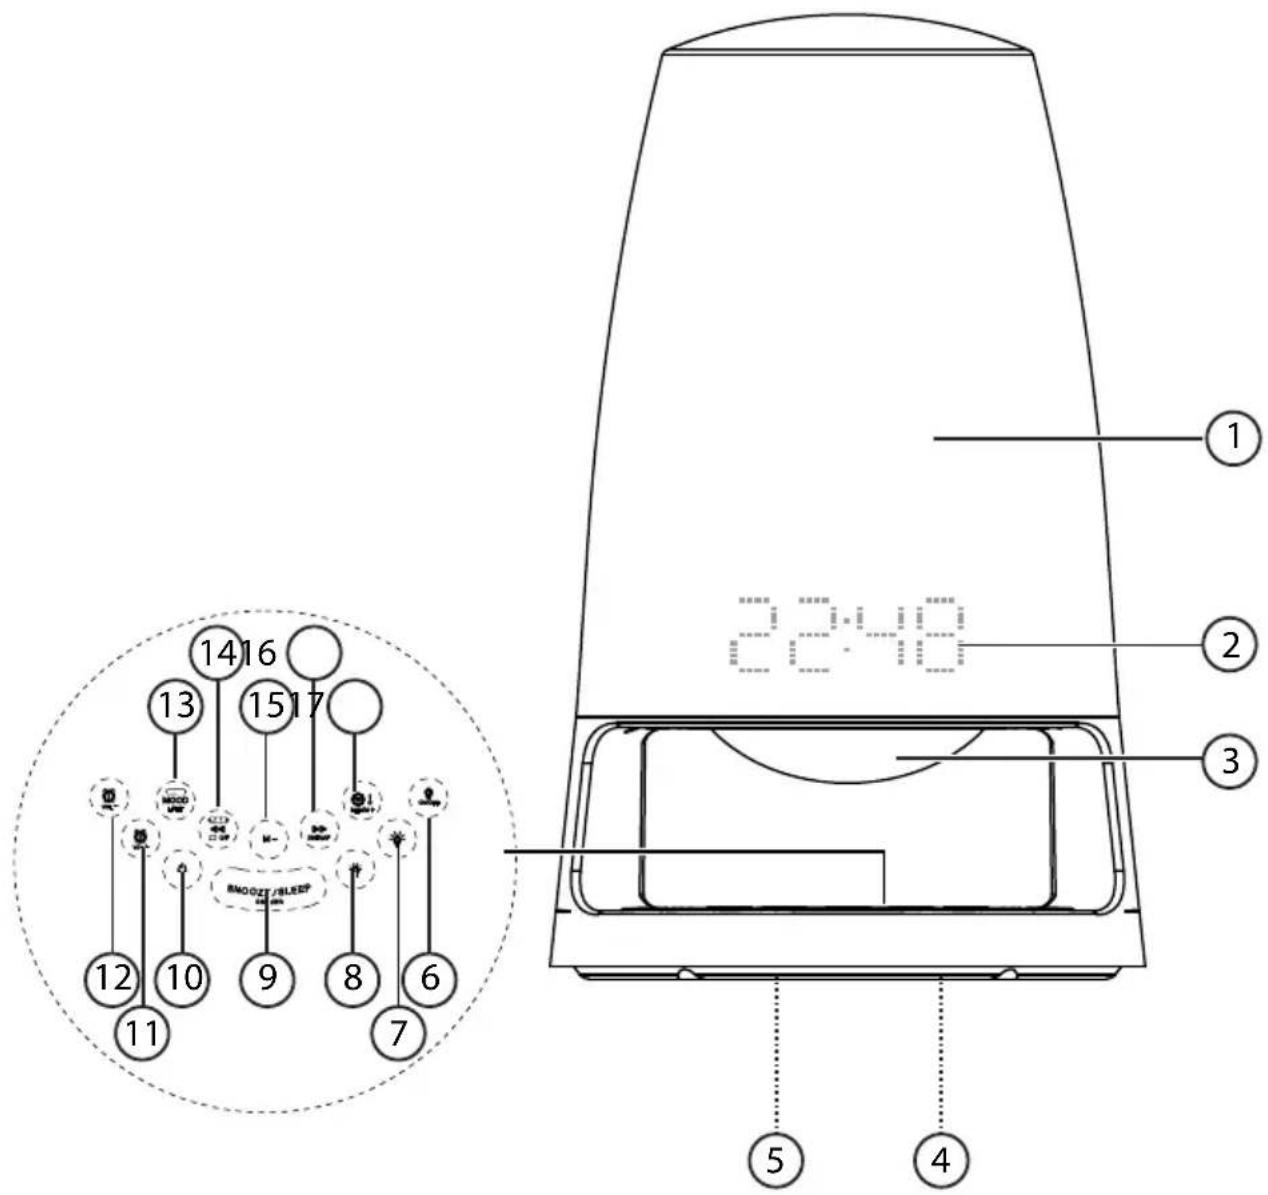
1) Light
2) Time/temperature display
3) Mood light
4) Battery compartment (underside of the device, not shown)
5) Type plate (underside of the device, not shown)
6) ONOFF: Light switch (light on/off)
7) Brighten the light
8) :Dim the light
9) SNOOZE/SLEEP: Snooze function, sleep function, dim display
10) :Operating switch (device on/device off)
11) Volume control (louder)/set alarm 2
12):Volume control (quieter)/set alarm 1
13) : Switch mood lighting on/off
14) Show date, station search backwards, alternating display
15) M:Memory space search back
16) DSTNAP: Station search forwards, summer time, nap timer
17) : Set time, temperature display, memory button, memory space search forwards
5.1. Rear
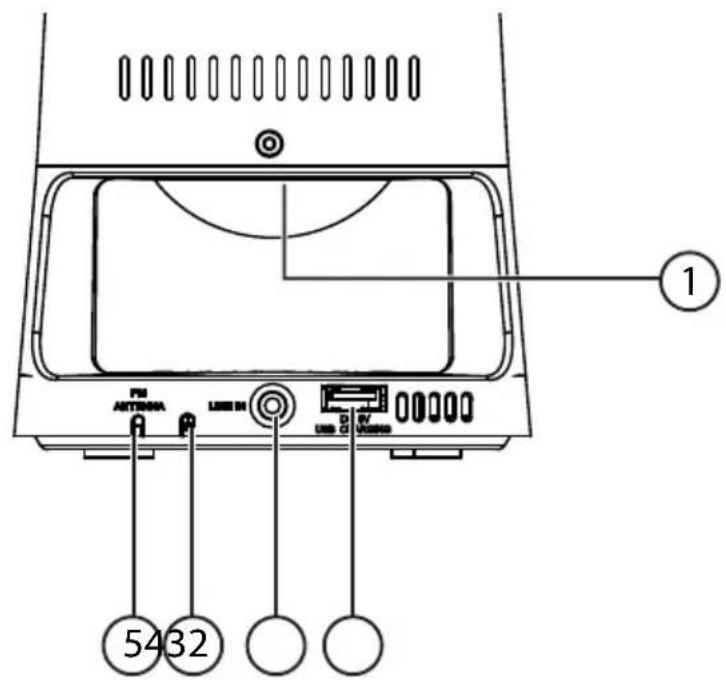
1) Speaker
2) DC 5V USB CHARGING: USB port for charging mobile phones, etc.
3) LINE IN: Input
4) Mains adapter cable
5) Wire aerial
6. Initial operation and use
6.1. Inserting the backup battery

NOTICE
If the device is operated for a long time without mains voltage (e.g. after a power failure), the clock may differ from the actual time by several minutes. After every power outage, check that the set time is correct and, if necessary, make adjustments.
- Undo the screw on the battery compartment cover with a Phillips screwdriver. Remove the battery compartment cover.
Insert the battery into the compartment with the negative pole facing downwards. Pay attention also to the diagram on the battery compartment cover.
Replace the battery compartment cover with the tab first.
Screw the battery compartment cover back on again.
Set the clock after the battery has been inserted to ensure the time is retained in the memory in the event of a power outage.

WARNING!
Risk of swallowing!
If a button cell battery is swallowed, it can lead to serious internal burns within 2 hours that can lead to death.
If the battery compartment does not close securely, keep the product away from children and stop using it.
6.2. Connecting the device
Plug the mains plug into a 230V 50Hz power outlet. 0.00 appears on the display.
6.3. Connecting devices via LINE-IN
You need an audio cable (e.g. 3.5 mm stereo jack to 3.5 mm stereo jack) to connect your audio device.
Set the audio device to a medium volume. Then switch it off.
- Connect one 3.5mm jack to the headphone socket or LINE OUT connection of the output device and the other to the LINE IN connection on the light alarm clock.
Switch on the light alarm clock as described above.
Now you can start music playback on the audio device.

NOTICE! Risk of faults!
Only battery-powered devices may be operated via the LINE IN connection.
6.4. Charging external devices via USB cable
You can charge your mobile device via a USB charging cable connected to the light alarm clock's USB port.
Connect the USB port of the mobile device via a suitable charging cable to the USB port DC 5V USB CHARGING on the light alarm clock.
The USB connection will now be recognised by your mobile device and charging will begin.
6.5. Setting the light
Press the ON button to switch on the light.
Press the button again to switch off the light.
Press the button (lighter) or button (darker) to set the brightness.
6.6. Mood light
Press the MOOD button to switch on the mood light.
Press the button again to switch off the mood light.

NOTICE
The mood light turns on automatically when the wake-up alarm goes off.
7. Setting the device
The radio must be switched off to carry out the different settings.

NOTICE
If no button is activated in the settings menu within 10 seconds, the menu is automatically terminated.
Settings made up to this point are saved. You must go through the whole menu again to make any further changes.
7.1. Setting the date and time
Set the date and time.
Press and hold down the button for approx. 2 seconds.
The display to be changed starts to flash.
Press the or button to set the year.

NOTICE
If you press and hold the or button the numbers scroll forwards/backwards.
Press the button to confirm.
Press the or DOTTAP button to set the month.
Press the button to confirm.
Press the button to set the day.
Press the button to confirm.
Press the or button to set either 12-hour or 24-hour display.
Press the button to confirm.
Press the or button to set the hour.
Press the button to confirm.
Press the or button to set the minutes.
Press the button to confirm.
7.2. Display date
Press the button to display the current year.
Press the 44 button again to display the current date.
Press the button again to display the current time.
After about 5 seconds without pressing any button, the display automatically switches to the time display.
7.3. Alternating display
To alternately display the time (for 10 seconds) and the temperature (for 5 seconds), activate the alternating display.
Press and hold the button for about 3 seconds until ON appears on the display.
The alternating display is now enabled and shows the time and temperature alternately.
To switch off the function: while in time display mode, press and hold the
button for about 3 seconds until OFF appears on the display.

NOTICE
To change the display from ^ Fahrenheit to ^ Celsius or vice versa, press and hold the button while in temperature display mode.
7.4. Summer time
To automatically account for daylight saving time, activate the DST option.
Press and hold down the button for approx. 2 seconds.
The time will be set forward an hour.
To set the clock back an hour again, press and hold the button again for about two seconds.
7.5. Alarm function
You have the option to set 2 different wake-up times (AL1 and AL2) as well as 4 different wake-up programmes.
7.5.1. Setting the alarm
To call up the AL1 or AL2 alarm time, press the ② or ① button.
To set AL1 or AL2, hold down the 2 or button for about 2 seconds.
Press the or button to set the hour.
Press the or button to confirm.
Press the or button to set the minutes.
Press the or button to confirm.
Press the or button to select one of the following alarm programmes:
-daily: Monday-Sunday (1-7)
-weekdays only: Monday-Friday (1-5)
-Weekend: Saturday and Sunday (6-7)
-one day only (1-1)
Press the or button to confirm.
Use the or buttons to select the setting for the alarm:
(BU: alarm sound; e.g. 88.8 FM: radio alarm).

NOTICE
The last tuned radio frequency is used for the radio alarm wake-up signal.
Press the or button to confirm.
In radio alarm mode: press the or button to adjust the volume of the radio playback.
Press the or button to confirm.
Press the or button to set the intensity of the wake-up light (LO1 - L10). If you do not want to activate the light, select OFF.

NOTICE
Around 30 minutes before the set alarm time, the light turns on and gradually increases in intensity to the set value.
Press the or button to confirm.
At the set alarm time, the alarm sounds or the radio will be automatically turned on. The mood light above the control panel lights up in alternating colours.

NOTICE
If the alarm is not switched off within 30 minutes, it terminates automatically and will go off again in 24 hours (depending on the selected alarm programme).
7.5.2. Activating/deactivating the alarm
In time display mode, press and hold the ② button for about 2 seconds to activate or deactivate the alarm AL1 or AL2.
If the alarm is activated, the symbol AL1 and/or AL2 will appear on the display.
7.5.3. Snooze
- When the alarm sounds, press the SNOOZE/SLEEP button to interrupt the alarm. The alarm is stopped and repeats nine minutes later. If the wake-up light function is activated, the light is switched off when the alarm is interrupted and the AL1 or AL2 display flashes.

NOTICE
The snooze function terminates automatically after 30 minutes. Even after hitting the snooze button, you will be woken in the manner you have selected.
7.5.4. Switching off the alarm
To deactivate AL1 or AL2, hold down the ② or ① button for about 2 seconds.
7.6. Display illumination
With the radio switched off, press the SNOOZE/SLEEP button to adjust the brightness of the display in two levels.
7.7. NAP timer
If the NAP timer is set, the light alarm clock switches on automatically at a specific time with the alarm sound.
Press the button to get to the settings for the NAP timer.
Then press the button repeatedly to set a time from N10 to N90.
The light alarm clock activates automatically after the set time has elapsed with a buzzer. This switches off automatically after 30 minutes. The wake-up light is not activated when the NAP timer is set.
By pressing the button again, you can call up the remaining time.
To switch off the NAP time, press the button or press the button repeatedly to select the OFF setting.
8. Automatic switch-off
With the SLEEP function, the device plays a radio station and turns off after a preselected time between 15 and 90 minutes.
8.1. Activate the SLEEP function
Press the SNOOZE/SLEEP button for 2 seconds to activate the sleep timer.
Press the SNOOZE/SLEEP button repeatedly to set the desired time period (between 15 and 90 minutes).
The light alarm clock turns off automatically after the set time has elapsed. To stop the function, press the SNOOZE/SLEEP button repeatedly, to select the OFF setting or press the button.
9. Radio operation
Fully unwind the connected wire aerial for VHF (FM) reception.
9.1. Switching the radio on and off
Press the button to switch on the radio.
Press the button again to switch off the radio.
9.2. Volume setting
You can use the ② and ① buttons to set the volume.
9.3. Manual station search
Press the or DSTNAP button to adjust the frequency up/down one step at a time.
- Keep the or button pressed to start a scan that stops automatically when the next radio station is found.
9.4. Storing stations
To save the set radio frequency, press the button for about 2 seconds. The next free memory space (P01-P10) will be displayed and flashes.
Use the or keys to select a memory space.
Pressing the button again will save this space.
There are a total of 10 memory spaces available.
9.5. Preset station selector
Use the M- or button to call up the previously saved radio stations.

NOTICE
If necessary, adjust the wire aerial to get optimal reception.
10. Cleaning
Remove the mains plug from the socket before cleaning. Use a dry, soft cloth to clean the device. Avoid the use of chemical solutions and cleaning products because these may damage the device surface or markings.
11. Disposal

Packaging
The product has been packaged to protect it from damage in transit. Packaging materials are raw materials and can therefore be reused or recycled.

Device
Old appliances should not be disposed of with the normal household rubbish.
In accordance with Directive 2012/19/EU, the device must be properly disposed of at the end of its service life.
This involves separating the materials in the device for the purpose of recycling and minimising the environmental impact.
Take old appliances to a collection point for electrical scrap or a recycling centre.
Contact your local waste disposal company or your local authority for more information on this subject.

Batteries
Do not dispose of used batteries in the household rubbish. Take the batteries to a collection point for used batteries.
12. Technical data
Mains adapter
Manufacturer Hung Kay Industrial Co., Ltd., China
Model:
HKP06-0501500dG
Input: 230V 50Hz,0.2A
Output: DC 5 V

1.5A
Backup battery: 3 volt lithium button cell, type CR2032 (not
supplied)
Connections
LINE IN input 3.5 mm stereo jack
USB connection DC 5 V, max. 500 mA
for charging only (e.g. for mobile phones, etc.)
Radio
FM band 87.5-108 MHz
Dimensions ( × H) approx. 11.6× 24~cm
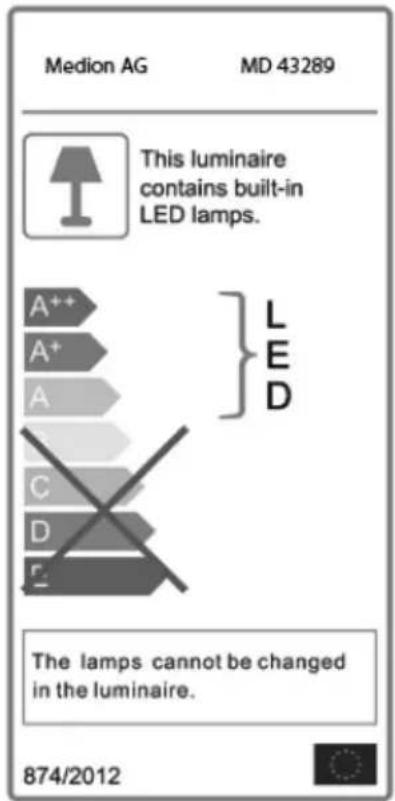
LED
13. Declaration of conformity
CE
Medion AG hereby declares that the product MD 43289 conforms to the following European requirements:
EMC Directive 2014/30/EU
Low Voltage Directive 2014/35/EU
- Ecodesign Directive 2009/125/EC
RoHS Directive 2011/65/EU
Full declarations of conformity are available at www.medion.com/conformity.
14. Legal notice
Copyright © 2016 Status: 2016-07-25 All rights reserved.
This operating manual is protected by copyright.
Mechanical, electronic and any other form of reproduction
is prohibited without the written permission of the
manufacturer
Copyright is owned by the company:
Medion AG
Am Zehnhof 77
45307 Essen
Germany

The operating manual can be reordered via the service hotline and is available for download via the service portal at www.medion.com/gb/service/start/. You can also scan the QR code above and download the operating manual onto your mobile device via the service portal.