C17KS61H0 - Coffee machine NEFF - Free user manual and instructions
Find the device manual for free C17KS61H0 NEFF in PDF.
| Product type | Automatic coffee machine with grinder |
| Brand | Neff |
| Model | C17KS61H0 |
| Dimensions (H x W x D) | 455 x 495 x 375 mm |
| Empty weight | 19 - 20 kg |
| Rated power | 1600 W |
| Voltage / Frequency | 220-240 V / 50-60 Hz |
| Pump pressure | 19 bars (max) |
| Water tank capacity | 2.4 L |
| Coffee bean container capacity | 500 g |
| Grinder type | Ceramic, adjustable |
| Main functions | Whole beans, ground coffee, milk beverages, hot water, simultaneous two-cup preparation, personalized beverages (8 memories) |
| Display | Screen with menu navigation |
| Milk system | Fresh milk container with hose, automatic and manual cleaning |
| Home Connect | Integrated Wi-Fi, control via app (remote start) |
| Maintenance programs | Descaling, cleaning, Calc'nClean, special rinse |
| Child lock | Control panel lock |
| Frost protection | Integrated drain program |
| Included accessories | Measuring spoon, water hardness test strip, milk hose, milk container, suction tube, quick reference guide |
| Spare parts and repairability | Cleaning tablets (00310575), descaling tablets (00576693), water filter (00575491), maintenance kit (00576330), milk container (00576166) |
| General information | User manual in French, 136 pages; disposal according to WEEE directive; warranty according to retailer's terms |
Frequently Asked Questions - C17KS61H0 NEFF
User questions about C17KS61H0 NEFF
0 question about this device. Answer the ones you know or ask your own.
Ask a new question about this device
Download the instructions for your Coffee machine in PDF format for free! Find your manual C17KS61H0 - NEFF and take your electronic device back in hand. On this page are published all the documents necessary for the use of your device. C17KS61H0 by NEFF.
USER MANUAL C17KS61H0 NEFF
Included in delivery (see page 37)
Included in delivery (for use) 37
Congratulations 37
Intended use 38
Important safety information. 38
Overview. 40
Controls. 40
Initial use 41
Display 42
Preparing drinks 43
Preparation using coffee beans. 45
Preparation using milk 45
Preparation using ground coffee 46
Dispensing hot water 47
Personalised drinks 47
Two cups at once. 48
Adjusting the grind setting 48
Childproof lock. 48
Menu. 49
Home Connect. 51
Care and daily cleaning. 55
Service programmes 58
Tips on energy saving 60
Frost protection. 61
Storing accessories 61
Accessories 61
Disposal. 61
Guarantee. 61
Simple troubleshooting. 62
Technical specifications. 65
Included in delivery (for use)
a Fully automatic coffee machine
Instruction manual
Quick reference guide
Measuring spoon
Water hardness testing strip
Milk tube (set)
Milk container
Suction pipe
Congratulations ...
... on purchasing this fully automatic coffee machine! You have now acquired a high-quality and modern kitchen appliance. It combines innovative technology with a range of functions and is easy to use. It will enable you to prepare a variety of delicious hot drinks quickly and simply – whether you're in the mood for an invigorating espresso, a creamy cappuccino, a smooth latte macchiato or white coffee, or a traditional cup of coffee. At the same time the appliance offers you a wide range of options for adapting it to your individual taste.
To ensure that you can use this fully automatic coffee machine with all its functions and features reliably and safely, we would like you to familiarize yourself with its components, functions, displays and controls.
These instructions are designed to help you. So please take the time to read them before you switch on the appliance.
How to use these instructions
These instructions also show display texts and symbols in a special way. These enable you to clearly see where we refer to texts or symbols that are marked or displayed on the appliance.
Display indicators: "Espresso"
Buttons and controls on the display: [▶]
The appliance comes with a quick reference guide where you can find the most important functions at a glance. It can be stored in the accessory drawer of the appliance.
Intended use
Check the appliance after unpacking it. Do not connect the appliance if it has been damaged in transit.
This appliance is intended for domestic use only.
Only use the appliance indoors at room temperature and up to 2000m above sea level.
Important safety information
Please read and follow the operating instructions carefully and keep them for later reference! Enclose these instructions when you give this appliance to someone else.
This appliance can be used by children aged from 8 years and above and by persons with reduced physical, sensory or mental capabilities or lack of experience and knowledge if they have been given supervision or instruction concerning use of the appliance in a safe way and if they understand the hazards involved. Keep children under 8 years of age away from the appliance and connecting cable and do not allow them to use the appliance. Children shall not play with the appliance. Cleaning and user maintenance shall not be made by children unless they are older than 8 years and supervised.

Warning
Risk of electric shock!
The appliance may only be connected to a power supply with alternating current via a correctly installed socket with earthing. Ensure that the protective conductor system of the domestic supply has been correctly installed.
- Connect and operate the appliance only in accordance with the specifications on the rating plate.
- Do not use the appliance if the power cord and/or appliance are damaged.
Only our customer service may repair the appliance, e.g. by replacing a damaged power cord, in order to avoid hazards.
If the supply cord is damaged, it must be replaced by a special cord or assembly available from the manufacturer or its service agent.
- Never immerse the appliance or mains cord in water.
If there is a fault, pull out the mains plug immediately or switch off the power supply.
- Avoid spillage on the connector.
- Please note the special information on cleaning in the instructions.
Warning
Hazard due to magnetism!
The appliance contains permanent magnets which can affect electronic implants such as pacemakers or insulin pumps. Persons wearing electronic implants must maintain a minimum distance of 10 cm from the appliance and from the following parts upon removal: milk container, milk system, water tank and brewing unit.
Warning
Risk of suffocation!
- Do not allow children to play with packaging material.
Store small parts safely as they can be easily swallowed.
Warning
Risk of injury!
- Do not reach into the grinding unit!
■ Be careful not to jam your fingers when closing the door.
A misuse of the appliance can potentially lead to injury.
Warning
Risk of burns!
The beverage outlet gets very hot. After use, always let it cool down before you touch it.
After the use the heating element surfaces can be subjected to residual heat.
- Freshly prepared beverages are very hot. Leave to cool a little if necessary.
Warning
Risk of scalding (Home Connect)!
If an unattended remote start takes place, third parties might be scalded if they reach under the coff ee dispenser during drinks dispensing. You should therefore make sure that with an unattended remote start that there is no risk to other people, in particular not to children, or to property.
Warning
Risk of fire!
The appliance gets hot.
- Never operate the appliance with the cupboard door closed.
The cupboard door must be open during operation.
Overview
1 Appliance door
a Recessed grip (for opening the door)
b Drip plate
2 Display
3 Control panel
4 Outlet system (coffee, milk, hot water), height-adjustable
a Cover
5 Milk system
a Snap lever
b Beverage outlet (upper part, lower part)
c Milk tube (2 pieces)
d Connecting element, metal (for magnet holder)
6 Mains switch [O/I] (power supply)
7 Accessory drawer
(for quick reference guide and accessories)
a Quick reference guide
b Measuring spoon
c Water hardness strip
d Milk tube (set)
8 Removable water tank
a Lid for water tank
9 Removable bean container
a Lid for bean container
10 Slide regulator for grinding degree setting
11 Magnet holder (for connecting element)
12 Removable drawer (for ground coffee/cleaning tablet)
13 Holder (for milk tube)
14 Protective cover (for brewing unit)
15 Brewing unit a Locking mechanism
b Cover
16 Eject lever
17 Drip tray, withdrawable
a Drip tray cover
b Coffee grounds container
18 Collecting tray
19 Holder
a Suction pipe
20 Rating plate (E number, FD)
21 Shelf with sensor (for milk container)
22 Milk container
a Stainless steel container
b Lower part of the lid
c Upper part of the lid
Controls
The appliance features user-friendly menu navigation to ensure that operation is as easy as possible while at the same time offering a wide range of functions. That means a range of options can be selected with just a few operating steps.
Mains switch [O/I]
The mains switch [O/I] (with the door open) is used to switch on the appliance or switch it off completely (power supply is interrupted).

Important: Do not press the mains switch while the appliance is in use. Switch off the appliance only when it is in energy saving mode, so that it can rinse automatically.
Control panel (touch field)
Navigate on the control panel by touching the symbols and characters.
You will hear an audible signal. The audible signal can be switched on and off (see the section "Menu - Key tones").
[①]
Touch [①] to switch on the appliance or put it into energy saving mode. The appliance is rinsed automatically.
The appliance does not rinse if:
-
if it is still warm when switched on, or
-
if no coffee was dispensed before it was switched off.
The appliance is ready for use as soon as the symbols for the drinks selection appear on the display.
[
Touch [ ] to call up the menu. Settings can be configured, information called up or the appliance connected to "Home Connect" (see section "Menu").
initial use
[ ]
Touch [m] to open the selection of service programmes. Run the desired programme as described in the section "Service programmes".
Double [ ]
Touch [ ] after selecting a drink to prepare two cups simultaneously (see the section "Two cups at once").
My Coffee [♥]
Touch [♥] to open the selection of "Personalised beverage preparation". Personal settings for coffee drinks can be saved and called up (see the section "Personalised drinks").
[]
Touch [D] for either beverage preparation or to launch a service programme.
If you touch [D] again while the drink is being prepared, dispensing will be prematurely halted.
Arrow navigation button
Press the arrow on the arrow button to navigate in the display or to change parameters.
Display
The display shows drinks, settings and information (see the section "Display").
Initial use
General
Fill the appropriate container using only pure, cold, uncarbonated water and solely roasted beans. Do not use coffee beans that have been glazed, caramelised or treated with other additives containing sugar, since they will block the brewing unit.

Before the appliance can be switched on and used, it must be assembled and connected according to the enclosed assembly instructions.
Setting up the appliance
Remove any protective plastic film.

Important: Only use the appliance in a frost-free room. If it has been transported or stored at temperatures below 0^ , wait at least 3 hours before initial use.
Take hold of the appliance door by the recessed grip and open.
- Remove the water tank, rinse it and fill it with fresh water up to the "max." mark.
- Replace the water tank and click into place.
- Remove the bean container, fill with coffee beans and replace.
- Set the mains switch to [ ① ] and close the appliance door.
The appliance heats up and is rinsed.
The display is activated.
"Please set your preferred language."
appears.
Press the [] arrow button. The field "Deutsch" has a light background. The language can be changed.
■ With the [> ] arrow button select the desired language.
Press the [] arrow button. The field "Language" has a light background.
- Select the "Water hardness" with the [> ] arrow button.

It is important to set the water hardness correctly to enable the appliance to accurately indicate when the descending programme should be run. The preset water hardness is level 4.If a water softener is installed in the house, please set the water hardness to level 3.You can also check the water hardness by asking your local water supplier.
Use the enclosed test strip to determine the water hardness. Briefly dip the test strip in water and check the result after one minute.
| Level | Water hardness | |
| German (°dH) | French (°fH) | |
| 1 | 1-7 | 1-13 |
| 2 | 8-14 | 14-25 |
| 3 | 15-21 | 26-38 |
| 4 | 22-30 | 39-54 |
Press touch button [] . The field "Water hardness" has a light background.
- Select "Home Connect" with the touch button ([>]
To now connect the appliance to the WiFi network (home network), touch the touch button [√].
To connect the appliance to the WiFi network later on, touch the symbol ([>]". "Complete set-up" appears.
Press touch button [] . The settings for Language and Water hardness are saved.

When selecting [Home Connect] please read the detailed description in the section "Home Connect".
The appliance is ready to use when the drink symbols are shown on the display.
The integrated fan switches on each time a drink is dispensed and switches off again after a few minutes.
When the appliance is used for the first time after running a service program, or if it has not been operated for a long period, the first beverage will not have the full aroma and should not be consumed.
When the fully automatic coffee machine is first used, a suitably thick and stable "crema" is only achieved after the first few cups have been dispensed.
Switch off appliance
Press the [ ① ] button.
The appliance rinses and switches to energy saving mode.
Exception: If only hot water is dispensed, the appliance switches off without rinsing.
To switch the appliance off completely, open the appliance door and set the mains switch to [O].
i Important: Do not press the mains switch while the appliance is in use. Switch off the appliance only when it is in energy saving mode, so it can rinse automatically.
The factory settings of the fully automatic coffee machine are programmed for optimal performance. The appliances switches automatically to the energy saving mode after a configured time and rinses (duration can be set, see "Switch off after" in the section "Menu").
The appliance is equipped with a sensor. If there is a milk container, this will be correspondingly shown on the display when switching to the energy saving mode. If there is milk in the container, please keep in the fridge.
Display
Display
The display shows the drinks, settings and setting options, as well as messages about the appliance's operating status.
Examples:
Drink selection

Information
Information disappears after pressing the button or after a short time.

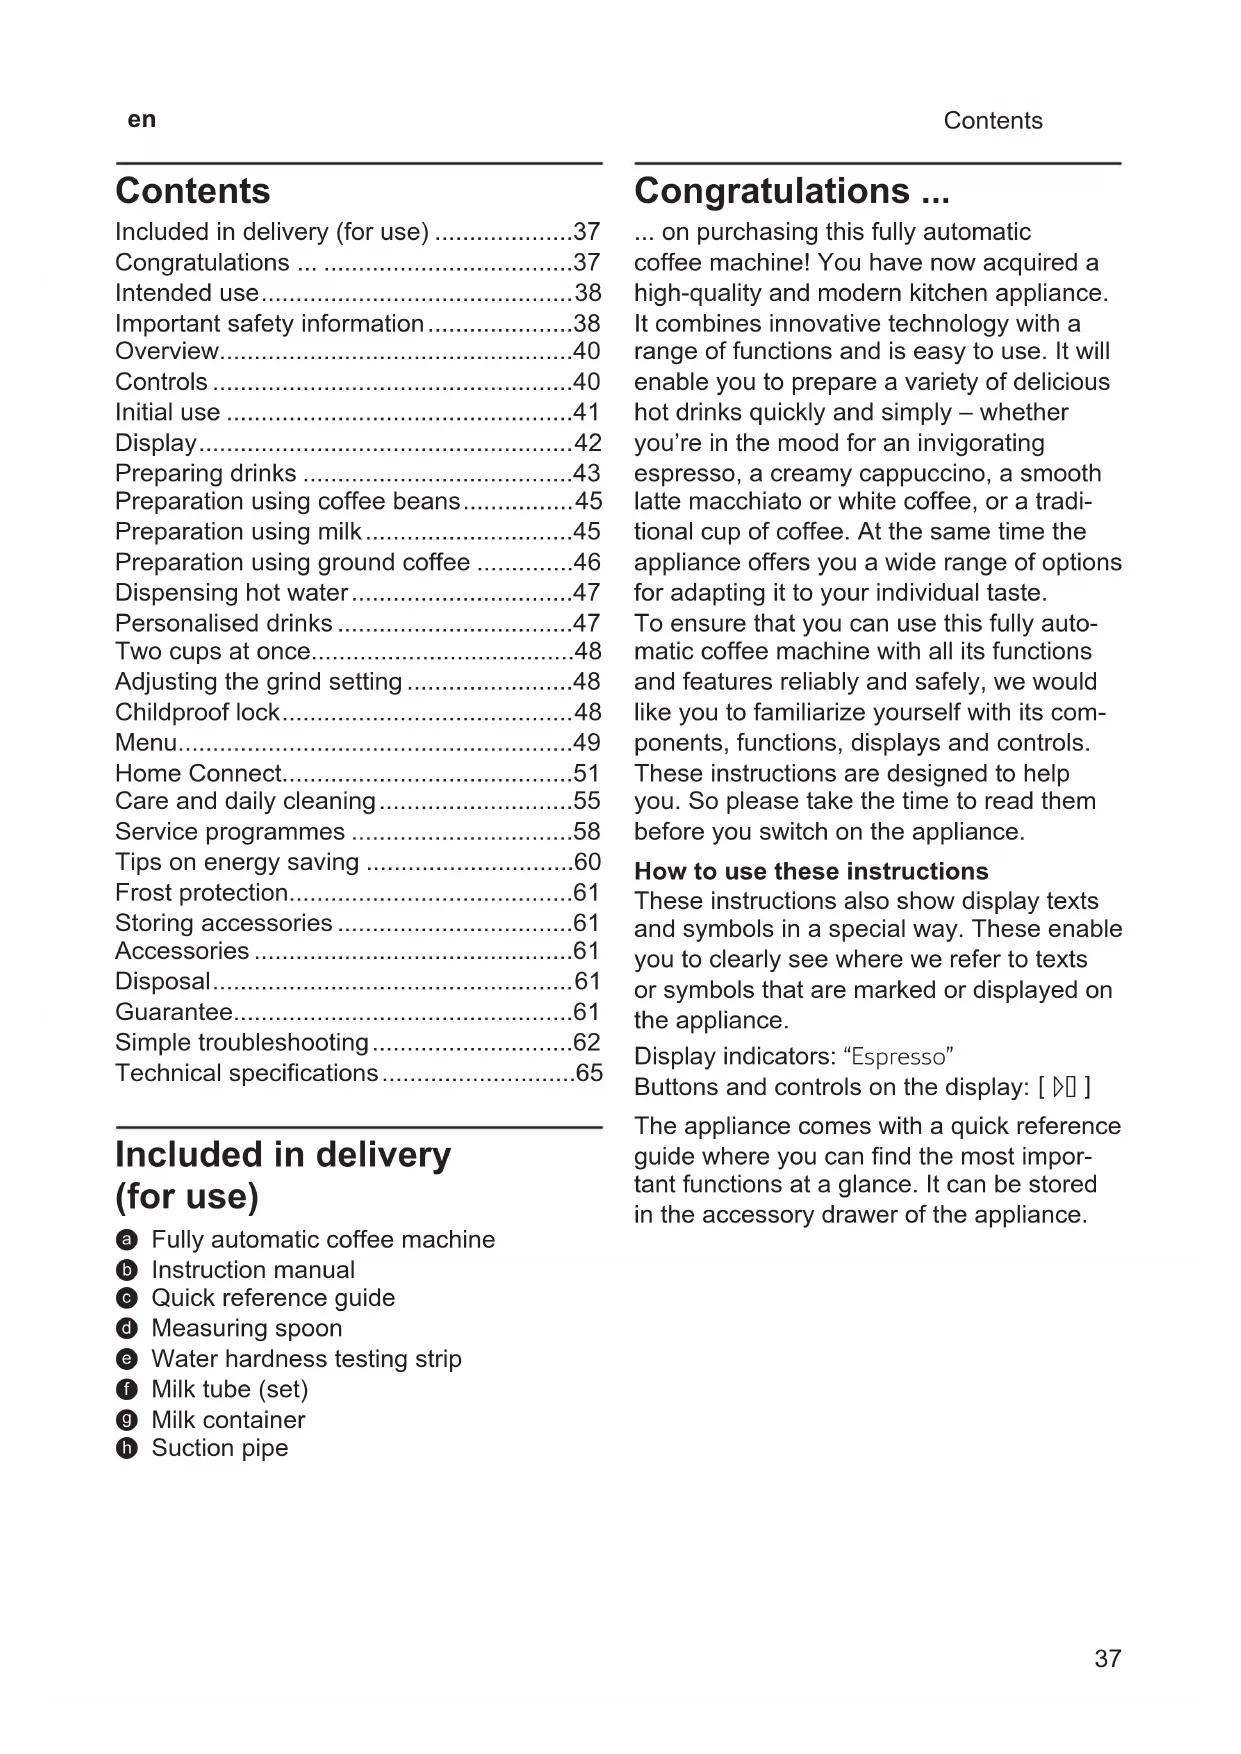
Water tank almost empty
Preparing drinks
The information remains however at the top of the display in the form of a small symbol.
0
Bean container almost empty
Water tank almost empty
Replace water filter
Cleaning programme necessary
V V
Dscaling programme necessary
Calc'nClean programme necessary
Prompts to take action

If the action required was carried out, e.g. filling the water tank, the corresponding message and symbol will disappear.
Preparing drinks
This fully automatic coffee machine can be operated using coffee beans or ground coffee (but not instant coffee).
If using coffee beans, they will be freshly ground for each brewing. For optimum quality, store the beans in a cool place in sealed containers.

Important: Fill the water tank with fresh, uncarbonated, cold water every day. The tank should always contain sufficient water for operating the appliance.
Tip: Cups should be prewarmed, e.g. with hot water. This applies particularly to small thick-walled espresso cups.
For some settings, coffee is prepared in two stages (see the section "Aroma Double Shot" and "Two cups at once"). Please wait until the process is completely finished.
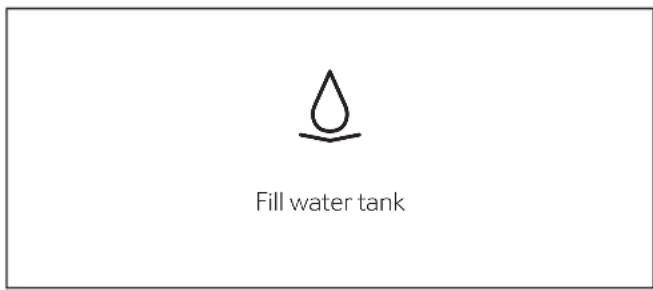
Beverage selection
Press the [ ] or [> ] arrow button to select different drinks:
The symbol for the selected drink will appear in the middle. The name of the drink and the values currently set, e.g. for the coffee strength and volume are shown in lower row.
The following drinks can be selected:
Ristretto
Espresso
Espresso Macchiato
Coffee
Cappuccino
Latte Macchiato
Caffe Latte
Milk froth
Warm milk
Hot water
The drink selected can be directly prepared with the pre-set values or first adjusted to individual taste.

If the appliance is connected to Home Connect, additional drinks can be selected from "Coffeeworld" and adjusted in the app. The last "Coffeeworld" drink selected in the app is shown in the display and can also be adjusted and dispensed directly at the appliance.
Drink adjustment
By pressing the [] arrow button, different fields will appear for adjustment depending on the drink.
The field where the value can be changed has a light background.
en Preparing drinks
An example:
The values for a cup of coffee can be changed as follows:
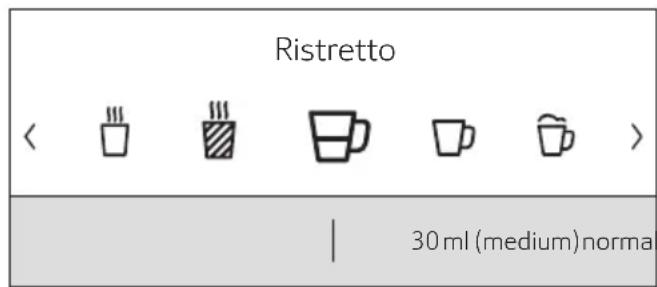
- Select "Coffee" with the [ ] or [> arrow button.
| Coffee |
| < > |
| | 120ml (medium)norma |
Press the [ ] arrow button.
The fields containing the preset values appear. The active field, e.g. "mild" for the coffee strength has a light background.
| Coffee |
| < normal > |
| 120 ml (medium) |
| Temperature normal |
Set the desired coffee strength, e.g. "strong" with the [ ] or [> ] arrow button.
Press the [ ] arrow button.
| Coffee |
| strong |
| < 120 ml (medium) > |
| Temperature normal |
Set the desired amount of coffee, e.g. "160 ml (large)" with the [<] or [>] arrow button.
Press the [ ] arrow button.
| Coffee |
| strong |
| 160 ml (large) |
| < Temperature normal > |
Set the desired temperature, e.g. "Temperature high" with the [<] or [>] arrow button.
| Coffee |
| strong |
| 160 ml (large) |
| < Temperature high > |
To go back to the drinks menu either press the [] arrow button or dispense a drink with [D] . The settings are saved.
There are different setting options depending on the type of drink. For coffee drinks, for example, the strength, temperature and quantity can be set, for milk only the volume.
The following settings are possible:
Coffee strength
very mild
mild
normal
strong
very strong
DoubleShot
DoubleShot +
DoubleShot ++
Aroma Double Shot
The longer the coffee is brewed, the more bitter substances and undesired aromas are released. This has a negative effect on the taste and makes the coffee less easily digestible. For extra strong coffee, the appliance has therefore a special Aroma Double Shot function. When half the quantity has been prepared, it grinds and brews fresh coffee beans so that only the pleasant, aromatic scents are released.
The Aroma Double Shot function is not available for ristretto, espresso macchiato, and when ground coffee is used.
Volume
The volume differs depending on the type of drink and can be set in ml steps.
The volume dispensed can fluctuate depending on the quality of the milk. If no controls are activated for approx. 30 seconds, the appliance will automatically exit the settings mode. The settings made will be automatically stored.
Drinks temperature
Values for coffee drinks:
Temperature normal
Temperature high
Temperature very high
Values for hot water:
70^ (White tea)
80^ (Green tea)
90^ (Black tea)
Max (Fruit tea)
Preparation using coffee beans
The appliance must be ready for use.
-
Place a cup underneath the beverage outlet.
-
Select "Ristretto", "Espresso" or "Coffee" with the [<] or [>] arrow button.
The display shows the selected drink along with the preset values for the strength of the coffee and the amount for this drink.
The settings can be changed as described in the section "Drink adjustment".
- Touch [▷] to start dispensing.
The coffee is brewed and then dispensed into the cup.
Touch [D] again to prematurely halt dispensing.
Preparation using milk
This fully automatic coffee machine has an integrated beverage outlet. This can be used to prepare coffee drinks with milk or also milk froth and warm milk.
Risk of burns! The beverage o
After use, always let it cool down before you touch it.
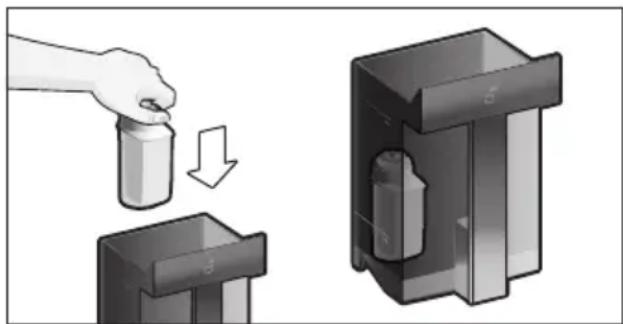
Milk container
The milk container has been designed especially for use together with this fully automatic coffee machine. It is intended solely for use in the household and for storing milk in the refrigerator. The insulated container keeps milk cool for a number of hours.
Important: Remove cups or glasses before opening the door in case they fall.
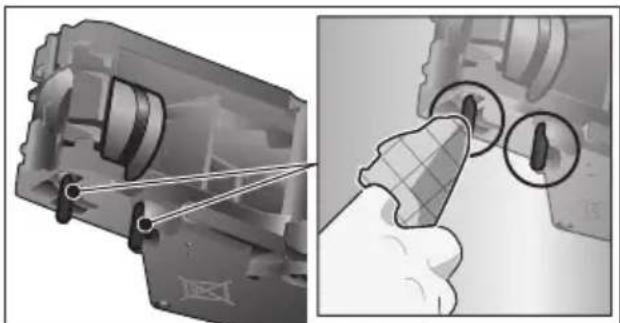
Connecting the milk container or a milk carton:
- Open the appliance door.
- Remove the cover of the beverage outlet towards the front.
Connect and fix the milk tubes and connecting elements as illustrated.
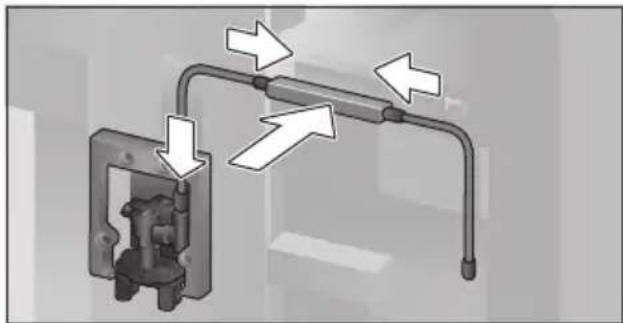
-
Attach the cover firmly from the front on to the beverage outlet.
-
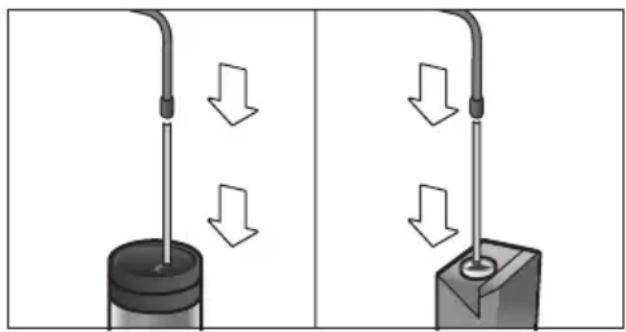
Attach the suction pipe and insert into the milk container or a milk carton.
- Close the appliance door.

Dried milk residues are difficult to remove, therefore always clean (see the section "Cleaning the milk system").
Coffee drinks with milk
- Place a cup or glass underneath the beverage outlet.
- Select "Espresso Macchiato", "Cappuccino", "Latte Macchiato" or "Caffe Latte" with the [ ] or [> ] arrow button.
The display shows the selected drink along with the preset values for the strength of the coffee and the amount for this drink.

The settings can be changed as described in the section "Drink adjustment".
- Touch [▷] to start dispensing.
The milk is dispensed into the cup or glass first. Then the coffee is brewed and runs into the cup or glass.
Press button [ ] again to stop the current step of the process prematurely.
Milk froth or warm milk
-
Place a cup or glass underneath the beverage outlet.
-
Select "Milk froth" or "Warm milk" with the [ ] or [> ] arrow button.

The settings can be changed as described in the section "Drink adjustment".
- Touch [▷] to start dispensing.
Milk froth or warm milk is dispensed from the beverage outlet.
Press button [ ] again to stop the current step of the process prematurely.
Preparation using ground coffee

When using ground coffee, the setting for the strength of the coffee and dispensing two cups at once is not available.
Important: Remove cups or glasses before opening the door in case they fall.
The appliance must be ready for use.
- Open the appliance door.
Remove the ground coffee drawer.
The removable drawer must be dry.
Put in coffee powder (maximum 2 level measuring spoons); do not press firmly.

Caution!
Do not use whole beans or instant coffee.
Replace the ground coffee drawer.
- Close the appliance door. The display shows "Ground coffee" instead of coffee strength.

If coffee is not dispensed within 90 seconds, the brewing chamber empties automatically to avoid an overflow. The appliance is then rinsed.
- Place a cup underneath the beverage outlet.
- Select a coffee drink or a coffee drink with milk with the [< ] or [>] arrow button.
The display shows the selected drink along with the preset values for this drink.

The settings can be changed as described in the section "Drink adjustment".
For coffee drinks with milk, please observe the instructions in the section "Preparation using milk".
- Touch [▷] to start dispensing.
The coffee is brewed and then dispensed into the cup. When selecting coffee drinks with milk, the milk is first dispensed and then the coffee brewed.

For another drink with ground coffee, repeat the procedure.
Dispensing hot water

Risk of burns!
The beverage outlet gets very hot. After use, always let it cool down before you touch it.
The appliance must be ready for use.
-
Remove the milk tube from the milk container.
-
Remove any milk or coffee residue from the outlet.
-
Place a cup or glass underneath the beverage outlet.
-
Select "Hot water" with the [<] or [>] arrow button.

The settings can be changed as described in the section "Drink adjustment".
- Touch [▷] to start dispensing.
The message appears "Milk tube removed from milk container?"
If still connected, remove the milk tube and press the [] arrow button.
Hot water flows out of the beverage outlet. Touch [D] again to prematurely halt the dispensing process.
Personalised drinks
Press [♥] to open the selection for personalised drinks.
Up to 8 storage spaces can be used. Save your favourite drinks that are frequently dispensed here with all their settings.

Press [♥] to exit the menu without saving at any time.
Entering or changing drinks
Touch [♥].
The selection of memory locations appears.
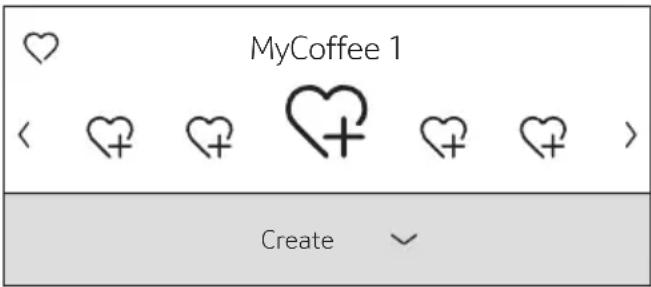
- Use the [ ] or [] arrow button to select an empty memory location ♀ for a new entry, change an occupied memory location, or to delete a favourite drink.
- Select "Create" at an empty memory location or "Change" at an occupied memory location.
Press the [] arrow button.

If "Delete" is selected, the settings for the memory location are deleted and it is again empty.
The menu for adjusting the drinks opens. The last drink dispensed is shown with the last settings selected.
If you do not wish to save last drink dispensed, select another drink with the [ ] or [ ] arrow button.
- Select each setting to be changed with the [ ] or [ ] arrow button. Adjust the values to your own wishes with the [ ] or [ ] arrow button.
Different setting options appear depending on the drink selected.

For milk drinks, the mixing ratio of coffee and milk can be set.
The settings can be stored under an individual name. Select "Save name". The mask for entering the name opens.
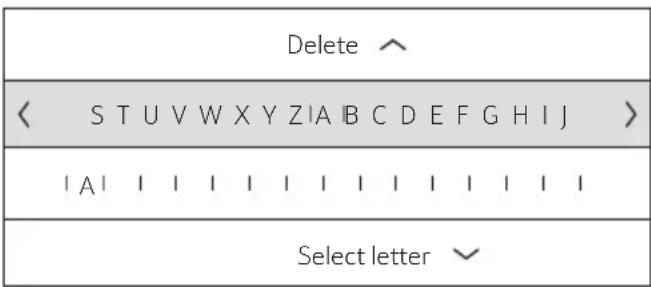
- With [] exit the entry without any change. The drink selection menu appears.
- Select a letter or a symbol in the upper row with the [ ] or [> ] arrow button.
- Press [√] to confirm the letter selected. To delete select [<] and press [√].
Select other letters or symbols and confirm.
Press [] to accept the entry. The selection menu opens.
Touch [♥] to exit the menu.
Select a personalised drink and dispense
- Touch [♥]. The selection of memory locations opens.
- Select the desired memory location with the [<] or [>] arrow button.
- Place a cup or glass underneath the beverage outlet.
- Touch [▷] to start dispensing.
Two cups at once
Touch [ ] to prepare two cups of the selected drink simultaneously. The setting is shown by a second cup symbol and as text, e.g. "2x Espresso".
- Select the desired drink with the [<] or [>] arrow button.
Touch [ ] - Place two cups left and right underneath the beverage outlet.
Touch [D] to start dispensing.
The selected drink is prepared and then dispensed into both cups.

The drink is prepared in two stages (two grinding operations).
Please wait until the process is completely finished.
Two cups at once cannot be dispensed for the settings "Aroma Double Shot" or "ground coffee".
Adjusting the grind setting
This fully automatic coffee machine has an adjustable grinding unit. This enables the grinding level of the coffee to be individually changed.
Open the appliance door.
- Slide the regulator to select the grinding degree setting between finely ground coffee and coarsely ground coffee.
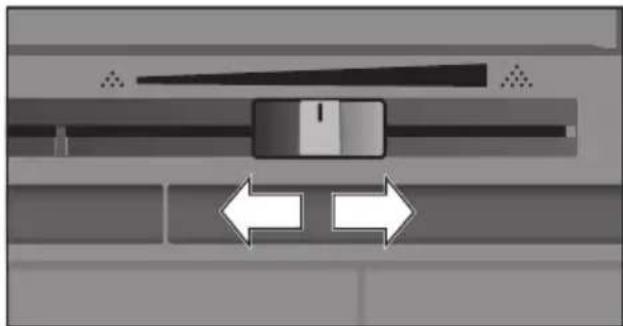
- Close the appliance door again.

For dark roast coffee beans, choose a finer grind, for lighter beans a coarser grind.
Tip: Only make small changes to the grinding degree setting.
The new setting will not become apparent until after the second cup of coffee.
If the display shows the message "Select a coarser degree of grinding", this means that the beans are being ground too finely. Adjust the grinding level to a coarser setting.
Childproof lock
The appliance can be locked to protect children against scalding and burns.
Press and hold [ ] for at least 4 seconds.
"Childproof lock activated" briefly appears on the display.
No further operation is now possible; only [①] can be pressed.
To deactivate the child lock, press and hold [空 ] for at least 4 seconds.
"Childproof lock deactivated" briefly appears on the display.
Menu
The menu is used for changing individual settings, accessing information and launching processes.
- Touch [♂] to open the menu.
The different setting options will appear.
Navigating through the menu:
The various menu points, e.g. "Language" can be selected with the [<] or [>] button. The respective setting, e.g. "Deutsch" are displayed with [> ] and changed with [<] or [>]. Press [^] to exit the respective setting again.
| Language |
| Set the language you require |
| < English > |
For example:
Set the appliance at 15 minutes to switch off automatically:
-
Touch [♂]. The menu opens.
-
Select "Switch off after" with the [<] or [>] arrow button.
Press the [] arrow button. - Select "0h 15min" with the [<] or [>] arrow button.
Touch [8]. "Save changes?" appears.
Press the [ ] arrow button. The setting is saved.
The drink selection appears on the display.

Press [O] to exit the menu at any time. If no entry is made within approx. 30 seconds, the menu closes automatically and the settings are not saved.
The following settings can be made:
Language
Set the desired language to show the display texts.
Water hardness
Set this to the local water hardness.
Level "1 (soft)" to "4 (very hard)" can be selected. The preset water hardness is "4 (very hard)".

It is important to set the water hardness correctly to enable the appliance to accurately indicate when the descaling programme should be run.
You can check the water hardness using the enclosed test strip or by asking your local water supplier. If a water softening system is installed in the house, please select the "Softening device" setting.
Water filter
If a water filter is inserted, renewed or removed, the setting "Activate", "Replace" or "Remove" must be made in the menu.

A water filter lessens limescale deposits and reduces impurities in the water. The appliance also does not need to be descaled so often. Water filters are available from retail outlets or from customer service (see section "Accessories").
Inserting or renewing a water filter:
A new water filter must be rinsed before it can be used.
- Select either "Activate" or "Replace" with the [ ] or [ ] arrow button.
Press the water filter firmly into the opening of the water tank.
- Fill the water tank with water up to the "max" mark.
- Remove the milk tube from the milk container and close the door.

Caution: Do not jam the tube when closing the door.
- Place a container with a capacity of 0.5 litre under the outlet.
en Menu
- Touch [D].
Water will now flow through the filter to rinse it.
Then empty the container.
The appliance is ready for use again.

Rinsing the filter simultaneously activates the setting for the change filter display.
The filter is no longer effective when the "Replace water filter" display appears, or at the latest after two months. It needs to be replaced for reasons of hygiene and to prevent a build-up of limescale (which could damage the appliance).
If a new filter is not inserted, select the setting "Remove" and press button [D].
The message "Remove filter, reinsert water tank, close door" appears.

If the appliance has not been used for a prolonged period (for example, while you are on holiday), the existing filter should be rinsed before the first time the appliance is used again. To do this, simply dispense a cup of hot water.
Detailed information about the water filter can be found in the manual supplied with the filter.
Switch off after
To set how long the appliance should wait after the last drink was prepared before it automatically rinses and switches itself off. You can specify values from 15 minutes to 8 hours. The factory setting is 30 minutes.
Home Connect
Settings for connection to WiFi network (home network) and mobile devices (see section "Home Connect").
Illumination
Setting the illumination of the beverage outlet. "On", "When in use" or "Off" can be selected.
Brightness illumination
Setting the illumination lightness of the beverage outlet. "Level 1" to "Level 10" can be selected.
Brightness display
Setting the illumination lightness of display.
Key tones
Switch the signal tones on or off.
Clock display
Display option for time and date "Off" or "Digital" (on). The settings for this can be changed in the next menu options.

If the appliance is switched off at the mains or there is a power failure, the settings for the time will be lost.
Time of day
Setting for the current time.
Date
Setting for the current date.
Frost protection
Service programme to prevent frost damage during transportation and storage.
This programme completely empties the appliance.
- Select "Start" to begin running the programme.
Empty the water tank and reinsert.
If available remove the milk container and close the door.
The appliance automatically empties all its pipes.
Empty the drip tray and re-insert.
Beverage info
Display shows how many drinks have been prepared since its initial use.
- Select "next" to show the information.
Factory settings
Resets your own settings to the condition when delivered.
- Select "reset" with the [<] or [>] arrow button. The message "Are you sure?" appears.
- Select either "reset" to confirm or "cancel" to interrupt.
Home Connect
This fully automatic coffee machine is WiFi-enabled and can be remotely controlled using a mobile device (e.g. tablet, smartphone). The Home Connect app offers additional functions which are a perfect complement to the networked appliance. If the appliance is not connected to the WiFi network (home network), it functions as a fully automatic coffee machine with no network connection and can be operated as usual via the display.
Important information:
The home network router must be operated in the 2.4 GHz frequency range. Please check it and adjust it if necessary.
The availability of the Home Connect function depends on the availability of Home Connect services in your country. Home Connect services are not available in every country. You can find more information on this at www.home-connect.com.

Please ensure that you follow the safety instructions given at the beginning of this user manual and make sure that they are also observed when operating the appliance via the Home Connect app and when away from home. Please also follow the instructions in the Home Connect app.

Operation at the appliance itself always takes priority, and during this time it is not possible to operate the appliance using the Home Connect app.
Setting up
To configure settings via Home Connect, you must have installed the Home Connect app on a mobile device (e.g. tablet, smartphone).
When doing so, observe the Home Connect installation instructions supplied, which are also available to download in additional languages at www.neff-home.com.
Follow the steps specified by the app to configure the settings.
Login of the appliance in the WiFi network can be carried out on initial set-up of the fully automatic coffee machine either directly or using the menu (first press [ ] to open the menu):
- Select "Home Connect" with the touch button [< ] or [>] .
Press touch button [] .
The Home Connect menu appears in the display. -
Switch on WiFi by pressing the touch button [] .
-
Select "Network not connected" with the touch button ([>]
Press touch button []
The option "Automatic Network Connection" appears.

If the router has WPS functionality, please select "Automatic Network Connection", otherwise select "Connect manually".
Connecting automatically to the WiFi network (home network)
- Select "Automatic Network Connection" with the touch button [ ] or [>] .
Press touch button [ ]
The display shows "Automatic network connection".
Press the WPS button on the home network router within a few minutes and wait until the display of the fully automatic coffee machine shows "Network connection successful". - Open the app on the mobile device.
- Select "Connect to the app" using the touch button [< ] or [>] .
Press touch button [] to connect.
The fully automatic coffee machine connects to the app. Follow the instructions in the app.
Wait until "Successfully connected to app" lights up briefly in the display.
- Select "Remote start off" with the touch button [< ] or [>] .
Press touch button [] to switch on.
A warning message appears.
- Continue to press touch button [ ] and read the warning message.
Press touch button [ ] and confirm the warning message.
Press button [ ] to close the menu.
Using the mobile device, the functions of the fully automatic coffee machine can now be used to their full extent via the app.

If "Remote start off" is selected, only the operating statuses of the fully automatic coffee machine are displayed in the Home Connect app. You can configure settings but not start drinks dispensing.
Connecting manually to the WiFi network (home network)
- Select "Connect manually" using the touch button [< ] or [>] .
Press touch button [ ]
The fully automatic coffee machine sets up a separate WiFi network that can be accessed with a tablet or smartphone. The display shows the SSID (the name) and the key (the password) of this network.
- Log the mobile device in to the network of the fully automatic coffee machine with the "HomeConnect" SSID and the "HomeConnect" key.
Start the app on the mobile device and follow the instructions for network login in the app and the supplied Home Connect documents.
The login process is complete when "Network connection successful" lights up briefly in the display of the fully automatic coffee machine.
- Select "Connect to the app" using the touch button [ ] or [>] .
Press touch button [] to connect.
The fully automatic coffee machine connects to the app. Follow the instructions on the app.
Wait until "Successfully connected to app" lights up briefly in the display.
- Select "Remote start off" with the touch button [< ] or [>] .
Press touch button [] to switch on. A warning message appears.
- Continue to press touch button [ ] and read the warning message.
Press touch button [ ] and confirm the warning message.
Press button [ ] to close the menu.
Using the mobile device, the functions of the fully automatic coffee machine can now be used to their full extent via the app.

If "Remote start off" is selected, only the operating statuses of the fully automatic coffee machine are displayed in the Home Connect app. You can configure settings but not start drinks dispensing.
Switching WiFi on and off
WiFi can be switched "on" or "off" as required (e.g. when on holiday).

Network information is retained after the appliance is switched off.
After switching on, wait a few seconds until the fully automatic coffee machine has connected to the WiFi network again.
In networked standby mode, the appliance requires a maximum of 2 W.
Press button [ ] to open the menu.
- Select "Home Connect" with the touch button [ ] or [] .
Press touch button [ ]
The Home Connect menu appears in the display.
- Select "WiFi" with the touch button [ ] or [>] .
- WiFi is either switched on or off by pressing the touch button [] .
Press button [ ] to close the menu.
Additional settings
Home Connect can be adapted to your individual needs at any time.
Note: The fully automatic coffee machine must be connected to the WiFi network.
Disconnecting
The fully automatic coffee machine can be disconnected from the WiFi network at any time.

If the fully automatic coffee machine is disconnected from the WiFi network, it cannot be operated using Home Connect.
Press button [ ] to open the menu.
- Select "Home Connect" with the touch button [ ] or [] .
Press touch button [] .
The Home Connect menu appears in the display.
- Select "Disconnect network" with the touch button [< ] or [>] .
Press touch button [] . The appliance is disconnected from the network and app.
Press button [ ] to close the menu.

Information about the WiFi network is cleared.
Connecting to the app
The Home Connect app can be installed on any number of mobile devices, which can then be used to connect to the fully automatic coffee machine.
The fully automatic coffee machine must already be connected to the WiFi network.
- Open the app on the mobile device.
Press button [ ] to open the menu. - Select "Home Connect" with the touch button [ ] or [] .
Press touch button [] .
The Home Connect menu appears in the display.
- Select "Connect to the app" using the touch button [ ] or [] .
Press touch button [ ] to connect the appliance to the app.
The fully automatic coffee machine connects to the app. Follow the instructions in the app.
Wait until "Successfully connected to app" lights up briefly in the display.
Press button [ ] to close the menu.
Remote start
If you wish e.g. to start drinks dispensing on the fully automatic coffee machine via a mobile device, remote start must be activated.

Risk of burns!
If an unattended remote start takes place, third parties might be scalded if they reach under the coffee dispenser during drinks dispensing. You should therefore make sure that there is no risk to other people, in particular not to children, or to property in the event of an unattended remote start.

The text field for turning on remote start can only be selected if connection to Home Connect has been successfully completed.

If remote start is switched off, only the operating statuses of the fully automatic coffee machine are displayed in the Home Connect app.
Press button [ ] to open the menu.
- Select "Home Connect" with the touch button [ ] or [>] .
Press touch button [ ]
The Home Connect menu appears in the display.
- Select "Remote start" with the touch button [ ] or [] .
Press touch button [] to switch on.
Press button [ ] to close the menu.
Appliance information
Display for network and appliance information
Press button [ ] to open the menu.
- Select "Home Connect" with the touch button [ ] or [] .
Press touch button [ ]
The Home Connect menu appears in the display.
- Select "Home Connect appliance information" with the touch button [<] or [>] .
Press touch button [ ] to make a selection.
The SSID, IP, MAC address and serial number of the appliance are displayed for a few seconds.
Press button [ ] to close the menu.
Display
The top right-hand corner of the display shows the Home Connect status with a symbol:
Connected to the network
Not connected to the network
No connection to server
Remote diagnostics
In the event of faults, customer service can use remote diagnostics to access your appliance. Contact customer service and ensure that your appliance is connected to the Home Connect server and check that the remote diagnostics service is available in your country.
For more information and to check whether the remote diagnostics service is available in your country, please visit the Help & Support area of the Home Connect website for your country: www.home-connect.com
Information on data protection
When the fully automatic coffee machine is connected for the first time to a WiFi network which is connected to the Internet, the appliance transmits the following categories of data to the Home Connect server (initial registration):
- Unique appliance identification (consisting of appliance codes as well as the MAC address of the installed WiFi communication module).
Security certificate of the WiFi communication module (to ensure a secure IT connection).
- The current software and hardware version of the fully automatic coffee machine.
Status of any previous resetting to the factory settings.
This initial registration prepares the Home Connect functions for use and is only required when you want to use these Home Connect functions for the first time.

Please note that the Home Connect functions can only be used in conjunction with the Home Connect app. Information on data protection can be accessed in the Home Connect app.
UKCA Declaration of Conformity
BSH Hausgeräte GmbH hereby declares that the appliance with Home Connect functionality meets the essential requirements and other relevant provisions of the relevant statutory requirements.
A detailed Declaration of Conformity can be found online at www.neff-home.com/uk among the additional documents on the product page for your appliance.

2.4 GHz band (2400-2483.5 MHz): Max. 100 mW
Care and daily cleaning

Risk of electric shock!
Never immerse the appliance in water. Do not steam-clean the appliance.
Wipe the outside of the appliance with a soft, damp cloth.
Clean the control panel and display using a micro-fibre cloth.
- Do not use any cleaning agents containing alcohol or spirits.
- Do not use abrasive cloths or cleaning agents.
Always remove any limescale, residues of coffee or milk, cleaning or descaling solution immediately. It is possible for corrosion to form underneath such deposits.

New sponge cloths may contain salts. Salts can cause rust film on stainless steel and must therefore be washed out thoroughly before use.
- Open the door and pull the drip tray out forwards.
- Remove drip tray cover and coffee grounds container.
Empty, clean and dry individual parts.

Important: The drip tray and coffee grounds container should be emptied and cleaned every day in order to prevent deposits.
- Remove the ground coffee drawer, clean under running water and dry well.
Wipe and dry the inside of the appliance (support, drip tray and the ground coffee drawer) and collecting tray.
Replace the dried parts, e.g. the ground coffee drawer.

Do not put the following parts in the dishwasher:
Accessory drawer, water tank, lid of the water tank, beverage outlet cover, bean container, lid of the bean container, metal connecting element, ground coffee drawer, protective cover of the brewing unit and the milk container.

The following parts may be cleaned in the dishwasher:
Drip plate, collecting tray, drip tray, drip tray cover, coffee grounds container, milk tubes, suction pipes, individual parts of the beverage outlet, measuring spoon and individual parts of the milk container lid.

If the appliance is cold when switched on, or if it is switched off after dispensing coffee, it rinses automatically. The system is therefore self-cleaning.
Important: If the appliance is not used for a lengthy period (e.g. while you are on holiday), clean the entire appliance thoroughly, including the milk system, the ground coffee drawer and the brewing unit before use.
Cleaning the milk system
The milk system is automatically cleaned with a short jet of steam directly after preparing a milk drink.

Tip: For particularly thorough cleaning, the milk system can be additionally rinsed with water (see the section "Rinsing the milk system").
Important: Clean the milk system manually every week and, if required, also more often (see the section "Cleaning the milk system manually").

Risk of burns!
The beverage outlet gets very hot. After use, always let it cool down before you touch it.
Rinsing the milk system
- Touch [ ] and select [ < ] or [ > ] "Rinse milk system" with the arrow button.
Press the [ ] arrow button. The programme starts.
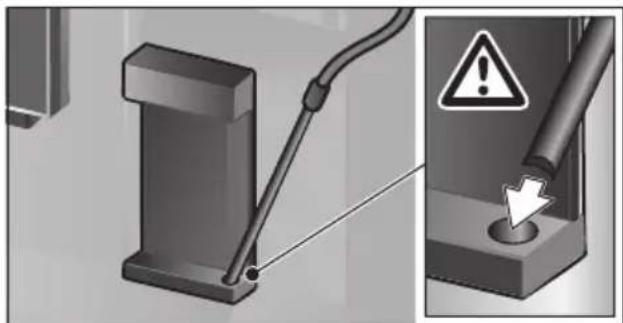
- Open door and remove suction pipe from the milk tube.
Wipe the suction pipe and insert the end of the suction pipe into the hole on the coffee grounds container.
- Close the door. Be careful not to jam the milk tube.
- Place an empty glass underneath the beverage outlet.
Touch[].
The milk system is rinsed with water.
Then empty the glass.
- Touch [ ] to exit the programme.
The milk system has finished rinsing. The appliance is ready for use again.
Cleaning the milk system manually
Take the milk system apart to clean it:
- Push the beverage outlet down completely and pull the cover forward to remove.
Press the snap lever to the left of the beverage outlet downwards and pull the beverage outlet forward.
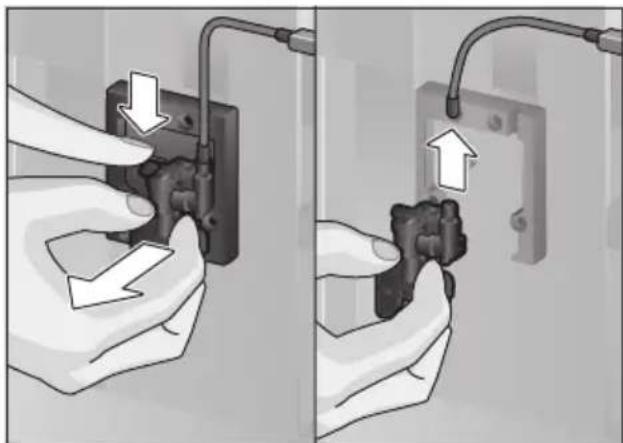
- Remove the milk tube. Dismantle the top and bottom sections of the beverage outlet.
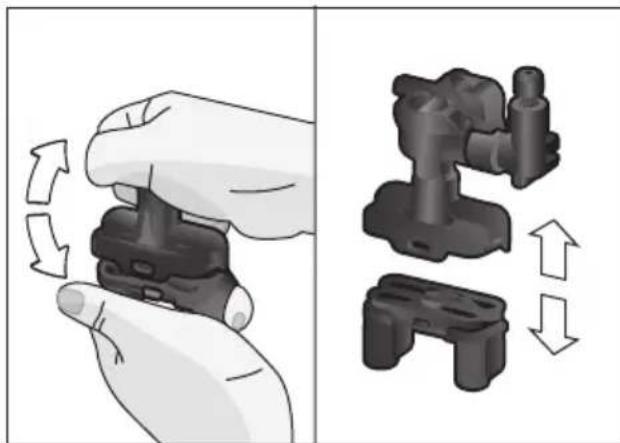
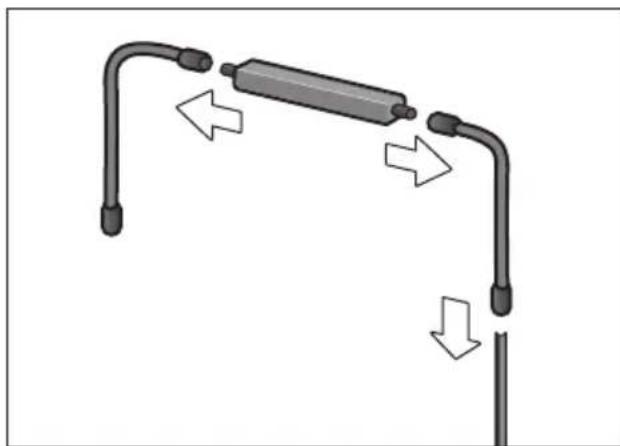
- Separate the milk tubes, connecting element and suction pipe.
are and daily cleaning
Clean the individual parts with a detergent solution and a soft cloth.
Rinse all parts with clean water and dry them.
Put the individual parts back together again (see also the quick reference guide).
- Attach the beverage outlet directly from the front firmly to the three connections.
Replace the cover.
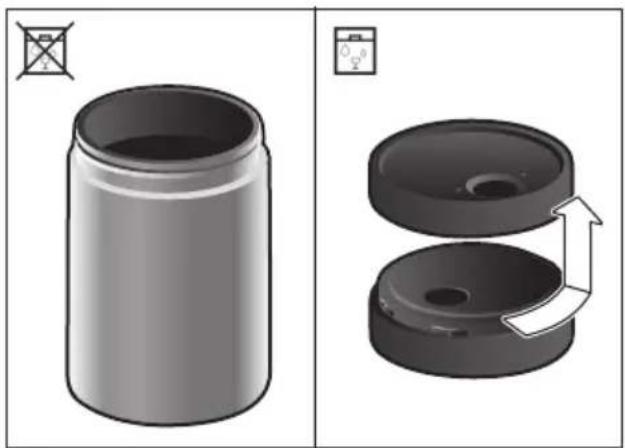
Cleaning the milk container
For reasons of hygiene, the milk container should be cleaned regularly. Only the individual parts of the lid are suitable for being cleaned in the dishwasher. Clean the stainless steel milk container by hand with a mild detergent.
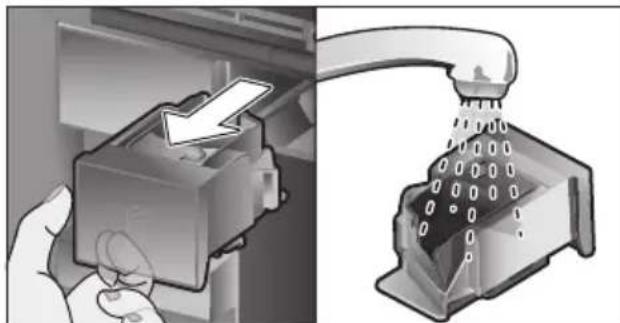
Cleaning the brewing unit
(see also the Quick reference guide) In addition to the automatic cleaning programme, the brewing unit should be removed regularly for cleaning.
- Open the appliance door.
Use the mains switch [O/I] to switch off the appliance completely. - Remove the protective cover of the brewing unit.
Remove the coffee grounds container. - Slide the red latch on the brewing unit all the way to the left.
Press the eject lever right down. The brewing unit will be released.
Take hold of the brewing unit by the recessed grips and carefully remove it. - Remove the cover of the brewing unit and clean thoroughly under running water.
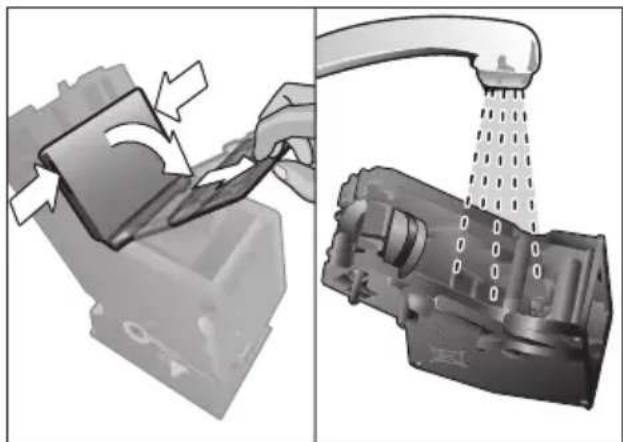
Clean the strainer of the brewing unit thoroughly under the water jet.
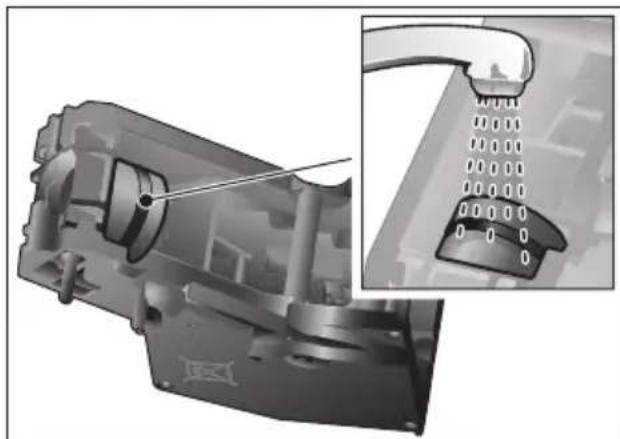
Thoroughly clean the connecting nozzles of the brewing unit.

Important: Clean it without using washing-up liquid and do not put it in the dishwasher.
Clean the inside of the appliance thoroughly with a moist cloth, removing any coffee residues.
- Leave the brewing unit and the inside of the appliance to dry.
- Place the cover back on the brewing unit.
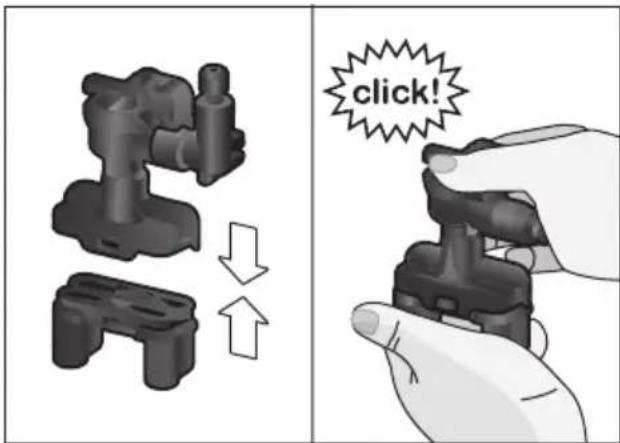
- Push the brewing unit all the way into the appliance and press on the middle until it audibly clicks into place.

Important: The red latch must be right over at the left at before replacing (see diagram E).
Press the eject lever right up and push the red latch right over to the right to 品
Insert the coffee grounds container.
Replace the protective cover.
- Close the appliance door.
Service programmes
(see also the Quick reference guide) The following messages will appear on the display at certain intervals, either
"Descending programme urgently required!" or "Cleaning programme urgently required!" or "Calc'nClean programme urgently required!".
The unit should immediately be cleaned or descaled using the appropriate programme. Alternatively, the two processes Descale and Clean can be carried out together using the calc'nClean function (see the section "Calc'nClean"). Failure to carry out the service programme according to the instructions may damage the appliance.

Important: If the appliance is not descaled when it is supposed to be, the message "Dscaling programme is overdue. Device will shortly be locked." will appear. Immediately perform the descaling process in accordance with the instructions. If the appliance is locked, it can only be operated again once the descaling process has been carried out.
To display how many beverages can still be prepared before one of the service programmes needs to be run, proceed as follows:
Touch [m].
- Select "Service info" with the [<] or [>] arrow button.
Press [ ] to call up the information.

Warning!
For each of the service programmes, use descaling and cleaning agents as described in the instructions and observe the (relevant) safety information.
Never interrupt a service programme. Do not drink liquids!
Never use citric acid, vinegar or any vinegar-based agents to descale the appliance.
Never place descending tablets or other descending materials in the coffee drawer!
i Important: Before starting each service program (Descale, Clean or
Calc'nClean) remove the brewing unit, clean as instructed and replace it.
Be careful not to jam the milk tube when closing the door.
After completion of each service programme, wipe the appliance immediately with a soft, damp cloth to remove any residues from the descending and cleaning solution. It is possible for corrosion to form underneath such deposits.
New sponge cloths may contain salts. Salts can cause rust film on stainless steel and must therefore be washed out thoroughly before use. Clean the beverage outlet, milk tubes and connecting piece thoroughly.
Specially developed, suitable.
descaling and cleaning tablets are available from retail outlets or from customer services (see the section "Accessories").
Using a water filter increases the intervals until a descending programme needs to be performed.
Dscaling
Takes about 21 minutes.
Touch [m].
- Select "Descale" with the [<] or [>] arrow button.
-
Touch [▷]. The display indicates the progress of the programme.
Empty the drip trays and replace.
Remove the water filter (if there is one) and press [D].
Pour lukewarm water into the empty water tank up to the "0.5 l" mark and then dissolve one Neff descaling tablet 00576693 in it.
If there is not enough descending solution in the water tank, you will be asked to do the following. Refill using uncarbonated water and press [ ] again. -
Remove the suction pipe from milk container, wipe it and insert the end of the suction pipe into the hole on the coffee grounds container.
Close the appliance door. - Place a container with a capacity of 0.5 litre under the beverage outlet.
- Touch [▷]. The descaling programme will now run for about 19 minutes.
Remove the container and touch [D]. - Rinse the water tank and (if removed) replace the water filter.
- Fill the tank with fresh water up to the "max" indicator.
- Replace the water tank and close the door.
- Place the container underneath the beverage outlet again.
- Touch [▷]. The descending programme will now run for about 2 minutes and rinse the appliance.
- Remove the container, empty the drip trays, replace and close the appliance door.
- Touch [▷]. The appliance has finished descaling and is ready for use again.
- Touch [ ] to exit the programme.
Cleaning
Takes about 5 minutes.
Touch [m].
- Select "Clean" with the [<] or [>] arrow button.
- Touch [▷]. The display indicates the progress of the programme.
Clean the beverage outlet and replace, empty the drip trays and replace. - Open the ground coffee drawer, drop in a cleaning tablet and close the coffee drawer again.
Close the appliance door. - Place a container with a capacity of 0.5 litre under the beverage outlet.
- Touch [▷]. The cleaning programme will now run for about 5 minutes.
- Remove the container, empty the drip trays, replace and close the appliance door.
en Tips on energy saving
- Touch [▷]. The appliance has finished cleaning and is ready for use again.
- Touch [m] to exit the programme.
Calc'nClean
Takes about 26 minutes.
calc'nClean combines the functions Descale and Clean. If both programmes are due to be carried out close together, the fully automatic coffee machine will automatically suggest this service programme.
Touch [m].
-
Select "Calc'nClean" with the [<] or [>] arrow button.
-
Touch [▷]. The display indicates the progress of the programme.
Clean the beverage outlet and replace, empty the drip trays and replace.
-
Open the ground coffee drawer, drop in a cleaning tablet and close the coffee drawer again.
-
Remove the water filter (if there is one) and touch [] .
Pour lukewarm water into the empty water tank up to the "0.5 l" mark and then dissolve one Neff descaling tablet 00576693 in it.

If there is not enough descending solution in the water tank, you will be asked to do the following. Refill using uncarbonated water and press [▷] again.
- Remove the suction pipe from milk container, wipe it and insert the end of the suction pipe into the hole on the coffee grounds container.
- Close the appliance door.
- Place a container with a capacity of 0.5 litre under the beverage outlet.
Touch [D].
The programme will now run for about 19 minutes.
Remove the container and touch [D].
- Rinse the water tank and (if removed) replace the water filter.
- Fill the tank with fresh water up to the "max" indicator.
- Replace the water tank and close the door.
- Place the container underneath the beverage outlet again.
- Touch [▷].
The programme will now run for about 7 minutes and rinse the appliance.
- Remove the container, empty the drip trays, replace and close the appliance door.
- Touch [▷]. The appliance is descaled, cleaned and ready for use again.
- Touch [ ] to exit the programme.
Special rinsing

Important: If any of the service programmes is ever interrupted, for instance by a power failure, please proceed according to the information on the display:
- Rinse the water tank and refill it with fresh water up to the "max" mark.
- Touch [▷]). The programme will now run for about 2 minutes and rinse the appliance.
- Empty the drip trays, replace and close the appliance door. The appliance is ready for use again.
- Touch [m] to exit the programme.
Tips on energy saving
- Touch [①] to switch the appliance to "energy saving mode". The appliances use very little power when in "energy saving mode", but monitors all safety-relevant functions so as to avoid damage.
In the menu under "Switch off after", set the automatic switch off period to 15 minutes.
-
Reduce the brightness of the display and the illumination in the menu to save energy.
If possible, do not interrupt the dispensing of coffee or milk froth. Stopping a process prematurely results in higher energy consumption and the drip tray fills up more quickly. -
Descale the appliance regularly to avoid a build-up of limescale. Limescale residues cause higher energy consumption.
Frost protection
To prevent frost damage during transport and storage, completely empty the appliance beforehand (see the section "Menu - Frost protection").
Storing accessories
The fully automatic coffee machine has a special accessory drawer for storing the Quick reference guide and the accessories in the appliance.
Put the measuring spoon and the water filter into the accessory drawer.
Put the Quick Reference Guide into the special support at the front of the accessory drawer.
The long suction pipe can be stored in the holder on the inside of the door.
The connecting element can be fixed to the magnetic holder above the ground coffee drawer.
Accessories
The following accessories are available from customer service:
Accessories Order number
| Customer service | |
| Cleaning tablets 00310575 | |
| Descaling tablets 00576693 | |
| Water filter 00575491 | |
| Care set 00576330 | |
| Milk container with "FreshLock" lid | 00576166 |
| Restrictors for opening angle 92° | 10020041 |
Disposal
Dispose of packaging in an environmentally-friendly manner. This appliance is labelled in accordance with European Directive 2012/19/EU concerning used electrical and electronic appliances (waste electricity and electronic equipment - WEEE). The guideline determines the framework for the return and recycling of used appliances as applicable throughout the EU. Please ask your specialist retailer about current disposalfacilities.
Guarantee
The guarantee conditions for this appliance are as defined by our representative in the country in which it is sold. Details regarding these conditions can be obtained from the dealer from whom the appliance was purchased. The bill of sale or receipt must be produced when making any claim under the terms of this guarantee.
Changes reserved.
Simple troubleshooting
| Problem Cause Solution | ||
| Strongly fluctuating coffee or milk froth quality (e.g. fluctuation in quantity or milk froth spraying). | Build-up of limescale in the appliance. | Descale the appliance according to the instructions, see the section "Service programmes". |
| The suction pipe is blocked. | Clean the suction pipe. | |
| Drinks cannot be dispensed. | Beverage outlet or one of the 3 connections are blocked. | Clean the beverage outlet and the connections. |
| The drink runs out at the entire outlet during dispensing. | Lower part of the beverage outlet is missing. | Attach the lower part, see the section "Cleaning the milk system". |
| Too little milk froth, none at all, or the milk system is not taking in any milk. | Build-up of limescale in the appliance. | Descale the appliance according to the instructions, see the section "Service programmes". |
| Beverage outlet or one of the 3 connections are blocked. | Clean the beverage outlet and the connections. | |
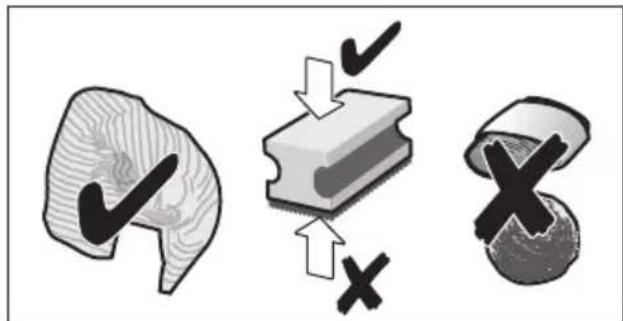
| Milk not suitable for foaming. | Do not use milk that has already been boiled. Use cold milk with a fat content of at least 1.5%. | |
| Beverage outlet or the milk tubes are not correctly assembled. | Moisten the individual parts and put them together again. | |
| The suction pipe is blocked. | Clean the suction pipe. | |
| The personally selected volume is not reached. Coffee dispensing slows to a trickle or stops completely. | Coffee is ground too finely. Preground coffee is too fine. | Adjust the grinding level to a coarser setting. Use a coarser ground coffee. |
| Heavy build-up of limescale in the appliance. | Descale the appliance according to the instructions, see the section "Service programmes". | |
| The brewing unit is soiled. | Clean brewing unit, see chapter "Cleaning the brewing unit". | |
| Hot water milky or tastes of coffee. | Milk tube has not been removed. | Remove the milk tube from the milk container. |
| Milk or coffee residue in the beverage outlet. | Clean the beverage outlet. | |
| Coffee has no "crema". Unsuitable type of coffee. Use a type of coffee with a higher proportion of robusta beans. | ||
| The beans are no longer fresh. | Use fresh beans. | |
| The grinding level is not suitable for the beans. | Adjust the grinding unit to a finer setting. | |
| Coffee is too "acidic". The grinding level is too coarse. Preground coffee is too coarse. | Adjust the grinding unit to a finer setting. Use a finer ground coffee. | |
| Unsuitable type of coffee. Change the type of coffee. | ||
| Coffee is too "bitter". Coffee is ground too finely. Preground coffee is too fine. | Adjust the grinding level to a coarser setting. Use a coarser ground coffee. | |
| Unsuitable type of coffee. Change the type of coffee. | ||
| Coffee tastes burnt. The brewing temperature is too high. | Reduce the temperature, see the section "Drink adjustment". | |
| Coffee is ground too finely. Preground coffee is too fine. | Adjust the grinding level to a coarser setting. Use a coarser ground coffee. | |
| Unsuitable type of coffee. Change the type of coffee. | ||
| Coffee is too "weak". Coffee strength selected is too weak. | Raise the strength of the coffee, see the section "Drink adjustment". | |
| Ground coffee jammed in the coffee drawer. | Remove the ground coffee drawing, clean and dry thoroughly. | |
| Ground coffee sticks in the coffee drawer. | Ground coffee sticks together. | Do not press the ground coffee firmly into the coffee drawer. |
| Coffee drawer is damp. Remove the ground coffee drawing, clean and dry thoroughly. | ||
| The water filter does not stay in position in the water tank. | Firmly press the water filter straight down into the tank connection. | |
| Bean container sticks when inserting. | Remove the beans. | |
| The coffee grounds are not compact and are too wet. | Adjust the grinding unit to a coarser or finer setting, or use 2 level measuring spoons of ground coffee. | |
| Grinding level adjustment is stiff. | Dispensing a drink from coffee beans. Only make any subse- quent changes to the grinding level in small steps. | |
| Brewing unit cannot be inserted. | Insert the brewing unit according to the instructions, see the section "Cleaning the brewing unit". | |
| Brewing unit is locked. Unlock the brewing unit, see the section "Cleaning the brewing unit". | ||
| Protective cover of the brewing unit cannot be properly attached. | Lock the brewing unit, see the section "Cleaning the brewing unit". | |
| There is water under the drip tray. | This water is condensed. Do not insert drip tray without cover. | |
| Display shows "12:00" | Power failure or appliance switched off at mains. | Re-enter values; do not switch the appliance off at the mains or select the "Off" option in the Clock display menu. |
| Display shows "Milk container connected?" despite connected milk container. | Container is outside the range of the sensor. | Position the container at the right edge. |
| Material e.g. milk carton is not recognised. | Confirm the display request with "yes" or use the enclosed milk container. | |
| Display shows "Overvoltage or undervoltage" | Voltage too high or too low. | Contact electricity or grid provider. Have the power supply checked by an expert. |
| Display shows "Leave device to cool" | Appliance is too hot. Switch off | ff appliance for 30 minutes. |
| Display shows, for example: "Fault: E0510" | The appliance has a fault. Proceed according to the display screen. | |
| Display shows "Fill bean container" although the container is already full, or the grinder is not grinding any beans. | Beans are not falling into the grinding unit (beans too oily). | Gently tap the bean container. Possibly change the type of coffee. When the bean container is empty, wipe it with a dry cloth. |
| Display shows "Clean brewing unit" | Brewing unit is soiled. Clean the brewing unit. | |
| Too much ground coffee in the brewing unit. | Clean the brewing unit. Do not place more than two level measuring spoons of ground coffee in the drawer. | |
| The mechanism of the brewing unit is stiff. | Clean the brewing unit, see the section "Care and daily cleaning". | |
| Display shows "Refill with still water or remove filter" | Water tank wrongly inserted | Insert water tank correctly |
| Carbonated water in the water tank. | Fill the water tank with fresh tap water. | |
| Float is stuck in the water tank. | Remove the tank and clean thoroughly. | |
| New water filter not rinsed according to instructions, or water filter used or defective. | Rinse the water filter according to the instructions and then switch on, or use a new water filter. | |
| Air in the water filter. Dip the | water filter into water until no more air bubbles escape, replace the filter. | |
| Display shows "Empty drip trays" despite them being empty. | Drip tray is soiled and wet. | Clean and dry the drip tray thoroughly. |
| Emptying is not detected when the appliance is switched off. | When the appliance is switched on, remove and re-insert the drip tray. | |
| Display shows "Insert drip trays" even though drip tray in use. | Inside of appliance (tray holder) dirty. | Clean the inside. |
| The coffee grounds container is not fully inserted. | Push the coffee grounds container all the way in. | |
| Very frequent display that descending is necessary. | Water is too hard. Insert water filter and configure settings accordingly in the menu. | |
| Water dripped onto the inner floor of the appliance when the drip tray was removed. | Drip tray was removed too soon. | Wait a few seconds after the last drink was dispensed before removing the drip tray. |
| Display shows "Switch off with power switch and then back on after 30 sec!" | Appliance is too warm. Leave the appliance to cool down. | |
| Dirty brewing unit. Clean the brewing unit. | ||
| Home Connect does not work correctly. | Go to www.home-connect.com | |
| If you are unable to solve the problem, always call the hotline! You will find the telephone numbers at the back of these instructions. | ||
Technical specifications
| Power connection (voltage - frequency) 220-240V – 50/60Hz | |
| Power rating 1600 W | |
| Maximum static pump pressure 19 bar | |
| Maximum water tank capacity (without filter) | 2.4 l |
| Maximum capacity of the coffee bean container | 500 g |
| Length of power cable | 1.7 m |
| Dimensions (H x B x D) | 455 x 495 x 375 mm |
| Weight, empty | 19-20 kg |
| Type of grinding unit | Ceramic |
This product contains light sources from energy efficiency class D. These light sources are available as a spare part and should only be replaced by trained specialist staff.
Sommaire
80^ (Thévert)
90^ C (Thé noir)
80^ (Groene thee)
90^ (Zwarte thee)
Max (Vruchtenthee)
Gate 1, 1555 Centre Road
Clayton, Victoria 3168
Tel.: 1300 087 033*
mailto:neff.au@bshg.com
www.neff.com.au
*Mo-Fr: 24 hours
BE Belgique, Belgie, Belgium
BSH Home Appliances S.A. - N.V. Rue Picard 7, box 400
www.neff-home.com/be
BG Bulgaria
BSH Domakinski Uredi Bulgaria EOOD Business center FPI, floor 5,
Chemi yrah Blvd. 51B
1407 Sofia
Tel.: 0700 208 18
mailto:informacia.servis-bg@bshg.com
www.neff-home.com/bg
BY Belarus, Benapycb
OOO“BCXБbITOBaTExHnKa
TeJ.: 4957372964
mailto:mok-kdhl@bshg.com
CH Schweiz, Suisse, Svizzera, Switzerland
BSH Hausgeräte AG
Neff Service
Fahrweidstrasse 80
8954 Geroldswil
Building 3, No.18 Qingjiang South Road, Gulou District,
Nanjing, Jiangsu Province
Service Tel.: 400 8289 588*
Fax: 025 8470 1672
mailto:careline.china@bshg.com
*phone rate depends on the network used
CY Cyprus, Kúnpoc
BSH Ikiakes Syskeves-Service 39, Arh. Makaariou III Str.
2407 Egomi/Nikosia (Lefkosia)
Tel.: 777 78 007
mailto:EGO-CYCustomerService@
bshg.com
DK Danmark, Denmark
BSH Hvidevarer A/S
Telegrafvej 4
2750 Ballerup
Tel.: 44898038
mailto:NEFF-Service-dk@BSHG.com
www.neff-home.com/dk
EE Eesti, Estonia
Renerki Kaubanduse OÜ
Tammsaare tee 134B
(Euronici kaupluses)
12918 Tallinn
Tel.: 06512222
mailto klienditeeenindus@renerk.ee
www.renerk.ee
Eliser OÜ
Mustamae tee 24
10621 Tallinn
Tel.: 06650090
mailto:hooldus@eliser.ee
www.kodumasinate-remont.ee
ES España, Spain
www.neff-home.com/fi
To arrange an engineer visit, to order spare parts and accessories or for product advice please visit www.
neff-home.com/uk
Or call
Tel.: 0344 892 8989*
*Calls are charged at the basic rate, please check with your telephone service provider for exact charges.
HR Hrvatska, Croatia
BSH kuçanski ureddaji d.o.o.
Ulica grada Vukovara 269F
10000 Zagreb
Tel.: 015999140
mailto:informacije.servis-hr@bshg.com
www.neff-home.com/hr
www.neff-home.com/hu
IE Republic of Ireland
BSH Home Appliances Ltd.
M50 Business Park,
Ballymount Road Upper,
Walkinstown
Dublin 12
To arrange an engineer visit, to order spare parts and accessories or for product advice please call
Tel.: 01450 2655*
www.neff-home.com/ie
*Calls are charged at the basic rate, please check with your telephone service provider for exact charges
IL Israel
C/S/B/ Home Appliance Ltd.
1, Hamasger St.,
North Industrial Park
Lod, 7129801
Tel.: 089777222
mailto:csb-serv@csb-ltd.co.il
IT Italia, Italy
www.neff-home.com/it
LB Lebanon
TehIni, Hana & Co.
Boulevard Dora 4043 Beyrouth,
P.O.Box 90449
Jdeideh 1202 2040
Tel.: 01255211
mailto:Info@tehini-hana.com
LT Lietuva, Lithuania
UAB "AG Service"
R. Kalantos g. 32
52494 Kaunas
Tel.: +370 (8) 700 556 55
mailto:servias@agservice.lt
www.agservice.it
Baltic Continent Ltd.
Luk'sio g. 23
09132 Vilnius
Tel.: +370 (8) 700 555 95
mailto:info@balticcontinent.It
www.balticcontinent.It
UAB Emtoservis
Savanoriu pr. 1 (Centrine bustine)
03116 Vilnius
Tel.: +370 (8) 700 447 24
mailto:svc@emtoservis.lt
www.emtoservis.lt
LU Luxembourg
www.neff-home.com/lu/de
LV Latvija, Latvia
SIA "General Serviss"
Bulli iela 70c
1067 Riga
Tel.: +371 6742 5232
mailto:info@serviscentrs.lv
www.serviscentrs.lv
Sia Elektronika-Serviss
Tadaiku iela 4
1004 Riga
Tel.: +371 6771 7060
mailto:serviss@elektronika.lv
www.elektronika.lv
MT Malta
Oxford House Ltd.
Notabile Road
Mriehel BKR 14
Tel.: 021 442 334
www.oxfordhouse.com.mt
NL Nederlande, Netherlands
www.neff-home.com/nl
NO Norge, Norway
www.neff-home.com/no
PL Polska, Poland
www.neff-home.com/pt
RO Romania, Romania
BSH Electrocasnice srl.
Sos. Bucuresti-Ploiesti, nr. 19-21
sect.1
013682Bucaresti
Tel.: 021 203 9748
mailto:service.romania@bshg.com
www.neff-home.com/ro
RU Russia, Pocsn
OOO“BCX BbITOBbIe Pn6Opby
CepBnc ot npOn3BOJnteJr
Ten.: 8 (800) 100 42 52
mailto:hotlineru@bshg.com
www.neff.ru
SE Sverige, Sweden
BSH Home Appliances AB
Landsvagen 32
169 29 Solna
Tel.: 0771 195 700
mailto:BSH-Service-SE@bshg.com
www.neff-home.com/se
SI Slovenija, Slovenia
BSH Hisni aparati d.o.o.
Litostrojska 48
1000 Ljubljana
Tel.: 015830702
mailto:informacije.servis-slo@bshg.com
www.neff-home.com/si
TR Türkiye, Turkey
96 Fifteenth Road, Randjespark
1685 Midrand-Johannesburg
Tel.: 086 002 6724
Fax:0866171780
mailto:bsh@iopen.co.za
mailto:applianceserviceza@bshg.com
Valid within Great Britain:
Imported to Great Britain by
BSH Home Appliances Ltd.
Grand Union House
Old Wolverton Road
Wolverton, Milton Keynes
MK12 5PT
United Kingdom

Mat. Nr. 8001236145
Date 30.09.21