Expedition T400919J - Watch TIMEX - Free user manual and instructions
Find the device manual for free Expedition T400919J TIMEX in PDF.

| Technical Specifications | Analog watch with resin case |
|---|---|
| Dimensions | Case diameter: 40 mm |
| Water Resistance | Resistant up to 100 meters |
| Movement Type | Quartz movement |
| Display | Analog display with luminous hands |
| Usage | Ideal for outdoor activities and hiking |
| Maintenance | Clean with a soft cloth, avoid chemicals |
| Repair | Battery replacement recommended every 2-3 years |
| Safety | Avoid strong shocks to preserve the mechanism |
| General Information | 2-year warranty, after-sales service available |
Frequently Asked Questions - Expedition T400919J TIMEX
User questions about Expedition T400919J TIMEX
0 question about this device. Answer the ones you know or ask your own.
Ask a new question about this device
Download the instructions for your Watch in PDF format for free! Find your manual Expedition T400919J - TIMEX and take your electronic device back in hand. On this page are published all the documents necessary for the use of your device. Expedition T400919J by TIMEX.
USER MANUAL Expedition T400919J TIMEX
Register your product at https://www.timex.com/product-registration.html
Congratulations on purchasing your TIMEX® watch. Please read these instructions carefully to understand how to operate your Timex timepiece. Your watch may not have all of the features described in this booklet. For more information, please visit: www.timex.com
HOW TO START YOUR WATCH
Quartz Movement: To start your watch remove the plastic guard from under the crown, then press the crown in against the case. The second hand will begin advancing in one-second intervals.
Some deep-depth water-resistant watches require the setting crown to be screwed in to secure water-resistance. If your watch case has a protrusion with screw threads, the crown must be screwed in after setting the watch.
To screw in, push the crown firmly against the threaded protrusion and hold in while turning the crown clockwise. Continue to screw in the crown until it is tight. You will need to unscrew the crown (counter-clockwise) before pulling it out the next time you want to set your watch.
Solar Movement: The watch includes a solar cell that charges its battery. Expose the watch in direct sunlight, sunlight through a window, or artificial (indoor) lighting to charge the battery prior to use. When fully charged, the watch may function without additional charging for up to 2 months.
To start your watch, remove the plastic guard from under the crown, then press the crown in against the case. The second hand will begin advancing in one-second intervals.
Charging happens faster while in direct sunlight and slower when indoors. A depleted battery may be charged by exposing the dial to sunlight for several days. Wear watch so that the sleeve does not cover all or part of the dial and impede charging. Store watch where it will be exposed to light or the battery will run down and require a full charge. See the table below for more information.
WARNING: Leaving the watch in direct sunlight or close to a lamp may cause the watch to become hot. Handle with care.
After many years of use, if the battery becomes unable to charge fully, it may be replaced with a new rechargeable battery of the same type. Please see BATTERY section for details.
| Illumination (Lx) | Light Source | Environment | Full Charge from Empty | Charge for One Day's Operation |
| 700 | Fluorescent Light | Office Lighting N/A 100 Minutes | ||
| 3,000 | Incandescent Light | 150W Lamp (8" / 20cm distance) | 60 Hours 25 Minutes | |
| 10,000 Sunlight | Cloudy Weather | 20 Hours 8 Minutes | ||
| 100,000 Sunlight Clear Weather 5 Hours 2 Minutes | ||||
Hand-wind Movement: To start your watch remove the plastic guard from under the crown, set the Time and Date (if applies) then press the crown in against the case. Slowly turn the crown clock-wise until you feel resistance. You should hear the watch "ticking" and the second hand will begin to move. If the watch stops in the next 24 hours, you should increase the amount of clock-wise turns of the crown during the winding process until you find the watch will work for 24 hours without stopping. You should wind the watch each 24-hour period at approximately the same time of day to ensure the watch does not become fully un-wound and stops. If the watch stops, follow the instructions to set the Time and Date (if applies), and wind to start the watch again.
WATER AND SHOCK RESISTANCE
If your watch is water-resistant, meter marking or ( ) is indicated.
| Water-Resistance Depth p.s. | i.a. * Water Pressure Below Surface |
| 30m /98ft 60 | |
| 50m /164ft 86 | |
| 100m /328ft 160 | |
| 200m /656ft 284 |
*rounds per square inch absolute
WARNING: TO MAINTAIN WATER-RESISTANCE, DO NOT PRESS ANY BUTTONS OR PULL OUT THE CROWN UNDER WATER UNLESS YOUR WATCH IS INDicated AS 200 METER WATER-RESISTANT.
- Watch is water-resistant only as long as lens, push buttons and case remain intact.
- Watch is not a diver watch and should not be used for diving.
- Rinse watch with fresh water after exposure to salt water.
- Shock-resistance will be indicated on watch face or caseback. Watches are designed to pass ISO test for shock-resistance. However, care should be taken to avoid damaging crystal/flores.
INDIGLO\* NIGHT-LIGHT
Press button or crown to activate light. Electroluminescent technology used in the INDIGLO® night-light illuminates entire watch face at night and in low light conditions.
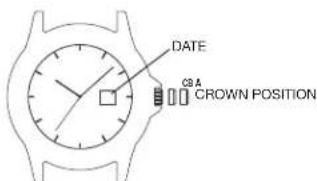
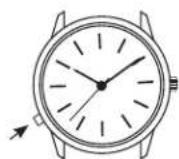
DATE MODELS
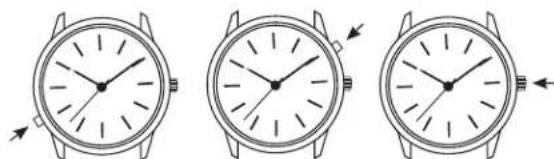
TO SET TIME:
- PULL crown all the way out and turn to correct time.
- Push crown in to restart. For screw-in setting crown, push crown in while turning CLOCKWISE to tighten.
Watches with date: Note correct time of day (A.M or P.M.) for proper date function.
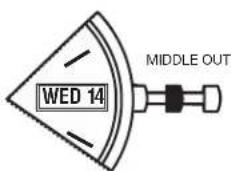
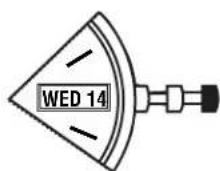
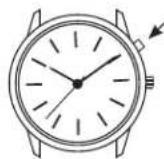
TO SET DAY:
- PULL crown to "middle" position and turn CLOCKWISE until correct day appears. If day does not change, pull crown to "out" position and turn CLOCKWISE or COUNTERCLOCKWISE through necessary number of 24 hour periods until correct day appears.
TO SET "QUICKDATE" FEATURE:
3-POSITION CROWN:
- Pull crown to "Middle" position and turn CLOCKWISE or COUNTERCLOCKWISE until correct date appears.
2-POSITION CROWN:
- Pull crown to "OUT" position and turn CLOCKWISE until date changes. Repeat until correct date appears. Adjust date when month has less than 31 days. Push crown in when finished.
Caution: Wearing or storing the watch with the crown in the "middle" position will cause damage to the movement. Always return the crown to the normal position, or if you wish to save the battery life while storing the watch, leave the crown in the "out" position.
TIMEX
The date function advances the date between the hours of 10 PM and 2 AM. Avoid setting the date during this timeframe. If you attempt to set the date during this time period, rotate the crown at a very slow rate to avoid damaging the watch.
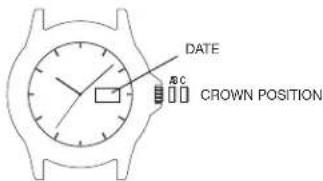
DAY / DATE MODELS
TO SET THE TIME:
- PULL the crown out to the "C" position.
- TURN the crown either way to the correct time.
- PUSH in the crown to the "A" position.
TO SET THE DATE:
- PULL the crown out to the "B" position.
- TURN the crown either way to the correct date.
- PUSH in the crown to the "A" position.
TO SET THE DAY:
- PULL the crown out to the "C" position.
- TURN the crown either way for full 24 hour cycle to set day.
- PUSH the crown in to the "A" position.
TO SET THE BILINGUAL DATE:
If your watch is equipped with a bilingual day display, you may select the desired language by advancing the day display.
- PULL the crown out to the "C" position.
- Repecedly move the time back to 11pm and forward to 4am until you see the current day displayed in the desired language.
- PUSH the crown in to the "A" position.
EASY SET ALARM
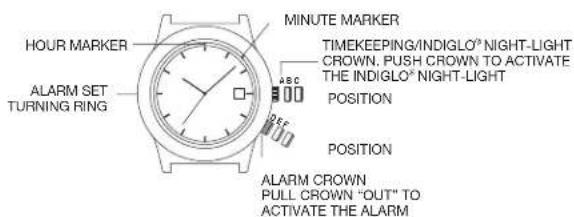
EASY SET ALARM WITH DATE & INDIGLO\* NIGHT-LIGHT
- From the "A" position, PUSH the TIMEKEEPING CROWN in (towards the watch case) to activate the INDIGLO Night-Light and illuminate the watch dial.
EASY SET ALARM DATE & TIME SETTINGS
TO SET THE DATE:
- With the TIMEKEEPING CROWN in the "B" position TURN the TIMEKEEPING CROWN or TURNING RING in either direction to set the date.
TO SET THE TIME:
- With the TIMEKEEPING CROWN in the "C" position TURN the TIMEKEEPING CROWN or TURNING RING in either direction to set the time.
EASY SET ALARM SETTINGS
- Your easy set alarm watch is equipped with two types of alarms:
- 12-Hour Alarm: rings OR vibrates twice per day at the desired hour and minute as long as the alarm is activated. (Alarm crown must be in "E" position.)
- Hourly Alarm: rings OR vibratos every hour at the desired minute if activated. (Alarm crown must be in "F" position.)
TO SET THE 12-HOUR ALARM:
- With the ALARM CROWN in the "D" position, TURN the ALARM CROWN or TURNOING RING in either direction to set the hour and minute alarm markers. To activate the alarm to ring or vibrate at the desired time, PULL the ALARM CROWN out to the "E" position. A single beep sound and flash, OR a vibration will indicate that the 12-Hour Alarm is activated.
- The alarm will sound and the dial will flash OR vibrate at the desired time (hour and minute) and will repeat every twelve hours unless the alarm is deactivated.
NOTE: Alarm is deactivated when the ALARM CROWN is in the "D" position. If the alarm is not deactivated it will automatically stop ringing after 20 beeps and flashes OR stop vibrating, and will resume in 12 hours at the indicated time.
TO SET THE HOURLY ALARM:
- With the ALARM CROWN in the "D" position, TURN the ALARM CROWN or TURING RING in either direction to set the minute alarm marker.
- To activate the alarm to ring or vibrate at the desired minute, PULL the ALARM CROWN out to the "F" position. Three beeps sound and flash OR a vibration indicates the Hourly Alarm is activated.
- The alarm will sound and the dial will flash OR vibrate at the desired minute and will repeat every hour on the specified minute unless the alarm is deactivated.
NOTE: Alarm is deactivated when the ALARM CROWN is in the "D" position. If the alarm is not deactivated it will automatically stop ringing after 20 beeps and flashes OR stop vibrating, and will resume again in one hour at the indicated minute.
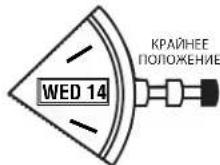
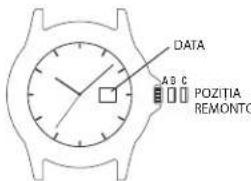
PERPETUALCALENDAR
Your Perpetual Calendar watch accurately keeps track of how many days are in each month. It also adjusts for leap years. The date on your watch (including the month and year) was preset at the factory to Eastern Standard Time, Greenwich Mean Time or Hong Kong Standard Time (depending on where you purchased your watch). You only need to adjust the time.
CHECK DATE (FACTORY USE ONLY)
SET TIME DAY, DATE
TO SET TIME
To set time, simply pull crown all the way out and turn. Day and date change automatically when time is adjusted past midnight; there is no additional step for setting day or date. Push crown in when done.
After setting, if date changes at noon, time needs to be adjusted ahead or back 12 hours.
If crown is accidentally put in MIDDLE position and turned, date display will change temporarily, but date setting is unaffected. Simply pull crown all the way out and set time. Proper date display will resume.
PERPETUALCALENDAR WATCH
FREE LIFETIME BATTERY REPLACEMENT
If the battery needs to be changed, we recommend that only TIMEX replace it. Your watch will need to be recalibrated to correct time and date after changing the battery. To return your watch to Timex, visit the retailer where you purchased your watch or go to http://www.timex.com/product/Warranty.html for information on contacting Timex.
** Shipping & handling charges apply.
NEVER INCLUDE A SPECIAL WATCHBAND OR ANY OTHER ARTICLE OF PERSONAL VALUE IN YOUR SHIPMENT.
TIMEX
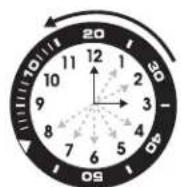
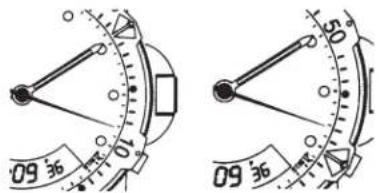
ELAPSED TIME RING
If your watch is equipped with a rotatable outer ring on the face, with numbers corresponding to minutes, you can use this Elapsed Time Ring to time an activity from the start, or to mark the ending time for the duration of an activity.
TO TIME AN ACTIVITY FROM THE START:
Set the Start/Stop triangle at the time (hour or minute) when you start the activity (As shown on the left in the illustration shown below). At completion, you can see how long the activity took.

TO MEASURE THE TIME REMAINING:
Set the triangle to the hour or minute position when you wish to complete the activity, and check the watch periodically for progress towards that goal.
In the illustration shown on the previous page on the right you can stop when the minute hand reaches the 20 minutes past the hour position.
TACHYMETER RING
The tachymeter feature can be used to measure speed in miles per hour (MPH), nautical miles per hour (knots) or kilometers per hour (KPH) using the sweep second hand and the scale on the wall above the watch face. You need to know the actual distance you are covering in miles or km.
Start the chronograph with the second hand at zero (the twelve o'clock position). Within the first minute, the second hand will point to the rate for a one-mile (or one kilometer) course; if it takes 45 seconds, the hand will point to 80 at that position - 80 MPH or 80 KPH.
If within the first minute, a distance greater than one mile or kilometer is covered, multiply the tachymeter number by the distance to get the actual rate: if you went 1.2 miles in 45 seconds, multiply the 80 by 1.2 - 96 MPH.
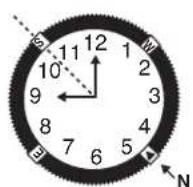
COMPASS RING
If your watch is equipped with a movable ring around the dial marked at the letters "N", "E", "W", "S" (for the four compass directions) or compass degrees, you can use this feature to find an approximate compass directional reading.
- Lay the watch on a flat surface, or hold it so that the face is parallel to the ground.
- Locate the sun and point the hour hand at the sun.
- In the A.M., rotate the ring until the "S" (south) marker is halfway between the hour hand and 12:00 (after the hour hand or within the shortest distance between the hour hand and 12:00).
- In the P.M., rotate the ring until "S" is before the hour hand and halfway between the hour hand and 12:00.

HOW TO ADJUST BRACELET
(Variations of the following bracelet sections apply to all watch models).
SLIDING CLASP BRACELET
- Open locking plate.
- Move clasp to desired bracelet length.
- Exert pressure while holding locking plate and slide clasp back and forth until it engages in grooves on underside of bracelet.
- Press locking plate down until it snaps closed. Clasp can be damaged if excessive force is used.
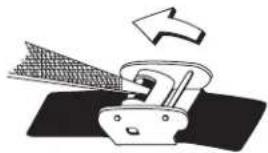
FOLDOVER CLASP BRACELET
- Find spring bar that connects bracelet to clasp.
- Using a pointed tool, push in spring bar and gently twist bracelet to disengage.
- Determine wrist size, then insert spring bar in correct bottom hole.
- Push down on spring bar, align with top hole and release to lock in place.
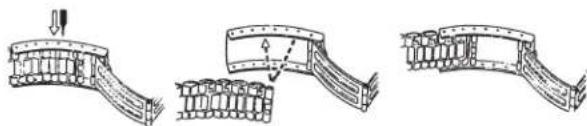
FIG.1 FIG.2 FIG.3
BRACELET LINK REMOVAL REMOVING LINKS:
- Place bracelet upright and insert pointed tool in opening of link.
- Push pin forcefully in direction of arrow until link is detached (pins are designed to be difficult to remove).
- Repeat until desired number of links are removed.

RE-ASSEMBLY:
- Rejoin bracelet parts.
- Push pin back into link in opposite direction of arrow.
- Press pin down securely into bracelet until it is flush.

BATTERY
Timex strongly recommends that a retailer or jeweler replace battery. Battery type is on watch back. If present, push/short internal reset switch after replacing battery. Battery life estimates are based on certain assumptions regarding usage; battery life may vary depending on actual usage.
DO NOT DISPOSE OF BATTERY IN FIRE. DO NOT RECHARGE. KEEP LOOSE BATTERIES AWAY FROM CHILDREN.
TIMEX INTERNATIONAL WARRANTY
http://www.timex.com/productWarranty.html
©2019 Timex Group USA, Inc. TIMEX, INDIGLO and QUICKDATE are registered trademarks of Timex Group B.V. and its subsidiaries.
TIMEX
Luz nocturna INDIGLO
BRACELET A FERMOIR DEPLIANT
www.timex.it/it_IT/productWarranty.html
一-七-7-7-7-7-7-7-7-7-7-7-7-7-7-7-7-7-7-7-7-7-7-7-7-7-7-7-7-7-7-7-7-7-7-7-7-7-7-7-7-7-7-7-7-7-7-7-7-7-7-7-
日付の設定:
一-七-七-7-7-7-7-7-7-7-7-7-7-7-7-7-7-7-7-7-7-7-7-7-7-7-7-7-7-7-7-7-7-7-7-7-7-7-7-7-7-7-7-7-7-7-7-7-7-7-7-7-7-
PLSLETToLNCo的取HsLUNKo的取HsL
- 予斯上被垂直立下置之,先的尖的道具をl克の隙間に入は。
- LINGK#H#E #E #E #E #E #E #E #E #E #E #E #E #E #E #E #E #E #E #E #E #E #E #E #E #E #E #E #E #E #E #E #E #E #E #E #E #E #E #E #E #E #E #E #E #E #E #E #E #E #E #E
www.timexwatch.jp/fs/timex/c/guide#returns
PNEUYPENKDEHME:XpaHEHVEaC0BNOIPIPMBMNCOINTHEHMMYyAMMIM Bn3NMAHMOXETPOBOCTNXHARpeBaHIO.BybTOcOCTOPOXHH.
IIOO NHOROTERO NOB30BAHA, CNO BATAPCR NPOCTAHTO HOPATBO 20050000000000000000000000000000000000000000000000000000000000000
IPOEPEPAATTOIIOBIOINHOCTIOIB3OBAHIN
YCTAHOKBA BPEMEHI HNHEIENEL,DAH
YCTAHOBKA BPEMEHN
JyCTAHOBKBNPcMCHHcO6XoDmIOPOCTOBdHHTb3aOHyTOI0N6Bky B KpAeHNOI0KHeNHOOBpAHTB.1pYCTAHOBKBCPOeMHNOCEIPOHYOH, DeHbHeHnIaTOMeHNOTCAABOMATueChk;KaKeIe-NbOcONHITENbHHe OhepaHINIOYCTAHOBKNEHHeHnIIMaHHe Ipe6yOICIOKoOKHHAHYN CYTAHOKNZ4aEBHbTO3aOBDHyTOON6BKyBNCOHOHC
LCnnoe yctaHOKINDA CMEHITCR BNOIDHB,NOTpeyETC COOTBCTBYOUIM 0bpaOM OTKOPPEKTHPOBaT bpcMAHa 12 HAOBBPCD NIAHA3A
TIMEX
Lcna3aBnHra ronokba 6bna cnyauHNO BduBnHyta BCPJIIEI NOKKeHn IOBcPHyTA,OTo6pKaChn DaTb BOeMHHO HmCHHTCgOHNKO YCTaHOBA KpaJHe NIOKHeN VctaHOBtBpeMa PpaHbHOe OTo6pKaHHe DaTb BO30bHOHNTCA.
BECTIATHAR 3AMEHA BATAPEU YACOB C BEYHBIM KAIEHDAPEM HA BECb CPOK CUYXbbl**
JnnaamenbatapeKnHbKaTcTHeOpKeOMeHyEoopaTaTcBnTOBkoBpmyTIMEX.0nueaamenbatapeKnHaBeOxOxoMnOzHO npocBaCTBnKAnpOBOyIyIyUcAIOBnPABNHOIOPEMeHNnIaJIb.1IOOBcOIOPAIBNCHBcBpMcyTimex, 6o9aTITcck K pO3HHIOXy PPODaBu, y KOTOPOr BBy Ix PPOBcPNA, INHn HcaPT www.timexeu/en_GB/productWarranty.html dnn noyHnHnHnHpOmaHnO TmK cBpTaTcB cPMAmTimex.
**KnIeHT HeCet OTBeTcBHeHObCT 3a paXoDbI NO doCTabKe I o6paOte 3aKa3a. HN PNI KAKX OBCTOREbCTBX HE NPNARAFTE K CBOE INOCBJKE BPCACET OTCAOB INJ KAKIE-NIIBO PNEDMETbl, PNECTABIAIOUUE INI BAC JINCHUYO LEEHOCTb.
KOJIbUO INHTEPBAJABPMEHNI
Ea 1000000000000000000000000000000000000000000000000000000000000000000000000000000000000
XPOHOMETPUPOBAHNE DEAETJIbHOCTNC MOMEHTA EE HAYANA:
YcHAnBHTepeyCnHbKStarl/Stoc(Chap/Clor)Haepm(aacnnmNHyT)Hana
DcTcNbHOCTn(KaKnKa3aHo HnHKoHpOMpyHCyKC)IO 3abccOHN Bn
OpEnePek,KAKdoIPOdnAaNaDeHANDENTENHOCTb.
N3MEPEHNE OCTABWETOORB PBEMEHN:
YCTAOIHTE TPEOTBNIHK HAC HIN MHNHY, BYKOTOPBE BILKENAETe 3ABEPLLITb TY HIN HNYO DETCBHLBOCTs, H NEPADNNECKC INPPOEAPNTHcH, YTO6b I PPOCNNTb, KAK DOIOFOCTANOC Do DCIOJIKENHUIU.
KaIIOKAK3HO PAHcNHE CIpRA HApIeJIyDJIeTI CIPAHINE,MOXHO OCTAOBH15CJ, KOJIaMAYTHINB CIpeIKA IOOCHINH IIOHNI 20 MInITYIOOIEA.
KOLbLTO TAXEOMETPA
FHyHnTAXeOMeIpa Tpe/Ha3HaueHa 111111111111111111111111111111111111111111111111111111111111111111111111
3anyctTe xpoHorpa c cekyHHO CTpeKoYCTAHOBENHO B HnyBoe NOXKeHHe (HO3nIMN 12-114ac0s),B TeHne HEPBO MmHb CcKyHINa CIPKka yKaKet Ha CKPOOJI JU Kpca DIOHN B OIOI MIOIO (MIOI OIOI KIOOMETP),EON YKA3HOE BPMA COCTAIAET 45 CEKyH,TO CTpeKa NOKAKET 80 B ATOI NO3NI,HTO O3NAET 80MN/NaACNN80Kw/Hac.
EcnB TceHHe NepBo MNHyTn PpoAeNo PaCToHMe DmHO B Boee Yem. OHy MInu KINOMETp, yMHOBe TOKaTeTb TaXeOMeTa HpaPcTOHHe 1nI
NoyueHnFaKtVNecko CKoPOCTn Eecn Bn PpoAn 1.2 MIn 3a 45 cekyHd, yMHOBe
80Ha 1.2 =96 mNHyNAC
KoIbUO KOMNACA
USTAWIANIE DATY W DWÖCH JEZYKACH:
KORONKA ALARMU (BUDZIKA)
WYCIAGNAC KORONKE
NA ZEWNAK2X
ABY WJACZYC AL ARM
ALARM (BUDZIK) EASYSET Z DATA I FUNKCJA PODSWIETLENIA INDIGLO*
LUMINA NOCTURNÄ INDIGLO
Apasati butonul Sau remontoarul pentru activarea Iuminarii. Tehnologiaelectroluminiscenta folosila in INDICI O'lumineasa intregul afaj alecuili noaptea si in conditi de lumaina redua.

MODELE DE DATA
PENTRU A SETA ORA:
- TRACET remontoarul complet in aara s i selecta Iora corecta.
- Impingeti remontoar la inauntrupre tca caesul sa repornescac.Pentru remontoarul de regiar cu insurubare, apasati remontoarul in timpce rotiti IN SENSUL ACLLOR DL CLASORNIC pntru a I strangc.
Ceasuri cu data: Luata nota de periodada corecta a zilei (AM, sau PM) pentru o functionare corecta a datei.
PENTRU A SETA ZIUA:
- TRAGETI remontoarul in poziia, intermediarai si roiti I IN SENSUL ACEOR DE CEASORNIC pana candi aquare zua corecta. Deca nu se chimba ziua, rageti remontoarul in poziia, afarai si roiti IN SENSUL ACLLOR DE CLASORNIC sau IN SENSUL INVLRS ACEOR DE CLASORNIC numarul necesar de perioade de 24 de ore panacandi aquare ziua corectla.
PENTRU A SETA FUNCIA,QUICKDATE:
REMONTOAR CU TREI POZITII:
- Trajeti remontoarul in pozita, intermediara, si rottii IN SENSUL ACELOR DE CFASORNIC SAU IN SENSUI INVERS ACFOR DE CFASORNIC pana cand apare da corectla
REMONTOAR CU DOUA POZITII:
- Trageti remontoarul n poizila AFARATs roiti IN SENSUL ACFOR DE CEASORNIC, panca cando se schimba data. Repetati pana la afisarea date corecte. Ajustari data, cando luna are mut puiin di 31 de zile. Impingeti remontoarul cando ati terminat.