RSH502T - Thermostat Renkforce - Free user manual and instructions
Find the device manual for free RSH502T Renkforce in PDF.

Frequently Asked Questions - RSH502T Renkforce
User questions about RSH502T Renkforce
0 question about this device. Answer the ones you know or ask your own.
Ask a new question about this device
Download the instructions for your Thermostat in PDF format for free! Find your manual RSH502T - Renkforce and take your electronic device back in hand. On this page are published all the documents necessary for the use of your device. RSH502T by Renkforce.
USER MANUAL RSH502T Renkforce
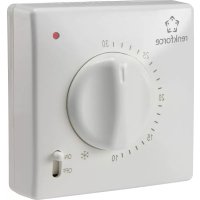
Temperature Controller
Item no. 1391579
Intended use
This product is suitable to switch an electric consumer on or off wirelessly controlled by temperature using a suitable receiver (not included) of the RS2W radio switch system. The electric consumer can also be switched on and off manually.
The temperature controller is powered by two AAA/micro-batteries. The temperature controller can be toggled between a heating mode and a cooling mode so that either a heating or a cooling device can be controlled. Switching times can be specified for an individual day, for all weekdays (Monday - Friday) or for the entire week (Monday - Sunday) with 8 different switching programmes that work independently of each other.
Please read the operating instructions carefully and do not discard them. If you pass the product on to a third party, please hand over these operating instructions as well.
Any use other than that described above could lead to damage to this product and involves the risk of short circuits, fire, electric shock, etc. No part of the product may be modified or converted! The safety instructions must be observed at all times!
This product complies with the applicable national and European requirements. All names of companies and products are the trademarks of the respective owners. All rights reserved.
Package contents
- Temperature controller
- Operating instructions
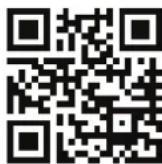
Up-to-date operating instructions:
1.0penwww.conrad.com/downloads in a browser or scan the displayed QR code.
2. Select document type and language and enter the item number into the search field. After submitting the query you can download displayed records.
Explanation of symbols

This symbol indicates specific risks associated with handling, operation or use.
The "arrow" symbol indicates special tips and operating information.
Safety instructions
Damage due to the failure following these operating instructions will void the warranty. We do not assume any liability for any resulting damage!
We do not assume any liability for material and personal damage caused by improper use or non-compliance with the safety instructions. In such cases, the warranty will be null and void!
- The unauthorised conversion and/or modification of the product is not permitted for safety and approval reasons (CE).
- The product is not a toy and does not belong in the hands of children. Position the product so it is out of the reach of children.
- The product may be used in dry, enclosed indoor areas only; it must not get damp or wet!
- The product must not be exposed to extreme temperatures, direct sunlight or strong vibrations. Keep the product away from strong magnetic fields generated by machines, electric motors or loudspeakers.
- Do not operate the device in environments where there are high levels of dust, flammable gases, vapours or solvents. There is a danger of fire and explosion!
-
Do not use this product in hospitals or medical institutions. Although the sensor emits only relatively weak radio signals, these may lead to the malfunction of life-supporting systems. The same may also apply to other areas.
-
Do not leave the packaging material unattended since this may become a dangerous plaything for children.
- Handle the product with care; it can be damaged by impacts, blows, or accidental falls, even from a low height.
Notes on batteries/rechargeable batteries
- Batteries/rechargeable batteries must be kept out of the reach of children.
- Do not leave any batteries/rechargeable batteries lying around openly. There is a risk of batteries being swallowed by children or pets. If swallowed, consult a doctor immediately.
- Replace flat batteries, rechargeable batteries in time, since flat or old batteries/ rechargeable batteries may leak.
- Leaking or damaged batteries/rechargeable batteries that come in contact with the skin can cause chemical burns, therefore use suitable protective gloves.
- Liquids leaking from batteries/rechargeable batteries are chemically highly aggressive. Objects or surfaces coming into contact with these liquids may get considerably damaged. Therefore, keep batteries/rechargeable batteries in a suitable location.
- Batteries/rechargeable batteries must not be short-circuited, disassembled or thrown into fire. There is a danger of explosion!
- Do not recharge normal, non-rechargeable batteries; danger of explosion!
- Never mix normal batteries with rechargeable batteries.
- Do not mix batteries/rechargeable batteries with different charges (e.g. flat and half-discharged batteries).
- Always replace the complete set of batteries/rechargeable batteries.
- Check that the polarity is correct when inserting the batteries/rechargeable batteries (pay attention to plus/+ and minus/-).
It is possible to operate the temperature controller with rechargeable batteries. However, the operating time and the display contrast, are greatly reduced due to the lower voltage (battery = 1.5V , rechargeable battery = 1.2V ).
We therefore recommend to use only high-quality alkaline batteries instead of rechargeable batteries.
Features and functions
Also consider the chapter "Technical data" at the end of these operating instructions.
Operation via two batteries/rechargeable batteries of type AAA/Micro
- Measures and displays temperature and humidity at its location
- Cooling or heating mode can be toggled
One receiver can be connected
- 8 switching programmes (each can be allocated one individual weekday, the period "Monday - Friday" or the period "Monday - Sunday")
- Manual operation of the receiver possible
- Receiver is controlled wirelessly (868 MHz technology)
- Positioning on a table or mounting on a wall
Getting started/operation
a) Inserting, replacing batteries
- Open the battery compartment on the back of the temperature controller and insert two batteries of type AAA/micro observing the correct polarity (pay attention to plus/+ and minus/-).
- All display segments appear briefly, then the digital clock starts and the first measurement value for temperature and humidity is shown on the right in the display.
- Close the battery compartment again.
The battery needs to be replaced when the display contrast is reduced considerably. The programmed data is preserved when the battery is replaced; you only need to set the time again.
b) Setting the time
- Repeatedly press the "FUNC" button briefly until "CANCEL" appears in the display.
- Hold the "FUNC" button pressed (approx. 3 seconds) until the weekday flashes on the top in the display (above the displayed time).
- Set the weekday or the period using the "+" or "-" buttons.
“MO”=Monday
"TU" = Tuesday
"WE" = Wednesday
"TH" Thursday
"FR" = Friday
"SA" = Saturday
"SU" = Sunday
- Briefly press the "FUNC" button to confirm and the hours will flash.
- Set the hours with the "+" or "-" buttons. For quick adjustment, press and hold down the corresponding button for longer.
- Briefly press the "FUNC" button to confirm and the minutes will flash.
- Set the hours minutes with the "+" or "-" buttons. For quick adjustment, press and hold down the corresponding button for longer.
- Briefly press the "FUNC" button to confirm and to exit the setting mode.
c) Registering a receiver for the temperature controller
The temperature controller can control a receiver of the RS2W radio switch system (e.g. a radio switch socket that is part of the system). Other receivers cannot be used.
Follow the operating instructions of the receiver of the RS2W radio switch system that will be used prior to the registration procedure.
A dimmer of the RS2W radio switch system cannot be used.
During the registration process, maintain a 20 - 30cm minimum distance between the temperature controller and the receiver. Failing to do this may result in a registration failure.
- If the receiver is switched on, switch it off for the moment.
The receiver (e.g. a radio switch socket) must be switched off (LED in the button is off); otherwise, registration cannot be done. - Start the registration procedure at the temperature controller.
- Repeatedly press the "FUNC" button briefly until "CANCEL" appears on the left in the display.
Hold the + / ON button pressed for 2 seconds until the two arrows in the symbol flash alternately. Then release the button.
The temperature controller is now ready to register the receiver.
- Hold the button on the receiver pressed (approx. 3 seconds) until the two arrows in the "■" symbol on the temperature controller stop flashing.
- The receiver switches on to indicate the end of the registration process.
Only one receiver can be registered at the temperature controller (a receiver of the RS2W radio switch system, but not a dimmer).
If you start a new registration procedure and register another receiver of the RS2W radio switch system, the receiver registered previously will be deleted/overwritten.
d) Deleting a registered receiver
If the receiver is registered at the temperature controller, proceed as follows:
- Start the registration procedure at the temperature controller.
Repeatedly press the "FUNC" button briefly until "CANCEL" appears on the left in the display.
Hold the + / 0N button pressed for 2 seconds until the two arrows in the "symbol flash alternately. Then release the button.
- Hold the "+" button pressed again for 2 seconds and the registered receiver will be deleted; the right part of the "---" symbol and the two arrows disappear.
e) Selecting heating or cooling mode
In heating mode, the receiver is activated when the measured temperature is below the set target temperature. This operating mode can be used in conjunction with a heater.
In cooling mode, the receiver is activated when the measured temperature is above the set target temperature. This operating mode can be used in conjunction with a cooling unit or fan.
- Repeatedly press the "FUNC" button briefly until "CANCEL" appears in the display.
- Hold the + / ON and - / OFF buttons pressed at the same time to toggle between the heating and cooling mode.
Depending on the mode selected, a corresponding symbol appears in the top left of the display:
Heating mode
*Cooling mode
f) Switching the consumer on/off manually
At the receiver
Follow the operating instructions of the receiver of the RS2W radio switch system.
At the button on the temperature controller
- Repeatedly press the "FUNC" button briefly until "CANCEL" appears in the display.
- The registered receiver can be switched on with the "+" button and switched off with the "-/OFF" button.
g) Selecting and setting the programme
- Repeatedly press the "FUNC" button briefly until "AUTO" appears in the display.
- Select one of the 8 programmes "PROG1" to "PROG8" with the "+" or "-" button.
- Hold the "FUNC" button pressed (approx. 3 seconds) until the temperature flashes at the left in the display.
- Set the temperature with the "+" button. For quick adjustment, press and hold down the corresponding button for longer.
- Briefly press the "FUNC" button to confirm and the weekdays will flash.
- Set the weekday or the period using the "+" or "-" buttons.
You can set:
"MO" = Monday
"TU" = Tuesday
"WE" = Wednesday
"TH" Thursday
"FR" = Friday
"SA" = Saturday
"SU" = Sunday
"MO TU WE TH FR" = Monday to Friday
"MO TU WE TH FR SA SU" = Monday to Sunday
-
Briefly press the "FUNC" button and the hours of the starting time will flash.
You can now enter a time period during which the set temperature should be maintained (e.g. from 8am to 5pm). -
Keep in mind that the set time periods must not overlap (e.g. if you would set programme 1 from 8 am to 5 pm and programme 2 from 9 am to 3 pm). Otherwise, some switching times or temperatures may not be activated as a result.
If a temperature is to be maintained for the entire day, set the same time for starting and ending time.
- Set the hours of the starting time with the "+" or "-" buttons. For quick adjustment, press and hold down the corresponding button for longer.
- Briefly press the "FUNC" button to confirm and the minutes of the starting time will flash.
- Set the minutes of the starting time with the + / ON or - / OFF buttons. For quick adjustment, press and hold down the corresponding button for longer.
- Briefly press the "FUNC" button to confirm and the hours of the ending time will flash.
- Set the hours of the ending time with the "+" or "-" buttons. For quick adjustment, press and hold down the corresponding button for longer.
- Briefly press the "FUNC" button to confirm and the minutes of the ending time will flash.
- Set the minutes of the ending time with the "+" or "-" buttons. For quick adjustment, press and hold down the corresponding button for longer.
- Briefly press the "FUNC" button to confirm and to exit the setting mode.
h) Manual temperature pre-selection
- Repeatedly press the "FUNC" button briefly until "MANU" appears in the display.
- Hold the "FUNC" button pressed (approx. 3 seconds) until the temperature flashes on the left in the display.
- Select the desired temperature with the "+" or -OFF button. For quick adjustment, press and hold down the corresponding button for longer.
- Press the "FUNC" button briefly to confirm.
→ Manual temperature pre-selection remains activated for the following 24 hours and then changes back to automatic operation.
i) Selecting the operating mode ("AUTO", "MANU", "CANCEL")
If the temperature controller is not in a setting mode, you can select the operating mode by briefly pressing the "FUNC" button.
Operating mode "AUTO"
The temperature controller maintains the temperature automatically according to the settings made for times/weekdays in the 8 programmes "PROG1" to "PROG8".
Operating mode "MANU"
The temperature controller maintains the temperature after activation of this operating mode for a duration of 24 hours and then changes back to automatic operation.
Operating mode "CANCEL"
The temperature controller is deactivated; a switching process is not executed.
j) Feedback on the switching process
A special feature of the RS2W radio switch system, to which the temperature controller belongs, is that it provides feedback on the successful (or unsuccessful) switching process.
The receiver sends information about reception and execution of the switching process back to the sender. In this way, you can always see if the radio receiver (e.g. a radio switch socket) has executed the switching command or not.
The temperature controller indicates this with double arrows:
"Switching process successful, feedback received
No feedback received from the receiver
A reason for missing feedback could be interferences at the same frequency, unfavourable reception conditions or similar (see next chapter "Range") or the receiver is not connected to the mains.
k) Installation/positioning of the temperature controller
The temperature controller can be hung from a nail, hook or screw in a wall, using an opening on the back.
Alternatively, unfold the mounting foot at the back and position the temperature controller on a level, stable surface. Protect valuable furniture surfaces by using a suitable mat to prevent scratch marks.
For operation, choose a place that is not directly exposed to the sun and not located close to a radiator. This will result in an erroneous temperature or humidity display as well as to an erroneous control of the heating or cooling device connected to the receiver.
Range
The transmission range of the radio signals between the temperature controller and the receiver is up to 150m under optimum conditions.
This value, however, is the so-called "open space range" (the range when transmitter and receiver are in line of sight, without any interference).
In practice, however, there may be walls, room ceilings, etc. between the transmitter and the receiver, which will reduce the range accordingly.
Due to the different influences on the radio transmission, no specific range can be guaranteed. However, trouble-free operation is usually possible in a single family house.
Sometimes the range can be considerably reduced due to:
- Walls, reinforced concrete floors, drywall walls with metal frame construction
- Coated/metallised insulated glass
- Proximity to metallic & conductive objects (e.g., heating elements)
- Proximity to human bodies
- Other devices on the same frequency (e.g. wireless headphones, wireless speakers)
- Proximity to electric motors/appliances, transformers, power supplies, computers
Declaration of conformity (DOC)
We, Conrad Electronic SE, Klaus-Conrad-Straße 1, D-92240 Hirschau, hereby declare that this product conforms to the fundamental requirements and other relevant regulations of the 1999/5/EC directive.
The Declaration of Conformity for this product is available at: www.conrad.com
Maintenance and cleaning
The product does not require any maintenance by the user; do not open/disassemble it (except for replacing the batteries). Repair or maintenance work must be carried out by a specialist.
You can use a clean, dry, soft cloth for cleaning. Dust can be very easily removed with a soft, clean brush and a vacuum cleaner.
Do not use aggressive chemical or scouring cleaning agents, as this may lead to discolouration or changes in the material on the surface.
Do not press on the display, it could be damaged.
Disposal
a) General
The product must not be disposed of in household waste! Please dispose of the device, when it is no longer of use, according to current statutory requirements.
Remove any inserted batteries/rechargeable batteries and dispose of them separately from the product.
b) Batteries and rechargeable batteries
As the end user, you are required by law (Battery Regulation) to return used batteries. Do not dispose of used batteries in the household waste!
Batteries/rechargeable batteries containing hazardous substances are labelled with these symbols to indicate that the disposal of them in the household waste is forbidden. The symbols for dangerous heavy metal constituents are: Cd=Cadmium, Hg=Mercury, Pb=Lead (name written on the battery/ rechargeable battery, e.g., under the rubbish bin symbol on the left).
You can return your used batteries/rechargeable batteries free of charge at the official collection points of your community, in our stores, or at places where batteries or rechargeable batteries are sold.
You thereby fulfil your statutory obligations and contribute to the protection of the environment.
Technical data
Power supply. 2x batteries of type AAA/Micro
Transmission/ reception frequency.....868.3 MHz
Temperature control range. 0^ to +50^
Switching programmes. 8 (daily, weekdays or entire week can be selected)
Range...up to 150 m (see chapter "Range")
Suitable receivers............Radio switches of the RS2W radio switch system (a dimmer cannot be used!)
Number receivers. 1
Ambient conditions.Temperature -9^ to +55^, air humidity 20% to 95% relative, not condensing
Dimensions (H x W x D) 102 x 53 x 18 mm
Weight........................ approx. 73 g (without batteries)
Mode d'emploi
Consignes relatives aux piles/batteries
Dimensions (H x L x P) 102 x 53 x 18 mm