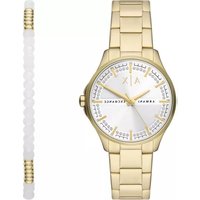
AR2460 - Watch Armani - Free user manual and instructions
Find the device manual for free AR2460 Armani in PDF.
| Technical Features | Analog watch, quartz movement, stainless steel case, case diameter 43 mm, thickness 11 mm, mineral glass. |
|---|---|
| Usage | Watch intended for daily use, suitable for formal and casual occasions. |
| Maintenance and Repair | Recommended to replace the battery every 2-3 years, regular cleaning with a soft cloth, avoid prolonged exposure to water. |
| Safety | Do not expose to extreme temperatures, avoid strong shocks, do not use in corrosive environments. |
| General Information | 2-year warranty, water resistance up to 50 meters, elegant and modern design, leather strap. |
Frequently Asked Questions - AR2460 Armani
Download the instructions for your Watch in PDF format for free! Find your manual AR2460 - Armani and take your electronic device back in hand. On this page are published all the documents necessary for the use of your device. AR2460 by Armani.
USER MANUAL AR2460 Armani
NOTE: Various models of the Emporio Armani Orologi collection have screw-down crowns. If you attempt to pull the crown out for time or date setting and it does not pull out easily, you may need to unscrew your crown before pulling the crown out. This is done by turning the crown counter-clockwise until it is completely unscrewed. Your crown will now pull out easily for time adjustment. To return crown to position 1, push in gently and turn clockwise simultaneously.
AUTOMATIC WINDING MOVEMENT
A timepiece fitted with an automatic winding movement obtains the power to wind itself by the movement of your wrist. When fully wound, your timepiece has a power-reserve of approximately 38 hours. If the timepiece has not been worn for over 38 hours it is advised that it be manually wound to ensure necessary power-reserve. To manually wind, keep the crown in position 1 and then turn it clockwise, 10 to 20 times.
Important Notes: As with every mechanical timepiece, the automatic day/date calendar is automatically adjusted by a complicated mechanism that is triggered between 10pm and 2am. It is important to avoid any adjustment of the day/date calendar setting operation and any backward movement of the watch hands during this period of time.
To ensure longevity and accuracy, it is recommended to have your mechanical timepiece over-hauled by a qualified technician every 3 - 5 years.
2 HANDS AND 3 HANDS
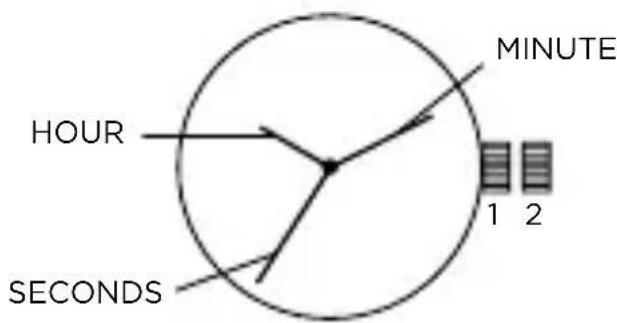
Time Setting
- Pull crown out to position 2.
- Turn crown clockwise to rotate hour and minute hands to desired time.
- Push crown back to position 1.
DATE MODELS
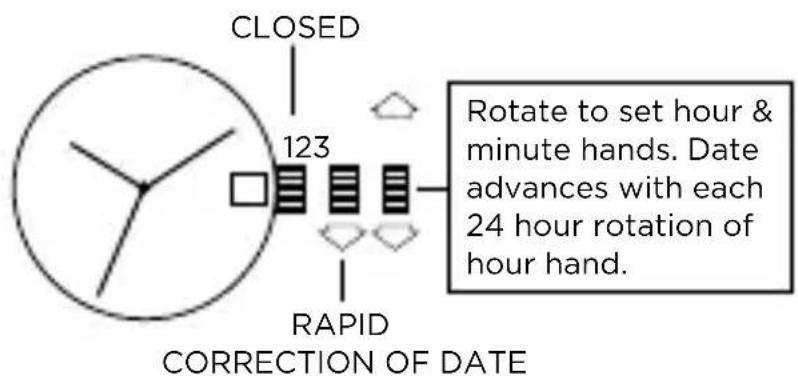
Date Setting
- Pull crown out to position 2.
- Turn the crown either clockwise or counter-clockwise and set the date for the previous day. The direction that moves the date varies on different watch models.
- Return crown to position 1.
Time Setting
- Pull crown out to position 3.
- Turn crown counter-clockwise until day changes to the present day. Continue to turn crown to set correct am/pm time.
- Return crown to position 1.
Do not change the date between the hours of 10pm and 2am. This is the time when the movement is in position to carry out the automatic date change, and any interference may cause damage to the movement.
BIG DATE
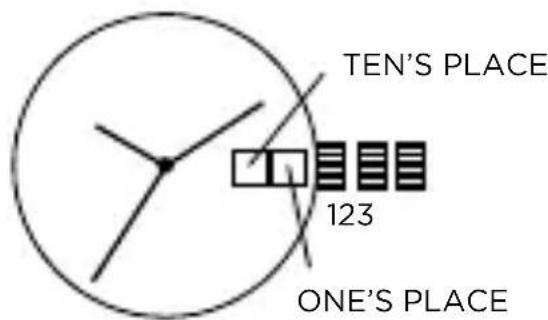
Time Setting
- Pull crown out to position 3.
- Turn crown clockwise to the correct time.
- Return crown to position 1.
Date Setting
- Pull crown out to position 2.
- Turn crown counter-clockwise to set the one's place digit.
- Turn crown clockwise to set the ten's place digit.
- Return crown to position 1.
NOTE: Date needs to be reset to "01" at the beginning of every month. NOTE: To ensure that the date is set correctly, do not set date between 9:00 p.m. and 1:00 a.m.
POWER RESERVE/DATE
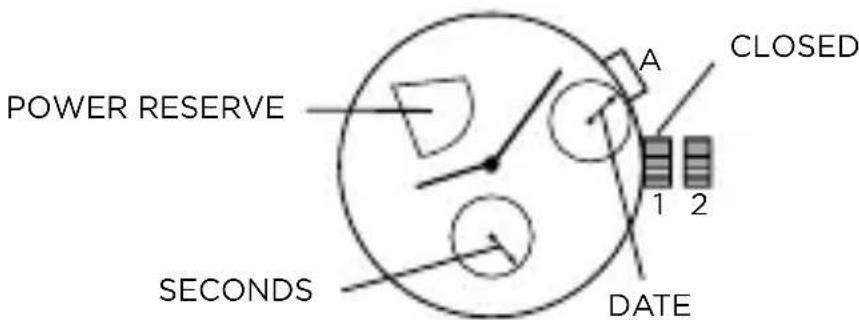
Time Setting
- Pull crown out to position 2.
- Turn crown clockwise to rotate hour and minute hands to desired time.
- Push crown back to position 1.
Date Setting
With any pointed (but not sharp) tool, push hidden pusher A to adjust the date.
Power Reserve Reading
When the power reserve display indicator approaches the lower part of power reserve display this means it is necessary to manually wind your timepiece or simply wear your timepiece so that it winds itself and therefore recharges itself.
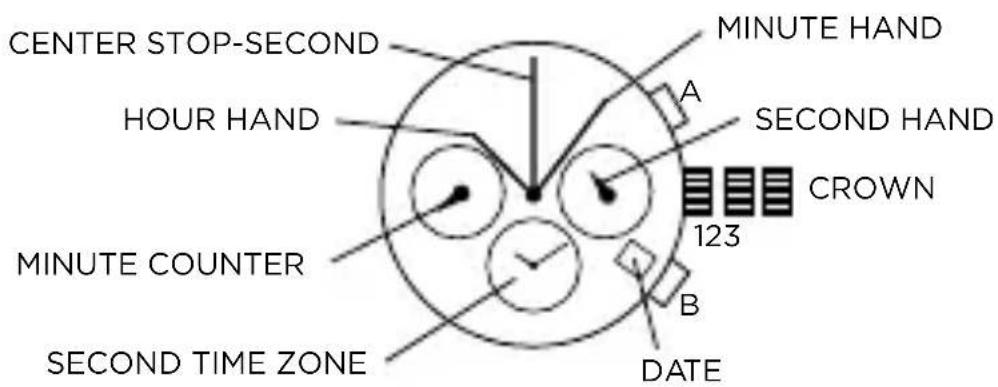
CHRONOGRAPH 2 EYE
Setting the time
- Pull crown out to position 3 (the watch stops).
- Turn crown until you reach the correct time.
- Push crown back to position 1.
Setting the date
- Pull crown out to position 2 (the watch continues to run).
- Turn crown until yesterday's date appears.
- Pull crown out to position 3 (the watch stops).
- Turn crown until correct date appears.
- Continue to turn crown until correct time appears.
- Push crown back to position 1.
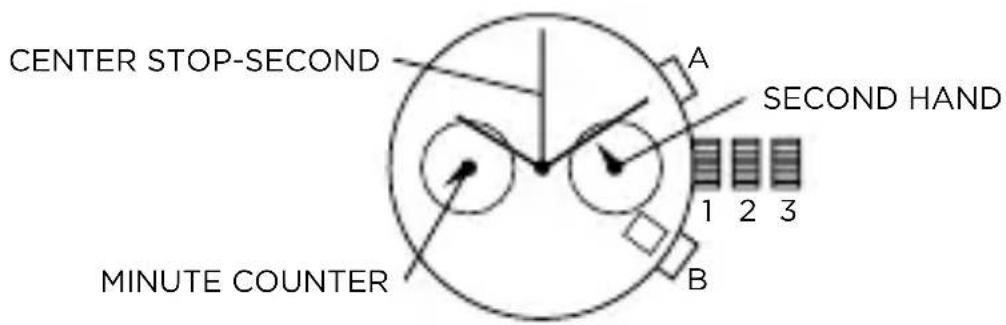
Chronograph
- The minute counter measures 30 minutes per rotation.
- The center stop-second measures 60 seconds per rotation.
Please note:
Before using the chronograph functions, please ensure that:
- the crown is in position 1 (= normal position).
- the two chronograph hands are precisely at zero position following activation of pusher B. Should this not be the case, the positions of the hands must be adjusted (see the chapter entitled "Adjusting the chronograph hands to zero position").
Chronograph: Basic function (Start / Stop / Reset)
- Press pusher A to start the center stop-second hand.
- To stop the timing, press pusher A again.
- To reset the two chronograph hands to zero positioning, press pusher B.
Chronograph: Intermediate or interval timing
- Press pusher A to start the center stop-second hand.
- Press pusher B to stop the chronograph.
NOTE: Although the chronograph hands have stopped, the movement continues to record the current timing.
- Make up the measured time:
Press pusher B again and the 2 chronograph hands are quickly advanced to the ongoing measured time. To continue to record intervals, continue to push pusher B.
- Press pusher A to stop and the final time is displayed.
- To reset the two chronograph hands to zero positioning, press pusher B.
Adjusting the chronograph hands to zero position
- Pull crown out to position 3 (the two chronograph hands are in their correct or incorrect zero position).
- Keep pushers A and B depressed simultaneously for at least 2 seconds (the center stop-second rotates by 360^ - corrective mode is activated).
- Press pusher A to single step the center stop-second hand. Press and hold pusher A to advance the center stop-second hand quickly. Press pusher B to advance to the next hand.
- Press pusher A to single step the minute counter hand. Press and hold pusher A to advance the minute counter hand quickly.
- Return the crown to position 1.
CHRONOGRAPH 2 EYE
Time Setting
- Pull crown out to position 3.
- Turn crown to set the desired time.
- Return crown to position 1.
Date Setting
- Pull crown out to position 2 (the watch continues to run).
- Turn crown until yesterday's date appears.
- Pull crown out to position 3 (the watch stops).
- Turn crown until correct date appears.
- Continue to turn crown until correct time appears.
- Return crown to position 1.
Chronograph Operation
- Press A to start/stop the chronograph.
- Press B for reset.
Adjusting the Chronograph
- Pull crown to position 3.
- Press A to reset the second hand to "0."
- Press B to reset the chronograph minute hand.
- Return crown to position 1.
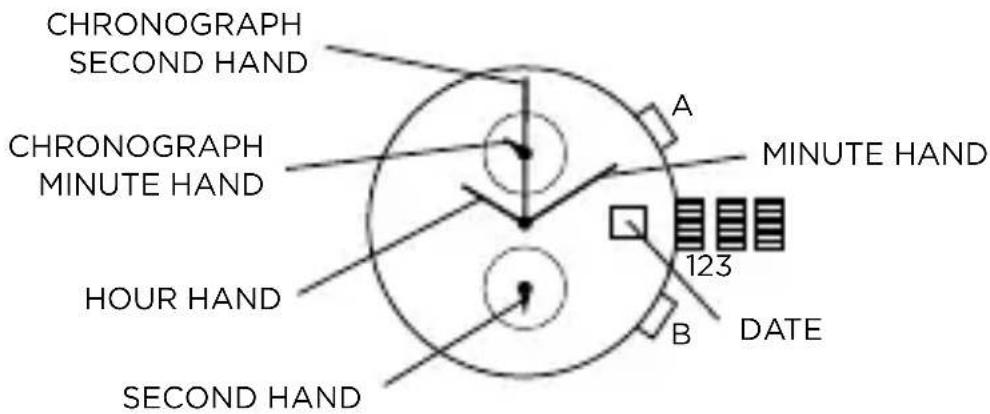
CHRONOGRAPH STOPWATCH

Time and Date Setting
- Before setting the time, make sure the chronograph is stopped and set to zero (12:00) position.
- Pull crown out to position 2.
- Turn crown clockwise until the previous day's date is displayed.
- Pull crown out to position 3 when the second hand is at the 12:00 position.
- Turn crown to set time.
NOTE: 24-hour hand moves correspondingly with the hour and minute hands. When setting the time be sure to check that the 24-hour hand is set properly.
- Return crown to position 1.
NOTE: When the crown is in position 2, do not press the pushers. Otherwise the chronograph hands will move.
Chronograph
- Press A to start/stop the chronograph.
- Press B to reset to zero.
Split Time
- Press B while the chronograph is running.
- Press B again to return to the chronograph.
- Press A to finalize timing.
- Press B to reset.
Chronograph Zero Reset
- If either of the chronograph hands is not at the zero (12:00) position, pull crown out to position 3.
- Press A to move hands clockwise; press B to move hands counter-clockwise.
- Return crown to position 1.
CHRONOGRAPH
Time Setting
- Pull crown out to position 3 (the watch stops).
- Turn crown to set the desired time.
- Return crown to position 1.
NOTE: In order to set the time to the exact second, the crown must be pulled out when the second hand is in position "60." Once the hour and minute hands have been set, the crown must be returned.
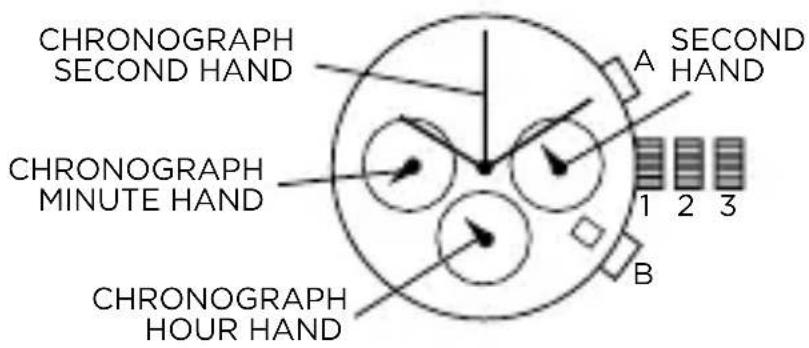
Date Setting
- Pull crown out to position 2 (the watch continues to run).
- Turn crown until the correct date is shown in the date window.
- Return crown to position 1.
NOTE: During the date changing phase between 9pm and 12pm, the date must be set to the date of the following day.
Chronograph: Basic
- Start: press A.
- Stop: press A.
- Reset: press B (the three chronograph hands will be reset to their zero positions).
Chronograph: Accumulated timing
- Start: press A (start timing).
- Stop: press A (e.g. 15 min 5 sec).
- Restart: press A (timing is resumed).
-
Stop: press A (e.g. 13 min 5 sec) = 28 min 10 sec (the accumulated measured time is shown).
-
Reset: press B (the three chronograph hands are returned to their zero positions). NOTE: The accumulation of the timing can be continued by pressing A (Restart / Stop, Restart / Stop, ...).
Chronograph: Intermediate or interval timing
- Start: press A (start timing).
- Display interval: press B (e.g. 10 minutes 10 seconds, timing continues in the background).
- Making up the measured time: press B (the 3 chronograph hands are quickly advanced to the ongoing measured time).
NOTE: Further intervals or intermediates can be displayed by pressing B (display interval / make up measured time, ...).
- Stop: press A (final time is displayed).
- Reset: press B (the 3 chronograph hands are returned to their zero position).
Adjusting the chronograph hands to zero position
One or several chronograph hands are not in their correct zero positions and have to be adjusted (e.g. following a battery change).
- Pull the crown out to position 3 (all 3 chronograph hands are in their correct or incorrect zero position).
- Keep A and B depressed simultaneously for at least 2 seconds (the center stop-second rotates by 360^ , corrective mode is activated).
- Press A to single step the center stop-second hand. Press and hold A to advance the center stop-second hand quickly. Press B to adjust the next hand.
- Press A to single step the hour counter hand. Press and hold A to advance the hour counter hand quickly. Press B to adjust the next hand.
- Press A to single step the minute counter hand. Press and hold A to advance the minute counter hand quickly.
- Return crown to position 1 (termination of the chronograph hands adjustment).
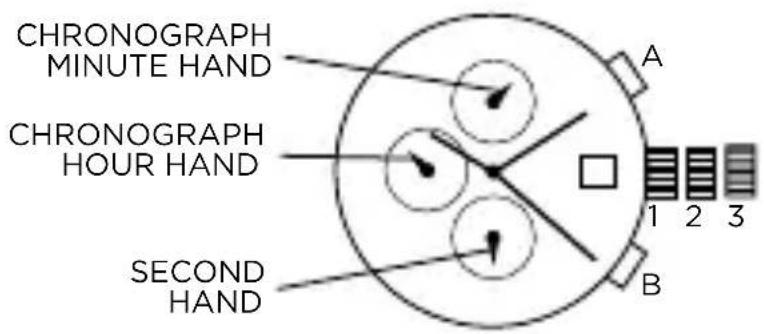
CHRONOGRAPH DUAL-TIME
Time and Date Setting
- Pull crown out to position 2 and turn clockwise to set date to the previous day.
- Pull crown out to position 3 and turn clockwise until the present date is displayed. Continue turning crown to set the correct a.m./p.m. time.
- Return crown to position 1.
NOTE: To ensure accuracy, do not set the date between 9:00 p.m. and 12:00 a.m.
Second Time Zone Setting
Before setting the second time zone, please ensure that the chronograph is stopped.
- Press B for 2 seconds until the second time zone minute hand advances one minute. Time setting mode is activated.
- Press B for less than one second to advance minute hand by one increment.
- Press B for 1-2 seconds to advance hour hand by one increment; press and hold B for more than 2 seconds for hour hand fast advance.
NOTE: If pusher is not pressed for 10 seconds, time setting mode is deactivated.
Chronograph Functions
Before using the chronograph, please ensure that:
- The crown is in position 1.
- The two chronograph hands are precisely at zero (12:00) position after pressing B. Should this not be the case, the positions of the hands must be adjusted. Please refer to the section titled "Adjusting the Chronograph Hands to Zero Position."
Basic Function
- Press A to start/stop the chronograph.
- Press B to reset to zero.
Interval Timing
- Press B while the chronograph is running to measure intervals (timing continues in the background).
- Press B again to display ongoing measured time.
- Repeat steps 1 and 2 to measure additional intervals.
- Press A to finalize timing.
- Press B to reset to zero.
Adjusting the Chronograph Hands to Zero Position
If one or both chronograph hands are not in their correct zero (12:00) positions after pressing B (for example, following a battery change):
- Pull crown out to position 3.
- Press A and B simultaneously for at least 2 seconds until center stop-second hand rotates by 360^ . Corrective mode is activated.
- To adjust center stop-second hand, press A to move hand one increment; press and hold A for fast advance.
- Press B to advance to minute hand. Press A to move hand one increment; press and hold A for fast advance.
- Return crown to position 1.
DUAL TIME ZONE
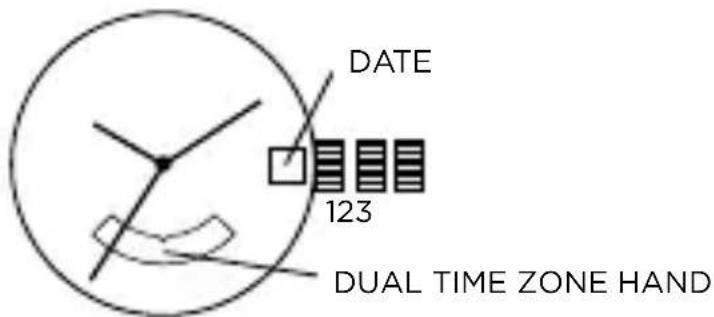
Time/Calendar Setting
- Pull crown out to position 2.
- Turn crown clockwise to set to previous day's date.
- Pull crown out to position 3.
- Turn crown clockwise until date changes to today's date; set correct a.m. or p.m. time.
- Return crown to position 1.
NOTE: Second time zone hand will move in conjunction with hour and minute hands. Set hour and minute hands before setting second time zone.
Dual Time Zone Setting
- Pull crown out to position 2.
- Turn crown counter-clockwise to set second time zone.
- Return crown to position 1.
NOTE: Second time zone hand is read in military time, indicated in the 24-hour time window at 6:00 position.
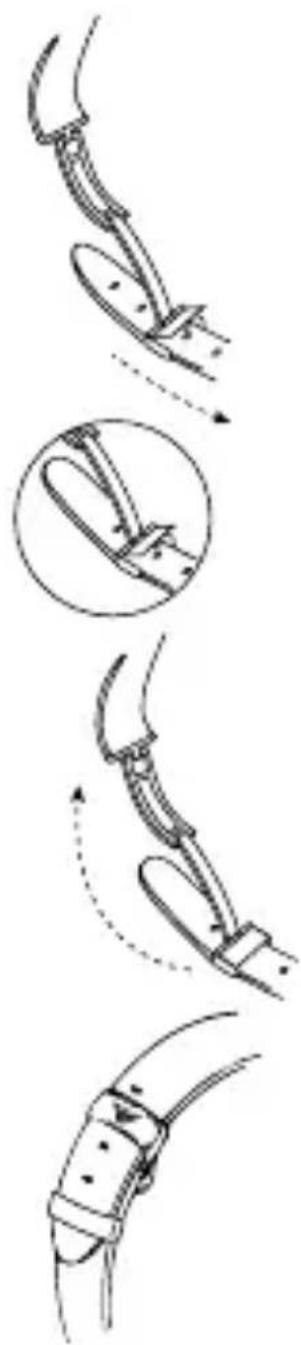
ADJUSTING THE STRAP
- Open the buckle and pull the strap (in the direction of the arrow shown) until the adjustment pin appears.
- When the position is correct for your wrist, place the adjustment pin in the desired hole.
- Pull the adjustment pin into the buckle (by pulling the strap in the direction of the arrow shown) until pin clicks into place.
- Slide extra strap through the loop keeper before snapping the clasp together.
PIN LINK DIAGRAM
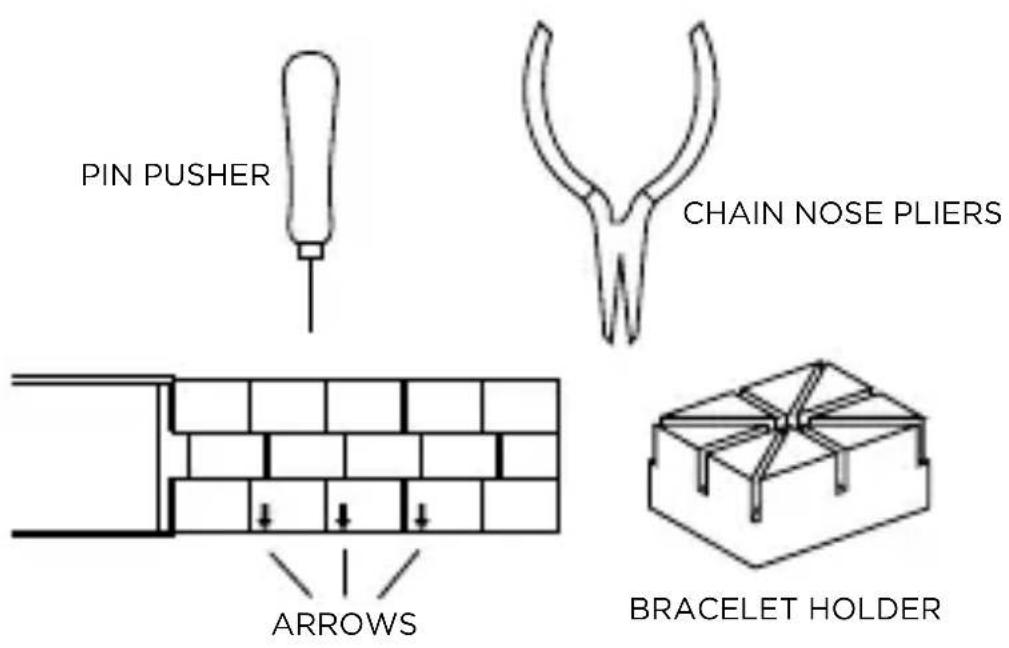
Link Removal
To remove a link from a pin link bracelet, you will need the bracelet holder, pin pusher, and chain nose pliers (see pin link diagram).
- Open the clasp on the bracelet.
- Look on the inside of the bracelet and locate the arrows near the clasp (see diagram).
- Place the band into the appropriate size slot of the bracelet holder with the arrows pointing down (see diagram).
- Center the desired pin to be removed over one of the holes in the bottom of the bracelet holder.
- With the pin pusher, push the pin, as far as possible, through the link.
- Remove the watch from the bracelet holder and simply finish pulling out the pin with the chain nose pliers.
NOTE: Two pins hold each link in place and must be taken out before a link can be removed. Please note that the pins are partially split down the center.
| WATER RESISTANCE | WATER-RELATED USE | ||||
| Caseback Marking | Depth | 5 | 2 | 3 | 4 |
| Washing Hands | Showering, Bathing | Swimming, Snorkeling | Scuba Diving | ||
| - | - | X | X | X | X |
| WR | - | √ | X | X | X |
| 3 ATM | 3 Bar, 30 Meters | √ | X | X | X |
| 5 ATM | 5 Bar, 50 Meters | √ | √ | X | X |
| 10 ATM | 10 Bar, 100 Meters | √ | √ | √ | X |
| 20 ATM | 20 Bar, 200 Meters | √ | √ | √ | √ |
| 30 ATM | 30 Bar, 300 Meters | √ | √ | √ | √ |
| 50 ATM | 50 Bar, 500 Meters | √ | √ | √ | √ |
| Always set the crown in closed position (the normal position). Tighten screw-lock crown completely. | |||||
WATCH CARE AND PRECAUTIONS
This watch contains precision electronic components. To ensure the best wear, please follow these simple guidelines for watch care:
-
Avoid leaving your watch in any extremes for long periods of time: direct sunlight, extremely warm, or extremely cold location.
-
Extreme heat will cause malfunctioning and shorten the life of your battery.
Extreme cold will cause your watch to gain or lose time. -
Avoid wet conditions unless your watch is suited for them.
-
Never operate any of the function buttons or crown when the watch is submerged in water.
-
Should water or condensation appear in the watch face, have the watch checked immediately. Water can corrode electronic parts inside the case.
-
Avoid extreme shock or impact. Your watch is designed to withstand impact under normal use.
-
Avoid using soap or other chemicals which could damage your watch.
-
Avoid wearing your watch in the presence of strong chemicals, solvents or gases. They may cause discoloration, deterioration or damage to the case, band and other components.
-
Avoid strong electric fields or static electricity which could harm your watch mechanics.
-
Generally, your watch is not affected by magnetic fields from such household appliances as television sets and stereos.
-
Keep your watch clean.
-
Clean your watch with a soft cloth and water only. Do not submerge your watch under water unless it is water rated (see caseback).
- After salt water use, rinse watch under tap water and wipe dry with a soft cloth.
-
Metal watch bands should be washed periodically to keep them looking beautiful. Clean with a soft brush dipped in mild, soapy water. Be sure to wipe dry thoroughly with a soft cloth.
-
Periodic Inspection.
-
We recommend having your watch checked once every year or two to ensure long use and trouble-free operation.
DEUTSCH
DOUBLE FUSEAU HORAIRE
OtoEmek Winding MOVEMENT
[1] 24.13.16, 24.13.17, 24.13.18, 24.13.19, 24.13.20, 24.13.21, 24.13.22, 24.13.23, 24.13.24, 24.13.25, 24.13.26, 24.13.27, 24.13.28, 24.13.29, 24.13.30, 24.13.31, 24.13.32, 24.13.33, 24.13.34, 24.13.35, 24.13.36, 24.13.37, 24.13.38, 24.13.39, 24.13.40, 24.13.41, 24.13.42, 24.13.43, 24.13.44, 24.13.45, 24.13.46, 24.13.47, 24.13.48, 24.13.49, 24.13.50, 24.13.51, 24.13.52, 24.13.53, 24.13.54, 24.13.55, 24.13.56, 24.13.57, 24.13.58, 24.13.59, 24.13.60, 24.13.61, 24.13.62, 24.13.63, 24.13.64, 24.13.65, 24.13.66, 24.13.67, 24.13.68, 24.13.69, 24.13.70, 24.13.71, 24.13.72, 24.13.73, 24.13.74, 24.13.75, 24.13.76, 24.13.77, 24.13.78, 24.13.79, 24.13.80, 24.13.81, 24.13.82,
- 用臺1的封由原封
| 방수를關reten용 | |||||
| 체이스백보시 | knife | ||||
| supposedly 기재,,복有的人,고고고고고고고고고고고고고고고고고고고고고고고고고고고고고고고고고고고고고고고고고고고고고고고고고고고고고고고고고고고고고고고고고고고고고고고고고고고고고고고고고고고고고고고고고고고고고고고고고고고고 X | |||||
| - | - | X | X | X | X |
| WR | - | √ | X | X | X |
| 3 ATM | 3 bar, 30 mirr | √ | X | X | X |
| 5 ATM | 5 bar, 50 mirr | √ | √ | X | X |
| 10 ATM | 10 bar, 100 mirr | √ | √ | √ | X |
| 20 ATM | 20 bar, 200 mirr | √ | √ | √ | √ |
| 30 ATM | 30 bar, 300 mirr | √ | √ | √ | √ |
| 50 ATM | 50 bar, 500 mirr | √ | √ | √ | √ |
| XXXXXXXXXXXXXXXXXXXXXXXXXXXXXXXXXXXXXXXXXXXXXXXXXXXXXXXXXXXXXXXXXXXXXXXXXXXXXXXXXXXXXXXXXXXXXXXXXXXXXXXXXXXXXXXXXXXXXXXXXXXXXXXXXXXXXXXXXXXXXXXXXXXXXXXXXXXXXXXXXXXXXXXXXXXXXXXXXXXXXXXXXXXXXXXXXXXXXXXXXXXXXXXXXXXXXXXXXXXXXXXXXXXXXXXXXXXXXXXXXXXXXXXXXXXXXXXXXXXXXXXXXXXXXXXXXXXXXXXXXXXXXXXXXXXXXXXXXXXXXXXXXXXXXXXXXXXXXXXXXXXXXXXXXXXXXXXXXXXXXXXXXXXXXXXXXXXXXXXXXXXXXXXXXXXXXXXXXXXXXXXXXXXXXXXXXXXXXXXXXXXXXXXXXXXXXXXXXXXXXXXXXXXXXXXXXXXXXXXXXXXXXXXXXXXXXXXXXXXXXXXXXXXXXXXXXXXXXXXXXXXXXXXXXXXXXXXXXXXXXXXXXXXXXXXXXXXXXXXXXXXXXXXXXXXXXXXXXXXXXXXXXXXXXXXXXXXXXXXXXXXXXXXXXXXXXXXXXXXXXXXXXXXXXXXXXXXXXXXXXXXXXXXXXXXXXXXXXXXXXXXXXXXXXXXXXXXXXXXXXXXXXXXXXXXXXXXXXXXXXXXXXXXXXXXXXXXXXXXXXXXXXXXXXXXXXXXXXXXXXXXXXXXXXXXXXXXXXXXXXXXXXXXXXXXXXXXXXXXXXXXXXXXXXXXXXXXXXXXXXXXXXXXXXXXXXXXXXXXXXXXXXXXXXXXXXXXXXXXXXXXXXX | |||||
社会关系学
i) i.
- 嘉社同通的职相道在也
(SAU,
- 合机为曾是的贝布卡时,当
- OLANSAONGUWUH1N\~2NHNHANBNNNNNNNNNNNNNNNNNNNNNNNNNNNNNNNNNNNNNNNNNNNNNNNNNNNNNNNNNNNNNNNNNNNNNNNNNNNNNNNNNNNNNNNNNNNNNNNNNN