
10030015 - Blender Klarstein - Free user manual and instructions
Find the device manual for free 10030015 Klarstein in PDF.

| Brand | Klarstein |
| Model | 10030015 |
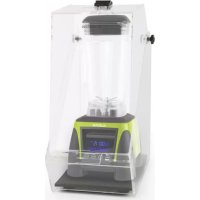
| Product type | Blender |
| Power supply | 220-240 V, 50-60 Hz |
| Jar capacity | Approx. 1.5 L (MAX mark) |
| Blade material | Stainless steel |
| Jar material | Glass or plastic (not specified) |
| Number of speeds | 3 (Low, Medium, High) |
| Pulse function | Yes |
| Soup function | Yes (6 minutes cooking) |
| Pusher function | Yes (for thick or frozen foods) |
| Overheat protection | Yes (automatic shut-off + Reset button) |
| Max continuous operating time | 30 seconds (normal blending), 3 minutes (continuous blending), 6 minutes (soup) |
| Required cooling time | 10 minutes after cycle, 30 minutes after 10 cycles |
| Cleaning | Auto-Clean function (hot water), dishwasher-safe parts (except base) |
| Child safety | Do not use by children without supervision |
| Weight | Approx. 2.5 kg (estimate) |
| Dimensions (WxDxH) | Approx. 20 x 20 x 40 cm (estimate) |
Frequently Asked Questions - 10030015 Klarstein
User questions about 10030015 Klarstein
0 question about this device. Answer the ones you know or ask your own.
Ask a new question about this device
Download the instructions for your Blender in PDF format for free! Find your manual 10030015 - Klarstein and take your electronic device back in hand. On this page are published all the documents necessary for the use of your device. 10030015 by Klarstein.
USER MANUAL 10030015 Klarstein
Congratulations on purchasing this equipment. Please read this manual carefully and take care of the following hints to avoid damages. Any failure caused by ignoring the mentioned items and cautions mentioned in the instruction manual are not covered by our warranty and any liability.
Contents
Technical Data 8
Safety Instructions 8
Product Description 9
Use and Operation 10
Cleaning and Care 12
Hints on Disposal 13
Declaration od Conformity 13
Technical Data
Item number 10030015
Power supply 220-240 V ~ 50-60 Hz
Safety Instructions
- Read all instructions.
- Before using check that the voltage power corresponds to the one shown on the appliance nameplate.
- Do not let cord hang over edge of table or counter.
- Do not place on or near a hot gas or electric burner, or in a heated oven.
- Do not operate any appliance with a damage cord or plug or after the appliance malfunction or has been damaged in any manner. Return the appliance to the nearest authorized service facility for examination, repair or adjustment.
- If the supply cord is damaged, it must be replaced by the manufacturer or its service agent or a similarly qualified person in order to avoid a hazard.
- Avoid contacting moving parts.
- Do not leave foreign objects, such as spoons, forks, knives or the measuring cup, in the jar as this will damage the blades and other components when starting the machine and may cause injury.
- Blades are sharp, so handle carefully.
- The use of attachment, including jar, jar lid, not recommended or sold by manufacturer may cause fire, electric shock or injury.
- The jar should not be more than 2/3 full when the tamper is left in while blending. Do not exceed 30 seconds of continuous blending with the tamper in place.
- When making nut butters or oil based foods, do not process for more than one minute after the mixture starts circulating. Over-processing can cause dangerous overheating.
-
When blending hot liquids or ingredients, use caution: spray or escaping steam may cause scalding and burns. Do not fill container to the maximum capacity. Always begin processing on the lowest speed setting. Keep hands and other exposed skin away from the lid opening to prevent possible burns.
-
Turn all controls to OFF and unplug the blender when it is not in use, before putting on or taking off parts, and before cleaning.
- Never leave the appliance unattended while it is running.
- To protect against risk of electrical shock do not put motor unit or power cord in water or other liquid.
- Keep hands and utensils out of jar while blending to reduce the risk of severe injury to persons or damage to the blender.
- If scraping is necessary, turn the power OFF, unplug from the electrical outlet, and use a rubber spatula only.
- Always operate blender with lid in place.
- Never put non-food items into the jar to blend.
- Do not open the lid before the blade stops running completely to avoid hazard.
- This product is not designed for use by persons (including children) who have reduced physical, sensory or mental capacities or persons with no experience or knowledge, unless they are instructed and supervised in the use of the appliance by a person responsible for their safety.
Children should be supervised to ensure that they do not play with the appliance. - Do not use outdoors.
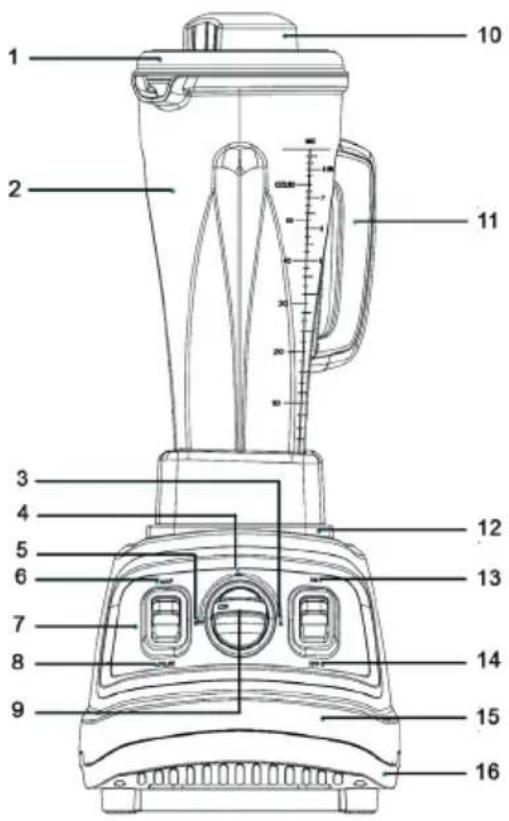
Product Description
1 Lid
2 Jar
3 High Speed
4 Medium Speed
5 Low Speed (OFF)
6 Soup
7 Function switch
8 Pulse
9 Speed
10 Measuring cup
11 Handle
12 Jar support pad
13 Power ON
14 Power OFF
15 Motor
16 Base
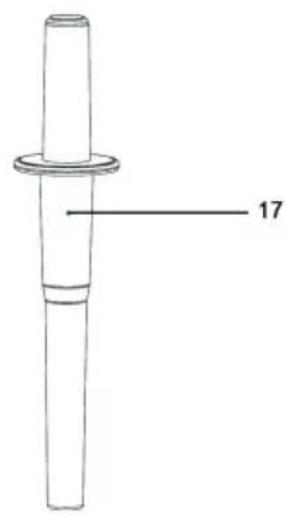
17 Tamper
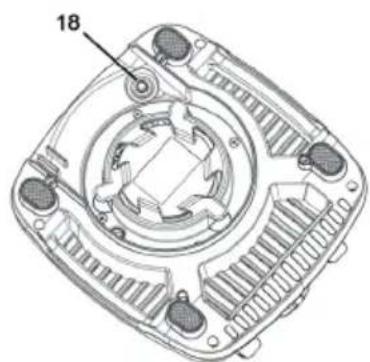
18 Reset button
Function switch: With "Soup" and "Pulse" for selection.
Tamper: The tamper allows you to accelerate the process of very thick and/or frozen mixtures that cannot be processed in a regular blender. If food is not circulating the machine may be overloaded or may have a trapped air bubble. Using the tamper helps to maintain circulation by preventing air pockets from forming. Fristly, turn off the appliance to make it stop working, and then remove the measuring cup, and through the hole in the lid insert the tamper and use it to press ingredients into the blades as you make frozen ice creams, nut butters, etc.
Resettable fuse button: Incorporated to protect the motor from overheating. If the motor shuts off while in use: turn controls to "OFF" and unplug from the wall outlet. Remove the jar from the motor unit and free the blade of any obstructions. Wait 30-45 minutes for the unit to cool down. Press external resettable fuse button on the bottom of the motor unit.
- Function switch is interlock with Speed dial, when operate Function switch, Speed dial is invalid and when operate Speed dial, Function switch is invalid.
- Turn off the appliance to make it stop working when the tamper is used during blending.
- You may need to move the tamper not only up and down, but also side to side.
Use and Operation
Before first Use
- Unpack the appliance and place all parts on a horizontal surface.
- Immerse the jar, jar lid, measuring cup and tamper in warm soapy water and rinse them and dry. Never immerse motor unit in water for cleaning to prevent the risk of electric shock. CAUTION: The blade is very sharp, please handle carefully.
- For attaching jar, firstly place the jar lid and measuring cup into the jar, ensure the jar lid and measuring cup are placed tightly and properly with the jar. And then place the jar onto the jar support pad and fix it onto the motor unit tightly. Until now, the blender is ready for use.
- Before assembling the jar, be sure the power cord is unplugged from the power outlet, the power switch and the speed dial are both on the "OFF" positions.
- The appliance will not start to work if the jar is not assembled onto the motor unit properly.
- Make sure all the parts are assembled properly.
Blending
- Lay the appliance on the flat horizontal surface and make sure it is unplugged.
- Prepare the carrots and cut them into cubes with a size of 15mm^15mm^15mm . And then remove the measuring cup and jar lid, after it, put the carrot cubes into the jar. Usually certain amount of purified water has to be added to facilitate the smooth running of appliance. The proportion of the carrot and water is 2:3. The amount of mixture should not exceed the max level as indicated on the jar. And then close the jar lid and measuring cup well in position.
- Connect the appliance with power source, and then push the power switch to "ON" position.
- Turn the speed dial to the "HI" speed setting and the appliance starts to blend carrots.
- After blending for about 30 seconds, turn the speed dial to "OFF" position, and the appliance stops working.
- You may add ingredients into the jar through the center opening of jar cover during operation, firstly, turn off the appliance to make it stop working, and then remove the measuring cup and add the ingredients into the jar through the center opening of jar, after it, replace the measuring cup in position. Finally, turn on the appliance again.
Important Hints on Blending
- During operation, if the mixture is too thick to be blended, operate by referring to the description of "Tamper" mentioned above.
- You'd better not remove the jar from the motor unit during working process. If it is necessary to remove the jar, please firstly turn off the appliance to make it stop working and then remove it.
- The max operation time per time shall not exceed 3 minutes and minimum 10 minutes rest time must be maintained between two consecutive cycles. And the appliance must rest for at least 30 minutes every 10 cycles.
- After finish blending, move the jar out of the jar support pad, and then carefully take down the measuring cup and jar lid, then pour and serve. The speed dial and power switch must be at "OFF" positions and the power outlet must be unplugged before removing the jar.
Crushing Ice
- Lay the appliance on the flat horizontal surface and make sure it is unplugged.
- Prepare some ice and cut them into cubes with a size of 15mm^×15mm^×15mm . And then remove the measuring cup and jar lid, after it, put the ice cubes into the jar. Usually certain amount of purified water has to be added to facilitate the smooth running of appliance. The proportion of the ice and water is 2:3. The amount of mixture should not exceed the max level as indicated on the jar. And then close the jar lid and measuring cup well in position. Connect the appliance with power source, and then push the power switch to "ON" position.
- Turn the speed dial to the "HI" speed setting or push the function switch to "Pulse" setting and the appliance starts to crush ice.
- After crushing ice for 3 minutes, turn the speed dial to "OFF" position, and the appliance stops working.
- You may add ingredients into the jar through the center opening of jar cover during operation, firstly, turn off the appliance to make it stop working, and then remove the measuring cup and add the ingredients into the jar through the center opening of jar, after it, replace the measuring cup in position. Finally, turn on the appliance again.
Important Hints on Crushing Ice
- During operation, if the mixture is too thick to be crushed, operate by referring to the description of "Tamper" mentioned above. You'd better not remove the jar from the motor unit during working process. If it is necessary to remove the jar, please firstly turn off the appliance to make it stop working and then remove it.
- The max operation time per time shall not exceed 3 minutes and minimum 10 minutes rest time must be maintained between two consecutive cycles. And the appliance must rest for at least 30 minutes every 10 cycles. After finish working, move the jar out of the jar support pad, and then carefully take down the measuring cup and jar lid, then pour and serve. The speed dial and power switch must be at "OFF" positions and the power outlet must be unplugged before removing the jar.
Grinding
- Lay the appliance on the flat horizontal surface and make sure it is unplugged.
- Prepare 200g roasted coffee beans, and then remove the measuring cup and jar lid and put the roasted coffee beans into the jar, after it, close the jar lid and measuring cup well in position. The maximum capacity of food to be grinded must not exceed 200g.
- Connect the appliance with power source, and then push the power switch to "ON" position.
- Push the function switch to "Pulse" setting and the appliance starts to grind coffee beans.
- After grinding for about 30 seconds, turn the speed dial to "OFF" position, and the appliance stops working.
Important Hints on Grinding
- During operation, if the coffee powder is too thick to be grinded, operate by referring to the description of "Tamper" mentioned above. You'd better not remove the jar from the motor unit during working process. If it is necessary to remove the jar, please firstly turn off the appliance to make it stop working and then remove it.
- The max operation time per time shall not exceed 1 minute and minimum 10 minutes rest time must be maintained between two consecutive cycles. And the appliance must rest for at least 30 minutes every 10 cycles.
After finish working, move the jar out of the jar support pad, and then carefully take down the measuring cup and jar lid, then pour and serve. The speed dial and power switch must be at "OFF" positions and the power outlet must be unplugged before removing the jar.
Making Soup
- Lay the appliance on the flat horizontal surface and make sure it is unplugged.
- Remove the measuring cup and jar lid, and then put the required ingredients into the jar and fill the jar with appropriate amount of room-temperature purified water. The amount of mixture should not exceed 1000ml. And then close the jar lid and measuring cup well in position.
- Connect the appliance with power source, and then push the power switch to "ON" position.
- Push the function switch to "Soup" setting and the appliance starts to make soup.
- The machine runs slowly at the first 15 seconds and will accelerate when detecting food.
- After cooking for about 6 minutes, turn the speed dial to "OFF" position, and the appliance stops working.
Important Hints on Making Soup
- During operation, if the soup is too thick and hard to be processed, operate by referring to the description of "Tamper" mentioned above.
- You'd better not remove the jar from the motor unit during working process. If it is necessary to remove the jar, please firstly turn off the appliance to make it stop working and then remove it.
- The max operation time per time shall not exceed 6 minutes and minimum 5 minutes rest time must be maintained between two consecutive cycles. And the appliance must rest for at least 30 minutes every 10 cycles.
- After finish working, move the jar out of the jar support pad, and then carefully take down the measuring cup and jar lid, then pour and serve. CAUTION: The speed dial and power switch must be at "OFF" positions and the power outlet must be unplugged before removing the jar.
Cleaning and Care
The Auto-Clean feature can help to clean the blender and blade assembly easily and rapidly in complete safety.
After use, reassemble the jar and pour about 400-500ml warm water into it and turn the speed dial to "HI" speed or push the function switch to "Pulse" position to work for a few seconds to remove the residual food.
After stop, remove the jar from the motor unit and rinse the jar under running water.
- Wiping the outer surface of motor unit with a damp cloth, do not use abrasive cleansers. Never immerse in water or other solution for cleaning.
- All parts except the motor unit are dishwasher-safe. You can also wash the parts, except the motor unit, in warm, soapy water.
- Dry all parts and then reassemble them again. But store the appliance with the jar lid not be closed completely to allow air to circulate and prevent jar odors.
- If any problem has been encountered during use, never disassemble the Motor Unit by yourself, there are no user serviceable parts inside. Contact only the authorized service facility for examination and repair.
- The blade is very sharp, handle carefully when clean.
- Do not use abrasive cleaners. Never immerse the Motor Unit in water for cleaning
Hints on Disposal

According to the European waste regulation 2002/96/EG this symbol on the product or on its packaging indicates that this product may not be treated as household waste. Instead it should be taken to the appropriate collection point for the recycling of electrical and electronic equipment. By ensuring this product is disposed of correctly, you will help prevent potential negative consequences for the environment and human health, which could otherwise be caused by inappropriate waste handling of this product. For more detailed information about recycling of this product, please contact your local council or your household waste disposal service.
Declaration of Conformity
Producer: Chal-Tec GmbH, Wallstraße 16, 10179 Berlin, Germany.

This product is conform to the following European Directives:
2004/108/EC (EMC)
2011/65/EU (RoHS)
2006/95/EC (LVD)
Estimado cliente:
Chere cliente, cher client,

- Contents
- Technical Data
- Safety Instructions
- Product Description
- Use and Operation
- Before first Use
- Blending
- Important Hints on Blending
- Crushing Ice
- Important Hints on Crushing Ice
- Grinding
- Important Hints on Grinding
- Making Soup
- Important Hints on Making Soup
- Cleaning and Care
- Hints on Disposal
- Declaration of Conformity
- Estimado cliente:
Brand : Klarstein
Model : 10030015
Category : Blender