FR 20403 IN - Oven ROSIERES - Free user manual and instructions
Find the device manual for free FR 20403 IN ROSIERES in PDF.
| Technical Features | Built-in oven ROSIERES FR 20403 IN, 65-liter capacity, energy class A. |
|---|---|
| Cooking Modes | Convection heat, grill, traditional cooking. |
| Dimensions | Dimensions (W x D x H): 59.5 x 56.7 x 59.5 cm. |
| Weight | Net weight: 30 kg. |
| Usage | Control panel with buttons and digital display for intuitive use. |
| Maintenance | Easy cleaning with an enamelled interior coating. |
| Safety | Door locking system and overheating protection. |
| Included Accessories | Grill rack and baking tray. |
| Warranty | 2-year warranty. |
Frequently Asked Questions - FR 20403 IN ROSIERES
User questions about FR 20403 IN ROSIERES
0 question about this device. Answer the ones you know or ask your own.
Ask a new question about this device
Download the instructions for your Oven in PDF format for free! Find your manual FR 20403 IN - ROSIERES and take your electronic device back in hand. On this page are published all the documents necessary for the use of your device. FR 20403 IN by ROSIERES.
USER MANUAL FR 20403 IN ROSIERES
EN OVENS USER INSTRUCTIONS
ES HORNOS EMPOTRABLES INSTRUCCIONES DE USO
Thank you for choosing one of our products. To get the most out of your oven we recommend that you:
Read the notes in this manual carefully: they contain important instructions on how to install, use and service this oven safely.
Keep this booklet in a safe place for easy, future reference.
When the oven is first switched on it may give out acrid smelling fumes. This is because the bonding agent for insulating panels around the oven has been heated up for the first time. This is a completely normal, if it does occur you merely have to wait for the fumes to clear before putting the food into the oven.
An oven by its very nature becomes very hot. Especially the glass of the oven door.
Do not allow children to go near the oven when it is hot, especially when the grill is on.
A specially designed protector shield which reduces considerably the surface temperature of the oven door can be obtained (some models only) through our service organization. This shield is recommended for households with young children.
Declaration of compliance. The parts of this appliance that may come into contact with foodstuffs comply with the provisions of EEC Directive 89/109.
CE This appliances complies with Directives 89/336/EEC, 73/23/EEC and following changes.
When you have unpacked the oven, make sure that it has not been damaged in any way. If you have any doubts at all, do not use it: contact a professionally qualified person. Keep packing materials such as plastic bags, polystyrene, or nails out of the reach of children because they are dangerous for children.
IMPORTANT
The oven must be used only for the purpose for which it was designed: it must only be used for cooking food.
Any other use, e.g. as a form of heating, is an improper use of the oven and is therefore dangerous. The manufacturers cannot be held responsible for any damage caused by improper, incorrect or unreasonable use.
When using any electrical appliance you must follow a few basic rules.
- Do not pull on the power cable to remove the plug from the socket.
- Do not touch the oven with wet or damp hands or feet.
- Do not use the oven unless you are wearing something on your feet.
- Do not allow children on irresponsible people to use the oven unless they are carefully supervised.
- It is not generally a good idea to use adapters, multiple sockets for several plugs and cable extensions.
- If the oven breaks down or develops a fault switch it off at the mains and do not touch it. If the cable is at all damaged it must be replaced promptly. When replacing the cable, follow these instructions.
Remove the power cable and replace it with one of equal length that has been insulated in rubber of the HO5RR-F type. The cable must be able to bear the electrical current required by the oven. Cable replacement must be carried out by properly qualified technicians.
The earthing cable (yellow-green) must be 10 mm longer than the power cable.
Use only an approved service centre for repairs and ensure that only original parts are used. If the above instructions are not adhered to the manufacturers cannot guarantee the safety of the oven.
Installation
Installation is the customer's responsibility. The manufacturers have no obligation to carry this out. If the assistance of the manufacturer is required to rectify faults arising from incorrect installation, this assistance is not covered by the guarantee.
The installation instructions for professionally qualified personnel must be followed. Incorrect installation may cause harm or injury to people, animals or things. The manufacturer cannot be held responsible for such harm or injury.
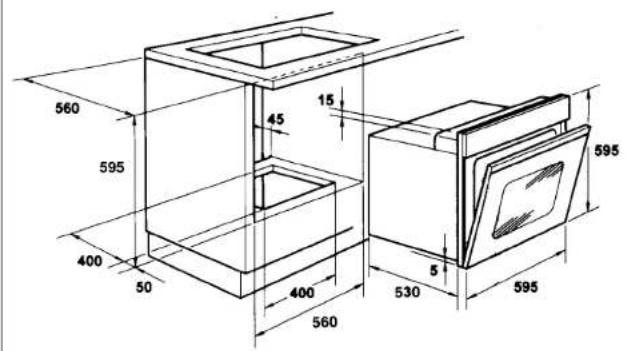
FITTING THE OVEN INTO THE KITCHEN UNIT
Fit the oven into the space provided in the kitchen unit: it may be fitted underneath a work top or into an upright cupboard.
Fix the oven in position by screwing into place, using the four fixing holes in the frame.
To locate the fixing holes, open the oven door and look inside.
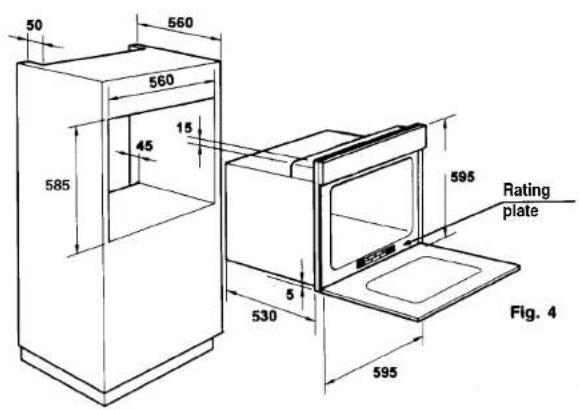
To allow adequate ventilation, the measurements and distances indicated in the diagram on page 11 must be adhered to when fitting the oven.
Note: For ovens that are combined with a hob unit the instructions contained in the manual for the hob unit must be followed.
IMPORTANT
If the oven is to work properly, the kitchen housing must be suitable.
The panels of the kitchen unit that are next to the oven must be made of a heat resistant material. Ensure that the glues of units made of veneered wood can withstand temperatures of at least 120^ . Plastics or glues that cannot withstand such temperatures will melt and deform the unit. Once the oven has been lodged inside the unit, the electrical parts must be completely insulated. This is a legal safety requirement. All guards must be firmly fixed into place so that it impossible to remove them without using special tools.
Remove the back of the kitchen unit to ensure an adequate current of air circulates around the oven. The hob must have a rear light of at least 45 mm.
Connecting to the power supply
Plug into the power supply. Ensure first that there is a third contact that acts as earthing for the oven. The oven must be properly earthed.
If the model of oven is not fitted with a plug, fit a standard plug to the power cable. It must be able to bear the power supply indicated on the specifications plate. The earthing cable is yellow-green. The plug must be fitted by a properly qualified person. If the socket and the plug are incompatible the socket must be changed by a properly qualified person. A properly qualified person must also ensure that the power cables can carry the current required to operate the oven.
An ON/OFF switch with a minimum distance of 3mm between contacts may also be connected to the power supply. The connections must take account of the current supplied and must comply with current legal requirements. The yellow-green earthing cable must not be governed by the ON/OFF switch. The socket or the ON/OFF switch used for connecting to the power supply must be easily accessible when the oven has been installed.
Important: During installation, position the power cable in such a way that it will not subjected to temperatures of above 50°C at any point.
The oven complies with safety standards set by the regulatory bodies. The oven is safe to use only if it has been adequately earthed in compliance with current legal requirements on wiring safety. You must ensure that the oven has been adequately earthed.
The cabling and wiring system must be able to bear the maximum electric power required by the oven. This is indicated on the specifications plate.
If you are in any doubt at all, use the services of a professionally qualified person.
The manufacturers cannot be held responsible for any harm or injury to persons, animals or things caused by failure to properly earth the oven.
WARNING: the voltage and the supply frequency are showed on the rating plate (fig. 4 - pag. 11).

MULTI-FUNCTION OVEN WITH MINUTE TIMER OR TIMER FOR COMPLETE COOKING PERIOD
Minute timer or timer for complete cooking period |
For information on the minute timer or the timer for a complete cooking period see the relevant section a pag. 6.
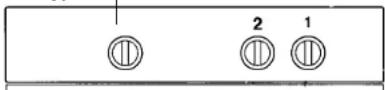
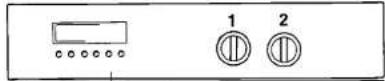
| The oven is fitted with:• a bottom resistance;• a top resistances for infra-redheat up or grilling | 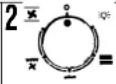 function dial function dial | 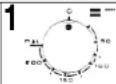 thermostat dial thermostat dial |
| Turn the control dial to ☑ The light will remain on during allthe successive phases. | ||
| Natural convectionBottom and top oven resistance are used. This is the traditionalform of baking and roasting. It is ideal for roasting joints of meatand game, baking biscuits and apples and making the food niceand crunchy. You will get the best results if you put the food on thesame shelf and set the temperature between 50^ C and 240^ C. | 50 ÷ MAX | |
| GrillingThis use the infra-red grill resistance. MAX | ||
| Grill fanThe air is heated by the grill resistance and the fan blows theair onto the food at the required temperature. This ranges from 50^ C to 200^ C. the grill/fan is an excellent alternative to roasting on the spit. It is ideal for roasting even large quantities ofpoultry, sausages and red meats. | 50 ÷ 200 | |
| Fan ovenAir that has been heated to a temperature between 50 and 240is blown by the fan onto the different levels. It is ideal for cookingdifferent types of food at the same time (e.g. meat and fish)without mixing tastes and smells. It cooks very gently and is idealfor sponge cakes, pastries, etc. | 50 ÷ MAX | |
| DefrostingWhen the dial is set at this position. The fan circulates room temperature air around the frozen food so that it defrost in a fewminutes without the protein content of the food being changedor altered. | 0 ÷ 50 |


MULTI-FUNCTION OVEN
WITH ELECTRONIC PROGRAMMER
| The oven is fitted with• a bottom element;• a top element for infra-red heat up or grilling.• a circular element which surrounds the fan. |  |  function dialthermost dial function dialthermost dial |
| Tum the control dial to ☑ The light will remain on during allthe successive phases. | (swest) | |
| Natural convectionBottom and top oven resistance are used. This is the traditionalform of baking and roasting. It is ideal for roasting joints of meatand game, baking biscuits and apples and making the food niceand crunchy. You will get the best results if you put the food on thesame shelf and set the temperature between 50°C and 240°C. | 50÷MAX |  |
| Fan ovenAir that has been heated to a temperature between 50 and 240is blown by the fan onto the different levels. It is ideal for cookingdifferent types of food at the same time (e.g. meat and fish)without mixing tastes and smells. It cooks very gently and is idealfor sponge cakes, pastries, etc. | MAX | (broad) |
| Grill fanThe air is heated by the grill resistance and the fan blows theair onto the food at the required temperature. This ranges from50°C to 200°C. the grill/fan is an excellent alternative to roasting on the spit. It is ideal for roasting eve large quantities ofpoultry, sausages and red meats. | 50÷200 | (broad)- |
| Top and bottom elements + fanThe top and bottom elements and the fan are used. This combination isideal for roasting meat and baking fish and cakes. It is especiallysuitable for cooking dishes on different levels at the same time at atemporature between 50 and 240°C. | 50÷MAX | (broad) |
| DefrostingWhen the dial is set at this position. The fan circulates room temperature air around the frozen food so that it defrost in a fewminutes without the protein content of the food being changedor altered. | 0÷50 | (broad) |
MULTIFUNCTION OVEN WITH
ELECTRONIC PROGRAMMER
For information on the electronic programmer see the relevant section on pages 7-8.
Electronic programmer
| The oven is fitted with:• a bottom element;• a top element for infra-red heat up or grilling. |  |  function dialthermcc function dialthermcc |
| Turn the function knob to the on position the light will be on for all the following operations. The cooling fan is also switched on. | ### | |
| DefrostingWhen the dial is set to this position. The fan circulates air at room temperature around the frowen food so that it defrosts in a few minutes without the protein content of the food being changed or altered. | ### | |
| Fan ovenAir that has been heated to a temperature between 50 and 240 is blown by the fan onto the different levels. It is ideal for cooking different types of food at the same time (e.g. meat and fish) without mixing tastes and smells. It cooks very gently and is ideal for sponge cakes, pastries, etc. | 50 ÷ MAX |  |
| Door closed fan grillThe air is heated by the grill element and the fan blows the air onto the food at the required temperature. This ranges from 50°C to 200°C. The grill/fan is an excellent alternative to roasting on the spit. It is ideal for roasting even large quantities of poultry, sausages and red meats. | 50 ÷ 200 |  |
| Fan plus lower elementThis function is ideal for delicate dishes (pies-souffle). | 50 ÷ MAX | ### |
| Natural convectionBottom and top oven elements are used. This is the traditional form of baking and roasting. It is ideal for roasting joints of meat and game, baking biscuits and apples and making the food nice and crunchy. You will get the best results if you put the food on the same shelf and set the temperature between 50°C and 240°C. | 50 ÷ MAX |  |
| Door closed GrillingThe setting of this function switches on the infrared grill element. This function is ideal for cooking meats of medium thickness (sausages and bacon). | 50 ÷ MAX | ### |
| Function pizzaThis function with hot air circulated in the oven ensure perfect result for dishes such as pizza or focaccia. | 50 ÷ MAX | PIZZA |
USING THE MINUTE TIMER
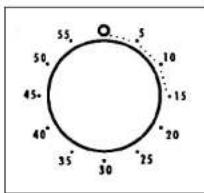
To set the cooking time, turn dial one complete revolution and then position the index to the required time. When the time has lapsed, the signal will ring for a few seconds.
USING THE COMPLETE COOKING PERIOD TIMER

This mechanism makes it possible to programme the whole cooking period so that the oven automatically switches off the end of set time (max. 2 hours). Switch on the oven and set to the required temperature. Turn the dial clockwise and position the index at the required time, expressed in minutes. When the set cooking time has elapsed the dial will have returned to the O position and the signal will ring automatically.
When the oven is to be used normally, without programming the automatic switching off, the switch knob has to be position ☐.

6
To operate the Electronic Clock/Programmer
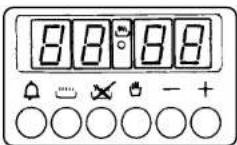
1. ELECTRONIC PROGRAMMER
Preliminary Operations to Perform After Plugging-in the Oven.
After initially plugging-in the unit, and after each interruption in power, the lighted display on the control panel will respond by flashing «AUTO» 0:00
Press the ☐ and ✗ buttons along with the + or - buttons to set the exact time. When the ☑ symbol appears on the display, the oven is ready to be used manually.
Available Functions
— Manual operation
— Timed operation
— Semi-automatic operation (programmed end to the cooking time)
— Automatic operation (programmed beginning and end of cooking time)
Manual Operation (of the oven):
This has already been described in the section of PRELIMINARY OPERATIONS. Just press the 📋 button to make the corresponding symbol appear in the center and remove the AUTO indicator.
Using the Electronic Programmer
As described in the PRELIMINARY OPERATIONS section, the electronic programmer allows the oven to be operated manually or by:
— The timer;
— Programming the end of the cooking time (semi-automatic operation):
— Programming the beginning and end of the cooking time (automatic operation).
Using the Timer
While pressing the ☐ button, use the + and - buttons to select the desired time (23:59 maximum). Setting the desired time will light the ☐ symbol. (Note: This function can be used either as a manual function or automatic along with another program).
At the end of the set time the programmer sounds an intermittent signal, to cancel the signal press 📄. While cooking, to display the time remaining press 📄.
Adjusting the Tone of the Timer Signal
Three different tones are available on the acoustic timer signal. To choose the bone desired, press the — button while the signal is sounding.
7

Semi-Automatic Programming (end of cooking time)
Select oven temperature and cooking function.
To program only the shut-off (and not the turn-on) time of the oven proceed as follows.
Press the button along with either the +or -button, and, while holding the buttons,
set the display to the desired cooking time. Release the buttons. The display responds by lighting the symbol and «AUTO», indicator.
The symbol on the display means the oven has begun to cook.
At the end of the cooking time, the oven shuts-off automatically, the programmer sounds a tons, the symbol vanishes from the display, and the «AUTO» indicator begins to blink.
Remember that when the «AUTO» indicator is blinking, the 📋 button must be pressed to return the oven to manual operation.
To display the cooking time remaining while cooking, press the 📄 button. Pressing the ✗ button shows the time when cooking will end
Automatic Programming (beginning and end of cooking time)
Select oven temperature and cooking function.
To program not only the oven shut-off time, but also the cooking time (and hence the turn-on time) the following steps must be performed:
1) Press and hold the ☐ button and use the + and - buttons to set the display to the desired cooking time.
Upon releasing the buttons, the display will again show the current time, the «AUTO» indicator, and the 🔒 symbol.
2) Press and hold the ✗ button and use the + and - buttons to set the display to the time cooking is to finish.
When the buttons are released, the display will again show:
— The current time;
— The «AUTO» indicator.
Once the above steps are completed, the oven will automatically turn on and off at the desired times.
The oven turn-on time will automatically be determined by the oven, based on the cooking times. When the oven begins operation, the programmer will display with ☐ symbol and the «AUTO» indicator. When the oven shuts-off, the tone sounds and the ☐ symbol disappears. The «AUTO» indicator begins to blink.
Remember that when the «AUTO» indicator is blinking, the 📋 button must be pressed to return the oven to manual operation.
The tone signaling the end of the cooking time can be canceled by pressing the 📋 button. To display the cooking time remaining while cooking, press the 📋 button. Pressing the ✗ button shows the time when cooking will end.
Warning: The symbols on the buttons may vary from model to model, but their functions remain the same.

8
USEFUL TIPS
Grilling
Grilling makes it possible to give food a rich brown colour quickly.
For browning we recommend that you insert the grill onto the fourth level, depending in the proportions of the food.
Almost all food can be cooked under the grill except for very lean game and meat rolls.
Meat and fish that are going to be grilled should first be lightly doused with oil.
Cleaning and maintenance
Clean the stainless steel and enamelled surfaces with warm, soapy water or with suitable brand products. On no account use abrasive powders that may damage surfaces and ruin the oven's appearance.
It is very important to clean the oven each time that it is used. Melted fat is deposited on the sides of the oven during cooking. The next time the oven is used this fat could cause unpleasant odours and might even jeopardise the success of the cooking. Use hot water and detergent to clean; rinse out thoroughly. To make this chore unnecessary all models can be lined with catalytic self-cleaning panels: these are supplied as an optional extra (see the section SELF-CLEANING OVEN WITH CATALYTIC LINING).
Use detergents and abrasive metal pads like «brillo pads» for the stainless steel grills.
The glass surfaces as the top, oven door and warming compartment door must be cleaned when they are cold. Damage that occurs to them because this rule was not adhered to are not covered by the guarantee.
To replace the interior light: switch off the mains power supply and unscrew bulb. Replace with an identical bulb that can withstand very high temperatures.
9

Self-cleaning oven with catalytic
Special self-cleaning panels covered in a micro-porous coating are available as optional extras for all models. If they are fitted, the oven no longer needs to be cleaned by hand.
The fat that is splattered onto the sides of the oven during roasting is eliminated by the microporous coating which breaks the fat down by catalysis and transforms it into gas.
Excessive splattering may nevertheless block the pores and therefore hinder self-cleaning. The self-cleaning capacity may be restored by switching on the empty oven to maximum for about 10-20 minutes.
Do not use abrasive products, metal cleaning wads, sharp objects, rough cloths, or chemical products and detergents that may permanently damage the catalytic lining.
It is a good idea to use deep roasting trays to roast fatty foods such as joints of meat etc. and to put a tray underneath the grill to catch surplus fat.
These simple precautions will ensure the correct temperature and ideal conditions for catalytic cleaning to take place.
If the walls of the oven are so thickly coated in grease that the catalytic lining is no longer effective remove surplus grease with a soft cloth or sponge soaked in hot water.
The lining must be porous for self-cleaning to be effective.
N.B.: All catalytic linings currently on the market have a working life of about 300 hours. They should therefore be replaced after about 300 hours.
Service centre
Before calling the Service Centre
If the oven is not working, we recommend that:
— you check that the oven is properly plugged into the power supply.
If the cause of the fault cannot be detected:
disconnect the oven from the mains, do not touch the oven and call the after sales service.
Before calling the Service Centre remember to make a note of the serial number on the serial number specifications plate (see fig. 4, pag. 11).
The oven is supplied with a guarantee certificate that ensures that it will be repaired free of charge at the Service Centre, except for the call out charge, for a year from the date of purchase.
Remember to send off part A of the guarantee certificate for confirmation within 10 days of purchase. Fill in part B and keep it in a safe place. It must be shown to the service agent together with the receipt issued by the retailer at the time of purchase.

10
INSTALLATION
The manufacturer will not be responsible for any inaccuracy resulting from printing or transcript errors contained in this brochure. We reserve the right to carry out modifications to products as required, including the interests of consumption, without prejudice to the characteristics relating to safety or function.