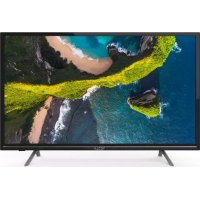
32S367BHS - TV TESLA - Free user manual and instructions
Find the device manual for free 32S367BHS TESLA in PDF.



| Product Type | LED TV 32 inches (81 cm) |
| Brand | Tesla |
| Model | 32S367BHS |
| Screen Resolution | 1366 x 768 pixels (HD) |
| Dimensions with stand (W x H x D) | 733.4 x 474 x 167.7 mm |
| Dimensions without stand (W x H x D) | 733.4 x 438.5 x 85.1 mm |
| Weight with stand | 4.0 kg |
| Weight without stand | 3.9 kg |
| Power Supply | 100-240 V~ 50/60 Hz |
| Power Consumption | 60 W |
| Audio Power (L+R) | 2 x 6 W |
| Connectivity | 2x HDMI, 1x USB, AV IN, digital audio output (S/PDIF), headphone jack, LAN port |
| Tuner | DVB-T/T2/C/S/S2 (digital terrestrial, cable, satellite) |
| Main Features | USB Recording (REC), Timeshift, Electronic Program Guide (EPG), Miracast, USB media player, Web browser, YouTube |
| VESA Standard | 100 x 100 mm |
| Maintenance and Cleaning | Clean with a soft, dry cloth. Unplug before cleaning. |
| Spare Parts and Repairability | Remote control batteries (2x AAA). Optional wall mount. Repair by qualified technician only. |
| Safety | Double insulation (Class II). Do not expose to water. Wall mounting recommended. Risk of button battery ingestion. |
| General Information | Manual available in multiple languages. Possibility to download the PDF manual from notice-facile.com. |
Frequently Asked Questions - 32S367BHS TESLA
User questions about 32S367BHS TESLA
0 question about this device. Answer the ones you know or ask your own.
Ask a new question about this device
Download the instructions for your TV in PDF format for free! Find your manual 32S367BHS - TESLA and take your electronic device back in hand. On this page are published all the documents necessary for the use of your device. 32S367BHS by TESLA.
USER MANUAL 32S367BHS TESLA
Please read these instructions before operating your set and retain them for future reference.
UDHËZIM PËR PËR
WARNINGS AND PRECAUTIONS....4
POSITIONING THE TV SET ....7
PANEL BUTTONS 10
TERMINALS.... 11
REMOTE CONTROL FUNCTIONS 12
PERSONAL VIDEO RECORDING (REC) 14
ELECTRONIC PROGRAMME GUIDE (EPG) 15
INITIAL SETUP & HOME FEATURES 16
MENU CONTROL 18
Menu Operation.... 18
Picture 18
Sound 18
Installation 19
Setup 21
Time....22
Advanced....23
Network 23
USB CONTROL 23
USB Menu....23
Reminder When Using the USB Player 23
Movie Menu....24
Music Menu 25
Photo Menu 25
TROUBLESHOOTING....26
SPECIFICATIONS....28
Note
- The graphics in this manual are only for reference.
- Your TV's OSD may be slightly different with that shown in this manual.
- The information in this document is subject to change without notice.
The manufacturer accepts no liability for damage resulting directly or indirectly from faults, incompleteness or discrepancies between the user manual and the product described. - In dry environment due to static electricity, the product may be restart and return to the main OSD interface, USB player interface or the previous source mode, please continue to operate the TV as your will.
WARNINGS AND PRECAUTIONS
Note: Read all of the instructions before operating the set. Keep these instructions well for later use.
- Read these instructions -All the safety and operating instructions should be read before this product is operated.
- Keep these instructions - The safety and operating instructions should be retained for future reference.
- Heed all warnings - All warnings on the appliance and in the operating instructions should be adhered to.
- Follow all instructions- All operating and use instructions should be followed.
- Do not use this apparatus near water - The appliance should not be used near water or moisture - for example, in a wet basement or near a swimming pool, and the like.
- Clean only with dry cloth.
- Do not block any ventilation openings. Install in accordance with the manufacturer's instructions.
- Do not install near any heat sources such as radiators, heat registers, stoves, or other apparatus (Including amplifiers) that produce heat.
- Do not defeat the safety purpose of the polarized or grounding plug. A polarized plug has two blades with one wider than the other. A grounding plug has two blades and a third grounding prong. The wide blade or the third prong is provided for your safety. If the provided plug does not fit into your outlet, consult an electrician for replacement of the obsolete outlet.
- Protect the power cord from being walked on or pinched particularly at the plugs, convenience receptacles, and at the point where they exit from the apparatus.
- Only use attachments/accessories specified by the manufacturer.
- Use only with the cart, stand, tripod, bracket, or table specified by the manufacturer, or sold with the apparatus. When a cart or rack is used, use caution when moving the cart/apparatus combination to avoid injury from tip-over.

- Unplug the apparatus during lightning storms or when unused for long periods of time.
- Refer all servicing to qualified personnel. Servicing is required when the apparatus has been damaged in any way, such as power supply cord or plug is damaged, liquid has been spilled or objects have fallen into the apparatus, the apparatus has been exposed to rain or moisture, does not operate normally, or has been dropped.
- CAUTION: These servicing instructions are for use by qualified service personnel only. To reduce the risk of electric shock, do not perform any servicing other than that contained in the operating instructions unless you are qualified to do so.
- Do not install this equipment in a confined or building-in space such as a book case or similar unit, and remain a well ventilation conditions at open site. The ventilation should not be impeded by covering the ventilation openings with items such as newspaper, tablecloths, curtains etc.
- Caution - To prevent electric shock hazard, replace grille.
- Please refer the information on rear enclosure for electrical and safety information before installing or operating the apparatus.
- To reduce the risk of fire or electric shock, do not expose this apparatus to rain or moisture. The apparatus shall not be exposed to dripping or splashing and that no objects filled with liquids, such as vases, shall be placed on the apparatus.
- For the terminals marked with symbol of "⚡" may be of sufficient magnitude to constitute a
risk of electric shock. The external wiring connected to the terminals requires Installation by an instructed person or the used of ready-made leads or cords.
- To prevent injury, this apparatus must be securely attached to the floor/wall in accordance with the installation instructions.
- Danger of explosion if battery is incorrectly replaced. Replace only with the same or equivalent type.
- The battery (battery or batteries or battery pack) shall not be exposed to excessive heat such as sunshine, fire or the like.
- Excessive sound pressure from earphones and headphones can cause hearing loss. Listening to music at high volume levels and for extended durations can damage one's hearing. In order to reduce the risk of damage to hearing, one should lower the volume to a safe, comfortable level, and reduce the amount of time listening at high levels.
- The mains plug/appliance coupler/direct plug-in adapter is used as disconnect device, the disconnect device shall remain readily operable.
- When not in use and during movement, please take care of the power cordset, e.g. tie up the power cordset with cable tie or something like that. It shall be free from sharp edges and the like that can cause abrasion of the power cordset. When put into use again, please make sure the power cord set being not damaged, If any damages found, please look for the service person to replace the power cord set specified by the manufacturer or have the same characteristics as the original one.
- Attention should be drawn to environmental aspects of battery disposal.
- No naked flame sources, such as lighted candles, should be placed on the apparatus. To prevent the spread of fire, keep candles or other open flames away from the apparatus at all times.
- If the apparatus don't have the symbol ☐ in its rating label and its power cord has three pins, it means protective earthing connection is needed. The apparatus should be connected to a mains socket outlet with a protective earthing connection.
- The following information are recommended to be included as far as applicable where applicable:
| ~ | Refers to alternating current (AC) |
| --- | Refers to direct current (DC) |
| Refers to ClassII equipment | |
| Refers to stand-by | |
| | | Refers to pow er ON. |
| Refers to dangerous voltage |
- Warning for Apparatus containing COIN/BUTTON CELL BATTERIES (Below instruction only used for the apparatus containing a user-replaceable coin/button cell battery)
WARNING
Do not ingest the battery, Chemical Bum Hazard (The remote control supplied with) This product contains a coin/button cell battery. If the coin/button cell battery is swallowed, it can cause severe Internal burns in just 2 hours and can lead to death. Keep new and used batteries away from children. If the battery compartment does not close securely, stop using the product and keep it away from children. If you think batteries might have been swallowed or placed inside any part of the body, seek immediate medical attention.
WEEE Directive

Correct Disposal of this product. This marking indicates that this product should not be disposed with other household wastes throughout the EU. To prevent possible harm to the environment or human health from uncontrolled waste disposal, recycle it responsibly to promote the sustainable reuse of material resources. To return your used device, please use the return and collection systems or contact the retailer where the product was purchased. They can take this product for environmental safe recycling.

CAUTION
RISK OF ELECTRIC SHOCK DO NOT OPEN

This lightning flash with arrowhead symbol within an equilateral triangle is intended to alert the user to the presence of non-insulated "dangerous voltage" within the product's enclosure that may be of sufficient magnitude to constitute a risk of electric shock. To reduce the risk of electric shock. Do not remove cover (or back). No user serviceable parts inside. Refer to qualified service personnel. The exclamation point within an equilateral triangle is intended to alert the user to the presence of important operating and maintenance instructions in the literature accompanying the appliance.
POSITIONING THE TV SET
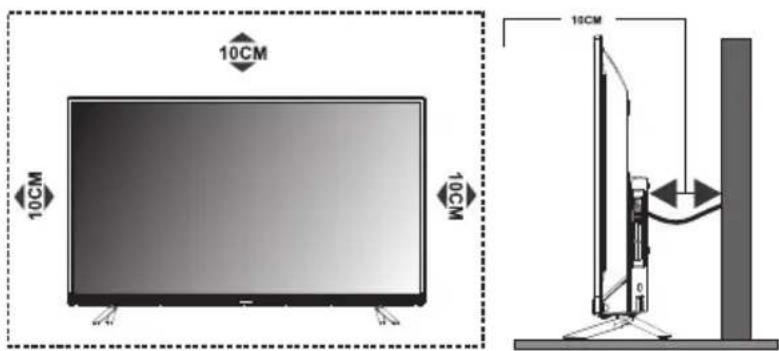
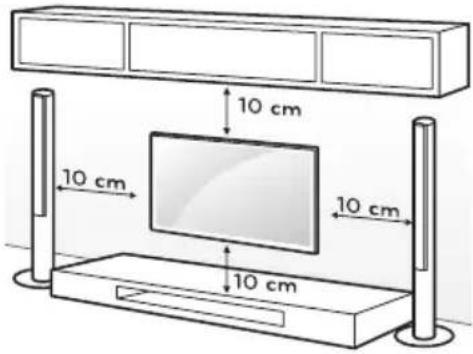
- Install Display on solid horizontal surface such as a table or desk. For ventilation, leave a space of at least 10 cm free all around the set. To prevent any fault and unsafe situations, please do not place any objects on top of the set. This apparatus can be used in tropical and/or moderate climates.
- Fixing the rear of enclosure to wall. Below picture is different from actual item, thus it's only for reference. (only for some regions)
Never place a television set in an unstable location. A television set may fall, causing serious personal injury or death. Many injuries, particularly to children, can be avoided by taking simple precautions such as:
• Using cabinets or stands recommended by the manufacture of the television.
- Only using furniture that can safely support the television.
- Ensuring the television is not overhanging the edge of the supporting furniture.
- Not placing the television on tall furniture (for example, cupboards or bookcases) without anchoring both the furniture and the television set to a suitable support.
- Not placing the television set on cloth or other materials that may be located between the television set and supporting furniture.
• Educating children about the dangers of climbing on furniture to reach the television or its controls.
If your existing television set is being retained and relocated, the same considerations as above should be applied (Only for the TV with mass exceed 7 kg).
- An optional wall mount can be used with your television. Consult with your local dealer for a wall mount that supports the VESA standard used by your TV model.
Carefully attach the wall mount bracket at the rear of the TV. Install the wall mount bracket on a solid wall perpendicular to the floor. If you are attaching the TV to other building materials, please contact qualified personnel to install the wall mount.
Detailed instructions will be included with the wall mount. Please use a wall mount bracket where the device is adequately secured to the wall with enough space to allow connectivity to external devices.
CAUTION
- Disconnect the power before moving or installing the TV. Otherwise electric shock may occur.
- Remove the stand before installing the TV on a wall mount by performing the stand attachment in reverse.
- If you install the TV on a ceiling or slanted wall, it may fall and result in severe injury. Use an authorized wall mount and contact the local dealer or qualified personnel. Otherwise it is not covered by the warranty.
- Do not over tighten the screws as this may cause damage to the TV and void your warranty
- To prevent injury, this apparatus must be securely attached to the floor/wall in accordance with the installation instructions.
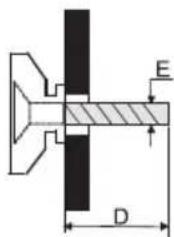
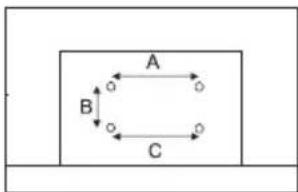
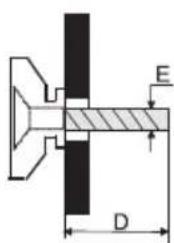
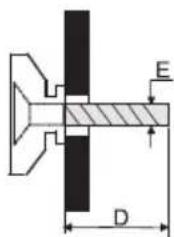
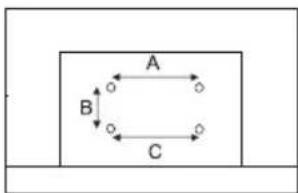
- Use the screws and wall mounts that meet the following specifications. Any damages or injuries by misuse or using an improper accessory are not covered by the warranty.
| Model Size: 32" Top Down | ||||
| Screw | Diameter (mm) "E" M4 M4 | |||
| Depth (mm)"D" | Max 9 9 | |||
| Min 6 6 | ||||
| Quantity 2 2 | ||||
| VESA (AxBxC) 100x100x100 | ||||
flowchart
graph TD
    A --> B
    B --> C
    C --> A
| Model Size: 40" Top Down | ||||
| Screw | Diameter (mm) "E" M6 M6 | |||
| Depth (mm)"D" | Max 20 | 15 | ||
| Min 12 | 7 | |||
| Quantity 2 2 | ||||
| VESA (AxBxC) 200x100x200 | ||||
Note:
1) The pictures are for reference only.
2) For the TV sets with terminals towards the wall, in order to leave enough space to use the terminals, a rubber cushion is needed together with the screw to fix the wall mount. It is a small hollow pillar whose internal diameter is 8mm, external diameter is 18mm and height is 30mm.
Operating Environment
- Do not install this device in confined spaces such as bookcases or similar units.
- Do not use the set in damp and cold areas. Protect the set from overheating.
- Keep away from direct sunlight.
- Do not use the set in dusty areas.
- Do not place candles to accessible, open areas to avoid flammable foreign material from entering the TV.
Precautions for Using Remote Control
- Use the remote control by pointing it towards the remote sensor. The items between the remote control and the remote sensor will interfere with the normal operation.
- Do not expose the remote control to violent vibrations. Also, do not splash liquid on the remote control and do not place the remote control in high humidity areas.
- Do not expose the remote control to direct sunlight which can cause deformation of the unit due to heat.
- When the remote sensor is exposed to direct sunlight or strong light, the remote control will not work. If this is the case, please change the light direction or the position of the TV, or use the remote control closer to the remote sensor.
Precautions for Using Battery
Inadequate use of batteries may cause leakage. Therefore, please follow the steps below and use them with care.
- Please note the batteries polarity to avoid short circuit.
- If the battery voltage is insufficient, which affects the remote control range, you should replace used batteries with the new ones. Remove batteries from the remote control unit if you do not intend to use it for a long time.
- Do not use different types of batteries (for example, manganese and alkaline batteries) together.
- Do not put the batteries into fire. Do not charge or disassemble batteries.
- Please dispose of batteries in accordance with the relevant environmental protection regulations.
- WARNING: The batteries (battery pack or batteries installed) shall not be exposed to excessive heat such as sunshine, fire or the like.
Remote Control Battery Replacement
Place two AAA batteries in the remote control battery compartment, making sure that the polarity markings inside the compartment are matched.
PANEL BUTTONS
Note: The images are intended for reference only.
Bottom view
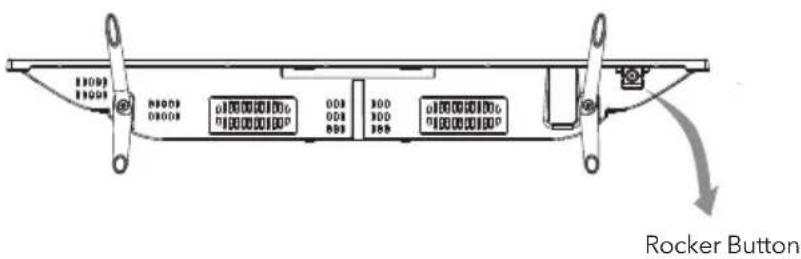
Press middle button:
- In standby mode, press it to turn on the TV;
- Without OSD, press it to access source menu; press and hold for 5 seconds to turn the TV to standby;
- With OSD, short press it to confirm a selection; long press it to return or exit a menu / submenu.
Push left: decrease volume or go to left.
Push right: increase volume or go to right.
Push forward: channel down or go to below.
Push backward: channel up or go to above.
TERMINALS
Note: The terminals may differ by model and regions, and please select the terminals based on your purchased TV set.
LAN: Network part
AV IN (AUDIO L/R & VIDEO): Connect video and audio signal from signal source such as DVD.
HDMI1/2: Connect HDMI input signal from signal source such as DVD.
DIGITAL AUDIO: Use a SPFIF cable to output your TV audio signal to a compatible audio receiver.
EARPHONE: Audio output, speakers will be muted when earphone is plugged in.
USB 1/2: USB port.
AIR/CABLE/LNB: Connect a coaxial cable ro receive signal from the antenna, cable or sattelite.
SERVICE: Debugging port only for professional technician.
Cl: Cl card port.
REMOTE CONTROL FUNCTIONS
Remote Control
-
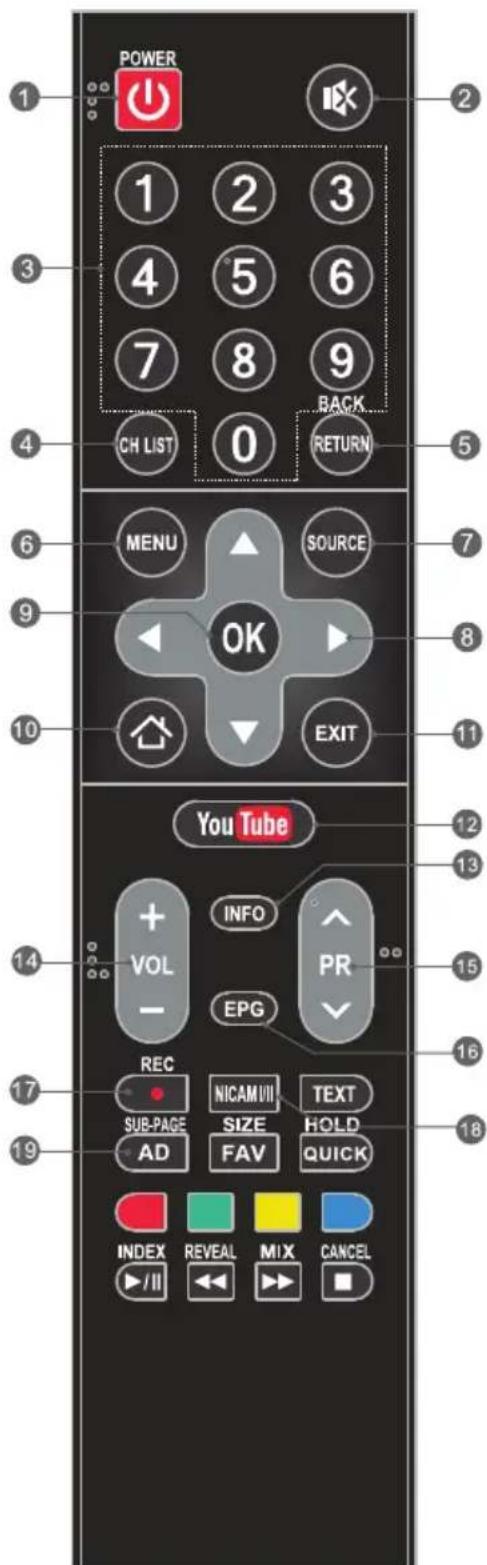
POWER (⏻) Press to turn the TV on or to put it in standby.
-
MUTE ( ) Press to mute or restore the volume.
-
Numeric buttons Choose channel directly.
-
CH LIST Press to enter the channel list.
-
RETURN (BACK) Press to go back to a previously viewed channel.
-
MENU Enter the menu options.
-
SOURCE Select the input source mode.
-
Up/Down/Left/Right (▲ /▼/◄ /►) Navigate through the menu.
-
OK Confirm the selection.
-
HOME Press this button will access the home page, you can use the smart features and media player etc.
-
EXIT Exit the current menu.
-
YouTube Access the YouTube.
-
INFO Display information about current source.
-
Volume Up/Down (VOL+/VOL-) Adjust the volume level.
-
Program Up/Down (PR+/PR-) Change programs up or down.
-
EPG Press to display the current EPG information in DTV mode.
-
Record (REC) Press to record the current programme (available in DTV mode only).
-
NICAM Press to select desired sound output depending on the broadcasting channel.
-
AD (Audio Description) Press to turn on audio description. Narrator will describe to blind or visually impaired viewers what is happening on the screen. Press again to turn this function off (available in DTV mode only).
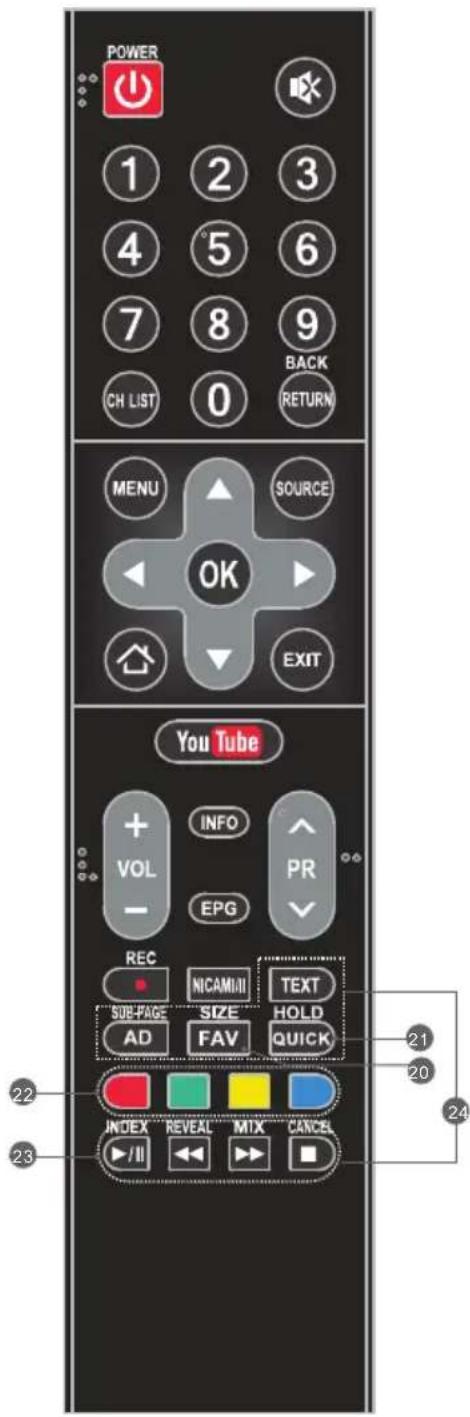
20. FAV. (Favorite Channel)
Press to view your assigned favourite channels. Press Up/Down buttons to move through your assigned favourite channels. Press OK to confirm.
-
QUICK Access the quick menu.
-
Color buttons Press to execute the fast-link function in TV or DTV mode.
23. USB Play Control Buttons Play & Pause (▶/II)
Press to pause playback, then press again to continue playback.
Stop (■)
Press to stop playback.
Fast Backward Button (◀)
Press to fast reverse.
Fast Forward (▶)
Press to fast forward.
24. TELETEXT BUTTONS
TEXT Press to enter or exit the teletext menu.
SIZE Enlarge the teletext display: Press this button once to enlarge upper half of the screen. Press this button again to enlarge lower half of the screen. Press this button again to return to normal screen size.
HOLD
Press to hold the teletext page on screen without update and changes. Press again to release the hold state.
SUB-PAGE
Press this button to enter or exit subpage mode (if subpage is available). Press Red / Green button to select the desired subpage.
INDEX Press this button to display index page.
REVEAL
Press this button to display concealed information, such as solutions to riddles or puzzles. Press gain to remove the information from the display.
MIX
Press this button to superimpose the teletext over the TV programme. Press again to return to normal teletext
CANCEL
Press this button to temporarily return to TV programme while searching for a Teletext page. When the search is done, the page number will be displayed on the upper left of the screen. Press again to return to the Teletext page.
Note: Some buttons may be invalid for some models. When you press such buttons, they will not respond or there will be a display "Not available" on the screen.
PERSONAL VIDEO RECORDING (REC)
In DTV mode and with a USB device properly plugged in, you can record the channel you are watching and view at a later, more convenient time. Use it to record a program when your viewing is interrupted or delayed.
IMPORTANT NOTE:
- The REC function may not be available for some regions.
- Please insert an external high-speed storage devices into the appropriate USB port at the back of the TV, and make sure the device has enough free space.
- Before the recording, suggest to format your USB device to ensure the operating speed. In Option menu, select "REC File System" to format the USB device.
- During the recording, do not change channels or operate another function.
- If the signal is interrupted or removed, the recording will stop until the signal is established. This may cause you to lose program content.
- Please do not turn the TV OFF during recording. This will make the TV exit the REC and turn to standby.
- The file recorded can only be used in this TV, any copy communication is strictly prohibited.
- Use high-quality mobile device to record HD programs, otherwise the videos will be jammed during the playback.
- Back up all of the data in the USB storage device in case data was lost due to an unexpected accident. We do not assume any liability for the losses by misuse or malfunction. Data backup is consumer's responsibility.
- Only in DVB-T/T2 &DVB-C input source, record files can be played from REC_LIST.
Instant one-touch recording and playback
Press REC button to start the recording, at the same time below control bar will show at the bottom of the screen.

- Want to watch the recorded video while recording the program, press left direction button to select ▶ and press OK button, the recorded video will start playing.
Select or can fast backward or fast forward the playing.
- If want to stop and exit the recording, select □ and press OK button.
Timeshift
Time-shift is the recording of television programs to a storage medium (such as your USB device) for viewing at a later, more convenient time. Use it to record a program when your viewing is interrupted or delayed. If you want to leave a while and watch the program without missing the contents, you can press ▶/□ button to stop the program, and press ▶/□ button again to start watching when you come back.
Note:
- Before time-shift, you'd better format the USB device to ensure the enough space for recording.
- You can also set the preset time of recording in EPG function (Refer to next page).
ELECTRONIC PROGRAMME GUIDE (EPG)
EPG stands for Digital Electronic Programme Guide. It is supplied by the programme providers and offers information about the programmes to be broadcast. You can access it in digital mode by pressing the EPG button on the remote control.
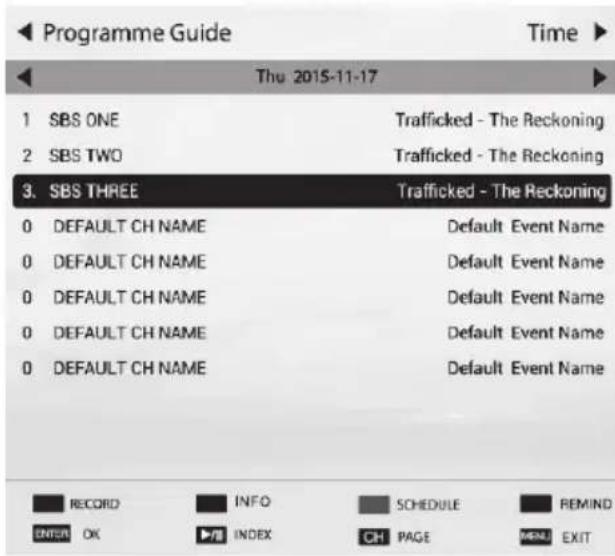
- Press the EPG button to enter the EPG interface. Current date and time will be displayed on the second bar from the top. On the list below, the channel you are currently watching will be highlighted.
- To check programmes to be broadcast in future, scroll up using the ▲ button to the date field. Use the ▶ button to select the date you want to check.
- Press the ▲ button to scroll up to the top bar in the display, then press the ▶ button to select "Time", you can check the program list of a channel of someday.
Schedule
Press the yellow button to display the recording schedule list. You can delete an appointment by press the red button.
Reminder
Press the blue button to display a reminder menu. You can set up the remind time and repeat mode.
Recorder
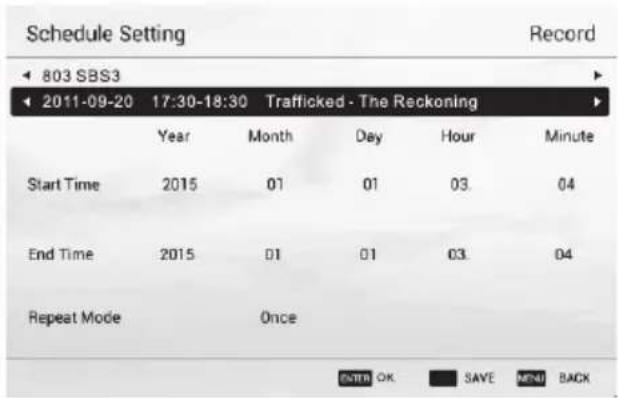
Press the RED button to display the schedule setting menu. By using navigation buttons, set the schedule time by highlight the number of year, month, day, hour or minute and press OK button, then use up and down buttons to adjust the number. Using same method to set up the repeat mode, and then select SAVE" button to save the setting.
Info
Press the GREEN button to show information about the selected program.
INITIAL SETUP & HOME FEATURES
Initial setup
The first time you power on the TV, there will show a setup wizard, press ENTER button to start and finish following steps:
Step 1 Select the OSD language as you need;
Step 2 Select the environment between "HOME" and "STORE";
Step 3 Select the country;
Step 4 Set up the TV clock (time setting), default is "Auto Sync";
Step 5 Read the legal statements;
Step 6 Set up the network configuration;
Step 7 Start auto tuning to search for programs, when finished, the programs will be stored into memories and the initial setup will be completed.
NOTE: Before power on the TV, you need to connect the TV signal cable to the tuner terminal well on the back of the TV.
Home
Press Home button to access the home page. Use navigation and OK buttons to select and access a shortcut.
Mirashare (May not be available on some models)
Without a data cable, open the Wi-Fi button on your mobile phone, then select "Mirashare" on the home screen after pressing HOME button, contents on your mobile phone will be shared to the TV, you can enjoy the big screen viewing experience.
STEPS:
- Open the miracast function of your mobile phone;
- Find the TV name on the mobile phone and select it, the TV will pop out a dialog, accept it to connect Mirashare function, the contents on your mobile phone will be played on the TV.
Note: For some models, after selecting the TV name, the mobile phone and the TV can connect automatically.
Source
Select input source.
Network Applications
Such social applications as YouTube are provided for you. For example, select the Facebook icon on the home page, press OK can access.
TV Browser
Select the TV Browser icon on the home page and press OK to access the internet surfing. Features include speed dial and bookmarks etc.
Note:
- The browser may not support some web pages or videos due to network failure, difference of regions or service interruption, which has nothing to do with the TV.
- If the current page is still not fully opened (progress bar is not completed), other page is selected directly, the previous page won't be saved in history.
Media Player
Connect a USB device to the TV and select the Media Player on the home page, you can play a video/music/photo file in your USB on the TV.
Opera TV
It is an on-line application store made for TV. Open it you can experience various types of apps, such as News & Weather, Nature & Travel, Kids, Lifestyle, Sports, Music, Live TV & Video, Games, Movies & TV etc.
Home Media (May not be available)
Sharing videos, music and pictures in your mobile phone or PC to the TV, you need to connect the TV and your device to the same network.
Note 1 Some of the applications on the home page may not be available on some models, and this manual doesn't include the operation instructions of all applications on the home screen.
Note 2 If service providers upgrade or modify their servers, applications such as YouTube and Facebook may not function on this Television.
Note 3 Your remote control may not be compatible well with some network applications or fail due to service interruption, that has nothing to do with this TV.
Note 4
Privacy Policy (may not be available): To protect your personal data and compliance with the legal provisions. You have the possibility to revoke at any time the acceptance of the privacy policy in the menu of your Tesla TV. If the cancellation is active, no connection is established to the Internet.
Note 5
Network application contents and services are controlled by network application providers by means of networks and transmission facilities, which are subject to alteration, suspension, removal, termination or interruption, or invalid access at any time without further notice in that the manufacturer is unable to control or to be informed of the aforesaid change. The manufacturer makes a further declaration that it disclaims any responsibility or liability arising from customer's failure to use the network application contents and services caused by, including but not limited to, failure of network connection or communication lines, technological updates, or the alteration, suspension, interruption, termination, disabling, or removal of any contents or services by the network application providers etc.
MENU CONTROL
For lasting update and upgrade, below descriptions of menu settings may not be in compliance with your TV, this is normal and the actual content on your TV shall govern.
Menu Operation
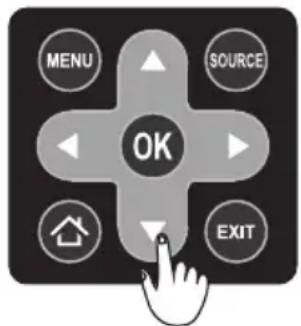
Press "MENU" key to enter the main menu.
Press the [◀] / [▶] key to select a menu.
Press the [▲]/[▼] key to select a menu.
Press "OK" key to enter the item.
Press "MENU" key to exit the item.
Note: The below menu options are under TV sources.
Picture
Picture Mode: Select the appropriate picture mode for different purposes.
Backlight: Adjust backlight parameter of the TV.
Color Temperature: Select the overall color tone of the picture.
Dynamic Noise Reduction: Choose between Off, Low, Middle and Strong.
MPEG Noise Reduction: Choose between Off, Low, Middle and Strong.
Aspect Ratio: Select the appropriate display mode for different purposes. Some options may not be available under some sources and video content.
Dynamic Contrast: Set to On or Off as desired.
Picture Sensor: This feature adjusts the screen brightness automatically when the brightness of the image changes. If the image is at night, the screen will turn darker automatically; if the image is at daytime, the screen will turn brighter automatically.
Film Mode: Set to On or Off as desired.
Picture Reset: Reset the picture settings to default values.
Sound
Sound Mode Setting: Choose between Standard, Music, Movie, Sport, User.
Balance: Control the sound balance between the right and left speaker.
Auto Volume: Choose between On and Off.
Surround Sound: Help to create rich and wider sound from stereo sound sources.
Analog Audio Output: This feature is used for selection of Headphone and Line Out.
Plug in a headphone to the headphone terminal of the TV, and you can listening through the headphone.
Digital Audio Output: This feature is used for selection of Auto and PCM. When connect a digital audio amplifier to the digital audio output terminal of the TV, select this feature from SOUND menu and then select the audio output mode.
Audio HDMI: Select the HDMI audio mode, options include: Auto, Digital and Analog.
Audio Description (May not be available): Turn on or turn off the Audio description. When turn on the audio description, a narrator will describe what is happening on the screen for blind or visually impaired viewers.
Sound Reset: Reset the sound settings to default values.
Installation
Program Edit
Edit the programs. You can press colored buttons on the remote control to skip programs, delete programs, and add programs to the favorite list by pressing FAV button.
5V Antenna Power
This option is only available in DVB-T/T2 source, select On to supply power for the TV's antenna; Select Off to turn off this function.
CI Information (Only available in DTV mode)
Enables the user to select from the CAM-provided menu. Select the CI menu based on the menu PC Card.
Signal Information
Showing the information of current DTV channel.
Auto Tuning
Select corresponding source from the source list before starting the auto tuning.
• DVB-S/S2 Auto Tuning
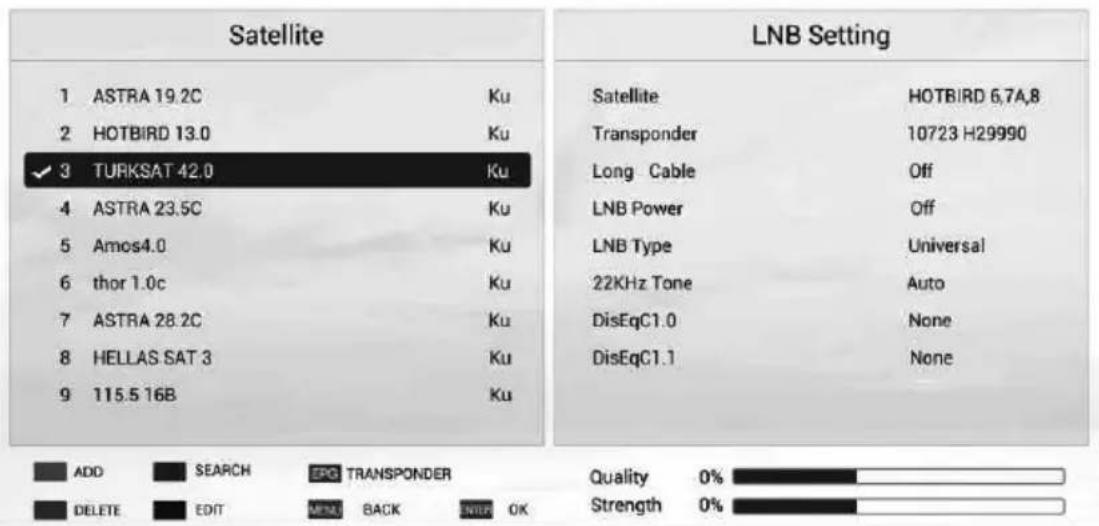
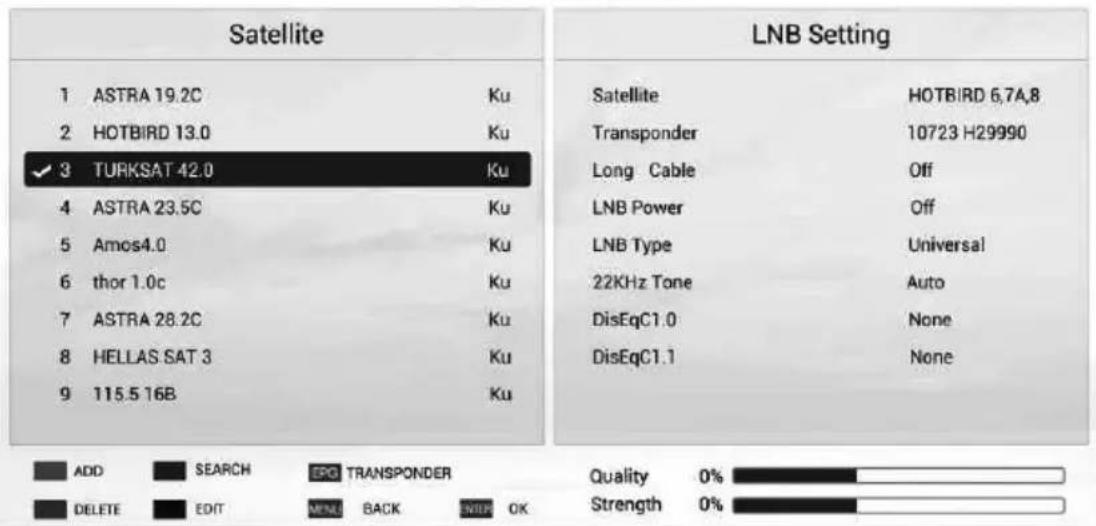
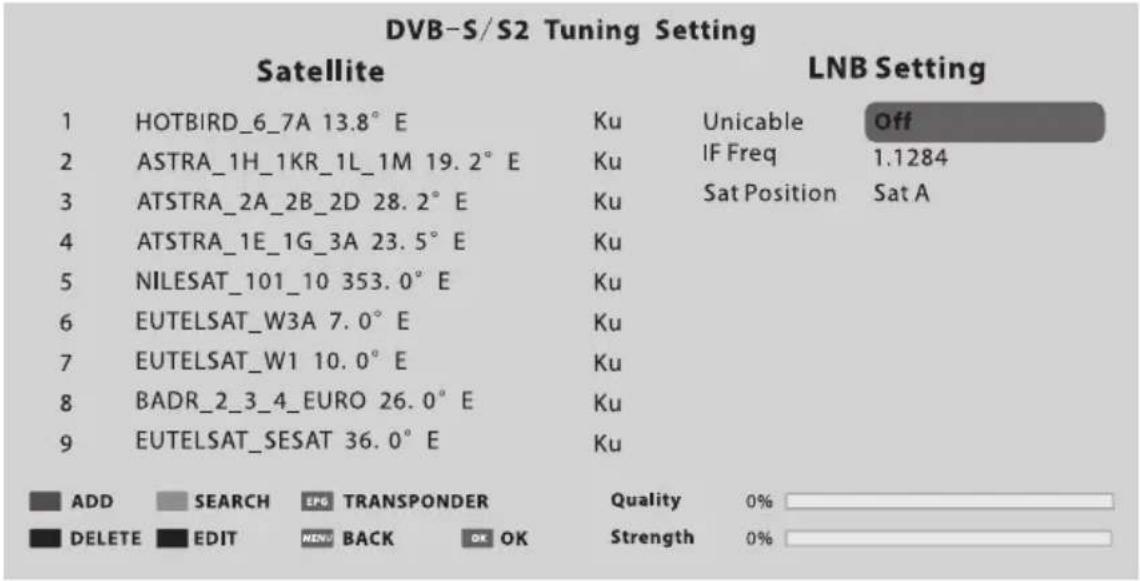
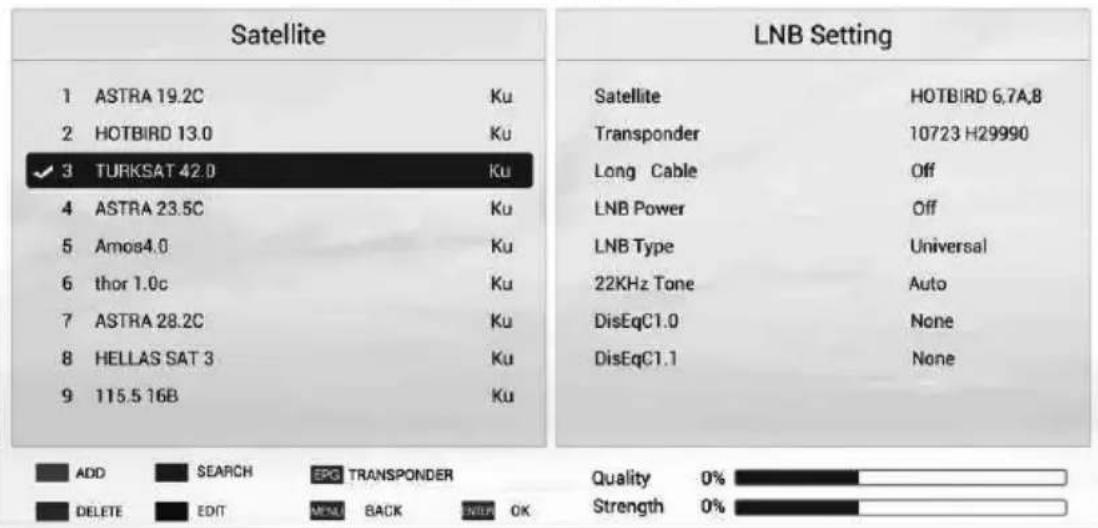
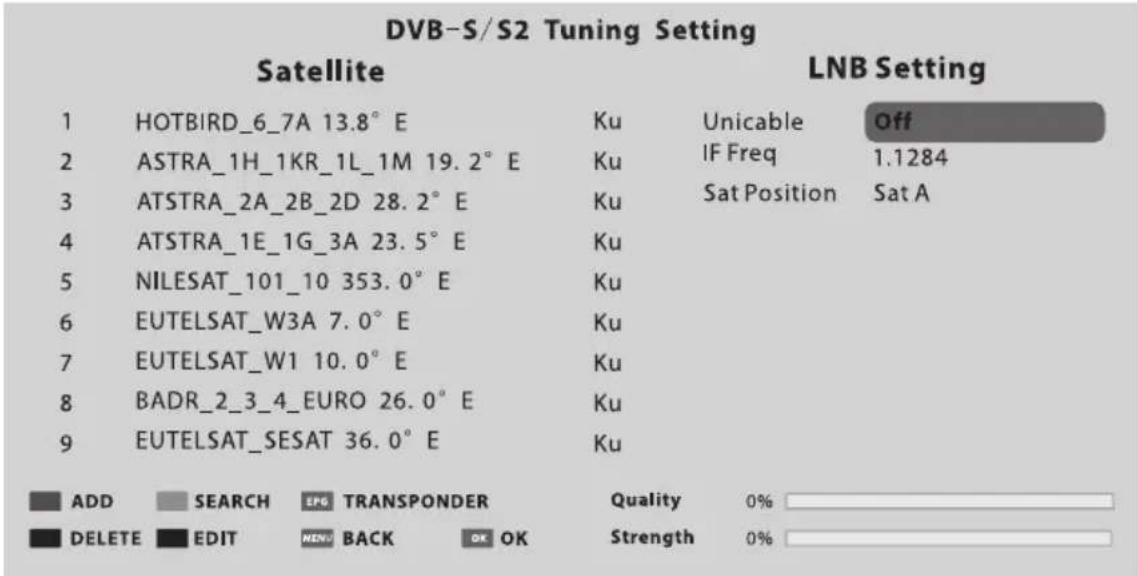
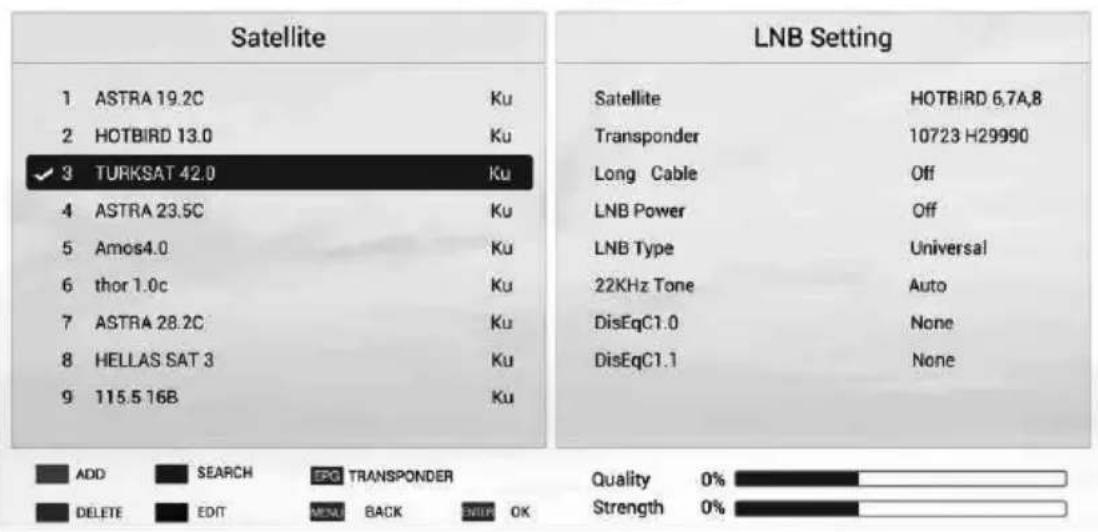
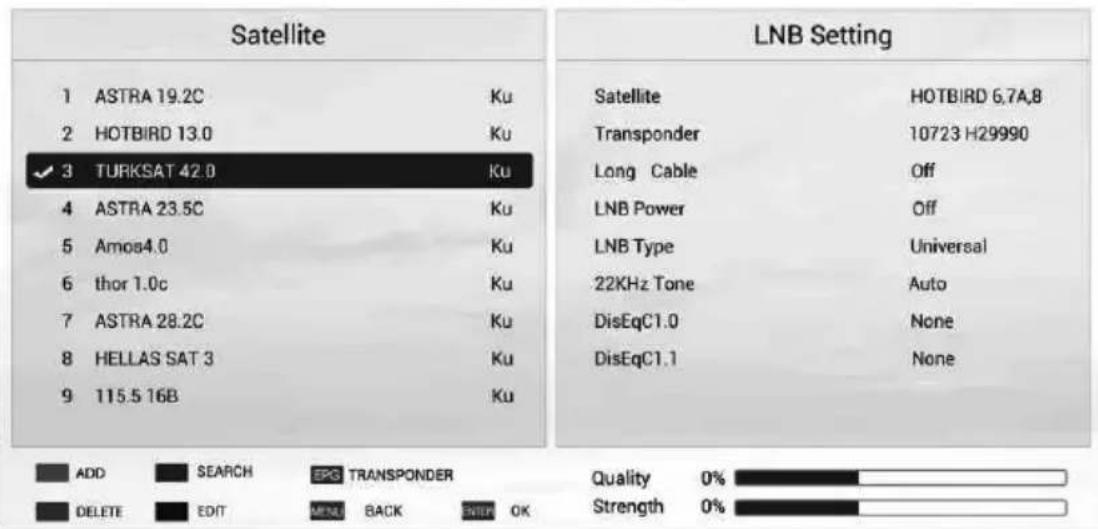
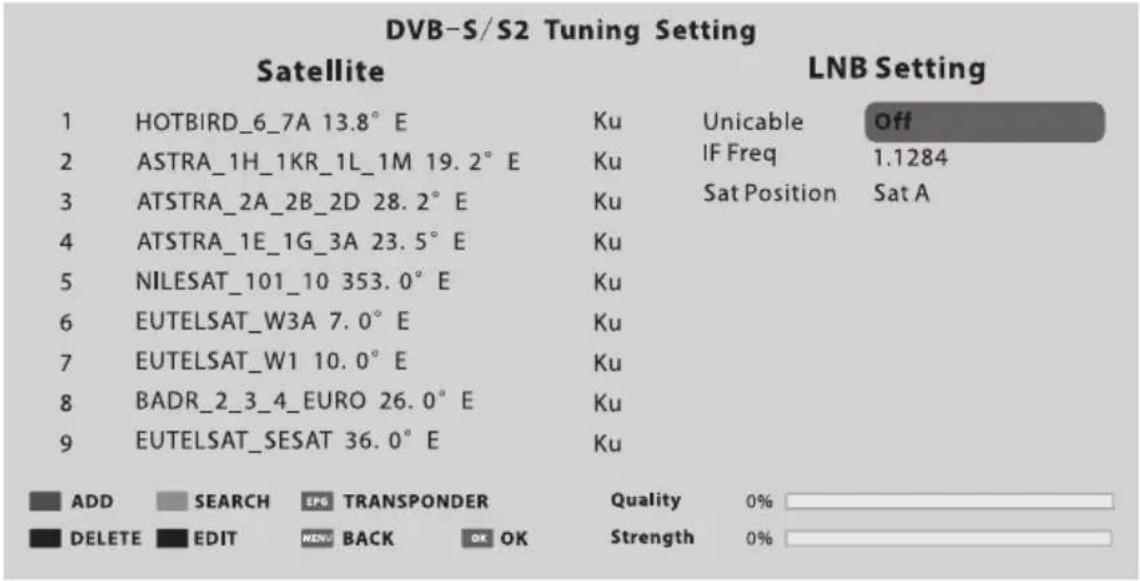
Satellite Dish Settings (Step 1-3, refer to Fig1 and Fig2)
A set of satellite dish settings must be configured for each wanted satellite before performing a channel scan.
Satellite - Select the satellite for this TV.
Long Cable - Increase LNB power.
LNB Type - Make sure the LNB type is corresponding to your dish.
LNB Power - Enable or disable the power supply for the LNB.
22KHz - Select the 22KHz to set 22K switch to ON/OFF. The auto mode is used to switch 22KHz on or off depending on the LNB type.
DiSEqC1.0/1.1 - Select the DiSEqC mode for the selected LNB.
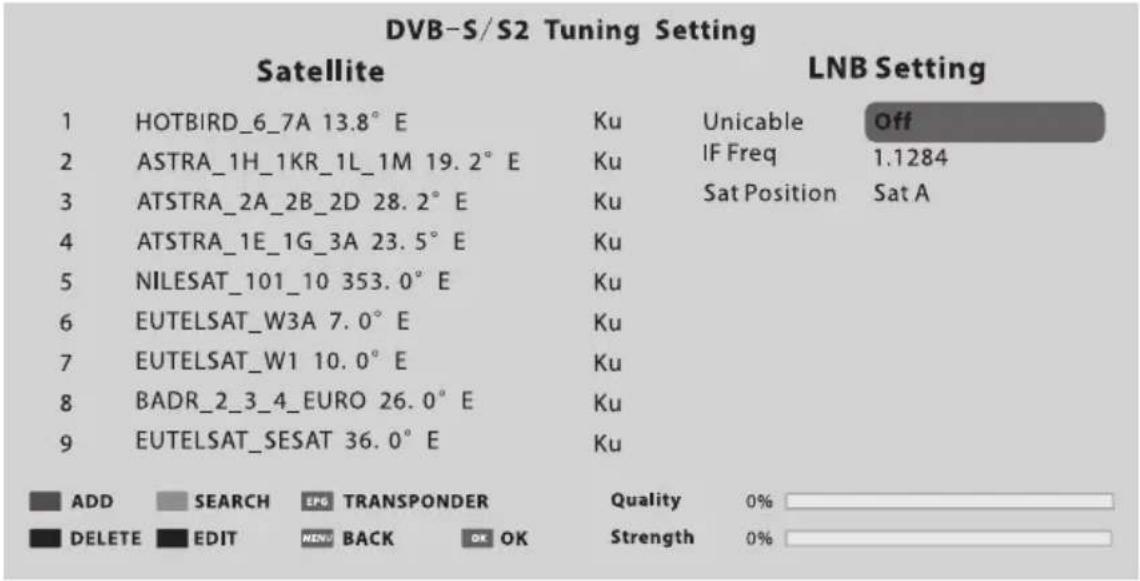
Unicable/IF Freq/ Set Position - Setting the unicable parameter depend on your disk.
DVB-S Tuning Setting
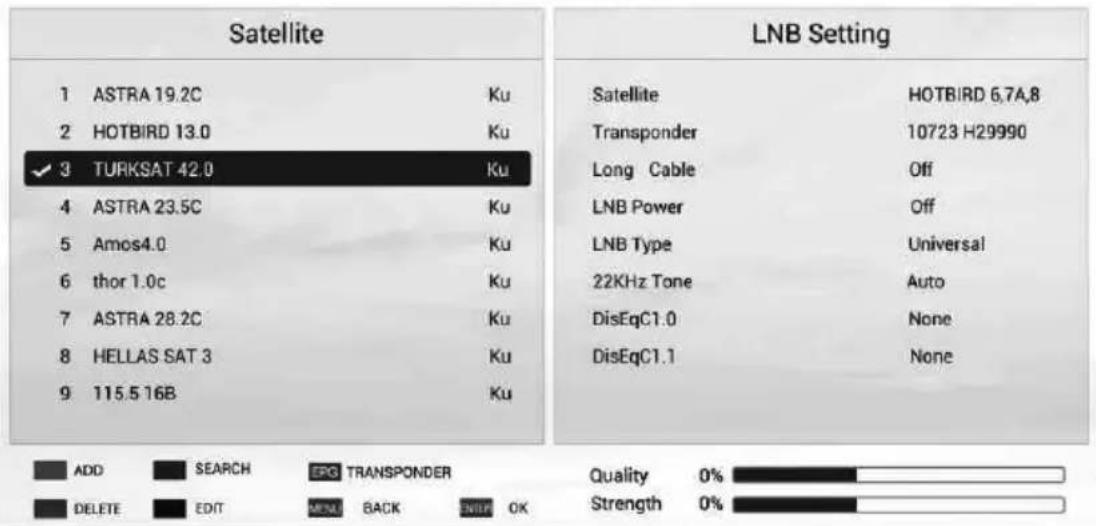
Fig. 1
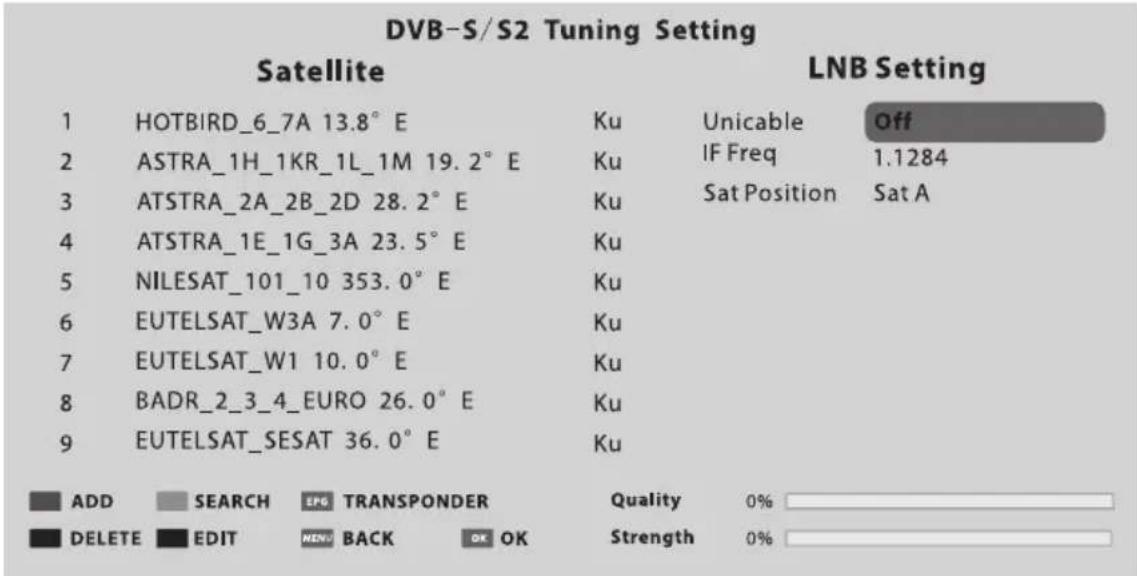
Fig. 2
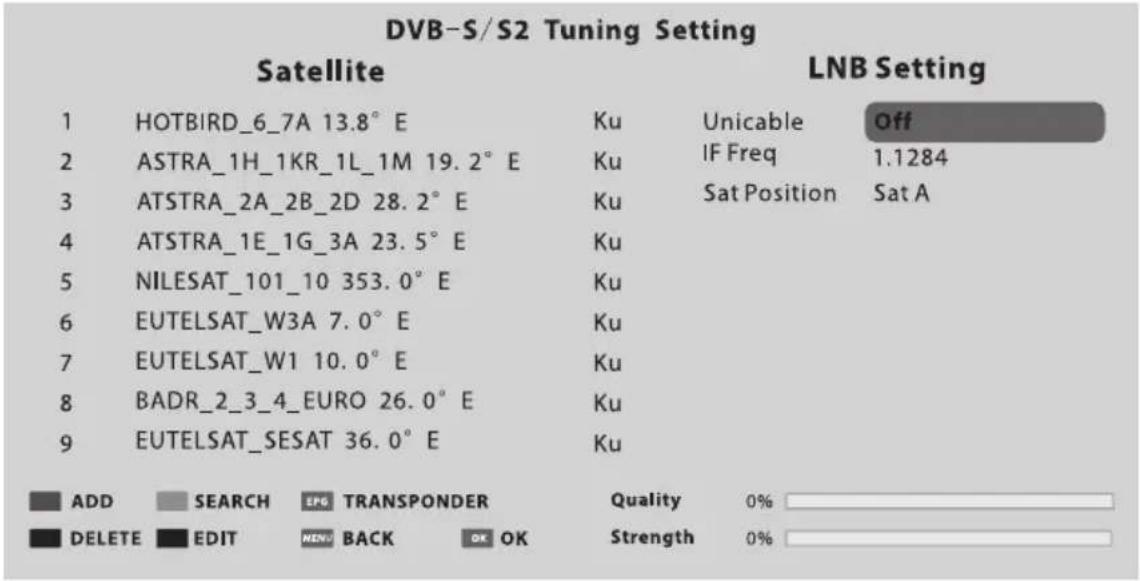
Step 1 Press MENU button and select INSTALLATION menu. Select DVB-S/S2 auto tuning and press OK button, the screen will show as Fig1, and the default satellite will be highlighted.
Step 2 Press OK button to confirm the selected satellite.
Step 3 Press button to switch to LNB setting, press button to highlight LNB Type and press OK button to set up this parameter.
Step 4 Check if the 22KHz Tone, DiSEqC1.0/1.1 is corresponding to the selected satellite, if not, highlight and press OK button to set up the right parameter. (Refer to Fig 2) After the above steps are finished, press the blue button to search for channels.
• DVB-T/T2 or DVB-C or ATV Auto Tuning
Select DVB-T/T2 (or DVB-C/ATV) Auto Tuning to search the programs automatically Before searching, you may need to select the country or set up the scan menu. If you want to stop the auto search, press MENU or EXIT button, a exiting dialog is popped out.
- Press ◀ to confirm exit.
- Press ▶ to continue searching.
DVB-T/T2 or DVB-C Manual Tuning
Search and store programs manually, first select the corresponding source before starting search.
- In Installation menu, select DVB-T/T2 (or DVB-C) manual tuning and press OK to access the searching interface, first select the country.
- Second press ◀ or ▶ to set up relevant parameters such as scan mode, scan scope etc., and then select Search and press or to start the search.
- The search stops when a program is found and this program will be stored in the current channel position. If you want to stop the search, press MENU button.
ATV Manual Tuning
In ATV mode, select ATV Manual Tuning and press OK button to access.
-
Use direction buttons to highlight and set up Storage To 1 (maybe other number), Color System, Sound System and Current Channel. Then select search and press ◀ or ▶ to start the search.
-
Press ▶ for the unit to search towards higher frequency;
-
Press ◀ for the unit to search towards lower frequency;
-
When a program is found, press the red button to stored it at the current channel position. If you want to stop the search, press MENU button.
- Fine-Tune
Use to make small adjustments to tuning of an individual channel. Fine-tune is not necessary under normal conditions. However, in area of inferior broadcast conditions where adjustments is necessary for a better picture and sound, use fine-tune.
- Select a channel that you want to fine tune.
- In Installation menu, select ATV Manual Tuning and press ▼ to highlight Fine-Tune.
- Press ◀ or ▶ to fine tune until the best possible picture and sound are obtained.
Setup
OSD Language: Select your desired OSD language.
Audio Language: Set the primary or secondary digital audio language corresponding to the signal.
Subtitle Language: Select the subtitle language.
Hearing Impaired: This feature is helping hearing-impaired users to understand the programs by showing the relevant graphic information (similar to subtitle but not subtitle) on the screen. You need to turn on the switch before using this feature.
Teletext Language: Select the teletext language as your desire.
REC File System: If you want to use this function, you must receive a digital program and plug a USB disk.
Note:
Suggest to use a high speed mobile hard disk, or your TV may get stuck when using the REC and time shift function.
HDMI CEC: Link and control both the TV and its external devices by connecting the external device to the HDMI port of the TV.
HDMI CEC - Turn on or off HDMI CEC function.
Auto Standby - Turn the TV to standby automatically.
Device List - When HDMI CEC is on, you check the device list of connecting to the TV.
Location: Select the location mode of playing at home or at store, when select "Store", you can turn on the sticker demo.
Presentation: Turn on or turn off the sticker demo and USB demo.
USB demo:
- Required settings: Add "AutoDemo.txt" txt file at the root directory of a USB device, and then write the route of videos need to be played on the TV, each route needs a line break.
- When "USB Demo" is set up as "On", the TV will automatically play the videos in the "AutoDemo.txt", after played all videos, TV will go back to play the previous watching program. After five mintues, the TV will cycle playing wrote videos and program.
- The route should be wrote in English or numbers, otherwise the TV can't identify it.
Software Update:
1. Software update (USB)
Firstly download and save the upgrading software into a USB device, secondly connect the USB device to a TV USB port, thirdly access "Setup" menu and select "Software update", then select "Software update (USB)" to start the upgrading process. When finished, the TV will restart automatically.
NOTE: Do not power off the TV during the software upgrading process, otherwise the TV may not work, and the customer should be responsible.
2. Software Update (Network)
Connect the TV to the internet and you can upgrade the TV system or a network application on the TV.
NOTE: "Network Upgrade" may not be available for some regions.
3. Software Update (OAD) (Only for some regions and only available in DVB-T mode)
Select it to update the TV system software over the air.
Advanced Option: Set up "Fast Boot" and "Wake on Network" function.
Blue Screen: When Blue Screen is set to On, the screen will turn blue and the sound will be muted when there is no signal received.
User Reset: Reset the menu settings to default values.
Legal Statements: Relevant legal statements.
Time
Clock: Set up the TV clock, time zone and summer time.
Clock mode - Options include Auto and Manual. When select "Auto", the TV clock will synchronize with the real time digital TV signal. When select "Manual", you need to manually set up the clock time, including setting up the number of year, month, date, hour and minute.
Time zone - Select the time zone according to your location.
Summer time (Daylight saving time)- You can turn on or turn off this function.
Off Timer: The feature allows you to set the TV to turn off automatically at a regular time.
On Timer: The feature allows you to set the TV to turn on automatically to a preset input or volume.
Sleep Timer: Set the automatic off time of the TV.
Automatic Power down: Set up the time to automatically turn off the TV on condition that there is no operation.
Continuous viewing timer: To prevent watching TV continuously for long periods of time, you can set a message to appear that suggests that the viewer takes a break. This is especially useful for preventing children from watching TV for long periods of time. From TIME menu select Continuous Viewing Timer and set the time. When the set time has passed, a message suggesting the viewer takes a break appears. Press OK or EXIT to clear the message.
Advanced
Lock System: Input the initial password (0000) to access this feature, select "on", the following feature such as "Set password", "Block channel", "Parental control" and "Panel lock" will be activated; select "off", the above mentioned three features will be inactivated. If you forget the password, try use the super password (8899) to access.
Set password: Reset the password of the lock system.
Block channel (Only in TV mode): Block the channels (programs) not suitable for your children.
Parental Control (Only in TV mode): Allows you to password restrict access to shows programs based on their parental rating.
Panel Lock: To disable the bottom keys on the TV. All buttons on the remote control can still be used.
Network
Wireless Connection
- Select "Wireless Connection" and press OK button, and then set "WLAN Switch" on;
- Wait a few seconds, the wi-Fi spots will be shown on the list, select and press OK button to open the interface of inputting password.
- Use navigation buttons to input the password, when finished, press the green button on the remote control to start the connection.
Wired Connection
- Connect the network cable to the LAN port at the back of the TV;
- Access main menu and select network sub-menu.
- Select "Wired Connection", and then select "Auto Input", wait a few seconds, the network configuration will be finished successfully.
Note: Before getting started, make sure that your router is working well.
USB CONTROL
USB Menu
You can view movie, music and photo files from your USB storage devices.
-
Connect USB storage device to USB input terminal.
-
Press Home button and select "Media Player".
MOVIE: Play movies from USB.
MUSIC: Play music from USB.
PHOTO: View photos from USB.
Reminder When Using the USB Player
- Some USB storage devices may not be compatible to operate smoothly with this TV.
-
Back up all of the data in the USB storage device in case data was lost due to an unexpected accident. We do not assume any liability for the losses by misuse or malfunction. Data backup is consumer's responsibility.
-
For large file sizes, the loading speed may be slightly longer.
- The recognition speed of a USB storage device may depend on each device.
- When connecting or disconnecting the USB storage device, ensure that the TV is not in USB mode otherwise the USB storage device or the files stored in it may be damaged.
- Please use only a USB storage device which is formatted in FAT16, FAT32, NTFS file system provided with the Windows operating system. In case of a storage device formatted as a different utility programme which is not supported by Windows, it may not be recognized.
- When using a USB Hard Disk Drive which requires electric power source, ensure its power does not exceed 500mA. If the power of the USB hard Disk exceeds 500mA, the TV system may be changed into standby mode, you should pull away the USB hand Disk and restart the TV system.
- An "Not support" message will be displayed if the file format is unsupported or corrupted
- FHD big picture needs longer time to process, which is not caused by the TV. Please be patient to wait.
- This TV may not support some multimedia files changed and upgraded as the change of encoding format or other technical advances.
Movie Menu
- Press ▲ / ▼ to select MOVIE. Press OK to enter.
- Press ◀ / ▶ or ▲ / ▼ to select the desired folder and Press OK to open the folder, press ▶/∥ to start playing.
- Press ■ to stop movie playing and return to movie list.
- Press "EXIT" to the previous menu screens.
Movie Control Bar
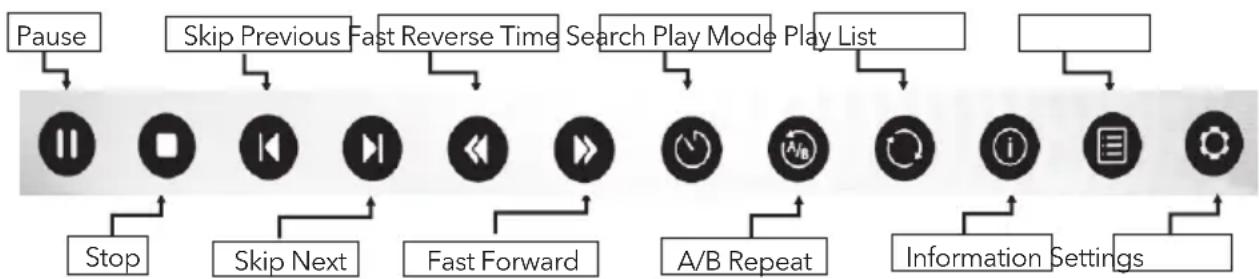
flowchart
graph TD
    A["Pause"] --> B["Slow"]
    C["Skip Previous"] --> D["Fast Reverse Time"]
    D --> E["Search Play Mode"]
    E --> F["Play List"]
    G["Stop"] --> H["Slow Next"]
    H --> I["Fast Forward"]
    I --> J["A/B Repeat"]
    J --> K["Information Settings"]
    L["Information Settings"] --> M["Information Settings"]
- Press [MENU] to display Movie Control Bar while playing the movie.
- Press [◀] / [▶] to select the desired settings.
- Press [MENU] to exit from Movie Control Bar.
Music Menu
- Press ▲/▼ to select MUSIC. Press OK to enter.
- Press ◀ / ▶ or ▲ / ▼ to select the desired folder and Press OK to open the folder, press ▶/Ⅱ to start playing.
- Press ■ to stop music playing and return to music list.
- Press "EXIT" to the previous menu screens.
Music Control Bar
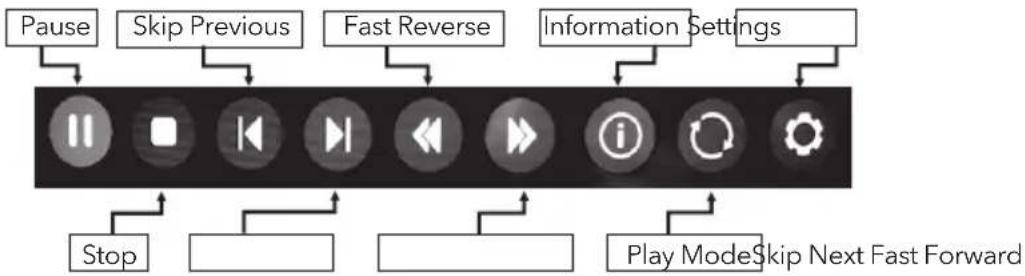
flowchart
graph TD
    A["Pause"] --> B["Slow Previous"]
    B --> C["Fast Reverse"]
    C --> D["Information Settings"]
    D --> E["Stop"]
    E --> F["Play ModeSkip Next Fast Forward"]
- Press [MENU] to display Music Control Bar while playing the music.
- Press [◀] / [▶] to select the desired settings.
- Press [MENU] to exit from Music Control Bar.
Photo Menu
- Press ▲/▼ to select PHOTO. Press OK to enter.
- Press ◀ / ▶ or ▲ / ▼ to select the desired folder and Press OK to open the folder, press ▶/Ⅱ to start playing.
- Press ■ to stop photo playing and return to photo list.
- Press "EXIT" to the previous menu screens.
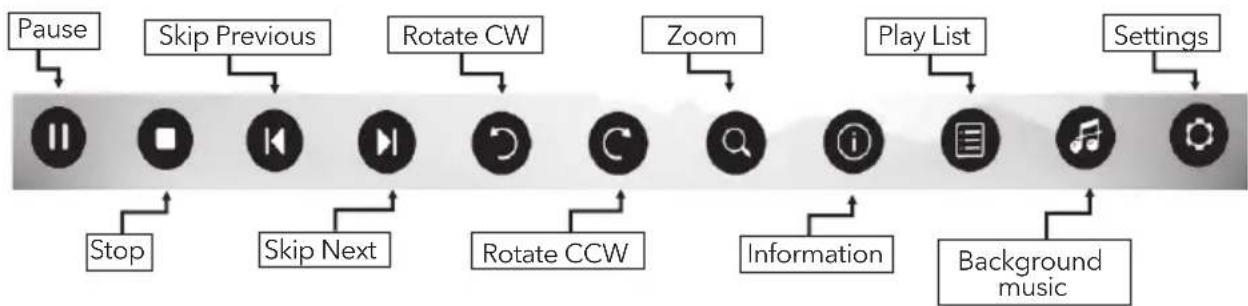
Photo Control Bar
flowchart
graph TD
    A["Pause"] --> B["Stop"]
    C["Skip Previous"] --> D["Skip Next"]
    E["Rotate CW"] --> F["Rotate CCW"]
    G["Zoom"] --> H["Information"]
    I["Play List"] --> J["Background music"]
    K["Settings"] --> L["Settings"]
- Press [MENU] to display Photo Control Bar during photo slide show.
- Press [◀] / [▶] to select the desired settings.
- Press [MENU] to exit from Info bar.
TROUBLESHOOTING
Before calling a service technician, review following information for possible causes and solutions for the problem you are experiencing.
| Symptom Solution | |
| Remote control does not work. | 1. Check the remote sensor on the remote control.2. Change the batteries.3. Batteries are not installed correctly.4. Main power is not connected. |
| Poor signal This is usually caused by interference from cell phones, walkie-talkie, automotive ignition system; neon, electric drill or other electronic equipment or radio interference sources. | |
| No picture, No sound 1. Check the signal source.2. Plug another electrical device into the outlet to make sure it is working or turned on.3. Power plug is bad contact with the outlet.4. Check the signal. | |
| Abnormal picture 1. For no color or bad picture quality, you may:Adjust the color option in menu settings.Keep the TV at a sufficient distance from other electronic products.Try another channel, maybe exist broadcasting signal problem.Bad TV signal (Display mosaic or snowflakes)Check the signal cable and adjust the antenna.Fine tune the channel.Try another channel. | |
| Normal picture, no sound 1. If no sound, unmute or increase the sound volume.2. Open the sound menu and adjust "Balance".3. Check if a headphone has been inserted in, if so, pull out the headphone. | |
| Audio is normal but video is abnormal. | 1. The media file maybe damaged, Check if the file can be played on the PC.2. Check if video and audio codec is supported. |
| Video is normal but audio is abnormal. | 1. The media file maybe damaged, Check if the file can be played on the PC.2. Check if video and audio codec is supported. |
| Network failure 1. Check if the router works well.2. For models needing USB dongle to connect to internet, check if the USB dongle is inserted well.3. Make sure the TV has connected to the router successfully. | |
| Web page can not be displayed completely. | 1. Flash is not supported.2. Supported formats: JPEG, PNG, GIF, BMP, WMV (ASF), WMA, MP3 and MP4. |
| Browser is foreced to be shut down. | Web page include too many large pictures, thus lead to insufficient memory and close the browser. |
Note: If the problem persists after solutions, please contact your local support centre. What the troubleshooting list describe is only for reference, the actual problem may differ from it.
SPECIFICATIONS
Tesla TV 32S367BHS
| Screen size - diagonal 81cm | |
| Screen resolution 1366x768 | |
| Audio output power (L+R) 6W + 6W | |
| Working voltage 100-240V~ 50/60Hz | |
| Rated power consumption 60W | |
| Dimensions with stand(W x H x D mm) | 733.4x474x167.7 |
| Dimensions without stand(W x H x D mm) | 733.4x438.5x85.1 |
| Net weight with stand 4.0kg | |
| Net weight without stand 3.9kg | |
| Environment(only for Tropical climates zone): | Working temperature: 5°C~45°CWorking humidity: 20%~80%Storage temperature: -15°C~50°CStorage humidity: 10%~90% |
| Environment(only for Moderate climates zone) | Working temperature: 5°C~35°CWorking humidity: 20%~80%Storage temperature: -15°C~45°CStorage humidity: 10%~90% |
| System DTV: DVB-T/T2/C/S/S2 | TV: PAL-BG/DK/I, SECAM-BG/DKAV: PAL, SECAM, NTSC |
| Preset programmes ATV: 100; DTV: | 1000 |
| Status displaying method On screen | display |
| Function adjustment indicator Menu | display |
| Language of OSD Multiple options | |
| RF aerial input 75 ohm unbalanced | |
| AV video input | 75 ohm, 1.0Vp-p, RCA |
| AV audio input | 10k ohm, 0.5Vrms |
Tesla TV 40S367BFS
| Screen size - diagonal 101cm | |
| Screen resolution 1920x1080 | |
| Audio output power (L+R) 6W + 6W | |
| Working voltage 100-240V~ 50/60Hz | |
| Rated power consumption 74W | |
| Dimensions with stand(W x H x D mm) | 906.5x209.0 x574.5 |
| Dimensions without stand(W x H x D mm) | 906.5 x84.9 x525.9 |
| Net weight with stand 6.6kg | |
| Net weight without stand 6.4kg | |
| Environment(only for Tropical climates zone): | Working temperature: 5°C~45°CWorking humidity: 20%~80%Storage temperature: -15°C~50°CStorage humidity: 10%~90% |
| Environment(only for Moderate climates zone) | Working temperature: 5°C~35°CWorking humidity: 20%~80%Storage temperature: -15°C~45°CStorage humidity: 10%~90% |
| System DTV: DVB-T/T2/C/S/S2 | TV: PAL-BG/DK/I, SECAM-BG/DKAV: PAL, SECAM, NTSC |
| Preset programmes ATV: 100; DTV: | 1000 |
| Status displaying method On screen | display |
| Function adjustment indicator Menu | display |
| Language of OSD Multiple options | |
| RF aerial input 75 ohm unbalanced | |
| AV video input 75 ohm, 1.0Vp-p, RCA | |
| AV audio input | 10k ohm, 0.5Vrms |
LICENCES

The terms HDMI and HDMI High-Definition Multimedia Interface, and the HDMI logo are trademarks or registered trademarks of HDMI Licensing LLC in the United States and other countries.

Manufactured under license from Dolby Laboratories.
Dolby, Dolby Audio and the double-D symbol are DOLBY AUDIO trademarks of Dolby Laboratories.
Përmbajtja
PARALAJMËRIME DHE MASA PARAPRAKE.... 32
POZICIONI I TV-SË. 35
BUTONAT E PANELIT.... 38
TERMINALET 39
FUNSKIONET E TELEKOMANDËS 40
REC (VIDEO INCIZIME PERSONALE) 42
EPG (GUIDË ELEKTRONIKE E PROGRAMIT) 43
KONFIGURIME FILLESTARE & HOME KARAKTERISTIKA 44
MENU KONTROLLI.... 46
Menu Operimi.... 46
Fotografia....46
Zëri....46
Instalimi.... 47
Konfigurime....49
Koha....50
Avancuar....51
Rrjeti....51
USB KONTROLLI 51
USB Menu....51
| Model Size: 32" Top Down | ||||
| Screw | Diameter (mm) "E" M4 M4 | |||
| Depth (mm)"D" | Max 9 9 | |||
| Min 6 6 | ||||
| Quantity 2 2 | ||||
| VESA (AxBxC) 100x100x100 | ||||

flowchart
graph TD
    A --> B
    B --> C
    C --> A
| Model Size: 40" Top Down | ||||
| Screw | Diameter (mm) "E" M6 M6 | |||
| Depth (mm)"D" | Max 20 | 15 | ||
| Min 12 | 7 | |||
| Quantity 2 2 | ||||
| VESA (AxBxC) 200x100x200 | ||||
Shënim:
EPG (GUIDË ELEKTRONIKE E PROGRAMIT)
Home Media (May not be available)
Fotografia
DVB-S Tuning Setting
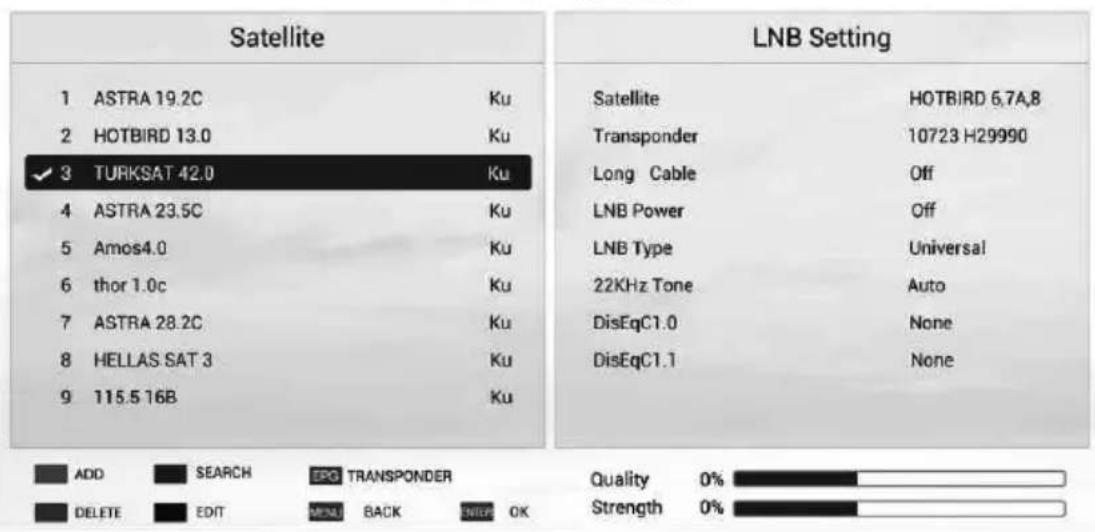
Fig. 1
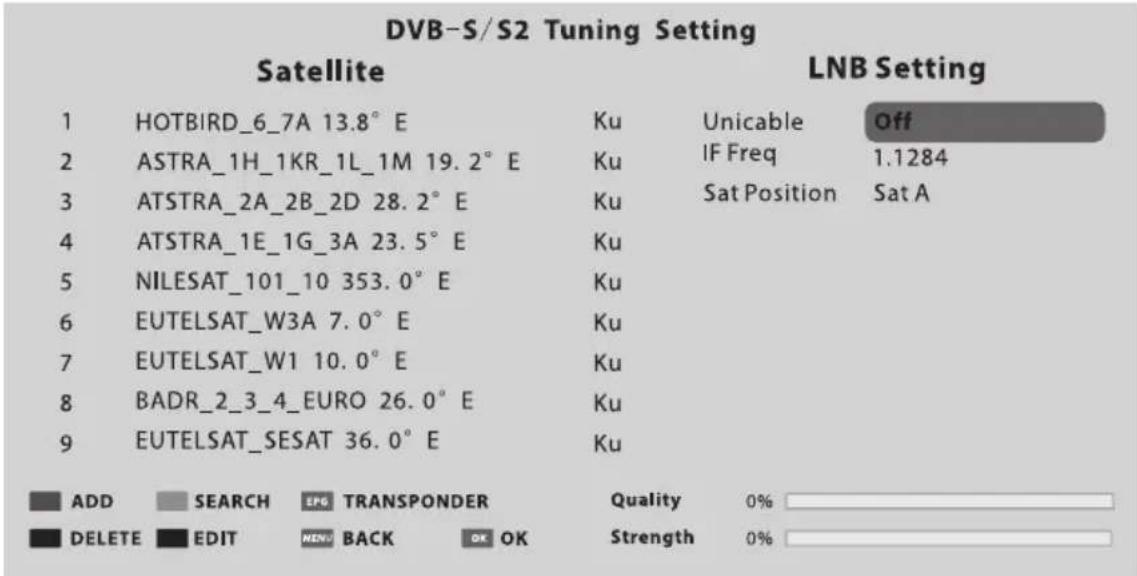
Fig. 2
flowchart
graph TD
    A["A"] --> B["B"]
    B --> C["C"]
    C --> A
| Veličina modela: 40" Vrh Dno | ||||
| Šraf | Prečnik (mm) "E" M6 M6 | |||
| Dubina (mm)"D" | Max 20 | 15 | ||
| Min 12 | 7 | |||
| Količina 2 2 | ||||
| VESA (AxBxC) 200x100x200 | ||||
Napomena:
1) Slike služe samo kao ilustracija.
2) Za postavljanje TV uređaja s terminalima okrenutim ka zidu potreban je i gumeni jastuk uz šraf prilikom fiksiranja postolja na zidu kako bi se obezbedilo dovoljno prostora za upotrebu terminala. To je mali šupalj stub čiji je unutrašnji prečnik 8 mm, spoljašnji 18 mm, a visina 30 mm
Radna sredina
- Ne stavljajte ovaj uređaj u zatvoreni prostor poput police za knjige ili sličnog komada namještaja.
- Ne koristite uređaj u vlažnom i hladnom okruženju. Zaštitite uređaj od pregrevanja.
- Držite dalje od direktnog utijecaja sunca.
- Ne koristite uređaj u okruženju koje sadrži prašinu.
- Da zapaljivi strani materijal ne bi dospjeo u TV uređaj, ne stavljajte svijeće u pristupačne, otvorene dijelove.
Slika
Režim slike: Odabrati prikladni režim slike.
Pozadinsko osvjetljenje: Podesiti parametre pozadinskog osvetljenja na TV-u.
DVB-S Tuning Setting
Slika 1
Slika 2
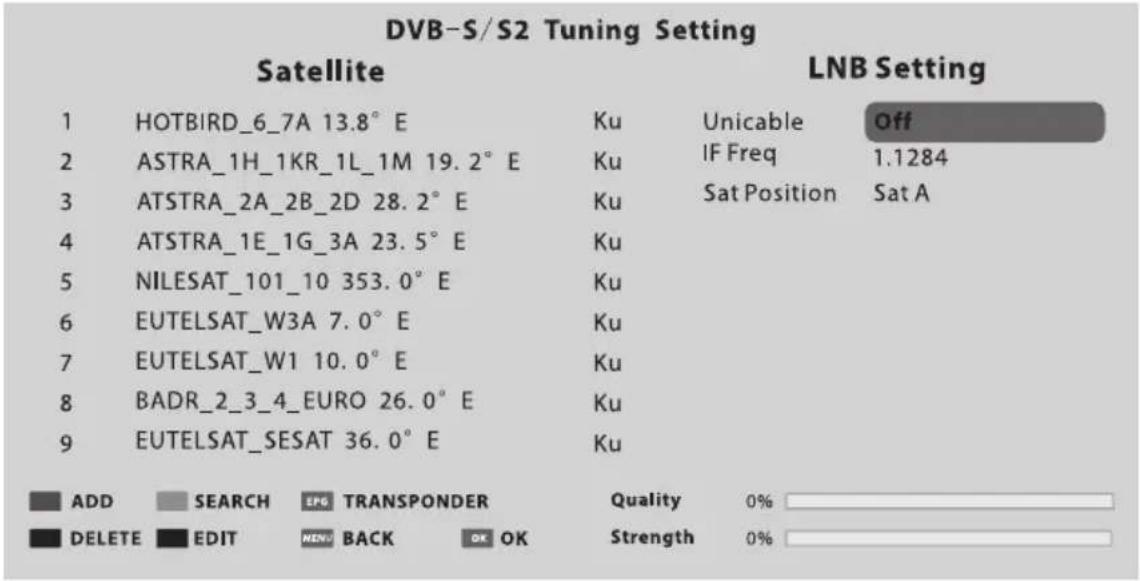
Korak 1 Pritisnuti taster MENI (MENU) i odabrati meni INSTALACIJA. Odabrati DVB-S/S2 automatsko podešavanje i pritisnuti taster OK, na satelitu će se prikazati isto što i na slici 1, a podrazumevani satelit biće istaknut.
Korak 2 Pritisnuti taster OK za potvrđivanje odabranog satelita.
Korak 3 Pritisnuti taster ▶ za prebacivanje na LNB podešavanja, pritisnuti taster ▼ za označavanje LNB tipa i pritisnuti taster OK za podešavanje parametara.
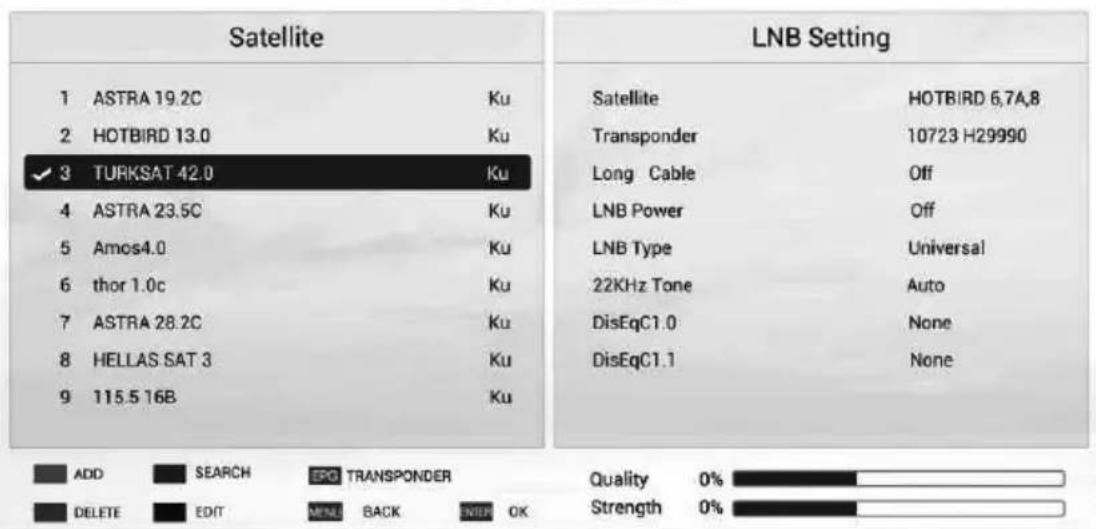
Korak 4 Provjeriti da li signal 22KHz, DiSEqC1.0/1.1 odgovara odabranom satelitu. Ukoliko ne odgovara, označiti ga i pritisnuti taster OK za podešavanje pravih parametara. (Odnosi se na sliku 2)
Nakon obavljenih navedenih koraka, pritisnuti plavi taster za traženje kanala.
- DVB-T/T2 ili DVB-C ili ATV Automatsko podešavanje
Odabrati DVB-T/T2 (ili DVB-C/ ATV) Automatsko podešavanje da bi se pokrenulo automatsko pretraživanje programa. Možda će biti neophodno da se podesi meni za pretragu ili izabere država prije pretrage. Ako se želi zaustaviti automatska pretraga pritisnuti MENI (MENU) ili taster IZLAZ (EXIT) i pojaviće se prozor za dijalog o napuštanju pretrage.
- Pritisnuti ◀ za potvrđivanje izlaska.
flowchart
graph TD
    A["A"] --> B["B"]
    B --> C["C"]
    C --> A
TEXT Press to enter or exit the teletext menu.
Total Time: 00:00:39


REC SHOW/HIDE
DVB-S Tuning Setting
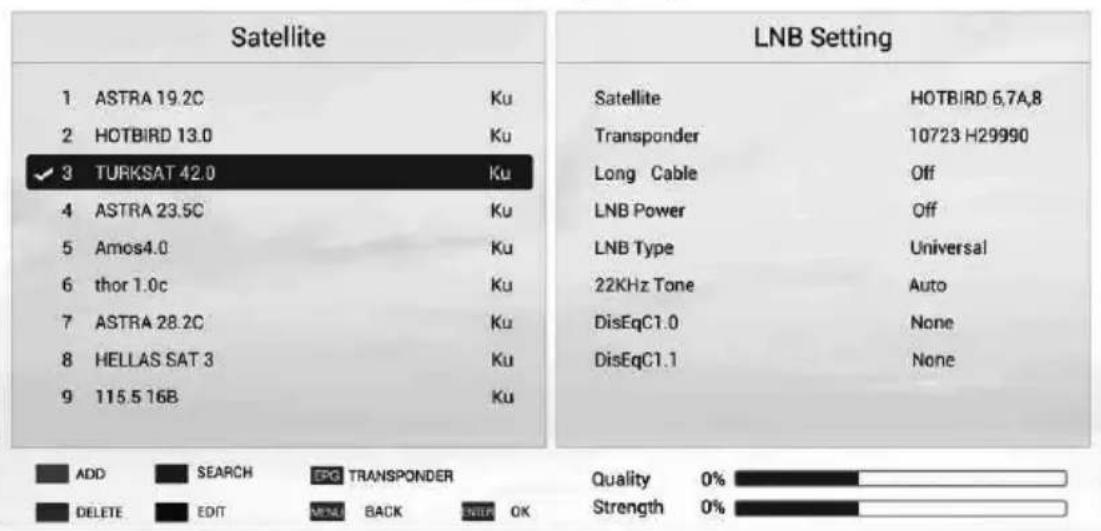
Fig. 1
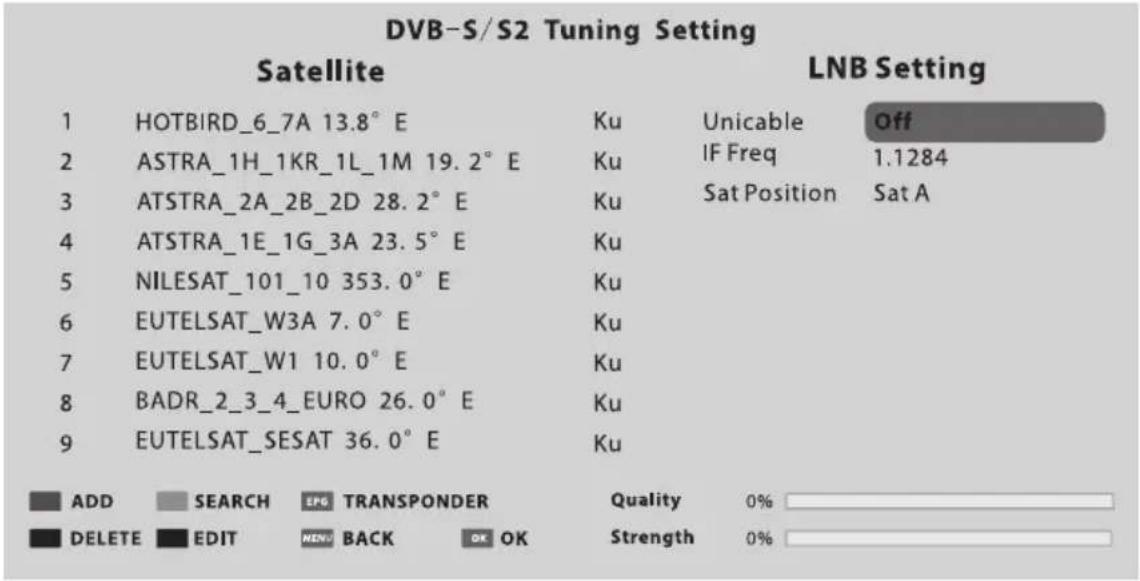
Fig. 2
For lasting update and upgrade, below descriptions of menu settings may not be in compliance with your TV, this is normal and the actual content on your TV shall govern.
Menübedienung
DVB-S Tuning Setting
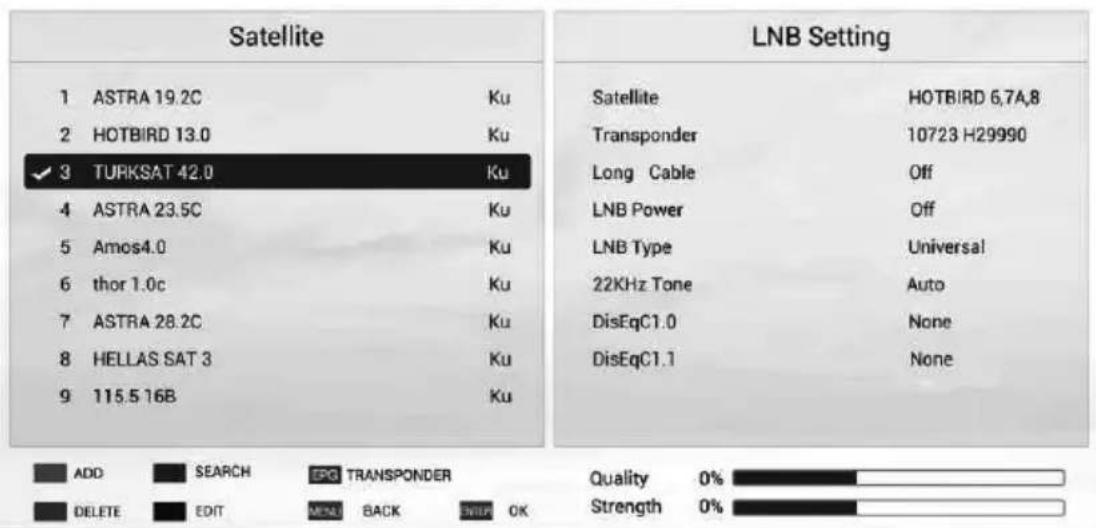
Abb. 1
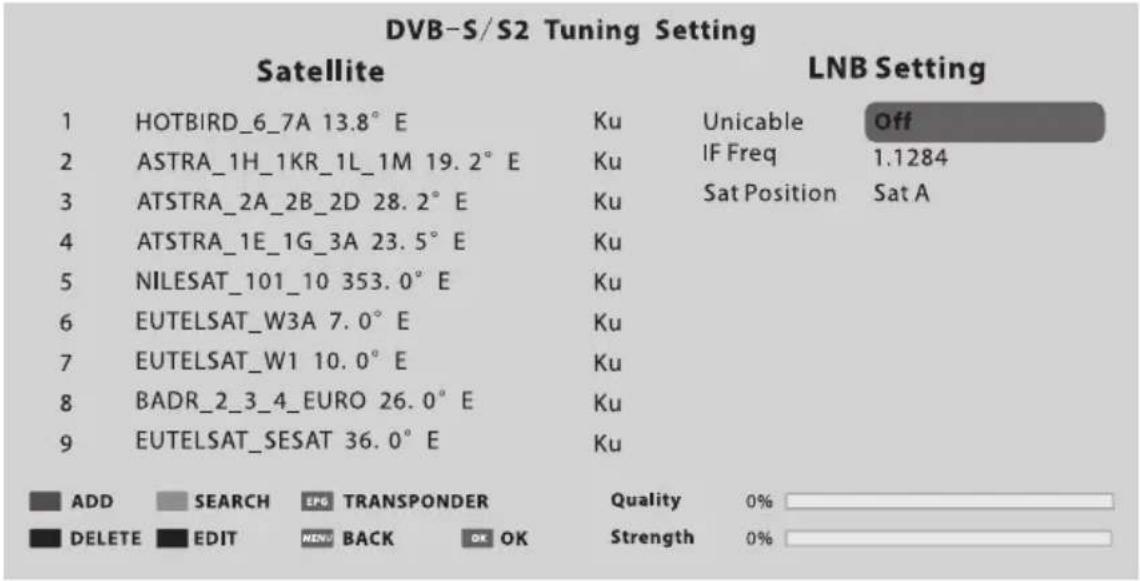
Fig. 2
Note: The below menu options are under TV sources.
Image
DVB-S Tuning Setting
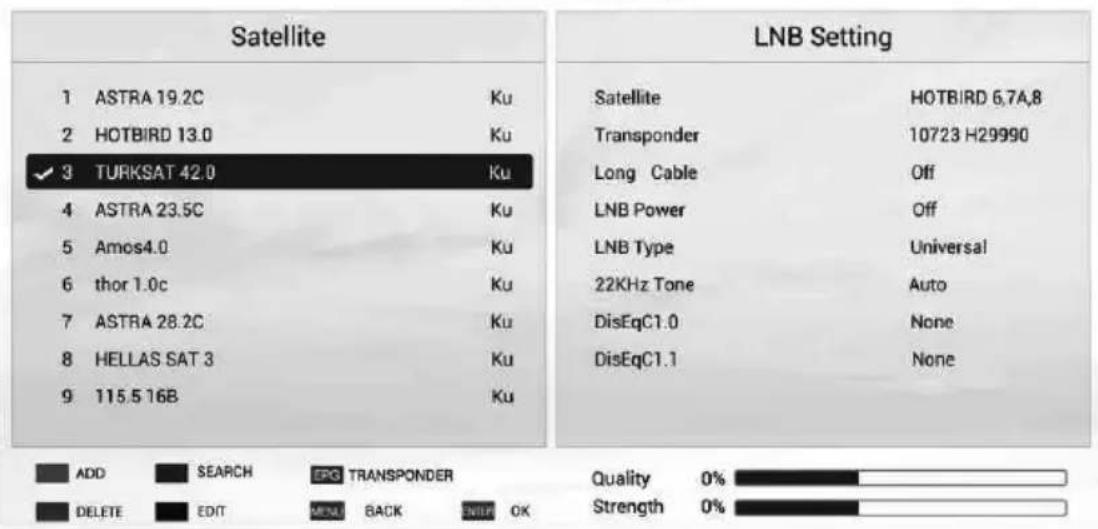
Fig. 1
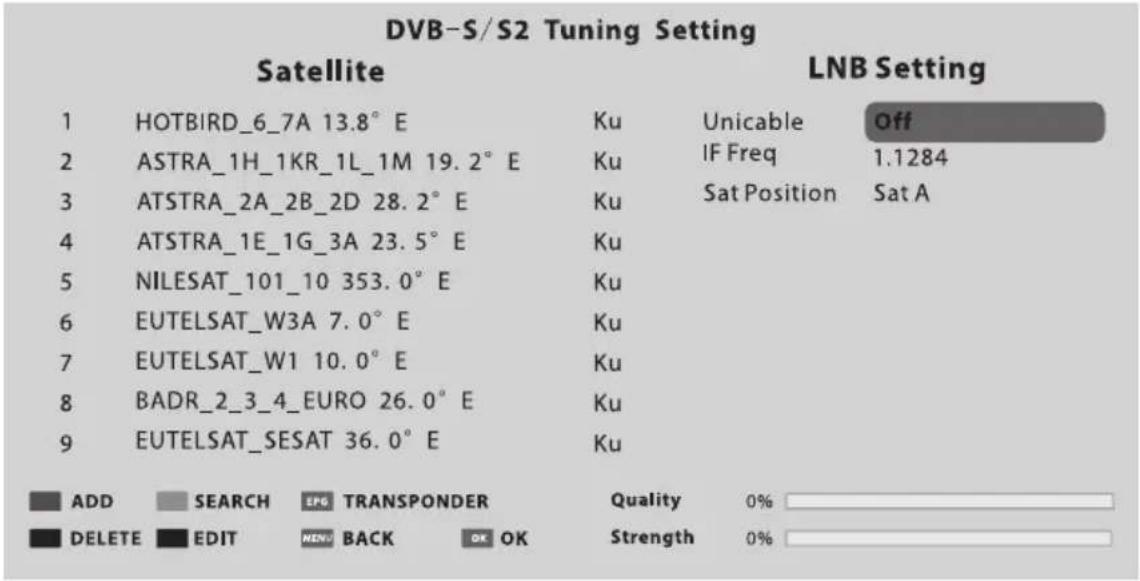
Fig. 2
| Veličina modela: 32" Gore Dolje | ||||
| Vijak | Promjer (mm) "E" M4 M4 | |||
| Dubina (mm)"D" | Max 9 9 | |||
| Min 6 6 | ||||
| Količina 2 2 | ||||
| VESA (AxBxC) 100x100x100 | ||||
flowchart
graph TD
    A --> B
    B --> C
    C --> A
| Veličina modela: 40" Gore Dolje | ||||
| Vijak | Promjer (mm) "E" M6 M6 | |||
| Dubina (mm)"D" | Max 20 | 15 | ||
| Min 12 | 7 | |||
| Količina 2 2 | ||||
| VESA (AxBxC) 200x100x200 | ||||
Napomena:
Slika
Način prikaza slike: Odaberite odgovarajući način prikaza slike za različite svrhe.
DVB-S Tuning Setting
Slika 1
Slika 2
Korak 1: Pritisnite tipku IZBORNIK (MENU) i odaberite izbornik INSTALACIJA. Odaberite automatsko podešavanje DVB-S/S2 i pritisnite tipku OK, na zaslonu će se pokazati slika kao na Slici 1 i zadani će satelit biti označen.
Korak 2: Pritisnite tipku OK i potvrdite zadani satelit.
Rocker gomb
Kép
DVB-S Tuning Setting
- ábra
ábra. 2
flowchart
graph TD
    A["A"] --> B["B"]
    B --> C["C"]
    C --> A
Tasto Rocker
- If want to stop and exit the recording, select □ e premiere il tasto OK.
Timeshift
Privacy Policy (may not be available): To protect your personal data and compliance with the legal provisions. You have the possibility to revoke at any time the acceptance of the privacy policy in the menu of your Tesla TV. If the cancellation is active, no connection is established to the Internet.
Nota 5
For lasting update and upgrade, below descriptions of menu settings may not be in compliance with your TV, this is normal and the actual content on your TV shall govern.
Immagine
Analog Audio Output: This feature is used for selection of Headphone and Line Out. Plug in a headphone to the headphone terminal of the TV, and you can listening through the headphone.
DVB-S Tuning Setting
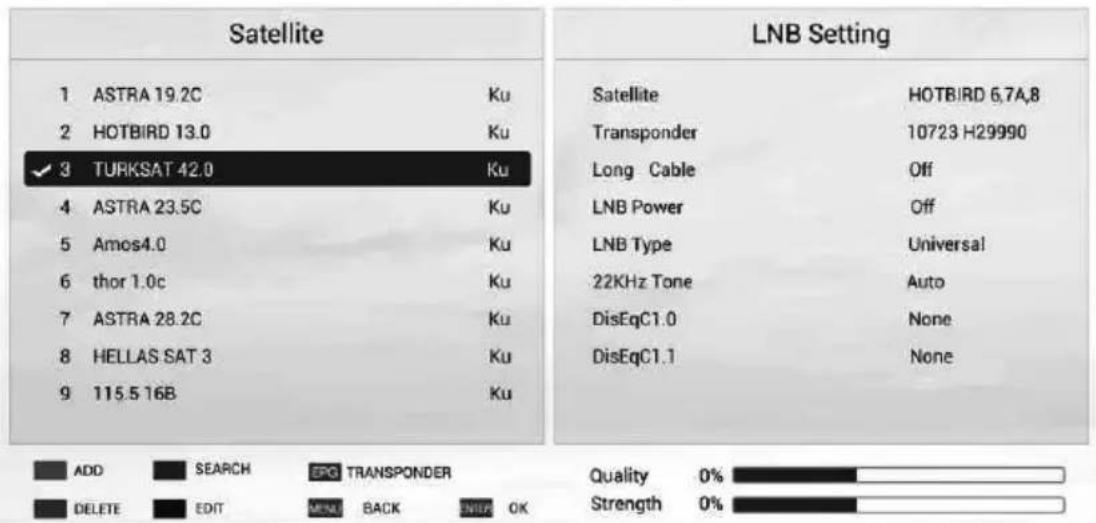
Fig. 1
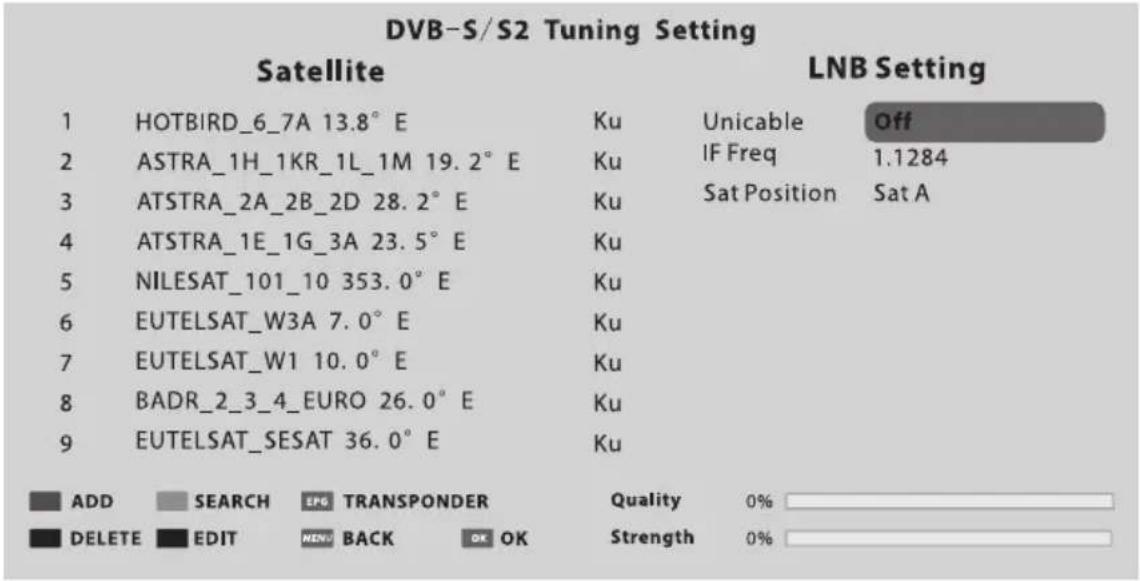
Fig. 2
The terms HDMI and HDMI High-Definition Multimedia Interface, and the HDMI logo are trademarks or registered trademarks of HDMI Licensing LLC in the United States and other countries.

Manufactured under license from Dolby Laboratories.
Dolby, Dolby Audio and the double-D symbol are DOLBY AUDIO trademarks of Dolby Laboratories.
СОДРЖИНА
СОДРЖИНА 255
flowchart
graph TD
    A["A"] --> B["B"]
    B --> C["C"]
    C --> A
Total Time: 00:00:39


REC SHOW/HIDE
DVB-S Tuning Setting
Слика 1
Слика 2
Butonul rocker
- Want to watch the recorded video while recording the program, press left direction button to select ▶ and press OK button, the recorded video will start playing.
Select or can fast backward or fast forward the playing.
- If want to stop and exit the recording, select □ and press OK button.
Imaginea
DVB-S Tuning Setting
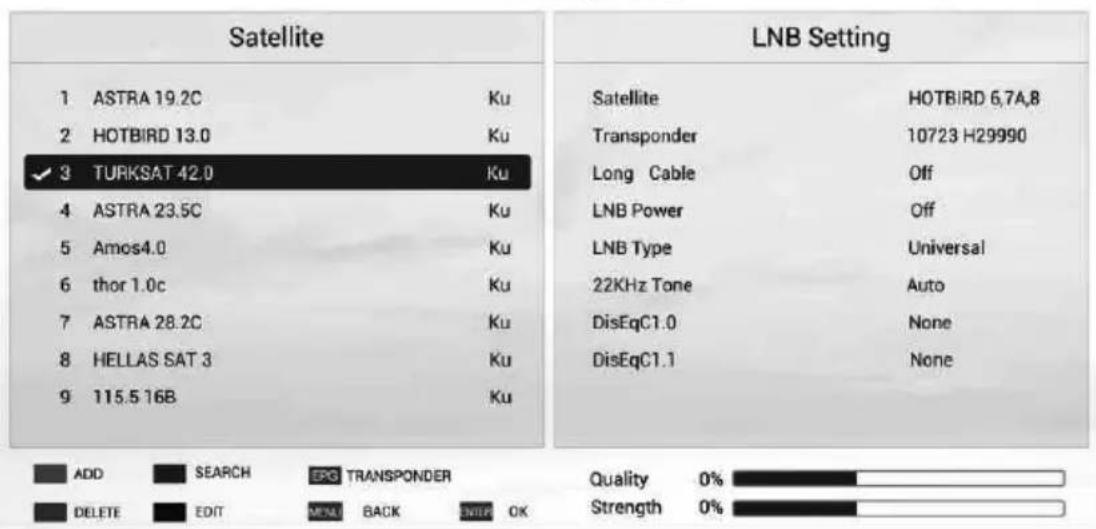
Fig. 1
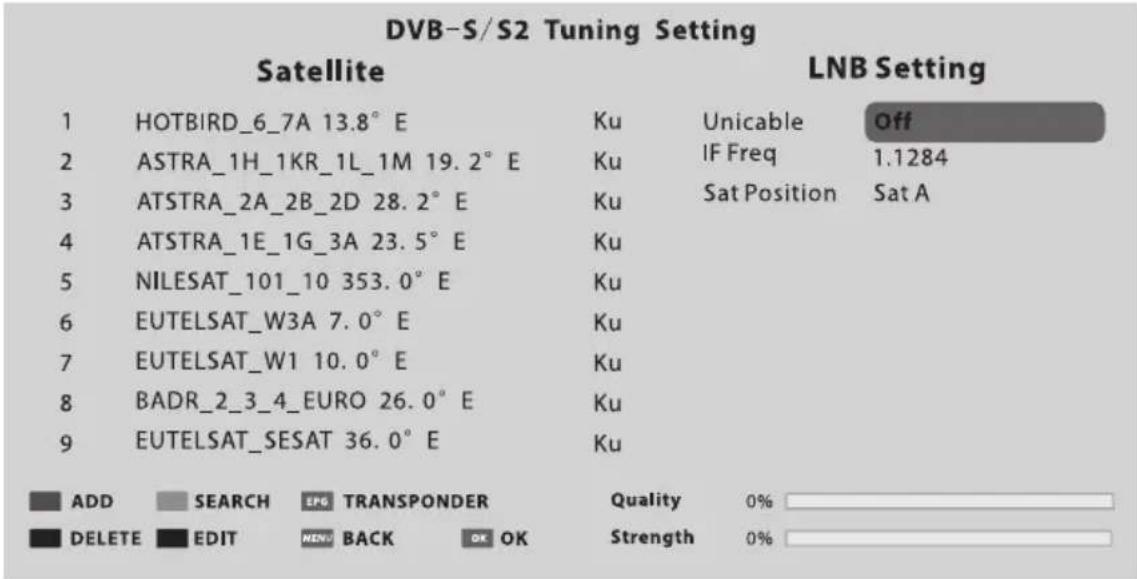
Fig. 2
Potisni gumb
Pritisnite srednjo tipko:
- Če želite gledati posnetek med snemanjem programa, pritisnite gumb ▶ in izberite ter pritisnite gumb OK. Posnetek se bo začel predvajati. Izberite◀ ali za previjanje nazaj ali naprej.
- Če želite prekiniti snemanje, izberite in pritisnite gumb OK.
Časovni zam
Slika
Način slike: Izberite primeren način slike za različne priložnosti.
DVB-S Tuning Setting
Slika 1
Slika 2
Prekidač
Pritisnuti taster u sredini:
- U režimu stanja pripravnosti pritisak na ovo taster uključuje TV;
- Ako nema ekranskog prikaza (OSD-a) kratkim pritiskom se pristupa osnovnom meniju; pritisak od 5 sekundi vraća TV u režim stanja pripravnosti;
- Ako ima ekranskog prikaza (OSD) kratkotrajnim pritiskom se potvrđuje izbor; dužim pritiskom se vraća ili izlazi iz menija /podmenija.
Levi deo tastera: smanjivanje zvuka ili pomeranje ulevo.
Desni deo tastera: pojačavanje zvuka ili pomeranje udesno.
Gornji deo tastera: menjanje kanala ili pomeranje prema dole.
Donji deo tastera: menjanje kanala ili pomeranje prema gore.
PRIKLJUČCI
Napomena: Priključci se mogu razlikovati po modelu i tržištima, izaberite priključke na osnovu TV prijemnika koji ste kupili.
LAN: Mreža
AV IN (AUDIO L/D I VIDEO): Povezivanje ulaza za audio i video signal s izvorom signala kao što je DVD.
- Ukoliko se želi gledati snimljeni video tokom snimanja programa pritisnuti levu stranu tastera za biranje ▶ i taster OK i počeće reprodukcija snimljenog video. Pritisnuti 📄 za brzu reprodukciju unazad ili unapred.
- Ukoliko se želi zaustavljanje i izlazak iz snimanja izabrati ☐ i pritisnuti taster OK.
Vremensko pomeranje
Vremensko pomeranje je snimanje televizijskog programa na medij za skladištenje podataka (kao što je USB uređaj) za naknadno gledanje u prikladnije vreme. Funkciju koristiti za snimanje programa kada se mora prekinuti ili odložiti gledanje. Ukoliko se korisnik želi udaljiti na neko vreme, a pritom gledati program bez propuštanja sadržaja, treba pritisnuti taster ▶/■ za zaustavljanje programa, a po povratku ponovo pritisnuti taster ▶/la početak gledanja.
Napomena:
Slika
DVB-S Tuning Setting
Slika 1
Slika 2
Korak 1 Pritisnuti taster MENI (MENU) i izabrati meni INSTALACIJA. Izabrati DVB-S/S2 automatsko podešavanje i pritisnuti taster OK, na satelitu će se prikazati isto što i na slici 1, a podrazumevani satelit biće istaknut.
Korak 2 Pritisnuti taster OK za potvrđivanje izabranog satelita.
Korak 3 Pritisnuti taster za prebacivanje na LNB podešavanja, pritisnuti taster za označavanje LNB tipa i pritisnuti taster OK za podešavanje parametara.
Korak 4 Proveriti da li signal 22KHz, DiSEqC1.0/1.1 odgovara izabranom satelitu. Ukoliko ne odgovara, označiti ga i pritisnuti taster OK za podešavanje pravih parametara. (Odnosi se na sliku 2).
Nakon obavljenih navedenih koraka pritisnuti plavi taster za traženje kanala.
- DVB-T/T2 ili DVB-C ili ATV Automatsko podešavanje
Izabrati DVB-T/T2 (ili DVB-C/ ATV) Automatsko podešavanje da bi se pokrenulo automatsko pretraživanje programa. Možda će biti neophodno da se podesi meni za pretragu ili izabere država pre pretraživanja. Ako se želi zaustaviti automatsko pretraživanje, pritisnuti MENI (MENU) ili taster IZLAZ (EXIT) i pojaviće se prozor za dijalog o napuštanju pretrage.
- Pritisnuti ◀ za potvrđivanje izlaska.

- UDHËZIM PËR PËR
- Note
- WARNINGS AND PRECAUTIONS
- WARNING
- WEEE Directive
- POSITIONING THE TV SET
- CAUTION
- Note:
- Operating Environment
- Precautions for Using Remote Control
- Precautions for Using Battery
- Remote Control Battery Replacement
- PANEL BUTTONS
- Bottom view
- TERMINALS
- REMOTE CONTROL FUNCTIONS
- Remote Control
- FAV. (Favorite Channel)
- USB Play Control Buttons Play & Pause (▶/II)
- Stop (■)
- Fast Backward Button (◀)
- Fast Forward (▶)
- TELETEXT BUTTONS
- HOLD
- SUB-PAGE
- REVEAL
- MIX
- CANCEL
- PERSONAL VIDEO RECORDING (REC)
- IMPORTANT NOTE:
- Instant one-touch recording and playback
- Timeshift
- ELECTRONIC PROGRAMME GUIDE (EPG)
- Schedule
- Reminder
- Recorder
- Info
- INITIAL SETUP & HOME FEATURES
- Initial setup
- Home
- Mirashare (May not be available on some models)
- STEPS:
- Source
- Network Applications
- TV Browser
- Media Player
- Opera TV
- Home Media (May not be available)
- Note 4
- Note 5
- MENU CONTROL
- Menu Operation
- Picture
- Sound
- Installation
- Program Edit
- 5V Antenna Power
- CI Information (Only available in DTV mode)
- Signal Information
- Auto Tuning
- • DVB-S/S2 Auto Tuning
- • DVB-T/T2 or DVB-C or ATV Auto Tuning
- DVB-T/T2 or DVB-C Manual Tuning
- ATV Manual Tuning
- - Fine-Tune
- Setup
- USB demo:
- Software Update:
- Software update (USB)
- Software Update (Network)
- Software Update (OAD) (Only for some regions and only available in DVB-T mode)
- Time
- Advanced
- Network
- Wireless Connection
- Wired Connection
- USB CONTROL
- USB Menu
- Reminder When Using the USB Player
- Movie Menu
- Movie Control Bar
- Music Menu
- Music Control Bar
- Photo Menu
- Photo Control Bar
- TROUBLESHOOTING
- SPECIFICATIONS
- LICENCES
- Përmbajtja
- Shënim:
- EPG (GUIDË ELEKTRONIKE E PROGRAMIT)
- Fotografia
- Napomena:
- Radna sredina
- Slika
- - DVB-T/T2 ili DVB-C ili ATV Automatsko podešavanje
- Menübedienung
- Image
- Kép
- Nota 5
- Immagine
- СОДРЖИНА
- Imaginea
- Pritisnite srednjo tipko:
- Časovni zam
- Pritisnuti taster u sredini:
- PRIKLJUČCI
- Vremensko pomeranje
Brand : TESLA
Model : 32S367BHS
Category : TV