10033019 - Pan Klarstein - Free user manual and instructions
Find the device manual for free 10033019 Klarstein in PDF.


| Product type | Electric bathroom heater (radiator) |
| Brand | Klarstein |
| Model | 10033019 (with black castors) |
| Power | 1000 W (low) / 2000 W (high) |
| Power supply | 220-240 V ~ 50/60 Hz |
| Dimensions (approx.) | Height 50 cm, Width 70 cm, Depth 20 cm |
| Weight (approx.) | 5 kg |
| Installation | Wall-mounted or on castors (included) |
| Material | Metal (white or black body depending on model) |
| Heating type | Convection / radiation |
| Temperature control | Electronic with thermostat, manual and automatic mode |
| Timer | 24h timer in manual mode, weekly programming in auto mode (up to 4 periods per day) |
| Display | LED screen: temperature, time, day, power, modes |
| Special functions | Open window detection, child lock, automatic shut-off with memory, standby mode |
| Power levels | 2: LO (1000 W) and HI (2000 W) |
| Light indicators | On, heating, power, open window, manual/auto mode |
| Safety distance | At least 1 m from flammable materials |
| Overheat protection | Yes, automatic shut-off |
| Protection rating | IP24 (suitable for bathroom, splash-proof) |
| Maintenance and cleaning | Unplug and allow to cool, clean with a soft dry cloth |
| Included accessories | Black castors (model 10033019), wall mounting kit |
| Repairability | No user-serviceable parts; contact a qualified electrician |
| Warranty | Manufacturer's warranty; attempt at repair voids it |
| Usage | Indoor and outdoor (but sheltered from weather); domestic use only |
Frequently Asked Questions - 10033019 Klarstein
User questions about 10033019 Klarstein
0 question about this device. Answer the ones you know or ask your own.
Ask a new question about this device
Download the instructions for your Pan in PDF format for free! Find your manual 10033019 - Klarstein and take your electronic device back in hand. On this page are published all the documents necessary for the use of your device. 10033019 by Klarstein.
USER MANUAL 10033019 Klarstein
Note: This product is only suitable for well insulated spaces or occasional use.
INHALTSVERZEICHNIS
Technische Daten 3
Abmessungen
| L (mm) | H (mm) | L1 (mm) | H1 (mm) |
| 830 400 | 250 | 254 |
natural_image
Technical line drawing of a mechanical device with a downward arrow indicating motion or assembly (no text or symbols present)natural_image
Symbol of a trash bin crossed with a diagonal line, no text or numbers presentCongratulations on purchasing this equipment. Please read this manual carefully and take care of the following hints to avoid damages. Any failure caused by ignoring the items and cautions mentioned in the instruction manual is not covered by our warranty and any liability. Scan the QR code to get access to the latest user manual and other information about the product:
CONTENT
Technical Data 15
Declaration of Conformity 15
Product Data Sheet 16
Safety Instructions 17
Device overview 20
Control panel 21
Operation 22
Disposal Considerations 26
TECHNICAL DATA
| Item number 10033016 10033017 | ||
| Rated Power (Watt) 1000/2000 | ||
| Power supply 220-240 V ~ 50/60 Hz | ||
| Accessories Castors white Castors black | ||
| Artikelnummer 10033018 10033019 | ||
DECLARATION OF CONFORMITY
Producer:
Chal-Tec GmbH, Wallstraße 16, 10179 Berlin, Germany.

This product is conform to the following European Directives:
2014/30/EU (EMC)
2014/35/EU (LVD)
2011/65/EU (RoHS)
2009/125/EG (ErP)
PRODUCT DATA SHEET
| Item number(s): 10033016 10033017 | ||||||
| Item Symbol Value Unit Item Unit | ||||||
| Heat output Type of heat input, for electric storage local space | heaters only | |||||
| Nominal heat output P | nom | 2,0 kW | manual heat | charge control, with integrated thermostat | no | |
| Minimum heat output (indicative) | Pmin | 1,0 kW | manual heat | charge control with room and/or outdoor temperature feedback | no | |
| Maximum continuous heat output | Pmax,c | 2,0 kW | electronic heat | charge control with room and/or outdoor temperature feedback | no | |
| Auxiliary electricity consumption | fan assisted heat output no | |||||
| At nominal heat output (fan motor) | elmax | 1,890 kW | Type of heat output/room temperature control | |||
| At minimum heat output (fan motor) | elmin | 0,946 | kW single stage | heat output and no room temperature control | no | |
| In standby mode | elsB | 0,38 | W | Two or more manual stages, no room temperature control | no | |
| with mechanic thermostat room temperature control | no | |||||
| with electronic room temperature control | no | |||||
| electronic room temperature control plus day timer | no | |||||
| electronic room temperature control plus week timer | yes | |||||
| Other control options (multiple selections possible) | ||||||
| room temperature control, with presence detection | no | |||||
| room temperature control, with open window detection | yes | |||||
| with distance control option | no | |||||
| with adaptive start control no | ||||||
| with working time limitation | no | |||||
| with black bulb sensor | no | |||||
| Contact details | Chal-Tec GmbH, Wallstraße 16, 10179, Berlin, Germany | |||||
SAFETY INSTRUCTIONS
- Read all instructions before using this unit.
- Do not leave this unit unattended when in use.
- This heater will get hot when in use. Do not touch hot surfaces.
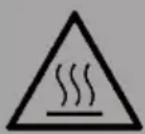
CAUTION: Risk of burns!
Some parts of this product can become very hot and cause burns. Particular attention has to be given when children and vulnerable people are present.
- Do not move the unit when in use. Wait until the heater is completely cool before moving and check that it has been unplugged from the power supply.
- Position the unit at least 1 m away from highly combustible materials such as furniture, trees, leaves, dry grass and bushes.
- The heater must not face with the heating element pointing upwards towards a ceiling. The heater element must be facing the area it is to heat.
Note: In order to avoid overheating do not cover the heater. It is not for drying clothes.
- Keep children and pets at a safe distance from the unit.
- This appliance can be used by children aged from 8 years and above and persons with reduced physical, sensory or mental capabilities or lack of experience and knowledge if they have been given supervision or instruction concerning use of the appliance in a safe way and understand the hazards involved.
- Children shall not play with the appliance. Cleaning and user maintenance shall not be made by children without supervision.
- Do not operate the heater if any signs of damage or malfunction manifest themselves.
- Do not attempt to repair or adjust any electrical or mechanical functions on this unit. The unit does not contain any user serviceable parts. Only a qualified electrician should perform servicing or repairs. Attempting to repair the unit yourself will void your warranty.
- If the power cable is damaged, it must be replaced by the manufacturer, its service agent or similarly qualified persons in order to avoid a hazard.
- Do not handle the element with bare hands. If it is inadvertently touched, remove finger marks with a soft cloth and methylated spirits or alcohol, otherwise the marks will burn into the element causing premature heater failure.
- Do not replace or attempt to replace the element in this product.
- This product is suitable for indoor and outdoor use. Do not use this heater in the immediate surroundings of a bath, shower or swimming pool.
- This product must not be left outdoors exposed to the elements for long periods of time.
- Do not touch the plug with wet or damp hands.
- Do not run the power cable under carpeting. Do not cover the power cable with rugs, runner, or similar coverings. Arrange the power cable away from foot traffic and where it will not be tripped over.
- Do not wind the power cable around the unit.
- Do not insert or allow foreign objects to enter any ventilation or opening on the heater, as this may result in electric shock, fire, or damage to the heater.
• To prevent a possible fire, do not block the air vents.
- A heater has hot and arcing or sparking parts inside. Do not use in areas where petrol, paint, explosive and/or flammable liquids are used or stored. Keep unit away from heated surfaces and open flames.
- Where possible, avoid the use of an extension cable as this may overheat and cause a fire. However, if you have to use an extension cable, ensure it is suitable for the purpose, has been tested for outdoor use and preferably has an RCD device fitted or attached.
- Always ensure the heater is plugged into a suitable socket, one that is tested for outdoor use.
- Always unplug the unit and ensure the unit is completely cold before moving, cleaning or storing.
- This heater is intended for domestic use only and should not be used commercially for contract purposes. Any alternative use, not recommended by the manufacturer, may result in fire, electric shock, or injury to persons.
- The use of attachments on the heater is not recommended.
- Do not use this heater with a programmer, timer, separate remote control system or any other device that switches the heater on automatically, since a fire risk exists if the heater is covered or positioned incorrectly.
ASSEMBLY
| Item number Product | |
| 10033016 | Bathroom metal panel heater white |
| 10033017 | Bathroom metal panel heater black |
| 10033018 | Castors white |
| 10033019 | Castors black |
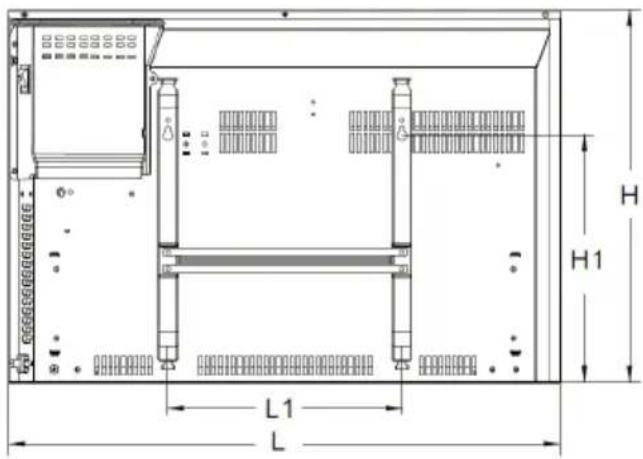
Dimensions
| L (mm) H | (mm) L1 (mm) H1 (mm) | |||
| 830 400 | 250 | 254 | ||
Mounting and dismounting the heater on the wall
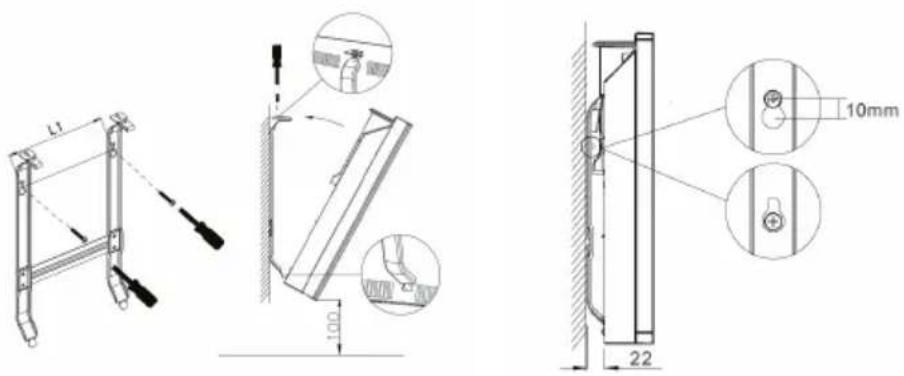
Wall mounted mode Take down the heater from wall
natural_image
Technical line drawing of a mechanical device with a downward arrow indicating motion or assembly (no text or symbols present)If the installation is complete, an acoustic click sounds.
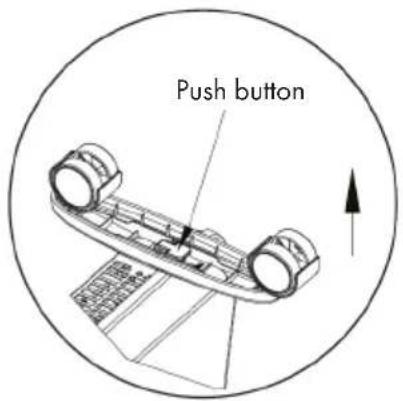
Press the button up, take down the caster.
DEVICE OVERVIEW
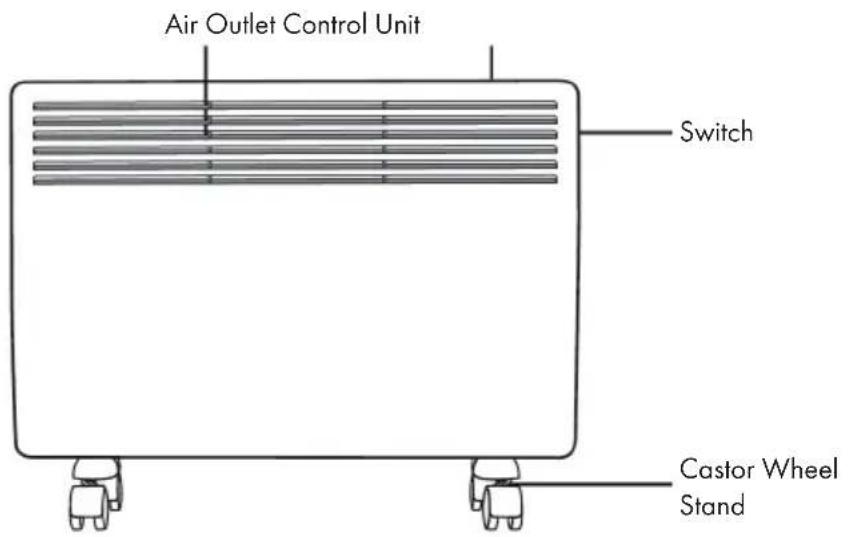
CONTROL PANEL
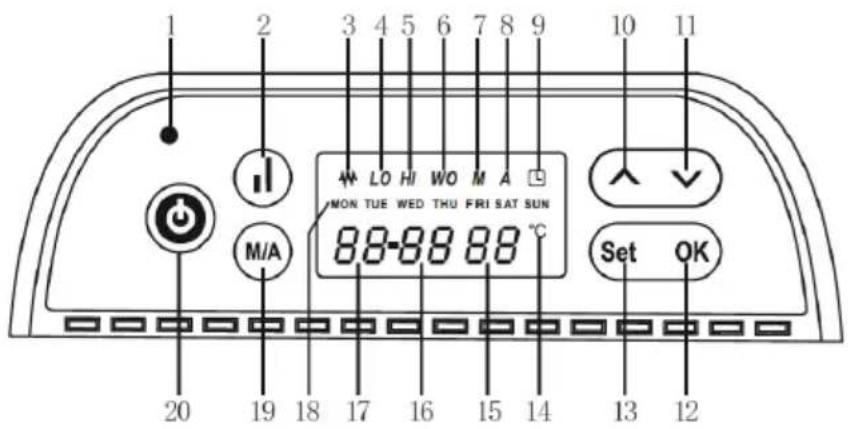
1 Power indicator
2 Heater element power
3 Heating indicator
4 Half Heating indicator (LO)
5 Full Heating indicator (HI)
6 Window Open Indicator (WO)
7 Manual mode indicator (M)
8 Auto mode indicator (A)
9 Timer indicator
10 Upwards adjustment (+) button
11 Downwards adjustment (-) button
12 Program Confirm (OK)
13 Program Set (Set)
14 Degrees Celsius symbol (°C)
15 Temperature indicator
16 Minute indicator
17 Hour indicator
18 Daily indicator
19 Auto and Manual mode change button
20 Power button
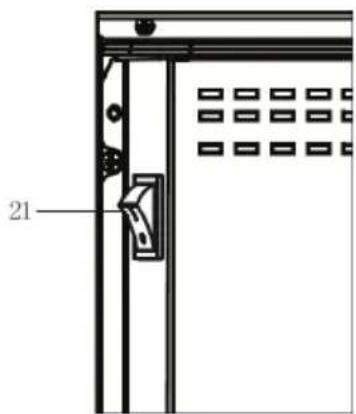
21 Power switch
OPERATION
Initial operation
- Carefully remove the heater from the box. Please keep the carton for off-season storage.
• Make sure the power switch (21) is turned off before pluggin it in. - Make sure that the heater is completely installed according to the installation instructions.
- It is better not to use the same outlet with other high power electrical equipment to avoid overloading the circuit.
Power on
- When the product is connected to the power supply, the red/blue light of the power indicator (1) lights up.
- Press the start/stop button (20), a short buzz sounds and the unit is switched on.
- The display shows the following settings: The day display (18) shows the day of the week (default is MON), the hour display (17) the hours, the minute display (16) the minutes, the temperature display (15) the room temperature, where degrees Celsius (°C) is normally preset. Auto mode (A) is enabled (alarm events, Auto mode default), system default is 35°C. If the device suddenly goes out during operation, the system wakes up again and continues working according to the last setting.
Setting the date and time
1 Press the "OK" (12) and "Set" (13) buttons simultaneously for 5 seconds when switching on, the day of the week display (18) flashes.
2 Press the up button (10) and down button (11) to select the date, confirm the date by pressing the "Set" button (13). The weekday indicator (18) stops flashing.
3 Now the hour display (17) starts flashing, press the up button (10) and down button (11) to select the hour.
4 After pressing the "Set" button (13), the minutes can be set, indicated by the flashing minute display (16).
5 Save the settings by pressing the "OK" key (12) and exit the settings menu.
Setting the temperature
• Auto mode is identical to manual mode, default unit is °C.
- When the instrument is switched on, you can select the temperature with the up (10) and down keys (11) when the temperature display (15) flashes.
- If no action is taken for 10 seconds after the setting is completed, the system automatically saves the setting and exits the menu.
Setting the timer
Setting the Timer in Manual Mode (24-hour timer)
1 Press the Auto/Manual mode button (19) to select the manual mode. The display shows "M" in manual mode (7).
2 Press the "Set" button (13) to set the hour of the timer to stop the heating. Press the up (10) and down (11) buttons to select the hour (if the selected hour is less than the current hour, the system is automatically activated the next day).
3 Press the "Set" button (13) to set the minute of the timer to stop the heating (if the set hour is identical to the current hour but the selected minute is less than the current minute, the system is automatically activated the next day).
4 Press the "OK" button (12) to save and exit the timer setting. The system is stopped at the time you set.
Setting the Timer in Auto Mode (Time Table Timer)
1 Press the Auto/Manual mode button (19) to select the Auto mode. The display shows "A" in Auto mode (8).
2 Press the "Set" button (13) to set the working timer of the heater.
3 Press the up (10) and down (11) buttons to select the week setting date.
4 Press the "Set" button (13) again to set the first working timer of the day.
5 Press the up (10) and down (11) buttons to set the hour for the heating start.
6 Press the "Set" button (13) again and use the up (10) and down (11) buttons to select the stop date of the heating.
7 Press the "Set" button (13) to confirm the first period. The set stop time appears in the day of the week display (18). There are 4 working hours per day.
8 Repeat the above procedure to set the working time for other time periods (if the start time matches the stop time, the system cancels this heating phase).
Power on and off
- Press the start/stop button (20) to turn the heater on or off. If you exit the system while it is in automatic mode, it will work according to the default procedure.
- However, if it is to remain off for a long time, you must switch the system to manual mode and then off. If the system is outside the preset working time, it switches off in 1 second after pressing the start/stop button (20) without any action.
Part power and full power choose
- Press the heating power button (2) to change the power to partial or full load.
- At full load, full heating capacity (5) is shown in the display and half heating capacity (4) shows "LO".
- In the case of partial load, "LO" is activated in the display half heating capacity (4) and "HI" is deactivated in the display full heating capacity (4).
Manual Mode and Auto Mode
- Press the Auto/Manual mode button (19) to change the mode to Manual or Auto.
- In manual mode, the display in manual mode (7) shows an "M" while the "A" is hidden.
- In auto mode, the display in auto mode (8) shows the "A" and the "M" is hidden.
Shutdown memory function
- Press the power switch (20) to turn the unit off and on again, or if it is in standby, turn it on. The temperature is the last set.
- Both the Auto Mode Timer and the Manual Mode Timer have a shutdown memory function.
Switching off the electrical memory function
- If the unit is unexpectedly turned off or there is a sudden power failure, only the power indicator (1) lights up when the power is back on and the system is turned off.
- Press the start/stop button (20) to turn the system back on. The system operates in the last mode saved.
Delete
- Press the "OK" button (12) for 5 seconds until a "di" tone is heard, all previous settings of the week timer or day timer have been deleted.
Open Window Detection
- If an open window is detected, the unit stops the heating.
Delete Open Window Detection
- Press the start/stop button (20) twice to switch off and on. The "WO" indicator light is deactivated in the window open display (6). The heater is in normal operation.
Signal sound
- Each time you press the key, an acoustic signal sounds, a continuous pressure sounds only once.
Child lock
- When the unit is in operation, press the up (10) and down (11) buttons simultaneously for 3 seconds. The system is locked. The temperature display (15) first shows "[ ]" and switches to room temperature after 5 seconds.
- If you make any entry, it will take 5 seconds "[ ]" is displayed, the acoustic signal sounds and then the room temperature is displayed again.
Unlock child lock
1 Switch off the device with the start/stop button (20).
2 The unit switches to the resting stage.
3 Press the up (10) and down (11) buttons for 3 seconds and the child lock is unlocked.
DISPOSAL CONSIDERATIONS
natural_image
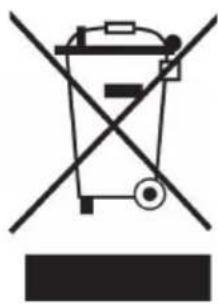
Symbol of a trash bin crossed with a diagonal line, no text or numbers presentAccording to the European waste regulation 2012/19/EU this symbol on the product or on its packaging indicates that this product may not be treated as household waste. Instead it should be taken to the appropriate collection point for the recycling of electrical and electronic equipment. By ensuring this product is disposed of correctly, you will help prevent potential negative consequences for the environment and human health, which could otherwise be caused by inappropriate waste handling of this product. For more detailed information about recycling of this product, please contact your local council or your household waste disposal service.
Chère cliente, cher client,
SOMMAIRE
Fiche technique 27
DÉCLARATION DE CONFORMITÉ

Fabricant:
Chal-Tec GmbH, Wallstraße 16, 10179 Berlin, Allemagne.
FICHE DE DONNÉES PRODUIT
Dimensions
| L (mm) | H (mm) | L1 (mm) | H1 (mm) |
| 830 400 | 250 | 254 |
natural_image
Technical line drawing of a mechanical device with a downward arrow indicating motion or assembly (no text or symbols present)natural_image
Symbol of a trash bin crossed with a diagonal line, no text or numbers presentÍNDICE
Datos técnicos 39
Dimensiones
| L (mm) H | (mm) L1 (mm) | H1 (mm) | |
| 830 400 | 250 254 |
natural_image
Technical line drawing of a mechanical device with a downward arrow indicating motion or assembly (no text or symbols present)natural_image
Symbol of a trash bin crossed out by a diagonal line, with no text or labels present.INDICE
Dati tecnici 51
Dimensioni
| L (mm) | H (mm) | L1 (mm) | H1 (mm) |
| 830 400 | 250 | 254 |
natural_image
Technical line drawing of a mechanical assembly with a downward arrow indicating motion (no text or symbols)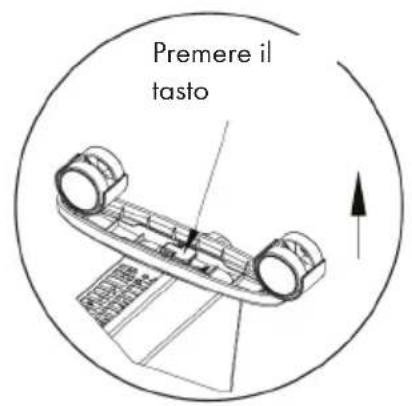
natural_image
Symbol of a trash bin crossed with a diagonal line, no text or numbers present

- INHALTSVERZEICHNIS
- CONTENT
- DECLARATION OF CONFORMITY
- SAFETY INSTRUCTIONS
- CAUTION: Risk of burns!
- ASSEMBLY
- DEVICE OVERVIEW
- CONTROL PANEL
- OPERATION
- Initial operation
- Power on
- Setting the date and time
- Setting the temperature
- Setting the timer
- Setting the Timer in Manual Mode (24-hour timer)
- Setting the Timer in Auto Mode (Time Table Timer)
- Power on and off
- Part power and full power choose
- Manual Mode and Auto Mode
- Shutdown memory function
- Switching off the electrical memory function
- Delete
- Open Window Detection
- Delete Open Window Detection
- Signal sound
- Child lock
- Unlock child lock
- DISPOSAL CONSIDERATIONS
- SOMMAIRE
- DÉCLARATION DE CONFORMITÉ
- ÍNDICE
- INDICE
Brand : Klarstein
Model : 10033019
Category : Pan