
10031206 - Saucepan Klarstein - Free user manual and instructions
Find the device manual for free 10031206 Klarstein in PDF.

| Product type | Electric pressure cooker (pot) |
| Brand | Klarstein |
| Model | 10031206 |
| Article number | 10031206 |
| Power supply | 220-240 V ~ 50-60 Hz |
| Power | 900 W |
| Capacity | 5 L |
| Operating pressure | 40-70 kPa |
| Maximum pressure | 90 kPa |
| Dimensions (approx.) | 30 x 30 x 30 cm |
| Weight (approx.) | 4.5 kg |
| Inner coating material | Non-stick |
| Cooking programs | Rice, Beans/Canning, Soup/Porridge, Baby puree, Cake, Meat/Chicken, Reheating, Steamed fish, Steamed vegetables, Steamed chops |
| Special functions | Delayed start (up to 24 h), Keep warm (up to 24 h), Adjustable pressure holding (2-99 min), Auto shut-off |
| Included accessories | Measuring cup, Rice spoon, Steaming rack |
| Safety | Pressure relief valve, Float valve, Safety lock preventing opening under pressure |
| Care and cleaning | Inner pot and lid washable with soapy water; base wipe with a damp cloth; do not immerse the base |
| Spare parts and repairability | Sealing ring, pressure relief valve, float valve, replacement inner pot (original parts recommended) |
| Warranty | Consult the manufacturer (Chal-Tec GmbH) |
Frequently Asked Questions - 10031206 Klarstein
User questions about 10031206 Klarstein
0 question about this device. Answer the ones you know or ask your own.
Ask a new question about this device
Download the instructions for your Saucepan in PDF format for free! Find your manual 10031206 - Klarstein and take your electronic device back in hand. On this page are published all the documents necessary for the use of your device. 10031206 by Klarstein.
USER MANUAL 10031206 Klarstein
Congratulations on purchasing this equipment. Please read this manual carefully and take care of the following hints to avoid damages. Any failure caused by ignoring the mentioned items and cautions mentioned in the instruction manual are not covered by our warranty and any liability.
Contents
Technical Data 11
Safety Instructions 11
Product Description 12
Overview of the Cooking Process 13
Use and Operation 14
Function of the Controls and Cooking Table 15
Programs and Programming 17
Cleaning and Care 18
Troubleshooting 18
Hints on Disposal 19
Declaration of Conformity 19
Technical Data
| Item number 10031206 | |
| Power supply 220-240 V ~ 50-60 Hz | |
| Power consumption 900 W | |
| Capacity 5 L | |
| Working pressure 40-70 kPa | |
| Limited pressure 90 kPa |
Safety Instructions
- Do not use the cooker in the wet situation, or that full of in flammables.
- Do follow the instructions of the second step in Guide to Operation when placing the food and the water.
- Do not damage the seal ring, for it is not allowed to substitute with other rubber rings, nor with a tension ring to intense seal.
- It would better wash the blocking proof as often as possible to keep it clean. Besides, the release valve needle should be examined as often as possible to ensure its unblocking.
- Do not open the lid forcibly when the float is still up.
- The pressure limit valve is not allowed to be pressed with heavy objects or to substitute with other objects.
-
Do not place a cloth between the lid and the thermal insulator; otherwise, it threats safety.
-
It would better keep clean both the outside bottom of the inner pot and the heater surface. Moreover, the inner pot is allowed neither to heat directly over the fire, nor to substitute with other pots.
- Do use the wooden or plastic spoons to prevent the non-stick coating from damage.
- Keep your face and hands away from the release outlet when it is releasing, and do not touch the lid when it is working, or you will get burnt.
- The maximum of the warm-keeping time is 24 hours, but it would better not surpass 6 hours so that you can get good dishes.
- The maximum of the preset time is 24 hours. You can preset the time as you like, and different time for different food to avoid food going bad.
- It is abnormal that the steam releases much from around the lid during working. In case of that, it can be protected by the safety pressure release setting. Unplug in and stop working, and then return it to the authorized service facility for examination, repair or adjustment.
- Hold the pot ear not the handle of the lid to move the cooker.
- In case it goes wrong while working, do return it to the authorized service facility for examination, repair or adjustment.
- Do not dismantle the cooker or substitute the parts with others by yourself.
- What's more, the spare parts should be from our company.
- Do not dismantle the power cord by yourself in case it is damaged. Besides, it must be replaced by the special cord or by the special parts from our company or the maintenance department.
- Do not let children,disabled,sensory or mental illness and lack of experience and knowledge persons to use alone.
- Products only allow to use in the home and restaurant.
Adults should monitor children to make sure that not play the products. - Indoor use only.
- The appliance must not be opened until the pressure has decreased sufficiently
- When the appliance is not in use and before cleaning, unplug the appliance from the outlet.
- To protect against the risk of electrical shock, do not immerse the unit, cord or plug in water or other liquid.
Product Description
Accessory
| Included accessories Optional accessories | |||
| Measuring cup Rice spoon Steam rack Steamer | |||
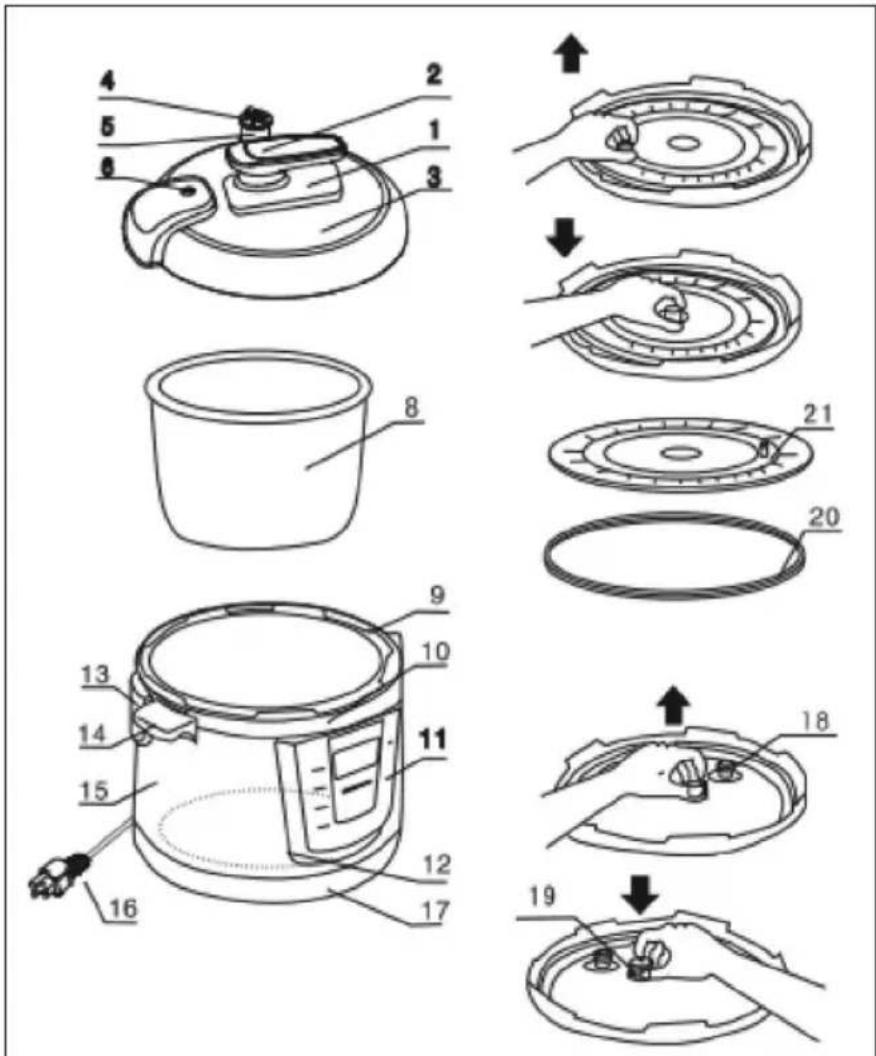
Product Description
1 Handle
2 Handle Lid
3 Lid
4 Pressure Limit Valve
5 Release valve needle
6 Float valve
7 Float
8 Inner pot
9 Middle pot
10 Middle Ring
11 Control Panel
12 Heater
13 Dew Collector
14 Pot Ear
15 Outer Shell
16 Power Cord, Pin Plug
17 Base
18 Seal Ring of Float Valve
19 Blocking Proof
20 Seal Ring
21 Hanging plate
Overview of the Cooking Process
1. Heating Process
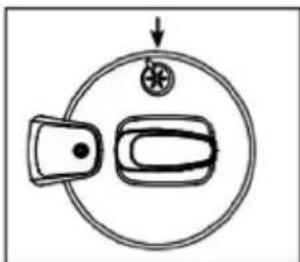
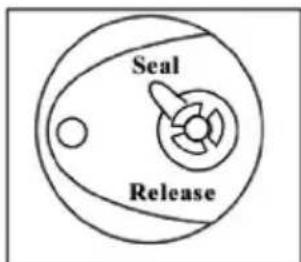
It is the first process, need electric and will produce pressure, the specific working time will depend on the which type of foods and how many foods you cook which do not display on the screen. If the foods is in low level, then the heating time will be less, if there is much foods inside, it need more time for heating certainly. please note, when cooking, you should put the „pressure limited valve“ to „seal“ position, then the cooker inside can save the pressure.
2. Pressure-keeping Process
When the pressure inside reach the working requirement, the cooker will turn to pressure-keeping process from electric heating process automatically, this process depend on the pressure inside to cook, the cooking time which displayed on the screen will count down automatically.
3. Pressure Release Process
when the pressure-keeping time countdown finished, it will turn to „warm“ function, and also will release the pressure inside automatically (the cooker will be locked automatically when there is pressure inside, so you can't open it, you just can open the cooker while all the pressure release completely), this release process is slow, in general, we suggest that you wait for it, or cut off the power, and then cover the lid with a wet towel to accelerate cooling.
However, if you real want to open the lid at once, you can put the „pressure limited valve“ to „release“ position to release pressure by yourself, but please note, you should be careful, because it maybe have steam sprayed out.
Information for Safe Use
- Do put the pressure limit valve to "Seal" before using it.
- Never touch the lid when it is working, for it is very hot.
- Selecting the function, and wait 8 blinks, it turns to work automatic.
- Do not put your hands over "Release" to avoid getting burnt when it is releasing.
- Please put the cooker beyond children's reach.
- Never connect with the power supply before locking the lid.
- Nothing must be on the pressure limit valve.
Use and Operation
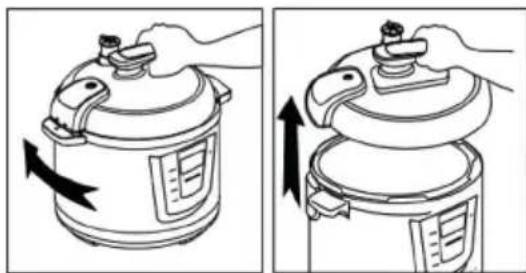
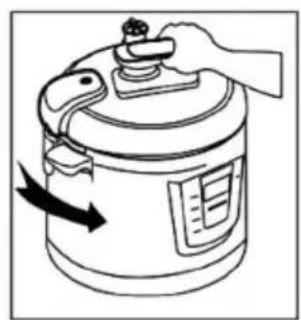
- Open the lid. Hold the handle, turning in clockwise direction to the limited side, and open it.
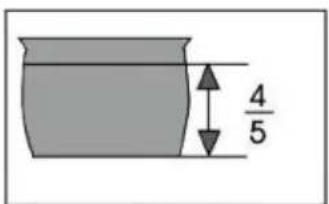
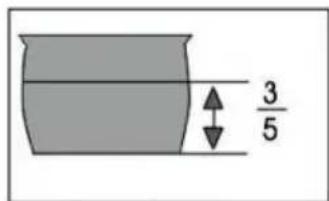
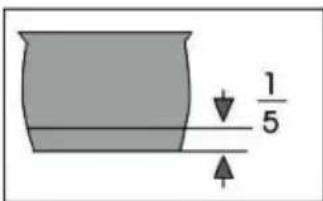
- Put the food and water in the inner pot. The food and water should not be more than 4/5 of the total, the easy-expanding food not more than 3/5, while, the food and water should not be less than 1/5
-
Attach the inner pot inside the thermal insulator. First, clean the outer of the inner pot, the surface of the heater and the inside of the thermal insulator; then attach the inner pot inside the thermal insulator, and make sure they have good connection.
-
Close the lid. Install the seal ring to the lid. Turn the seal ring left and right to make it a good position. Hold the handle and put it in the limited area, turning in contra-clockwise direction to lock up the lid.

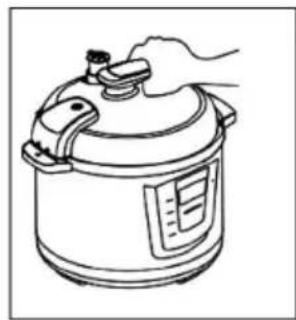
- Install the pressure limit valve, and make sure that the float is down. (It must be down before working).
Function of the Controls and Cooking Table
| Program Set time Time range Temperature range | ||||
| Rice 12 minutes 8-16 minutes 125-145 °C | ||||
| Beans/Tinned 40 minutes 15-50 minutes 100-105 °C | ||||
| Soup/Porridge 18 minutes 8-24 minutes 100-105 °C | ||||
| Baby food | 20 minutes 15-40 minutes 100-105 °C | |||
| Cake | 30 minutes | 30-50 minutes | 125-145 °C | |
| Meat/Chicken 21 minutes 15-30 minutes 100-105 °C | ||||
| Leftover heating | 10 minutes | 5-15 minutes | 100-105 °C | |
| Program Set time Time range Temperature | ture range | |||
| Steam | fish 8 minutes 8-16 m | minutes 100-105 °C | ||
| Vegetable 10 minutes | 8-16 minutes 100- | 105 °C | ||
| short rib 15 minutes 8 | -16 minutes 100-10 | 5 °C | ||
| Warm/Cancel -- -- 65-75 °C | ||||
| Pressure keeping setting -- | 2-99 minutes -- | |||
| Preset setting | -- | 0.5-24 hours | -- | |
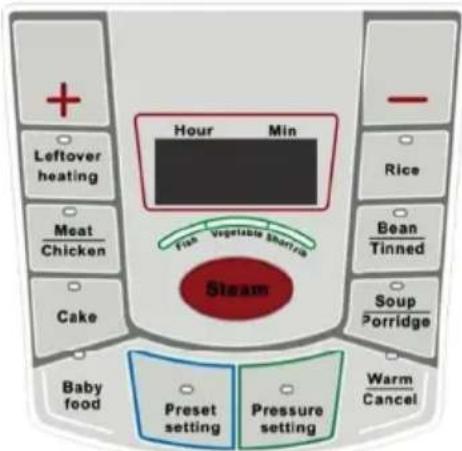
Hints on programs and Functions
Options has functions: rice, baby food, Meat/Chicken, leftover-heating, bean/Tinned, cake, steam (fish, vegetable, short rib), soup/porridge, pressure keeping setting, preset setting. after function chose or setting finished, you just wait 8 blinks then the cooker will start to work automatically
- The "Preset Setting" key is for delayed cooking. Pressing PRESET SETTING each time, the preset time will show on the display and its indicator light will blink. At the beginning, each pressing adds by 0.5 hour. When the preset time goes more than 10 hours, each pressing adds 1 hour. The maximum preset time is 24 hours.
- The "Leftover-heating" key is for heating cold food.
- The "Warm/Cancel" others function finish then will automatic turn to "Warm" function, the warm function light on. The maximum warm time is 24 hours.
- The "Rice" key is fully automated smart program for cooking regular rice or part boiled rice. The cooking duration is adjusted automatically depending on the amount of food inside. To cook 2 cups of rice, it takes about 10 minutes. For 3-6 cups of rice, it takes about 12 minutes, more cups will take longer time accordingly. Total cooking time is not displayed, whereas the pressure keeping time will be shown when working pressure is reached. Please note: you can cook as little as 2 cups of rice with the correct ratio of water.
- The "Soup/Porridge" key is to make sour or porridge. You can use the "+" or "-" to select a cooking time, 18 mins for rice porridge. When the program is finished, do not put steam release handle in venting position, otherwise the porridge will splatter through with the steam release.
- The "Meat/Chicken" key. Choose "+" or "-" key can be used to change the cooking time to achieve the desired texture of the meat. In general, 98 mins has a bone-stripping effect on the meat cooked.
- The "Bean/Tinned" key is specifically for cooking beans and making tinned. If you want the beans well cooked, please use "+" key to select 30mins for cooking.
- The "Baby Food" key is for making food for baby special. You can use the "+" or "-" to select a shorter or longer cooking time.
- The "Steam" key is designed for steaming purposes. You can steam fish, vegetables, short ribs with the provided steam rack. When steaming vegetables and fish, please noted that using the natural release method for releasing the steam will likely overcook the food. You will need to release the steam as soon as the cooking time has expired using the quick release method.
Programs and Programming
Preset Setting
Pressing PRESET SETTING each time, the pertinent preset time shows on the display and its indicator light blinks. At the beginning, each pressing adds by 0.5 hour. When the preset time goes more than 10 hours, each pressing adds by 1 hour. The maximum of the preset time should be 24 hours.
Finishing PRESET SETTING, for example, you set preset time is 4 hours. Then options selecting or pressure-keeping setting, wait 8 blinks, it will turn to count backwards and start to work automatic after 4 hours later. (If the preset time is less than 10 hours, it decreases by 0.5 hour. While, the preset time more than 10 hours, it decreases by 1 hour.)
Pressure Keeping Setting
- Pressing PRESSURE KEEPING SETTING each time, the pertinent pressure-keeping time increases by 2 mins. The maximum of the pressure-keeping time is 98 mins.
- Keep pressing PRESSURE KEEPING SETTING, the pressure-keeping time increases continuously.
- When setting the time, you can not select options.
- Finishing pressure time setting, wait 8 blinks, it turns to work automatic. the indicator light of the pressure time stops blinking. After the pressure inside reaches the design one, the pressure-keeping time decreases by 1 min.
- Press WARM/CANCEL, it will cancel function selecting.
- When it is working, press WARM/ CANCEL to stop working.
- Any function can automatically transfer to warm keeping after its working. And the maximum of the warm-keeping time is 24 hours.
- Unplug in. Hold the handle of the lid, turning in clockwise direction to the limited side, and open it. (Illustration 2&3) The food is serving.
To program the device step by step
- Plug in, press Rice or other options key (or set the pressure-keeping time). 8 blinks later it tums to work automatic, and the time which displayed on the Screen stays on.
- There is a sound when the pressure inside reaches the design one. Then, the pressure-keeping time starts to decrease by 1 min.
- It transfers to warm keeping automatically after the pressure keeping finishes. At the same time, there are 5 sounds, and the indicator light of WARM blinks, The temperature and pressure inside are still very high at that time, meanwhile, The lid can't be opened because of itself's safety protect device
- Wait for the pressure inside releasing and the float falling down by itself, then only open the lid.
- Unplug and serve the food.
Important Hints
- When sticky food cooked, the pressure limit valve should not be raised before the indicator light of warm keeping stops blinking and the float falls down. Otherwise, the food will go out from the release valve needle.
- In general, we suggest you wait for the pressure releasing by itself, but this process will take some time. If you want to accelerate cooling, you can cut off the power, and cover the lid with a wet towel. If you want to release the pressure by yourself, you'd better to release the steam when the indicator light of warm keeping stays on, it indicates the pressure inside is going low. And you also should be careful because there is maybe steam goes out.
Cleaning and Care
- When the appliance is not in use and before cleaning, unplug the appliance from the outlet and allow it to cool down before cleaning.
- Polish the cooker body with a soft cloth. Do not wash the body in the water or spray water over it.
Take off the dew collector to wash thoroughly, then polish with a wet cloth, and put it back. - Wash the inner of the lid thoroughly, including the seal ring, the pressure limit valve, the blocking proof, the release valve needle, the float valve, and then polish dry with a soft cloth.
- Wash the inner pot with a sponge or a non-metal soft brush, and then polish dry the outside with a soft cloth.
- The appliance must be dried completely before using.
Troubleshooting
Error Codes
Troubleshooting
| Error Code E1 E2 E3 | |||
| Problem Sensor trip-out Sensor short circuit Signal switch out of work | |||
| Problem Possible Cause | Solution | |
| Difficult to close the lid The | the seal ring is badly installed Make good instaation | |
| The float sticks the pusher bar | Push the pusher bar gently | |
| Difficult to open the lid The | the float is still up after releasing the steam | Press the float gently with chopsticks |
| The steam leaking from the lid | The seal ring is uninstalled Install the seal ring | |
| The seal ring has food crumbs Clean the seal ring | ||
| The seal ring is damaged Change the seal ring | ||
| The lid is unlocked Lock the lid | ||
| The steam leaking from the float valve | the seal ring of the float valve has food crumbs | Clean the seal ring of the float valve |
| the seal ring of the float is damaged Change the seal ring of the float valve | ||
| The float refusing up The | float blocks the handle plastic Return to the maintenance department for examination, repair or adjustment. | |
| The lid or the pressure limit valve leaks the steam | ||
Hints on Disposal

According to the European waste regulation 2012/19/EU this symbol on the product or on its packaging indicates that this product may not be treated as household waste. Instead it should be taken to the appropriate collection point for the recycling of electrical and electronic equipment. By ensuring this product is disposed of correctly, you will help prevent potential negative consequences for the environment and human health, which could otherwise be caused by inappropriate waste handling of this product. For more detailed information about recycling of this product, please contact your local council or your household waste disposal service.
Declaration of Conformity
Producer: Chal-Tec GmbH, Wallstraße 16, 10179 Berlin, Germany.

This product is conform to the following European Directives:
2014/30/EU (EMC)
2014/35/EU (LVD)
2011/65/EU (RoHS)
Chere cliente, cher client,

- Contents
- Technical Data
- Safety Instructions
- Product Description
- Accessory
- Overview of the Cooking Process
- Heating Process
- Pressure-keeping Process
- Pressure Release Process
- Information for Safe Use
- Use and Operation
- Function of the Controls and Cooking Table
- Hints on programs and Functions
- Programs and Programming
- Preset Setting
- Pressure Keeping Setting
- To program the device step by step
- Important Hints
- Cleaning and Care
- Troubleshooting
- Hints on Disposal
- Declaration of Conformity
Brand : Klarstein
Model : 10031206
Category : Saucepan