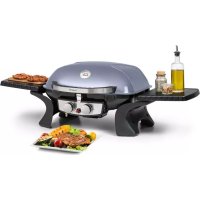
Parforce Duo - Barbecue Klarstein - Free user manual and instructions
Find the device manual for free Parforce Duo Klarstein in PDF.


| Product Type | Gas Barbecue |
| Brand | Klarstein |
| Model | Parforce Duo |
| References | 10033296, 10033297 |
| Usage | Outdoor only |
| Gas Type | Butane (G30) or Propane (G31) |
| Gas Pressure | 28-30 mbar (Butane) / 37 mbar (Propane) for BE/NL; 50 mbar (Butane/Propane) for DE |
| Main burner injector | 0.76 mm (BE/NL) / 0.66 mm (DE) |
| Power | 5.0 kW |
| Gas consumption | 363 g/h (Butane) / 357 g/h (Propane) |
| Power supply | Gas bottle (not included) with regulator conforming to EN12864 |
| Compatible bottle dimensions | Height < 80 cm, width < 35 cm |
| Barbecue dimensions | Not specified in the manual |
| Weight | Approximately 15 kg (estimate for a barbecue of this size) |
| Main functions | Grilling with open or closed lid, integrated spark ignition, main burner |
| Ignition | Piezo igniter with push-button |
| Maintenance and cleaning | Clean grills and interior surfaces with soapy water; regularly check and clean burners and venturi tubes; soap leak test |
| Safety | Do not use indoors; keep children away; do not place bottle under the barbecue; check for leaks; use protective gloves |
| Spare parts | Replace flexible hose every 2 years; electrode, burners and igniter available (not listed) |
| General information | Manufactured by Chal-Tec GmbH, Berlin; CE standard 2531-18; destination countries: BE/NL/DE |
Frequently Asked Questions - Parforce Duo Klarstein
User questions about Parforce Duo Klarstein
0 question about this device. Answer the ones you know or ask your own.
Ask a new question about this device
Download the instructions for your Barbecue in PDF format for free! Find your manual Parforce Duo - Klarstein and take your electronic device back in hand. On this page are published all the documents necessary for the use of your device. Parforce Duo by Klarstein.
USER MANUAL Parforce Duo Klarstein
KLRSTEIN NIELS RKR TEIN NIELS RKR KLAR KLRSTEIN NIELS RKR TEIN NIELS RKR KLAR KLRSTEIN NIELS RKR TEIN NIELS RKR KLAR KLRSTEIN NIELS RKR KLAR
Klarstein
Parforce Duo
Gasgrill Gas Gril
10033296 10033297
DIESER GASGRILL IST NUR FÜR DIE VERWENDUNG IM FREIEN GEEIGNET. THIS GAS GRILL IS DESIGNED FOR OUTDOOR USE ONLY. CE BARBECUE À GAZ CONVIENT POUR UNE UTILISATION EN EXTÉRIEUR UNIQUEMENT. QUESTO DISPOSITIVO É PROGETTATO ESCLUSIVAMENTE PER L'UTILIZZO ALL'APERTO.Esta barbacoa de gas solo es apta para su uso en exterioroes.

Congratulations on purchasing this equipment. Please read this manual carefully and take care of the following hints to avoid damages. Any failure caused by ignoring the mentioned items and cautions mentioned in the instruction manual are not covered by our warranty and any liability. Scan the QR code to get access to the latest user manual and other information about the product.

CONTENTS
Technical Data 15
Safety Instructions 16
Installation 17
Connection to a gas cylinder 20
Operation 21
Maintenance 23
Troubleshooting 24
TECHNICAL DATA
| Models 10033296, 10033297 | |||||
| Country of destination | Appliance Category | Gas Supply and Pressure | Main Burner Injector Sizeø | Heat Inputs (Hs) | Consumption |
| BE/NL I3+/28-30/37) | Butane (G30) 28-30 mbar | 0.93 mm 3.5 | kW 255 g/h | ||
| Propane (G31) 37 mbar | 0.93 mm 3.5 | kW 249 g/h | |||
| DE✓ | I3B (50) Butane/Propane 0.82 mm | 3.5 kW | 255 g/h | ||
| Use Outdoors Only. Read the instructions before using the appliance. The gas cylinder should not be placed inside BBQ. Warning : Accessible parts may be very hot. Keep young children away. | CE | 2531-18 | |||
| Producer: Chal-Tec GmbH 10179 Berlin Germany | |||||
SAFETY INSTRUCTIONS
IMPORTANT:READ ALL INSTRUCTIONS AND OPERATIONS BEFORE OPERATING THIS UNIT. FOLLOW ALL STEPS IN ORDER. NEVER ALLOW CHILDREN TO OPERATE THIS UNIT.
- Only to be used outdoors.
- Read the instructions before using the appliance.
- Accessible parts maybe very hot, keep young children away.
- Do not move the appliance during use.
- Turn off the gas supply at the gas cylinder after use.
- Any modification of the appliance may be dangerous.
- Parts sealed by the manufacturer or his agent must not be altered by the user.
- Do not modify the appliance.
- Some parts of this appliance become very hot, take special care when children or elderly are present.
Fuel handling safety
- Do not store or use gasoline or mentholated fuels or any other flammable vapors and liquids in the vicinity of this or any other appliance.
- Never light a gas grill with gasoline or comparable fluids!
- Suggestion: user should not change the assembly that the manufacturer packaged.
Product safety
- Food can be barbecued on the cooking grid either with or without the lid being
- closed. When the lid is closed for 5 minutes, the lid must be open for 1 minute to
- release heat.
- With a grease tray or a grease cup under the case.
- Adequate ventilation is vital for combustion and efficiency performance of the barbecue. This will ensure the safety of the user and other people in the vicinity of the area where the appliance is being used. Never use the appliance in any enclosed covered area..
- When the wind speed is above 2m / s , don't use gas grill facing to the wind.
- Never mount the cylinder under the barbecue on the base shelf as this could
- result in serious injury to the user, other people and/or property.
- Use protective gloves when handling particularly hot components
- The appliance must not have any overhead obstruction. E.g. trees, shrubs, lean to roofs. The appliance must be installed with a clearance of 1m around the appliance.
- The appliance must not be used near flammable materials. (Petroleum based)
- products, thinners or any other solid object that carries a flammable warning label.].
- The use of this appliance in enclosed areas can be dangerous and is prohibited.
INSTALLATION
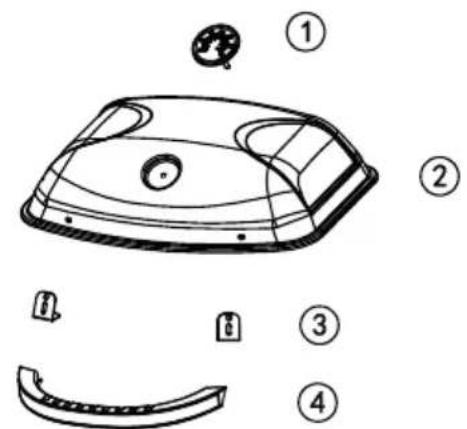
Parts

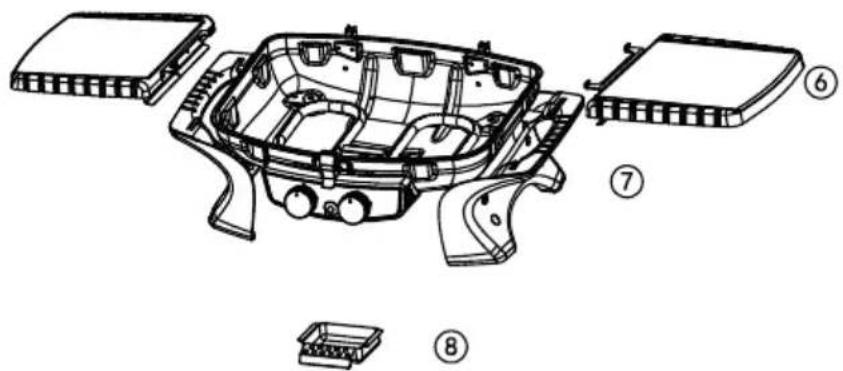
| ① *1 | ② *1 | ③ *2 |
| ④ *1 | ⑤ *2 | ⑥ *2 |
| ⑦ *1 | ⑧ *1 | A M5*2 |
| B 2 | C 2 |
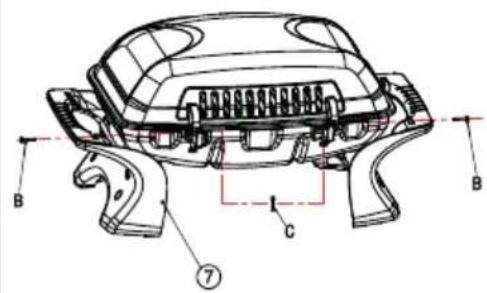
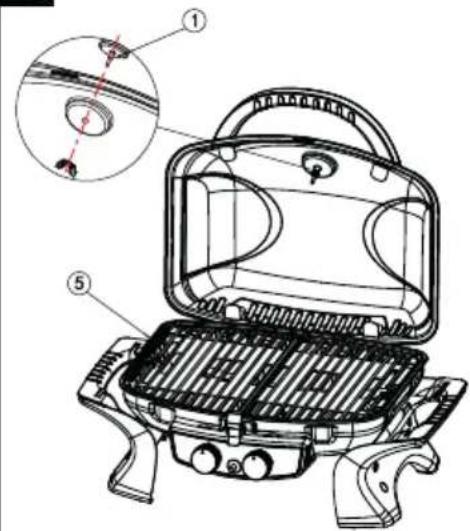
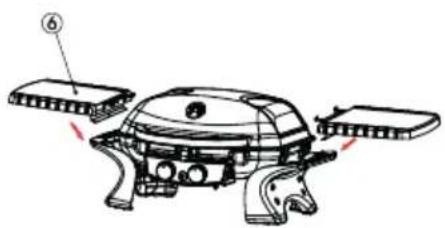
Assembly
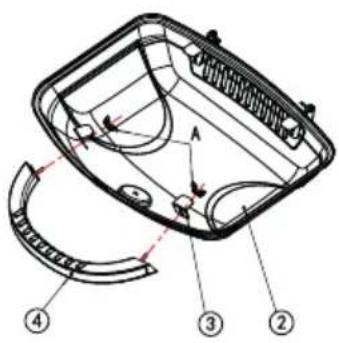
1
2
| B | 2x | |
| C | 2x |
3
4
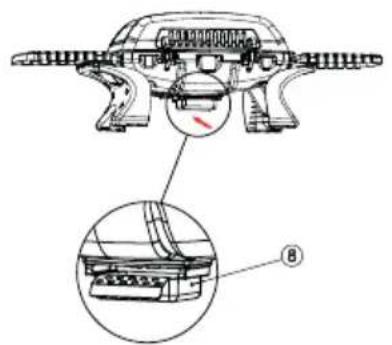
5
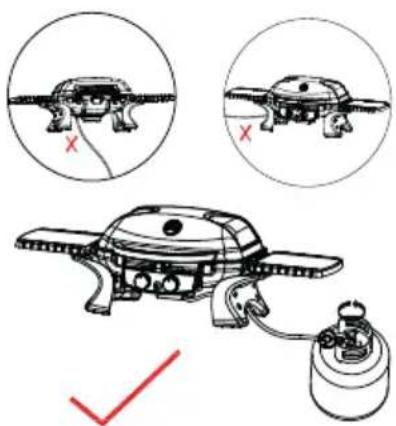
6
CONNECTION TO A GAS CYLINDER
After purchasing your gas cylinder you will then be ready to set it up with gas grill.
- When changing the gas cylinder which shall be carried out away from any source of ignition. Position the gas cylinder at left side of your gas grill. It must not be placed inside the grill. Keep in mind that the bottle must be kept away from heat and in a safe position.
- When ready to use your gas grill insert the regulator into the gas bottle valve and tighten firmly.

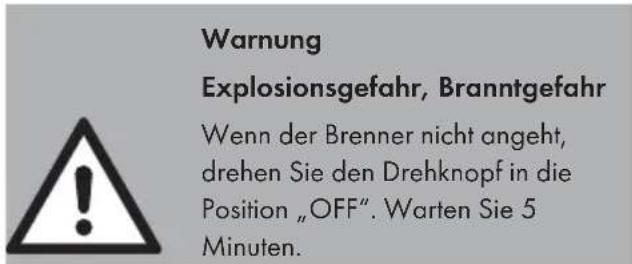
Warning
Risk of exposition. Risk of fire.
Before attempting to light your gas grill you must refer to your lighting instructions and warning / safety points.
You will need LPG gas bottle and proper regulators under the gas pressure to operate this gas grill. The regulators should be comply with EN12864 with current version and national regulation.
Ensure that the hose is not subjected to twisting which will affect the gas flow when installing your gas grill. Also the hose must not have undue tension and must not touch any part of the gas grill which may be hot.
Please choose flexible hose whose heatproof higher than 80
Flexible tube should be changed every 2 years; It's necessary to change the flexible tube when the national conditions require it.
How to change your cylinder
Note: Turn off the switch of cylinder (No spanner is required).
The height of the gas cylinder is below the 80~cm and the width is within 35~cm .
- Turn the orange cap so that the arrow is pointing to the gap in the shroud.
- Remove the orange safety cap by pulling the lanyard out, then out. Do not use tools. Leave the cap hanging.
- Check that the black sealing washer is fitted inside the cylinder valve. Connect the regulator to the valve.
- Turn the switch clockwise on gas bottle-then turn on the gas grill as instructed.
How to disconnect a gas bottle
- Except for twin-cylinder installations with a changeover valve, turn off the gas tap if fitted to the appliance. Wait until the burner and pilot light have gone out. For installations with a changeover valve, it is only necessary to switch off the empty cylinder.
- Replace the orange safety cap onto the empty cylinder.
OPERATION
Please read the following points before using your gas grill
- Always test gas line for leaks at connector with soapy water after making connections.
- The top lid must always be open when lighting the burner.
- Use oven gloves and sturdy, long handled gas grill tools when cooking on the grill.
- Be prepared if an accident or fire should occur. Know where the first aid kit and fire extinguishers are and know how to use them.
- Keep any electrical supply cord and the fuel supply hose away from any heated surfaces.
Always cook with great care. - Do not heat any unopened glass or metal container of food on the grill. Pressure may build up and cause the container to burst, possibly resulting in serious personal injury or damage to the grill.
Lighting instructions

With all gas controls on the Gas grill in the "OFF" position "● OFF", turn the gas cylinder valve to the on position at the regulator. To create a spark you must press the control knob (A) and hold in this position for 3-5 seconds to allow gas flow and then turn anticlockwise to "HIGH" (B). It can spark to the burner lighting tube (C). You will hear a "snap" from the igniter and you will also see a orange flame coming from the burner lighting tube at the left side of the burner (D).
Continue to hold the burner control knob in for two seconds after the "snap", this will allow gas to flow completely down the burner tube (E) and insure ignition. When the burner is alight, adjacent burners will cross light when their controls are turned to "HIGH".
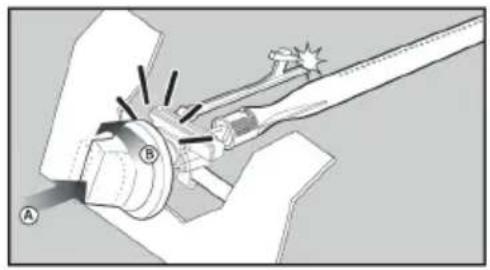
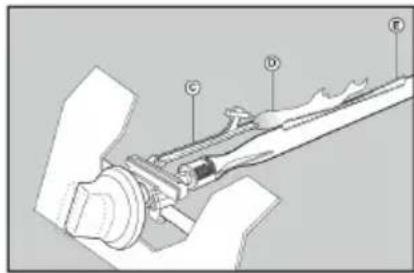
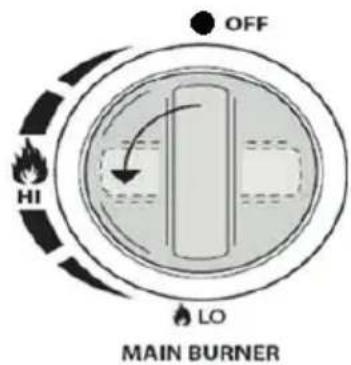
At "High" setting the burner flame should be approximately 12-20mm long with a minimum of orange flame. Turn the gas control fully anticlockwise for minimum setting. Should you have any difficulty lighting your gas grill following the above steps, contact your dealer for advice.
If the automatic ignition can't be used, please remove the cooking grill and heat diffuser (hotplate), and turn the valve anticlockwise to 90^ to light with BBQ lighter in the distance of 5mm to the burner fire hole. Replace the cooking grill and heat diffuser (hotplate), please wear the fireproof and heat resisting gloves.
Energy saving tips
- Reduce the opening time of the lid.
- Turn the grill off as soon as cooking is completed.
- Preheat the gas grill for 10 to 15 minutes only. (Except for the first use)
- Do not preheat longer then recommended.
- Do not use a higher setting than required.
- Connect the hose and regulator to the gas container at the left side of the gas grill. Keeping in mind that the gas container must be kept away from heat and in a safe position. The hose dimension is 8-10mm diameter. The Length of hose recommended which shall not exceed 1.5m.
MAINTENANCE
Storage
Your Gas Bottle must be stored outdoors in a well ventilated area and must be disconnected from your gas grill when not being used. Ensure that you are outdoors and away from any sources of ignition before attempting to disconnect your gas bottle from your gas grill.
When you are using your gas grill after a period of storage, please ensure to check for gas leaks and check for any obstructions in the burner etc. before using. Also follow the cleaning instructions to ensure gas grill is safe.
If gas grill is stored outdoors ensure to check that all areas under the front panel are free from any obstructions (insects etc.) This area must be kept free as this may affect the flow of combustion or ventilation air.
Cleaning
Maintenance is recommended that every 90 days for your gas grill, but it is absolutely necessary to perform maintenance at least once a year. By doing so, you will extend the life of your gas grill.
Your gas grill is easy to clean with minimum effort, just follow these helpful hints for cleaning convenience.
| Problems Possible cause | Prevention/ Solution | |
| Gas leaking from cracked/cut/burned hose | Damaged hose Turn off gas at LP tank | if hoes is cut or cracked, replace hose.See LP tank lead test and con- nection regulator to the LP tank |
| Gas leaking from LP tank | Mechanical failure due to resting or mishandling. | Turn off LP tank valve |
| Gas leaking from LP tank valve | Failure or tank valve from mis- handling or mechanical failure | Turn off LP tank valve. Return LP tank to gas supplier |
| Gas leaking between LP tank and regula- tor connection | Improper installation, connection not tight, failure of rubber seal | Turn off LP tank valve, remove regulator from cylinder and visually inspect rubber seal for damage, see LP tank test and connection regulator to the LP tank |
| Fire coming through control panel | Fire in burner tube section of burner due to partial blockage | Turn off control knobs and LP tank valve. Af- ter fire is out and grill is cold, remove burner and inspect for spider nests or rust. see natural haz- ard and cleaning the burner assembly pages. |
| Grease fire or continu- ous excessive flames above cooking surface | Too much grease build- up in burner area | Turn off LP Tank. Leave lid open to allow flames to die down. After cooling, clean food parti- cles and excess grease from inside firebox area, grease cup/pan/tray, and other surfaces |
| Burner will not light using ignites. | Gas issues1.Trying to light wrong burner2. Burner not engaged with control valve3. Obstruction in burner4.No gas flow5.Vapor lock at cou- pling nut to LP tank6. Coupling nut ad LP tank valve not fully connected. | 1. See instructions on control panel and section in the Use and Care.2. Make sure valve are positioned inside of burner tubes.3. Ensure burner tubes are not obstruct- ed with spider webs or other matted, see cleaning section of use and care4.Make sure LP tank is not empty. If LP tank is not empty, refer to "sudden drop in gas flow.5.Turn off knobs and disconnect coupling nut from LP tank. Reconnect and retry.6. Turn the coupling nut approximately. |
| Burner will not light using ignitor. | Electrical issues1. Electrode cracked or broken;” sparks at crack.”2. Electrode tip not in proper position3. Wire and/or electrode covered with cooking residue4. Wires are loose or disconnected5. Wires are shorting (sparking) between igitor and electrode6. push button sticks at bottom sparking between ig-nitor and electrode. | 1. Replace electrode.2. Tip of electrode should be pointing to-ward port hole in burner. The distance should be 1/8” to 3/16”. Adjust if necessary.3. Clean wire and or electrode with rub-bing alcohol and clean swab.4. Reconnect wires or replace electrode/wire assembly.5. Replace ignitor wire6. Replace ignitor7. Inspect wire insulation and proper connec-tion. Replace wires if insulation is broken. |
| Burner will not mach light. | See "gas issues;" on previous page.2. Improper method of match-lighting. | 1. See “Pilot Gas Control Igni-tion” section of use and care. |
| Sudden drop in gas flow or low flame. | 1. Grease buildup.2. Excessive fat in meat.3. Excessive cooking temperature | 1. Clean burners and inside of grill/ firebox2. Trim fat from meat before grilling. |
| Flames blow out. High or gusting winds.Low on LP gas.Excess flow valve tripped. | Turn front of grill to face wind or increase flame height.Refill LP tank.Refer to "sudden drop in gas flow" above. | |
| Persistent grease fire. Grease trapped by food buildup around burner system. | Turn knobs to OFF. Turn gas off at LP tank.Leave lid in position and let fire burn out. Af-ter grill cools, remove and clean all parts. | |
| Flashback...(fire in burner tube(s)) | Burner and burner tubes are blocked. | Turn knobs to OFF. clean burner and/or burner tubes. See burner cleaning section of use and care manual. |
| Flare-up 1. Grease buildup.2. Excessive fat in meat.3. Excessive cooking temperature | 1.Clean burners and inside of grill/ firebox2. Trim fat from meat before grilling.3. Adjust (lower) temperature | |
| Unable to fill LP tank Some dealers have older fill nozzles with worn threads. | Turn worn nozzles don't have enough "bite" to engage the valve. Try a second LP dealer. | |
| One burner does not light from other burner(s) | Grease buildup or food parti-cles in end of carryover tube | Clean carry-over tube with wire brush |
If your problem is not resolved from the information above, please Contact your local gas dealer.
a) Turn the burner on for 15 to 20 minutes. Ensure appliance is cold before continuing.
- Grids should be cleaned periodically by soaking and washing in soapy water.
- The interior surfaces of the grill housing cover should also be washed with hot, soapy water. Use a wire brush, steel wool or a scouring pad to remove stubborn spots.
- Periodically check the burner to see that it is free from insects and spiders which may clog the gas system, deflecting gas flow. Ensure to clean venturi pipes on burner very carefully, make sure that there are no obstructions. We recommend that you use a pipe cleaner to clean the venturi pipe area.
- Any modifications of this appliance may be dangerous and are not permitted.
Chere cliente, cher client,

- KLRSTEIN NIELS RKR TEIN NIELS RKR KLAR KLRSTEIN NIELS RKR TEIN NIELS RKR KLAR KLRSTEIN NIELS RKR TEIN NIELS RKR KLAR KLRSTEIN NIELS RKR KLAR
- Klarstein
- CONTENTS
- TECHNICAL DATA
- SAFETY INSTRUCTIONS
- Fuel handling safety
- Product safety
- INSTALLATION
- Assembly
- CONNECTION TO A GAS CYLINDER
- Warning
- How to change your cylinder
- How to disconnect a gas bottle
- OPERATION
- Please read the following points before using your gas grill
- Lighting instructions
- Energy saving tips
- MAINTENANCE
- Storage
- Cleaning
Brand : Klarstein
Model : Parforce Duo
Category : Barbecue