
HCA62741BH - Basket BEKO - Free user manual and instructions
Find the device manual for free HCA62741BH BEKO in PDF.
| Product type | Decorative chimney hood |
| Brand | Beko |
| Model | HCA62741BH |
| Color | Stainless steel and glass |
| Width | 60 cm |
| Electrical supply | 220-240 V, 50 Hz |
| Motor power | Not specified |
| Number of speeds | 4 (including a timed one at maximum speed) |
| Lighting | Variable intensity LED (5 levels) |
| Air outlet diameter | 120/150 mm |
| Minimum installation height (gas) | 50 cm |
| Minimum installation height (electric) | 45 cm |
| Grease filter type | Aluminum, dishwasher safe |
| Carbon filter type | Optional, replacement every 4 months |
| Grease filter alarm | Yes (flashing LED) |
| Carbon filter alarm | Yes (manually activated) |
| Boost function | Yes (speed 4 for 5 minutes) |
| Body material | Stainless steel |
| Panel material | Glass |
| Control type | Touch electronic |
| Energy efficiency class | Not specified |
Frequently Asked Questions - HCA62741BH BEKO
User questions about HCA62741BH BEKO
0 question about this device. Answer the ones you know or ask your own.
Ask a new question about this device
Download the instructions for your Basket in PDF format for free! Find your manual HCA62741BH - BEKO and take your electronic device back in hand. On this page are published all the documents necessary for the use of your device. HCA62741BH by BEKO.
USER MANUAL HCA62741BH BEKO
Please read this manual first!
Dear Customers!
Thank you for preferring a Beko product. We hope that you get the best results from your product which has been manufactured with high quality and state-of-the-art technology. Therefore, please read this entire user manual and all other accompanying documents carefully before using the product and keep it as a reference for future use. If you handover the product to someone else, give the user manual as well. Follow all warnings and information in the user manual.
Remember that this user manual is also applicable for several other models. Differences between the models are explicitly described in the manual.
Meanings of the Symbols
Following symbols are used in the various section of this manual:

Important information and useful hints about usage.

WARNING:Warnings for dangerous situations concerning the safety of life and property.
Warning for electric shock.
Warning for hot surfaces.

This product has been manufactured in environmental friendly modern plants without giving any harm to the nature.
ENGLISH 5-18
DEUTSCH 19-36
БылгAPСКИ 37-54
ČESKY 55-70
NEDERLANDS 71-88
ESTONIAN 89-104
FRANÇAIS 105-122
HRVATSKI 123-138
ITALIANO 139-155
LIETUVIU 156-172
POLSKI 173-189
PORTUGUES 190-207
PyCCKn 208-226
SLOVAKIA 227-242
1 Important safety and environmental instructions 5-8
1.1 General safety 5
1.1.1 Electrical safety 5
1.1.2 Product safety 6
1.1.3 Children's safety 7
1.2 Intended use 7
1.3 Compliance with WEEE Directive and disposing of the waste product 8
Compliance with RoHS Directive: 8
1.4 Package information.. 8
2 Technical specifications of your appliance 9
3 Installing your appliance 10-13
3.1. Power connection 10
3.2.Installation 10
3.2.1 Before you start installation: 10
3.2.2 Preparation for the Assembly of the Hood onto the Wall 11
3.2.3Assembling the hood flue 12
3.2.4 Assembly of the Hood onto the Wall 13
4 Operating your appliance 16
4.1 Operation 16
4.2 Control with levels 16
4.3 Grease filter alarm 16
4.4 Charcoal filter alarm 16
4.5 Energy efficient usage: 16
5 Cleaning and maintenance 17-18
5.1 Cleaning 17
5.2 Cleaning the glass panel 17
5.3 Charcoal filter (filtered models only) 17
Circular charcoal filter. 17
5.4 Grease filter 17
5.5 Cleaning 18
5.6 Replacing the lamps 18
01M-8847943200-4615-03
01M-8847953200-4615-03
01M-8847963200-4615-03
01M-8847973200-4615-03
01M-8847983200-4615-03
01M-8847993200-4615-03
01M-8850553200-4615-03
01M-8848003200-4615-03
01M-8851133200-4615-03
01M-8851143200-4615-03
1
Important safety and environmental instructions
This section contains safety instructions that will help protect from risk of personal injury or property damage. Failure to follow these instructions invalidates the granted warranty.
1.1 General safety
- Always have the installation and repairing procedures carried out by the Authorized Service Agent. Manufacturing firm shall not be held responsible for damages that may be caused by unauthorized persons.
- This appliance is not intended for use by persons (including children) with reduced physical, sensory or mental capabilities, or lack of experience and knowledge. Children should be supervised to ensure that they do not play with the appliance.
1.1.1 Electrical safety
Always unplug the appliance from the mains supply during installation, maintenance, cleaning and repair operations.
-
If the power cable is faulty, it should be replaced by a qualified person certified by the manufacturer, after-sales service or similar (preferably an electrician) or a person described by the importer.
-
Operating voltage is 220 to 240 volts.
- If the appliance has a failure, it should not be operated unless it is repaired by the Authorized Service Agent. There is the risk of electric shock!
- Do not route power cable close to hobs. Otherwise power cable may cause fire since it melts down easily.
- Never plug the hood before installation is completed.
In order to obtain the best performance, external conductor must not be longer than 4m . It must not contain more than 2 perpendicular (90^) angles and its diameter must be min. 120mm - Disconnect the appliance from mains before any intervention to the internal parts of the appliance.
- Use the appliance with a grounded outlet only.
1
Important safety and environmental instructions
1.1.2 Product safety
- You can use a pipe with a diameter of 120mm or 150mm on the flue connection of the hood.
- Do not make connections to the flues connected with stoves, exhaust shafts or flues with rising flames. Observe the rules set by authorities on the discharge of exhaust air.
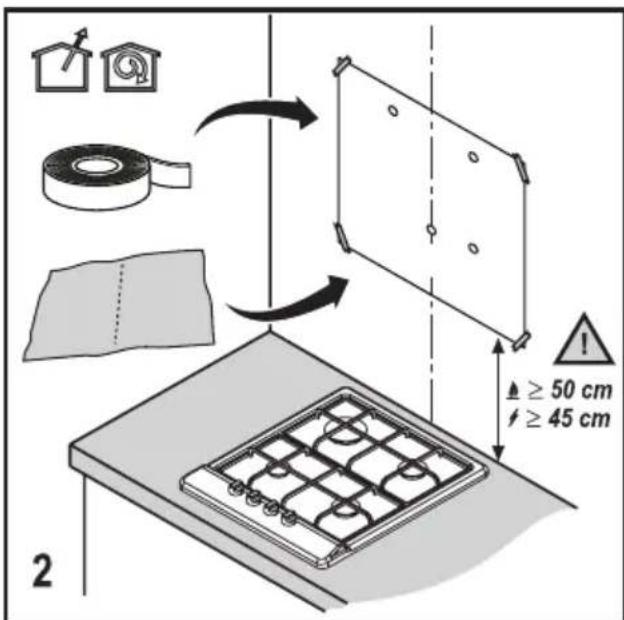
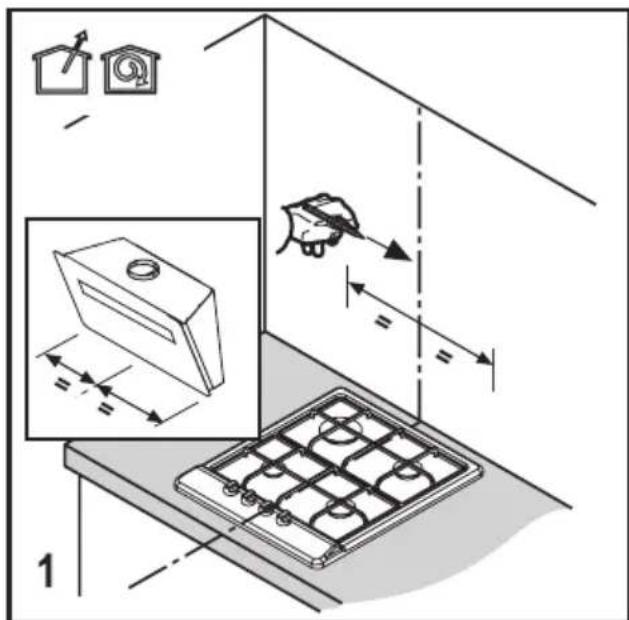
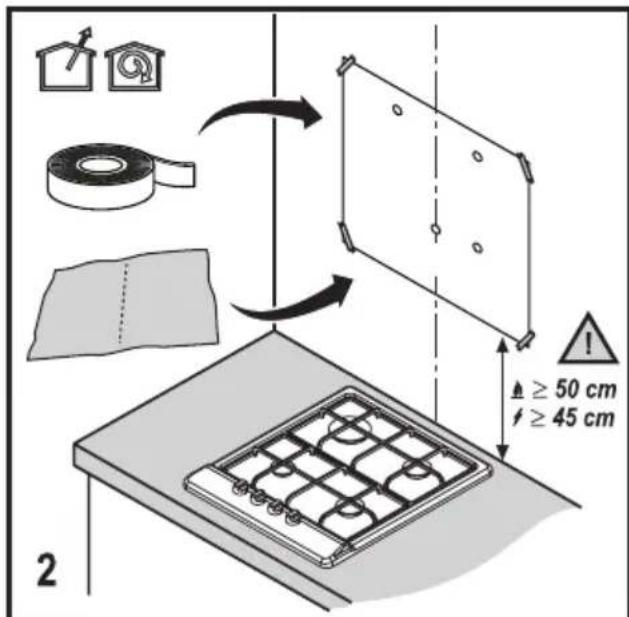
- The height between the lower surface of the hood and upper surface of the stove/oven should not be less than 50~cm for gas hobs and 45~cm for electric hobs.
- Do not operate the hood without aluminum filters and do not remove the filters while it is operated.
- Never touch the hood's lamps after they are operated for a long time. Hot lamps may burn your hand.
- Avoid large flames beneath the product. Otherwise, particles on oil filter may ignite and lead to a fire.
-
Turn on the hobs after placing pans or pots on it. Otherwise, rising heat may deform certain parts of your product.
-
Turn off the hobs before taking away pans or pots.
- Avoid inflammable materials under the hood.
- Oil may ignite while frying foods. Therefore, be careful about cloths and curtains.
- Never leave the cooker unattended when frying foods; otherwise hot oil may cause fire.
- There is the risk of fire if your hood is not cleaned in the specified periods.
- Be extremely careful and wear gloves when cleaning the hood.
- We advise you to operate the appliance a few minutes before starting to cook in order to increase the suction power. Thus, you shall have a continuous and stable suction power when the vapors arise.
- Operate your hood for 15 minutes more after the end of cooking or frying in order to remove the smell and cooking vapor in the kitchen.
- When the hood is in use, especially together with gas cookers, make sure that environment is ventilated with clean air.
1
Important safety and environmental instructions
- Pay attention not to connect the appliance to the flues used by non-electrical devices. (E.g.: Heater flue).
- Simultaneous and smooth operation of the hood and another device that require air is only possible when a low pressure of 4 Pa (0.04 mbar) is reached, and thus the reabsorption of the gas is avoided. This can only be achieved by means of air coming from uncovered openings (door, window, ventilation openings or other technical measures). Pay utmost attention to provide sufficient air flow. A flue that provides air ingress/egress is not enough for this purpose.
1.1.3 Children's safety
- Packaging materials are dangerous to children. Keep packaging materials in a safe place out of reach of children.
-
Electrical appliances are dangerous to children. Keep children away from the product. Do not allow children play with the appliance.
-
This appliance can be used by the children who are at the age of 8 or over and by the people who have limited physical, sensory or mental capacity or who do not have knowledge and experience, as long as they are supervised with regard to safe use of the product or they are instructed accordingly and understand the risks of using the product. Children should not play with the appliance.
- CAUTION: Accessible parts may heat up when used with a cooking device.
1.2 Intended use
- This appliance is intended for domestic use. It is not suitable for commercial use and it must not be used out of its intended use.
- The manufacturer shall not be liable for any damage caused by improper use or handling.
Service life of your appliance is 10 years. This is the period required for availability of spare parts for proper functioning of the product. - WARNING: Failure to fix the screws in concordance with the instructions provided in the manual may lead to electrical hazards.
1
Important safety and environmental instructions
1.3 Compliance with WEEE Directive and disposing of the waste product
This product complies with EU WEEE Directive (2012/19/EU). This product bears a classification symbol for waste electrical and electronic equipment (WEEE).
This product has been manufactured with high quality parts and materials which can be reused and are suitable for recycling. Do not dispose of the waste product with normal domestic and other wastes at the end of its service life. Take it to the collection center for the recycling of electrical and electronic equipment. Please consult your local authorities to learn about these collection centers.
Compliance with RoHS Directive:
The product you have purchased complies with EU RoHS Directive (2011/65/EU). It does not contain harmful and prohibited materials specified in the Directive.
1.4 Package information
Package of the product is made of recyclable materials in accordance with our National Legislation. Do not dispose of
the packaging materials together with the domestic or other wastes. Take them to the packaging material collection points designated by the local authorities.
2 Technical specifications of your appliance
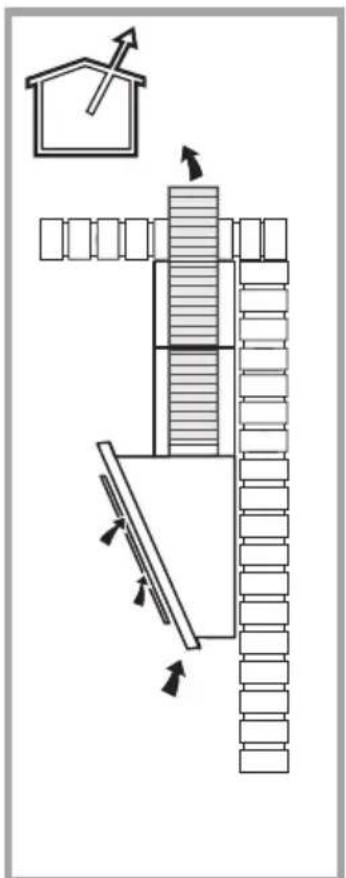
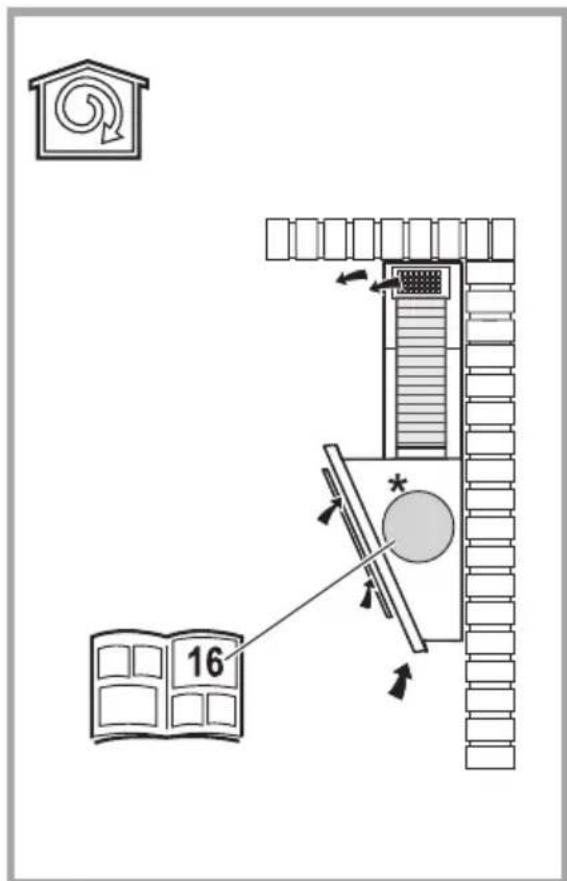

Usage with charcoal filterUsage with flue
Markings on the product or the values stated in other documents supplied with the product are values obtained under laboratory conditions as per relevant standards. These values may vary depending on operational and environmental conditions of the product.
B Installing your appliance
Please consult the nearest Authorized Service Agent for the installation of the hood.
*Preparation of location and electrical installation for the product is under customer's responsibility.

WARNING: Remove the protective film (if any) on the hood and flue surface after the installation.
The height between the lower surface of the hood and upper surface of a hob should not be less than 50~cm for gas hobs and 45~cm for electric hobs.
Have a qualified electrician make the electrical connection.
Install your product so that you can reach the power connection (plug, outlet) easily after installation.
Dimensions are given in mm.
3.1. Power connection
- Main power supply should comply with the values indicated on the plate inside the hood. Connect the hood to an outlet in compliance with current regulations by means of a plug and place it within an accessible area. After installation; if device doesn't have a plug (direct mains supply connection) or plug is out of reach, use a double-pole switch in line with standards, that enables disconnection of main plug under circumstances related to overcurrent category III.

WARNING: Before reconnecting the hood to main power source and checking if it functions correctly, ensure that main power cable is connected properly.
- The hood is equipped with a special power cable. Contact Authorised Service Agent if the the power cable is damaged.
3.2. Installation
3.2.1 Before you start installation:
- Check that the product purchased has appropriate sizes for installation location.
- Remove the active charcoal (*) filter if supplied (see also relative paragraph). That/those will only be installed if you want to use the hood as a filtered model.
- Check if any other material (such as screw package () , warranty card () etc.) is delivered in the hood and if available, remove them and keep elsewhere.
- If possible, remove freestanding or sliding hob and pull it aside in order to reach rear wall / ceiling easily. If not possible, cover the bench, hob or oven with a thick protective cloth in order to secure them against damage and dirt. Select a flat surface to install the appliance. Cover the surface with a protective cloth and place all awning hood parts and hardware in it.
- Besides; check if a plug is available on assembly area of hood (besides, on the accessible area after assembling the hood) and check if connecting the hood to outside (only for the model with aspiration) is possible.
- Finish all required operations related to wall (e.g. plugging power plug and/or opening a hole for discharge hose).
Wide dowels are available to allow for fixing the hood on a variety of wall/ceiling types. Additionally, conformity of material to wall/ceiling type should be confirmed by a qualified technician. Wall/ceiling should be able to sustain the hood. Do not assemble the appliance on tile, plaster or silicon surfaces. Assemble it only on to a wall.
If a panel and/or side wall and/or furniture exist, check that there is sufficient place for assembly of hood and that control panel is easily accessible.
3 Installing your appliance
3.2.2 Preparation for the Assembly of the Hood onto the Wall
Information required for the preparation of the installation place for your hood is given below.
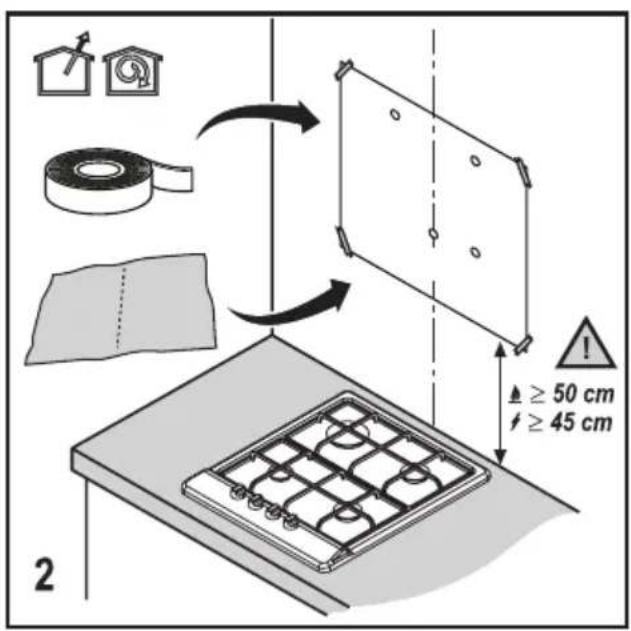
- Mark the surface where assembly template is going to be hung. (Figure 1)
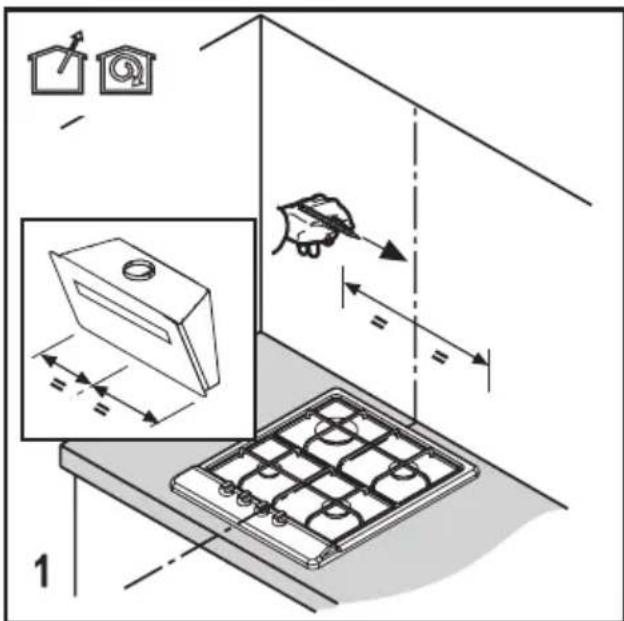
- Affix the assembly template onto the installation place of the hood. (Figure 2)
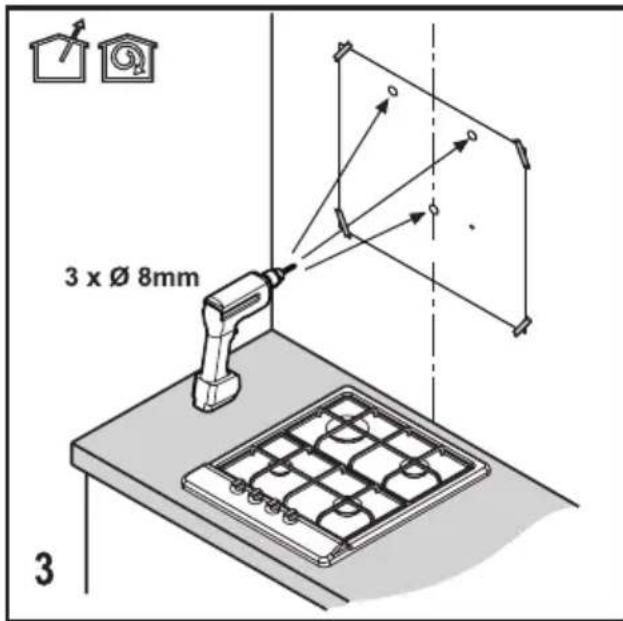
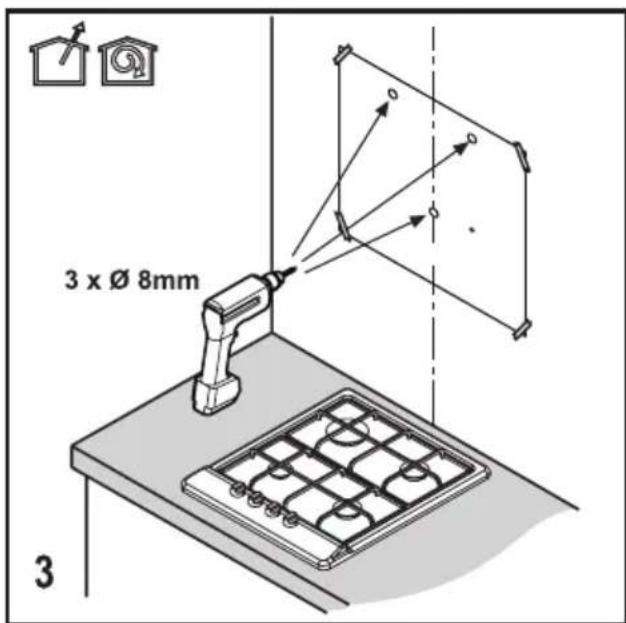
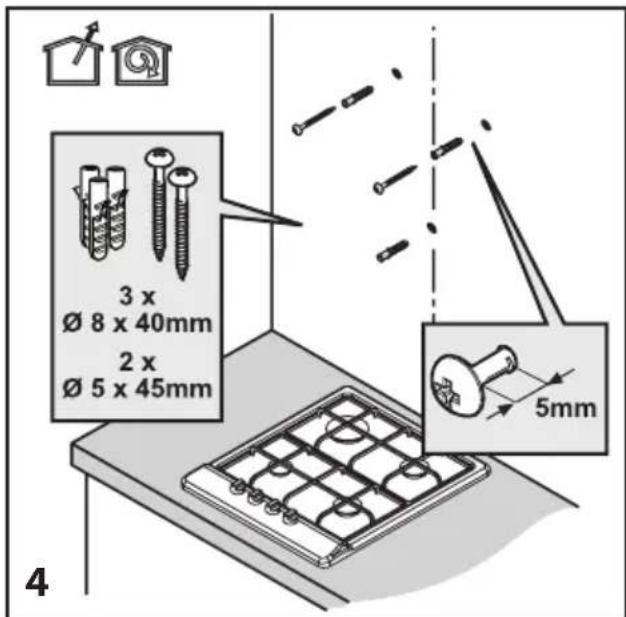
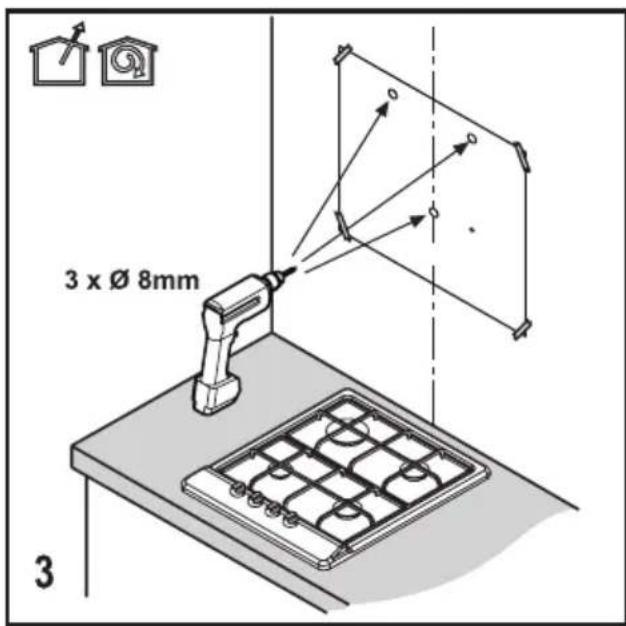
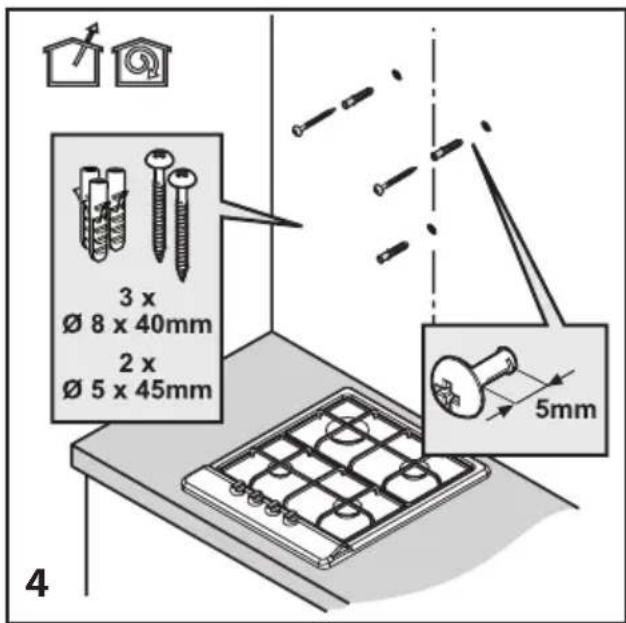
- Drill a hole with 0 8 mm bit on marked points. (Figure 3)
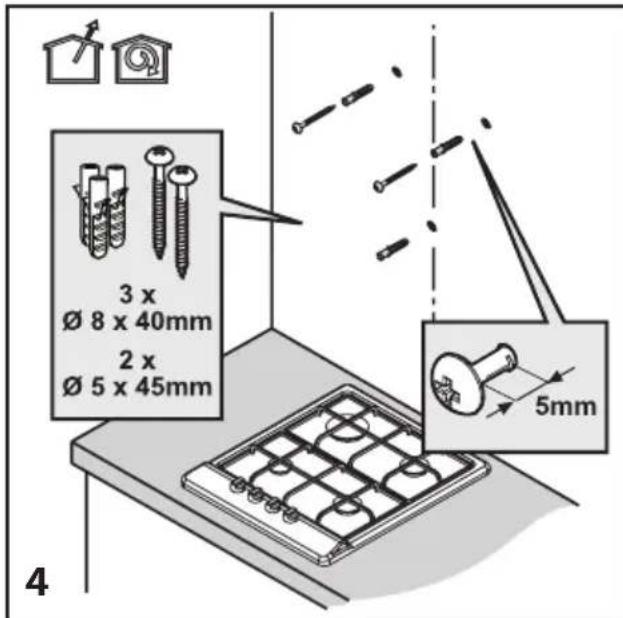
- Hammer 3 pieces of 0.8 × 40 mm dowels in drilled holes. Screw 2 pieces of 0.5 × 45 mm hanging screws to dowels hammered above. There must be a gap of 5 ~mm between the screw head and the wall. (Figure 4)
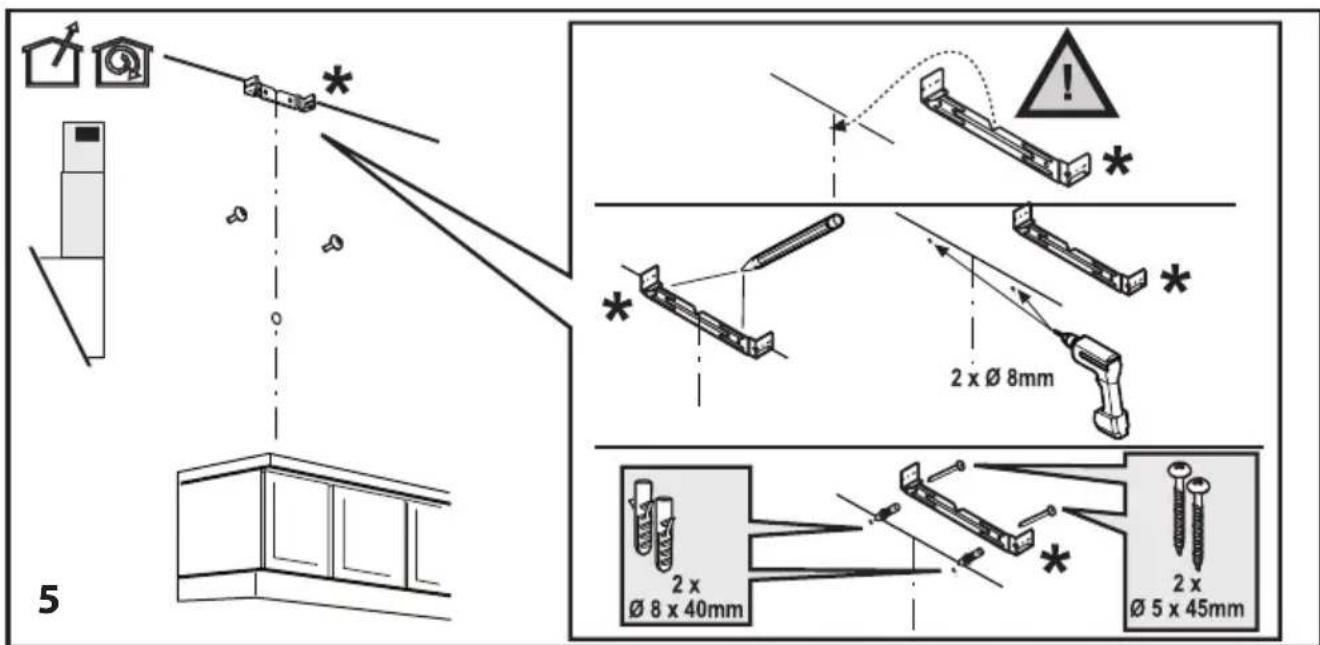
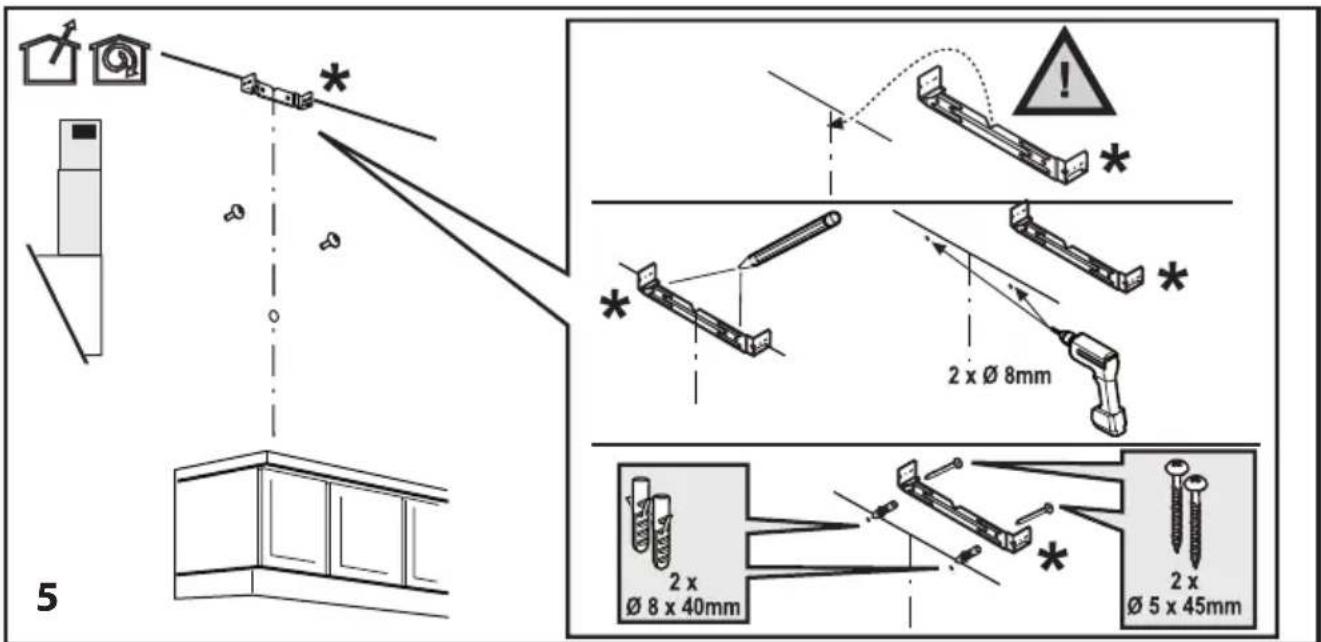
3.2.3 Assembling the hood flue
Drill holes on marked points with 8 mm bit in order to attach flue plate. Hammer 2 pieces of 8 × 40 mm dowels in drilled holes. Screw 2 pieces of 5 × 45 mm hanging screws to dowels hammered.
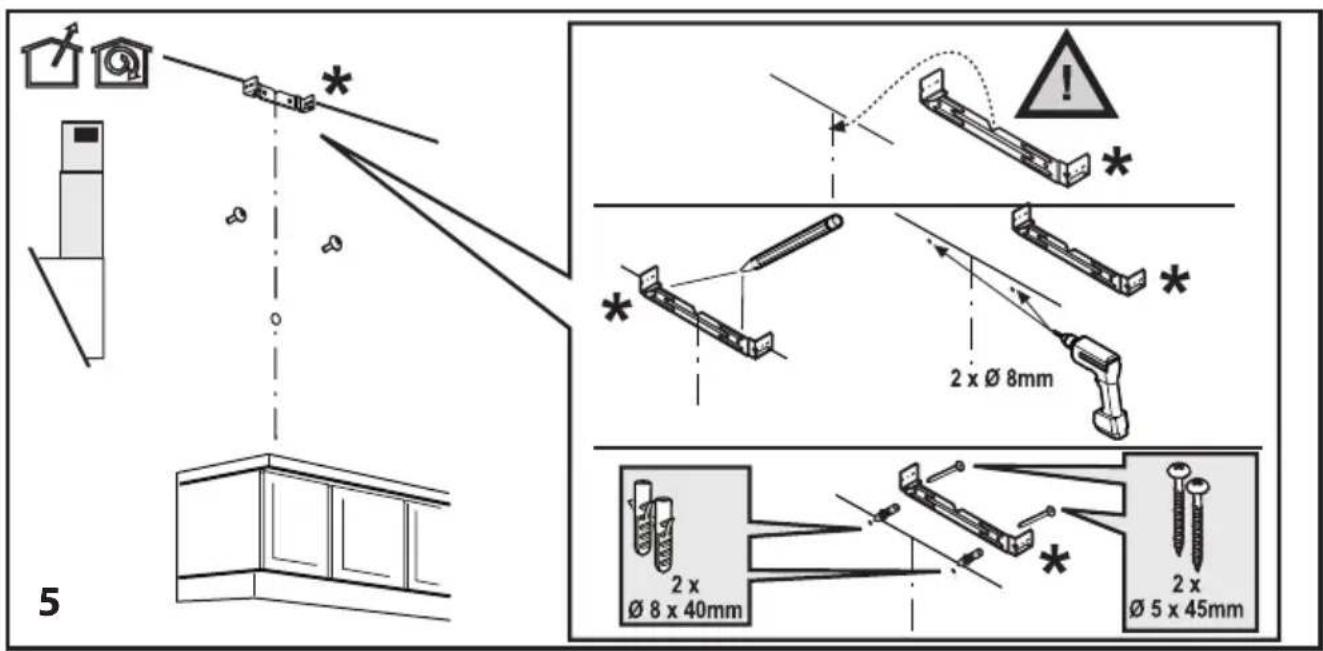
(Figure 5)
3 Installing your appliance
3.2.4 Assembly of the Hood onto the Wall
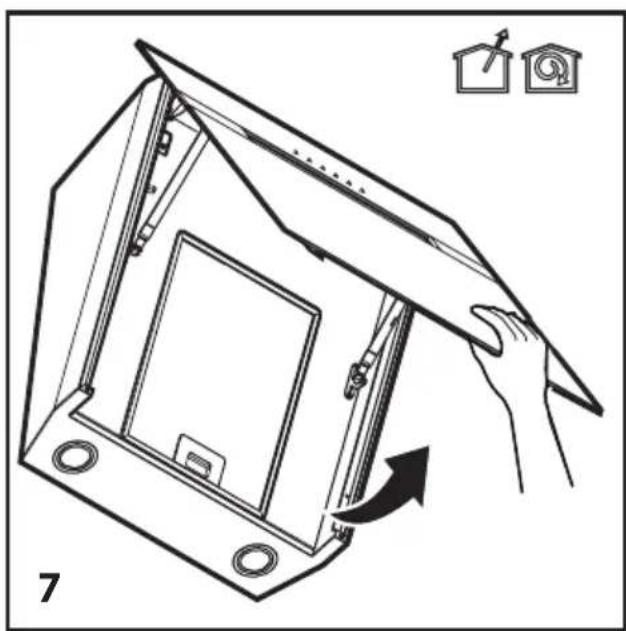
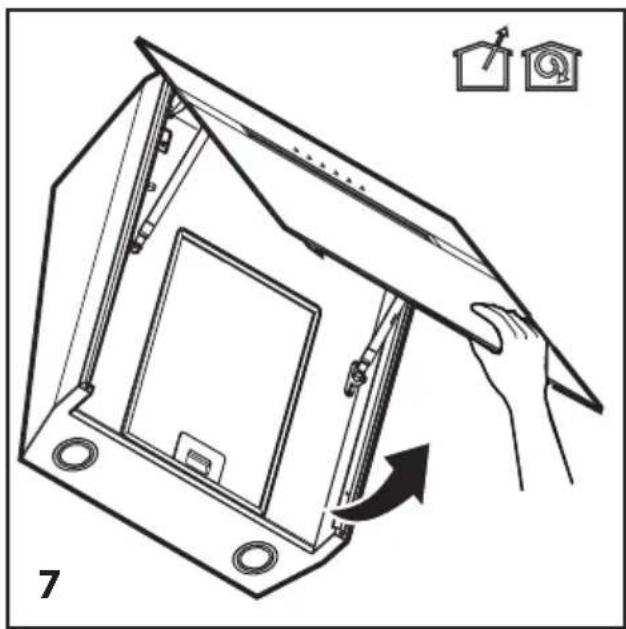
- Remove front panel to attach the hood onto the wall. (Figure 7)
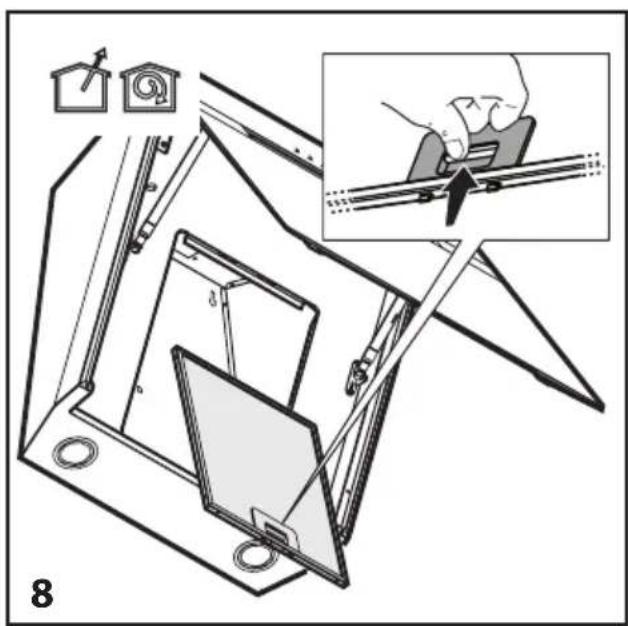
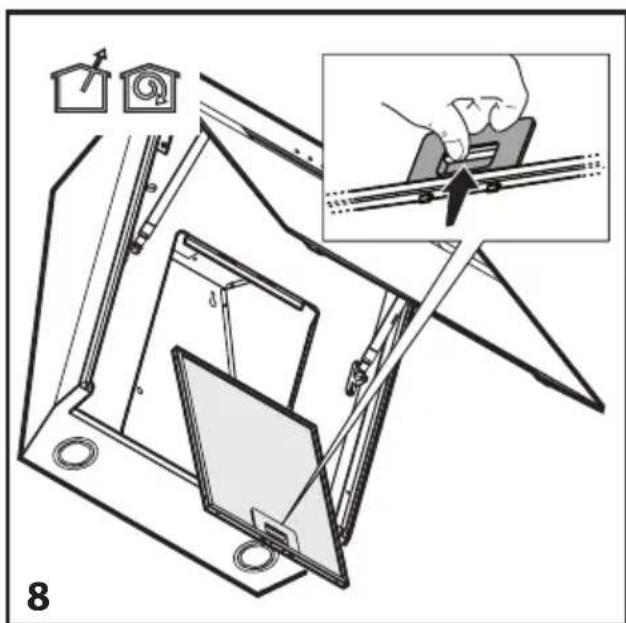
- Remove the filters. (Figure 8)
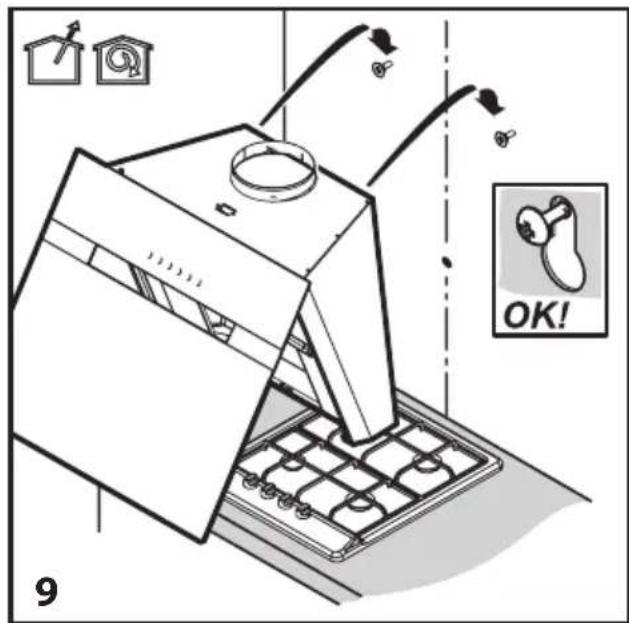
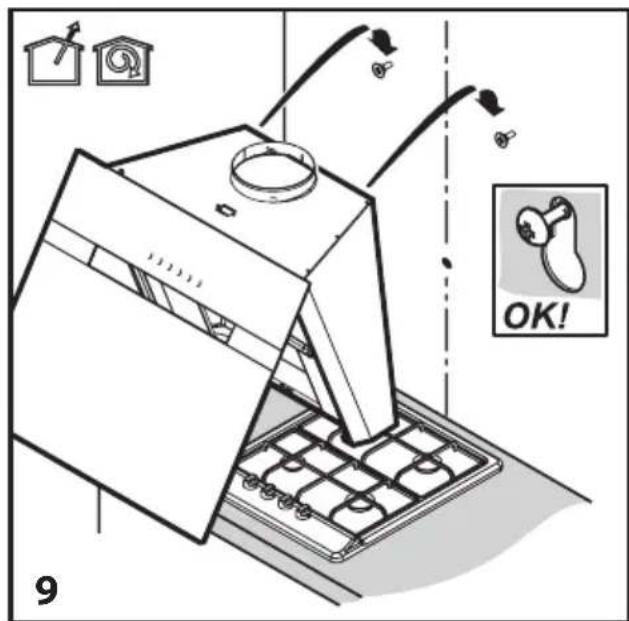
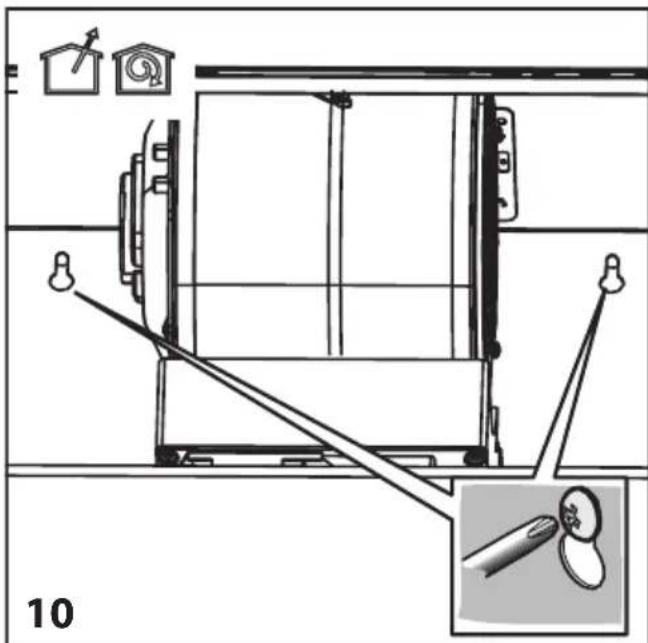
- Place the hood in a way that screws match with screw heads. (Figure 9)
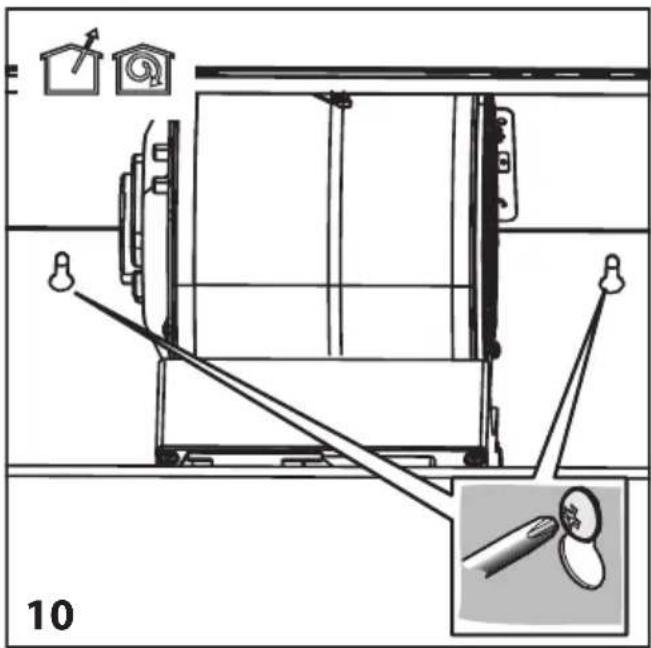
- Tighten the screws to fasten the hood. (Figure 10)
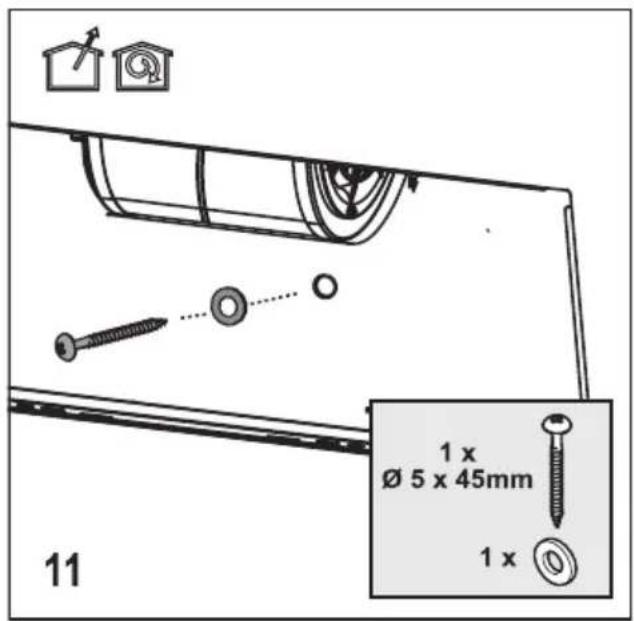
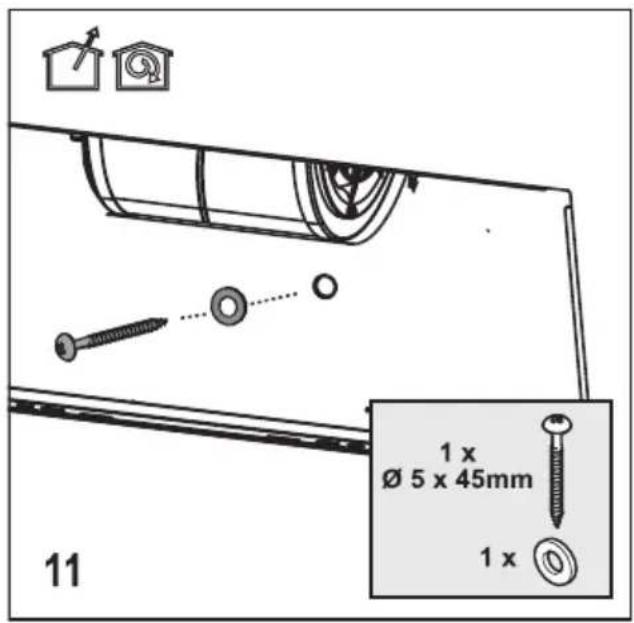
- In order to fasten the hood, use washers and tighten with 0.5 × 45 screws.(Figure 11)
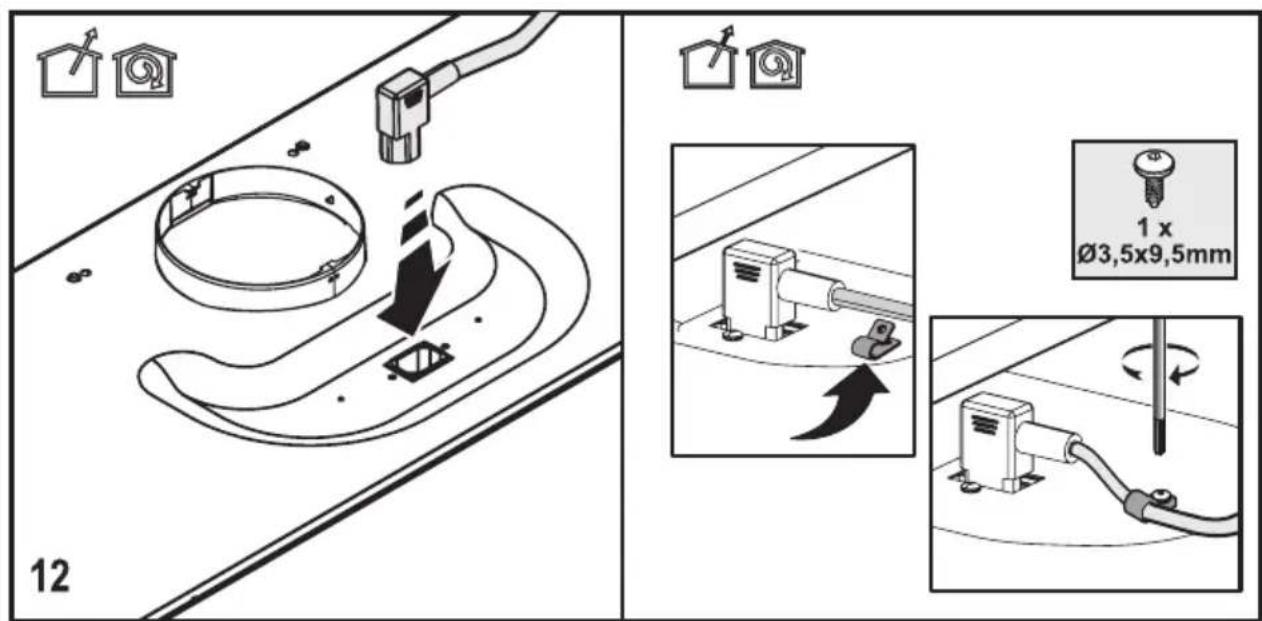
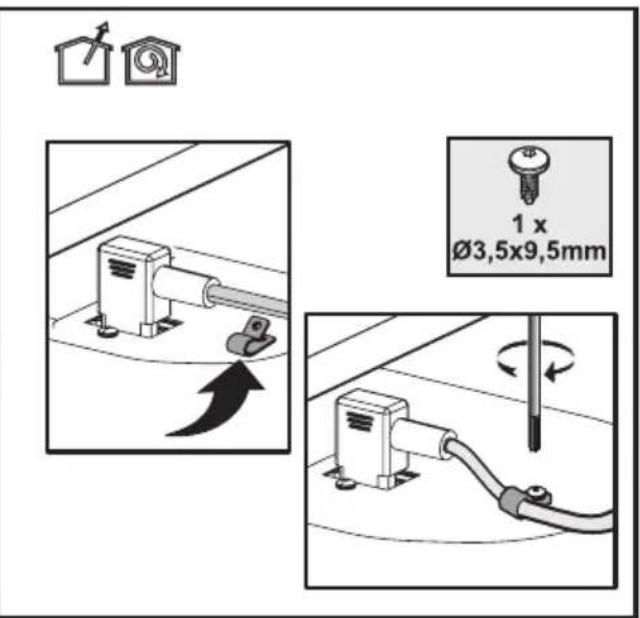
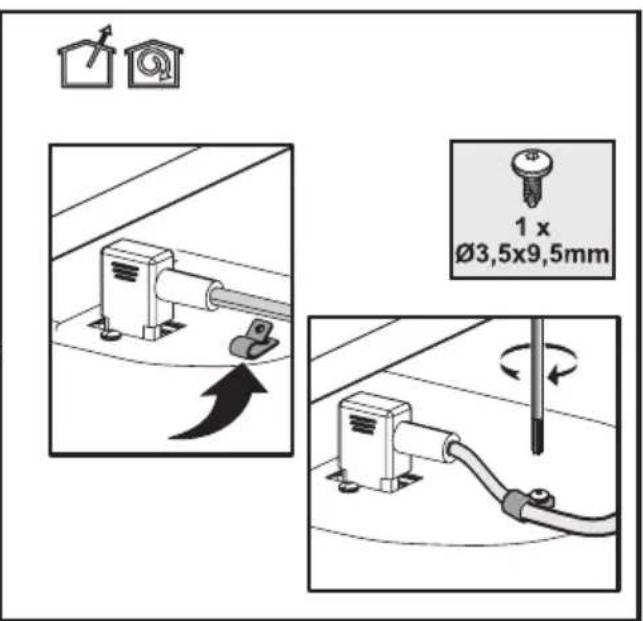
- Plug in the power cable. Use 0 3.5x9.5 screw to fasten the cable.(Figure 12)
Bnstalling your appliance
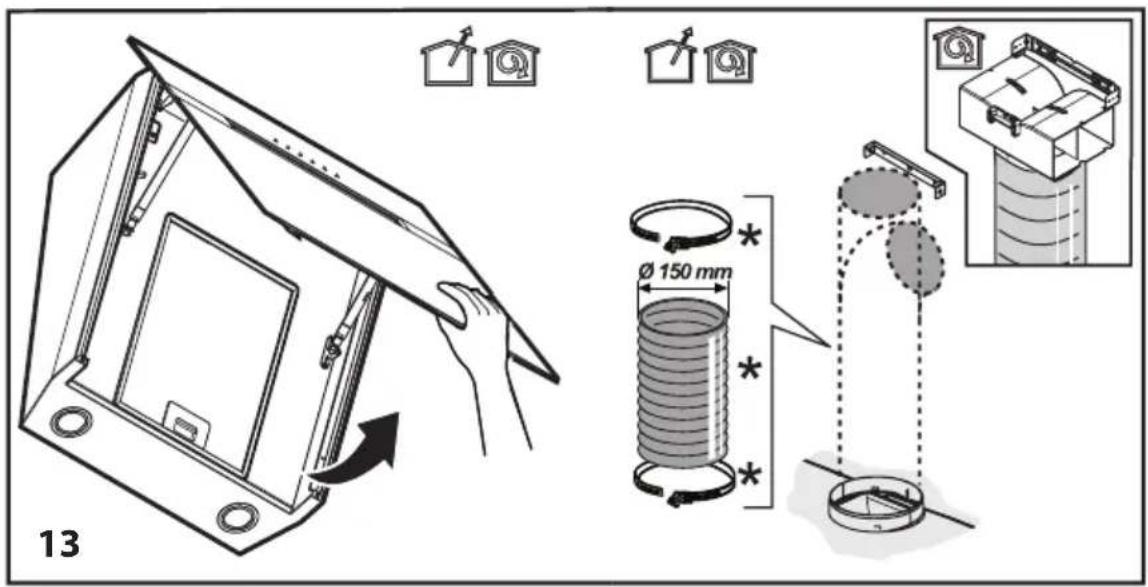
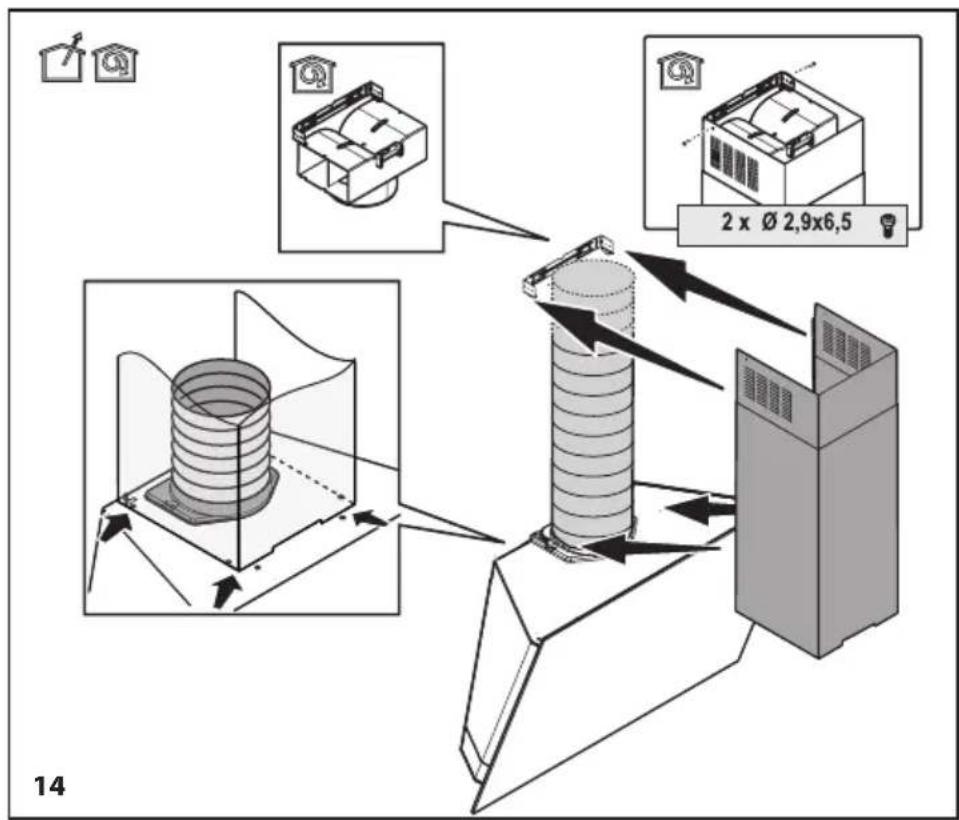
- Place flue connection according to figures.
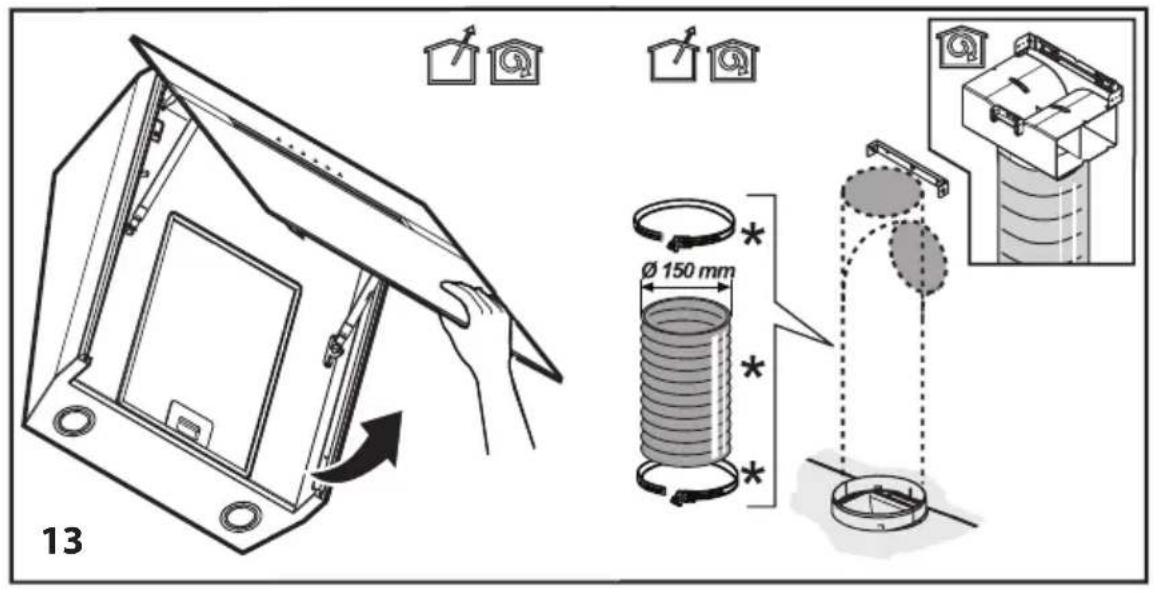
Figure 13,14

4 Operating your appliance
4.1 Operation
- Use high suction power if excessive vapor is formed in kitchen. It is recommended that hob hood suction unit is turned on 5 minutes before beginning cooking and is left in operation during and for 15 minutes after cooking.
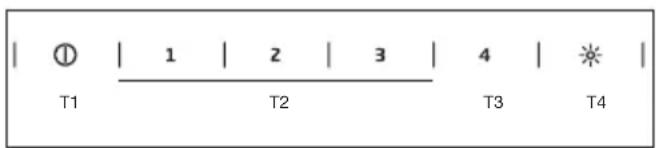
4.2 Control with levels
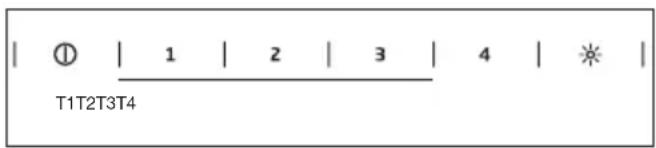
T1. On/Off key. If the appliance is OFF, turns on the appliance. If the appliance is at any speed level, turns it OFF.
T2. Operates the appliance in speed levels 1, 2 and 3.
Operates the appliance in speed level 1. LED 1 lights.
Operates the appliance in speed level 2. LED 2 lights.
Operates the appliance in speed level 3. LED 3 lights.
T3. Operates the appliance at speed level 4 for 5 minutes. While the appliance is in operation in any level (1, 2, 3) if this key is pressed then the current speed LED will become steady and speed level 4 LED will flash. At the end of 5 minutes, speed level 4 LED will switch OFF and the product will exit max. speed mode. If speed level 4 key is pressed before 5 minutes is over, the product exits max. speed mode.
T4. Lamp On/Off key. Briefly press this key to turn ON/OFF the lamp. Press and hold for more than 1 second to select one of the 5 brightness levels.
4.3 Grease filter alarm
Flashing of LED 1 warns the user for cleaning the metal filter. When this alarm is given, it is time to clean the grease filter. Press and hold the ON/OFF key for 3 seconds to reset the warning while the product is in operation. LED 1 will stop flashing.
4.4 Charcoal filter alarm
The product is delivered with the charcoal filter alarm deactivated. Press and hold keys 1 and 2 for 3 seconds to activate the charcoal filter cleaning warning while the product is OFF. First LED 1 and then LED 1 and 2 light up and indicate that the warning is activated. Press and hold keys 1 and 2 for 3 seconds to deactivate the warning while the product is OFF. First LED 1 and 2 then LED 1 light up and indicate that the warning is deactivated.
Flashing of LED 2 warns the user for cleaning the charcoal filter. Press and hold the ON/OFF key for 3 seconds to reset the the warning while the product is in operation.

If both metal and charcoal filter warnings are activated simultaneously, resetting should be performed separately for each warning.
4.5 Energy efficient usage:
- When operating the hood, adjust the speed level according to the odour and vapour intensity in order to prevent unnecessary power consumption.
- Use low speeds in normal conditions (1-2), and high speeds (3-4) when smell and vapors are intensified.
- Lamps on the hood are intended for illuminating the cooking zone. Using them to illuminate the ambient/kitchen will result with unnecessary power consumption and inadequate illumination.
5 Cleaning and maintenance
5.1 Cleaning
- Prior to cleaning and maintenance, unplug the appliance or turn the main switch off or loosen/ switch off the fuse that supplies the hood.
- Hood should be cleaned regularly (at least with the same frequency with which you carry out maintenance of the grease filters) internally and externally.
- Clean the hood using a clean cloth dampened with a mixture of warm water and neutral liquid detergent.
- Do not use abrasive products. DO NOT USE ALCOHOL!

WARNING: Failure to carry out the basic cleaning instructions of the hood and to replace the filters may cause fire.
- For this reason, we recommend you to follow mentioned instructions.
- Manufacturer cannot be held responsible for motor and fire damage caused by inappropriate maintenance or not following the above mentioned safety recommendations.
5.2 Cleaning the glass panel
- Glass panel and suction surfaces should be cleaned with the same interval valid for grease filters.
- Clean with a damp cloth and a neutral liquid detergent.
- Avoid using abrasive products. DO NOT CLEAN WITH ALCOHOL!
5.3 Charcoal filter (filtered models only)
-
After a long usage period, charcoal filter may become full depending on cooking type and whether the oil filter is cleaned regularly.
-
In any case, cartridge should be replaced at least every four months (or when filter fullness indicator system indicates that filter should be replaced if available in the model). (Figure 16)
- Charcoal filter cannot be washed and reused.
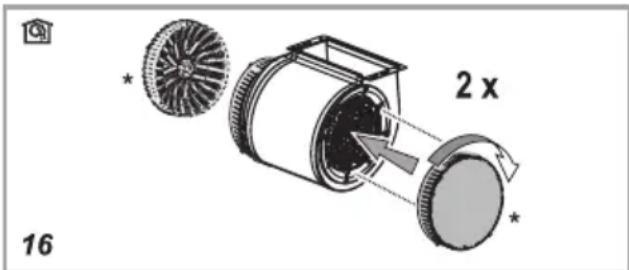
Circular charcoal filter
- Place one filter next to the protection cages of motor propeller, then turn the part clockwise.
- For disassembly, turn the part counterclockwise.
5.4 Grease filter
- Retains grease particles caused by cooking procedure.
- Grease filter should be cleaned monthly (or filter fullness indicator system - if available in purchased model - indicates when it is time) using acid-free detergent by hand or in a dishwasher with low temperature and short program.
- When washed in a dishwasher, color of grease filter may fade slightly, but this does not affect its filtering capacity.
- Pull spring release lever in order to remove grease filter. (Figure 17)
5 Cleaning and maintenance

5.5 Cleaning
Particularly do not neglect to clean your hood immediately after you have made frying.
- Use a soft cloth soaked with liquid detergent to clean the outer surface of your hood.
- Never use abrasive or scratching materials for cleaning.
- You may use the cleaning agents commercially available for persistent grease etc. by following the warnings on the product. In order not the scratch the brushed steel body, wipe in the same direction with the bush trace.
- Do not use cleaning agents containing hydrochloric acid, bleach or abrasive powders in order to maintain the surface quality of your product. Use a cloth dampened in soapy water or special stainless steel cleaning spray for stainless steel surfaces. Remove the protective foil on the appliance.

Caution: You may cause a fire if you do not follow the instructions on the cleaning and replacement of the filters of your hood.

If you need to transport the appliance:
Keep the original packaging of the appliance. Transport the appliance with its original package, and follow the transport markings on the original package.
If you do not have the original package:
- Do not put heavy objects on the hood.
- Protect the outer surface from impacts.
- Pack the product so that it would not be damaged during transport.
5.6 Replacing the lamps

WARNING: Prior to touching the light bulbs, ensure that they are cooled down.

Contact Authorized Service Agent for lamp replacement.
MapknpoBknte Ha npodykta nIIN CTOnHocHTte, NOCOyeHN B dpyrN DOkyMeHTN, DIOCTaBeHN C Hero Ca CTOnHOCTN, NOJyHeHn pIn Ia6opatOpHn ycNoBn, CbIpaCHO npNIIOxIMn cTaNdApTn. Te3N CTOnHOCTN MoKe Da BapnPAT, B 3aBNCUMoCT OT pa6OTHnTE ycNoBna Ha npodykTa n ycNoBnra Ta Ha OKoJIHaTa CpeDa.
3 MoNTaJHa ypeDa
CbpxeTe ce c Hai-6n3kn yIbHOMOeH cepBn3eH areHT 3a MOHTax Ha a6cop6atopa.
*Iodrotobkata Ha MCTOTO n eJektpueckoto HnHctaHnpaHe Ha npOdyKta ca OTROBOPHOCT Ha Notpe6nten.

IPEyPExEHE:OTcTaHeTe 3aHToTO pOIO (aKO hMa TaKOBa)OT NOBbPxHOCTT aHa abCop6aTopa N dIMooTBoDa cJeM MOHTaxa.
Bncounhata Mejdy donHaTaNobbpxHocT ha a6- cop6atopa n rohpata NOBbpxHocT Ha neykaTa/ fypHaTHe Tp6Ba da 6bJe no-MaJIko OT 50 cm npn ra3OBN KOTNoHN 45 cm npn eJNeKTPnueckn KOTNoHN.
EneKtpnuecknte Bpb3Kn Tp86Ba Da ce HappaBt OT KBaHnΦnUnpaH eNeKtpoTeXnK.
MOnTnpaIte npOdykTa Taka, Ye da MoXeTe da DoCTnIrate 3axpaHbAunKa6eN (Uencen, KOHTaKT)JeCHO CNeD MOHTaJa.
Pa3MePnte ca daedeHn B mm.
3.1. CBbp3BaHe Ha 3axpaHbaHeTo
3axpaHbAHTo Tp6Ba Da CbOTBeTCTBa Ha NocOueHIne B Kopnyca Ha abCop6aTopa DaHH. CbByPxe Te abCop6aTopa KbM KOHT, CbOTBcTBAu Ha NocOueHIne Bbpy HrO DaHHN, I rO pa3nOJoxTe Taka, Ye da 6bJe Ha DoCTbHNO MxCTo. Cne MoHTaKa, Ako ypeBt HrMa UeNCen (DnpeKTHo 3axpaHbAe) INI NsEncelbT e TpyHDoCTbNeH, IN3NoJI3BaIte PReBKnIOUbATEJ B JINHraTa, KOIT ONo3BOJRA BaN3KJIyBaHe Ha 3axpaHbAHeTO npY cNoOBnHa CBpbXtOK OT kateropn III.

ПЕДУПЕХДECHNE: Пешида CBьржete OTHOBO abcopbaTopa КБМ 3axpaHbAHeto И да поверптддл paBOTи павилно, ce ybepeTe, Ye 3axpaHbauTЯкбел e CBьрзан павилно.
- Abcop6batoptteobopydBaHcbc cneuaJIeH 3axpaHbauKaben. CbpxKeTe ce cyIbIHO-MoUeH cepBn3eH aKeHT, aKO 3axpaHbauNt Ka6eIce NOBpei.
3.2.Montax
3.2.1 Празда заночente MOHTажа:
- Поберете далл порукът Има пдховьш pa3Мер 3a мястOTO на могта.
-
Мергеля.
-
Otrpahe Te BbIeHnA nITbp (^*) , ako e doCTaBeH (BIXTe CbOTBeTHnA naparpaΦ). Toi ce MOHTnpa, cAmO aKO XeJaTe Da N3NoJ3BaTe abcop6aTopa KaTo MoJeN C nITbp.
-
Поберете дали с acopbaTopa ca doctaBeHn Дуг MaTePnaHn (Ha npimep naket C BnHTObe (^) , rapaunOnHa KapTa (^) nДр.) n aKO ToBa e Taka, nO OTcPaHete n CbXpaHete Ha dpyro MЯCTO.
-
Ako e Bb3MOxHO OTCpaHete CBO6OHDocToIuNTe NIN Pb3raUc CE KOTIOHN IN 3DbpNaHTe HAcTpaHn, 3a Da DOCTURHeTe 3aHaTaCTeHa / TaBaHa IecHO. Ako He e Bb3MOxHO, NOKPInTE PLOTA, KOTIOHA INN PhHPATA C PbTHO 3aUNTHO NOKPUBaNO, 3a Da IN 3aNA3ITE OT NOBpeIN 3aMbpcBaHe. N36epeTepabHa NOBbpxHOCT 3a MOHTIPAhe Ha ypeA. NOKPInTE NOBbpxHOCTTa Cbc 3aUNTHO NOKPBAIO IN pa3NoJoxTe BCNUK Pa3OnaKOBAHU qACTn BbpxHrero.
Ocben ToBa npoBepTe daHn B oBnaCTTa 3a crno6yBaHe Ha a6Cop6aTopa nMa KOHTAKT (B 6bN30cT B DoCTbHnHaTa O6NaCT CNeI MoHTaKa Ha a6Cop6aTopa) n DaJIe Bb3MOxHo CBbp3BaHe Ha acnnpaunra Ta Ha a6Cop6aTopa (camo 3a MoDJI N C acnnpaunr).
3 MoNTaJHa ypeDa
3aBbPwTe Heo6xOIMnTe onepaun Ha CTeHaT (HapnpMep BkIIOUvBaHe Ha uenceNa/nn np6uBaHe Ha OTBOP 3a Mapkya 3a OTBeXdaHe).
IpeIarat ce InpOKn 7noHKn 3a cIKcnaHe Ha abcop6aTopa KbM pa3HOO6pa3HN TINOBe CTehn / TabAH.NOCBeH TOBa e Heo6OIMo Da Ce NOTBbPdN CbBMecTImOcTTa Ha MaTePnAJa C MaTePnAJa Ha CteHata/TabaHa OT yNbJHOMOueh TexHK. CteHata/TabaHbT Tp6Ba Da N3DbpxKat TerlOTO Ha abcop6aTopa.He MOHTpaIte ypeDa Ha NOBbPx-HocTN OT KepAMuHn PLOU, INNC INN CNIIKOH. PnIKpenBaIte camo KbM CTeha.
Ako IMa IaHeI n/IIIn CtpaHnUHa CTeHa, n/IIIn Me-6eI, npOBepTe DaIIM Ma DoCTaTbUHO MAcTO 3a crNo6BaHe Ha a6Cop6aTopa N daIIN NaHeIbT 3a ynpabVeHne 6bJe neCHO DoCTbNeH.
3 MoNTaJHa ypeDa
3.2.2 Побrotовka 3a монтурапена ha abcopbaTopa Ha cTeHaTa
Ito-donye daedeHa HnΦopMaunra, Heo6xOma 3a IodrotOBkata Ha MOHTaXHOTo MrcTo Ha a6cop6atopa.
1.Obo3HaueTe NOBbpxHOCTTa,Bbpy KOrTO NCKaTe Da OKaHTe CrlNo6KaT.A.(Furpa 1)
2.ФИКСИРаTe шaблonaHa crIIOБkaTа Вьру MOHTaЖHOTo MЯCTO Ha a6cop6aTopa. (ФИгура 2)
3.ПобиTe OTBOP cbc CBpeINo 8mmHa mapKnapaHnTe TOnkN.(Фура3)
4.CnmoTaHaUyK npKpeTe 36poaHNOHKn 8x40 mm B npObHTte OTBOp. 3aBnTe 2 BnHTa 5x45 mm B nocTaBeHnte no onncAnna No-rope hauHH uonHKn. Heo6xoJMo e da HMa MeKdHa ot 5mm MeKdy rIaBaTa Ha BVnTa n CTehata.(Furpa4)
3 MoNTaJHa ypeDa
3.2.3 Crno6BaHe Ha dmOoTbOda Ha a6cop6aTopa
IpoBnTe OTBOpHa MapKnpaHnTe TOnKn CbC CBpeNo 08 mm, 3a Da npKpEnTe PNOyata Ha DnMOOTBoDa. C NOMOuTa Ha uK NoCTaBeTe DBe IINOHKn 8x40 mm B npoBnTe OTBOpN. 3aBnTe 2 BNHTa 05x45 mm KbM NoCTaBeHnTe NO ONaHnHaun HnOHKn. (Anrpya 5)
3 MoNTaJHa ypeDa
3.2.4 Crno6BaHe Ha a6cop6aTopa Ha cTeHaTa
- OTeTpaHete npednnaHeI, 3a da npKpeNte abcop6aTopa KbM cTeHaTa.(Furpa 7)
- OTeTpaHeteФИТPnTe.(ФИгура 8)

- NocTaBete abCop6aTopa no TaKbB HaunH, Ye BnHTOBete Da CbBnaDat C rIaBNTe Ha BnHToBeTe. (Furpa 9)
- 3aTeHHeTe BnHTOBeTe, 3a Da 3aKpeNITe a6-cop6aTopa. (Фура 10)

3 MoNTaJHa ypeDa
- 3a da 3akpenite abcop6aTopa, n3no13BaIte wai6n i 3aterheTe c BnHTObe 0 5x45
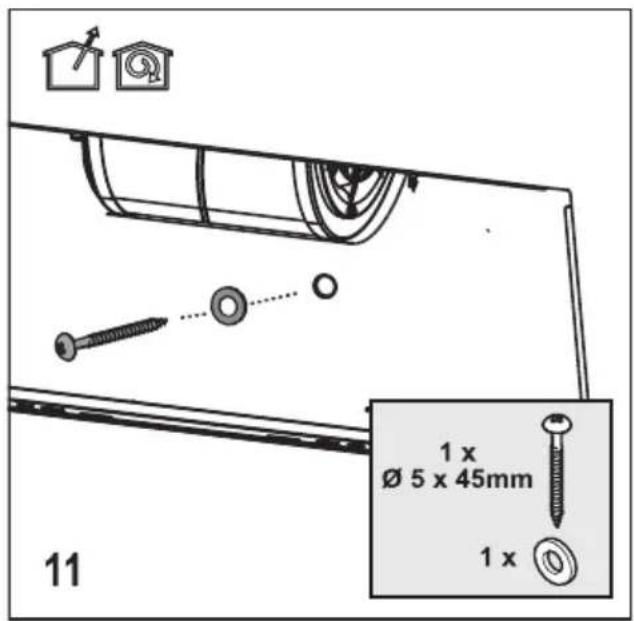
Figure 11)
- BkIouhe 3axpaHbau nka6eI. 3a 3atraHe Ha ka6ena n3no3BaIte BnHTObe 0 3.5x9.5.
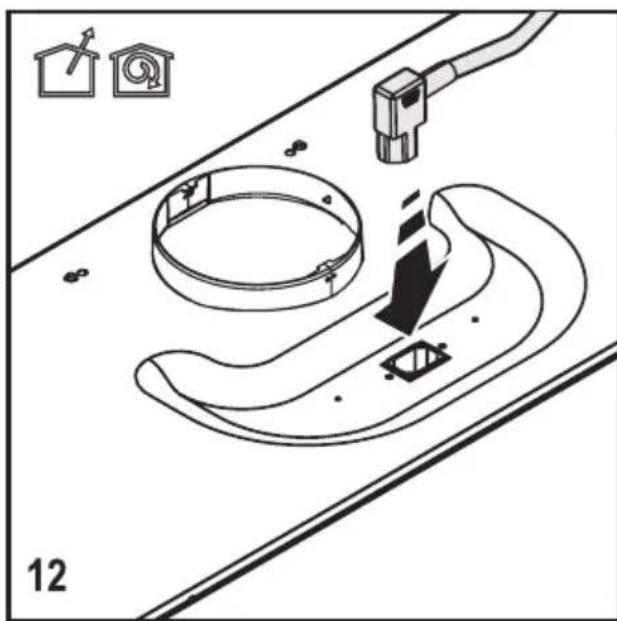
Figure 12
3 MoNTaJHa ypeDa
- Pa3noJoxeTe Bpb3KaTa Ha dIMoOTbOda KaKTo e noka3aHo Ha cHpyrpute. (Furpa 13, 14)
4.1 Pa6ota
- I3noJ3BaIte BnCOKaTa CmYkATEJHa MoU, aKO B KUYHrTa NMa TBbPde MHOr O nap. IpeNOpBvBa ce 3acMyKBaHeTo Ha abCop6aTopa Da Ce BKJIuOuN 5 MNHTn PpeN HaayanoTo Ha rotBeHTo N da npoDbJxN da pa6OTn KaKTo NO Bpeme Ha npiroTbHTo, Taka n 15 MNHTn CJeI pNkJIIOuYBaHTo My.
4.2Управleness с поюта на НИВа
T1. ByToH 3a BkIIOUBaHe/IN3KIIIOUBaHe. Ako ype- dt e IN3KJIIOUeH, e Heo6XODIMO da ro BkIIOuTe. Ako ypeIbTe ha onpeJeNeHO HnBO Ha CKOpocT,TO Ce IN3KJIIOUBA.
T2. BkIIOUyBa ypeHa HnBa Ha ckopoCT 1, 2 n 3.
BknHouBa ypeHa Ha HnBO Ha ckOpocT 1. CBeTbCaBETnHEn HnDnKaTop 1.
BknHouBa ypeHa HnBO Ha ckOpocT 2. CBeTbCaBtIINHeHnDnKaTop 2.
BknHouBa ypeHa HnBO Ha ckOpocT 3. CBeTbCaBtIINHeHnDnKaTop 3.
T3. BkHouBa ypeHa Ha HnBO Ha ckOpoc 4 3a 5 MNHyTN. DOKATO ypeBt pa60Tu Ha npOn3- BOJHO HnBO (1,2,3) HAtnCKaHeTo Ha 6yToHa BOIN DO CTa6NJHO CBTeHe Ha CBETNIHHNn INDnKaTOP Ha CKOpocTTa n IprIMnBaHe Ha CBETNIHHNn INDnKATOP 3a HnBO Ha CKOpoc 4. B Kpa Ha 5 MNHyTH CBeTIINHHNn INDnKATOP 3a HnBO Ha CKOpoc 4 n3rAcBa n IpoDyKTbT n3JIu3a OT pexHM Ha MaKcImaHaCKOpoc. AKO HATncHete 6yToHa 3a HnBO Ha CKOpoc 4 IpeDN u3TNUaHeTo Ha 5 MNHyTN, IPOdyKTbT n3JIu3a OT pexMHa MaKcImaHa CKOpocT.
T4. ByToH 3a BKn./n3Kn. Ha Iamnata. HATncHeTe 6bP30 To3n 6byTOH, 3a Da BKNIOUHTe/IN3KIOU- YnTE IaMnata. HATncHeTe n 3aIpbXTe 3a NOBuee ot 1 cekynda, 3a da IN36epete eEDHO OT 5 HnBa Ha npCKoCT.
4.3 Anapma Ha Фильтаа Ma3HHH
PpIMnRbAHeTo Ha CBeTlnHeH INDnKaTOp 1 npedynpeJdaBa Notpe6nteJa NaOnCTn MeTaHNHaPnTbp. Ppi HAnuHne Ha Ta3n aIapMa e BpeMe Da NouchTe FInTbpa 3a Ma3HNH. HatncHeN 3aDpbXTe 6yToHa 3a BKn./n3Kn. 3a 3 cekyHn, 3a Da HynpaTe npedynpexDeHneTO, KOraTO npOpykTbT pa6OTn. CBeTlnHeHnDnKaTOp 1 npectaBA da npIMrBa.
4.4 Anapma Ha BbIeHnA ΦnTbp
IpoDyKTbT ce doCTaBc DeakTNBnPaHa anapMa Ha BblneH aNITbp. HataChete n 3adpbXte 6yToH 1 n 2 3a 3ceyn, 3a da akTNBnPat e npedynpeJdeHneto 3a noNCtBaHe Ha BblneH aNITbp, KOrato npOdyKTbTe en3KnUoyen. CBeTba NpBPBO CBETnHEn INnKATop 1, a cNeT TOBA 1 n 2, 3a da nokkat, ye anapMaTa e akTNBnPaHa. HataChete n 3adpbXte 6yToHn 1 n 2 3a 3ceyn, 3a da deakTNBnPate npedynpeJdeHneto, KOrato npOdyKTbTe en3KnUoyen. CBeTbat NpBPBO CBETnHHn INnKATopn 1 n 2, a cNeT TOBA 1, 3a da nokkat, ye anapMaTa e deakTNBnPaHa.
PpIMnRbaHTo Ha CBtIiHeH INDnKaTOp 2 npedynpeKdAba Notpe6nteJa NaocnBbIeHnaФnTbp.HaTncHeTe 3aApkTe 6yToHa 3a BKn./n3Kn. 3a 3ceKHydn, 3a Da HynpaTe npedynpeKdeHneTO, KOraTO nopdyKTbT pa6OTn.

Ako eHOBpemehno ca aKTHBn npedynpejdeHna 3a nouchTbaHe Ha BbIeH n MeTaJeH cHJTbp, HnilpaheTo Tpr6Ba Da ce N3BbPNI NOOTdEJIHO 3a BCaKO OT npedynpejdeHnra.
4.5 EHeprnHOb eΦeKTHBHa ynoTpe6a
- По врeme Ha pa6ota Ha abcop6aTopa perynpaIte HNBata Ha ckopocT cnopei nHTeH3NBHOCTTa Ha Mnpu3MNTe n napute, 3a da npedotBpataTE HeKeJHa eHeproKOHcMaZna.
- I3noJ3BaIte HnCKn CkOpocTn (1-2) npn HopMaJIHn ycIOBn y BnCOKn CkOpocTn (3-4) npn FOJaMa INHTeH3NBHOCT Ha MInp3MnTe n napTe.
- Lamnnte Ha a6cop6aTopa ca npedHa3NaueHn 3a OCBETYBaHe Ha 30HaTa 3a rOtBeHe. N3noI3BaHTo IM 3a OCBETNeHne Ha KyXHraTa ige BOBeDe Do HeKeJHa eHEPROKHCymaun I HeadeKBaTHO OCBETNeHne.
5.1 Почистванe
- Прени поочьане и подрьхka ИЗкючeteураи ИЗкючete превкючbatела назхранвано pa3хларбete/N3кючeteпрениотеля Ha 3axpaHbaaata BeNaHa abcop6aTopa.
- A6cop6aTopbT Tp86Ba Da ce nouuctBa peIOBHO (PnBcRAKO NOUCTBaHe N NOIpbKHaΦNITbpa 3a Ma3HINH) OTBbTpE N OTBbH.
-Почиствашие abcopба_TOPа КATO ИЗпОЛЗВАТ -Натосяа В ТОПЛЯ BODA И HeyТрапЕ ТЕЧЕ -Почистваши пренир AT Kьрп.
He n3noJ3BaIte a6pa3nBn npOdykTn. HE I3PON3BAITE CnIPT.

PPEyPExEHE:PiH HeCnA3BaHe Ha OCHOBHIne HNCTpyKz 3a NocHCTBaHe Ha a6cop6aTopa nako He CMeHrTeΦHTpTE, e Bb3MOxKeH NOxap.
- IopaI Na3n npuHa npenOpbVbMe da cIeDbate CnOMEHaTnte IHCTpyKcN.
- Поньодпелг He HOCN OTROBOPHOCT 3a DBnraTeJI N UeTN OT NOxap, npuynHeHn nopadn HnnpabUNHa NOdRpBXKa nIIN HeCneDbAHe Ha CnOmeHaTte No-rope npenopbKn 3a 6e3OnaCHOCT.
4.4 Söeffiltri marguanne
3NeKtpnueckne coeHHeHna DOnXHbI BblOJI-HrTbcra KBaInOpuropBaHHbIM 3NeKtpnKOM.
I3dJIe NcIeIyET yCTaHaBnBaTb TaK, YTO6bl NO-TOM MOxHO 6bINO C JERKOCTbO DOTAHyTBcR Do CETN NITAHN (PO3ETKN, BbIXOda).
Pa3mepbipnBedeHb BMM.
2.ПикpenTe MOHTaXHbI WAp6NoH K MeCTy dIy yCTaHOBKn BbITaXKN.(PcCyHok 2)
3.ПрocВерпnte OTВерстЯ CBернOM 8 MM B OTMeueHHbIX MeCTax.(PncyHok 3)
4.YctaHOBnTe 3IIO6eJ8x40MMBnpocBep- HHe BTE 3ABHTte 2 BNHTa IINoDBeWNBaHnO5x45MMB BbIweyka3AHhIE IIO6eHN.Mexdy rONOBKOBnBnHTa nCTeHOn DOnXKeH 6bITb 3a3Op B 5 MM (PncyHOK4)
3 yctaHOBka npn6opa
3.2.3. C6opka BbITJXHOJ Tpy6bl
PpocBepnTe OTBepCTnB OOTMeueHHbIX TOckax CBepnOM 8 MM dIpy npKpeHnN pIaCTnbl DblMOxOda.YcTaHOBnTe 2 IIO6eIg 8x40 MM B PpocBepnHbIe OTBepCTnIg.3aBnHTnTe 2 BNHTa dIpy nOdBWeuBaHnIg 5x45 MM B 3a6ntbIe IIO6eI. (PncyHok 5)
3 yctaHOBka npn6opa
1.YdaNTe nepeHIO naneB,TO6bI npKpeNITb BbITXkKy Ha CTeHy. (PncyHok 7)

- YdaJIte cHJIbTpbl. (PcCyHok 8)
- NomeCTIte BbITXk Ky TaKIM 06pa3OM, yTO6bl FOIOBKN BnHTOB COBnaDAnN C COOTBETCTByH-UMN OTMeTKaMn. (PncyHok 9)

- 3aTAHNTe BnHTbI DJIa QNKCaUN BbITJAKKIN. (PncyHok 10)
3 yctaHOBka npn6opa
5.ДЯЗAPENNEHNA BBITJAKN NCSIOJIb3yIte WAn-6bl IN BnHTbl 05x45.(PncyHok11)
6.Поdkлочte kaбел nbntaHn.YIcnoь3yIte BnHT 3,5x9,5ДЯ Фикcaци Ka6eЯ. (PncyuHok 12)

3 yctaHOBka npn6opa
7.ПоДКЛЮЧИТЕ ДБIMOXOD,ΚΑΚ ПОКаЗАноHa pu-cyнкax.(PucyHOK13,14)


4.1. 3крлyaразия
BHHMaHHe! Heco6IIOJeHne nHCTpyKuN IO ONUCTKe I 3aMeHeΦnIbTPOB BbITJAKKMOXe TpNBcTn K NOxApy.

B cnyuae ecn Heo6xOdmo nepeBe3T np6op:
COxpaHnteOpnHaJIbHyU yNaKOB Ky BbITaXKn; NepeBO3NtB BbITaXKy CNeDyET BeeOpnHaJIbHOu yNaKOBKe, PnpIePknBaIcB TpaHCnOPTHOm MapKnPOBKn Ha yNaKOBke.
5.5.Чinctka
He cneyuET npene6peraT bHCTKO BbITJKKn cpa3y nocne xapkn.
-Дя OунCTКи BHeUHNe NOBepxHOCTN BbITJXKN HeO6xOdmo NcNoJIb3OBaTb MmKyIO TkaHb, CMOueHHyIO XnIckM MOUuM CpeDCTBOM.
He cneDyET nCNoJb3OBaTb a6pa3NBHbIe IJIu capanauOUIne MaTePnaIbI dJa YnCTKn Bbl- TAAKKN.
Moxho nCnoB3OBaTb KOMMepueckn DOCTynHbIe YnCTaUne CpeDCTBa DnI NOCToHHoCMA3Kn I T.Д., PnPdEpxNBaRcB NpeDynpexDaIOuXn HNCTpyKuN Ha npOdykTe. YTo6bl HeNoUAPAanatb 5eTKoN CTaJIbHOk Kopnyc, Heo6-XoDIMO npOTupaTb erO B HnPaBNeHn CneJa.
B clyuae oTcyTCTBnApurHaJIbHOyNaKOBKn:
He cnejdyet knaCTb Ha BbITJkKy TjXeIbe npedMetbl;
- CneIyET 06e30nacntb BHeuHIO NOBepxHOCTb OT yIapOB;
CneDyET ynaKOBaTb npnbop TaKIM 6pa3OM, TTO6bl He NOBpeHtB ee BO BpEmr TpaHCnOpTnpOBKn.
5.6.3ameHa namn

IPEIOCTEPEXHE: nepei TEM KaK npkacaTbcK JAmnam, ybeHTEcB, YTO OHN OCTbIN.

ДлЯЗAMHeIлamN CBxHITecb C aBTOPn3OBaHHbIM TEXHnueCKM CneUHaJINCTOM.

- Please read this manual first!
- Dear Customers!
- Meanings of the Symbols
- Important safety and environmental instructions 5-8
- Technical specifications of your appliance 9
- Installing your appliance 10-13
- Operating your appliance 16
- Cleaning and maintenance 17-18
- 1
- Important safety and environmental instructions
- General safety
- Electrical safety
- Product safety
- Children's safety
- Intended use
- Compliance with WEEE Directive and disposing of the waste product
- Compliance with RoHS Directive:
- Package information
- Technical specifications of your appliance
- B Installing your appliance
- Power connection
- Installation
- Before you start installation:
- Installing your appliance
- Preparation for the Assembly of the Hood onto the Wall
- Assembling the hood flue
- Assembly of the Hood onto the Wall
- Bnstalling your appliance
- Operating your appliance
- Operation
- Control with levels
- Grease filter alarm
- Charcoal filter alarm
- Energy efficient usage:
- Cleaning and maintenance
- Cleaning
- Cleaning the glass panel
- Charcoal filter (filtered models only)
- Circular charcoal filter
- Grease filter
- Cleaning
- If you need to transport the appliance:
- If you do not have the original package:
- Replacing the lamps
- MoNTaJHa ypeDa
- CBbp3BaHe Ha 3axpaHbaHeTo
- 3.2.Montax
- Празда заночente MOHTажа:
- Побrotовka 3a монтурапена ha abcopbaTopa Ha cTeHaTa
- Crno6BaHe Ha dmOoTbOda Ha a6cop6aTopa
- Crno6BaHe Ha a6cop6aTopa Ha cTeHaTa
- Pa6ota
- 4.2Управleness с поюта на НИВа
- Anapma Ha Фильтаа Ma3HHH
- Anapma Ha BbIeHnA ΦnTbp
- EHeprnHOb eΦeKTHBHa ynoTpe6a
- Почистванe
- Söeffiltri marguanne
- yctaHOBka npn6opa
- C6opka BbITJXHOJ Tpy6bl
- 3крлyaразия
- 5.5.Чinctka
- B clyuae oTcyTCTBnApurHaJIbHOyNaKOBKn:
- 5.6.3ameHa namn
Brand : BEKO
Model : HCA62741BH
Category : Basket