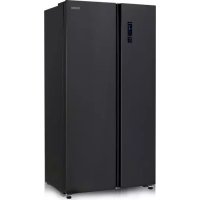
DO933SBS - Fridge DOMO - Free user manual and instructions
Find the device manual for free DO933SBS DOMO in PDF.
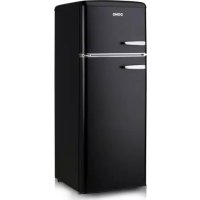
| Features | Details |
|---|---|
| Device type | Combined refrigerator |
| Total capacity | 300 liters |
| Energy consumption | A++ |
| Dimensions (HxWxD) | 185 x 60 x 65 cm |
| Weight | 70 kg |
| Cooling system | Static cooling |
| Number of drawers | 3 drawers in the freezer |
| Noise level | 42 dB |
| Additional features | LED lighting, adjustable thermostat |
| Maintenance | Manual defrosting |
| Safety | Door locking system |
| Warranty | 2 years |
Frequently Asked Questions - DO933SBS DOMO
Download the instructions for your Fridge in PDF format for free! Find your manual DO933SBS - DOMO and take your electronic device back in hand. On this page are published all the documents necessary for the use of your device. DO933SBS by DOMO.
USER MANUAL DO933SBS DOMO
Usage Information Shelving and rack adjustment Important note: all food and drink should be removed from all shelves and racks before adjusting or removing them You can adjust the shelving in the fridge compartment to your required configuration. To remove a shelf, lift it up slightly so the plastic stabilisers that on either side of the shelf are above the shelf rails and then pull it towards you. You can adjust the racks in the fridge and freezer compartments to your required configuration. To remove a rack hold both sides of the rack, lift it upwards (1) and then pull it towards you (2).
- Om een deurrek te verplaatsen, neem deze vast met 2 handen. Hef het deurrek omhoog en trek deze naar je toe. Usage Information Shelving and rack adjustment Important note: all food and drink should be removed from all shelves and racks before adjusting or removing them You can adjust the shelving in the fridge compartment to your required configuration. To remove a shelf, lift it up slightly so the plastic stabilisers that on either side of the shelf are above the shelf rails and then pull it towards you. You can adjust the racks in the fridge and freezer compartments to your required configuration. To remove a rack hold both sides of the rack, lift it upwards (1) and then pull it towards you (2).
- Pour déplacer une étagère de porte, empoignez-la des deux mains. Soulevez-la et tirez-la vers vous. Usage Information Shelving and rack adjustment Important note: all food and drink should be removed from all shelves and racks before adjusting or removing them You can adjust the shelving in the fridge compartment to your required configuration. To remove a shelf, lift it up slightly so the plastic stabilisers that on either side of the shelf are above the shelf rails and then pull it towards you. You can adjust the racks in the fridge and freezer compartments to your required configuration. To remove a rack hold both sides of the rack, lift it upwards (1) and then pull it towards you (2).
WARRANTY Dear client , All of our products are always submitted to a strict quality control before they are sold to you. Should you nevertheless experience problems with your device, we sincerely regret this. In that case, we kindly request you to contact our customer service. Our sta will gladly assist you. +32 14 21 71 91 info@linea2000.be Monday – Thursday: 8.30 – 12.00 and 13.00 – 17.00 Friday: 8.30 – 12.00 and 13.00 – 16.30 This appliance has a two year warranty period. During this period the manufacturer is responsible for any failures that are the direct result of construction failure. When these failures occur the appliance will be repaired or replaced if necessary. The warranty will not be valid when the damage to the appliance is caused by wrong use, not following the instructions or repairs executed by a third party. The guarantee is issued with the original till receipt. All parts, which are subject to wear, are excluded from the warranty. If your device breaks down within the 2-year warranty period, you can return the device together with your receipt to the shop where you purchased it. The guarantee on accessories and components that are liable to wear-and-tear is only 6 months. The guarantee and responsibility of the supplier and manufacturer lapse automatically in the following cases:
- If the instructions in this manual have not been followed.
- In case of incorrect connection, e.g., electrical voltage that is too high.
- In case of incorrect, rough or abnormal use.
- In case of insucient or incorrect maintenance.
- In case of repairs or alterations to the device by the consumer or non-authorised third parties.
- If the customer used parts or accessories that are not recommended or provided by the supplier / manufacturer.52 DO933SBS
- This appliance may be used by children from the age of 16 and up, and also by persons with a physical or sensorly limitation, as well as mentally limited persons or persons with a lack of experience and knowledge. But only on the condition that these persons have received the necessary instructions on how to use this appliance in a safe way and know the dangers that can occur by using this appliance.
- Children cannot be allowed to play with the appliance.
- Maintenance and cleaning of the appliance may not be done by children, unless they are older than 16 years old and are under supervision. Keep the appliance out of reach of children younger than 16 years old.
- This appliance is suitable to be used in a household environment and in similar surroundings such as:
- Kitchen for personnel of shops, oces or other similar professional surroundings
- Hotel or motel rooms and other surroundings with a residential character
- Guest rooms or similar
- Attention: This appliance cannot be used with an external timer or a separate remote control.
- Read all instructions before use.
- Before use, check if the voltage stated on the appliance corresponds with the voltage of the power net at your home.
- Do not let the cord hang on a hot surface or on the edge of a table or counter top.
- Never use the appliance when the cord or plug is damaged, after malfunction or when the appliance itself is damaged. In that case, take the appliance to the nearest qualied service center for check-up and repair.
- Close supervision is necessary when the appliance is used near or by children.
- The use of accessories that are not recommended or sold by the manufacturer can cause re, electrical shock or injuries.
- Unplug the appliance when it is not in use, before assembling or disassembling any parts and before cleaning the appliance. Put all buttons and knobs into the ‘o’ position and unplug the appliance by grasping the plug. Never unplug by pulling the cord.
- Do not leave a working appliance unattended.
- Never place this appliance near a gas stove or electrical stove or in a place where it may come into contact with a warm appliance.
- Do not use the appliance outdoors.
- Only use the appliance for its intended use.
- Always use the appliance on a steady, dry and level surface.
- Only use the appliance for domestic use. The manufacturer can not be held responsible for accidents that result from improper use of the appliance or not following the instructions described in this manual.53 DO933SBS www.domo-elektro.be
- All repairs should be carried out by the manufacturer or its aftersales service.
- Never immerse the appliance, the cord or the plug in water or any other liquid.
- Make sure that children do not touch the cord or appliance.
- Keep the cord away from sharp edges and hot parts or other heat sources.
- Before use, remove all packaging materials and any promotional stickers.
- Keep the ventilation openings free of obstructions.
- Do not use any mechanical or other devices to speed up the defrosting process.
- Do not use any other electrical appliance inside the fridge, unless they are approved for this purpose by the manufacturer.
- Do not keep any explosive substances inside the appliance, like for instance aerosol cans with a ammable propellant.
- Make sure that the refrigerant circuit does not get damaged, for instance during transportation or installation.
- Make sure that the plug does not get squashed or damaged by the back of the appliance. A squashed or damaged power plug may overheat and cause re.
- Make sure that you have access to the plug of the appliance.
- Do not pull the cord.
- If the socket is loose, do not plug in the appliance. (risk of electric shock or re)
- This is a heavy appliance. Be careful when moving it.
- Do not touch anything that comes out of the freezer with damp or wet hands. This could cause skin burns.
- Avoid long exposure to direct sunlight. INSTALLATION
- Remove the exterior and interior packing, wipe the outside thoroughly with a soft dry cloth and the inside with a wet, lukewarm cloth.
- Avoid placing the cabinet in a narrow recess or near any leave source, direct sunlight, or moisture.
- Let air circulate freely around the cabinet. Keep the rear of the refrigerator 10 cm away from the wall.
- Select a place with a strong, level oor.
- Avoid direct sunlight and heat. Direct sunlight may aect the acrylic coating. Heat sources nearby will cause higher electricity consumption.
- Avoid very moist places. Too much moisture in the air will cause frost to from very quickly on the evaporator, and your refrigerator.
- Before connecting your refrigerator to the power supply, check that the voltage stated on the rating label of your appliance corresponds to the voltage in your home. A dierent voltage could damage the appliance.54 DO933SBS
- The appliance must be grounded. The manufacturer is not responsible for damages that may occur as a result of usage without grounding.
- For uneven surfaces, front feet can be aligned.
- After installation, leave the freezer for 12 hours before turning it on. This way the refrigerant can settle. CONNECT THE WATER AND ICE DISPENSER TO THE WATER SUPPLY At the back of the appliance there is a supply to connect the appliance to the water line. Please follow carefully the instructions:
1. Turn o the water supply.
2. Connect the white tube to the supply (A) at the back of the appliance.
3. Connect the other side of the tube to the water lter (B).
4. Connect the blue tube to the other side of the water lter (C). You can attach the water
lter to the wall along the water line using the supplied holders to install everything properly.
5. Connect the other side of the blue tube to the water line (D). It is very important this
connection ts the water line correctly. If necessary, you have to use a connecting-piece (not supplied) to make the connection t perfectly on the water line.
6. Turn the water supply back on and open the tap. The appliance is now ready to dispense
If the doors are not aligned in height, they can be adjust up to a maximum of 5 mm.
1. Turn the security nut clockwise with a spanner to loosen it. (2 full rotations).
2. Now you can adjust the adjusting nut to raise or lower the door.
- The door is too low: turn the adjusting nut counter-clockwise to raise the door.
- The door is too high: turn the adjusting nut clockwise to lower the door.
3. Once the doors are correctly aligned, retighten the security nut.56
4. Vegetable drawers
8. Water and ice dispenser
BEFORE THE FIRST USE
- Remove the exterior and interior packing.
- Wipe the outside thoroughly with a soft dry cloth and the inside with a wet, lukewarm cloth.
- Set the temperature. See “Instructions>Temperature control”. Close the doors. USE Touch screen buttons A. Temperature of freezer B. Temperature of fridge C. Functions D. Child safety lock E. On/ o button water and ice dispenser F. Setting ice cubes/ crushed ice/water/lter set
1. Temperature of freezer
2. Temperature of fridge
7. Turn on/o the water and ice dispenser
8. Ice cubes setting
9. Setting crushed ice
10. Setting cold water
11. Child safety lock
The control panel goes into sleep mode automatically. The display lights up when a button is touched and when the doors are opened. TEMPERATURE CONTROLS
- The temperature of the fridge can be set between 2 and 8°C. Under normal conditions, it is best to select 4°C. Press “REF. TEMP.” button (temperature fridge) and continue to press until the desired temperature is displayed.
- The temperature of the freezer can be set between -16 and -24°C. Under normal conditions, it is best to select -18°C. Press the “FRZ.TEMP.” button (temperature freezer) and continue to press until the desired temperature is displayed.58 DO933SBS
- The operating time and temperature is inuenced by the location of the fridge, the number of times the door is opened and the temperature of the room the fridge is in.
- Select this function if the standard temperature does not cool suciently. For example: with extremely hot weather, if the fridge door is opened often, with a high environmental temperature, if a large quantity of uncooled food is placed in the fridge, etc.
- By selecting this function, the fridge temperature is set at 2°C for a period of 2 1/2 hours. This function is switched o automatically after the time has elapsed. The previously set temperature will once again be maintained.
- This function can be turned on and o with the “MODE” button (functions). The QUICK REF symbol (quick cool) will be displayed. Quick freeze
- Select this function if you want to freeze fresh foods.
- By selecting this function, the freezer temperature is lowered to -24°C. It is recommended that this function be selected 12 hours prior to the freezing.
- You can set the time at 48 or 26 hours after you have selected this function. Press and hold the button a few seconds to set the freezer temperature. The display will show ‘48’. If you press once again, ‘26’ will appear. This means that, for the next 48 or 26 hours, the freezer will freeze at -24 °C, depending on the time setting selected. After 48 or 26 hours, the setting will be switched back automatically. The previously set temperature will once again be maintained.
- If the temperature of the freezer goes below -24 °C before the set time has elapsed, the setting will automatically be switched o.
- This function can be turned on and o with the “MODE” button (functions). The QUICK FRZ symbol (quick freeze) will be displayed. Quick cool and freeze
- Select this function if the standard temperature does not cool suciently. For example: with extremely hot weather, if the doors are opened often, with a high environmental temperature, if a large quantity of uncooled/unfrozen food is placed in the appliance, etc.
- By selecting this function, the freezer temperature is lowered to -24°C for a maximum of 48 hours. The fridge temperature is set at 2°C for 2 1/2 hours. This function is switched o automatically after the time has elapsed. The previously set temperature will once again be maintained.
- If the temperature of the freezer goes below -24 °C before the set time has elapsed, the setting will automatically be switched o.
- This function helps save energy during those periods when the appliance is used irregularly, such as, for example, during vacations.
- By selecting this function, the freezer temperature is set at -18°C. The fridge is turned o.
- This function can be turned on and o with the “MODE” button (functions). The symbol will be displayed.
- Important: with this function in operation, make sure that all food and drink have been removed from the fridge compartment.
The child safety lock automatically blocks the buttons for safety. Press the “LOCK” button (child safety lock) for 3 seconds to block the panel. The display will show a closed lock. Press the “UNLOCK” button (child safety lock) for 3 seconds to unblock the panel. The lock will disappear on the display.
WATER AND ICE DISPENSER
Press this function to turn on or o the water and ice dispenser. The symbol ICE OFF (turn on/ o the water and ice dispenser) will illuminate or will go out. This is recommendable when you are not going to use the water and ice dispenser for a while.
SETTING ICE CUBES/ WATER/ FILTER SET
Press this function to make your choice.
- Setting water The symbol of the chosen setting will illuminate to show the selection. You can take ice cubes, crushed ice or water using the tap under the display.
- It is completely normal the water and ice cube dispenser makes a sound while producing ice cubes or crushed ice.
- If you hear a scratchy sound when taking ice cubes, it is possible that the ice cubes are frozen together. Then, remove the ice cube container from the freezer and use a wooden or plastic spoon to remove them from each other.
- You can only take ice cubes, crushed ice or water when the door of the freezer is closed. If you open the door during this process, it will stop automatically. Water lter set Depending on the water consumption, the lter will last for an average of 150 – 180 days. If you need to replace the lter, the symbol will illuminate.60 DO933SBS Replace the lter by following below instructions: 1. Turn o the water supply. 2. Remove both the white and blue tube from the water lter at the back of the appliance. 3. Place the new water lter and reconnect the white and blue tube to the lter. 4. Turn back on the water supply. The water and ice dispenser is now again ready for use. 5. Reset the water lter function by pressing the lter set (DISPENSER) button for 3 seconds. ERRORS · Every time you open the door of the refrigerator or the freezer, you will hear a signal. This signal only indicates the appliance is operating. · If the doors are too long open, you will hear an alarm which indicates you need to close the doors to maintain the temperature inside the refrigerator or the freezer. · In case of a power cut-o, all settings will be remembered. When the appliance receives power again, it takes back the preset settings. Errors on the displayBelow error notications can appear on the display. In that case, it is recommendable to contact the nearest after sales service for inspection. Error DescriptionE0 Error in the water and ice dispenser. E1 Problem with the temperature in the refrigerator. E2 Problem with the temperature in the freezer.E5 Problem with the automatic defrost sensor. E6 Error in the communication. E7 Problem with the ambient temperature sensor. EE Problem with the water and ice dispenser sensor. EH Problem with the humidity sensor. MOVING THE SHELVES AND DOOR RACK · Empty the fridge before moving the shelves or the door racks. · To move a shelf, raise it and pull it towards you. Usage Information Shelving and rack adjustment Important note: all food and drink should be removed from all shelves and racks before adjusting or removing them You can adjust the shelving in the fridge compartment to your required configuration. To remove a shelf, lift it up slightly so the plastic stabilisers that on either side of the shelf are above the shelf rails and then pull it towards you. You can adjust the racks in the fridge and freezer compartments to your required configuration. To remove a rack hold both sides of the rack, lift it upwards (1) and then pull it towards you (2).
- To move a door rack, grip it rmly with 2 hands. Raise the door rack and pull it towards you. Usage Information Shelving and rack adjustment Important note: all food and drink should be removed from all shelves and racks before adjusting or removing them You can adjust the shelving in the fridge compartment to your required configuration. To remove a shelf, lift it up slightly so the plastic stabilisers that on either side of the shelf are above the shelf rails and then pull it towards you. You can adjust the racks in the fridge and freezer compartments to your required configuration. To remove a rack hold both sides of the rack, lift it upwards (1) and then pull it towards you (2).
LIGHTINGThe lighting in the fridge is LED light. This is more ecological and manufactured for a long life. For this reason, these may not be replaced. If there is a problem with the lighting, contact a qualied service centre in your area.MOVING YOUR APPLIANCEIf the appliance is turned o for any reason, wait for 10 minutes before turning it back on. This will allow the refrigeration system pressures to equalise before restarting. · Turn o the appliance and unplug it from the mains socket. Remove all food. Also remove all mobile parts (shelves, accessories, etc.) or x them into the fridge to avoid any shock. · Relocate and install. If the appliance has been left on its side for any length of time, leave it standing upright for at least 10 minutes before turning on.Your appliance uses isobutane (R600a) as a refrigerant. Although R600a is an environmentally friendly and natural gas, it is explosive. Therefore you should be careful during shipment and installation to prevent your appliance’s cooler elements from being damaged. In the event of a leak caused by damage to the cooler elements, move your fridge from open ame or heat sources and ventilate the room where the appliance is located for a few minutes.STORING FOOD IN THE FRIDGEThe fridge helps to extend the storage times of fresh perishable foods.Fresh food care for best results: · Store foods that are very fresh and of good quality. · Ensure that food is well wrapped or covered before it is stored. This will prevent food from dehydrating, deteriorating in colour or losing taste and will help maintain freshness. It will also prevent odour transfer. · Make sure that strong smelling foods are wrapped or covered and stored away from foods such as butter, milk and cream which can be tainted by strong odours. · Cool hot foods down before placing them in the fridge.62 DO933SBS
- To store deep-frozen food.
- To freeze food. Note: Ensure that the freezer door has been closed properly. Avoid opening the freezer drawers unnecessarily. Purchasing frozen food
- Packaging must not be damaged.
- Use by the ‘use by /best before/best by/’ date.
- If possible, transport deep-frozen food in an insulated bag and place quickly in the freezer. Freezing fresh food Freeze fresh and undamaged food only. To retain the best possible nutritional value, avour and colour, vegetables should be blanched before freezing. Aubergines, peppers, zucchini and asparagus do not require blanching. Note: Keep food to be frozen away from food which is already frozen.
- The following foods are suitable for freezing: Cakes and pastries, sh and seafood, meat, game, poultry, vegetables, fruit, herbs, eggs without shells, dairy products such as cheese and butter, ready meals and leftovers such as soups, stews, cooked meat and sh, potato dishes, soués and desserts.
- The following foods are not suitable for freezing:Types of vegetables, which are usually consumed raw, such as lettuce or radishes, eggs in shells, grapes, whole apples, pears and peaches, hard-boiled eggs, yoghurt, soured milk, sour cream, and mayonnaise. Packing frozen food To prevent food from losing its avour or drying out, place food in airtight packaging.
1. Place food in packaging.
4. Label packaging with contents and dates of freezing.
Suitable packaging: Plastic lm, tubular lm made of polyethylene, aluminium foil, freezer containers. Recommended storage times of frozen food in the freezer These times vary depending on the type of food. The food that you freeze can be preserved from 1 to 12 months (minimum at -18°C).63 DO933SBS www.domo-elektro.be
Food Storage time Bacon, casseroles, milk 1 month Bread, ice cream, sausages, pies, prepared shellsh, oily sh 2 months Non-oily sh, shellsh, pizza, scones and muns 3 months Ham, cakes, biscuits, beef and lamb chops, poultry pieces 4 months Butter, vegetables (blanched), eggs whole and yolks, cooked craysh, minced meat (raw), pork (raw) 6 months Fruit (dry or in syrup), egg whites, beef (raw), whole chicken, lamb (raw), fruit cakes 12 months Never forget:
- When you freeze fresh foods whit a ‘use by /best before/best by/’ date, you must freeze them before the expiry of this date.
- Check that the food was not already frozen. Indeed, frozen food that has thawed completely must not be refrozen.
- Once defrosted, food should be consumed quickly. POWER FAILURE
- Most power failures are corrected within an hour or two and will not aect your refrigerator temperatures. However, you should minimize the number of door openings while the power is o.
- During power failures of longer duration, take steps to protect your food by blacking dry ice on top of packages.
- Frozen food should not be aected if the power failure lasts for less than 15 hours. Do not refreeze frozen foods that have thawed completely. The food may be dangerous to eat.
CLEANING AND MAINTENANCE
- Do not use abrasive cleaning agents or solvents.
- Disconnect the mains plug from the mains socket.
- Take out the food and store in a cool location.
- Clean the appliance with a soft cloth, warm water and detergent.
- Wipe the door seal with clear water only and then wipe dry thoroughly.
- After cleaning reconnect and adjust the temperature control knob as desired.
- Put the food back into the appliance. CLEANING AND MAINTENANCE OF THE WATER AND ICE DISPENSER It is recommendable to clean regularly the water and ice dispenser in order to avoid strange odours or tastes in the ice or water.64 DO933SBS
1. Turn o the water and ice dispenser via the control panel. Unplug the appliance.
2. Remove the ice cube container from the freezer by lifting it up rst and then pulling it out
in a horizontal movement.
3. Remove the lid of the container and clean all parts carefully with a soft cloth, warm water
and a mild detergent.
4. Assemble the water and ice dispenser again, but please make sure all parts are
completely dry. Attention: the rod at the bottom of the water and ice dispenser needs to be replaced correctly in the opening of the freezer.
5. Replace the water and ice dispenser into the freezer. Turn the appliance back on. Also,
switch the water and ice dispenser back on via the control panel. TROUBLE SHOOTING Problem Possible causes Solution The appliance doesn’t work.
- The plug is not fully in the wall outlet.
- The wall socket is faulty.
- Put the plug in the mains.
- Contact an electrician. Strange odours. · The food in the refrigerator has been spoiled.
- Clean the inside of the refrigerator. The doors do not close completely.
- The refrigerator or the freezer is too full.
- The appliance is not level.
- Make sure food or drinks do not obstruct the closing of the doors.
Unusual sounds. · The appliance is not level.
- The unit it touching a wall or another object.
- Readjust the adjusting feet and level the unit.
- Gently move the appliance.
- Contact your repair service. Buzzing or bubbling sound.
- The compressor starts / is operating.
- The cooling gas circulates in the appliance.
- This is normal. The side panel is hot. · The condensation duct is on this side.
- This is normal. ENVIRONMENTAL GUIDELINES This symbol on the product or on its packaging indicates that this product may not be treated as household waste. Instead it must be brought to the applicable collection point for recycling of electrical and electronic equipment. By ensuring this product is disposed of correctly, you will help prevent potential negative consequences for the environment and human health, which could otherwise be caused by inappropriate waste handling of this product. For more detailed information about recycling of this product, please contact your local city oce, your household waste disposal service or the shop where you purchased the product. The packaging is recyclable. Please treat the packaging ecologically.66 DO933SBS
- Para mover un estante de la puerta, sujételo con las dos manos. Levante el estante de la puerta y tire de él hacia usted. Usage Information Shelving and rack adjustment Important note: all food and drink should be removed from all shelves and racks before adjusting or removing them You can adjust the shelving in the fridge compartment to your required configuration. To remove a shelf, lift it up slightly so the plastic stabilisers that on either side of the shelf are above the shelf rails and then pull it towards you. You can adjust the racks in the fridge and freezer compartments to your required configuration. To remove a rack hold both sides of the rack, lift it upwards (1) and then pull it towards you (2).
Usage Information Shelving and rack adjustment Important note: all food and drink should be removed from all shelves and racks before adjusting or removing them You can adjust the shelving in the fridge compartment to your required configuration. To remove a shelf, lift it up slightly so the plastic stabilisers that on either side of the shelf are above the shelf rails and then pull it towards you. You can adjust the racks in the fridge and freezer compartments to your required configuration. To remove a rack hold both sides of the rack, lift it upwards (1) and then pull it towards you (2).
- Poličku na dvěřích pevně uchopte oběma rukama. Tlačte směrem nahoru a přitom lehce tahejte k sobě, dokud se polička neuvolní. Usage Information Shelving and rack adjustment Important note: all food and drink should be removed from all shelves and racks before adjusting or removing them You can adjust the shelving in the fridge compartment to your required configuration. To remove a shelf, lift it up slightly so the plastic stabilisers that on either side of the shelf are above the shelf rails and then pull it towards you. You can adjust the racks in the fridge and freezer compartments to your required configuration. To remove a rack hold both sides of the rack, lift it upwards (1) and then pull it towards you (2).
Usage Information Shelving and rack adjustment Important note: all food and drink should be removed from all shelves and racks before adjusting or removing them You can adjust the shelving in the fridge compartment to your required configuration. To remove a shelf, lift it up slightly so the plastic stabilisers that on either side of the shelf are above the shelf rails and then pull it towards you. You can adjust the racks in the fridge and freezer compartments to your required configuration. To remove a rack hold both sides of the rack, lift it upwards (1) and then pull it towards you (2).
- Poličku na dverách pevne uchopte oboma rukami. Tlačte smerom hore a pritom ľahko ťahajte k sebe, kým sa polička neuvoľní. Usage Information Shelving and rack adjustment Important note: all food and drink should be removed from all shelves and racks before adjusting or removing them You can adjust the shelving in the fridge compartment to your required configuration. To remove a shelf, lift it up slightly so the plastic stabilisers that on either side of the shelf are above the shelf rails and then pull it towards you. You can adjust the racks in the fridge and freezer compartments to your required configuration. To remove a rack hold both sides of the rack, lift it upwards (1) and then pull it towards you (2).