
DO331L - Vacuum packaging machines DOMO - Free user manual and instructions
Find the device manual for free DO331L DOMO in PDF.

| Product Type | Vacuum Sealer |
| Brand | Domo |
| Model | DO331L |
| Power Supply | 220-240 V~ 50 Hz |
| Power | 130 W |
| Standby Consumption | 0.33 W |
| Main Functions | Vac&Seal (automatic vacuum and sealing), manual sealing, pulse vacuum, sealing adjustments (dry, moist, extended), pressure adjustment (normal, gentle), canister packaging, marinating |
| Included Accessories | Film roll, storage container, container hose |
| Usage | Household |
| Warranty | 2 years (appliance), 6 months (accessories) |
| Care and Cleaning | Clean with a soft, damp cloth; sealing strip cleaned only when cooled; do not immerse the appliance |
| Safety | Thermal protection; do not use with an external timer or remote control; keep out of reach of children |
| Dimensions (approx.) | Approx. 40 x 20 x 10 cm |
| Weight (approx.) | Approx. 2 kg |
| Cord Length (approx.) | Approx. 1 m |
| Compatible Film Type | Special plastic film for vacuum sealers (supplied or sold separately) |
| Maximum Sealing Capacity | Bags of width suitable for vacuum chamber (approx. 30 cm) |
| Freezing Temperature of Container | Up to -18 °C |
| Main Material | ABS Plastic |
| Spare Parts and Repairability | Sealing strip, seal gasket, blade, hose; repairs by manufacturer or after-sales service |
Frequently Asked Questions - DO331L DOMO
User questions about DO331L DOMO
0 question about this device. Answer the ones you know or ask your own.
Ask a new question about this device
Download the instructions for your Vacuum packaging machines in PDF format for free! Find your manual DO331L - DOMO and take your electronic device back in hand. On this page are published all the documents necessary for the use of your device. DO331L by DOMO.
USER MANUAL DO331L DOMO
natural_image
Exterior view of a black and silver JARO water heater (no visible text or symbols on body)DO331L
natural_image
Close-up of a printer holder with paper roll and a clear water dispenser labeled '9', alongside an inset image showing the paper's internal structure (no text or symbols on main components)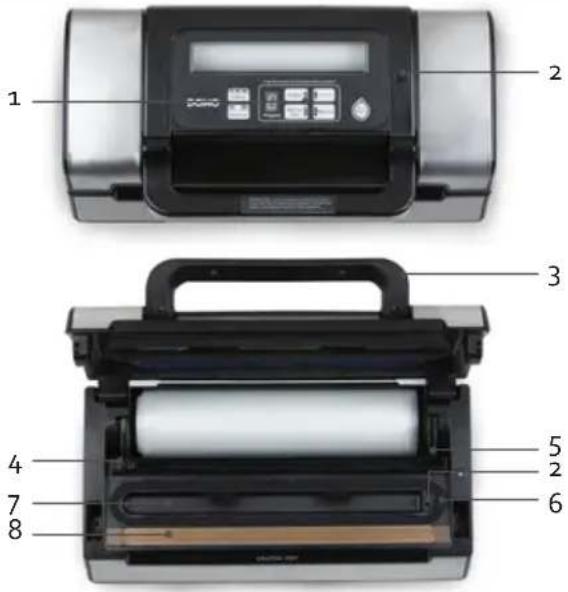
BEDIENING
- Vacuum & Seal/Cancel:
natural_image
Close-up of hands handling a sheet of paper inside a black filing tray (no visible text or symbols)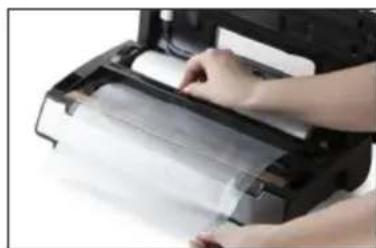
natural_image
Close-up of hands printing a printed paper or document on a printer (no visible text or symbols)VERPAKKEN IN EEN ZAKJE MET VAC&SEAL-TOETS
natural_image
Person handling a packaged food item via a black printing machine (no visible text or symbols)VERPAKKEN IN EEN ZAKJE MET PULSE VACUUM-TOETS
natural_image
Laboratory equipment with a glass beaker containing a brown liquid, next to a digital display (no visible text or symbols)natural_image
Recycling symbol icon with three chasing arrows forming a triangle (no text or labels)natural_image
Two views of a printer or printer device: one showing a black cover with paper strips, the other showing a labeled container with number 9 and a tube labeled 10 (no text or symbols on the device itself)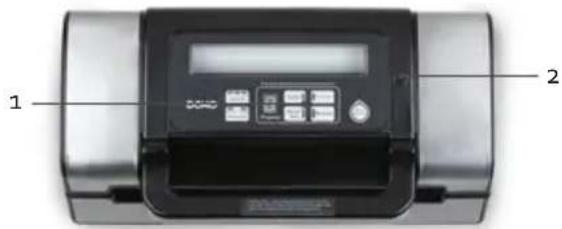
COMMANDE
- Vacuum&Seal/Cancel:
natural_image
Close-up of hands handling a sheet of paper or paper inside a black printer case (no visible text or symbols)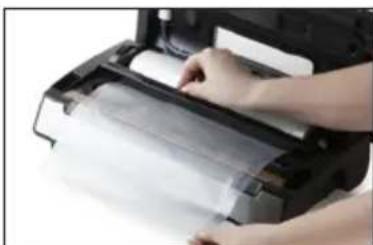
natural_image
Close-up of hands printing a printed paper or document on a printer (no visible text or symbols)natural_image
Person handling a bag of raw meat inside a black industrial machine (no visible text or symbols)natural_image
Laboratory setup with digital display and glass beaker containing a red liquid, no visible text or symbolsCONSERVATION
natural_image
Symbol of a trash bin crossed with diagonal lines, no text or numbers presentnatural_image
Recycling symbol icon (three chasing arrows) inside a rounded square frame, no text or labels present.natural_image
Two electronic devices: a black printer with rollers and a water dispenser with a labeled component (no visible text or symbols)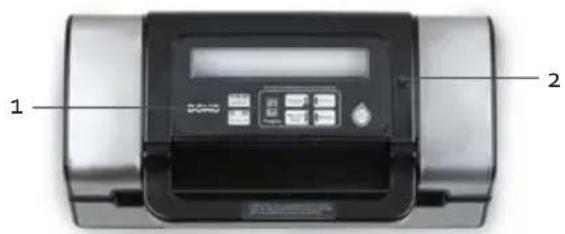
BEDIENUNG
- Vacuum&Seal/Cancel:
natural_image
Person handling a rolled-up paper or plastic sheet inside a black printer case (no visible text or symbols)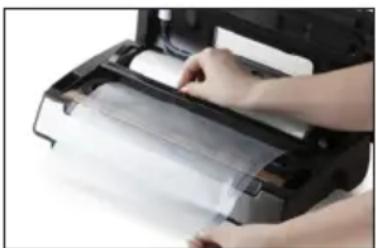
natural_image
Close-up of hands printing or packaging a sheet of paper from an open printer (no visible text or symbols)natural_image
Person handling a bag of raw meat inside a black printing machine (no visible text or symbols)IM BEUTEL VAKUUMIEREN MIT DER PULSE VACUUM-TASTE
natural_image
Modern laboratory instrument with digital display and glass jar containing red liquid (no visible text or symbols)natural_image
Recycling symbol icon with three chasing arrows forming a triangle (no text or labels)Thank you very much for placing your trust in DOMO. We hope you enjoy your new purchase.
All our products undergo strict quality control before reaching you. If you still experience any problems with your device, we sincerely regret that. We have collected the most frequently asked questions about our devices on our webshop. Scan the QR code and have a look! If you cannot find a solution to your problem there, do not hesitate to contact our customer service via info@linea2000.be. Our staff will do everything they can to assist you!

This appliance has a two year warranty period. During this period the manufacturer is responsible for any failures that are the direct result of construction failure. When these failures occur the appliance will be repaired or replaced if necessary. The warranty will not be valid when the damage to the appliance is caused by wrong use, not following the instructions or repairs executed by a third party. The guarantee is issued with the original till receipt. All parts, which are subject to wear, are excluded from the warranty. If your device breaks down within the 2-year warranty period, you can return the device together with your receipt to the shop where you purchased it.
The guarantee on accessories and components that are liable to wear-and-tear is only 6 months.
The guarantee and responsibility of the supplier and manufacturer lapse automatically in the following cases:
- If the instructions in this manual have not been followed.
· In case of incorrect connection, e.g., electrical voltage that is too high.
· In case of incorrect, rough or abnormal use.
· In case of insufficient or incorrect maintenance.
· In case of repairs or alterations to the device by the consumer or non-authorised third parties. - If the customer used parts or accessories that are not recommended or provided by the supplier / manufacturer.
SAFETY INSTRUCTIONS
When using electrical appliances, basic safety precautions should always be taken, including the following:
- Read all instructions carefully. Keep this manual for future reference.
- Make sure all packaging materials and promotional stickers have been removed before using the appliance for the first time. Make sure children cannot play with the packaging materials.
· This appliance is intended to be used in household and similar applications such as:
· staff kitchen areas in shops, offices and other working environments;
- farm houses;
· by clients in hotels, motels and other residential type environments;
- bed and breakfast type environments.
· Children should be supervised to ensure that they do not play with the appliance.
- This appliance can be used by children aged from 16 years and above and persons with reduced physical, sensory or mental capabilities or lack of experience and knowledge if they have been given supervision or instruction concerning use of the appliance in a safe way and understand the hazards involved. Children shall not play with the appliance. Cleaning and user maintenance shall not be made by children unless they are older than 16 and supervised.
- Keep the appliance and its cord out of reach of children younger than 16 years.
• Attention: This appliance cannot be used with an external timer or a separate remote control.
The appliance can become hot during use. Keep the power cord away from hot parts and don't cover the appliance.
- Before use, check if the voltage stated on the appliance corresponds with the voltage of the power net at your home.
- Do not let the cord hang on a hot surface or on the edge of a table or counter top.
- Never use the appliance when the cord or plug is damaged, after malfunction or when the appliance itself is damaged. In that case, take the appliance to the nearest qualified service center for check-up and repair.
- Close supervision is necessary when the appliance is used near or by children.
- The use of accessories that are not recommended or sold by the manufacturer can cause fire, electrical shock or injuries.
- Unplug the appliance when it is not in use, before assembling or disassembling any parts and before cleaning the appliance. Put all buttons and knobs into the 'off' position and unplug the appliance by grasping the plug. Never unplug by pulling the cord.
· Do not leave a working appliance unattended. - Never place this appliance near a gas stove or electrical stove or in a place where it may come into contact with a warm appliance.
- Do not use the appliance outdoors.
- Only use the appliance for its intended use.
· Always use the appliance on a steady, dry and level surface.
- Only use the appliance for domestic use. The manufacturer can not be held responsible for accidents that result from improper use of the appliance or not following the instructions described in this manual.
· All repairs should be carried out by the manufacturer or its aftersales service.
· Never immerse the appliance, the cord or the plug in water or any other liquid.
- Make sure that children do not touch the cord or appliance.
- Keep the cord away from sharp edges and hot parts or other heat sources.
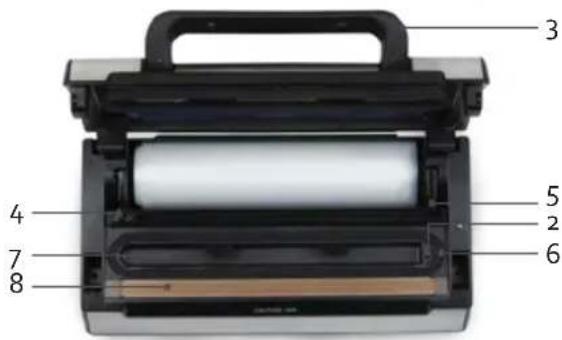
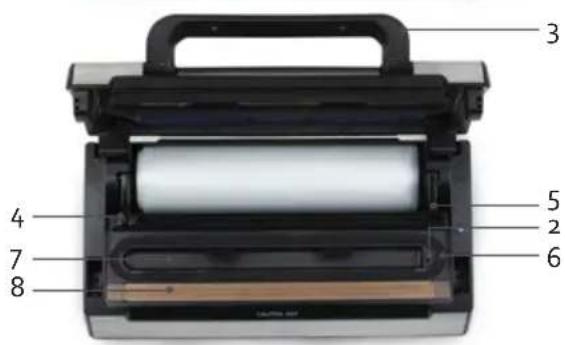
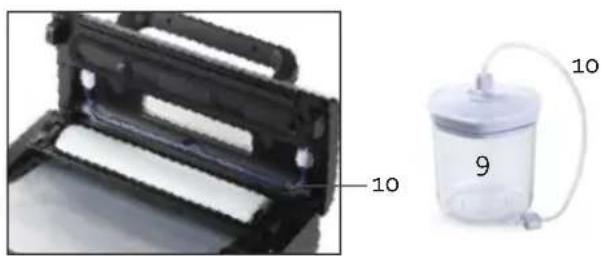
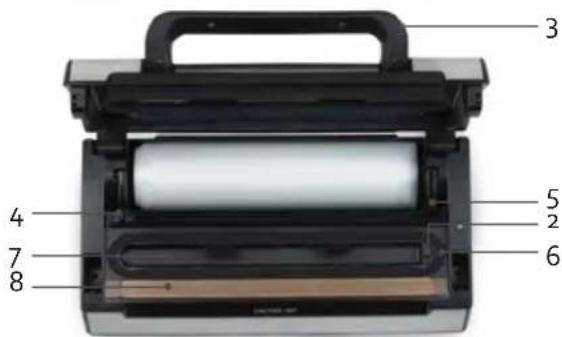
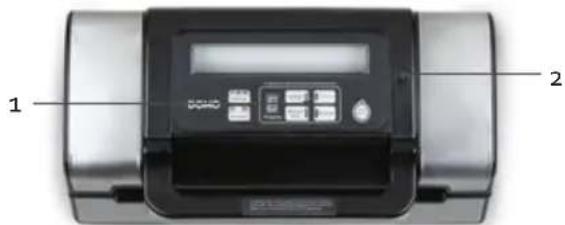
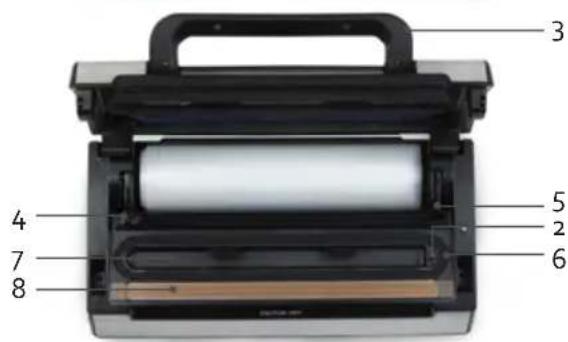
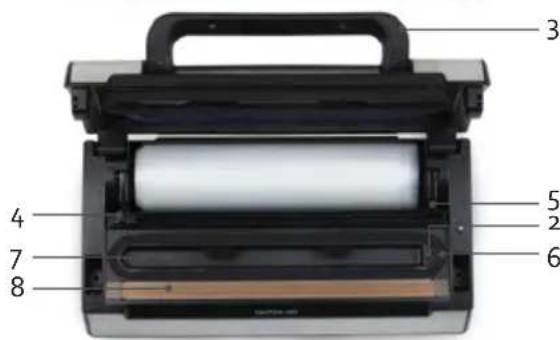
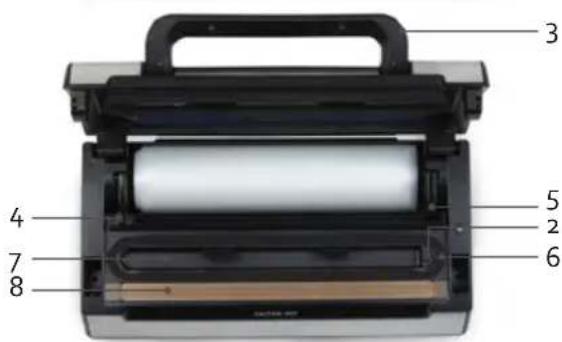
PARTS
- Operation
- Air inlet
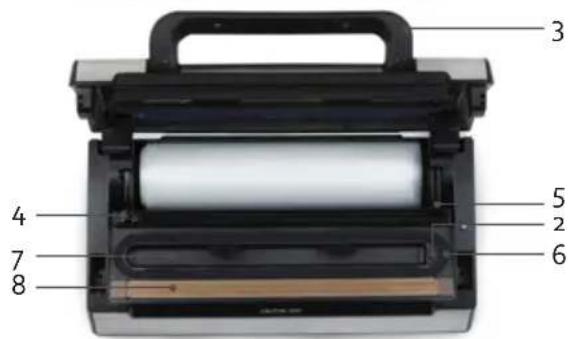
- Handle
- Cutting blade
- Cutting edge
- Sealing ring (above and below)
- Vacuum chamber
- Sealing strip (do not remove)
- Food container
- Hose for food container
natural_image
Two electronic devices: a black rack with white rollers and a transparent container with a paper tube labeled '9' and '10' (no text or symbols on the devices themselves)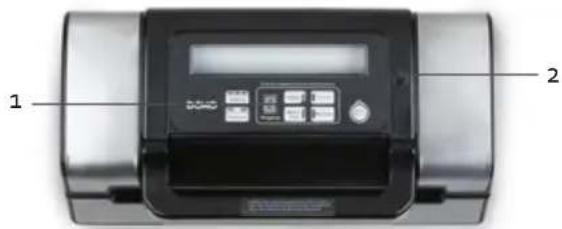
- Vacuum&seal/cancel:
This button has 2 functions, depending on the status of the machine:
- In "stand-by" mode: if you press the button now, the complete process of vacuum packing and sealing will run automatically.
-
While operating the machine (vacuum packaging or closing of the packaging): if you press the button now, the machine will stop operating.
-
Manual Seal:
This button has 2 functions
· In order to seal the open end of a bag when you make bags from a film roll.
- When the automatic "vacuum & seal" function is on, this button will switch the vacuum pump off and immediately seal the packaging. In this way you can control the vacuum pressure in a package, in order to prevent certain substances from being flattened.
- Pulse vacuum:
If you press this button, the vacuum pump is switched on. If you let the button go, the vacuum pump will stop, allowing you to control the vacuum process optimally. This can be repeated several times. Then the Manual Seal button can be used to seal the packaging.
- Sealing:
This button can be used to set the packaging time, depending on the food to be packaged.
- Dry setting: for dry bags or substances without moisture, which have a shorter closing time. The Dry indicators light up.
- Moist setting: for moist bags or foods with more moisture, which have a longer closing time. The Dry and Moist indicators light up.
- Extended setting: for wet bags or food with a high moisture content. The closing time is longer than with the Moist setting. The Dry, Moist and Extended indicators light up.
The standard setting is for dry bags and a normal closing time.
- Pressure:
Use this button to set the pressure.
Normal: this is the normal setting for standard pressure.
Gentle: there is less pressure with this setting. Select this setting when sealing delicate foodstuffs.
- Canister
Press this button when vacuum sealing with the hose and food container.
- Marinate
Use this button to marinate meat. Alternately having the container on vacuum and allowing the air back in opens up the pores in the meat. This allows the marinade to penetrate optimally. Repeat the process 3x for the best result.
BEFORE THE FIRST USE
Always clean the machine before using it. Read the instructions in the section on maintenance and cleaning.
Place the machine on a smooth and stable surface. Allow for sufficient working room around the machine.
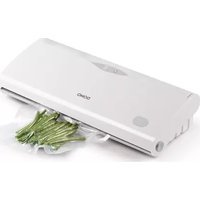
USE
- The machine is only intended for household use. We advise allowing the machine to cool off between 2 uses. The machine can only be used 1 time per minute and for a maximum of 10 minutes at this rate. If you exceed this rate, the machine will overheat and may get damaged.
- The "seal" button on the machine will no longer work if it is pressed again within 15 seconds after the previous use.
- The appliance works only with the film supplied with it. The film is also available as a separate item for this appliance. Do not use other films or bags in this machine.
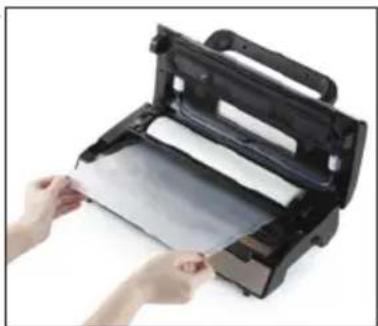
MAKING BAGS WITH THE FILM ROLL
The film roll allows you to make bags yourself according to the size of the food that you want to package.
- Put the plug in the socket.
- Ensure that the cutting blade is positioned at the far left or far right of the cutting edge. Raise the cutting edge.
-
Roll the film out to the required length. Lower the cutting edge and cut the roll using the cutting blade.
-
Make sure that the film is clean and has no folds in it.
-
Place one open end of the film on the heating strip. PLEASE NOTE: Do not allow the film to get into the vacuum chamber.
-
Press the lid down using the handle so that it clicks shut. The display will show a 'o'. The lid is now closed.
-
Press the Manual Seal button to switch on the machine and to seal the film at one end. The red Manual Seal light comes on and the numbers on the display count down. When the red light goes off, the bag is ready to use.
natural_image
Person handling a sheet of paper inside a black filing machine (no visible text or symbols)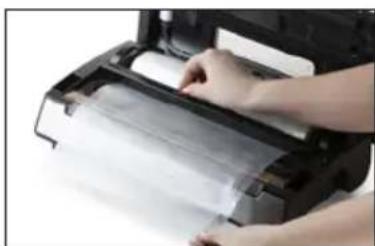
natural_image
Close-up of hands printing a printed paper or document on a printer (no visible text or symbols)SEALING A BAG USING THE VAC&SEAL BUTTON
- Put the plug in the socket.
- Place the food you want to store in the bag. Open the lid.
- Place the open end of the bag in the vacuum chamber, without covering the air inlet. Make sure that the end of the bag that rests of the sealing strip is completely clean and free of food particles. The bag must be kept tight, without any folds in it.
- Press the lid down using the handle so that it clicks shut.
- Select the weld time using the Sealing button. Set the pressure with the Pressure button.
- Press on the Vac&Seal button to start the machine. The machine will now automatically vacuum seal. The Vac&Seal button light will first come on. The numbers on the display count down. The Manual Seal lamp will then also light up, indicating that the bag in now being sealed. When sealing is complete, the indicator lamps will switch off again. The display will show a 'o'.
- Open the lid and check whether the bag is sealed properly.
natural_image
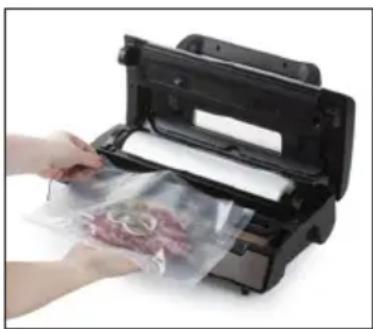
Person handling a bag of raw meat inside a black printing machine (no visible text or symbols)SEALING IN A BAG USING THE PULSE VACUUM BUTTON
- Put the plug in the socket.
- Place the food you want to store in the bag. Open the lid.
- Place the open end of the bag in the vacuum chamber, without covering the air inlet. Make sure that the end of the bag that rests of the sealing strip is completely clean and free of food particles. The bag must be kept tight, without any folds in it.
- Press the lid down using the handle so that it clicks shut.
- Select the weld time using the Sealing button. Set the pressure with the Pressure button.
- Press the Pulse Vacuum button. Release the button when the desired vacuum has been achieved.
- Now press on the Manual Seal button to seal the bag. The button's red light comes on and the numbers on the display count down. When the red light goes off, the machine is ready.
- Open the lid and check whether the bag is sealed properly.
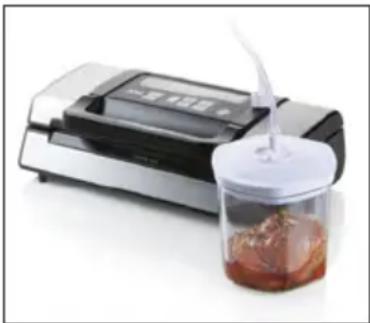
SEALING IN A FOOD CONTAINER
- Ensure that the food container, the lid and the lid sealing ring are clean before using them.
- Place the food you want to store in the food container. Do not overfill the container, ensuring that the lid remains in contact with the container.
- The hose can be found in the storage area provided within the appliance. Take this out.
- Press the lid down using the handle so that it clicks shut. Insert the end of the hose in the air inlet to the right of the operating panel. Place the other end in the opening of the lid.
- Turn the knob on the lid so that the arrow points towards the word 'seal'.
- Set the pressure to Normal with the Pressure button.
- Keep your hand on the lid to prevent any air from escaping. Press the Canister button. The button's red light comes on and the numbers on the display count down. When the red light goes off, the machine is ready.
- Remove the hose from the container, and then from the appliance.
- To open the food container, turn the knob on the lid so that the arrow points towards the word 'open'.
The food container is freezer-safe down to -18 °C.
MARINATING IN THE FOOD CONTAINER
- Ensure that the food container, the lid and the lid sealing ring are clean before using them.
- Place the food you want to marinate in the food container. Do not overfill the container, ensuring that the lid remains in contact with the container.
- The hose can be found in the storage area provided within the appliance. Take this out.
- Press the lid down using the handle so that it clicks shut. Insert the end of the hose in the air inlet to the right of the operating panel. Place the other end in the opening of the lid.
natural_image
Product photo of a digital laboratory instrument with a glass jar containing a brown liquid and a white lid, no visible text or symbols.-
Turn the knob on the lid so that the arrow points towards the word 'open'.
-
Keep your hand on the lid to prevent any air from escaping. Press the Marinate button. The button's red light comes on and the numbers on the display count down. When the red light goes off, the machine is ready. The marinate function takes around 5 minutes.
-
We recommend repeating the programme. The best results are achieved after 3 cycles.
-
Remove the hose from the container, and then from the appliance.
STORAGE LIFE
By using the packaging machine, you can increase the storage life of food 3 to 5 times, both in the fridge and in the freezer.
Storage life in the fridge (+5°C) in days
| Normal With the film sealing machine | |
| Meat 3 - 4 8 - 9 | |
| Fish 1 - 3 4 - 5 | |
| Cheese 15 - 20 25 - 60 | |
| Sandwich filling 7 - 15 25 - 40 | |
| Vegetables 1 - 3 7 - 10 | |
| Fruit 5 - 7 14 - 20 |
Storage life in the freezer (-18°C)
| Normal With the film sealing machine | ||
| Meat, fish and seafood 3-5 months | >1 year | |
CLEANING AND MAINTENANCE
APPLIANCE
- Remove the plug from the socket prior to cleaning the machine.
- After each use, clean the machine with a dry or slightly damp, soft cloth. Make sure that no fluids get into the machine.
-
Remove all particles of bags that you have sealed from the sealing strip of the machine with a soft cloth. Only clean the sealing strip once it has cooled completely.
-
Clean the vacuum chamber with a soft, moist cloth.
- The sealing ring on the vacuum chamber can be removed. Take care not to damage it as air may otherwise escape from the vacuum chamber. Always ensure that the sealing ring is completely dry during use.
· Do not expose the machine to extreme temperatures, moisture, shock, dust or direct sunlight. - Do not drop the machine.
· Never use corrosive or abrasive products to clean the machine.
FOIL BAGS
The bags can be cleaned for reuse.
- Clean the bags in warm water using a mild detergent.
- The bags are dishwasher-safe. Turn the bags inside out so that the entire surface comes into contact with the water.
· Dry carefully before use.
FOOD CONTAINER
- Clean the lid of the food container a soft damp cloth.
- You can clean the bottom of the food container in warm water with a mild detergent or in the dishwasher.
STORAGE
- Do not lock the lid of this machine after use. This could damage the sealing rings, resulting in the vacuum packaging no longer working properly.
- Place the cord in the cord storage at the back of the machine. Never wrap the cord around the machine.
PROBLEMS AND SOLUTIONS
The machine will not start?
- Check if the plug is in the socket.
- Check if the indicator light is on.
- The thermal safety is switched on: allow the machine to cool.
The machine does not vacuum the bag completely?
- Check whether the bag is positioned correctly in the vacuum chamber, but do not cover the air inlet.
- Check whether the bag is positioned correctly in the vacuum chamber.
- The sealing strip may be overheated. Wait a few minutes until the sealing strip has cooled and then try again.
- There may be a hole in the bag; try using a new bag.
- Check that the sealing ring is not damaged.
The bag does not remain vacuum packed after it has been sealed?
- Check whether there is a leak in the bag. Protect sharp edges of food that you want to seal with a piece of paper towel.
- Check that there are no particles stuck to the closure of the bag, e.g. crumbs, fat, etc. Reopen the bag and try to seal it again.
The bag has melted and is not sealed properly?
· Make sure that the inside of the bag is clean and that it is smooth
The food container fails to create a vacuum?
- Check whether the hose is connected correctly.
- Ensure that the knob on the lid is turned to 'seal'.
- Keep the lid facing away from you during the vacuum process.
- The edge of the container and the lid must be clean before use.
SPECIFICATIONS
| Model DO331L | |
| Voltage 220-240 V~ 50 Hz | |
| Power 130 W | |
| Energy consumption in off-mode after o minutes 0.33 W |
ENVIRONMENTAL GUIDELINES
This symbol on the product or on its packaging indicates that this product may not be treated as household waste. Instead it must be brought to the applicable collection point for recycling of electrical and electronic equipment. By ensuring this product is disposed of correctly, you will help prevent potential negative consequences for the environment and human health, which could otherwise be caused by inappropriate waste handling of this product. For more detailed information about recycling of this product, please contact your local city office, your household waste disposal service or the shop where you purchased the product.

natural_image
Recycling symbol icon with three chasing arrows inside a rounded square (no text or labels)The packaging is recyclable. Please treat the packaging ecologically.
GARANTIA
natural_image
Two-panel image showing a printer holder and a vacuum tube device with labeled parts (no text or symbols on the devices themselves)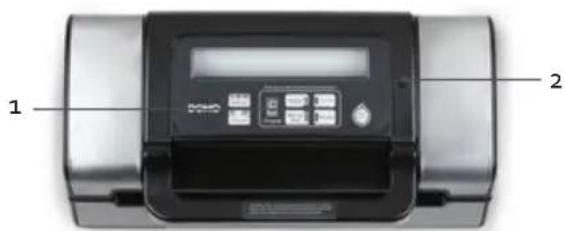
CONTROL
1. Vacuum&seal/cancel:
natural_image
Close-up of hands handling a black printer or scanner with a sheet of paper (no visible text or symbols)
natural_image
Close-up of hands printing a printed paper or document on a printer (no visible text or symbols)natural_image
Person printing or packaging material from a black printer into a plastic sheet (no visible text or symbols)natural_image
Laboratory setup with a digital display and a glass jar containing red liquid, no visible text or symbols.natural_image
Recycling symbol icon with three chasing arrows forming a triangle (no text or labels)natural_image
Close-up of a black plastic roller roller with white paper bands, labeled with number 10 (no text or symbols on the roller itself)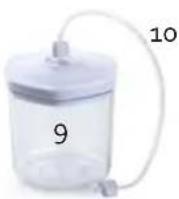
PANNELLO COMANDI
- Vacuum & Seal/Cancel:
natural_image
Person handling a sheet of paper inside a black printer or printer (no visible text or symbols)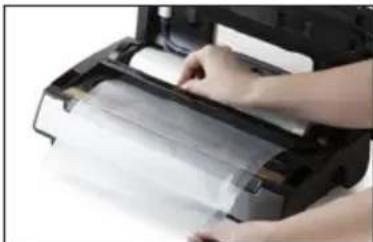
natural_image
Person printing a paper airplane into a printer (no visible text or symbols)CONFEZIONARE IN SACCHETTI CON IL TASTO VAC&SEAL
natural_image
Person printing or packaging material into a black printer (no visible text or symbols)CONFEZIONARE IN SACCHETTI CON IL TASTO PULSE VACUUM
natural_image
Modern kitchen appliance with digital display and glass jar containing a brown liquid, no visible text or symbolsnatural_image
Recycling symbol icon with three chasing arrows forming a triangle (no text or labels)natural_image
Two-panel image showing a black plastic printer holder and a transparent cylindrical device with labeled parts (no text or symbols on the devices themselves)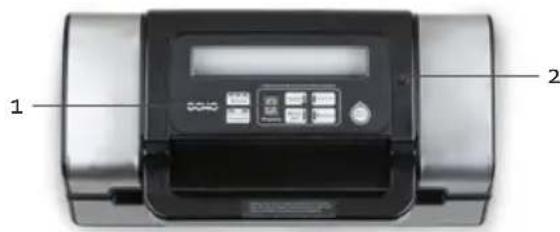
FUNKCE
natural_image
Person holding a sheet of paper inside a black printer case (no visible text or symbols)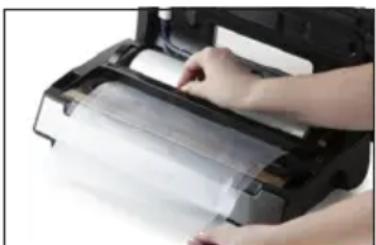
natural_image
Close-up of hands handling a plastic sheet or paper on a printer (no visible text or symbols)natural_image
Person handling a bag of raw meat inside a black printing machine (no visible text or symbols)natural_image
Modern laboratory instrument with digital display and glass beaker containing red liquid (no visible text or symbols)OHLED NA ŽÍVOTNÍ PROSTŘEDÍ
natural_image
Symbol of a trash bin crossed out by diagonal lines, enclosed in a rounded rectangle (no text or numbers present)natural_image
Two views of a printer or scanner device: one showing a black cover with paper strips, the other showing a transparent container labeled '9' with a tube and cable (no readable text or symbols beyond labels)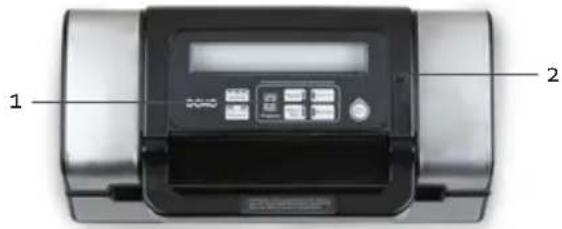
SVETELNÁ KONTROLKA PRI VÁKUOVANIE TEKUTÍN / JEMNÉHO
- Vákuovanie a zváranie (VACUUM AND SEAL) / prerušenie (CANCEL)
natural_image
Person handling a sheet of paper inside a black printer case (no visible text or symbols)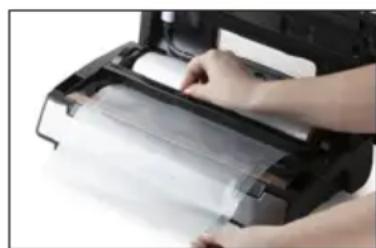
natural_image
Close-up of hands printing a printed paper or document on a printer (no visible text or symbols)natural_image
Person handling a bag of raw meat inside a black industrial machine (no visible text or symbols)MANUÁLNÉ VÁKUOVANIE A ZVÁRENIE SÁČKU POMOCOU FUNKCIE VACUUM
natural_image
Laboratory equipment with a digital display and a glass of brown liquid being poured into it (no visible text or symbols)natural_image
Recycling symbol icon with three chasing arrows forming a triangle (no text or labels)natural_image
Two cylindrical containers of milk, no text or symbols visible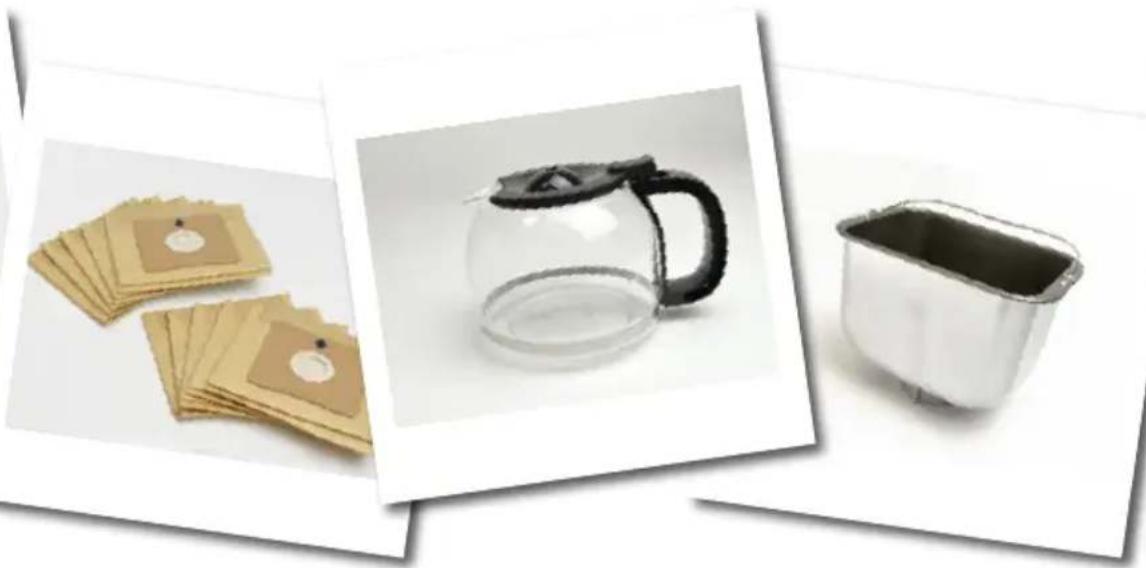
natural_image
Three product photos: cardboard sheets, a clear glass coffee maker, and a metal baking pan (no text or symbols visible)of scan hier:
ou scannez ici:
oder hier scannen:
or scan here:

- DO331L
- BEDIENING
- VERPAKKEN IN EEN ZAKJE MET VAC&SEAL-TOETS
- VERPAKKEN IN EEN ZAKJE MET PULSE VACUUM-TOETS
- COMMANDE
- CONSERVATION
- BEDIENUNG
- IM BEUTEL VAKUUMIEREN MIT DER PULSE VACUUM-TASTE
- SAFETY INSTRUCTIONS
- PARTS
- BEFORE THE FIRST USE
- USE
- MAKING BAGS WITH THE FILM ROLL
- SEALING A BAG USING THE VAC&SEAL BUTTON
- SEALING IN A BAG USING THE PULSE VACUUM BUTTON
- SEALING IN A FOOD CONTAINER
- MARINATING IN THE FOOD CONTAINER
- STORAGE LIFE
- CLEANING AND MAINTENANCE
- APPLIANCE
- FOIL BAGS
- FOOD CONTAINER
- STORAGE
- PROBLEMS AND SOLUTIONS
- ENVIRONMENTAL GUIDELINES
- GARANTIA
- CONTROL
- Vacuum&seal/cancel:
- PANNELLO COMANDI
- CONFEZIONARE IN SACCHETTI CON IL TASTO VAC&SEAL
- CONFEZIONARE IN SACCHETTI CON IL TASTO PULSE VACUUM
- FUNKCE
- OHLED NA ŽÍVOTNÍ PROSTŘEDÍ
- SVETELNÁ KONTROLKA PRI VÁKUOVANIE TEKUTÍN / JEMNÉHO
- MANUÁLNÉ VÁKUOVANIE A ZVÁRENIE SÁČKU POMOCOU FUNKCIE VACUUM
Brand : DOMO
Model : DO331L
Category : Vacuum packaging machines