Astroride A6.0 - Treadmills Reebok - Free user manual and instructions
Find the device manual for free Astroride A6.0 Reebok in PDF.

User questions about Astroride A6.0 Reebok
0 question about this device. Answer the ones you know or ask your own.
Ask a new question about this device
Download the instructions for your Treadmills in PDF format for free! Find your manual Astroride A6.0 - Reebok and take your electronic device back in hand. On this page are published all the documents necessary for the use of your device. Astroride A6.0 by Reebok.
USER MANUAL Astroride A6.0 Reebok
natural_image
Abstract red geometric logo on white background (no text or symbols)Reebok
natural_image
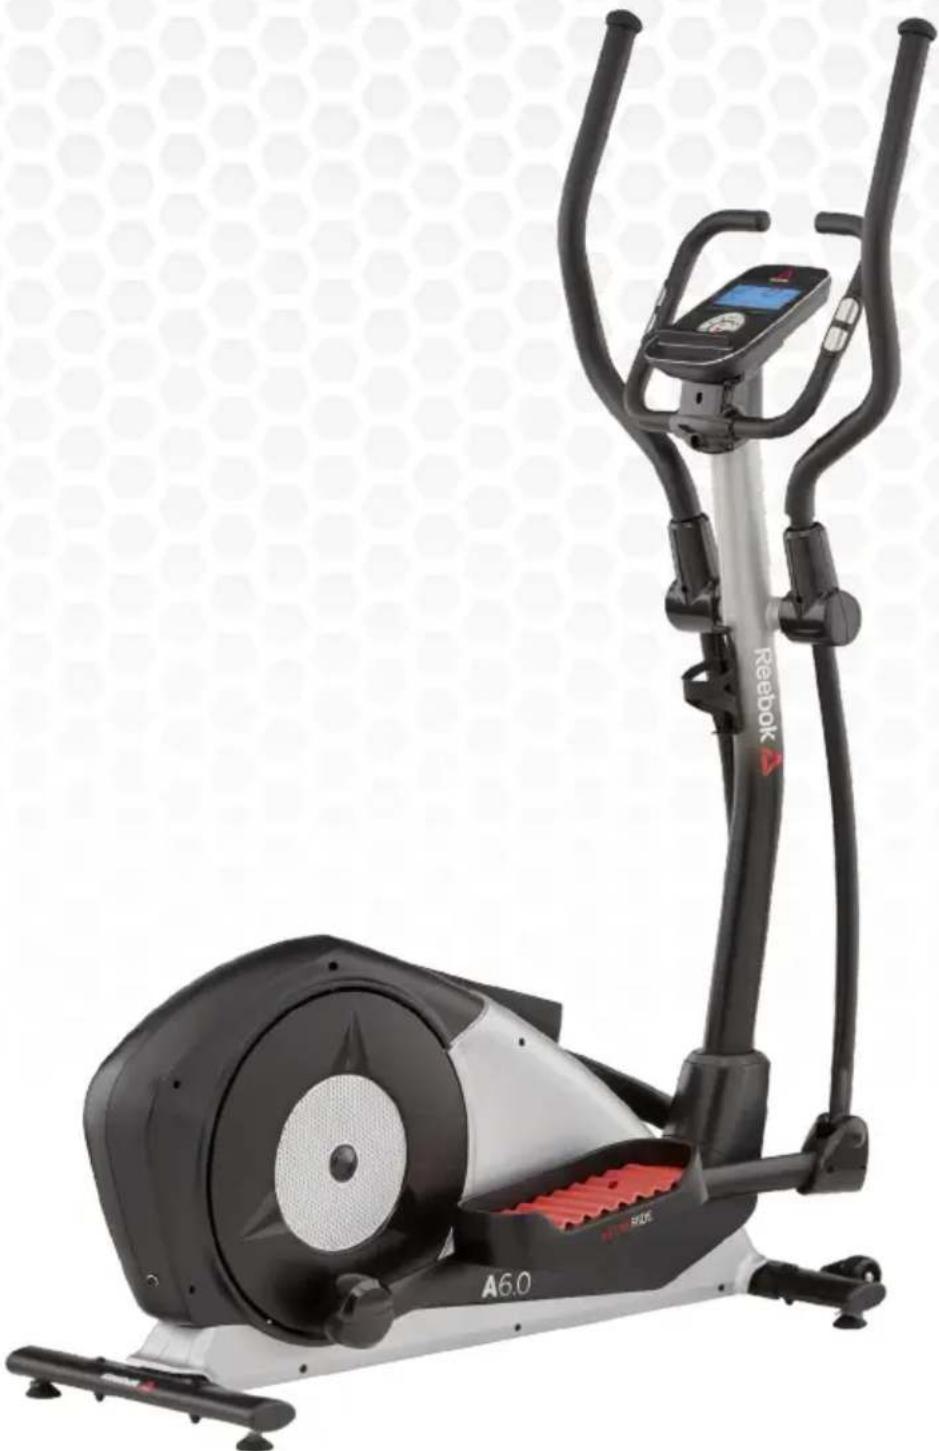
Exterior view of a Reebok A6.0 stationary exercise bike (no signage or text overlays)Reebok
Reebok

PARTS

text_image
A1 Console x1 B Front Handlebar Set x1 C1 Upper Handle Bars x2 D Handlebar Post Set x1 E Lower Handlebar x2 C4 ID35 Adapter x1 F1 Main Frame Set x2 F17 Footplate Tube Covers x2 F19 Pedals x2 F20 Fixed Shaft Handlebar x1 F21 Baluetooth Dongle x1 F28 F29 F27 Cap of Upper Handlebar x2 F26 Cover of Handlebar x1Important: This appliance can be used by children aged from 12 years and above and persons with reduced physical sensory or mental capabilities or lack of experience and knowledge if they have been given supervision or instruction concerning use of the appliance in a safe way and understand the hazards involved. Children shall not play with the appliance. Cleaning and user maintenance shall not be made by children without supervision.
text_image
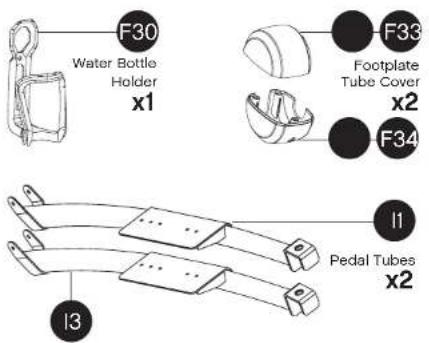
F30 Water Bottle Holder x1 F33 Footplate Tube Cover x2 F34 I1 Pedal Tubes x2 I3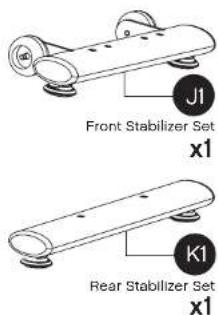
text_image
J1 Front Stabilizer Set x1 K1 Rear Stabilizer Set x1HARDWARE PACK 1

text_image
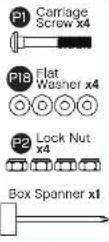
Reebok P6 Hex Bolt x2 P2 Nut x8 P16 Screw x4 P4 Curved Washer x4 P7 Flat Washer x2 P17 Flat Washer x4 P5 Flat Washer x2 P13 Regular Washer x4 P12 Allen Bolt x1 P1 Carriage Bolt x4 P14 Spring Washer x4 P15 Screw x8 P3 Carriage Bolt x4HARDWARE PACK 2
text_image
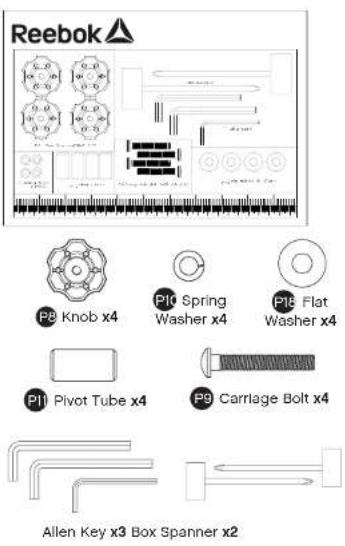
Reebok P8 Knob x4 P10 Spring Washer x4 P16 Flat Washer x4 P11 Pivot Tube x4 P9 Carriage Bolt x4 Allen Key x3 Box Spanner x2Reebok
Reebok

1
text_image
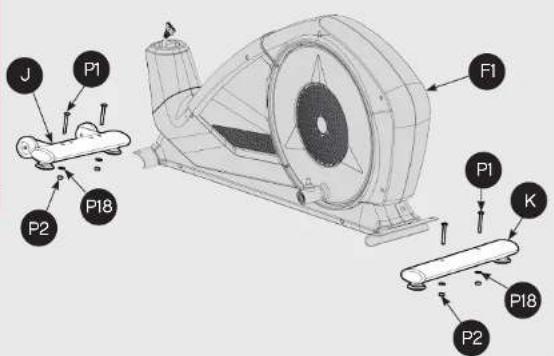
J P1 P2 P18 F1 P1 K P18 P23
text_image
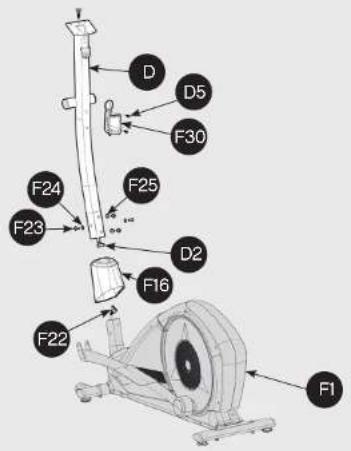
D D5 F30 F24 F25 F23 D2 F16 F22 F12
text_image
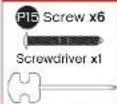
New x6 Power x1 I3 F32 S5 S3 F34 S4 P15 F1 F31 I1 S5 S3 F33 S4 P154
text_image
P5 Flat Washer x2 P6 Nylon x2 P7 Flat Washer x2 P16 Screw x4 P17 Flat Washer x4 Allen Key x1 Box Spanner x1
text_image
P6 E P5 P7 F21 D3 D P7 P5 E P16 P17 P16 P17Reebok
Reebok

5
text_image
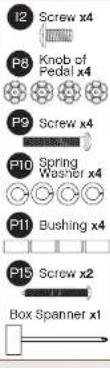
I2 Screw x4 P8 Knob of Pedal x4 P9 Screw x4 P10 Spring Washer x4 P11 Bushing x4 P15 Screw x2 Box Spanner x1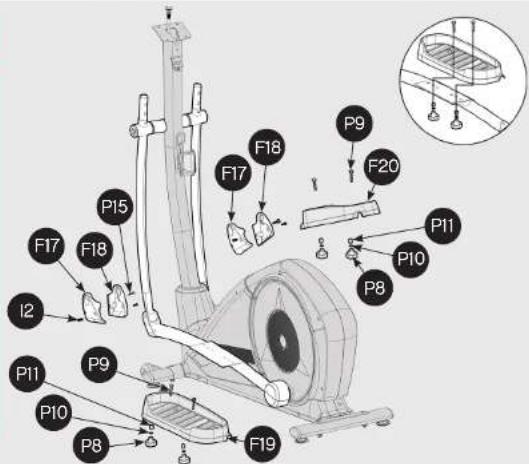
text_image
P9 F20 F18 F17 F15 F17 F18 I2 P11 P9 P10 P8 F19 P10 P11 P10 P87
text_image
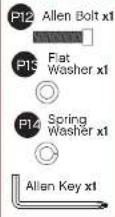
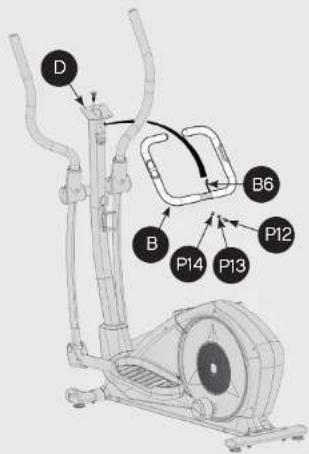
D B B6 B P14 P13 P126
text_image
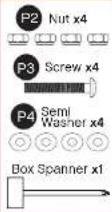
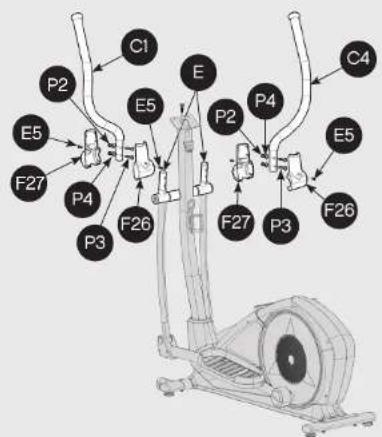
C1 P2 E5 F27 P4 P3 F26 E P2 E5 P4 P3 F27 P3 F26 C48
text_image
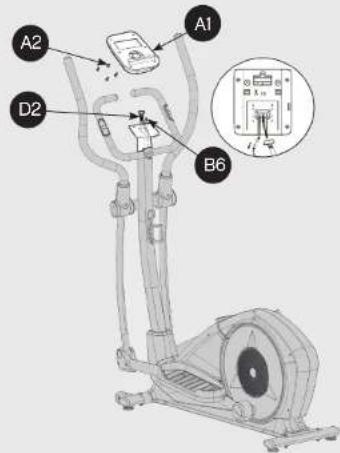
A1 A2 D2 B6Reebok
Reebok

text_image
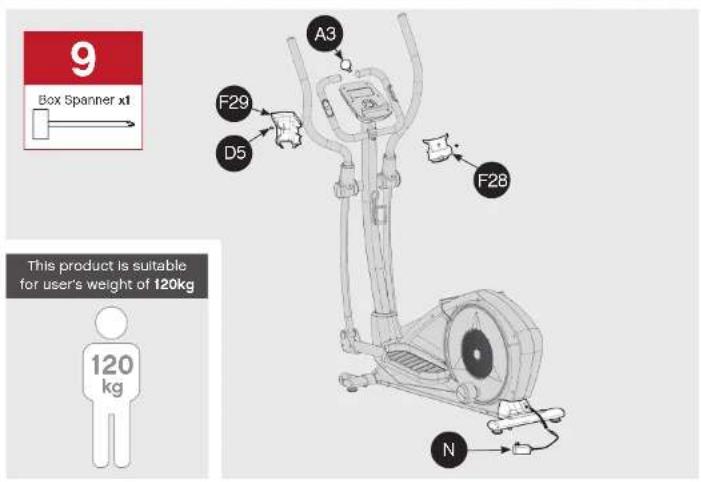
9 Box Spanner x1 A3 F29 D5 F28 This product is suitable for user's weight of 120kg 120 kg NMoving the elliptical
natural_image
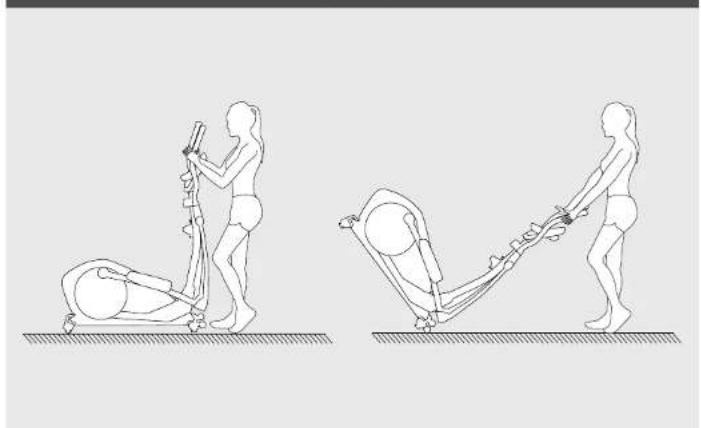
Two line drawings of a person performing a physical exercise using an equestrian, with no text or symbols present.
text_image
Allow for a minimum space of 0.6m around the elliptical when in operation. 0.6m 0.6m 0.6m 145cm (L) x 59cm (W) x 171cm (I) kg 48kg
text_image
Product Registration and Support Enregistrement et support du produit Productregistratie en ondersteuning Registro de productos y soporte Registro de produto e suporte Регистрация и поддержка продукта 製品の登録とサポート 产品注册和技术支持 제품 등록 및 지원 www.reebokfitness.info/product-support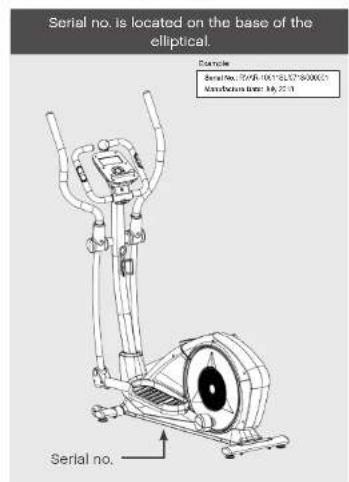
text_image
Serial no. is located on the base of the elliptical. Example Serial No. 1270R-106118LCT-900003 Transmission line: 14, 25, 34 Serial no.
text_image
Find out more at: reebokfitness.com/reebok-app Search 'Reebok Fitness Equipment' Bluetooth® IEEE logo this symbol on a product means that the product is covered by European Director 2014-53-U. The Bluetooth® word mark and logos are registered trademarks owned by Bluetooth's SIO, Inc. and any use of most marks by RFL International in order to secure. Terry: RFL International declares that the product is in compliance with the essential requirements and other relevant provisions of Director 2014-53-U.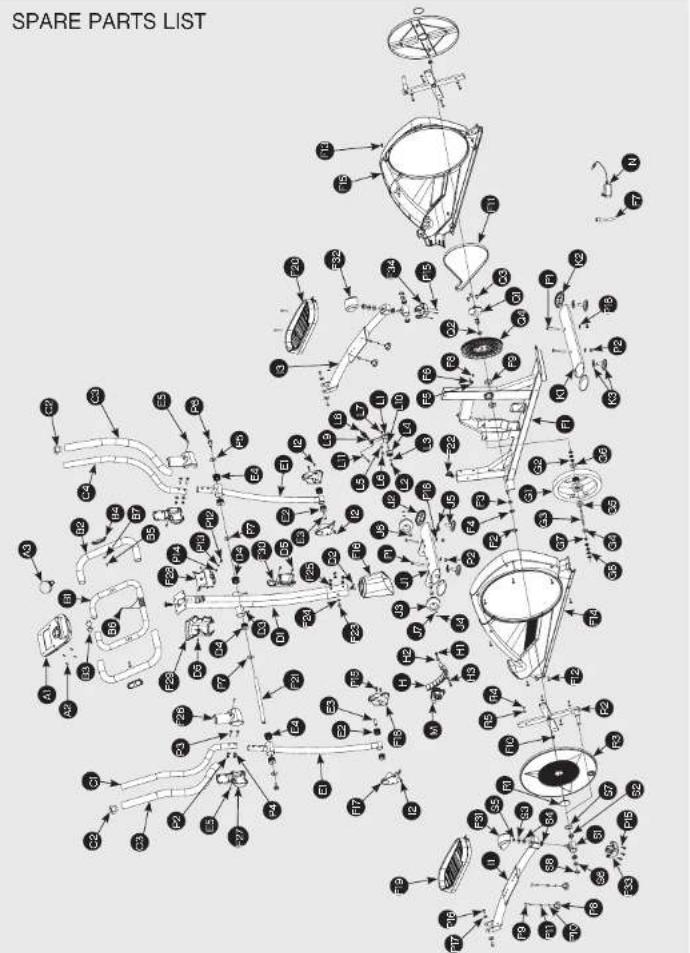
flowchart
graph TD
    A["Top Part"] --> B["Component 1"]
    A --> C["Component 2"]
    A --> D["Component 3"]
    A --> E["Component 4"]
    A --> F["Component 5"]
    A --> G["Component 6"]
    A --> H["Component 7"]
    A --> I["Component 8"]
    A --> J["Component 9"]
    A --> K["Component 10"]
    A --> L["Component 11"]
    A --> M["Component 12"]
    A --> N["Component 13"]
    A --> O["Component 14"]
    A --> P["Component 15"]
    A --> Q["Component 16"]
    A --> R["Component 17"]
    A --> S["Component 18"]
    A --> T["Component 19"]
    A --> U["Component 20"]
    A --> V["Component 21"]
    A --> W["Component 22"]
    A --> X["Component 23"]
    A --> Y["Component 24"]
    A --> Z["Component 25"]
    A --> AA["Component 26"]
    A --> AB["Component 27"]
    A --> AC["Component 28"]
    A --> AD["Component 29"]
    A --> AE["Component 30"]
    A --> AF["Component 31"]
    A --> AG["Component 32"]
    A --> AH["Component 33"]
    A --> AI["Component 34"]
    A --> AJ["Component 35"]
    A --> AK["Component 36"]
    A --> AL["Component 37"]
    A --> AM["Component 38"]
    A --> AN["Component 39"]
    A --> AO["Component 40"]
    A --> AP["Component 41"]
    A --> AQ["Component 42"]
    A --> AR["Component 43"]
    A --> AS["Component 44"]
    A --> AT["Component 45"]
    A --> AU["Component 46"]
    A --> AV["Component 47"]
    A --> AW["Component 48"]
    A --> AX["Component 49"]
    A --> AY["Component 50"]
ITEM DESCRIPTION QTY.
| A1 Console 1 SET | ||
| A2 Screw 4 PCS | ||
| A3 Bluetooth Dongie 1 PCS | ||
| B Front Handlebar Set 1 SET | ||
| B1 Front Handlebar 1 PCS | ||
| B2 Foam Grip 2 PCS | ||
| B3 Handlebar 2 PCS | ||
| B4 Hand Pulse Sensor 2 PCS | ||
| B5 Screw 2 PCS | ||
| B6 Heart Rate Wire | 1 PCS | |
| B7 Semi Washer | 2 PCS | |
| C Upper Handlebar Set | 1 SET | |
| C1 Upper Handlebar Left | 1 PCS | |
| C2 Handlebar End Cap | 2 PCS | |
| C3 Foam Grip 2 PCS | ||
| C4 Upper Handlebar Right | 1 PCS | |
| D Handlebar Post Set 1 SET | ||
| D1 Handlebar | 1 PCS | |
| D2 Cable | 1 PCS | |
| D3 Screw 2 PCS | ||
| D4 Sleeve | 2 PCS | |
| D5 Screw 4 PCS | ||
| D6 Upper Tension Controller | 1 PCS | |
| E Lower Handlebar Set | 2 SET | |
| E1 Lower Handlebar | 2 SET | |
| E2 Sleeve | 4 PCS | |
| E3 Fixed Axle Lower Handlebar | 2 PCS | |
| E4 Sleeve of Axle | 4 PCS | |
| E5 Screw 4 PCS | ||
| F1 Main Frame Set | 1 SET | |
| F2 C Ring | 1 PCS | |
| F3 Wave Washer | 1 PCS | |
| F4 Flat Washer | 1 PCS | |
| F5 Wire | 1 PCS | |
| F6 Sensor Bracket | 1 PCS | |
| F7 DC Wire | 1 PCS | |
| F8 Screw 1 PCS | ||
| F9 Bearing | 2 PCS | |
| F10 Nut | 2 PCS | |
| F11 Pulley | 1 PCS | |
| F12 Screw 4 PCS | ||
| F13 Screw 6 PCS | ||
| F14 Left Cover | 1 PCS | |
| F15 Right Cover | 1 PCS | |
| F16 Cap of Handlebar Post 1 PCS | ||
| F17 Foplate Tube Cover | 2 PCS | |
| F18 Foplate Tube Cover | 2 PCS | |
| F19 Left Pedal | 1 PCS | |
| F20 Right Pedal | 1 PCS | |
| F21 Fibed Shaft of Handlebar | 1 PCS | |
| F22 Wire of Servo Motor | 1 PCS | |
| F23 Screw | 4 PCS | |
| F24 Fiat Washer | 2 PCS | |
| F25 Semi Washer | 2 PCS | |
ITEM DESCRIPTION QTY:
| F25 | Front Cap Upper Handlebar | 2 PCS |
| F27 | Rear Cap Upper Handlebar | 2 PCS |
| F28 | Front Cover Upper Handlebar | 1 PCS |
| F29 | Rear Cover Upper Handlebar | 1 PCS |
| F30 | Water Bottle Holder | 1 PCS |
| F31 | Footplate Tube Rear Cover, Upper Left | 1 PCS |
| F32 | Footplate Tube Rear Cover, Upper Right | 1 PCS |
| F33 | Footplate Tube Rear Cover, Lower Left | 1 PCS |
| F34 | Footplate Tube Rear Cover, Lower Right | 1 PCS |
| G | Flywheel Set | 1 SET |
| G1 | Flywheel Axle | 1 PCS |
| G2 | Nut | 5 PCS |
| G3 | Flywheel Axle | 1 PCS |
| G4 | Flat Washer | 1 PCS |
| G5 | Bearing | 1 PCS |
| G6 | Bearing | 1 PCS |
| G7 | Bushing | 1 PCS |
| G8 | Star Washer | 2 PCS |
| H | Magnet Set | 1 SET |
| H1 | Screw 2 PCS | |
| H2 | Flat Washer | 2 PCS |
| H3 | Spring Washer | 2 PCS |
| H4 | Spring | 1 PCS |
| I | Pedal Tube Set | 1 SET |
| II | Left Pedal Tube | 1 PCS |
| I2 | Screw 4 PCS | |
| I3 | Right Pedal Tube I PCS | |
| J Front Stabilizer Set | 1 SET | |
| J1 | Front Stabilizer | 1 PCS |
| J2 | Nap | 2 PCS |
| J3 | Roller | 2 PCS |
| J4 | Nut | 2 PCS |
| J5 | End Cap | 2 PCS |
| J6 | Bushing | 2 PCS |
| J7 | C Ring | 2 PCS |
| K Rear Stabilizer Set | 1 SET | |
| K1 Rear Stabilizer | 1 PCS | |
| K2 | End Cap | 2 PCS |
| K3 | Nap | 2 PCS |
| L Idler Set | 1 SET | |
| L1 | Idler | 1 PCS |
| L2 | Screw I PCS | |
| L3 | Flat Washer | 1 PCS |
| L4 | Jockey Wheel | 1 PCS |
| L5 | Flat Washer | 1 PCS |
| L6 | Screw I PCS | |
| L7 | Nut | 1 PCS |
| L8 | Spring | 1 PCS |
ITEM DESCRIPTION QTY
| L9 | Spring Bracket | 1 PCS |
| L10 | Wave Washer | 2 PCS |
| L11 | Screw 1 PCS | |
| M | Servo Motor Set | 1 SET |
| N | Adaptor | 1 PCS |
| P | Hardware Kit | 1 SET |
| P1 | Screw 4 PCS | |
| P2 | Nut | 8 PCS |
| P3 | Screw 4 PCS | |
| P4 | Seml Washer | 4 PCS |
| P5 | Flat Washer | 2 PCS |
| P6 | Nylon | 2 PCS |
| P7 | Flat Washer | 2 PCS |
| P6 | Knob of Pedal | 4 PCS |
| P9 | Screw 4 PCS | |
| P10 | Spring Washer | 4 PCS |
| P11 | Bushing | 4 PCS |
| P12 | Screw 1 PCS | |
| P13 | Flat Washer | 1 PCS |
| P14 | Spring Washer | 1 PCS |
| P15 | Screw 8 PCS | |
| P16 | Screw 4 PCS | |
| P17 | Flat Washer | 4 PCS |
| P18 | Flat Washer | 4 PCS |
| P19 | Bushing Wrench 2 PCS | |
| P20 | Six Wrench | 2 PCS |
| Q | Axle Set | 1 SET |
| Q1 | Axle | 1 PCS |
| Q2 | Bushing | 1 PCS |
| Q3 | Screw 3 PCS | |
| Q4 | Pulley | 1 PCS |
| R | Disc Set 1 SET | |
| R1 | End Cap of Disc | 2 PCS |
| R2 | Cross-brace | 2 PCS |
| R3 | Disc | 2 PCS |
| R4 | Screw 8 PCS | |
| R5 | Flat Washer | 5 PCS |
| S | Pedal Bracket Set | 2 SET |
| S1 | Pedal Bracket | 2 PCS |
| S2 | Bearing | 4 PCS |
| S3 | Flat Washer | 2 PCS |
| S4 | Rubber Washer | 4 PCS |
| S5 | Nut | 2 PCS |
| S6 | Wave Washer | 2 PCS |
| S7 | Flat Washer | 4 PCS |
| S8 | C Ring | 2 PCS |
Reebok
Reebok

CONNECT YOUR SMARTPHONE TO YOUR NEW REEBOK EQUIPMENT
DOWNLOAD:
Search 'Reebok Fitness Equipment' on the App Store or Google Play.


CONNECT:
Your Reebok machine connects to the app via the bluetooth dangle, so you don't need GPS or internet to use it.
The USB connector is colour coded blue to match the correct USB port on your machine.
Once you have selected a workout or planned your route, the app will ask you to choose the machine you would like to connect with.


text_image
Map My Route PLAVGUT 4.64h 10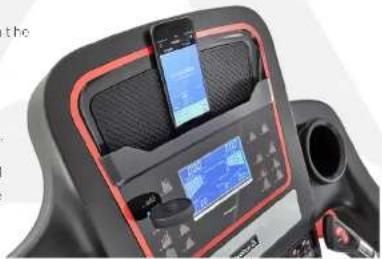
natural_image
Close-up of a black treadmill with red trim, digital display, and smartphone (no visible text or symbols)PLAN YOUR ROUTE
Choose 'MAP MY ROUTE' from the 'GET STARTED' tab.
01. PRESET ROUTES:

There are 5 preset routes, that you can select from by clicking the preset icon.
02. CUSTOMISE YOUR ROUTE:

First, Search for a location where you would like to plan your route.

Create your route by pressing on the map to choose your starting point, finish point, and up to 8 way points.

START YOUR ROUTE

Once you have chosen your route, slide the 60 button left and then connect with your Reobok machine.
Once you have connected successfully, press start on your cardio equipment to begin your workout!
MONITOR WORKOUT DATA
To change the data view, swipe to scroll between workout data, elevation and HR/pace.

To remove the data view from the screen, press the data view button.

text_image
Map My Route 4.41 1.34m 17.16mth 119m INCLINE 5 Map My Route INCLINE 3TRACK YOUR WORKOUT
The Reebok Fitness app allows you to track your progress via Google Maps.

You can switch the view between map, salellie, flyover and street view.
The treadmill's elevation level will automatically adjust to match your programmed route, or if you are using a bike or cross trainer, the resistance level will automatically adjust accordingly.

text_image
via Google Map My Route 4.41 1.26m 17.18 mm 31% INCLUDE 0 70 105mm 05.03 m/s INCLUDE B
ANALYSE YOUR TRAINING
At the end of your training session, the app shows you a workout profile, giving you stats such as distance covered, calories burned and average pace.
You can add personalised notes to your workout profile such as how challenging or hard you found the workout.
The training history page allows you to review your previous workouts and stats such as total number of calories burned.
More languages available at: reebokfitness.com/reebok-app

Reebok
ENGLISH

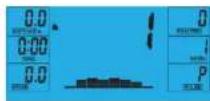
BUTTON FUNCTIONS

ENTER
Used to confirm a setting or selection.

RECOVERY
To test heart rate recovery.

DOWN
To select training mode and adjust function value down.

RESET
Used to reset the functions at any time. Please note STOP must be pressed before RESET.

UP
To select training mode and adjust function value up.

START/STOP
To start or stop exercise.

text_image
Reebok 0:00:08:08:08 50:08:08:08 0:00:08:08:08 A C B D E FOPERATION PROCEDURE
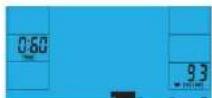
When the power supply is connected to the machine the computer will power on with a long beep sound. All segments of the LCD display will light up for 2 seconds and the wheel diameter 78" will be displayed as below.
select M, then highlight value (Speed, Distance, Time, Pulse), use UP/DOWN to alter the data, and then press ENTER to confirm the setting. Press START to begin when details have been inputted. The inputted data will now count down from the entered information.
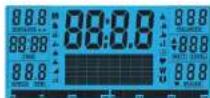
The main menu will be displayed. The user can press START to begin Immediately in the manual mode. All Values (SPEED, DISTANCE, TIME) will count up from zero. Resistance level can be changed at any time during exercise by pressing UP or DOWN.

When setting the WATT level the resistance will automatically adjust to the preset WATTS regardless of the speed (except for very slow speed and higher WATTS settings where the resistance can only increase to 32).
Before beginning the manual exercise the user can set the desired workout for TIME, DISTANCE, CALORIES and PULSE.
From main menu press UP/DOWN buttons to highlight MANUAL at the top of the screen. Press ENTER to
PROGRAM
- In main menu press UP/DOWN to highlight the program function.
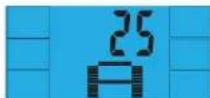
- Press ENTER P1 will be displayed (After 2 seconds the program profile will be shown).
- Use UP/DOWN to select program P1-P12.
- Press ENTER to enter the program.
- Use UP/DOWN to change the program level.
- Press START to begin.

ENGLISH
Reebok

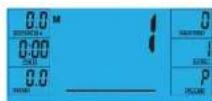
H.R.C (HEART RATE CONTROL)
- In main menu press UP/DOWN to highlight TARGET H.B.
- Press ENTER to select
- Age will be displayed, press UP/DOWN to change.
- Press ENTER to move to next section.
- The % of heart rate workout will be displayed. Press UP/DOWN between 55%, 75%, 90% and THR.

THR is the users preferred TARGET HEART RATE to work out to. This can be altered before the exercise is started.
Maximum users heart rate is worked out at 220-age =total TARGET HEART RATE. This is the maximum your heart rate (MHR) should be. You can then work out at 55%, 75% or 90% of this. For example 220-25(users age)=195 MHR, from here you can work out at the desired %.
- Press ENTER to confirm.

-
Computer will record the TARGET HEART RATE and allow the user to work out within this. The resistance level will automatically be changed.
-
If the heart rate is too high the computer will beep to indicate this.
-
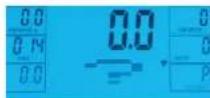
If no heart rate is being recorded the below will be displayed on the screen. In this instance ensure that both hands are securely holding the pulse sensors.
USER PROGRAM
User can create own profile
- In main menu press UP/DOWN to select USER.
- Program profile will be displayed as below.
- Press UP/DOWN to alter resistance level in the first segment of the profile.
- Press ENTER to move to the next segment.
- Continue the above for all columns.
- Press START to begin exercise once complete.
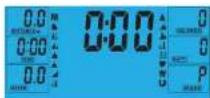
RECOVERY
At any time during workout RECOVERY button can be pressed to record recovery level.
Press RECOVERY button.
- Place both hands on the pulse sensors.
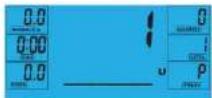
• Computer will count down from 60 seconds and display the PULSE as below. DO NOT REMOVE YOUR HAND FROM PULSE SENSORS OR THE READING WILL NOT BE GIVEN.
• After the computer has counted down for 60 seconds a RECOVERY level reading will be given.
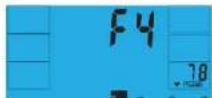
RECOVERY
F1 Excellent
F2 Very Good
F3 Good
F4 Satisfactory
F5 Below Average
F6 Poor
NOTE
- This computer is powered by a 9V power adaptor. DO NOT USE ANY OTHER ADAPTOR WITH THE MACHINE.
- If the computer is inactive for approximately 4 minutes it will shut down automatically and the resistance motor will reset. Press any button to turn the computer back on.
- if at any time the computer does not function correctly remove the power supply and reconnect it to restart.
Reebok
FRANÇAIS


FRANÇAIS
Reebok

FONCTION DES TOUCHES

ENTER

RÉCUPÉRATION
text_image
Reebok 8:00:00 8:00:00 8:00:00 8:00:00 A C B E F Dtext_image
Reebok 9:00:08:08:08 50:38:39:39 A C B E F DANVÄNDNING
RECOVERY (RESTITUTION)
For at tjekke restitution af hjartefrekvensen

DOWN (NED)
PAINIKKEIDEN TOIMINNOT

SYÖTTÖ

PALAUTUMINEN
H.R.C. (SYKKEEN HALLINTA)
RECOVERY (GERI YÜKLEME)
text_image
Reebok 9.88:88.8:88.8 9.88:88.8:88.8 9.88:88.8:88.8 A C B E F DÇALIŞMA PROSEDÜRÜ
RECOVERY (GERI YÜKLEME)
START/STOP (CTAPT/CTOP)
text_image
Reebok 9.8: 88:8.8: 88:8 10.8: 9.8: 9.8: 9.8 A C B E F D操作手顺
natural_image
Abstract red triangular logo on white hexagonal background (no text or symbols)Reebok
ASTRORIDE A6.0 ELLIPTICAL + BLUETOOTH
For product information or service please contact:
UK: RFE Europa Ltd. 8 Clarendon Drive, Wymbush, Milton Keynes, MK8 8ED.
Customer Service: Tel: +44 (0)800 440 2459 Email: techsupport@rfeinternational.com
Europe: serviceeuropa@rfeinternational.com
Spain: serviciotecnico@rfeinternational.com
APAC (excluding Australia): RFE Asia Pacific, 2608-1609, 1 Hung To Road, Kwun Tong, Kowloon, Hong Kong. Email: techsupportapac@rfeinternational.com
Australia: techsupportaustralia@rfeinternational.com
USA: RFE Sporting Goods Inc., 1300 Smith Road, STE 104, Austin, Texas, 78721, USA.
Email: techsupportusa@rfeinternational.com