 — Cooker — Mode d'emploi PDF")
TK 642 I CL (T) - Cooker INDESIT - Free user manual and instructions
Find the device manual for free TK 642 I CL (T) INDESIT in PDF.

User questions about TK 642 I CL (T) INDESIT
0 question about this device. Answer the ones you know or ask your own.
Ask a new question about this device
Download the instructions for your Cooker in PDF format for free! Find your manual TK 642 I CL (T) - INDESIT and take your electronic device back in hand. On this page are published all the documents necessary for the use of your device. TK 642 I CL (T) by INDESIT.
USER MANUAL TK 642 I CL (T) INDESIT
Built-in cooking tables Installation and use
natural_image
Technical line drawing of a screwdriver inserted into a base block, with arrows indicating direction (no text or symbols)text_image
15 0 5 Booster ⑨ ⑧ ③ ② ③ ⑥ ① ⑤ ⑪ ⑫ ⑦ ③ ④ ② ③ ⑩ ⑤ ⑫ ⑫text_image
00 00 00 - +Démarrer un foyer
natural_image
Three identical cooking pots with crossed x marks on their bases, no text or symbols presentnatural_image
Three diagrams showing crossed-out electrical symbols: a box, a pot, and a cylinder (no text or labels)natural_image
Technical line drawing of a screwdriver inserted into a base block, with arrows indicating direction (no text or symbols)text_image
00 00 00 - +natural_image
Technical line drawing of a screwdriver inserted into a base block, with arrows indicating direction (no text or symbols)text_image
00 00 00 00 - +Advice and recommendations
- This appliance was designed for non-professional, household use.
- Before using the appliance, read the instructions in the owner's manual carefully since it contains all the instructions you require to ensure safe installation, use and maintenance. Keep this owner's manual in a safe place for future reference.
- When you have removed the packing, check whether the appliance is intact. If you have any doubts, contact a qualified professional before using the appliance.
- Never leave the packing components (plastic bags, polystyrene foam, nails, etc.) within the reach of children since these are a source of potential danger.
- The appliance must be installed by a qualified technician in compliance with the instructions provided by the manufacturer.
- The latter denies all responsibility for improper installation which may harm persons and animals and damage property.
- The electrical safety of this appliance can only be guaranteed if the latter is correctly and efficiently earthed, in compliance with regulations on electrical safety. Always ensure that this vital safety measure has been taken. If you have any doubts, call in a qualified technician to check the electrical system thoroughly.
- The manufacturer denies all responsibility for damage resulting from a system which has not been earthed correctly.
- Before powering the appliance, check whether the technical characteristics featured on the appliance data plate correspond with those of the mains electrical system.
- Check that the current load of the mains supply and of the power sockets is suitable for the maximum power of the appliance, indicated on the appliance data plate. If in doubt, contact a qualified professional.
- This appliance must only be used for the purpose for which it was expressly designed. Any other use (such as heating a room for example) is considered to be improper and consequently dangerous.
- The manufacturer denies all responsibility for damage resulting from improper or incorrect use of the appliance.
- Certain fundamental rules must be followed when using electrical appliances. The following are of particular importance:
- do not touch the appliance with wet or damp hands,
- never use the appliance when barefoot,
- never use extensions,
- never pull on the power supply cable or the appliance itself to unplug it from the mains socket,
- never leave the appliance exposed to atmospheric agents (rain, sun, etc.),
-
do not allow children or persons who are not familiar with the appliance to use it without supervision.
-
Always unplug the appliance from the mains or switch off the main switch before cleaning or performing any cleaning or maintenance operations.
- If the surface of the glass cracks, unplug the appliance immediately. For any repairs, contact only an authorised after-sales service centre and demand original spare parts. Failure to comply with the above may compromise the safety of the appliance.
- Cut the power supply cable after disconnecting it from the power mains when you decide not to use the appliance any longer. Also make all potentially dangerous parts of the appliance safe, above all for children who could play with the appliance.
- The glass ceramic hob is resistant to thermal and mechanical shocks. However, it may break due to a shock caused by a sharp object, such as a tool for example. In this case, unplug the appliance immediately and contact an authorised after-sales service centre to have it repaired.
- Remember that the heating area stays hot for at least half an hour after being turned off; please refrain from placing any cookware or other items on the cooking zone while still hot.
- Do not turn on the heating zones if aluminium foil or plastic items have been placed on the hob surface.
- Do not go near the heating zones when these are still hot.
- If you use small electric appliances near the hob, make sure their power supply cable does not come into contact with the hot parts of the hob.
- Make sure all pan handles are always pointing inwards towards the centre of the hob to prevent any accidental spills.
First use: the glue used on the hob seals may leave greasy traces on the glass surface. We recommend you wipe these off before using the appliance, with the aid of a non abrasive cleaner. During the first few hours of use, you may detect a smell of rubber, which will disappear quickly.
Installation and fastening
The following instructions are intended for a qualified fitter to guide him/her along the installation, adjustment and technical maintenance procedures as correctly as possible and in full compliance with the applicable norms in force.
Important : unplug the hob before all operations.
Installation
- This hob can be built into a worktop simply by cutting out the corresponding slot.
- The worktop must be made with a material designed to withstand a temperature of approximately 100^ .
- The hob should be positioned at least 40 mm away from the back wall or any other vertical surface in order to allow for correct ventilation and to prevent the surfaces around the appliance from overheating.
- If you wish to install the hob on top of an oven, the latter must be fitted with a cooling fan.
- Try to avoid installing the hob on top of a dishwasher; if this is unavoidable, place a watertight separating element between the two appliances.
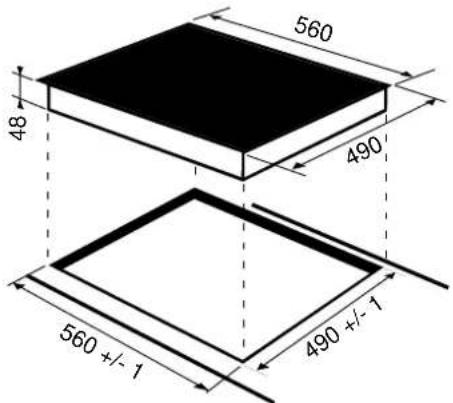
text_image
560 48 490 560 +/- 1 490 +/- 1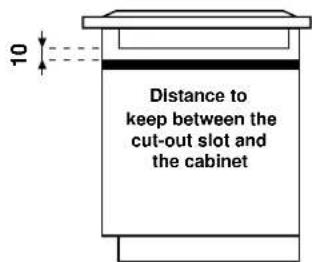
text_image
10 Distance to keep between the cut-out slot and the cabinetFastening
Very important: It is vital that you ensure the glass ceramic hob is built into a perfectly flat supporting surface. Deformations due to improper fastening could alter the characteristics of the hob and compromise its performance.
The fastening springs are fastened by screws (see diagram).
It is vital that these screws be kept accessible at all times.
Insert the hob into the cut-out slot, applying pressure all along the perimeter of the hob frame so that the latter adheres fully to the worktop.
REAR SPRING ASSEMBLY
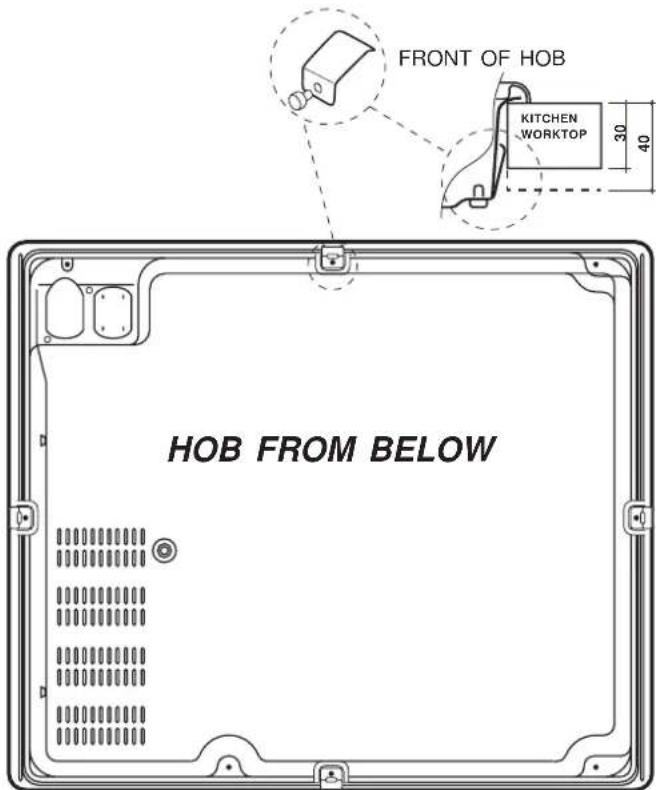
text_image
FRONT OF HOB KITCHEN WORKTOP 30 40 HOB FROM BELOWElectrical connection
- The electrical safety of this appliance can only be guaranteed if the latter is correctly and efficiently earthed, in compliance with regulations on electrical safety. Always ensure that this vital safety measure has been taken. If you have any doubts, call in a qualified technician to check the electrical system thoroughly.
- The manufacturer denies all responsibility for damage resulting from a system which has not been earthed correctly.
- Before powering the appliance, check whether the technical characteristics featured on the appliance data plate correspond with those of the mains electrical system.
- Check that the current load of the mains supply and of the power sockets is suitable for the maximum power of the appliance, indicated on the appliance data plate. If in doubt, contact a qualified professional.
Disconnect the appliance from the electricity supply before all operations.
Connect your hob to the electrical system by means of a junction box: if the appliance is connected permanently to the mains, an omnipolar circuit breaker, accessible if necessary, with a minimum contact opening of 3 mm should be installed.
Valid only for models with a power supply cable
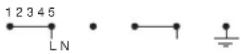
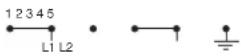
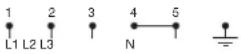
Some models are supplied with a single-phase power supply cable, and should consequently only be connected to the single-phase mains. Observe the wire colours, as indicated in the diagram attached.
| Electrical connections V | Voltage, Frequency Fuses, Sections | |
| FR-BE-AT-DE-GR-ES-IL-IT-NZ-PT-GP-CH-MA-LU-IE-FI-SE-IS-GB-NL-DK230V - 1+N~50HzCY-MT-AU-NZ-KW240V - 1+N~50Hz | 25A *2,5 mm ^2 | |
| FR-BE-NO230V - 2 ~ 50Hz | ||
| BR=BRUN,BL=BLEUBR=BRUIN, BL=BLAUW | BR=BRAUN, BL=BLAUBR=BROWN, BL=BLUE | |
| *Application of the simultaneity coefficient in accordance with cei 60335-2-6 norm | ||
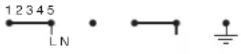
Valid only for models without a power supply cable
Some models are not fitted with a power supply cable, as the cable should be sized according to the type of electrical connection in use (see connection table below). To connect the cable, proceed as follows:
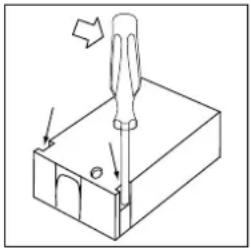
- Using a screwdriver, prise on the side tabs of the terminal board cover;
- Pull open the cover of the terminal board.
To install the cable, proceed as follows: - unscrew the wire clamp screw and the contact screws.
natural_image
Technical line drawing of a screwdriver inserted into a housing (no text or symbols)• to make the desired electrical connection (see table), use the jumpers housed inside the box. Position the power supply cable wires according to the indications in the table.
- once the connections have been made, tighten all the terminal screws fully.
- Fasten the supply cable in place with the clamp and close the cover of the terminal board.
| Electrical connections | Voltage, Frequency | Fuses, Sections |
 | FR-AT-BE-DE-GP--ES-IE-IL-IS-IT-LU-RE-FI-GB-GR-PT--SE-MA-NZ230V-1+N~50 Hz | 25 A*2,5 mm2 |
 | FR-BE-NO230V-2~50/60 Hz | 25 A*2,5 mm2 |
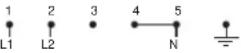 | FR-BE-CH-DE-AT--ES-IL-IT-NZ-PT-MA- LU-SE-IS-NL400V2-N~50 Hz | 16 A*1,5 mm2 |
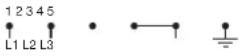 | FR-BE-NO230V3~50 Hz | 16 A*1,5 mm2 |
 | FR-AT-BE-DE-ES-IL-IS-IT-LU-PT-SE-MA-NZ-CH-DK-N-L400V3+N~50 Hz | 16 A*1,5 mm2 |
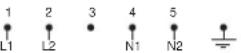 | NL230V2+2-N~50 Hz | 16 A*1,5 mm2 |
 | CY-AU-NZ-KW-MT240V-1+N~50 Hz | 25 A*2,5 mm2 |
| * Application of the simultaneity coefficient in accordance with cei 60335-2-6 norm | ||
This appliance conforms with the following European Community Directives:
- 73/23/EEC of 19/02/73 (Low Voltage) and subsequent amendments;
- 89/336/EEC of 03/05/89 (Electromagnetic compatibility) and subsequent amendments;
- 93/68/EEC of 22/07/93 and subsequent amendments;
- 2002/96/EC
The European Directive 2002/96/EC on Waste Electrical and Electronic Equipment (WEEE), requires that old household electrical appliances must not be disposed of in the normal unsorted municipal waste stream. Old appliances must be collected separately in order to optimise the recovery and recycling of the materials they contain and reduce the impact on human health and the environment. The crossed out “wheeled bin” symbol on the product reminds you of your obligation, that when you dispose of the appliance it must be separately collected. Consumers should contact their local authority or retailer for information concerning the correct disposal of their old appliance.
Warning: If the hob is fitted above a built-in oven, the hob and the oven must be connected to the mains separately for safety reasons and to simplify operations when it is necessary to pull the oven out for some reason.
Cooking zone description
Induction zones
Induction is the fastest cooking method available.
Unlike traditional cooking zones, the induction zone does not heat up the glass surface. The pan itself is the heating element: the pan evenly transfers heat to its contents as long as it is made of ferromagnetic material.
Radiant zones
This type of burner consists of several coils that guarantee the even distribution of heat over the bottom of the pan and ensure the success of all cooking on low heat: simmering, sauces or reheating.
| HOBS TK 642 I CL | |
| Cooking zones Potenza(in W) | |
| Back left R 1400 | |
| Front left I 1200 | |
| Back right I 1800 / B 3000 | |
| Front right R 1800 | |
| Overall power 7400 | |
Each zone is controlled:
- by a selector key whose silk screen printing reproduces the cooking zone drawing,
- and by a power adjustment set comprising two parts (+, -) .
As long as the temperature of the cooking zones remains above 60^ C, even after use, the residual heat indicators stay on (the power display indicates H) to prevent the risk of burns.
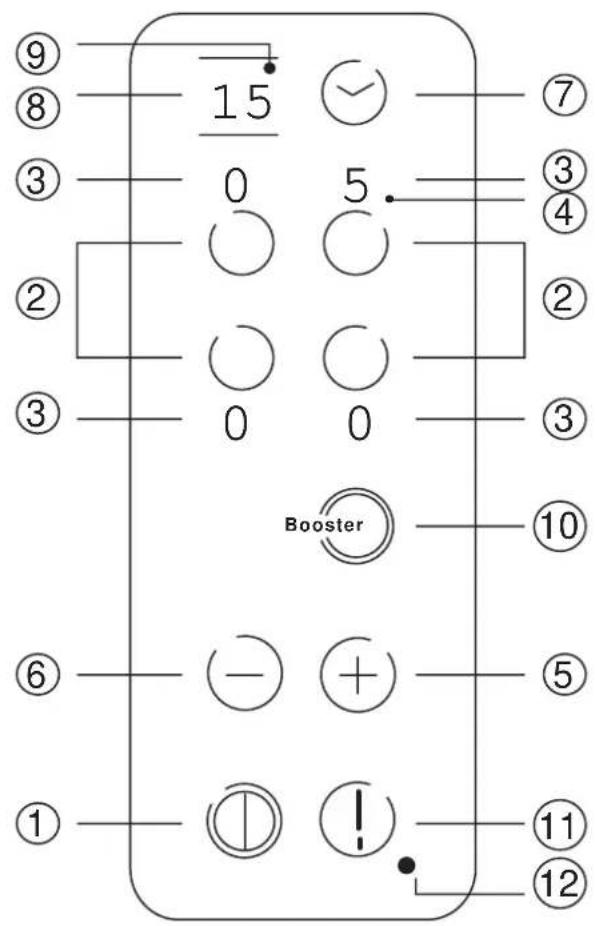
The controls
text_image
⑨ ⑧ ③ ② ③ ⑥ ① 15 0 0 15 5 Booster - + ! ① ⑤ ② ④ ③ ⑦ ② ①1 ⑫ ⑫- ON/OFF key
- Cooking zone selector keys
- Power (from 0 to 9) and residual heat indicators (H)
- Zone selection indicator:
- on: the corresponding zone is selected and can be modified,
- off: the corresponding zone is not selected, no modification can be made.
- Power increase key
- Power decrease key
- Timer control key for cooking time programming (only on hobs fitted with a timer)
- Programmed cooking time indicator
- Indicator light corresponding to the programmed cooking zone
10.Booster key
11.Controls lock key - Lock indicator light
Operation
When you connect the hob to the power supply, a beep will sound after a few seconds: you can now turn the hob on.
Turning on the hob
Press key Ⓞ to turn the hob on.
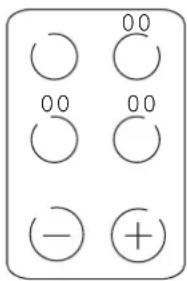
Cooking zone control
Each cooking zone is operated by a control key and by a power adjustment set (⊕/⊕)
text_image
00 00 00 00 - +Turning on a cooking zone
- To turn a cooking zone on, press the corresponding control key and set the desired heating power (from 0 to 9) using the “⊕” and “⊖” keys.
- To set the maximum power directly (9), press key “ ” briefly.
(only for Radiant zones):
To speed up the rise in temperature on a particular cooking zone, proceed as follows:
- set the cooking zone power to the maximum setting (9),
- then press the “⊕” key: the power display will indicate “A”,
- now set the power you wish to cook with (for example 5).
Turning off a cooking zone
To turn off a cooking zone, press the corresponding control key and:
- press both “ ” and “ ” simultaneously: the cooking zone power drops immediately to zero and the zone is turned off.
- or press the “ ” key: the heating power drops progressively until the zone eventually turns off.
Turning off the hob
Press the ⏻ key; the appliance has been turned off.
If you have locked the hob controls (see paragraph below), the same will still be locked when you turn the hob back on. Unlock the controls in order to operate the cooking zones.
The booster
To speed up the rise in temperature of the cooking zones (see cooking zone table on the previous page), press the

The power display will indicate "P". The booster function comes to an automatic stop after 4 minutes.
When the booster function is on, certain cooking zones (see the cooking zone table on the previous page) are limited to a maximum power of 600W.
Controls lock
When the hob is in use, you can lock the controls to avoid any accidental changes to the settings (by children or when cleaning, for example).
Just press the Ⓐ key, the indicator light next to the key lights up and the controls are locked.
To change the power level setting or stop cooking, the controls have to be unlocked: press the ① key, the indicator light turns off and the controls are unlocked.
To access the setting of a cooking zone again, select the zone by pressing the corresponding control key.
Cooking time programming
You may programme all the cooking zones simultaneously for a maximum cooking time of 99 minutes.
Proceed as follows:
- select the cooking zone by pressing the corresponding control key,
- set the desired heating power using the “⊕” and “⊖” keys,
- press the programming key 🕒,
- set the desired cooking time using the “ ④ ” and “ ” keys,
- confirm your programming by pressing the programming key 🤕 again.
The countdown begins immediately.
The end of programmed cooking is signalled by a beep (one minute long) and the cooking zone concerned is turned off.
The safety devices
Pan recognition
(only for inductions zones)
Each induction cooking zone is fitted with a pan recognition device. The cooking zone only provides heat in the presence of a pan which is suitable for the cooking zone.
A blinking pan recognition indicator could signal:
- that the pan is made of unsuitable material, which is not ferromagnetic,
• that the diameter of the pan is too small,
• that the pan has been removed.
Always match the diameter of the pan with that of the cooking zones.
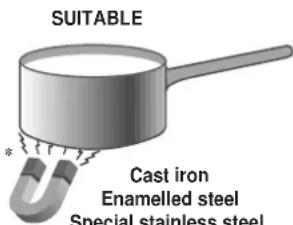
What cookware to use
Given that induction only exists when the magnetic field is sealed by a metallic recipient, the pan stops being heated as soon as it is taken off the cooking zone.
Use cookware made of material which is compatible with induction (ferromagnetic material).
Cast iron, enamelled steel or special induction stainless steel saucepans are ideal.
Copper, ceramic, earthenware, glass, terracotta, aluminium and non magnetic stainless steel cookware is incompatible with induction cooking.
The easiest way to find out whether the pan is suitable is with a magnet. If the magnet is attracted by the pan bottom and stays “stuck” to the same, the pan is made of ferromagnetic material and can be used on your induction hob.
We recommend you use pans with a very flat and thick bottom and avoid at all costs all cookware with irregular rough bases which could scratch the glass surface.
text_image
SUITABLE * Cast iron Enamelled steel Special stainless steel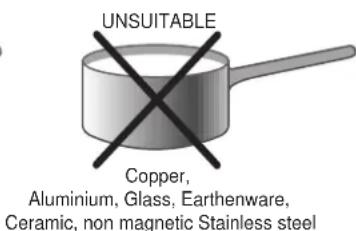
text_image
UNSUITABLE Copper, Aluminium, Glass, Earthenware, Ceramic, non magnetic Stainless steelFor the attention of wearers of pacemakers or other active implants:
The hob complies with all current standards on electromagnetic interference.
Your induction hob is therefore perfectly in keeping with legal requirements (89/336/CEE directives). It is designed not to create interference on any other electrical apparatus being used on condition that the apparatus in question also complies with this legislation.
Your induction hob generates short-range magnetic fields. To avoid any interference between your induction hob and a pacemaker, the latter must be designed to comply with relevant regulations.
In this respect, we can only guarantee our own product conformity. Please consult the pacemaker manufacturer or your doctor concerning its conformity or any possible incompatibility.
Acoustic signal
Anomalies such as:
- an object (such as a saucepan or a lid, etc.) placed for more than 10 seconds on the control zone,
- boiled-over liquids or food spilled on the control zone,
• prolonged pressure on a key,...
could cause a beep to sound and the hob to turn off.
To stop the beep from sounding, remove the cause of the malfunction.
To use the hob, turn it back on and re-select the cooking zone(s) you wish to use. Set the desired heating power.
Safety cut out
Your appliance is fitted with a safety cut out which intervenes after a certain amount of time (see table below) depending on the power setting. When the safety cut out has intervened, the power display indicates "0".
for example: the back right cooking zone is set to 5 and the front left zone is set to 2. The back right zone will turn off after 3 hours of operation and the front left zone will turn off after 10 hours of operation.
To unlock the controls, turn the hob off by pressing the

key.
| Power level | Maximum duration of operation |
| 1-2 10 hours | |
| 3 5 hours | |
| 4 4 hours | |
| 5-6 3 hours | |
| 7-8 2 hours | |
| 9 1 hour |
Overheating protection device
Should your appliance's electronic components overheat, the hob will turn off automatically and “—” will come up on the power level display.
The letter will disappear as soon as the temperature drops back down to an acceptable level.
Maintenance and care
Advice on using your appliance
To get the best from your hob, it is vital that you follow a few fundamental rules during cooking and when preparing food.
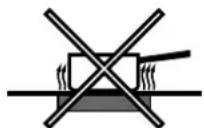
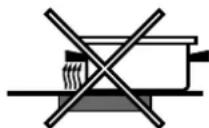
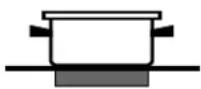
- Use pans with a flat bottom so they adhere fully to the heating zone.
• Always use pans whose diameter covers the cooking zone fully so that all the available heat can be used.
- Make sure the pan base is always clean and dry, to guarantee good contact and long life for the cooking zones and pans alike.
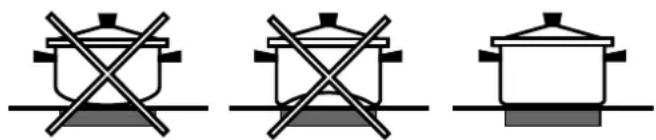
- Avoid using pans used normally on gas burners. The concentration of heat on gas burners can warp the bottom of the pan, consequently you would never obtain the desired result when using the pan on the glass ceramic hob.
- Never leave a cooking zone on without a pan on it as the maximum heat level would be reached very quickly, which could damage the heating elements.
- The glass ceramic hob is resistant to thermal and mechanical shocks. However, it may break due to a shock caused by a sharp object. In this case, unplug the appliance immediately and contact an authorised after-sales service centre to have it repaired.
Always keep your hob clean. Before proceeding with maintenance operations, check that all the cooking zones are turned off and have cooled down completely.
Stainless steel frame
Stainless steel can stain as an effect of enduring contact with limescale in water or as an effect of highly aggressive detergents (containing phosphorus). We recommend you rinse and dry it thoroughly after maintenance. It is preferable to remove any water spills immediately.
Hob care
The vitroceramic glass used for the heating surface is smooth and poreless and it is also resistant to thermal shocks and to mechanical shocks under normal conditions of use. In order to preserve these properties, we recommend you care for your hob as follows:
- for ordinary maintenance, just wipe it with a damp sponge and dry it thoroughly using paper towels.
- If the hob is dirty, rub clean using a special cleaner suitable for vitroceramic glass, rinse off and dry thoroughly.
- food residue and dirt can be removed using a special scraper. Do this as soon as possible, do not wait for the hob to cool down in order to avoid incrustations. For excellent results, use a special stainless steel wool pad for vitroceramic glass cleaning soaked in soapy water.
- When the hob is clean, you can apply a special product for the care and protection of the same: this type of product leaves an invisible film on the surface of the hob to protect the same against any spills and boiled-over food. It is best if you do this when the hob is lukewarm or cold.
- Make sure you always rinse the hob with clean water and dry it thoroughly: otherwise the cleaning products could become encrusted onto the hob during subsequent cooking.
Recommendations
- Never use abrasive or corrosive substances, such as aerosol cleaners for grills and ovens, stain removers or rust removers, scouring powders and abrasive sponges: even the delicate ones could scratch the hob surface irreversibly.
- We recommend you keep all items which could melt away from the hob, such as plastic utensils, sugar or products with a high sugar content. Should liquid boil over onto the hob surface, remove it immediately (while the hob is still hot) using a razor blade scraper, in order to avoid damaging the surface.
- Use this hob exclusively for cooking. Do not place items on the hob when the same is not in use. Do not use the hob as a work surface (by placing lids, sauce-pans or dishcloths on it, for example), nor as a chopping board.
- Never leave aluminium wrappers, aluminium foil and plastic cookware on the hob when hot or still warm.
- Do not use steam cleaners or high pressure cleaners to clean your appliance.
- Do not place metal items on the hob (such as knives, spoons, lids, etc.).
- Never heat up unopened tins: they could burst.
The guarantee does not cover damage to the hob caused by incorrect use.
