1 — Oven — Mode d'emploi PDF")
HI 20.A (BK)1 - Oven INDESIT - Free user manual and instructions
Find the device manual for free HI 20.A (BK)1 INDESIT in PDF.
| Product type | Built-in oven with hob |
| Brand | Indesit |
| Model | HI 20.A (BK)1 |
| Dimensions (W x H x D) | 43.5 x 32 x 43.5 cm |
| Oven volume | 57 liters |
| Electrical supply | 230V/400V~ 3N 50/60 Hz |
| Maximum absorbed power | 8400 W |
| Cooking programs | Traditional, Top heat, Grill, Pizza |
| Hob type | Electric cast iron or ceramic glass plates (depending on model) |
| Number of cooking zones | 4 (depending on model) |
| Oven lighting | 25 W bulb, E14 base |
| Removable door | Yes, for cleaning |
| Cleaning | Manual, enamel, do not use steam cleaners |
| Child safety | Requires supervision, hot surfaces |
| Spare parts | Bulb, door gasket |
| Repairability | Approved technical assistance |
| Energy class | Compliant with directive 2002/40/EC |
Frequently Asked Questions - HI 20.A (BK)1 INDESIT
User questions about HI 20.A (BK)1 INDESIT
0 question about this device. Answer the ones you know or ask your own.
Ask a new question about this device
Download the instructions for your Oven in PDF format for free! Find your manual HI 20.A (BK)1 - INDESIT and take your electronic device back in hand. On this page are published all the documents necessary for the use of your device. HI 20.A (BK)1 by INDESIT.
USER MANUAL HI 20.A (BK)1 INDESIT
Operating Instructions
COOKER AND OVEN
Contents
Operating Instructions,1
WARNING
Description of the appliance-Overall view,2
Description of the appliance-Control Panel,2
Installation,3
Start-up and use,5
Cooking modes,6
Using the hob,7
Precautions and tips,8
Care and maintenance,9
Assistance,9

Français
Mode d'emploi
CUISINIERE ET FOUR
Sommaire
Mode d'emploi,1
ATTENTION
Ekkivnon kai xprnon,33
Ppoypaetaaayepaatoc,34
Xpnn nns Etnipaveiaos payeipepaato,35
PpoulaeicKaoupuoua36
Zuvtnpnon kai povtida,37
Texivikn UTOOthpiN,37

Espanol
WARNING: The appliance and its accessible parts become hot during use.
Care should be taken to avoid touching heating elements.
Children less than 8 years of age shall be kept away unless continuously supervised.
This appliance can be used by children aged from 8 years and above and persons with reduced physical, sensory or mental capabilities or lack of experience and knowledge if they have been given supervision or instruction concerning use of the appliance in a safe way and understand the hazards involved. Children shall not play with the appliance. Cleaning and user maintenance shall not be made by children without supervision.
WARNING: Unattended cooking on a hob with fat or oil can be dangerous and may result in fire.
NEVER try to extinguish a fire with water, but switch off the appliance and then cover flame e.g. with a lid or a fire blanket.
WARNING: Danger of fire: do not store items on the cooking surfaces.
WARNING: If the surface in glass-ceramic is cracked, switch off the appliance to avoid the possibility of electric shock.
The internal surfaces of the compartment (where present) may become hot.
Never use steam cleaners or pressure cleaners on the appliance.
Remove any liquid from the lid before opening it.
Do not close the glass cover (if present) when the gas burners or electric hotplates are still hot.
WARNING: Ensure that the appliance is switched off before replacing the lamp to avoid the possibility of electric shock.
Do not use harsh abrasive cleaners or sharp metal scrapers to clean the oven door glass since they can scratch the surface, which may result in shattering of the glass.
FR Français ATTENTIONATTENTIONATTENTION
Description of the appliance Overall view
- Control panel
2..Sliding grill rack
3.DRIPPING pan
4.GUIDE RAILS for the sliding racks
5.position 5
6.position 4
7.position 3
8.position 2
9.position 1
FR
Description of the appliance Control panel
- SELECTOR knob
- ELECTRIC HOTPLATE indicator light
- Electric HOTPLATE control knob
FR
! Before placing your new appliance into operation please read these operating instructions carefully. They contain important information for safe use, for installation and for care of the appliance.
Please keep these operating instructions for future reference. Pass them on to possible new owners of the appliance.
Positioning
! Keep packaging material out of the reach of children. It can become a choking or suffocation hazard (see Precautions and tips).
! The appliance must be installed by a qualified person in compliance with the instructions provided. Incorrect installation may cause harm to persons, animals or may damage property.
Fitting the appliance
Use the appropriate cabinet to ensure that the appliance functions properly.
- The panels adjacent to the oven must be made of heat-resistant material.
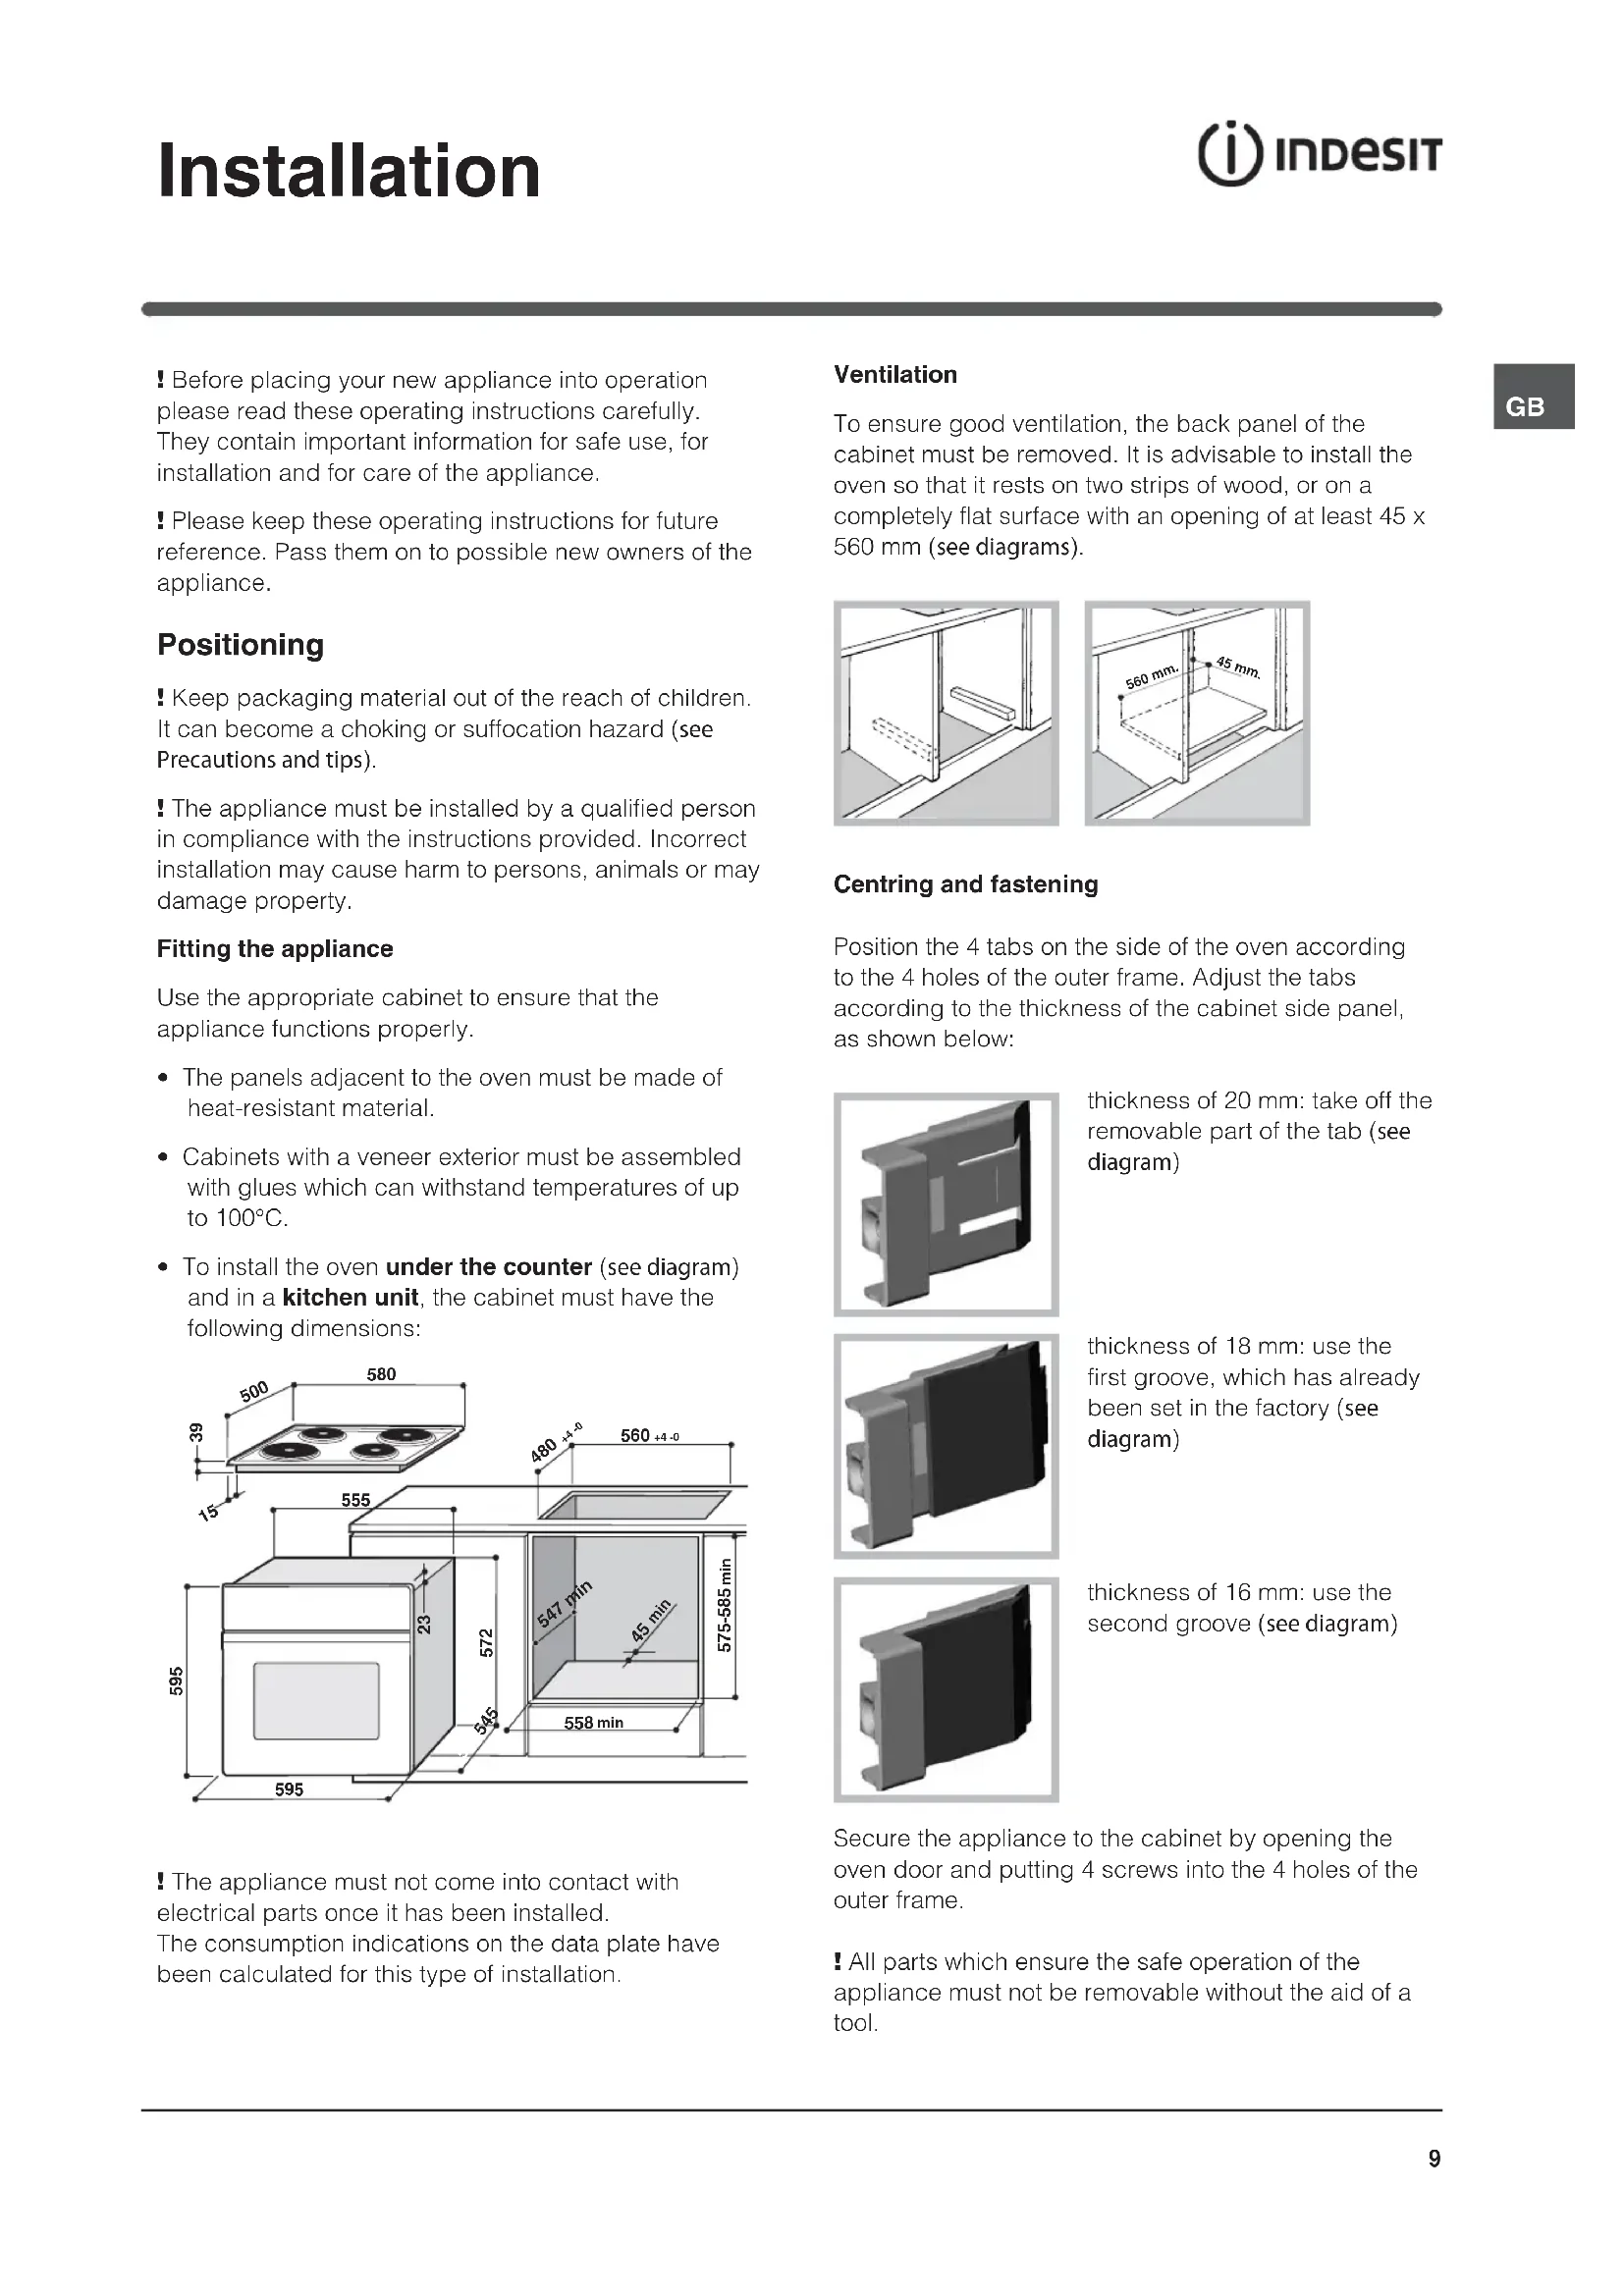
Cabinets with a veneer exterior must be assembled with glues which can withstand temperatures of up to 100^ - To install the oven under the counter (see diagram) and in a kitchen unit, the cabinet must have the following dimensions:
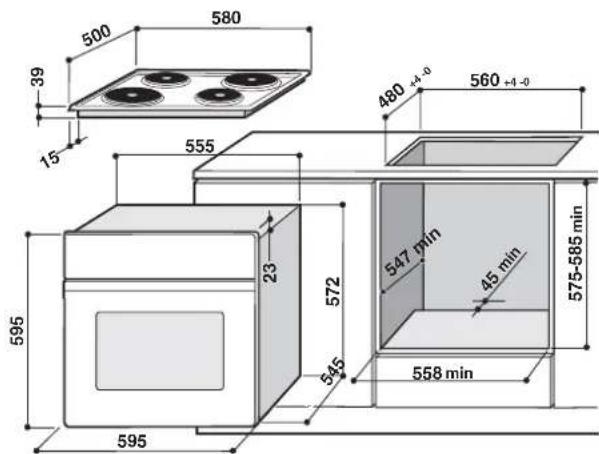
The appliance must not come into contact with electrical parts once it has been installed. The consumption indications on the data plate have been calculated for this type of installation.
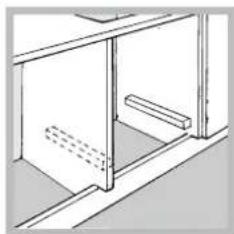
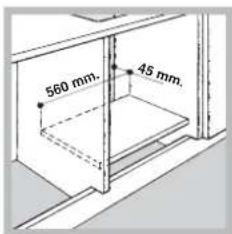
Ventilation
To ensure good ventilation, the back panel of the cabinet must be removed. It is advisable to install the oven so that it rests on two strips of wood, or on a completely flat surface with an opening of at least 45 × 560 ~mm (see diagrams).
Centring and fastening
Position the 4 tabs on the side of the oven according to the 4 holes of the outer frame. Adjust the tabs according to the thickness of the cabinet side panel, as shown below:
thickness of 20mm take off the removable part of the tab (see diagram)
thickness of 18mm use the first groove, which has already been set in the factory (see diagram)
thickness of 16 mm: use the second groove (see diagram)
Secure the appliance to the cabinet by opening the oven door and putting 4 screws into the 4 holes of the outer frame.
! All parts which ensure the safe operation of the appliance must not be removable without the aid of a tool.
GB
Electrical connections
The cooker must be connected to the mains electricity supply. It is designed to operate with alternating current at the voltage and frequency indicated on the data plate (see the following page).
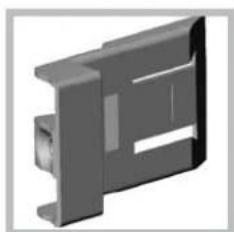
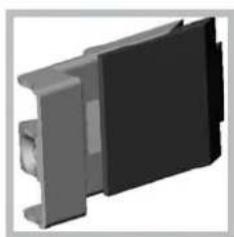
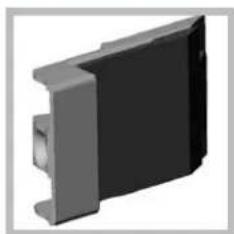
The hob is connected to the cooker using a special connector.
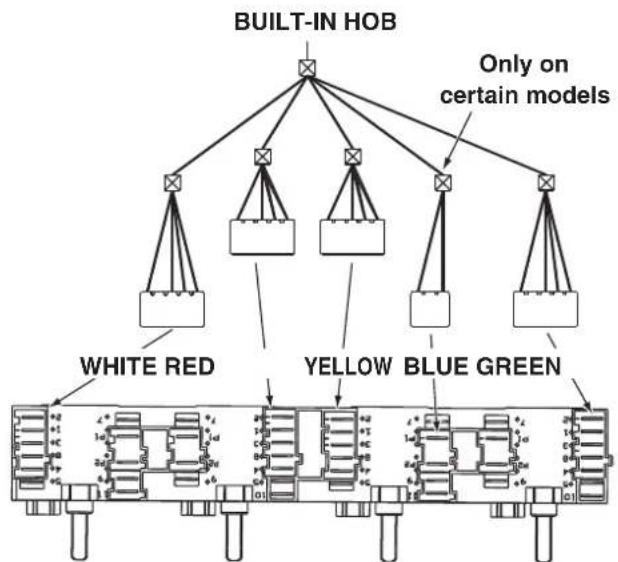
BUILT-IN COOKER
Replace the metal protection after performing all the necessary hob connections. If the hob is removed from its position, the red cap which was originally protecting the red connector must be replaced.
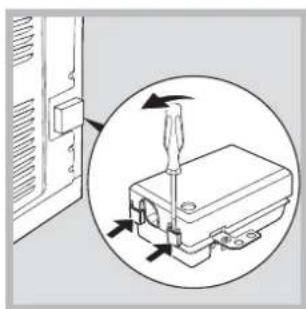
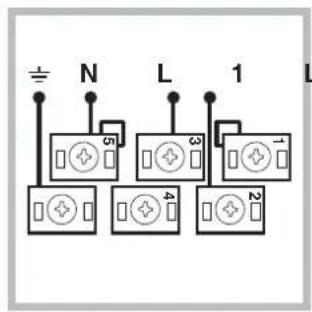
Fitting the power supply cable
-
Open the terminal board by inserting a screwdriver into the side tabs of the cover. Use the screwdriver as a lever by pushing it down to open the cover (see diagram).
-
Install the power supply cable by loosening the cable clamp screw and the wire contact screws L-N- Connect the wires to the corresponding terminals: the Blue wire to the terminal marked (N), the Brown wire to the terminal marked (L) and the Yellow Green wire to the terminal marked
The terminal board is designed for a 400V three-phase connection (see diagrams below).
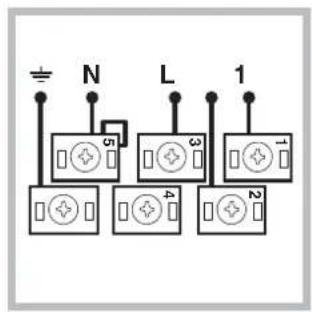
400V3N\~ H05RR-F5x2.5CEI-UNEL35363 H05VV-F5x2.5CEI-UNEL35746
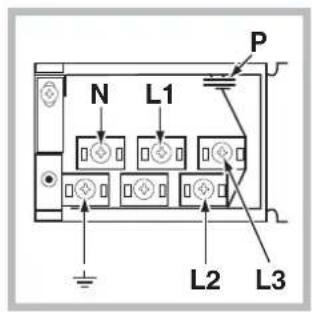
If the electrical system has other characteristics (see diagrams below), carry out the electrical connection using the connection supports provided in the box P.
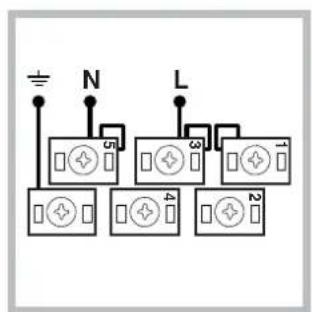
230V~ H05RR-F3x4 CEI-UNEL35363 H05VV-F3x4 CEI-UNEL35746
400V2N\~ H05RR-F4x4CEI-UNEL35363 H05VV-F4x4CEI-UNEL35746
-
Secure the power supply cable by fastening the clamp screw.
-
Close the cover of the terminal board.
Connecting the supply cable to the mains
Install a standardised plug corresponding to the load indicated on the data plate (see side). The appliance must be directly connected to the mains using an omnipolar circuit-breaker with a minimum contact opening of 3mm installed between the appliance and the mains, suitable for the load indicated and complying with current electrical regulations (the earthing wire must not be interrupted by the circuit-breaker). The supply cable must not come into contact with surfaces with temperatures higher than 50^ .
! The installer must ensure that the correct electrical connection has been made and that it is compliant with safety regulations.
Before connecting to the power supply, make sure that:
- The appliance is earthed and the plug is compliant with the law.
- The socket can withstand the maximum power of the appliance, which is indicated on the data plate (see below).
- The voltage must be in the range between the values indicated on the data plate (see below).
- The socket is compatible with the plug of the appliance. If the socket is incompatible with the plug, ask an authorised technician to replace it. Do not use extension cords or multiple sockets.
!Once the appliance has been installed, the power supply cable and the electrical socket must be easily accessible.
! The cable must not be bent or compressed.
! The cable must be checked regularly and replaced by authorised technicians only (see Assistance).
! The manufacturer declines any liability should these safety measures not be observed.
| DATA PLATE | |
| Dimensions | width 43.5 cm height 32 cm depth 43,5 cm |
| Volume | lt. 57 |
| Electrical connections | voltage: 230V/400V~ 3N 50/60Hz maximum power absorbed 8400W |
| ENERGY LABEL | Directive 2002/40/EC on the label of electric ovens. Standard EN 50304 Energy consumption Class certification Natural convection heating mode: TRADITIONAL |
| CE | This appliance conforms to the following European Economic Community directives: 73/23/EEC of 19/02/73 (Low Voltage) and subsequent amendments; - 89/336/EEC of 03/05/89 (Electromagnetic Compatibility) and subsequent amendments; - 93/68/EEC of 22/07/93 and subsequent amendments. - 2002/96/EC |
Start-up and use
The first time you use your appliance, heat the empty oven with its door closed at its maximum temperature for at least half an hour. Ensure that the room is well ventilated before switching the oven off and opening the oven door. The appliance may produce a slightly unpleasant odour caused by the burning away of protective substances used during the manufacturing process.
Starting the oven
- Select the desired cooking mode by turning the SELECTOR knob.
- See the Cooking advice table for cooking modes and the suggested cooking temperatures (see Cooking Modes).
- You may do the following during cooking:
- change the cooking mode by turning the SELECTOR knob
- stop cooking by turning the SELECTOR knob to the "0" position
! Never put objects directly on the oven bottom to avoid damaging the enamel coating.
! Always place cookware on the rack(s) provided.
GB
Oven light
When selecting with the SELECTOR knob the oven light goes on. It remains on when a cooking mode is selected.
Cooking modes
TRADITIONAL OVEN mode
Both the top and bottom heating elements will come on. With this traditional cooking mode, it is best to use one cooking rack only; if more than one rack is used, the heat will be distributed unevenly.
The oven will automatically reach the temperature set, and the thermostat, which is controlled by the SELECTOR knob, will keep it constant.

TOPOVENmode
The top heating element comes on. This mode can be used to brown food at the end of cooking. Always cook in this mode with the oven door closed.
Practical cooking advice
! In the GRILL cooking mode, place the dripping pan in position 1 to collect cooking residues (fat and/or grease).
GRILL
- Insert the rack in position 3 or 4. Place the food in the centre of the rack.
- The top heating element is regulated by a thermostat and may not always be on.
PIZZA
- Use a light aluminium pizza pan. Place it on the rack provided.
For a crispy crust, do not use the dripping pan (prevents crust from forming by extending cooking time).
- If the pizza has a lot of toppings, we recommend adding the mozzarella cheese on top of the pizza halfway through the cooking process.
Cooking advice table
| Foods | Weight (in kg) | Rack position | Pre-heating time (min) | Recommended temperature | Cooking time (minutes) |
| Pasta | |||||
| Lasagne | 2.5 | 3 | - | 210 | 75-80 |
| Cannelloni | 2.5 | 3 | - | 210 | 75-80 |
| Tagliatelle | 2.5 | 3 | - | 210 | 75-80 |
| Meat | |||||
| Veal | 1.7 | 3 | - | 220 | 85-90 |
| Chicken | 1.5 | 3 | - | 220 | 110-115 |
| Turkey | 3.0 | 3 | - | 220-Max | 95-100 |
| Duck | 1.8 | 3 | - | 220 | 120-125 |
| Rabbit | 2.0 | 3 | - | 220 | 105-110 |
| Pork | 2.1 | 3 | - | 220 | 100-110 |
| Lamb | 1.8 | 3 | - | 220 | 90-95 |
| Fish | |||||
| Mackerels | 1.1 | 3 | - | 210-230 | 55-60 |
| Dentex | 1.5 | 3 | - | 210-230 | 60-65 |
| Trout baked in foil | 1.0 | 3 | - | 210-230 | 40-45 |
| Pizza | |||||
| Napolitan | 1.0 3 15 Max 30-35 | ||||
| Pies | |||||
| Biscuits | 0.5 | 3 | 15 | 180 | 30-35 |
| Tart | 1.1 | 3 | 15 | 180 | 30-35 |
| Chocolate cake | 1.0 | 3 | 15 | 200 | 45-50 |
| Leavened cake | 1.0 | 3 | 15 | 200 | 50-55 |
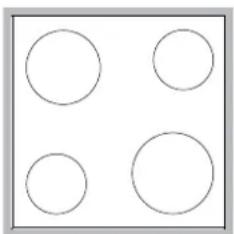
Type of hob
The oven is combined with a hob that can be made up of two types of heating elements: cast-iron electric plates (see diagram 1) or glass ceramic hobs (see diagram 2).
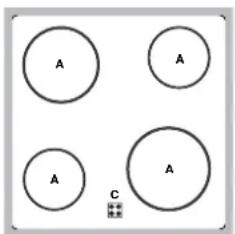
Switching on the glass ceramic hob
Traditional cooking zones
Traditional cooking zones are made up of circular heating elements. They turn red approximately ten seconds after they have been turned on.
Each cooking zone is fitted with a control knob allowing you to select from 6 different temperature settings from a minimum of 1 to a maximum of 6.
Residual heat indicator lights*
The indicator lights (C) indicate that the temperature of the corresponding cooking zones have exceeded 60^ , even after the heating element has been switched off.
Recommended power levels for various types of cooking:
| Setting | Normal or Fast Plate |
| 0 | Off |
| 1 | Cooking vegetables, fish |
| 2 | Cooking potatoes (using steam) soups, chickpeas, beans. |
| 3 | Continuing the cooking of large quantities of food, minestrone |
| 4 | For roasting (average) |
| 5 | For roasting (above average) |
| 6 | For browning and reaching a boil in a short time. |
Practical advice on using the glass ceramic hob
! The glue that is applied on the gaskets leaves some traces of grease on the glass. Before using the appliance, we recommend you eliminate these with a special non-abrasive cleaning product. During the first few hours of use there may be a smell of rubber which will disappear very quickly.
To obtain the best results with your hob:
- Use flat-bottomed pans to ensure that they adhere to the cooking zone perfectly.
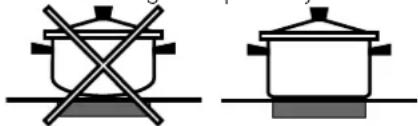
Always use pans with a diameter that is large enough to cover the hotplate fully, in order to use all the available heat.

- Make sure that the bottom of the cookware is always dry and clean to guarantee correct adherence and long life, not only for the cooking zones but also for the cookware itself.
- Avoid using the same cookware that is used on gas burners: the heat concentration on gas burners may deform the base of the pan, causing it not to adhere correctly.
- Never leave a cooking zone on without cookware on it because as it heats up and rapidly reaches the maximum level, it could damage the heating elements.
Precautions and tips
GB
! The appliance was designed and manufactured in compliance with international safety standards. The following warnings are provided for safety reasons and must be read carefully.
General safety
- The appliance was designed for domestic use inside the home and is not intended for commercial or industrial use.
- The appliance must not be installed outdoors, even in covered areas. It is extremely dangerous to leave the appliance exposed to rain and storms.
- When handling the appliance, always use the handles provided on the sides of the oven.
- Do not touch the appliance with bare feet or with wet or moist hands and feet.
- The appliance must be used to cook food by adults only and according to the instructions in this manual.
- Do not touch the heating elements and parts of the oven door when the appliance is in use; these parts become extremely hot. Keep children well away from the appliance.
- Ensure that the power supply cable of other electrical appliances does not come into contact with the hot parts of the oven.
- The openings used for ventilation and dispersion of heat must never be covered.
Always grip the oven door handle in the centre: the ends may be hot.
Always use oven gloves to place cookware in the oven or when removing it. - Do not use aluminium foil to line the bottom of the oven.
- Do not place flammable materials in the oven: if the appliance is switched on by mistake, it could catch fire.
Always make sure the knobs are in the "●"/"O" position when the appliance is not in use. - When unplugging the appliance always pull the plug from the mains socket, do not pull on the cable.
- Never carry out any cleaning or maintenance work without having unplugged the plug from the mains.
- In the case of a malfunction, under no circumstances should you attempt to repair the appliance yourself. Repairs carried out by inexperienced persons may cause injury or further malfunctioning of the appliance. Contact a Service Centre (see Assistance).
-
Do not rest heavy objects on the open oven door.
-
The glass ceramic hob is resistant to mechanical shocks, but it may crack (or even break) if hit with a sharp object such as a tool. If this happens, disconnect the appliance from the electricity mains immediately and contact a Service Centre.
- Remember that the temperature of the cooking zones remains relatively high for at least thirty minutes after they have been switched off.
- Keep any object that could melt away from the hob, for example plastic and aluminium objects, or products with a high sugar content. Keep plastic or aluminium objects away from the hob: if you forget them on surfaces that are still hot, they may cause serious damage to the hob.
- The appliance should not be operated by people (including children) with reduced physical, sensory or mental capacities, by inexperienced individuals or by anyone who is not familiar with the product. These individuals should, at the very least, be supervised by someone who assumes responsibility for their safety or receive preliminary instructions relating to the operation of the appliance.
- Do not let children play with the appliance.
Disposal
- Observe local environmental standards when disposing packaging material for recycling purposes. Observe existing legislation when disposing of the old appliance.
- The European Directive 2002/96/EC on Waste Electrical and Electronic Equipment (WEEE), requires that old household electrical appliances must not be disposed of in the normal unsorted municipal waste stream. Old appliances must be collected separately in order to optimise the recovery and recycling of the materials they contain and reduce the impact on human health and the environment. The crossed out "wheeled bin" symbol on the product reminds you of your obligation, that when you dispose of the appliance it must be separately collected. Consumers should contact their local authority or retailer for information concerning the correct disposal of their old appliance.
Respecting and conserving the environment
- By using the appliance in the hours between late afternoon and early morning, you can help reduce the work load placed on electrical companies.
Always keep the oven door closed when using the GRILL mode to attain best results and to save energy (approximately 10% ). - Regularly check the door seals and wipe clean to ensure they are free of debris so that they stick properly to the door and do not allow heat to disperse.
Switching the appliance off
Disconnect your appliance from the electricity supply before carrying out any work on it.
Cleaning the appliance
- The stainless-steel or enamel-coated external parts as well as the rubber seals may be cleaned using a sponge that has been soaked in lukewarm water and neutral soap. If these stains are difficult to remove, use only specialised products. After cleaning, rinse and dry thoroughly. Do not use abrasive powders or corrosive substances.
- Ideally, the inside of the oven should be cleaned after each use, when it is still lukewarm. Use hot water and detergent, rinse and dry with a soft cloth. Do not use abrasive products.
- The accessories can be washed like everyday crockery (even in your dishwasher).
! Never use steam cleaners or pressure cleaners on the appliance.
Cleaning the oven door
Clean the glass part of the oven door using a sponge and a non-abrasive cleaning product, then dry thoroughly with a soft cloth. Do not use rough abrasive material or sharp metal scrapers as these could scratch the surface and cause the glass to crack. To clean more thoroughly, you can remove the oven door.
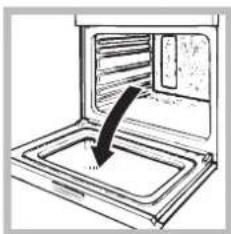
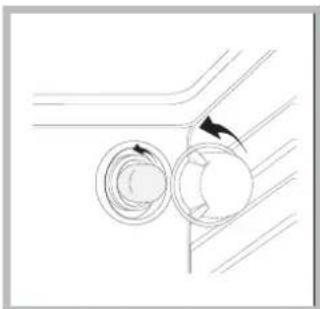
- Open the oven door fully (see diagram).

- lift up and turn the small levers situated on the two hinges; (see diagram).

- Grip the door on the two external sides and close it approximately half way. Unlock the door by pressing on the clamps F, then pull the door towards you lifting it out of its seat (see diagram).
To replace the door, reverse this sequence.
Inspecting the seals
Check the door seals around the oven periodically. If the seals are damaged, please contact your nearest After-sales Service Centre (see Assistance). We recommend not using the oven until the seals have been replaced.
Replacing the light bulb
To replace the oven light bulb:
- Remove the glass cover of the lamp-holder.
- Remove the light bulb and replace it with a similar one: Wattage 25 W, cap E 14.
- Replace the glass cover (see diagram).
! Do not use the oven lamp as/for ambient lighting.
Assistance
Communicating:
- appliance model (Mod.)
- serial number (S/N)
This information is found on the data plate located on the appliance and/or on the packaging.
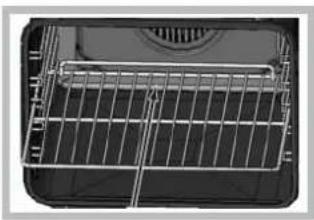
! When inserting the shelf make sure the backstop is at the rear of the cavity (see image).
Installation
FR
PoypaataaayeipaeatoC
Ppoypaeta NAPAAOIAKOY FOYPNOY
EvpyoiouVTa duo 0epmuvtikc stoixia, to kato kai to eavw. Me auto to npapaoiako mayepma evai kalutepa va xpoaipotoiee movo eva eti:do: me Tpiopotepa eTTtEa Unpxekk kakn katavoun Tng oepokpaoic.
H TeEioa 0epuokpaoia eTTiuyxavetai autoupaata kai diatnpieitai otaepn aTo to 0epuooTtou dieuovetai aTo Tov EIIoyea IPOI PAMMATON.

PpOpyaua FOYPNOEIAN
Avabi To eTavw 0epuavtioo oToiyeio. H aeitoupyia autn mtopei va xpnoipotoiietai yia oupiAnpwon tou npoiatoc. dEvpeite ta paayepaatae Tnv Topta tou pfoupvou kEiotn.
Nivakac ynoiμaTOs
PpaktkeC ououeC ynoiatoC
Ppaktkeoumuoue ynoiato
! 2a payeipepa TGRILL, va toTIOthetaTov AIOOuaAektn Otn thcN 1vi tn ouAoyn twv UTOAemuATW payeipepaTOC (ouuia n/kaI aiT).
GRILL
ToTTOtheTeTo TIAeYma Otn ΘeOa 3 n4, DIEUeTawVtac Ta TPOphiMa OTO KevTpo Tou IAEymuToC.
Mnygavviaceovn nTavwavioTaon devivauvexwavmuevn: n aeitoupyia tnc eayxetai ato 0epuooTatn.
ITSA
Ppoulaeic kai ouuoue
GR
I H oukeun oxediatoNKE kai kataokuadoTNE oUWVAe touc diethetaic kavoves aopaiaac. OITPOEIDOTIOAEi autc TApexovtai ia loyouc aopaiaic kai npETe i daiaaotauv Tpoeekia.
Evikn aσφαλει
H ouakeun autn oxeiaotke yia un eTayeaatikx npon oTo eoTEpiKO katoiKa.
H ouakeun dev ykaioatai oe e wtepiok xwpo, K OUTE av o xwpoc kertiaetai, diot iivai TALU ETIKIDUVO VA TNV aepnoete EKTEeievN oe poxn kai kakokaipia.
Tia va metakivnete Tn oukeun va xpanoiotoei Teavta Tc avtioixe IaIe c Tou Biokovtai oTa IIaiv a Tou foypvou.
Mny ayyiTe Tn unxavn uTNDia yuuvn e Ta xepia n ta TNDia BpEvmuva.
H oukeun npetie va xpnaioioeirai ia to payeipepa trophiuov, mvo aTIO aToPAEvnlaika kai oUmuwva e TIC odnyies Tou avapepvotai OTO TAPOV EYxepidio.
Kata tn xpno tnC oukeunc ta 0epmuvtka otoxeia kai opioeva npn Tns npctou poupvou kaioiavtai mou 0epua. Ipooexete va uny ta ayyicete kai kpatate ta maiia paia.
A TIOPEUYETO KAALWIO TPOPOOOIAC AALW OIKIAKW OUAKEUwVa ayyicTe Taepu maepn Tou qoupvou.
Mn Bouawve Ta avoiymuata aepioou kai anaywyn ts nC eepoTntac.
- Na triave t n a n avoiuato s tnc troptac oKevtpo: oTn Tlaivmuopei va evai zetn.
XpnoiopoIOIE TnVTA yavTia qoupvou vla va baTe n va ByaCETe OKEUn.
Mny kaUttTe Tbaon Tou pOupvoue aoumuVoxapro.
Mny toToTeTE EupkTo uIko OTo QOpvO: av n ouokun TeGei qavikAcE Aetoupyia Ta ttopouoe va Tapei qwiTi.
Na 8eBaiwveote navta oI oEIIIOyeic eivai otn eoon "I"o-otav n oukeun dEv xpnoiopoieitai.
Mn ByaceTe To buoMa aTo Tnv nEeTpiK npiz TaBwVtac To kaawio, aaA TiavovTaC to BuOma.
Mny kavete kaqapiao n ouvtnpanxwpi tsponyouevwvvaexte byaale to buoatao tvnlektpi npia.
Σε πεπΠτωπ βλαβης, μη επεμβανετε σε καμια περπΠτωπ στούς εωσερικός μηχανίαμούς γιαν επιχερήσετην επιδοκυή. Επικοινωνησε με την ἀντενική Yποθήριξη (βλέπε Αγθοῦτηρός).
Mny aTIOHOETETe bApia avTIkeiEvA OTNV aVOIXTH TOpTa Tou FOUPVou.
H uαlokepaikn eTTiPavieia eivai aveKTIk nTic mXavikec Kpouoei, wotoo mTopei va paiyei (n evdeoxevwca v Otnaei) av xTuTTne iE aixunpo avikejEvO, oTWC evaepyaleio. TIC TEPITWoeic autec, aTOoUVDeote aedws Tn ouakeun to doktuo naektpko kai aTeuuvtheite OTnv
YIIOOHTnpiEiN.
Mny Exvate oTn 0epuokpaia Tuv cwwu wayepmuatos napaevi apketa uynan yia toulaixotov triavta aenra meta to obnio.
Na kpatate 6e loyikn attoataon atto nTv ETTiPaveia
muayepaatoC OTIOODNTOE AVTIKEIevo Tou aTtopooue
va aeioei, yia npadoeiyma TAAOTiKa AVTIkeiEvA,
alouivio n ppoiovta uwnan oukyevtpwon caxapnc.
PiooETE Iidaitepa otic ouakeuaiec kai ta pilu atro
Tlaotiko n alouivio: av ta ExaoTe otic ETTiPaveiec
akoun Cotecs n Xliape c mTopei va TpokAnthe oobapn
Znui aTnv ETTiPaveia.
ev npoBleTetai n xpnoTnC OuakeunC ato aToa (ouuTePiAumavoeuvtwv Taaivw) uE uWVEc quikcs, aoNTiKcs n vontikcs IKavotntcs, ato atoa m Eutiepa n xupic eoikeiwan e To TPOIOv, EKToc K av ETTOTUEOVTA tto atoTOUteuVOY ia TNV aopalaia touc n Exov dextei TpokatapkTkeCs odnyies yia tn xpnoTnC oukeunC.
Atopeuyte va tiaouv ta tiaiia t oukeun.
Aic0e0n
Δiaθeon Tou ulikou ouakeuaiaç; va εφapμoεte touc totiokouc kavoviouoc, etoi ouakeuaiec θa μtropouv va επavaXPnOToinθouv.
H eupwniok nyia 2002/96/EK yia Ta AtnoBnTa HAKIOU KAI HAKTOVIKOU EOTIAOu (AHHE), aTtaiTe OI OIIaIEc OIKIAKEc NAEKPIKcS OUKEUC SEV TIPETe va atoBalaovta paiz TE uToAoiTa aTIOBnTA Tou dnoTOKOU oikTuO. OI IaaiC cuaKEc S TpETe va ouAAxBOuXwpiTa TPOKeiEvou VA BAtIoTOnIOINouv n AttoKaataoan Ka n avakukawon Tuv uAikw Tous TEPiExoukaipeoTn meoiwn TwbAbaepowv ETITIWoeWv OTNV AVpWtvN Uyeia KaT To pIbAiov. To oMuBoo ME TO DIEpymuEvo "Doxieo aTTOBnWv" OTO TPOIOV UTVEUmuCEi OE OA tnv UTOXPEwON OA, TTWCOTAV ETIbueite va TTetAgete TN OUAKEUn, TpETe va OUALExOei XwpiTa.
Oi katavalwTeG aTIPeTE va ateuuovovta otis totikEs apxE n oTa kataoTHmuata liavrkS yia TAnpoopopie tsou apopoov tn owtidheon tow taaiwv nEktpikwv oukeuwv.
Egoikovouonn evpyeiac kai oepaog oTo Tepiabaaov
to movrlo tnns unxavn (Mod.)
Tov aipo oεiapac (S/N)
Auté os Teleutaiç πλnpopopieç βpiokovtai OTnv TaμteItoa xapaktnpiotikwv Tou βpioketai OTn oukeun n/kai OTN oukeuaia.