HIM 504 K.A IX - Oven INDESIT - Free user manual and instructions
Find the device manual for free HIM 504 K.A IX INDESIT in PDF.

User questions about HIM 504 K.A IX INDESIT
0 question about this device. Answer the ones you know or ask your own.
Ask a new question about this device
Download the instructions for your Oven in PDF format for free! Find your manual HIM 504 K.A IX - INDESIT and take your electronic device back in hand. On this page are published all the documents necessary for the use of your device. HIM 504 K.A IX by INDESIT.
USER MANUAL HIM 504 K.A IX INDESIT
Electrical connections
Français, 13
Nederlands, 25English;
Data plate
DE GR

Deutsch, 37 EAnvika, 49
ES
Espanol, 61
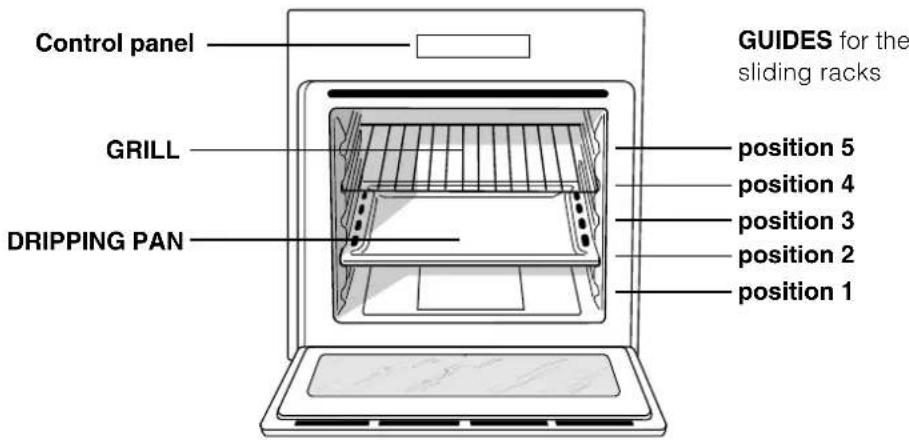
Description of the appliance, 5
Overall view
Control panel
RS
Pycckn,73
HIM 50 K.A
HIM 50 K.A IX
HIM 53 K.A
HIM 53 K.A IX
HIM 504 K.A
HIM 504 K.A IX
Start-up and use, 6
Starting the oven
Using the cooking timer
Cooking modes, 7-8
Cooking modes
Practical cooking advice
Cooking advice table
Hob, 9
Type of hob
Switching on the glass ceramic hob
Practical advice on using the glass ceramic hob
The electronic cooking programmer, 10
Precautions and tips, 11
General safety
Disposal
Respecting and conserving the environment
Maintenance and care, 12
Switching the appliance off
Cleaning the appliance
Cleaning the oven door
Replacing the light bulb
Assistance
GB
Before placing your new appliance into operation please read these operating instructions carefully. They contain important information for safe use, for installation and for care of the appliance.
Please keep these operating instructions for future reference. Pass them on to possible new owners of the appliance.
Positioning
! Keep packaging material out of the reach of children. It can become a choking or suffocation hazard (see Precautions and tips).
The appliance must be installed by a qualified person in compliance with the instructions provided. Incorrect installation may cause harm to persons, animals or may damage property.
Fitting the appliance
Use the appropriate cabinet to ensure that the appliance functions properly.
The panels adjacent to the oven must be made of heat-resistant material.
Cabinets with a veneer exterior must be assembled with glues which can withstand temperatures of up to 100^ .
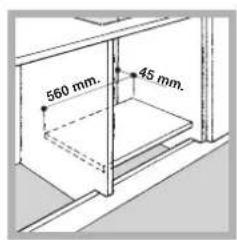
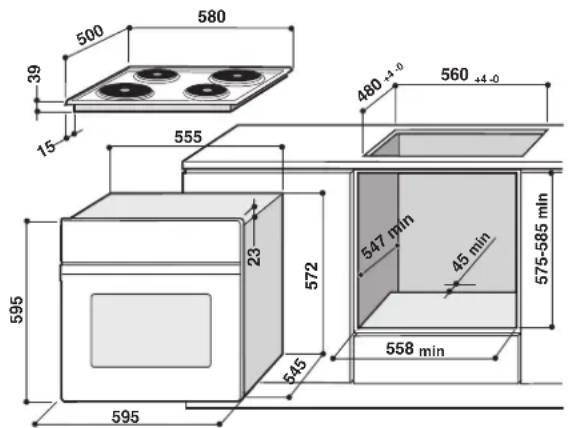
- To install the oven under the counter (see diagram) and in a kitchen unit, the cabinet must have the following dimensions:
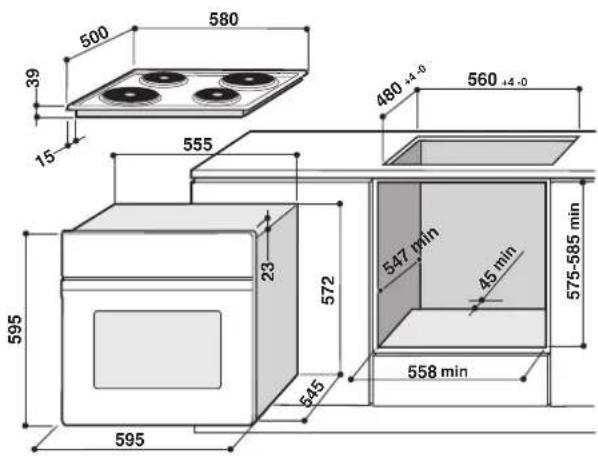
The appliance must not come into contact with electrical parts once it has been installed. The consumption indications on the data plate have been calculated for this type of installation.
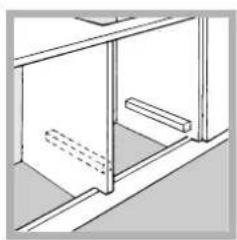
Ventilation
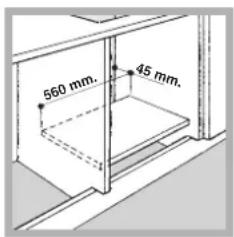
To ensure good ventilation, the back panel of the cabinet must be removed. It is advisable to install the oven so that it rests on two strips of wood, or on a completely flat surface with an opening of at least 45 × 560 mm (see diagrams).
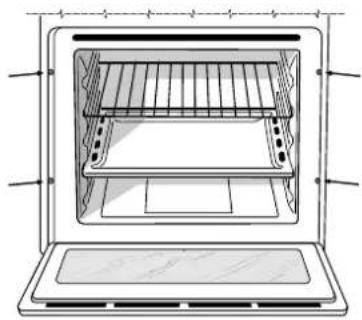
Centring and fastening
Secure the appliance to the cabinet by opening the oven door and putting 4 screws into the 4 holes of the outer frame.
All parts which ensure the safe operation of the appliance must not be removable without the aid of a tool.
Electrical connections
The cooker must be connected to the mains electricity supply. It is designed to operate with alternating current at the voltage and frequency indicated on the data plate (see the following page).
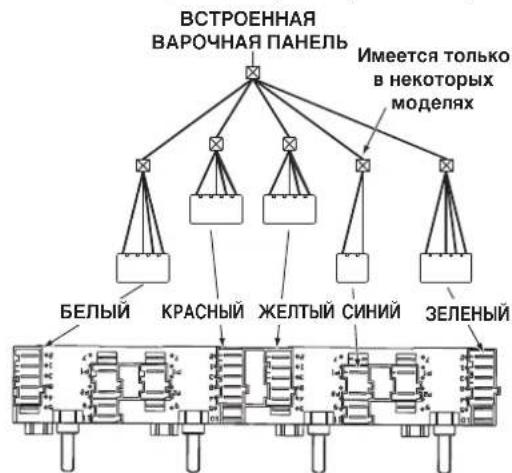
The hob is connected to the cooker using a special connector.
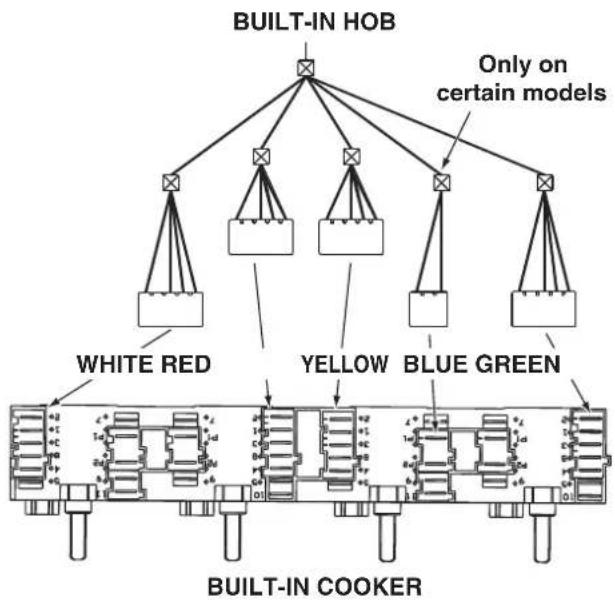
Replace the metal protection after performing all the necessary hob connections. If the hob is removed from its position, the red cap which was originally protecting the red connector must be replaced.
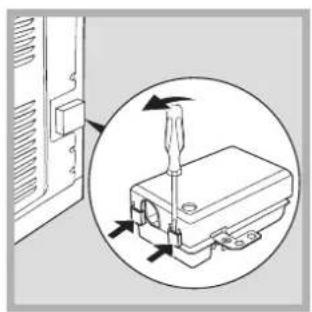
Fitting the power supply cable
-
Open the terminal board by inserting a screwdriver into the side tabs of the cover. Use the screwdriver as a lever by pushing it down to open the cover (see diagram).
-
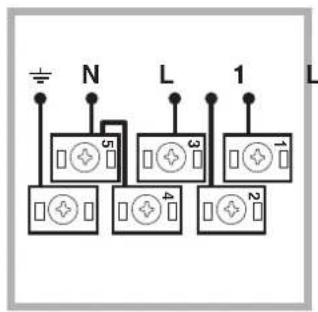
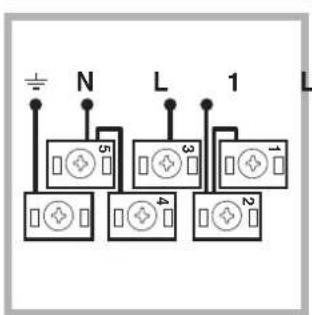
Install the power supply cable by loosening the cable clamp screw and the wire contact screws L-N- Connect the wires to the corresponding terminals: the Blue wire to the terminal marked (N), the Brown wire to the terminal marked (L) and the Yellow Green wire to the terminal marked
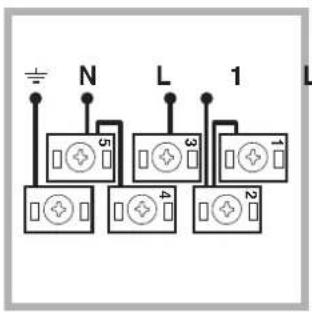
The terminal board is designed for a 400V three-phase connection (see diagrams below).
400V 3N~H05RR-F
5x2.5 CEI-UNEL 35363
3 L 2
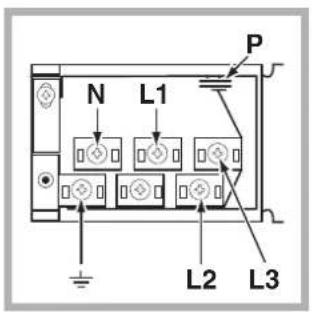
If the electrical system has other characteristics (see diagrams below), carry out the electrical connection using the connection supports provided in the box P.

230V ~H05RR-F 3x4 CEI-UNEL 35363
400V 2N~H05RR-F 4x4 CEI-UNEL 35363 2
-
Secure the power supply cable by fastening the clamp screw.
-
Close the cover of the terminal board.
Connecting the supply cable to the mains
Install a standardised plug corresponding to the load indicated on the data plate (see side).
The appliance must be directly connected to the mains using an omnipolar circuit-breaker with a minimum contact opening of 3mm installed between the appliance and the mains, suitable for the load indicated and complying with current electrical regulations (the earthing wire must not be interrupted by the circuit-breaker). The supply cable must not come into contact with surfaces with temperatures higher than 50^ .
The installer must ensure that the correct electrical connection has been made and that it is compliant with safety regulations.
Before connecting to the power supply, make sure that:
The appliance is earthed and the plug is compliant with the law.
- The socket can withstand the maximum power of the appliance, which is indicated on the data plate (see below).
The voltage must be in the range between the values indicated on the data plate (see below).
- The socket is compatible with the plug of the appliance. If the socket is incompatible with the plug, ask an authorised technician to replace it. Do not use extension cords or multiple sockets.
! Once the appliance has been installed, the power supply cable and the electrical socket must be easily accessible.
The cable must not be bent or compressed.
The cable must be checked regularly and replaced by authorised technicians only (see Assistance).
! The manufacturer declines any liability should these safety measures not be observed.
| DATA PLATE | |
| Dimensions | width 43.5 cm height 32 cm depth 40 cm |
| Volume lt. 56 | |
| Electrical connections | voltage: 230V/400V~ 3N 50/60Hz maximum power absorbed 8450W |
| ENERGY LABEL | Directive 2002/40/EC on the label of electric ovens. Standard EN 50304 Energy consumption for Forced convection heating mode: Multi-cooking Declared energy consumption for Natural convection Class heating mode: Convection |
| CE | This appliance conforms to the following European Economic Community directives: - 2006/95/EEC of 12/12/06 (Low Voltage) and subsequent amendments; - 2004/108/EEC of 15/12/04 (Electromagnetic Compatibility) and subsequent amendments; - 93/68/EEC of 22/07/93 and subsequent amendments. - 2002/96/EC and subsequent amendments. |
Overall view
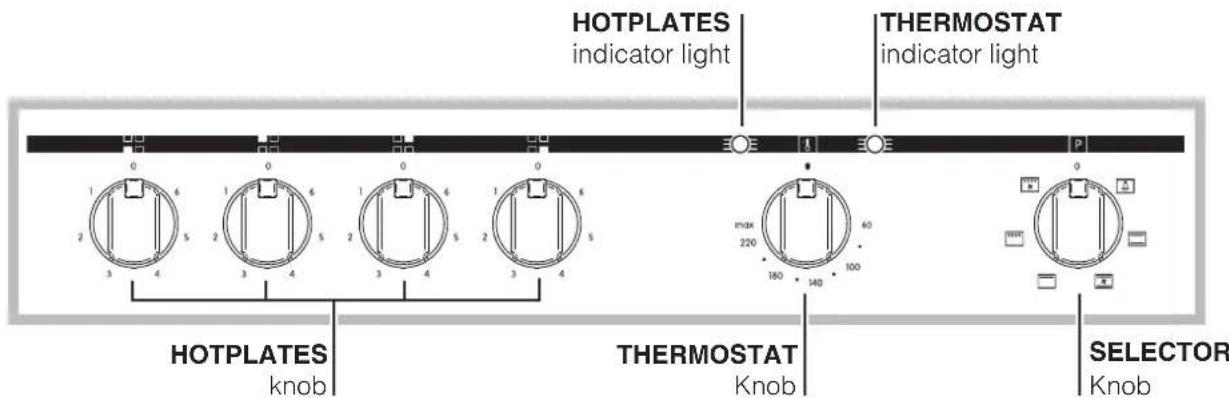
Control panel

* Only on certain models
! The first time you use your appliance, heat the empty oven with its door closed at its maximum temperature for at least half an hour. Ensure that the room is well ventilated before switching the oven off and opening the oven door. The appliance may produce a slightly unpleasant odour caused by the burning away of protective substances used during the manufacturing process.
Starting the oven
- Select the desired cooking mode by turning the SELECTOR knob.
- Select the desired temperature with the THERMOSTAT knob. See the Cooking advice table for cooking modes and the suggested cooking temperatures (see Cooking Modes).
- When preheating is finished, the THERMOSTAT indicator light will stay on: place the food in the oven.
- You may do the following during cooking:
- change the cooking mode by turning the SELECTOR knob.
- change the temperature by turning the THERMOSTAT knob.
- stop cooking by turning the SELECTOR knob to the "0" position.
! Never put objects directly on the oven bottom to avoid damaging the enamel coating.
! Always place cookware on the rack(s) provided.
Cooling ventilation
In order to cool down the external temperature of the oven, some models are fitted with a cooling fan that blows out air between the control panel and the oven door.
Once the cooking has been completed, the cooling fan remains on until the oven has cooled down sufficiently.
Oven light
It goes on when selecting with the SELECTOR knob. It stays on when a cooking mode is selected.
Cooking modes
! A temperature value can be set for all cooking modes between 60^ and Max, except for
- GRILL (recommended: set only to MAX power level);
- GRATIN (recommended: do not exceed 200^ ).

CONVECTION OVEN mode
Both the top and bottom heating elements will come on. With this traditional cooking mode, it is best to use one cooking rack only; if more than one rack is used, the heat will be distributed unevenly.

MULTI-COOKING mode
All the heating elements (top and bottom), as well as the fan, will come on. Since the heat remains constant throughout the oven, the air cooks and browns food uniformly. A maximum of two racks may be used at the same time.

TOP OVEN mode
The top heating element comes on. This mode can be used to brown food at the end of cooking.

GRILL mode
The top heating element comes on. The extremely high and direct temperature of the grill makes it possible to brown the surface of meats and roasts while locking in the juices to keep them tender. The grill is also highly recommended for dishes that require a high temperature on the surface: such as beef steaks, veal, rib steak, filets, hamburgers etc... Some grilling examples are included in the "Practical Cooking Advice" paragraph. Always cook in this mode with the oven door closed.

GRATIN mode
The top heating element, as well as the fan, will come on. This combination of features increases the effectiveness of the unidirectional thermal radiation of the heating elements through forced circulation of the air throughout the oven. This helps prevent food from burning on the surface, allowing the heat to penetrate right into the food. Always cook in this mode with the oven door closed.
Practical cooking advice
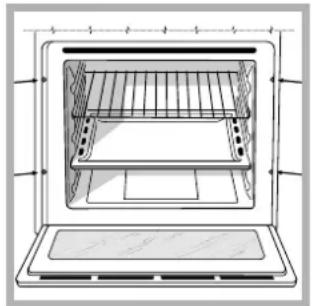
! Do not place racks in position 1 and 5 during fan-assisted cooking. Excessive direct heat can burn temperature sensitive foods.
! In the GRILL and GRATIN cooking modes, place the dripping pan in position 1 to collect cooking residues (fat and/or grease).
MULTI-COOKING
- Use position 2 and 4, placing the food that requires more heat on 2.
- Place the dripping pan on the bottom and the rack on top.
GRILL
- Insert the rack in position 3 or 4. Place the food in the centre of the rack.
We recommend that you set the maximum power level. The top heating element is regulated by a thermostat and may not always be on.
PIZZA
- For best results when cooking pizza, use the MULTI-COOKING mode.
- Use a light aluminium pizza pan. Place it on the rack provided. For a crispy crust, do not use the dripping pan (prevents crust from forming by extending cooking time).
- If the pizza has a lot of toppings, we recommend adding the mozzarella cheese on top of the pizza halfway through the cooking process.
Cooking advice table
| Cooking modes | Foods | Weight (in kg) | Rack position | Pre-heating time (min) | Recommended temperature | Cooking time (minutes) |
| Convection Oven | Duck | 1 | 3 | 15 | 200 | 65-75 |
| Roast veal or beef | 1 | 3 | 15 | 200 | 70-75 | |
| Pork roast | 1 | 3 | 15 | 200 | 70-80 | |
| Biscuits (short pastry) | - | 3 | 15 | 180 | 15-20 | |
| Tarts | 1 | 3 | 15 | 180 | 30-35 | |
| Multi-cooking | Pizza (on 2 racks) | 1 | 2 and 4 | 15 | 230 | 15-20 |
| Lasagne | 1 | 3 | 10 | 180 | 30-35 | |
| Lamb | 1 | 2 | 10 | 180 | 40-45 | |
| Roast chicken + potatoes | 1+1 | 2 and 4 | 15 | 200 | 60-70 | |
| Mackerel | 1 | 2 | 10 | 180 | 30-35 | |
| Plum cake | 1 | 2 | 10 | 170 | 40-50 | |
| Cream puffs (on 2 racks) | 0.5 | 2 and 4 | 10 | 190 | 20-25 | |
| Biscuits (on 2 racks) | 0.5 | 2 and 4 | 10 | 180 | 10-15 | |
| Sponge cake (on 1 rack) | 0.5 | 2 | 10 | 170 | 15-20 | |
| Sponge cake (on 2 racks) | 1 | 2 and 4 | 10 | 170 | 20-25 | |
| Savoury pies | 1.5 | 3 | 15 | 200 | 25-30 | |
| Top oven | Browning food to perfect cooking | - 3/4 15 220 - | ||||
| Grill | Soles and cuttlefish | 1 | 4 | 5 | Max | 8-10 |
| Squid and prawn kebabs | 1 | 4 | 5 | Max | 6-8 | |
| Cod filet | 1 | 4 | 5 | Max | 10 | |
| Grilled vegetables | 1 | 3 or 4 | 5 | Max | 10-15 | |
| Veal steak | 1 | 4 | 5 | Max | 15-20 | |
| Cutlets | 1 | 4 | 5 | Max | 15-20 | |
| Hamburgers | 1 | 4 | 5 | Max | 7-10 | |
| Mackerels | 1 | 4 | 5 | Max | 15-20 | |
| Toasts | 4 | 4 | 5 | Max | 2-3 | |
| Gratin | Grilled chicken | 1.5 | 2 | 5 | 200 | 55-60 |
| Cuttlefish | 1.5 | 2 | 5 | 200 | 30-35 | |
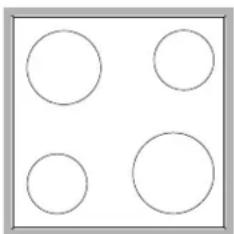
Type of hob
The oven is combined with a hob that can be made up of two types of heating elements: cast-iron electric plates (see diagram 1) or glass ceramic hobs (see diagram 2).
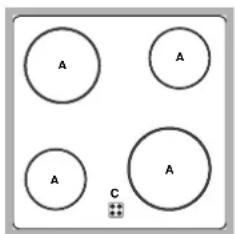
Switching on the glass ceramic hob
Traditional cooking zones
Traditional cooking zones are made up of circular heating elements. They turn red approximately ten seconds after they have been turned on. Each cooking zone is fitted with a control knob allowing you to select from 6 different temperature settings from a minimum of 1 to a maximum of 6.
Residual heat indicator lights*
The indicator lights (C) indicate that the temperature of the corresponding cooking zones have exceeded 60^ , even after the heating element has been switched off.
Recommended power levels for various types of cooking:
| Setting | Setting |
| 0 | Off |
| 1 | Cooking vegetables, fish |
| 2 | Cooking potatoes (using steam) soups, chickpeas, beans. |
| 3 | Continuing the cooking of large quantities of food, minestrone. |
| 4 | For roasting (average) |
| 5 | For roasting (above average) |
| 6 | For browning and reaching a boil in a short time |
Practical advice on using the glass ceramic hob
! The glue that is applied on the gaskets leaves some traces of grease on the glass. Before using the appliance, we recommend you eliminate these with a special non-abrasive cleaning product. During the first few hours of use there may be a smell of rubber which will disappear very quickly.
To obtain the best results with your hob:
- Use flat-bottomed pans to ensure that they adhere to the cooking zone perfectly.

Always use pans with a diameter that is large enough to cover the hotplate fully, in order to use all the available heat.
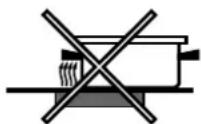
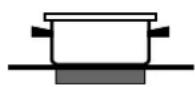
- Make sure that the bottom of the cookware is always dry and clean to guarantee correct adherence and long life, not only for the cooking zones but also for the cookware itself.
- Avoid using the same cookware that is used on gas burners: the heat concentration on gas burners may deform the base of the pan, causing it not to adhere correctly.
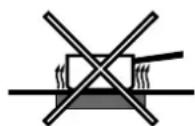
- Never leave a cooking zone on without cookware on it because as it heats up and rapidly reaches the maximum level, it could damage the heating elements.
GB
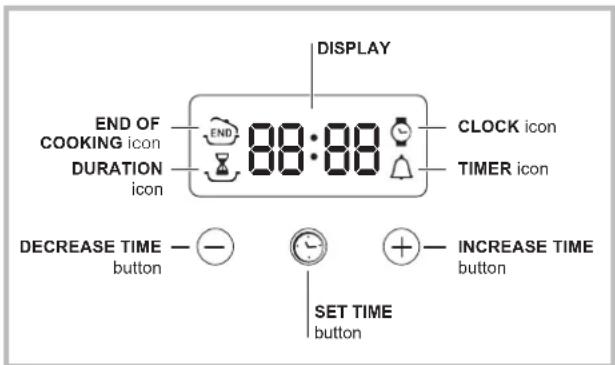
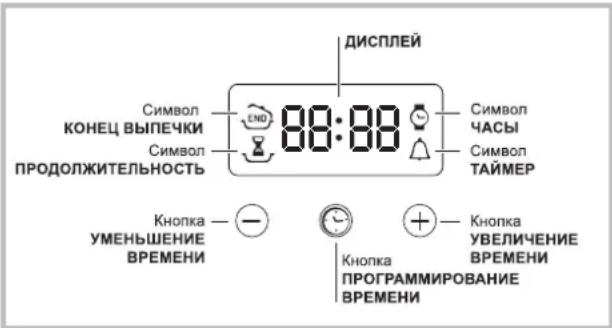
Setting the clock
The clock may be set when the oven is switched off or when it is switched on, provided that a the end time of a cooking cycle has not been programmed previously.
After the appliance has been connected to the
mains, or after a blackout, the icon and the four numerical digits on the DISPLAY will begin to flash.
- Press the button several times until the icon and the four digits on the display begin to flash.
- Use the "+" and "-" buttons to adjust the time; if you press and hold either button, the display will scroll through the values more quickly, making it quicker and easier to set the desired value.
- Wait for 10 seconds or press the button again to finalise the setting.
Setting the timer
This function does not interrupt cooking and does not affect the oven; it is simply used to activate the buzzer when the set amount of time has elapsed.
- Press the button several times until the icon and the three digits on the display begin to flash.
- Use the "+" and "-" buttons to set the desired time; if you press and hold either button, the display will scroll through the values more quickly, making it quicker and easier to set the value.
- Wait for 10 seconds or press the button again to finalise the setting.
The display will then show the time as it counts down. When this period of time has elapsed the buzzer will be activated.
Programming cooking
! A cooking mode must be selected before programming can take place.
Programming the cooking duration
- Press the button several times until the Z icon and the three digits on the DISPLAY begin to flash.
- Use the "+" and "-" buttons to set the desired duration; if you press and hold either button, the display will scroll through the values more quickly, making it quicker and easier to set the value.
- Wait for 10 seconds or press the button again to finalise the setting.
- When the set time has elapsed, the text END appears on the DISPLAY, the oven will stop cooking and a buzzer sounds.
- For example: it is 9:00 a.m. and a time of 1 hour and 15 minutes is programmed. The programme will stop automatically at 10:15 a.m.
Setting the end time for a cooking mode
! A cooking duration must be set before the cooking end time can be scheduled.
- Follow steps 1 to 3 to set the duration as detailed above.
- Next, press the button until the icon and the four digits on the DISPLAY begin to flash.
- use the "+" and "-" buttons to adjust the cooking end time; if you press and hold either button, the display will scroll through the values more quickly, making it quicker and easier to set the desired value.
- Wait for 10 seconds or press the button again to finalise the setting.
- When the set time has elapsed, the text END appears on the DISPLAY, the oven will stop cooking and a buzzer sounds.
Programming has been set when the and buttons are illuminated. The DISPLAY shows the cooking end time and the cooking duration alternately.
Cancelling a programme
To cancel a programme:
- press the button until the icon corresponding to the setting you wish to cancel and the digits on the display are no longer flashing. Press the "-" button until the digits 00:00 appear on the display.
- Press and hold the "+" and "-" buttons; this will cancel all the settings selected previously, including timer settings.
The appliance was designed and manufactured in compliance with international safety standards. The following warnings are provided for safety reasons and must be read carefully.
General safety
- The appliance was designed for domestic use inside the home and is not intended for commercial or industrial use.
- The appliance must not be installed outdoors, even in covered areas. It is extremely dangerous to leave the appliance exposed to rain and storms.
- When handling the appliance, always use the handles provided on the sides of the oven.
- Do not touch the appliance with bare feet or with wet or moist hands and feet.
- The appliance must be used by adults only for the preparation of food, in accordance with the instructions outlined in this booklet. Any other use of the appliance (e.g. for heating the room) constitutes improper use and is dangerous. The manufacturer may not be held liable for any damage resulting from improper, incorrect and unreasonable use of the appliance.
- When the appliance is in use, the heating elements and some parts of the oven door become extremely hot. Make sure you don't touch them and keep children well away.
- Ensure that the power supply cable of other electrical appliances does not come into contact with the hot parts of the oven.
- The openings used for ventilation and dispersion of heat must never be covered.
- Always grip the oven door handle in the centre: the ends may be hot.
Always use oven gloves to place cookware in the oven or when removing it. - Do not use aluminium foil to line the bottom of the oven.
- Do not place flammable materials in the oven: if the appliance is switched on by mistake, it could catch fire.
Always make sure the knobs are in the "●"/"○" position when the appliance is not in use. - When unplugging the appliance always pull the plug from the mains socket, do not pull on the cable.
- Never carry out any cleaning or maintenance work without having unplugged the plug from the mains.
- In the case of a malfunction, under no circumstances should you attempt to repair the appliance yourself. Repairs carried out by inexperienced persons may cause injury or further malfunctioning of the appliance. Contact a Service Centre (see Assistance).
-
Do not rest heavy objects on the open oven door.
-
The glass ceramic hob is resistant to mechanical shocks, but it may crack (or even break) if hit with a sharp object such as a tool. If this happens, disconnect the appliance from the electricity mains immediately and contact a Service Centre.
- Remember that the temperature of the cooking zones remains relatively high for at least thirty minutes after they have been switched off.
- Keep any object that could melt away from the hob, for example plastic and aluminium objects, or products with a high sugar content. Keep plastic or aluminium objects away from the hob: if you forget them on surfaces that are still hot, they may cause serious damage to the hob.
- The appliance should not be operated by people (including children) with reduced physical, sensory or mental capacities, by inexperienced individuals or by anyone who is not familiar with the product. These individuals should, at the very least, be supervised by someone who assumes responsibility for their safety or receive preliminary instructions relating to the operation of the appliance.
- Do not let children play with the appliance.
Disposal
- Observe local environmental standards when disposing packaging material for recycling purposes. Observe existing legislation when disposing of the old appliance.
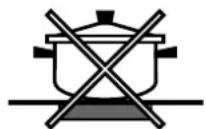
- The European Directive 2002/96/EC on Waste Electrical and Electronic Equipment (WEEE), requires that old household electrical appliances must not be disposed of in the normal unsorted municipal waste stream. Old appliances must be collected separately in order to optimise the recovery and recycling of the materials they contain and reduce the impact on human health and the environment. The crossed out "wheeled bin" symbol on the product reminds you of your obligation, that when you dispose of the appliance it must be separately collected.
Consumers should contact their local authority or retailer for information concerning the correct disposal of their old appliance.
Respecting and conserving the environment
- By using the appliance in the hours between late afternoon and early morning, you can help reduce the work load placed on electrical companies.
Always keep the oven door closed when using the GRILL mode to attain best results and to save energy (approximately 10% ). - Regularly check the door seals and wipe clean to ensure they are free of debris so that they stick properly to the door and do not allow heat to disperse.
GB
Switching the appliance off
Disconnect your appliance from the electricity supply before carrying out any work on it.
Cleaning the appliance
- The stainless-steel or enamel-coated external parts as well as the rubber seals may be cleaned using a sponge that has been soaked in lukewarm water and neutral soap. If these stains are difficult to remove, use only specialised products. After cleaning, rinse and dry thoroughly. Do not use abrasive powders or corrosive substances.
- Ideally, the inside of the oven should be cleaned after each use, when it is still lukewarm. Use hot water and detergent, rinse and dry with a soft cloth. Do not use abrasive products.
- The accessories can be washed like everyday crockery (even in your dishwasher).
! Never use steam cleaners or pressure cleaners on the appliance.
Cleaning the oven door
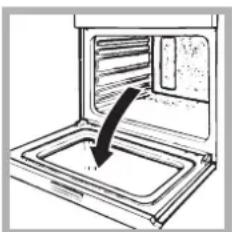
Clean the glass part of the oven door using a sponge and a non-abrasive cleaning product, then dry thoroughly with a soft cloth. Do not use rough abrasive material or sharp metal scrapers as these could scratch the surface and cause the glass to crack. To clean more thoroughly, you can remove the oven door.
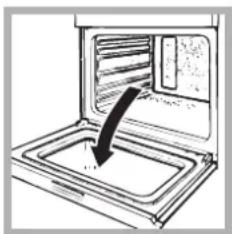
- Open the oven door fully (see diagram).
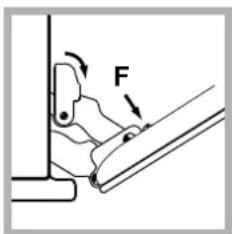
- lift up and turn the small levers situated on the two hinges; (see diagram).
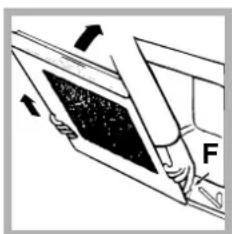
- Grip the door on the two external sides and close it approximately half way. Unlock the door by pressing on the clamps F, then pull the door towards you lifting it out of its seat (see diagram).
To replace the door, reverse this sequence.
Inspecting the seals
Check the door seals around the oven periodically. If the seals are damaged, please contact your nearest After-sales Service Centre (see Assistance). We recommend not using the oven until the seals have been replaced.
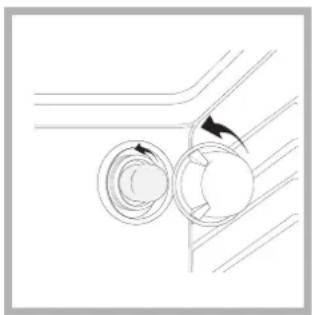
Replacing the light bulb
To replace the oven light bulb:
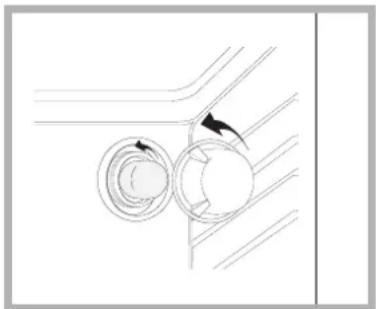
- Remove the glass cover of the lamp-holder.
- Remove the light bulb and replace it with a similar one: Wattage 25 W, cap E 14.
- Replace the glass cover (see diagram).
Assistance
Communicating:
- appliance model (Mod.)
- serial number (S/N)
This information is found on the data plate located on the appliance and/or on the packaging.
Sommaire
GB

NL
Installation, 14-16
Positionnement
Raccordement electrique
Français, 13
Nederlands, 25English,
Nederlands, 25 English,
Hivakia xaapaktnpiTikwv
GR
DE
GR
ES
Deutsch, 37 EAnviKa, 49
Espanol, 61
NepiypaΦn Tns OUsKeunc, 53
EuvoAikn aTouyn
IivakacελeYxou
RS
Pycckn,73
Ekkivnon kai xphon, 54
EkkivnTouΦoupvou
PoypaTα, 55-56
Ppoypaeta maayepaato
Ppoulaeis kai ouuoue, 59
Γενικασφαλεια
IaTeo
Egoikovun epeyiaac kai oeaouc 0to
περιβαλλον
Suvtnpno n kal povtida, 60
PporpaMMbl npnroTOBneHn
PpakTnueckne coBebI no npuroToBneHIO
Ta6nua npuroToBneHna
HIM 50 K.A
HIM 50 K.A IX
HIM 53 K.A
HIM 53 K.A IX
HIM 504 K.A
HIM 504 K.A IX
Bapouhna naneIb, 81
MoJeN BapOuHoi nAHeJI
BkIIOueHne cTeKIOKepaMueecko BapOCHo paHei
IpaKaTnueckne peKoMeHdaCUN No NcNoJIb3OBAHIO
CTeKIOkepaMueecko BapOuHNo NaHeJI
3JIeKToHHbI TaMep
nporpaMMnpoBaHnBbIneUKN,82
IpeoctopoxKHOCTn npekomeHaaun, 83
Obne Tpe6oBaHnK 6e3oNaChOCTN
Ytun3aun
3KoHOMnA 3JIeKtpO3Heprn n OxpaHa OkpyKaIOuIeN
cpebl
TexHnueckoe 06cnyxnbAHne n yxo,84
OTKJIIOUeHHe 3NEKTPoPNTaHn
UncTka n3dennr
UncTa DBePbI
3aMeHa nAMnOuKN
CepBnCHe o6cnyKuBaHne
!BaxHo coxpaHnTb DaHHee pyKoBOcTBo dna erO nocJeDyUoNIX KOHCyIbTaUm. B cIyuae npOdaXn, nepeDaun3dEInra nn npn peee3de Ha HOBe MeCTO XHTeJIbCTBa Heo6xoJIMo IpOBepuTB, YTO6blpyKOBOcTBO OCTaBAIOCb BMecTe C u3dEnMe, JnTo TOrO YTO6bl erO HObBI BnAdeJeuC MOR O3HaKOMNTbcC npaBnAm NkCnPyTaUm N C COOTBeTcTBYUUMM npedynpeKDeHnAMN.
!BHnMaTeBHo npOuNTaTe HNCTpyKUIM: B Hux coepKaTcBaxHbIe CbeHnro 6 yctaHOBe, 3KnpyaTaUN n 6e3oNaCHOCTn N3DeJIIn.
PacnoJoxeHne
!He pa3pewaIte DeTmIrpaTb c ynaKOBouHbIMMaTePnAaMn. YnaKOBOuHbIe MaTePnAbldoJXHbI6bItbYHHToKeHbIB COOTBeCTBnC npaBnAmPa3deJIbHoro c6opa Mycopa (cm.IpeocmopoxHoCmu peKOMeHaauu).
!YcTaHOBka n3dJIINnI pON3BOUNTCB COOTBeTCTBm C daHbIMN HhCTpyKUINM KBAJINΦuINPOBaHHbIMN cNeLHaNCtAm. HenpaBnBHaYcTaHOBKa n3dJIIN MOKeT cTaTB npuHoiN NOBpeXDeHn NMyueCTBa n npuHHTb yuep6 IIOJAM N DOMaWHIM XNBOThbIM.
BcTpoeHHbIMoHTax
IЯ obecneueHnIcnpaBHorO yHKUHOHPOBaHnI3JeJNRAKxOHbI 3JIeMeHT DOJIKeH IMeTb COOTBeTCTByIOUne XapAKTePNCNTMKN:
- NaHeJI KkyoONHbIX 3eMeENTOB, nPIJeraiOuNX K dyXOBOMy WkaCy, DOnJxHbI 6bITb BblIOJHeHbI N3 TepMOCTOIKORo MaTePnAna.
KNe KxOHHbIX 3JMeHToB 3JMeHToB N3 faHepoBaHHoro DepeBa DOJKeH 6bITb yCToUHBIM K TemnepaType 100^
ДЯ BCtpaBHaNry DxyxOBO r WkaFpaIOn KkyxOHbIM TOnOM (CM. pUCyHOK) nIN B KOLOHHY HnWJa KxyOHHO 3NeMeHTa DoJkHA NmTe b CneDyUOupe pa3Mepbl:
!Iocne BCtpaBnHnN N3deJnB KkyoHHbI 3JeMeHT D0JXHa 6bITb NCKJIOUeHa BO3MOKHOCTb KacaHnK 3JIeKTPuYeCKMn YacTmN. PacxOJ 3NeKTPo3Heprn, Yka3aHHb Ha nacnpTHoT TaBNIuKe N3deJnN, 6bl 3aMepeH dJaAHHO TnNa MOHTaKa.
BeHTnJIaLna
IЯ obecneueHnaJlekaeBBeHTnIaHHeoXOIMO CHrTb 3aHIOU NaHeJIb HmIu KxOHHO3IeMeHtA.PekOMeHdyTeYcTaHOBtB DyXOBou WkaΦHa IBa DepeBraHbIX 6pyCa NII Ha CnloWhoe OCHOBAHHe C OTBepCTnEM dNaMaETpOM He MeHee 45 x 560 MM (cm Yepmexku).

UeHTpOBka n KpenJIeHne
IpnKpeHnHnN3JenN K KyxOHHomy 3JeMeHTy: OTKpoTe DBypUdyDxyOBOrO uKaΦa N3aBnHTne 4 Wypyna DnI DepeBHHbIX NaHeJIe B 4 OTBepCTnB pame.
!Bce3aunThbIe 3nEmHeTbI dONKHbI 6bITb 3akpenneHbI TaKIM 06pa3OM, yTO6bI IN MX MOKHO 6bINO CHrTB TOJbKO npn NMOUc ncluaNBHorO HNCTpyMeHTa.
3JIeKtpnuecko noCoeHHeHne
3NeKtpuuecko noCoedHHeHne u3denn BbIINHReTbC KxOHHO nnTO, paCHTaHHo Ha nepemehhB ToK, c HapJKeHNm N acToTo, yKa3aHHbIMn Ha nacnopTHo TaBnUHc (cm. cNeyouyOcmpaHuCy). BapouHra naHJIb coeHNHreTcR C kXOHHO nnTO npn NoMOUs cneuaHbHorpa3beMa.
BCTPOEHHbI DYXOBOJUKAΦ
YcTaHOBnTe Ha MeTo 3aUHTHyo MetaJIuYeCKyO 3aRnyuKy NocNe 3JeKtpuYeCKOrO NOkKnUoyeHn BapOCHn NaHeN. B CnyueA demoHTaxa BapOCHn NaHeJn Heo6xOdImO yCTaHOBnTb Ha CBOe MecTo KpacHyO 3aRnyuKy Ha KpacHbI pa3bEm.
POncoeMHHeHne ceTeBOrO uHypa
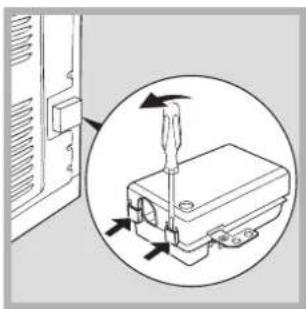
- OTkpoIe 3axmHyo Kopo6ky, Haxab npn NOMOUI OTBepTKn Ha BbICTynb C 60KOB KpbIuKN: NOTAHNTe n OTkpoIe KpbIuKy (CM. pucyHOK).
2.OTBnHTTe BnHT KaBeJbHOrO CaJIbHnKa N BbIHbTe erO, NOdEeB OTBepTKoI (CM.CxEmy).
3.OTBnHTNe BnHTbI KOHTaKToB L-N- n 3aTeM npHKpeNITe npoBoa nO rOIOBkAMn BnHTOB, co6JIIOdaA CBeTOByIO MapKnPOBky CnHn (N) KopuHeBbI (L) XKeIto- 3eHeh ()
3aKMMH a Kopo6ka pacuHTaHa Ha TpexΦa3H 3JIeKTpONrTaHne 400 B (cm. pucyHKu Hxke)
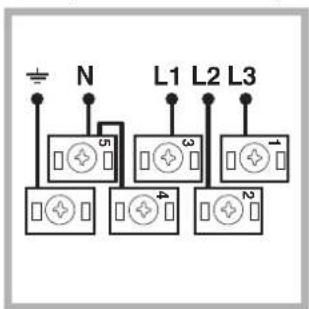
400B 3N~H05RR-F
5x2.5 CEI-UNEL 35363
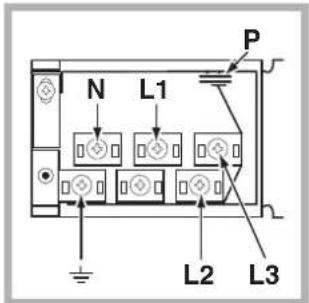
Ecnn 3neKtpoPobOka mMeet dpyrn eXapakTepncTkn (cm. pucyHKU Hxke), nJra 3neKtpnueckoro noDCoeDnHeHn uCnoJIb3ynte coeDnHTeJbHbIe nepembluKn, pacnoIooKeHHbIe BHyTpN KopobkN P.
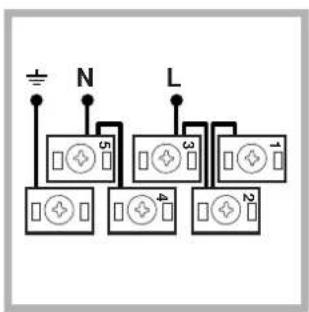
230B 1N~H07RN-F 3x4 CEI-UNEL 35364
400B 2N~H05RR-F
4x2.5 CEI-UNEL 35363
2
- 3akpennte ceTeBoi Hyp B cneuaJbHOM Ka6eJIbHOM caJIbHKe.
- 3aKpoIe KpbIuKy 3axmHOn Kopo6Kn.
IopcoeHHeHne ceTeBOro uHypa K cetu 3JeKTPoPHTAHn
YcTaHOBnTe Ha CeTeBoi ShHyp HopMaJIIN3OBAHHyU
WTeNceIbHyIO BUNKy, pacuTaNHHyIO Ha Harpy3KY,
yKa3aHNyIO Ha nacnopTHo Ta6nueKe (cm. c60ky).
B Cnyae npraMoro NODKnIOHeHry K CetN 3neKtpOniTahnRA
MeKdy KyxOHNo IITnoI IN CetbIO HeOBxOJIMMO YCTaHOBnTB MyTINIOJARpHBm BBIKIOHaTeNB C MInHMmaIbHBIM
pacCToRHaEM MeKdy KOHTAKTM 3 MM, paCHTuHaHbHa
DaHHyIO HArpy3KY IN COOTBeTCTByIOUzIM DeIcTByIOUzIM
HopMaTINBaAM (BbIKIOHaTEb HE DoJTKeH pa3MbkaTb PPOBOID
3a3emNeHry). CTeBOI WUnPdoJTKeH 6bIb paCIOJIOKe TAKIM
O6pa3OM, Yo6bl H B ODHn TOUke erO TempePaTyPe He
IpeBbIaJa TEmpePaTyPiomeJeHry BoJee cH Ma 50°C.
13neKtpoMoHTep Hecet OTBeTCTBeHHocTb 3a npabnIbHoe NOkKnOueHne N3dEnN K 3JeKtpuuecko ceTN n 3a co6JIOeHne npabUN 6e3OnacHOCTN.
Ipepe nOcOeHHeHem cTeBOro uHypa npOBepbTe cNeDyUoee:
- p03eTka DOnJXHa 6bItb CoeUHeHa C 3a3eMJIeHHeM COOTBETCTBOBaTb HOpMaTnBAM;
ceTeBa p03eTka DOnKHa 6bItb paccuTaHa Ha MaKcImaJIbHyIO NOTpe6JIReMyIO MOUHOCt bN3dEINr, yKa3aHHyIO Ha nacnopTHo Ta6nue (CM. Hxke); - HanpЯЖeHne cETn 3JIeKTpONITAHN DAJIXHO HaxoINTBcB B ppeJenAX 3HaueHnY, yKa3aHHbIX Ha nacnopTHo T6JIuYe (CM. HuKe);
- ceTeBa r po3eTKa DOJHKHa 6bITb COBMeCTmA co WTeNCeIbHO BnIKoN3dEINr. B npOTuBHOM Cnyae 3aMeHInTe po3eTKy INN BnIKy; He NcNoJIb3yInTe yDnIHHTeIN NIN TPOHNKn.
!H3dJIeNnEdoJNKHO6bITb yCTaHOBNEHO TaKIMo6pa3OM, 4TO6bI 3JIeKTPnueCKn IPOBOu n CeTeBa r po3eTKa 6blIN JERKO DOCTyNHbl.
13neKtpueckn npoBOD n3dennr He doJKeH 6bItb coHT Nn CxkT.
!PeryIpaHIO npOBepaHTe coCToHHe ceTeBOrO shypa n B cnyae Heo6xoDmocTn NopyuHTe ero 3aMeHy TOJbKO yNoJIHOMOeHHbIM TexHnKam (CM. TexHuueckoe o6cIyXuehaHe).
!Pon3BOUnteH He Hecet OTBeTCTBHeHHocTH3a nocneCTBnHecO6JIoDeHnIpeueHCnEHHbIX Tpe6oBaHn.
PporpaMMbI npnroTOBJIeHnA
!IINBcex nporpaMM MoKHO 3aDaTb TemnepaTy pO T 60^ do MAKC Kpome:
- PUNJB (pekomeHnyetc yctaHaBnBaTb ToJIbKO MAKC. TemepaTypy);
- IOДРУМЯНВАHNE (pekOMeHnyeTcH npeBbIwA Tb TemnepaTpy 200°C).

*IMeetcTOnbkoBHeKoToPbIXMoJeJx
3JIeKtpoHbI TaMep npOprpaMMnpoBaHna BbIneUKN
RS
PporpaMMnpoBaHne yacOB
!AcbI MOxHO HAcTPOuTB KAK PnBbIKIOueHHOM DxyOBOM uKaOy,TAK N Pn BkJIIOeHHOM,Pn ycIOBNN UTo He 6blIO 3aHaHO BpeMg OKOHuaHnBBineKn. Iocne NoKIOUeHnK 3NeKtpueccko CeTNnn IocJe OTKIOUeHn 3NEKTOpO3HePmN,HaHET MmTaB NkoHa n YeTbIpe LcΦpbl Ha DCNPIEE.
- HaxmTe HeckoBko pa3 KhoNky u ydepXnBaIte Do Tex nop, noka Ha DNICPJIEE He 3aMnraeT NKOHa N YeTbipe LcΦpOBbIX 3HaueHn;
- npn nomoun " + " n -" perynpyeTcBpeM; npn nx ydepknBaHmU LnpbMeHrOTo 6bictpee, yTo o6neryae TcTaHOBky.
- NOdoKdnte 10 cek. HnH aXmTe cHOBa Ha KhoNky DnIa fNKcnpoBaHn yCTaHOBKn.
PporpammpoBaHne TaMepa
!DaHHaФyHKUHe npepbIbAeT npOcecca BblneKn H He 3aBNCHT OT pa6oTBdyXOBOrO uKaΦa. OHa N03BOJRAET TOJIbKO BKHOnuTb 3ByKOBo CnHaJI NO nCTeueHm 3adaHHOrO BpeMeHn.
- Haxmnte HeckoIbko pa3 KhoNky Do tex np, noka Ha INCJIeE He 3amraet CnMBOJ n Tpu UΦpoBbIe 3haueHn;
- npn nomoun " + " n -" perynpyeTc BpeM; npn nx ydepxuBaHm UΦpbl MeHrOToC 6bIcTpee, yTo o6neruae T yctaHOky.
- NOdoKdnte 10 cek. Hnna HaxmTe cHOBa Ha KhoNky Dnra qncnpoBaHry yCTaHOBKn.
Ha dncnnee 6ydeT noka3aH o6paTHbI OTCueT BpeMeHH, PO 3aBepWeHH KOTOpO RKnHOHTcra 3BykoBoi CnHaI.
PporpaMnpoBaHne BbIneYKn
!3anporpammmpoBaT roTOBky MOKHO TOnbKO nocne Bbl6opa coOTBeTCTByouei nporpaMMbl.
Popraok nporpaMMnpoBaHna
npoJoxKTeJIbHOCTN BblneuKN
- Haxmnte HeckoIbko pa3 KhoNky Do Tex nop, noka Ha INCPIEe He 3aMURAe TcMbOJ u Tpu cnpobbie 3haueHnra;
- npn nomoosn " + " n -" perynnpyetcBpeM; npn
nx ydepknBaHm ncpbMeHJOTc8bictpee,TO 06nneryaeTycTaHOBky.
- NOdoKdnte 10 cek. Hn HaKMnTe cHOBa Ha KhoNky DnA qKcnpoBaHn yCTaHOBKn.
- no nCTeHn 3aHaHHoro BpeMeHn Ha dncnnee noka3bBaetc Hndncb END (KOHEU), n dyxoboi kkaΦ 3aBepwaet npuroTOBHeHne co 3BykoBbIM cnHaJOM. Ira ee octahOBKn HaxMnte JIO6yIO KHOKNK.
-Ппмер:В9.00 Bbl nporpamMpyeTe Bblneky,Ha KOTopyH noTppe6yetc 1 yac 15 MmHyT. Пп�тobJIeHnE aBtOMaTHueCKn 3aBepWntcR B 10:15.
Iopraok nporpaMMnpoBaHn OOKHaHn BbIneKN
!3anporpammmpoBaTbOKOHuaHne BblneuKMOxHO TOJbKO NocHe HAcTpouKn ee npdoJXKeTeNbHOCTN.
- BbINOHNHe ONEpaCn C NyHKTa 1 no NyHKT 3, B KOtOpbIX ONNCbIBaE TcN POpJdOK nporpamMnPoBaHn IpoDoJNKTeJIbHOCTn;
- 3aTeM HaxMMTe HeCKoJIbKO pa3 KHOIky Do Tex nop, Noka Ha INCPIEe He 3aMURAeT CmBOJ n YeTbipe UcΦPOBbIX 3HaueHnra;
- npn nOmoi "+n" -" peryynpyeTcB Bpem OKOHuaHnroTOBKn; npn nx ydepXnBaHm nΦpbl MeHbOTc 6bIcTpee, yTo oBneryaeT yCTaHOBky.
- NOOxKdTe 10 cek. Hn HaKMnTe cHOBa Ha KhoNky DnA qKcnpoBaHn yCTaHOBKn.
- no nCTeHn 3aHaHHoro BpeMeHn Ha dncnnee noka3bBaetc HAdncb END (KOHEU), u dyxOBoi WkaΦ 3aBepwaet npiroTOBHeHne co 3ByKOBbIM cHrHaON. Ira ee oCTaHOBKn HaxMnte NIO6yH KHOKNY.
BKnIOueHHbIe CmMBOJIbI 1N K3bIBaHT, YTO npOn3BeHeo nporpaMMnpOBaHne. Ha INCPIEEE nonepMeHHo NOKa3bIBaETCBpEMg OKOHaHnI npOIOJKNTEJBHOCTb BbIneKn.
-Примет:В9:00 Bbl nporpaMMpyeTe npoJOnKInTeIbHocTb 1vac.B12:30 nlaHpyeTc3aBepWHTb UKN.ПрорpaMa aBTOMaTnueckn 3anyckaTcB 11:30.
OTmeHa nporpammpoBaHn
Popraok OTMeHb3aInporpaMMpOBaHHoro 3HaueHnA:
HaKIMaTb Ha KHOKy Do Tex nop, noka Ha dncJIee He HauHET MraTb CmBOJ yCTaHOBKN, KOToPbI HxKHO OTMeHNrB, nUΦpbl. HaKIMaTb Ha KHOky "-" Do Tex nop, noka Ha dncJIee He noBaTcra UΦpbl 00:00.
- ODHOBpeMeHHo HaKaTb N yDepeKuBaTb KHOPIKn " ^+ "N -" TAKIM 6pa30M OTmeHryOTc Bce 3aDaHHbIe ycTaHOBKn, BKIOUyAra TaMep.
!N3dJIne cnpoekTnpoBaHO nI3roToBnEHO B COOTBeTCTBm C MExdyHapOHyBMHN HOpMaTNBaMn IIO 6e3OnacHocTn. Heo6xoIMMo BHMaTeJbHo npouHTaTb NaCTOaUe npdeynpeKDeHnA, CoCTaBNeHHbIe B cIeJax BaWei 6e3OnacHocTn.
06uhe npabnla 6e3onacnoctn
JaHHe n3dJeIne npedHa3HaayaeTc JnHepnoeCCNOHaHbHOro NcNoB3OBAHnB DOMaHnxycIOBnX.
3anpeaaetc yctahabnBaTb n3JeIne Ha yuNue, daKe noi Habecom, TAK KaK Bo3eIeCTBne Ha Hero Doxknd np03bl ABnEeTc4 Ype3BbUaHNo onachbIM.
Дпяпетмшенииндениьсегдаберпесьзсециальные руки,pacnoonoхнысбokовduyxoboroшkaф.
He npikacatbcK n3deJIOBnAkhbIMn pykam, 6ocNKOMnnCmOKpbIMnHoramn.
-3dJIHe npEHa3HauYeHO IINpIroTOBJeHnI HsBbIX PPOyKTOB,MOXeT6bITbHCNoJIb3OBAHO TObKO B3PocJIbIMN JIuCaMNB CooTBeTCTBmC INCTpyKUJnMI,IPuBEdeHHbIMN B DaHHOM TexHueckOM pykoBoDcTBe.JIIObe OpyRo ero NcNoJIb3OBAHne (HaNPmep:OTOnJIeHnE NOMEeHnE) CHTaETcRe HeHaNDexKaUIMNCleDoBaTeJIbHO ONaChbIM.PoIN3BOInTeJIb He HeCet OTBETCTBeHHOCTH 3a BO3MOxHbI yUep6,Bb13BaHHbI HeHaNDexKaUIM, HEPpaBnIbHBiM IN Hepa3ymHbIM NCNoJIb3OBAHnEM N3dJIInr.
Bnpocecce 3Kcnnyataunn H3deJnHaRpeBaTeIbHbIe 3JeMeHTb I HeKOToPbIe YacTn DBepuI dyXOBKn NOBepraIoTc CnblHomy HarpeBy. Heo6xOIMO npoRBJIbTb OCTpOxHOCTb BO N36ExKaHne KOHTaKTOBc 3TmMn Yactamn H he pa3peuTaTb DeTm npn6JInxKaTbc K dyXOBKe.
-ИЗбетаиткakаняпpoBOIOB элКТрОПТАнHЯДpyrHx 6bITOBbIX элКТрОПРБОВ K rOрЯчМЧаСТМ ДухОВOrошkaфa.
He 3akpbBaTe BeHTnJIaIOHbIe peWetKn IOBepCTNa paccenBaHnTena.
- Bepntecb 3a pyky DBepuB B UeHTpe: C 60KOB OHa MOKeT 6blrTopyue.
BcerdaHaedeBaTe KxOHHbIe BapeKKn, KOrDa cTaNTE nnBbIHMaete 6nOda n3DyXOBKn.
-He noKpbBaIe IHO duXOBoro uKaΦaΦoJbRoI.
-He xpaHnTe B dyXOBom uKaΦy Bo3ropaEmbIX npedMeTOB. npi CnyaHOM BKIOueHm N3deJIINr TaKne MaTePnAbI MOrY T 3arOpetbcra.
Bcerda npoBepaIte, yTo6bl pyKoATrKn HaxOaJInncb B noIOKeHH " 一 ^ 一 / 一 ^ 一 , KOrda n3DeJIne He NcNoJIb3yETcra.
- He TaHnTe 3a CeTeBOu WHyp IJN OTOCoEInHeHHa BUNIK N3DeJIINr H3 CeTeBOu PO3eTKU, BO3bMUTecb 3a BUNKy pyKoI.
-Пepeн haayanom YnCTkn nnn TeXnueckoro 06cnykBaHnna N3dEIny Bcerda BbHmMaTe WTeNCenbHyIO BuNky N3 CeTeBOu po3eTKn.
Bcnyae HncnpabHocn KaTeOpuYeckn 3anpeaetcnoKpbIbA b BHyTpEHnE MexAHN3MbI N3dennC cJeIbIOx camOCToTeJbHoro pemOnTa. O6paauTecb LcHtp
TexnueckoorOobnykubHnA (cm.TexobcyxueaHue).
He cTabe Te TaKeIbe IpeMeTbHa OTKpbTyIO DBepuy LyXOBORO uKaΦa
CTeKIOkepAMuecka BapOHaY naHeJIy yToOnuBa K MExAHueCKIM yIapaM,TeH He MeHee OHa MoKeT TpeCHyTb (NJIN DaJKe pa36ntbc) npU yApe oCtpbIM npEMeTOM NnN HcTpymeHTOM.B 3tOM cnyae He3ameJInTeJIbHOOTcoEHNHTe N3deJIne OT cETN 3JIekTpONHTAHn I o6paNTteCb B LcHTp texHnueckoro 06cIpyKuBaHn.
- TomHHTe, yTo TemnepaTpa KOHΦopOK OCTaETcOueHb BbICOKoB TteEHe TpuUcaTN MmHyT NocJe Hx BbIKJIOUeHn.
-ДеркиTe Ha 6e3oNaChOMpacToHmOTBapOuHoI naHEnIIO6bIe npEdMeTbI, KOToPbIE MOryT pacNnABNTbcra,Ha npImEep,IIaCtMaCCa,AnOMHHmUnn H3dJIyN3 caxapa.ObpaauIte oco6oe BHMaHne Ha yNaKOBouHbIe MaTePnaJIbI,NOJIN3TNHeHOByIO nn aJIOMMHNEByIO INeHKy:ecnIOCTaBnTB 3TN MaTePnaJIbI Ha eue ropayen nI IN TeNNo NOBepxHocTn, OH MoTy Cepbe3HO IOBepDnTB BapOuyIO NaHeJIb.
YTNn3aun
- YHnTuKeHne yNaKOBouhBix MaTePnaIaOB: co6nIOdaIte MeCTHbIe HopMaTnBbI NO yTNJIu3aUu yNaKOBouhBix MaTePnaIaOB.
CorgnacHo EbponeckoI NipeKtne 2002/96/CE KacaTeNbHO yTNIN3aunn 3JIeKtpOnHbIX n 3JIeKTPnuecknx 3JIeKTPonpnpOboB 3JIeKTPonpnp6Opbl He DOJIKHb BbIbpaCbBaTbc BMeCTe C 06bUHbIM rOpOcKIM Mycopom. BbIbeHeHHbIe n3 CTPO np6Opbl DOJIKHbI CObnapTbc OTDJeNBHO IIN OITMMN3aunn IN x yTNIN3aunn IN pekyepaunn COCTABNIAUx IN MaTePnaNoB, a TaKke IJNA 6e3ONaCHocTn OKpyKaIOuSei CpeDbI N 3DopOBb. CmBOJ 3aUePKHytaR MycOPHa J KOp3NHKA, IMeOuINcR Ha BCex pIn6opax, CnykNT HAnOMnHaHHeM O bX OTDeJbHOyTNIN3aunn. 3a 6Oone NoDPo6HOH INΦOpMaqneE O npabINbHOY TIN3aunn 5bITOBbIX 3JIeKTPonpnpOboB NOlb3OBaTeHN MOrYT o6paTnTBcRI B CNEuaNbHyIO roCydapCTBeHHyO opraHn3aunIO uIN B Mara3HN.
3KoHOMn 3JekTpo3Heprn n OxpaHa OKpykaOuien Cpebl
- EcIn Bbl 6ydeTe NoJIb3OBAbTcBd yXOBbIM WkaΦom BeuepOM Ndo paHrero Ytpa, 3To NOMoKET COKpaNTb Harpy3Ky Notpe6JIeHnI 3JIeKTPo3HeprnN 3JIeKTPocTaHcIyMn.
- PekomeHnyetcBcerda roTOBtB BpeKmme TPNb c 3akpyTo nDBepuee: 3TO Heo6xOdmo dna 3HaHTeJbHOn 3KOHOOMN 3NeKtpo3Heprn (npMepHo 10%), a TaKke IyUnx pe3yIbTaTob npiroTOBneHn.
CoepKTe yIIOHTHeHn B NcnpabHOM nYCTOM COCTOHN, npOBepaIte, YTObI OHN IIOTHo pPJIeRaN K DBepe H He npOnyckaIy Yeuek TeIIa.
OTKJIoueHne 3NeKTpOHTaHHa
Ipeed hauanom kakoi-Jno opepaunn no 06cJyKuBaHmIO nn YnCTKe oTcoeHNHTe N3JeJIne OT cTeN 3JIeKTPoNTAHn.
UncTkauNdeJnna
!He nCnoB3yIe npoBbIe YnCTTne arpeTaI INn arpeTaI NOB BbICOKIM DaBHeHEm DnY ChTKn N3DeNIA.
HapyKbIe 3MaJInpoBaHbIe 3JIeMeHTbI ININ DeTaJIN 13 HepKaBeOUsE CTaJIN, a TAKKe pe3HHOBBie yNIOtHEHnM OXHO IPOTIPaTB r6KOJ, CMOueHHoB B TeJIOB BOe INN B PAcTBOpE HeITpAIBHOro MOUcero cpeCTBa. JnYydaJeHnOOCo60 TpyNbIX nTeH NcNOJb3yIne CneuHaNBHe iYCTaUme cpeCTBa, IMeIoUncEeB I npOJaKe. IocNe YnCTKn peKOMeHNyTe TuaTeJbHO ydaJIbTb OCaTkn MOUcero cpeCTBa BLnAkhOH TprAnKo IN BbICyUHTb dYxOBky. He nCNoJIb3yIne abpa3INBHe InpOUsKn INN Koppo3nHbIe BeIecTBA.
CneDyeT npOn3BODITb BHYTpEHHIO YNCTky DxyOBoro ukaqpa NocNe KaKdOrO ero NCNoJIb3OBaHnI, He DoXuJaCb erO NoHOrO oxnaXDeHnI. IcNoJIb3yUte TeNpyHO BDOy n MOIouee cpeCDtBO, onoIOChnTe n IpOtpNTe MmKoTpIKNoI. N36eraIte NCNoJIb3OBaHnI abpa3NBbIX CpeCDTB.
CbeMHbIe DeTaJI MOKHO JIeKO BbIMbITb KAc JIO6yIO pyryIO Nocydy, TaKcE B NocyDoMOeHOn MaunHe.
!Hikorda He nCnoJb3yIe npoBbIe uCCTaIe arperaTbI IIN arperaTbI NOD BbICOKM daBHeHem dJa YnCTKn 13JeJIa.
YnctkaDbepcbI
IJa YnCTKn CTeKna DBePbIy NcNoJIb3yJTe
Hea6pa3NHBhIe ry6kn N UcHCTaIuIe CpeIcTBA, 3aTEM
BbITpInTe Hacyxo MAnKO TprIKoH. He NcNoJIb3yJTe
TBepIbIe abpa3NHBHIE MaTePnaJIb IINO cTpBiE
MeTaIIINueckne CKepe6Kn, KOToPbe MoYr NOJapAnaTb
NOBepxHOCTb N pa36nTb CTeKIO.
IJa 6OJe eTuAtaTeJIbHOu YnCTKn MOXHO CHrTb DBePcy
dyXOBKn.
- NOHOCbIO OTKpoIe TBepy DxyOBKn (CM.Cxemy); 2. npn NOMOuN OTBepTKN NOHNMHTe N NOBepHNTe
HnHa DByx WapHnpax (CM. cxeMy);


- BO3bMntecb 3a DBepCy pyKaMM C DByX CTOpOH, PnabH0 3akpoTte ee, Ho He NOnHOCTbIO. 3aTeM NotAHHTe DBepCy Ha Ce6ra, ChImar ee c neTeB (CM.Cxemy).Dna YcTaHOBKn DBepCuHa MeCTo BblONHHTe BblweOncaHHbIe OepaUM B o6paTHOM
nopraKe.
PpOBepka ynNoTHeHn
Perynnapno npOBepnTe cocToHne yNIOtheHnBOKpyr DBepuI dyXoBOro uKapa.B cnlyae NobpejdeHnryNIOtheHnO6paauTecb B6nnkaiuui LcHTp TexHuueckoro ObcnyKnbAHnCm.TexHuueckoe 0cbNyKueaHue).He peKOMeHdyETcnoJIb3oBaTbcra dYxOBko n NobpejdeHHbIM yNJIOtheHnEM.
3aMeHa JlamNoyKn
3aMeHa NaMnOuKN B duXOBOM uKaΦy:
1.OTBnHTnTe
CTeKnHHyo KpbIiKy nlafoHa JAmNoUkN;
2. BbIKpyTnTe NaMNoKy n 3aMeHnTe ee Ha HOByo TaKOrO Je Tnna: MoUHocTb 25 BT, pe3b6a E 14.
3. BoccaTaHOBnte KpbIkwy Ha MeCTO (CM
cxemy).
CepBnchoe 06cnyxNbaHne
!HnKOrda He o6paaTecb K HeynoJHMOeHHbIM TexHnKaM.
Pn 6paueHm B CHTp CepBnchoro 06cnykBaHn Heo6xoDnMo coo6uTb:
TIN HENCnpaBHOCTN;
- Moelb u3denna (Mo.)
- HomepTex.nacnopTa (cepHbI Ng)
3Tn daHHbIe Bbl HaJeTe Ha nacnopTHoN Ta6mNKe, pacnoJIOXKeHHoH Ha 3dEJIIN.