
DF400 - Deep fryer BLACK & DECKER - Free user manual and instructions
Find the device manual for free DF400 BLACK & DECKER in PDF.
| Product type | Electric deep fryer |
| Brand | Black & Decker |
| Model | DF400 |
| Power | 1500 W |
| Voltage | 120 V |
| Frequency | 60 Hz |
| Oil capacity | 2 L (approx) |
| Max temperature | 190 °C (375 °F) |
| Timer | Up to 99 minutes |
| Cord type | Removable with magnetic connection |
| Tank coating | Non-stick |
| Filters | 2 permanent filters under vents |
| Lid | With viewing window |
| Basket handle | Button-release, foldable |
| Materials | Steel and plastic |
| Safety | Polarized plug, auto shut-off not specified |
| Maintenance | Clean lid, tank and basket with soapy water; do not immerse appliance |
| Weight | Approximately 3.5 kg |
| Dimensions | Approximately 35 × 30 × 30 cm |
Frequently Asked Questions - DF400 BLACK & DECKER
User questions about DF400 BLACK & DECKER
0 question about this device. Answer the ones you know or ask your own.
Ask a new question about this device
Download the instructions for your Deep fryer in PDF format for free! Find your manual DF400 - BLACK & DECKER and take your electronic device back in hand. On this page are published all the documents necessary for the use of your device. DF400 by BLACK & DECKER.
USER MANUAL DF400 BLACK & DECKER
DF400Pub100002346 10/5/05 2:29 PM Page 1
PLEASE READ AND SAVE THIS USE AND CARE BOOK.
POR FAVOR LEA ESTE INSTRUCTIVO ANTES DE USAR EL PRODUCTO.
VEUILLEZ LIRE ET CONSERVER CE GUIDE D'ENTRETIEN ET D'UTILISATION.
BLACK&DECKER
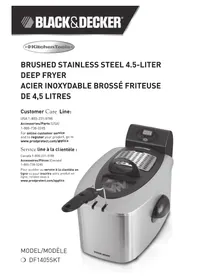
FryMate™ Deep Fryer Olla de freir FryMate™ Friteuse FryMate™

USA/Canada 1-800-231-9786
Mexico 01-800-714-2503
www.blackanddecker.com
Accessories/Parts (USA/Canada) 1-800-738-0245
When using electrical appliances, basic safety precautions should always be followed, including the following:
Read all instructions.
Do not touch hot surfaces. Use handles and knobs.
To protect against a risk of electric shock, do not immerse the unit, the cord, or plug in water or other liquid.
- Close supervision is necessary when any appliance is used by or near children.
Unplug from outlet when not in use and before cleaning. Allow to cool before pulling on or taking off parts and before cleaning.
Do not leave the appliance unattended when in use.
Do not operate any appliance with a damaged cord or plug or after the appliance malfunctions or is dropped or damaged in any manner. Return the appliance to the nearest authorized service facility for examination, repair, or electrical or mechanical adjustment. Or, call the appropriate toll-free number listed on the cover of this manual.
The use of attachments not recommended or sold by the appliance manufacturer may cause injuries.
Do not use outdoors.
Do not let cord hang over the edge of table or counter or touch hot surfaces.
Do not place on or near a hot gas or electric burner or in a heated oven.
Extreme caution must be used when moving an appliance containing hot oil or other hot liquid.
Always attach plug to appliance first, then plug cord in the wall outlet. To disconnect, turn any control to off, then remove plug from wall outlet.
Do not use appliance for other than intended use.
Extreme caution must be used when moving fryer containing hot oil.
- Be sure that handles are properly assembled to basket and locked in place. See detailed assembly instructions.
POLARIZED PLUG
This appliance has a polarized plug (one blade is wider than the other). To reduce the risk of electric shock, this plug is intended to fit into a polarized outlet only one way. If the plug does not fit fully into the outlet, reverse the plug. If it still does not fit, contact a qualified electrician. Do not attempt to modify the plug in any way
ELECTRICAL CORD
a) A short power supply cord (or detachable power-supply cord) is provided to reduce the risk resulting from becoming entangled in or tripping over a longer cord.
b) An extension cord or longer detachable power-supply cord is not recommended.
TAMPER-RESISTANT SCREW
Warning: This appliance is equipped with a tamper-resistant screw to prevent removal of the outer cover. To reduce the risk of fire or electric shock, do not attempt to remove the outer cover. There are no user-serviceable parts inside. Repair should be done only by authorized service personnel.
SAVE THESE INSTRUCTIONS.
DP400Pub100002346 10/5/05 2:29 PM Page 4
Product may vary slightly from what is illustrated.

+1. Lid with viewing window (Part# DF400-01)
+2.Rubber gasket (Part# DF400-02)
3. Permanent dual filters (under vents)
† 4 . Nonstick cooking pot (Part# DF400-03)
+5.Fryingbasket Part#DF400-04
6. Temperature control
7. Power/temperature light
8. Lid release (OPEN) lever
9. 99-minute timer digital display
10. Timer button
11. Frying basket handle release switch
†12. Detachable cord (Part# DF400-06)
+Consumer replaceable/removable parts
How to Use
This product is for household use only.
Important: For warranty verification, do not remove line cord sticker.
GETTING STARTED
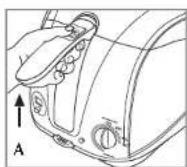
- Pull up the frying basket handle until it locks horizontally (A).

- Press the lid release (OPEN) lever to open the lid (B).
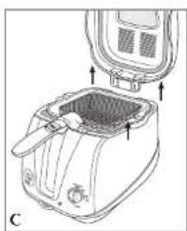
- Grip the frying basket handle and lift the basket out of the unit (C).
- Remove any packing materials and stickers.
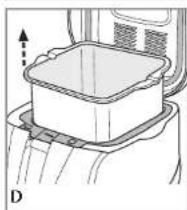
- Grip side handles of the nonslick cooking pot and remove from the unit (D).
- Wash the cooking pot and frying basket in warm water and liquid detergent. Rinse, and dry thoroughly.
- Replace the cooking pot and frying basket in the unit.
- Wipe the exterior of the unit including the lid with a damp sponge or cloth. NEVER IMMERSE THE UNIT IN WATER.
DP400Pub100002346 10/5/05 2:29 PM Page 6
Important:
Always use your fryer on a flat, heat resistant surface.
- Do not use the fryer under cabinets or curtains.
- Never leave it unattended during use.
PREHEATING
Note: During first use, you may detect a slight odor. This is normal.
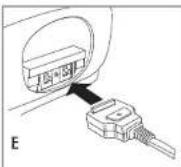
- Attach the magnetic end of detachable cord into the socket on the back of the unit (E).
- Insert the cooking pot into the unit and fill with approximately 8 cups (2.0 liters) of vegetable cooking oil.
Important:
Do not use olive, sunflower or flavored oils.
- Do not go below the MIN MARK or exceed the MAX FILL MARK inside the cooking pot.
- Insert the empty frying basket into the unit and close the lid.
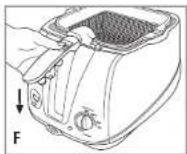
- Slide the frying basket handle release switch down to fold the handle as you lower the frying basket into the oil (F).
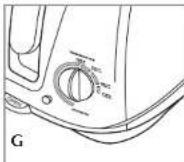
- Plug unit into an electric outlet and turn the temperature control to the appropriate temperature for your food (G). The power temperature light will be red.
Important: Never turn on the unit without any oil in the cooking pot.
The power/temperature light turns green when the selected temperature is reached. The light will cycle between green and red to indicate the unit is operating.
- To raise the basket pull up the frying basket handle until it locks into place (see A). Let the frying basket drain a few seconds.
COOKING
- Press the lid release (OPEN) lever down to open the lid.
- Place the food to be cooked in the frying basket, DO NOT OVERFILL THE BASKET.
Note: Fry freshly battered foods without the frying basket. - Slide the frying basket handle release switch to fold the handle and lower the frying basket.
4. Close the lid.
- Cook your food according to Frying Chart or follow your recipe.
-
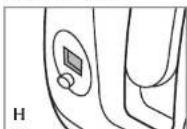
Set the timer by pressing the timer button until the desired time (up to 99 minutes) displays on the digital display (H)
-
Once the button is released the timer counts down the minutes until it reaches the last minute, then it counts down in seconds
Once the time is up, a beep sounds. One minute later, another beep sounds.
Cooking Tips
-
Avoid touching the exterior of the unit during cooking.
-
Keep the lid closed while frying; you may peek into the viewing window to check progress without opening the lid.
-
It is normal for steam to appear in the window, but it will clear during cooking if you keep the window clean after each use.
-
Avoid the vent and the seam around the lid during cooking as steam may be hot.
-
When cooking is done, open the lid and pull up the frying basket handle (see B) to lock in place horizontally.
-
Let the food drain 10-15 seconds.
-
Carefully lift the basket out (be sure not to press the handle release switch) and empty the food onto a plate covered with paper towels to drain.
-
Replace the frying basket in the unit and close the lid.
- Lower the frying basket back into the oil to reheat.
- Let the oil regain the set temperature before frying additional batches of food.
- When finished, turn the temperature control to the "Minimum" position, and unplug the unit.
FRYING CHART
| Food Temperature Time in Tips | Minutes | ||
| Mozzarella 350°F (175 Sticks (frozen) with a fork 3/8" (0.95 cm) Up to 8 sticks at a time | °C) 2-4 Be careful when removing. | not to stick | |
| Mushrooms, 350°F (175 Single layer | °C) 2-4 Dip into | an egg batter, then in seasoned bread crumbs. | |
| Onion Rings (frozen) About 1 cup at a time | 375°F (190 °C) 3 | 5 Fry about | 6 oz. at a time. |
| Scallops, Fresh Bay, 1/2 lb./227g | 350°F (175 °C) 2 | 4 Dip in an egg batter then roll in seasoned bread crumbs. Drain on paper towels. Serve with Tartar sauce. | |
| Shrimp (frozen) | 350°F (175 °C) 2 | 4 Drain well then fry. Serve with your favorite cocktail sauce. | |
| Zucchini Sticks, single layer | 350°F (175 °C) 3 | 5 Dip into an egg batter then in seasoned bread crumbs. | |
DP400Pub1000002346 10/5/05 2:29 PM Page 8
Care and Cleaning
This appliance contains no user serviceable parts. Refer service to qualified service personnel.
Important: Always unplug the unit and allow it to cool completely before discarding the oil and cleaning.
STORING OIL
Note: You do not have to change the oil after each use. Oil can be re-used until it gets dark or there is visible debris (such as batter or bits of food) in it.
-
Unplug unit from wall outlet
-
Remove magnetic end of power cord from the unit socket.
-
Be sure the oil is completely cool before removing the cooking pot.
-
Store the cooled oil in its original container.
CLEANING
Lid
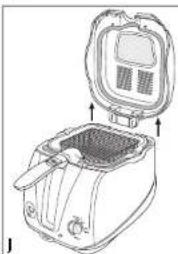
- Open the lid and pull straight up to remove it (J).
- Wash the lid in warm soapy water using a sponge or nylon pad with liquid detergent.
- Rinse, and dry thoroughly.
- To reattach the lid, insert it straight down into the notches in the unit.
Important: Be sure the lid is securely in place.
Cooking Pot and Frying Basket
-
Wash frying basket in the dishwasher, or wash by hand with a non-abrasive liquid cleanser using a nylon pad to remove any remaining oil.
-
Wash cooking pot by hand with a non-abrasive liquid cleanser using a sponge or nylon pad to remove remaining oil.
-
Do not use any abrasive cleaners, coarse cleansers, or metal pads as they may damage the nonstick coated surface.
- Be careful not to bang the pot as any dents can affect future performance.
- After washing, dry the cooking pot, frying basket and handle thoroughly. Note: Over time and repeated use, there may be some fat buildup in the pot and on the basket. This is normal.
EXTERIOR SURFACES
DO NOT IMMERSE THE UNIT. Wipe it with a damp sponge or cloth and liquid detergent.
IMPORTANT MISES EN GARDE
For service, repair or any questions regarding your appliance, call the appropriate "800" number on the cover of this book. Do not return the product to the place of purchase. Do not mail the product back to the manufacturer nor bring it to a service center. You may also want to consult the website listed on the cover of this manual.
One-Year Limited Warranty
(Appplies only in the United States and Canada)
What does it cover?
- Any defect in material or workmanship; provided; however, Applica's liability will not exceed the purchase price of the product.
For how long?
One year after the date of original purchase.
What will we do to help you?
- Provide you with a reasonably similar replacement product that is either new or factory refurbished.
How do you get service?
-
Save your receipt as proof of the date of sale.
-
Check our on-line service site at www.prodpprotect.com/applica, or call our toll-free number, 1-800-231-9786, for general warranty service.
If you need parts or accessories, please call 1-800-738-0245.
What does your warranty not cover?
- Damage from commercial use
- Damage from misuse, abuse or neglect
- Products that have been modified in any way
- Products used or serviced outside the country of purchase
Glass parts and other accessory items that are packed with the unit - Shipping and handling costs associated with the replacement of the unit
- Consequential or incidental damages (Please note, however, that some states do not allow the exclusion or limitation of consequential or incidental damages, so this limitation may not apply to you.)
How does state law relate to this warranty?
- This warranty gives you specific legal rights, and you may also have other rights that vary from state to state or province to province.
JNECESITA AYUDA?
BLACK & DECKER is a trademark of The Black & Decker Corporation,
Towson, Maryland, USA
Marca registrada de The Black & Decker Corporation,
Towson, Maryland, E.U.
Copyright © 2005 Applica Consumer Products, Inc.
Pub.No.100002346-00-RV00
Made in People's Republic of China
Printed in People's Republic of China
Importado por:
Applica de Mexico S.de R.L.de C.V.
Blvd. Manuel Avila Camacho 2900 Int. 902
Los Pirules, Tlalnepantla
Edo.Mex.
C.P.54040
Mexico
Telono: (55) 1106-1400
Del interior marque sin costo
00)714-2499
Applica
2005/5-19-95 C/S/T
- BLACK&DECKER
- POLARIZED PLUG
- ELECTRICAL CORD
- TAMPER-RESISTANT SCREW
- SAVE THESE INSTRUCTIONS.
- How to Use
- GETTING STARTED
- Important:
- PREHEATING
- COOKING
- Close the lid.
- Cooking Tips
- Care and Cleaning
- STORING OIL
- CLEANING
- Cooking Pot and Frying Basket
- EXTERIOR SURFACES
- IMPORTANT MISES EN GARDE
- One-Year Limited Warranty
- (Appplies only in the United States and Canada)
- What does it cover?
- For how long?
- What will we do to help you?
- How do you get service?
- What does your warranty not cover?
- How does state law relate to this warranty?
- JNECESITA AYUDA?
- Importado por:
Brand : BLACK & DECKER
Model : DF400
Category : Deep fryer