
DF1405SKT - Deep fryer BLACK & DECKER - Free user manual and instructions
Find the device manual for free DF1405SKT BLACK & DECKER in PDF.
| Product Type | Electric Deep Fryer |
| Brand | Black & Decker |
| Model | DF1405SKT |
| Power Supply | 120 V, polarized plug |
| Oil Capacity | 4 to 5 liters (MIN/MAX) |
| Cooking Temperatures | 130°C (265°F), 150°C (300°F), 170°C (340°F), 190°C (375°F) |
| Timer | 1 minute to 1 hour (default 15 minutes) |
| Bowl Material | Non-stick |
| Basket Material | Stainless Steel |
| Basket Handle | Removable, snap-on |
| Lid | Removable with filter |
| Display | Digital LCD |
| Power Cord | Magnetic detachable (ref. DF1405-06) |
| Auto Shut-off | After 30 minutes of inactivity |
| Preheat Function | Yes (indicator and beep) |
| Spare Parts Available | Yes (ref. DF1405-01 to DF1405-06) |
| Maintenance | Removable parts dishwasher safe (except control module) |
| Safety | Polarized plug, tamper-resistant screw, auto shut-off, cool-touch handles |
| Warranty | Limited 2-year (US and Canada) |
| Use | Household use only |
Frequently Asked Questions - DF1405SKT BLACK & DECKER
User questions about DF1405SKT BLACK & DECKER
0 question about this device. Answer the ones you know or ask your own.
Ask a new question about this device
Download the instructions for your Deep fryer in PDF format for free! Find your manual DF1405SKT - BLACK & DECKER and take your electronic device back in hand. On this page are published all the documents necessary for the use of your device. DF1405SKT by BLACK & DECKER.
USER MANUAL DF1405SKT BLACK & DECKER
Accessories/Parts (USA)
1-800-738-0245
For online customer service
and to register your product, go to
www.prodprotect.com/applica
Please Read and Save this Use and Care Book.
IMPORTANT SAFEGUARDS
When using electrical appliances, basic safety precautions should always be followed, including the following:
Read all instructions.
- Do not touch hot surfaces. Use handles or knobs.
To protect against electric shock do not immerse cord, plugs or digital control assembly in water or other liquid.
Close supervision is necessary when any appliance is used by or near children.
- Unplug from outlet when not in use and before cleaning. Allow to cool before putting on or taking off parts, and before cleaning the appliance.
- Do not operate any appliance with a damaged cord or plug, or after the appliance malfunctions or has been damaged in any manner. Return appliance to the nearest authorized service facility for examination, repair or adjustment.
- The use of accessory attachments not recommended by the appliance manufacturer may cause injuries.
Do not use outdoors.
- Do not let cord hang over edge of table or counter, or touch hot surfaces.
- Do not place on or near a hot gas or electric burner, or in a heated oven.
- Extreme caution must be used when moving an appliance containing hot oil or other hot liquids.
- Always attach plug to appliance first, then plug cord in the wall outlet. To disconnect, turn any control to OFF (0), then remove plug from wall outlet.
- Do not use appliance for other than intended use.
Extreme caution must be used when moving fryer containing hot oil.
- Be sure handles are properly assembled to basket and locked in place. See detailed assembly instructions.
SAVE THESE INSTRUCTIONS.
This product is for household use only.
POLARIZED PLUG (120V Models Only)
This appliance has a polarized plug (one blade is wider than the other). To reduce the risk of electric shock, this plug is intended to fit into a polarized outlet only one way. If the plug does not fit fully into the outlet, reverse the plug. If it still does not fit, contact a qualified electrician. Do not attempt to modify the plug in any way.
TAMPER-RESISTANT SCREW
Warning: This appliance is equipped with a tamper-resistant screw to prevent removal of the outer cover. To reduce the risk of fire or electric shock, do not a ttempt to remove the outer cover. There are no user-serviceable parts inside. Repair should be done only by authorized service personnel.
ELECTRICAL CORD
a) A short power-supply cord (or detachable power-supply cord) is to be provided to reduce the risk resulting from becoming entangled in or tripping over a longer cord.
b) Longer detachable power-supply cords or extension cords are not to be used with this product.
Note: If the power supply cord is damaged, it should be replaced by qualified personnel.
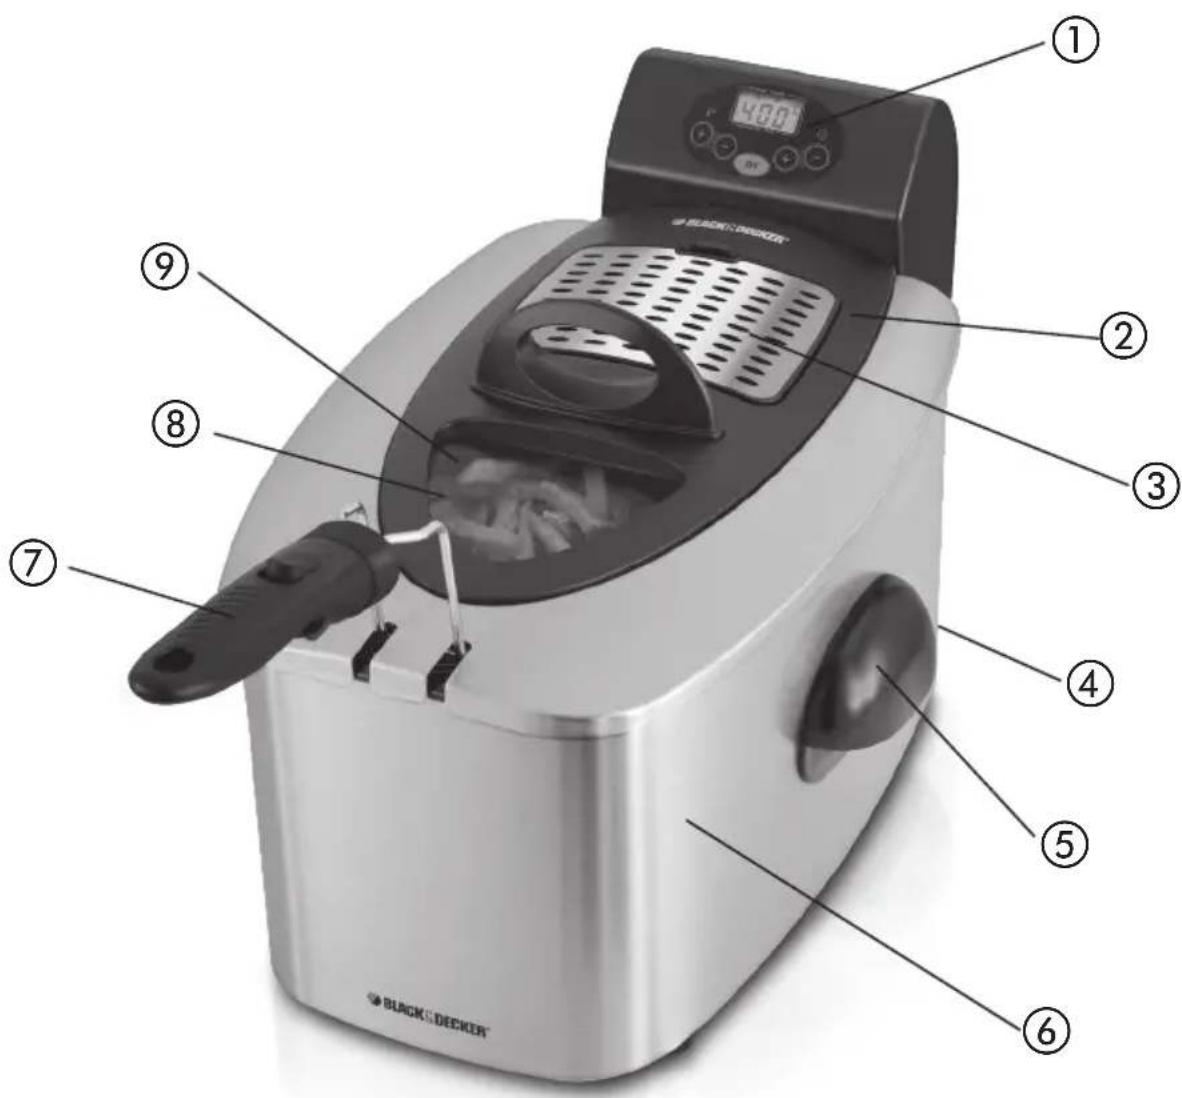
- Digital controls with LCD display
† 2. Detachable lid (Part # DF1405-01)
† 3. Removable filter cover (Part # DF1405-02)
† 4. Detachable magnetic power cord (not shown)
[Part # DF1405-06]
-
Base handles
-
Base
† 7. Removable basket handle (Part # DF1405-04)
† 8. Stainless steel frying basket (not shown) (Part #DF1405-03)
† 9. Nonstick cooking pot (not shown) (Part # DF1405-05)
Note: † indicates consumer replaceable/removable parts
How to Use
This product is for household use only.
GETTING STARTED
- Remove all packing material and any stickers. Remove and save Use and Care manual.
- Please go to www.prodprotect.com/applica to register your warranty.
- Wash all removable parts as instructed in CARE AND CLEANING section.
- Wipe outside of appliance with a damp cloth; dry thoroughly.
- Assemble product following directions as directed below.
- Select a stable, level, heat-resistant surface where this appliance is to be used, allowing enough space from back of unit and the wall to allow heat to flow without damage to cabinets and walls.
- Fill with oil to MIN (4 quarts) or MAX (5 quarts) line.
- This fryer has a detachable cord with a magnetic power attachment to be inserted to the rear of the fryer. This must be inserted with the words THIS SIDE UP facing upward.
- Attached the cord to the appliance by matching the 2 electrical pins on the back of the control assembly with the 2 indentations on the power cord.
- Plug unit into electrical outlet
ASSEMBLING YOUR FRYER
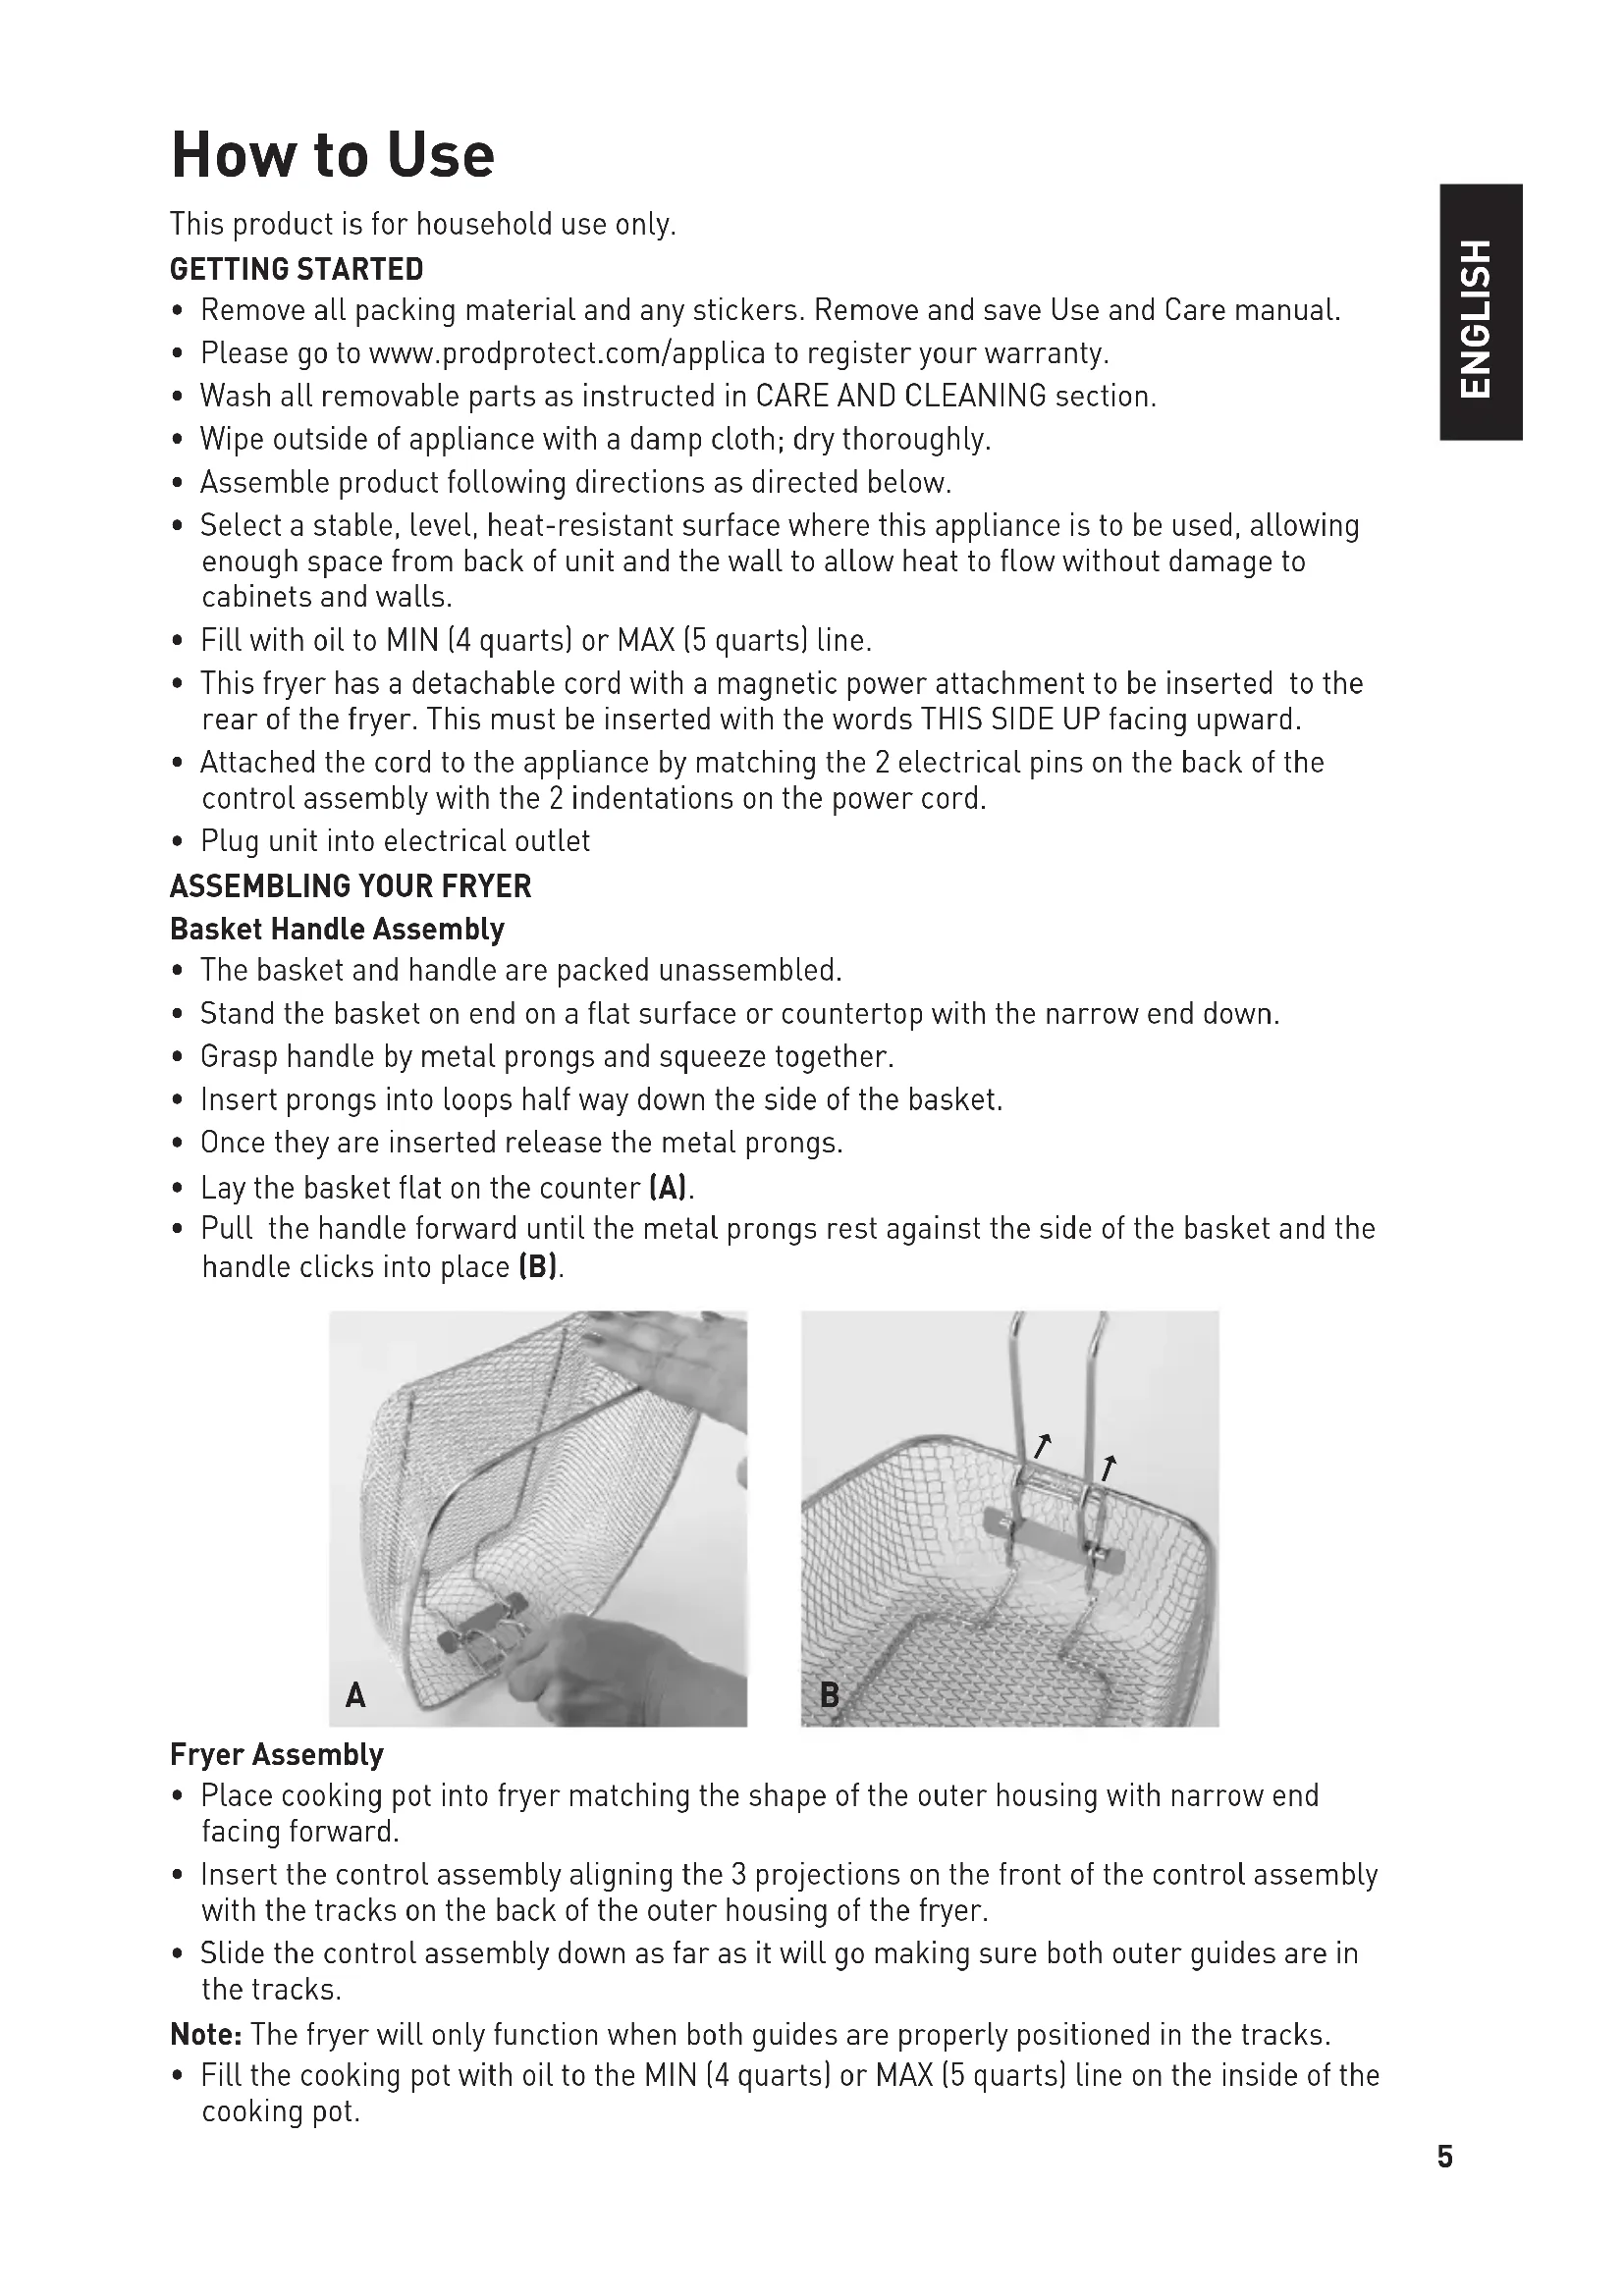
Basket Handle Assembly
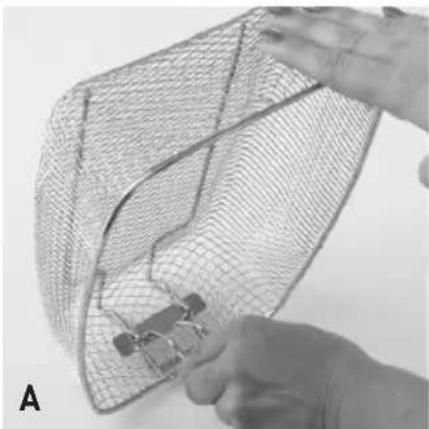
- The basket and handle are packed unassembled.
- Stand the basket on end on a flat surface or countertop with the narrow end down.
- Grasp handle by metal prongs and squeeze together.
- Insert prongs into loops half way down the side of the basket.
- Once they are inserted release the metal prongs.
- Lay the basket flat on the counter (A).
- Pull the handle forward until the metal prongs rest against the side of the basket and the handle clicks into place (B).

Fryer Assembly
- Place cooking pot into fryer matching the shape of the outer housing with narrow end facing forward.
- Insert the control assembly aligning the 3 projections on the front of the control assembly with the tracks on the back of the outer housing of the fryer.
- Slide the control assembly down as far as it will go making sure both outer guides are in the tracks.
Note: The fryer will only function when both guides are properly positioned in the tracks.
- Fill the cooking pot with oil to the MIN (4 quarts) or MAX (5 quarts) line on the inside of the cooking pot.
Note: The amount of oil in the cooking pot must always be between the MIN and MAX line. Never allow the oil to go below the MIN line or exceed the MAX line.
Note: When the fryer is functioning, the oil gets extremely hot. Use caution at all times. Do not touch any of the metal parts, such as the basket or cooking pot once the appliance is heating.
- Insert the basket into the cooking pot.
- Place the lid on the fryer.
- This fryer has a detachable cord with a magnetic power attachment to be inserted to the rear of the fryer. This must be inserted with the words THIS SIDE UP facing upward.
- Attach the cord to the appliance by matching the 2 electrical pins on the back of the control assembly with the 2 indentations on the power cord.
Important: This magnetic cord is designed to detach easily from the appliance; this will cause the appliance to stop heating. Avoid moving the fryer or touching the cord in any way during use.
Important: The appliance will only operate when both guides are properly positioned in the tracks.
- Always use handles on the base when lifting or moving the appliance. Never lift or move appliance using digital control assembly.
Caution: Never attempt to move the fryer when it contains hot oil.
TO START COOKING
- Fill cooking pot with cooking oil up to the MIN (4 quarts) or MAX (5 quarts) level marking. Do not exceed the MAX level mark.
- Insert the cooking basket into the cooking pot
- Close the lid.
-
Attach the cord to the appliance and plug into electrical outlet.
-
When the fryer is plugged in there will be an audible signal.
Digital display shows 130^ -
Select the desired temperature (see FRYING CHART on page 7) by pressing the + or - button on the left side of the control assembly and allow fryer to preheat. The temperature range is (130^, 150^, 170^, and 190^) .
-
The recommended setting for most frying is 190^ C.
- Press the On/Off button on the control assembly. There will be an arrow on the upper LCD indicating preheat status.
- Once the appliance has reached set temperature the numbers on the display will flash and an alarm will sound (beep) several times and the arrow below the Ready signage will appear on the LCD display.
- Lift the lid.
- Manually raise the basket and rest it on the drain hook at the front of the cooking pot
- Allow the basket to drain for several seconds.
- Fill the basket no more than 34 full with food to be cooked. Do not overfill.
- Close the lid manually and lower the basket off of the drain hook and into the oil.
- Press the switch on the handle to lower it into the rest position parallel to the front of the fryer.
- Press the + / - button on the right side of the control assembly to select the cooking time; the deafult time is 15 minutes. The timer can be set from 1 minute to 1 hour.
Note: During cooking with the timer displayed on the LCD, if the temperature button is pressed the temperature display will revert back to its original set temperature of 130^ and the temperature will need to be reset to maintain its previous set temperature.
- During cooking the time can be increased or decreased by pressing + / - button. If the ON/
OFF button is pressed for 3 seconds the fryer will turn off. If this happens, unplug the fryer and wait 10 minutes and then plug in the fryer, reselect the desired cooking temperature and press the On/Off button and allow the fryer to reheat.
- When the timer reaches 0 there will be an audible signal. Raise the basket and allow it to rest on the drain hook for several seconds to drain the excess oil.
- When frying has completed, hold down the ON/OFF switch for 3 seconds to return to standby mode if there is no operation for 10 minutes the fryer will automatically return to standby mode. The last selected temperature will be displayed on LCD display.
- If the fryer is not used for 30 minutes it will automatically turn off and begin to cool down.
- Unplug power cord from wall outlet and then from the base. Allow oil and appliance to cool down completely.
FRYING CHART
| FOOD TEMPERATURE | COOKING TIME COMMENTS | |
| Fresh chicken wings 1 | 70°C Approximately 350°F | 4 - 5 minutes Dip in milk and coat in seasoned flour or bread crumbs. |
| Frozen coated chicken tenders | 170°C Approximately 350°F | 4 - 5 minutes Do not overfill fryer; drain on paper towels or brown paper. |
| Frozen coated fish fillets | 170°C Approximately 350°F | 4 - 5 minutes Do not overfill fryer. |
| Fresh shrimp 170°C | Approximately 350°F | 4 - 5 minutes Peel, leaving tail intact; dip in tempura batter. |
| Frozen coated shrimp | 170°C Approximately 350°F | 4 - 5 minutes Do not overfill fryer. |
| Frozen snack foods 170°C | Approximately 350°F | 4 - 5 minutes Do not overfill fryer; season while hot. |
| Frozen French fries and other frozen potatoes | 190°C 375°F | 3 to 4 minutes Do not overfill fryer. |
| Frozen onion rings 190°C | 375°F | 2 to 3 minutes Do not overfill fryer. |
| Doughnuts and funnel cakes | 190°C 375°F | 2 to 3 minutes Do not overfill fryer. |
Care and Cleaning
This product contains no user serviceable parts. Refer service to qualified service personnel.
Important: Before cleaning any part, be sure the appliance is off, unplugged, and cool.
- All parts, except the digital control can be washed by hand in hot, soapy water or in the dishwasher. Place the base and lid in the bottom rack.
- Never immerse digital control assembly in water or wash in a dishwasher. Wipe with a damp cloth.
- If you choose to use a dishwasher there may be some discoloration of parts. This will not affect the fryer's performance.
- Do not use steel wool scouring pads or abrasive cleaners to clean any part.
- To clean the frying basket handle, remove it by squeezing the dring hooks and folding the handle into the basket until the handle bars are out of the brackets. Continue squeezing to remove both pegs from the bracket holes. After cleaning, reattach handle as instructed in BASKET HANDLE ASSEMBLY.
- CAUTION: Before moving or cleaning the appliance, wait until the hot oil has cooled completely.
STORAGE
- Press the release button on the handle into the vertical position and lower than handle until it rests flush against the front of the fryer.
NEED HELP?
For service, repair or any questions regarding your appliance, call the appropriate 800 number on the cover of this book. Please DO NOT return the product to the place of purchase. Also, please DO NOT mail product back to manufacturer, nor bring it to a service center. You may also want to consult the website listed on the cover of this manual.
TWO-YEAR LIMITED WARRANTY
(Applies only in the United States and Canada)
What does it cover?
- Any defect in material or workmanship provided; however, Applica's liability will not exceed the purchase price of product.
For how long?
- Two years from the date of original purchase with proof of such purchase.
What will we do to help you?
- Provide you with a reasonably similar replacement product that is either new or factory refurbished.
How do you get service?
- Save your receipt as proof of date of sale.
- Visit the online service website at www.prodprotect.com/applica, or call toll-free 1-800-231-9786, for general warranty service.
- If you need parts or accessories, please call 1-800-738-0245.
What does your warranty not cover?
- Damage from commercial use
- Damage from misuse, abuse or neglect
- Products that have been modified in any way
- Products used or serviced outside the country of purchase
Glass parts and other accessory items that are packed with the unit - Shipping and handling costs associated with the replacement of the unit
- Consequential or incidental damages (Please note, however, that some states do not allow the exclusion or limitation of consequential or incidental damages, so this limitation may not apply to you.)
How does state law relate to this warranty?
- This warranty gives you specific legal rights. You may also have other rights that vary from state to state or province to province.
BLACK&DECKER is a registered trademark of The Black & Decker Corporation, Towson, Maryland, USA
Made and Printed in People's Republic of China
Note: † indicates consumer replaceable/removable parts
Utilisation
San Jose, Costa Rica
Tel.: (506) 257-5716 / 223-0136
Ecuador
Servicio Master
Col. Centro, Cuauhtemoc,
Mexico, D.F.
Tel. 01 800 714 2503
Nicaragua
ServiTotal
City Market Nivel Plaza Local 153
Diagonal Hotel Melia, Caracas.
Tel. (582) 324-0969
www.applicaservice.com
servicio@applicamail.com
Códio de Fecha / Date Code / Le code de date
Comercializo por:
Rayovac de Mexico SA de C.V
KM. 14.5 Carretera Puente de Viges.
Applica Consumer Products, Inc.
- Please Read and Save this Use and Care Book.
- IMPORTANT SAFEGUARDS
- SAVE THESE INSTRUCTIONS.
- POLARIZED PLUG (120V Models Only)
- TAMPER-RESISTANT SCREW
- ELECTRICAL CORD
- How to Use
- GETTING STARTED
- ASSEMBLING YOUR FRYER
- Basket Handle Assembly
- Fryer Assembly
- TO START COOKING
- Care and Cleaning
- STORAGE
- NEED HELP?
- TWO-YEAR LIMITED WARRANTY
- (Applies only in the United States and Canada)
- What does it cover?
- For how long?
- What will we do to help you?
- How do you get service?
- What does your warranty not cover?
- How does state law relate to this warranty?
- Utilisation
- Ecuador
- Nicaragua
- Códio de Fecha / Date Code / Le code de date
Brand : BLACK & DECKER
Model : DF1405SKT
Category : Deep fryer