
TD6831/HH951F - Phone PHILIPS - Free user manual and instructions
Find the device manual for free TD6831/HH951F PHILIPS in PDF.
| Brand | PHILIPS |
| Model | TD6831/HH951F |
| Product type | DECT additional handset for landline |
| Standard | GAP (compatible with any GAP base) |
| Handset power supply | 2 NiMH rechargeable batteries R03/AAA |
| Base/charger power supply | 230 V AC adapter (according to base) |
| Initial charging time | 12 hours minimum |
| Standby time | Approximately 1 week |
| Talk time | Approximately 15 hours |
| Indoor range | Up to 50 m (depending on environment) |
| Outdoor range | Up to 300 m on open site |
| Display type | LCD with contrast adjustment |
| Number of ringtones | 9 melodies (external/internal) |
| Ring volume | Adjustable (including silent) |
| Key tones | Enable/disable |
| Maximum number of handsets | 8 (on the same base) |
| Main functions | Intercom, internal conference, call transfer, baby monitor, operator prefix, directory |
| Caller ID | Yes (if base compatible) |
| Maintenance and cleaning | Slightly damp cloth with mild soap, no solvent |
| Safety | Do not open, avoid contact with liquids, use clean charging contacts |
| General information | International warranty 12 months, PHILIPS consumer support |
Frequently Asked Questions - TD6831/HH951F PHILIPS
User questions about TD6831/HH951F PHILIPS
0 question about this device. Answer the ones you know or ask your own.
Ask a new question about this device
Download the instructions for your Phone in PDF format for free! Find your manual TD6831/HH951F - PHILIPS and take your electronic device back in hand. On this page are published all the documents necessary for the use of your device. TD6831/HH951F by PHILIPS.
USER MANUAL TD6831/HH951F PHILIPS
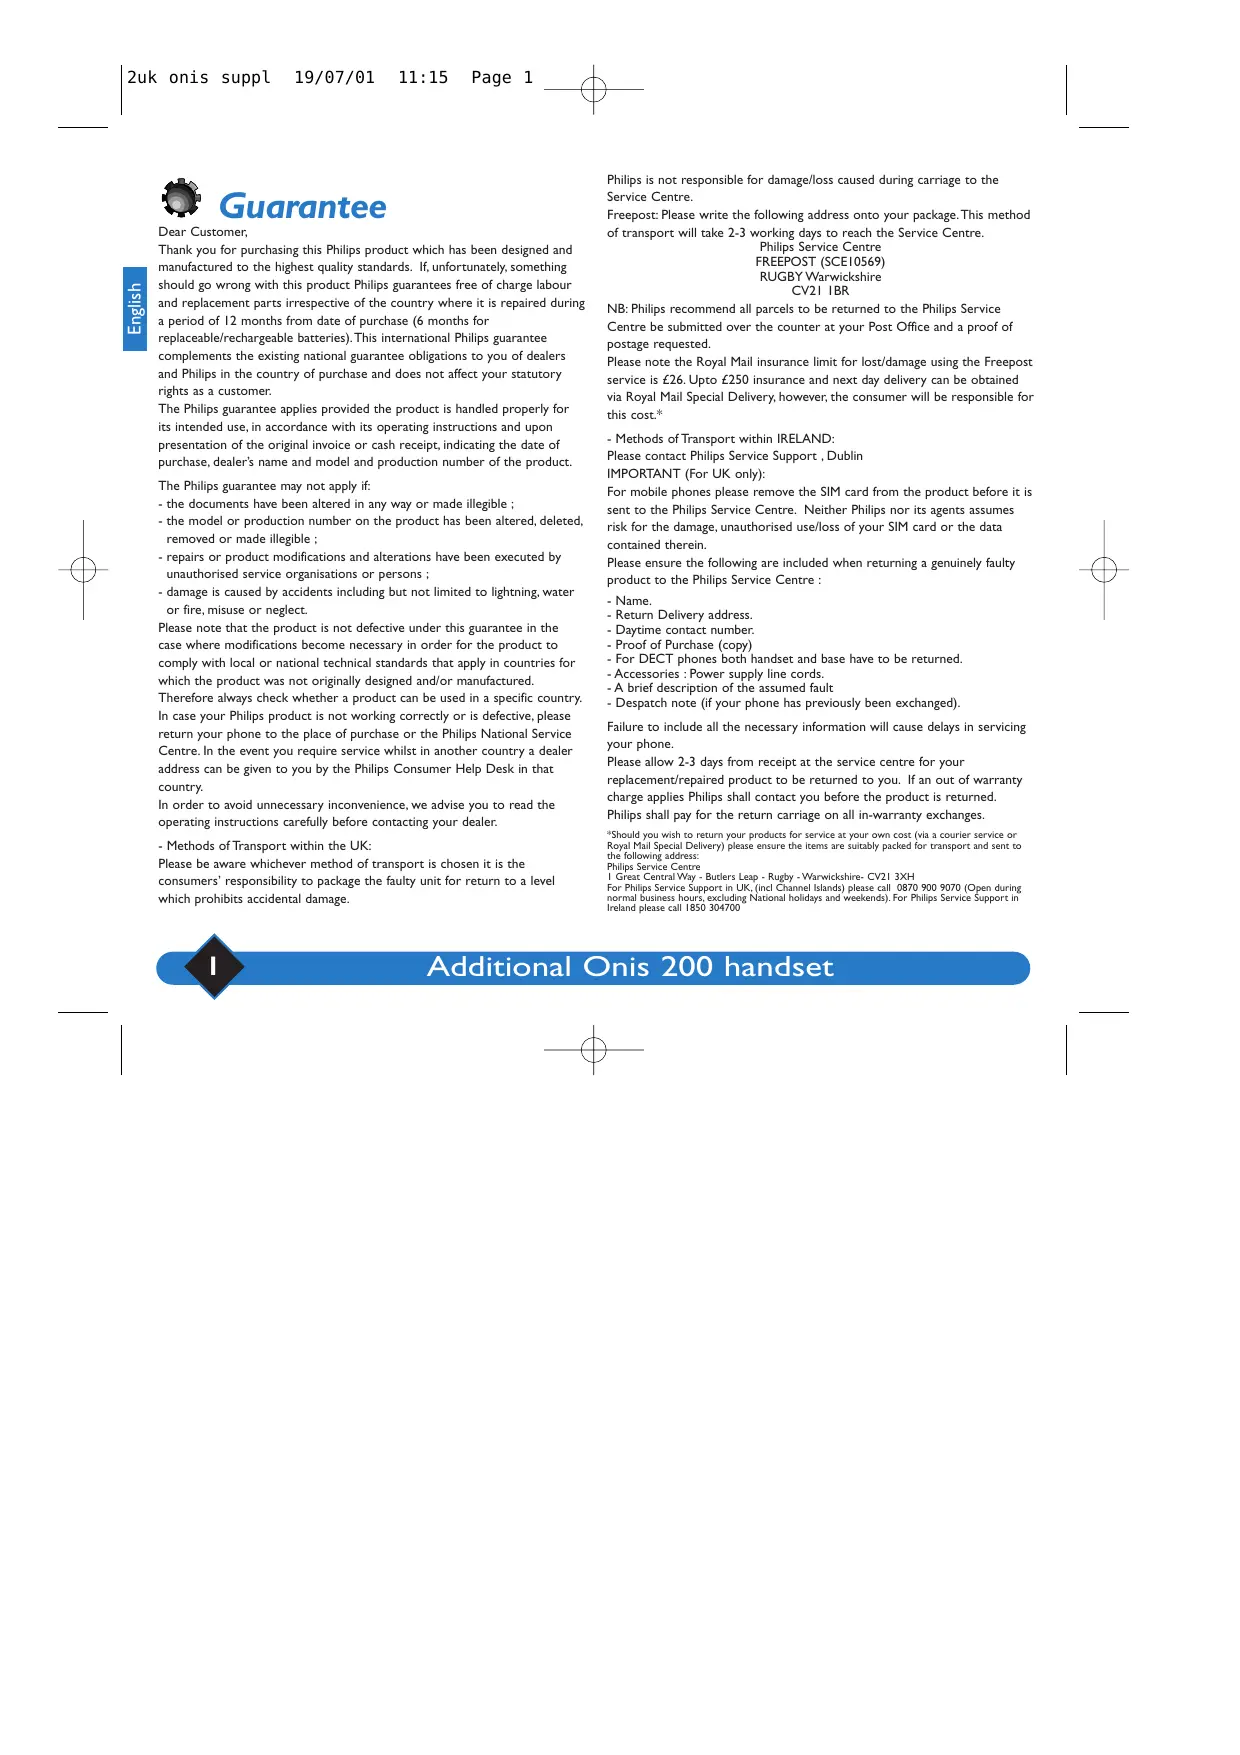
Thank you for purchasing this Philips product which has been designed and manufactured to the highest quality standards. If, unfortunately, something should go wrong with this product Philips guarantees free of charge labour and replacement parts irrespective of the country where it is repaired during a period of 12 months from date of purchase (6 months for replaceable/rechargeable batteries). This international Philips guarantee complements the existing national guarantee obligations to you of dealers and Philips in the country of purchase and does not affect your statutory rights as a customer.
The Philips guarantee applies provided the product is handled properly for its intended use, in accordance with its operating instructions and upon presentation of the original invoice or cash receipt, indicating the date of purchase, dealer's name and model and production number of the product.
The Philips guarantee may not apply if:
- the documents have been altered in any way or made illegible ;
- the model or production number on the product has been altered, deleted, removed or made illegible;
- repairs or product modifications and alterations have been executed by unauthorised service organisations or persons;
- damage is caused by accidents including but not limited to lightning, water or fire, misuse or neglect.
Please note that the product is not defective under this guarantee in the case where modifications become necessary in order for the product to comply with local or national technical standards that apply in countries for which the product was not originally designed and/or manufactured.
Therefore always check whether a product can be used in a specific country. In case your Philips product is not working correctly or is defective, please return your phone to the place of purchase or the Philips National Service Centre. In the event you require service whilst in another country a dealer address can be given to you by the Philips Consumer Help Desk in that country.
In order to avoid unnecessary inconvenience, we advise you to read the operating instructions carefully before contacting your dealer.
- Methods of Transport within the UK:
Please be aware whichever method of transport is chosen it is the consumers' responsibility to package the faulty unit for return to a level which prohibits accidental damage.
Philips is not responsible for damage/loss caused during carriage to the Service Centre.
Freepost: Please write the following address onto your package. This method of transport will take 2-3 working days to reach the Service Centre.
Philips Service Centre
FREEPOST (SCEI0569)
RUGBY Warwickshire
CV2I IBR
NB: Philips recommend all parcels to be returned to the Philips Service Centre be submitted over the counter at your Post Office and a proof of postage requested.
Please note the Royal Mail insurance limit for lost/damage using the Freepost service is £26. Upto £250 insurance and next day delivery can be obtained via Royal Mail Special Delivery, however, the consumer will be responsible for this cost.*
- Methods of Transport within IRELAND:
Please contact Philips Service Support, Dublin
IMPORTANT (For UK only):
For mobile phones please remove the SIM card from the product before it is sent to the Philips Service Centre. Neither Philips nor its agents assumes risk for the damage, unauthorised use/loss of your SIM card or the data contained therein.
Please ensure the following are included when returning a genuinely faulty product to the Philips Service Centre :
- Name.
- Return Delivery address.
- Daytime contact number.
- Proof of Purchase (copy)
- For DECT phones both handset and base have to be returned.
- Accessories : Power supply line cords.
- A brief description of the assumed fault
- Despatch note (if your phone has previously been exchanged).
Failure to include all the necessary information will cause delays in servicing your phone.
Please allow 2-3 days from receipt at the service centre for your replacement/ repaired product to be returned to you. If an out of warranty charge applies Philips shall contact you before the product is returned.
Philips shall pay for the return carriage on all in-warranty exchanges.
*Should you wish to return your products for service at your own cost (via a courier service or Royal Mail Special Delivery) please ensure the items are suitably packed for transport and sent to the following address: Philips Service Centre
I Great Central Way - Butlers Leap - Rugby - Warwickshire- CV21 3XH
For Philips Service Support in UK, (incl Channel Islands) please call 0870 900 9070 (Open during normal business hours, excluding National holidays and weekends). For Philips Service Support in Ireland please call 1850 304700

Additional Onis 200 handset

Introduction
English
SCREEN ICONS:

Battery charge status

Answerphone activated

Indicates message on answerphone or Operator mail box

Internal call in progress

Handset ringer deactivated

Loudspeaker activated

Withheld identity activated

Base/Handset link correct
Additional Onis 200 handset
Recommendations and safety information
This additional HANDSET, compliant with both Onis 200 and Onis Vox 200 models, gives you permanent access to a cordless telephone in rooms which do not have a telephone socket.
You may use up to 8 HANDSETS with each Onis 200 and Onis Vox 200 base station. In order to get the most out of your HANDSET, we recommend you read the instructions supplied with your main BASE STATION and HANDSET.
This HANDSET meets GAP standard requirements and may be used with any GAP base station, irrespective of the make.
In this case, we recommend you carefully read the following information, compiled using comments and suggestions provided by other users.
Safety information:
- Avoid contact with liquid.
- To avoid any risk of electric shock, please do not attempt to open the handset or base station. Repairs should be carried out by our after-sales service.
- The charging contacts should be kept away from conductive objects (metal objects, keys, jewellery, etc.).
The CE mark on your telephone means that it is compliant with European directive 99/05/EC on technical regulations for user safety, electromagnetic interference and radio tests.
Electric connection: 230V mains supply, single phase AC, with the exception of IT-type equipment described in standard EN 60-950.
(NB: Excessive mains voltage limits are defined according to criteria laid out in the same standard.)
Operating temperature is between 5°C and 45°C. The mains power pack has a 230V supply sectioning feature to protect the user.
As a preventive measure, this should be close to the equipment and easily accessible.
Telephone connection: network voltage is classed as telephone network voltage in compliance with EN 60-950.
Environmental Protection:
Your HANDSET has been designed in compliance with the Philips EcoDesign program, which takes environmental factors into consideration throughout the product's life cycle.
Additional Onis 200 handset

Setting up the handset
Installing the handset
Proceed as follows:
- Plug the mains adapter into an easily-accessible socket.
- Place the HANDSET on the CHARGER.
Before initial use or following a long period without charging, the HANDSET should be fully charged for at least 12 hours.

WARNING:
Once the handset is fully charged, you should follow the procedure described on page 5 (registering the handset with a base station).
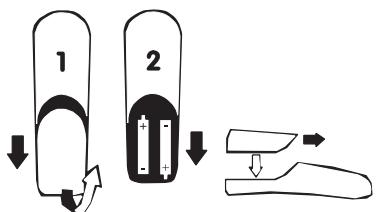
Inserting and replacing batteries
R03/AAA NiMh rechargeable batteries should be used as replacements.
- Slide open the HANDSET battery cover in the direction indicated by the arrow.
- Remove batteries.
- Insert new batteries as indicated and replace the cover.
- Place the HANDSET on the BASE STATION. Charge for at least 12 hours.

WARNING:
Never use non-rechargeable batteries. Use only the recommended types (R03/AAA NiMh).
NOTE. Used batteries should not be disposed of with household waste.
Return used batteries to your distributor or take to a suitable collection centre.

Changing the handset language
On the idle screen, scroll through the list of menus and select |SETTINGS.
2 Scroll to "Handset settings".
3 Select OK|.
4 Choose OK| to select the "Language" option.
5 Scroll to the language you want and select OK|.
6 Press and hold the C_/R key to return to the idle screen.
Additional Onis 200 handset

Registering the handset with a base station
In order to use the HANDSET with the BASE STATION, you must first follow the procedure described below. Each HANDSET may be used with two different BASE STATIONS.
English

WARNING:
Before commencing the following, the handset must be fully charged for at least 12 hours.
ONIS 200 or ONIS Vox 200 base stations
1 Unplug and plug back in the power supply of the Onis 200 BASE STATION.
2 Scroll to "Register hdset" under "Handset settings" in the "Settings" menu and select OK|.
3 Enter the base station registration code (4 figures) and select OK.
4 The screen will display “Recording...” for a short while, followed by “Set!” once the procedure is complete.
In the event of failure, begin again from step 1.
The code is shown on the label beneath the base station bottom (RC).
Another base station
First, follow the procedure described by the manufacturer (see base station manufacturer's instructions).
Once this is done, follow steps 2 to 4 of the procedure shown above for the HANDSET.

Cleaning your handset
Use a damp, lightly soaped cloth to clean your HANDSET. Wipe with a dry cloth.
- Never use a solvent or household product. Clean your telephone regularly to keep it looking brand new.
Important:
Do not place your telephone in a place where it may fall.
Additional Onis 200 handset

Using the handset with an ONIS 200 base station
The additional HANDSET functions in the same manner as the handset which comes with your Onis 200 or Onis Vox 200 BASE STATION.
With this multi-handset setup you can now:
- make conference calls,
- transfer calls,
- make an external call with two other HANDSETS in an intercom mode (if you have 3 or more HANDSETS). See instructions for more information.
- use the "babysit" function.

Using the handset with another GAP standard base station
The GAP standard guarantees minimum operating performance for all handsets and base stations, irrespective of their make.
Your HANDSET conforms with this standard.
In order to get the most out of your HANDSET, we recommend you read both these and the manufacturer's instructions.
When your HANDSET is used with a different make of base station, line connection, call reception and dialling functions are guaranteed.

Charger wall-mounting
I Make two holes in the wall, 65mm apart vertically and insert screws.
2 Mount the base using the plastic attachment and pull down.

Battery performance
The telephone will work for approximately one week when the HANDSET is away from the BASE STATION in idle mode and around 15 hours when in use.
- During a call, beeps will provide a warning when only a few seconds of battery life remain.
Communication will be cut off automatically when after this time.
The icon indicates a charge level below 5% (no bar). You should now charge the HANDSET
Additional Onis 200 handset

Recharging
It takes at least 12 hours to fully recharge an empty battery.
The outline of the 📄 icon flashes to show that the handset is correctly placed on the charger.


Range
The HANDSET has a range of around 300m in an open area with good radio reception.
- During a call, reception will begin to break up as you near the range limit. Should this happen, you should quickly move closer to the base station to prevent communication being cut off.
This information is approximate and applies to a fully charged battery.
Please follow the installation recommendations on page 3.

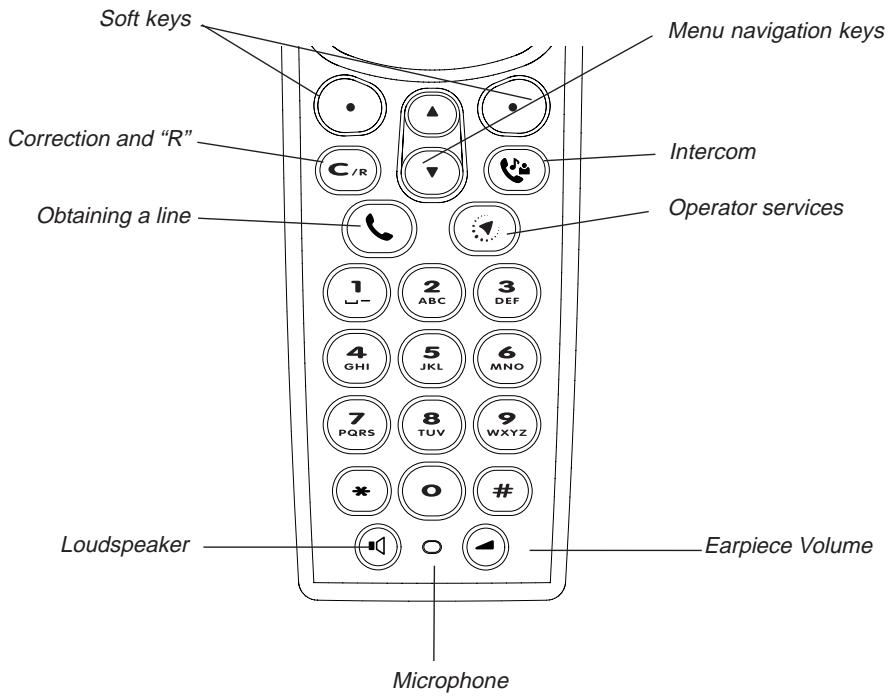
Onis 200 handset keys
• The 🔒 key allows you to transfer and receive calls.
- The Ⓞ key allows you to activate or deactivate the HANDSET loudspeaker.
• The 🔺 key allows you to select intercom with another handset.
- The ⏻ key allows you to adjust the receiver or loudspeaker volume level during a call.
- The C _in key allows you to delete a character already entered. The same key also enables you to use the “R” function during a call. Pressing and holding this key allows you to return to the idle screen at any time.
• The 🔑 key allows you to access the list of operator services.
Additional Onis 200 handset

Understanding the menu system
Menus are displayed on the fourth line, with headings and sub-headings shown on the second and third lines of your screen.
Using the menus:
You can access the menus using the ⏻ keys:
- Use these keys to select menus shown at the bottom of the screen. Eg: On the idle screen, the available menus are |REDIAL and SHARED|.
- Use the ⚠️ keys to scroll through menus not shown on screen. Use the ⚠️ keys to select, as above.
- Press and hold the C / key to interrupt any activated function and return to the idle screen.
Headings and sub-headings:
- Headings are shown on the second line on a black background.
- Sub-headings are shown on the third line. Use the ⚠️ keys to scroll through the sub-headings. Use the ⚙️ keys to select OK| or retrace a step |BACK.
- Some headings enable you to modify options. When accessing the heading, the active option appears first, preceded by “√”. To choose another option, use the ⚙️ keys to scroll through the list and validate your option using.
The ♦ icon indicates that other menus are available.
The ♦ icon does not appear on screen for headings and sub-headings.
Additional Onis 200 handset

Customising your handset
Ringer settings
English
The HANDSET has 9 ringer melodies.
I Scroll to “Ext. ringer type” or “Int. ringer type” under the “Handset sounds” heading in the “Settings” menu and select OK|.
2 Scroll to one of the nine melodies and select OK|.
External melody: for all incoming calls. Internal melody: for all intercom calls.
You will hear the selected ringer.
Ringer volume
I Scroll to "Ringer Volume" under the "Handset sounds" heading in the "Settings" menu and select OK.
2 Scroll to the chosen volume and select OK|.
To deactivate the ringer, select the Silence option. The 🎯 icon will be displayed.
Screen contrast
I Scroll to “Contrast” under the “Handset Settings” heading in the “Settings” menu and select OK.
2 Scroll to the chosen contrast and select OK|.
The screen contrast will immediately be adjusted.
Activating/deactivating the key tones
HANDSET keys can be set to sound when pressed. You can program this sound:
I Scroll to “Key tones” under the “Handset sounds” heading in the “Settings” menu, and select OK|.
2 Choose whether to activate or deactivate the tones and select OK|.
Additional Onis 200 handset

Using the telephone
Making a call
When you lift the HANDSET from the CHARGER, the Y icon should be highlighted.
If this is not the case, please refer to the section entitled “Telephone troubleshooting”.
I Press
2 Check for a tone and dial the number you wish to call.
3 To end the conversation, press 📞 again or replace the handset on its charger.
You can also obtain a line by pressing the 🔒 key. This activates the handset loudspeaker.
Preparing the number before calling (predial)
To check the number and, where necessary, correct before calling:
I Enter the number on the keypad.
- If you make a mistake, you can delete the last character using |CORRECT or by pressing C_fR *
2 Press 📊 or 📌 to make the call.
*Press and hold 📔/₈ to delete the number.
The number will be displayed on screen. The RECORD| function allows you to store the number in one of the phonebooks.
Answering a call
Your ONIS 200 rings, unless you have deactivated the ringer:
I Press 📊 to talk.
- You can deactivate the handset ringer by pressing |SILENCE.
2 Press 📋 again to hang up, or replace the handset on the base station or charger.
Additional Onis 200 handset

Using the Intercom
Your base station may be used with 8 handsets. Intercom allows you to communicate internally between two handsets.
In addition, if you have three or more handsets, external calls may be made while the intercom function is in use (e.g. one handset is used to communicate externally while two others are used for an internal call).
English
Internal calls
I Press
2 Use ⚠️ ⏰ to scroll through the list and select the extensions you wish to call.
3 Select CALL| or 📞 to make the call.
4 Select | STOP INTER. or press 📞 to end intercom from the handset.
- On the HANDSET called, press 📞 to answer.
NOTE:
If you receive an external call while in intercom mode, beeps will alert the handsets in use. You must hang up the internal call before taking the external call. However, a third HANDSET, not being used on an internal call, may also be used to take the external call.
You may also enter the number of the handset you wish to call ⏻ or to make all handsets ring. In this case, steps 2 and 3 become redundant.
Intercom during external call and call forward
During the external call, tell the person on the other end of the line that you will be unable to hear them for a moment, then:
I Press
2 Use ⚠️ ⚡️ to scroll through the list and choose the handset you wish to call. Select CALL|.
The person on the other end of the line will hear hold music.
Additional Onis 200 handset
3 Select |SWITCH to place the internal call on hold and speak to the person on the external line. Using this function, it is possible to switch between internal and external lines.
- Select TRANSF. to forward the external call to your chosen handset.
- Scroll to and select CONF.CALL| to set up a conference call between the external caller and two internal handsets.
On the handset(s) called:
Press 📊 to answer.
You can also hang up by pressing 📞.

Using the babysit function
Acts as a silent intercom, while another handset is used as an intercom monitoring handset to listen to noise in the room where the former monitoring handset has been placed. If you receive a call, the intercom will remain silent and will not take the call.
Activating babysit mode
I Scroll to “Babysit mode” under the “Handset settings” heading in the “Settings” menu and select OK.
2 Scroll to activate the function and select OK|.
Deactivating the babysit mode
On the idle screen shown, select CANCEL|.
Using the intercom
In order to listen to noises picked up by the monitoring handset, you will need to set up the intercom (see page 11) between the handsets.
The “Babysit mode” indicator then appears on the idle screen.
You can deactivate the babysit mode using the “Babysit mode” menu, following the same procedure as that used to activate the mode.
NOTE:
Handsets in “Babysit” mode can still be used to make calls, but will not ring when a call is received.
Additional Onis 200 handset

Telephone troubleshooting...
| PROBLEMS | REASONS | SOLUTIONS |
| The HANDSET ☐ icon does not flash when the handset is placed on the charger. | - Poor contact.- Dirty contacts. | - Move the HANDSET slightly.- Clean the contacts with a cloth moistened with alcohol. |
| No dial tone. | - No power.- The HANDSET is not sufficiently charged.- You are too far away from the BASE STATION. | - Check connections.- Charge the HANDSET.- Move closer to the BASE STATION. |
| No ringer. | The ringer is deactivated. | See “Ringer settings”. |
| The ⚠ icon is not displayed. | - The handset has not been registered.- No mains power.- The HANDSET is too far from the BASE STATION. | - Begin the handset registration procedure again (page 5).- Check connections.- Move closer to the BASE STATION. |
| When adding a HANDSET to the BASE STATION, a “Failure” message is displayed on the HANDSET. | The procedure used to add a HANDSET to the BASE STATION has failed.The maximum number of handsets (8) has been reached. | Disconnect and connect the BASE STATION mains power supply. Begin the handset registration procedure again (p. 5). |
| Interference during the call. | - You are too far away from the BASE STATION.- The BASE STATION is too close to electrical appliances, reinforced concrete walls or metal door frames. | - Move closer to the BASE STATION.Check the range.- Move the BASE STATION to find a better position (the higher the better). |
Additional Onis 200 handset

Garantie
De HANDSET beschikt over 9 beltypes.
PHILIPS Consumer Communications
Route d'Angers
72081 Le Mans Cedex 9
France
Cordless Business Director

Certification of conformity
We,
PHILIPS Consumer Communications
Route d'Angers
72081 Le Mans Cedex 9
France
Declare that the product Onis 200 DECT handset (HS 6831) is in compliance with ANNEX III of the R&TTE-Directive 99/05/EC and then with the following essential requirements :
Article 3.1 a : (protection of the health & the safety of the user)
EN 60950 (92) Ed.2 + amendements 1,2 (93); 3 (95); 4 (97) & 11 (97)
Article 3.1 b : (protection requirements with respect to electromagnetic compatibility)
ETS 300 329 (97)
Article 3.2 : (effective use of the radio spectrum)
TBR6 (97)
The presumption of conformity with the essential requirements regarding Council Directive 99/05/EC is ensured.
Date : 26/09/2000 Le Mans
Cordless Business Director

PHILIPS Consumer Communications
Route d'Angers
72081 Le Mans Cedex 9
Frankreich
PHILIPS Consumer Communications
Route d'Angers
72081 Le Mans Cedex 9
Frankrijk
Cordless Business Director
PHILIPS Consumer Communications
Route d'Angers
72081 Le Mans Cedex 9
Francia
Cordless Business Director

PHILIPS Consumer Communications
Route d'Angers
77081 Le Mans Cedex 9
Francia
natural_image
Solid blue horizontal bar with rounded ends, no text or symbols present
- Additional Onis 200 handset
- SCREEN ICONS:
- Recommendations and safety information
- Safety information:
- Environmental Protection:
- Setting up the handset
- Installing the handset
- WARNING:
- Inserting and replacing batteries
- Changing the handset language
- Registering the handset with a base station
- English
- ONIS 200 or ONIS Vox 200 base stations
- Another base station
- Cleaning your handset
- Using the handset with an ONIS 200 base station
- Using the handset with another GAP standard base station
- Charger wall-mounting
- Battery performance
- Recharging
- Range
- Onis 200 handset keys
- Understanding the menu system
- Using the menus:
- Headings and sub-headings:
- Customising your handset
- Ringer settings
- Ringer volume
- Screen contrast
- Activating/deactivating the key tones
- Using the telephone
- Making a call
- Preparing the number before calling (predial)
- Answering a call
- Using the Intercom
- Internal calls
- NOTE:
- Intercom during external call and call forward
- On the handset(s) called:
- Using the babysit function
- Activating babysit mode
- Deactivating the babysit mode
- Garantie
- Certification of conformity
Brand : PHILIPS
Model : TD6831/HH951F
Category : Phone