Jamie Oliver HB5008 - Hand blender TEFAL - Free user manual and instructions
Find the device manual for free Jamie Oliver HB5008 TEFAL in PDF.

| Product type | Immersion blender |
| Brand | Tefal |
| Model | Jamie Oliver HB5008 |
| Power (estimated) | 700 W |
| Supply voltage | 220-240 V ~ 50/60 Hz |
| Mixing bowl capacity | 0.8 L |
| Mini chopper capacity | 0.5 L |
| Included accessories | Blending shaft, whisk, mini chopper, graduated mixing bowl, wall mount |
| Speeds | 2 speeds with variable control (variable speed and turbo speed) |
| Blade material | Stainless steel |
| Main functions | Blend, whisk, chop |
| Safety | Automatic shut-off in case of overload, sealed motor unit |
| Cleaning | Blending shaft, whisk and bowls are dishwasher-safe; motor unit wiped with a damp sponge |
| Dimensions (estimated) | Height: 40 cm, Width: 8 cm, Depth: 8 cm |
| Weight (estimated) | 0.9 kg |
| Maximum preparation temperature | 80 °C (175 °F) |
| Warranty | 2 years (parts and labor) |
| Repairability | Spare parts available from authorized after-sales service |
Frequently Asked Questions - Jamie Oliver HB5008 TEFAL
User questions about Jamie Oliver HB5008 TEFAL
0 question about this device. Answer the ones you know or ask your own.
Ask a new question about this device
Download the instructions for your Hand blender in PDF format for free! Find your manual Jamie Oliver HB5008 - TEFAL and take your electronic device back in hand. On this page are published all the documents necessary for the use of your device. Jamie Oliver HB5008 by TEFAL.
USER MANUAL Jamie Oliver HB5008 TEFAL
B1 Speed control dial
C Speed 2 start button (high speed)
D Accessory ejection button
E Blender shaft
F Attachment unit for whisk
G Whisk
H Graduated blender bowl (0.8 L)
H1 Blender bowl lid
I Mini-chopper
I1 Mini-chopper lid
I2 Mini-chopper blade with blade protector
13 Mini-chopper bowl (0.5 L)
14 Non-slip mat
] Wall mount
Safety instructions
- This appliance complies with applicable technical rules and standards at time of manufacture.
- It is designed to run only on alternating current. Please check before first use that the mains power supply corresponds to that indicated on the appliance's rating plate. Any error in connection will cancel the terms of the warranty.
- Never touch moving parts. Never handle the blender shaft blade or the whisk when the appliance is connected. Never run the blender shaft without food.
- 'when handling the mini-chopper blade, always hold it by the axis.
- CAUTION: the blades are extremely sharp.
- Care is needed when removing the blade from the bowl, emptying the bowl and during cleaning.
- Do not immerse the motor unit or put it under water.
-
Unplug the blender:
-
if it is left unattended,
- if it is not working correctly,
-
before assembly, disassembly, cleaning or maintenance.
* after each use. -
Switch off the appliance before changing accessories or touching parts which move in use.
- Do not place or use this appliance on a hot plate or close to a flame (gas cooker).
-
You must not use a household electrical appliance if:
-
it has been dropped,
-
it is damaged or incomplete,
-
the power cord appears faulty or shows signs of damage.
-
If the power supply cord is damaged, it must be replaced by an authorised service centre to avoid any risk of danger.
- Never pull the power cord to unplug the appliance.
- Only use an extension cord if you have already checked that it is in good working order.
- Do not let the power cord hang down.
- Do not disassemble the appliance. The only procedures you need to make are cleaning and ordinary maintenance.
- For all other repairs, YOU MUST contact an authorised service centre.
- This product has been designed for domestic use only. Any commercial use, inappropriate use or failure to comply with the instructions, the manufacturer accepts no responsibility and the guarantee will not apply.
- This appliance is not intended for use by persons (including children) with reduced physical, sensory or mental capabilities, or lack of experience and knowledge, unless they have been given supervision or instruction concerning use of the appliance by a person responsible for their safety. Children should be supervised to ensure that they do not play with the appliance.
- Do not use the blender shaft or the whisk in the mini-chopper bowl.
Using your hand blender
Using the blender shaft:
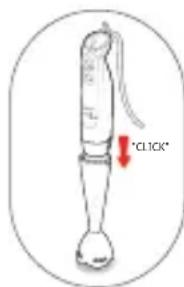
Insert the shaft (E) onto the motor unit (A) until you hear the "click" that tells you it has locked.
Your blender is ideal to prepare sauces, soups, cocktails, milk-shakes, mayonnaise, pancake mixes, waffle mixes.
To avoid splashing, first immerse the hand blender head into the mixture, plug in the appliance and then press the button (B), using the dial B1 to adjust the speed, or press the button (C), then move the hand blender in a circular movement as well as up and down to mix the ingredients thoroughly. After use, switch the appliance off, unplug then press the ejection button (D) to remove the blender shaft accessory.
Using the whisk:
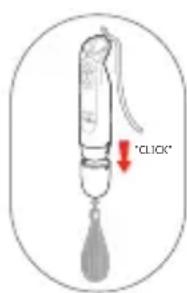
Fit the whisk (G) into the attachment unit (F), then slot the assembly onto the motor unit (A) until you hear the "click" that tells you it has locked. You can use the whisk to make light preparations (pancake mix, whip egg white, chantilly whipped cream, etc.). Plug in the appliance and then press the button (B), using the dial B1 to set the speed, or press the button (C). Unplug the appliance before pressing the ejection button (D) to remove the whisk accessory.
Using the mini-chopper:
Before using the mini-chopper:
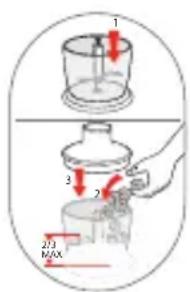
- First remove the protector from the blade (I2) then fit it carefully in the bow on the central axis. Remember to replace the protector once you have finished your preparation.
- Place the bowl on the non-slip mat (I4). Put the food into the bowl.
- Place the lid (I1) and then the motor unit (A) on the lid (I1).
- Plug in the appliance and then press the button (B), using the dial B1 to set the speed, or press the button (C). Use the mini-chopper to chop parsley, onion, garlic, meat (250g) , hazelnuts (100g) , etc. The bowl (I3) should be 2/3 full at most.
GB
Practical hints
- You should never fill the bowl more than 2/3 full when blending or whipping to avoid spillages.
- The preparation must at least cover the lower part of the blender shaft for the blending to be successful.
- Remove bone and gristle from meat before putting it in the bowl.
- When using the blender shaft to process hot preparations directly in the cooking pan, remove the pan from the heat source first and leave to cool slightly. When blending hot food in the mini-chopper bowl, leave them to cool for a while before putting them in the bowl.
- Do not blend food and liquids at a temperature higher than 80^ (175°F).
- For fibrous foods (leeks, celery, asparagus, etc.) clean the blender shaft regularly during use while following the safety instructions for disassembly and cleaning.
- For fruit-based preparations, first cut up the fruit and remove pips and stones.
- Do not use the appliance with hard food like coffee beans, ice cubes, sugar, cereals, whole spices, grains and chocolate.
- Do not use the blender shaft or the whisk in the mini-chopper bowl.
- Recommended processing times for the mini-chopper:
| Ingredients Max. | quantity Time (in max | speed) |
| Raw meat (cut into pieces) | 250g8sec | |
| Parsley 50g 8sec | ||
| Walnuts 100g 10sec | ||
| Gruyère cheese (cut into cubes) | 150g 10sec | |
| Onions (cut into quarters) | 150g 8sec |
Cleaning
CAUTION: the blades are extremely sharp.
- Always unplug the appliance before cleaning it.
- Do not put the appliance, power supply cord or plug into water or any other liquid.
- Never put the motor unit (A), the attachment unit for the whisk (F) or the mini-chopper lid (I1) in the dishwasher.
Never immerse them in water or put them under the tap. Clean with a moist sponge.
- You can clean the blender shaft (E) (blade facing upwards), whisk (G) (whisk side facing upwards), graduated mixing (H), blade (I2) and the mini-chopper bowl (I1) in the dishwasher.
- We advise you to clean the blender shaft immediately after each use. If the plastic parts become discoloured by food like carrots, rub them with a cloth soaked in cooking oil and then clean as usual.
Storage

Use the wall mount (J) so you can always have your blender ready to hand.
To secure the wall mount, drill two attachment points horizontal to each other with a gap of 59mm then place the mount the right way up on the attachment screws.
Electrical or electronic product at end of service life

Environment protection first !
① Your appliance contains valuable materials which can be recovered or recycled.
Leave it at a local civic waste collection point.
HELPLINE: If you have any product problems or queries, please contact our Customer Relations Team first for expert help and advice: 0845 602 1454 - UK (01) 677 4003 - Ireland or consult our website - www.tefal.co.uk