Vera F2401 - Smartphone ORA - Free user manual and instructions
Find the device manual for free Vera F2401 ORA in PDF.

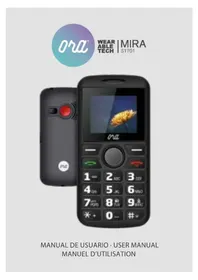
| Product Type | Smartphone (keyboard phone) |
| Brand | ORA |
| Model | Vera F2401 |
| Power | Removable battery (estimated 1000 mAh), charging via Micro USB |
| Screen | Color LCD screen (size not specified) |
| Dimensions | Approximately 125 x 60 x 12 mm (estimated) |
| Weight | Approximately 90 g (estimated) |
| Connectivity | Micro USB, 3.5mm headphone jack |
| Camera | Built-in camera (likely VGA) |
| Memory | Micro SD card (capacity not specified, estimated max 32 GB) |
| Main functions | Calls, SMS, flashlight, SOS, alarm, calendar, contacts, speed dial M1/M2 |
| Ringtones | Polyphonic ringtones, support for custom audio files |
| Special buttons | Dedicated SOS button, left/right function keys, M1/M2 keys |
| Care and cleaning | Clean with a soft, dry cloth. Do not use chemical products. |
| Safety | Do not expose to moisture or extreme temperatures. Use only the supplied charger. |
| Spare parts and repairability | Removable battery, charger and Micro USB cable available. Repair by authorized after-sales service. |
| General information | Warranty according to ORA Wearable Tech conditions. Support: http://www.orawearabletech.com |
Frequently Asked Questions - Vera F2401 ORA
User questions about Vera F2401 ORA
0 question about this device. Answer the ones you know or ask your own.
Ask a new question about this device
Download the instructions for your Smartphone in PDF format for free! Find your manual Vera F2401 - ORA and take your electronic device back in hand. On this page are published all the documents necessary for the use of your device. Vera F2401 by ORA.
USER MANUAL Vera F2401 ORA
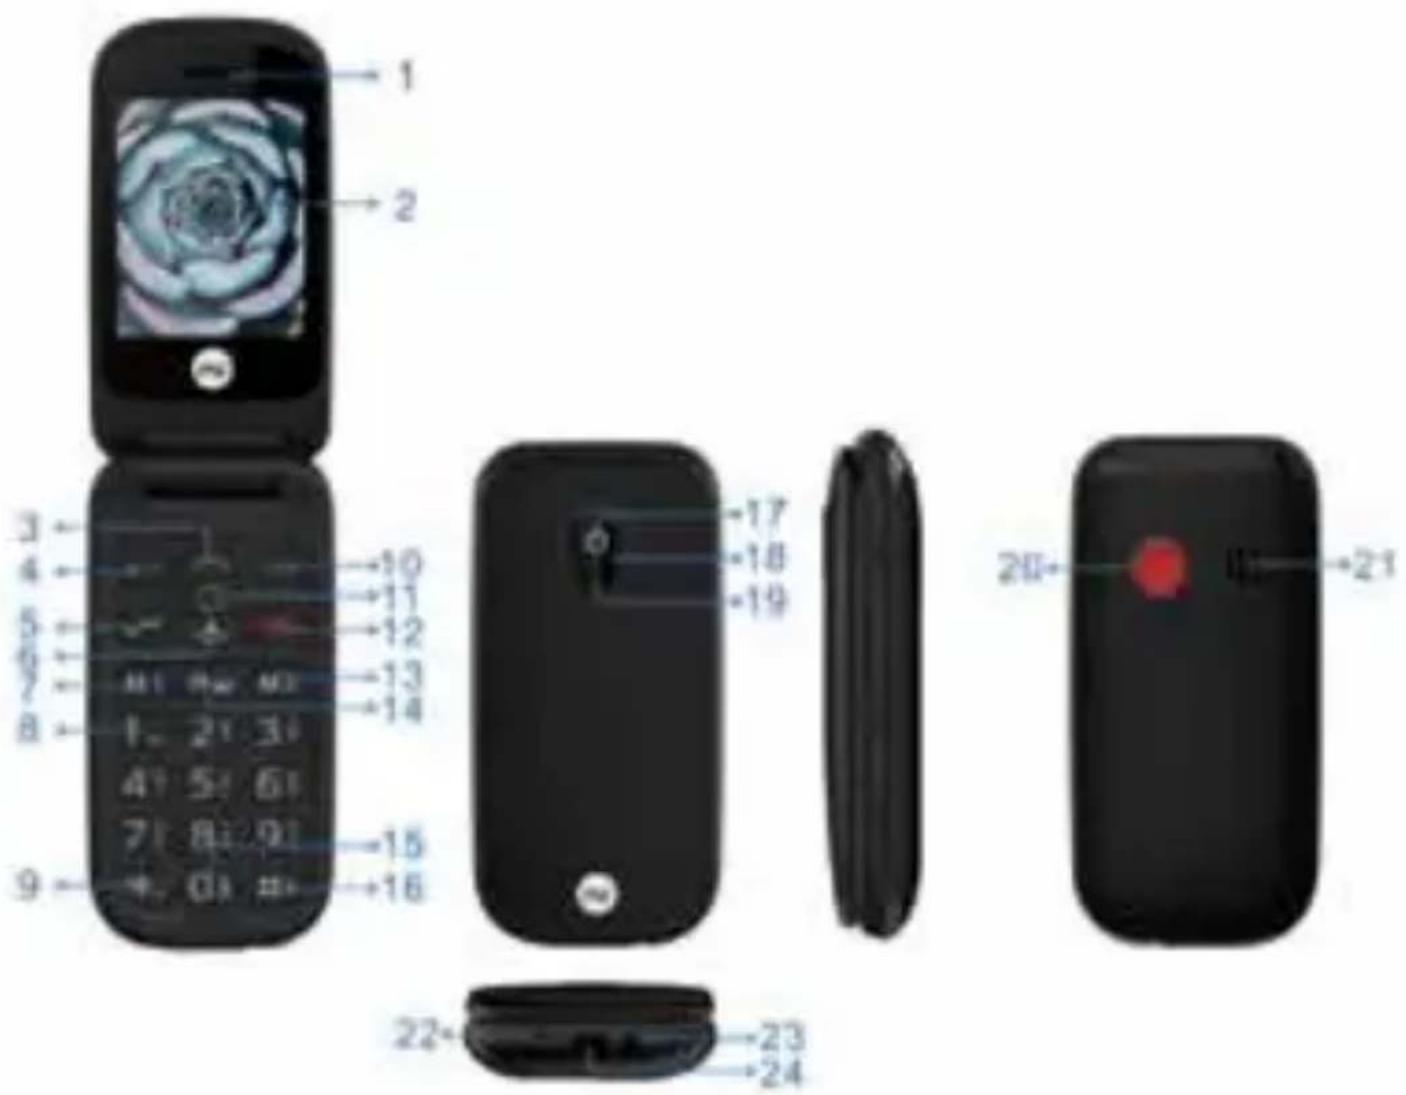
- Receiver
- Screen
- Arrow button (up): Shorcut to text message in standby mode
4.Left menu key / main menu - Green call button / call list: Call in standby mode/ OK button
- Arrow button (down): Call the Speed
Dial contacts in standby mode
- Direct dial button M1 / Move to the left
-
1 key/Voice mail (press and hold 2 sec)
-
- Button: Press this key in standby mode to enter the following characters: * /+ /P / W.
-
Arrow button (down): Call the Speed dial contacts in standby mode
- OK key
- Power button (press and hold 8 seconds), ending call, reject call
- Direct dial button M2 / Move to the right
- Camera button / Speaker switch
- Flashlight: By long press 0 key for 3 seconds to activate / deactivate the flashlight
-
Key / Pound: In the standby mode, by long pressing enable / disable the silent mode. In the edit mode: change the input method
- Camera
- Red LED: Low battery (flashing) / charging mode (lights up)
- LED Torch
- SOS Emergency button
- Polyphonic speaker
- Microphone
- Connection for Headset (3.5mm)
- Micro USB charger connect
GETTING STARTED
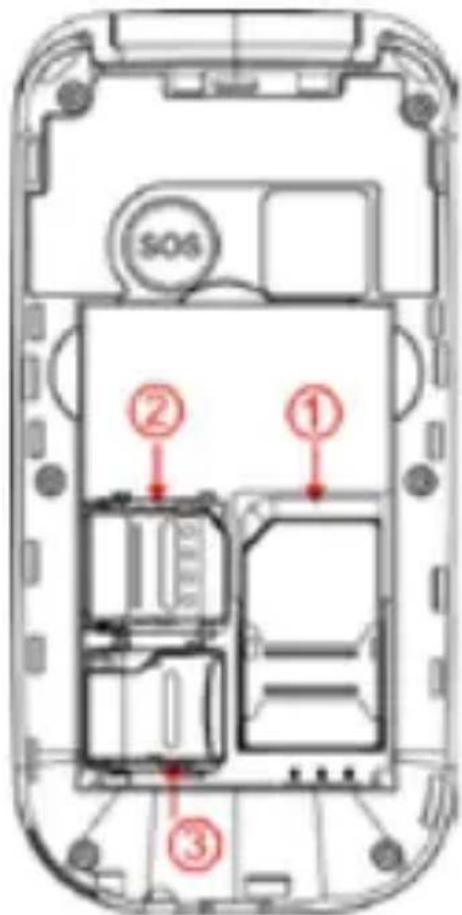
Inserting a SIM card
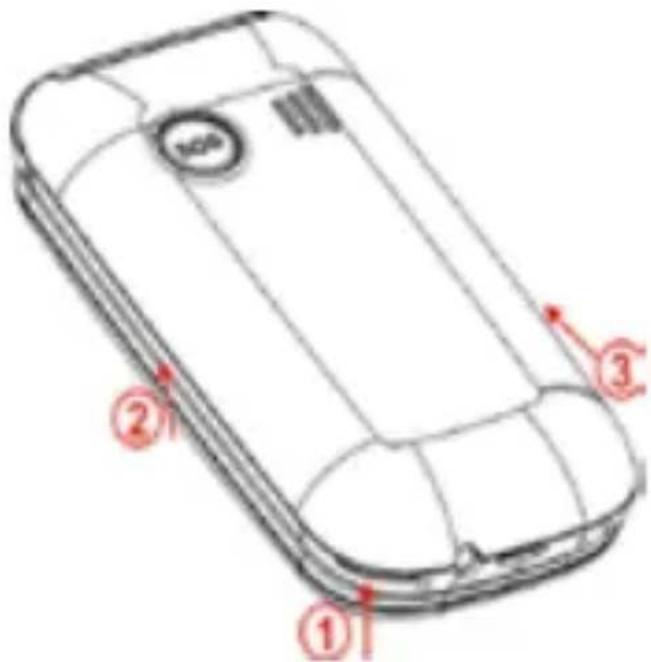
- Remove the battery cover (opening in the bottom left-hand corner)
- Slide the SIM card into the SIM card holder with gold contacts facing down.
- Slide your MicroSD card into the card holder with gold contacts facing down
Inserting and battery
- Insert the battery, making sure that battery contacts touch the gold contacts, then place the battery cover and press down until it clicks into place.
USING THE PHONE
In standby mode the phone is one, but is not running any applications (call, SMS message, etc.).
> Using the menu
Press Left menu key (left 3-dot key) to open the menu.
- Press Up/Down arrow keys to flick through the menu items.
- Press Left menu key to open a menu item.
- To return to standby mode, press Red button or close the phone.
> Dual-function keys
Some keys have additional functions if they are pressed and held down for a few seconds.
- Number 1 key: Listen to mailbox.
-
(Pound) key: Switch between normal mode and meeting (vibrate only) mode.
- Number 0 key: Torch on continuously when the phone is on.
SAVING CONTACTS TO PHONEBOOK
Contacts/Phonebook can be accessed by pressing the right menu key (right 3-dot key) OR pressing the left menu key (left 3-dot key) in standby mode, selecting Contacts -> OK
- Press Options > New > OK
- To input contact's name, use down arrow key to move the highlight to Name, then press Edit. Press OK when finish.
- To input phone number, press the down arrow button to move the highlight to Mobile or Home number, press edit, press OK when finish.
Please note: You can assign specific ringtone to each contact. Simply move the highlight to Default ringtone, press Edit then select ringtone from Phone ringtones or your own sound files.
CHANGING THE RINGTONE
Press the Left Menu key in standby Mode Scroll to and select Settings
- Select Profiles
- Select Normal (or your current Profile)
- Select Option > Settings > OK
- Scroll to and select Ring Settings > Caller ringtone > Select
- Choose ringtone from Fixed ringtones (comes with the phone) or More ringtones (download from your computer to phone memory or optional Micro SD card)
- Press OK > Done to return to the previous menu.
- Repeat step 3 and 4, select Message ringtone to change incoming message ringtone.
SETTING UP THE SOS FUNCTION
- Press the Left Menu key (on keypad)
- Scroll to and select Settings
- Select SOS setting > OK (Ensure Status is checked), scroll to Set SOS numbers > Select
- Select No. 1. (if no numbers have been previously programmed it will be empty)
-
You can use keypad to key in the SOS contact numbers, or press Contacts to choose a saved contact from Phonebook.
-
Press Save.
- Repeat steps 5-7 to add up to 6 SOS contacts. When activated, the phone will dial the phone numbers in order of entry.
- Select SOS message.
- The default SMS is "SOS!!" To change this, press the right menu key to clear the message and Edit your own words. Press Save after done.
Please note: SOS message will only be sent to mobile phone numbers (in SOS list). SOS calls need to be accepted by the receiver within a specific timeframe. If you are programming a phone number that has an automatic answering feature please test before use.
SETTING UP THE M1/M2 DIAL
Please note: A valid SIM card needs to be installed in order to set up the Speed dial function.
- Press Menu button (on keypad)
- Scroll to and select Settings
- Scroll to and select Speed dial
- Select Option > Edit > Input number > OK
Note: Once you set the number, next time you go the interface, you can "View/Edit/Modify contactor/call/delete" it
MEETING (VIBRATE ONLY) MODE
When in standby mode, the phone can be changed to meeting (Vibrate only) mode by pressing and holding the pound (#) key
for three seconds. Repeat the step will switch the phone back to normal mode.
ENABLECALL/DIALNUMBERSOUND
- Press the Menu button (on keypad)
- Scroll to and select Settings
- Scroll to and select Number sound
- Press OK then press select
"Dial number sound"
"Call in number"
RESTORE FACTORY SETTINGS
- Press the Menu button (on keypad)
- Scroll to and select Settings
- Scroll to and select Restore factory settings
- Enter password (default 1234)
- Press OK, then OK to confirm
Please note: By performing this function, all settings will be restored to factory default. All information includes contacts will be erased. Please ensure backup all your contacts to SIM card before performing this function.
MON TÉLÉPHONE
Please check terms and conditions of the warranty and Aftersales contact at: http://www.orawearabletech.com
ORA Wearable Tech reserves the right to make changes on the product specifications without notice.
Consulter les conditions de garantie et le service après-vente: http://www.orawearabletech.com
www.orawearabletech.com
Made in china