N5008AB - Stapler HITACHI - Free user manual and instructions
Find the device manual for free N5008AB HITACHI in PDF.
| Product Type | Pneumatic Stapler |
| Brand | Hitachi |
| Model | N5008AB |
| Dimensions (L × H × W) | 367 mm × 244 mm × 70 mm |
| Weight | 2.5 kg |
| Power Source | Compressed air, pressure 70 – 120 psi (4.9 – 8.3 bar) |
| Maximum Supply Pressure | 120 psi (8.3 bar) – do not exceed |
| Magazine Capacity | 156 staples |
| Staple Type | 16 gauge, 7/16" crown, length 7.9 – 25 mm |
| Air Consumption | 0.046 ft³/cycle at 100 psi (1.3 l/cycle) |
| Air Inlet | 3/8 NPT thread |
| Main Functions | Intermittent (trigger) and continuous (safety lever) actuation |
| Noise Level | Hearing protection required (not specified in dB) |
| Maintenance and Cleaning | Purge air filter daily, lubricate with Hitachi oil, clean magazine and feeder mechanism with compressed air |
| Safety | Safety lever, mandatory safety glasses, recommended hearing protection and helmet |
| Spare Parts and Repairability | Repairs exclusively by an authorized Hitachi service center; spare parts available from Hitachi |
| Included Accessories | Safety glasses, Allen key M6, M5, M4, M3 (depending on model) |
| Applications | Wall cladding, roof panels, crate manufacturing, pallets, doors and windows |
| Storage Temperature | Dry and warm place, frost-free |
Frequently Asked Questions - N5008AB HITACHI
User questions about N5008AB HITACHI
0 question about this device. Answer the ones you know or ask your own.
Ask a new question about this device
Download the instructions for your Stapler in PDF format for free! Find your manual N5008AB - HITACHI and take your electronic device back in hand. On this page are published all the documents necessary for the use of your device. N5008AB by HITACHI.
USER MANUAL N5008AB HITACHI
natural_image
Technical line drawing of a mechanical device with no visible text or symbols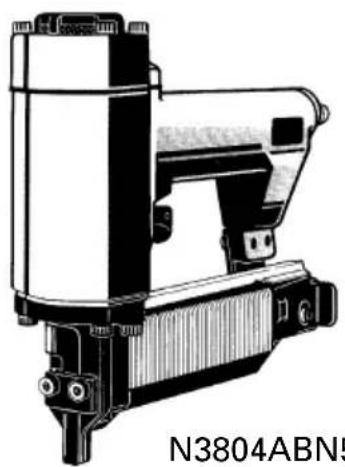
natural_image
Technical line drawing of a mechanical device (no text or symbols on the device itself)N3804ABN5008AB
INSTRUCTION MANUAL AND SAFETY INSTRUCTIONS
DANGER
Improper and unsafe use of this Stapler will result in death or serious injury!
This Manual contains important information about product safety.
Read and understand this Manual before operating the Stapler.
Keep this Manual available for others before they use the Stapler.
MODE D'EMPLOI ET INSTRUCTIONS DE SECURITE
DANGER
IMPORTANT SAFETY INSTRUCTIONS
FOR USING STAPLERS 4
EMPLOYER'S RESPONSIBILITIES 6
OPERATION
NAME OF PARTS 7
SPECIFICATIONS 8
STAPLE SELECTION 8
ACCESSORIES 9
STANDARD ACCESSORIES 9
OPTIONAL ACCESSORIES 9
APPLICATIONS 9
Page
BEFORE OPERATION.... 10
WORKING ENVIRONMENT 10
AIR SUPPLY 10
LUBRICATION 12
COLD WEATHER CARE 12
TESTING THE STAPLER 12
ADJUSTING AIR PRESSURE 14
LOADING STAPLES 15
STAPLER OPERATION.... 15
METHODS OF OPERATION 16
MAINTENANCE
MAINTENANCE AND INSPECTION 17
SERVICE AND REPAIRS 18
WARRANTY.... 59
PARTS LIST 60
TABLE DES MATIERES
Français
Page
INFORMATION IMPORTANTE 21
DEFINITION DES MOTS DE SIGNALISATION ... 21
SECURITE
CONSIGNES DE SECURITE IMPORTANTES
POUR L'UTILISATION DE L'AGRAFEUSE ..... 22
RESPONSABILITES DE L'EMPLOYEUR ..... 25
UTILISATION
NOM DES PIECES 26
SPECIFICATIONS 27
SELECTION DES AGRAFES 27
ACCESSOIRES 28
ACCESSOIRES STANDARD 28
ACCESSOIRES EN OPTION 28
APPLICATIONS 28
Page
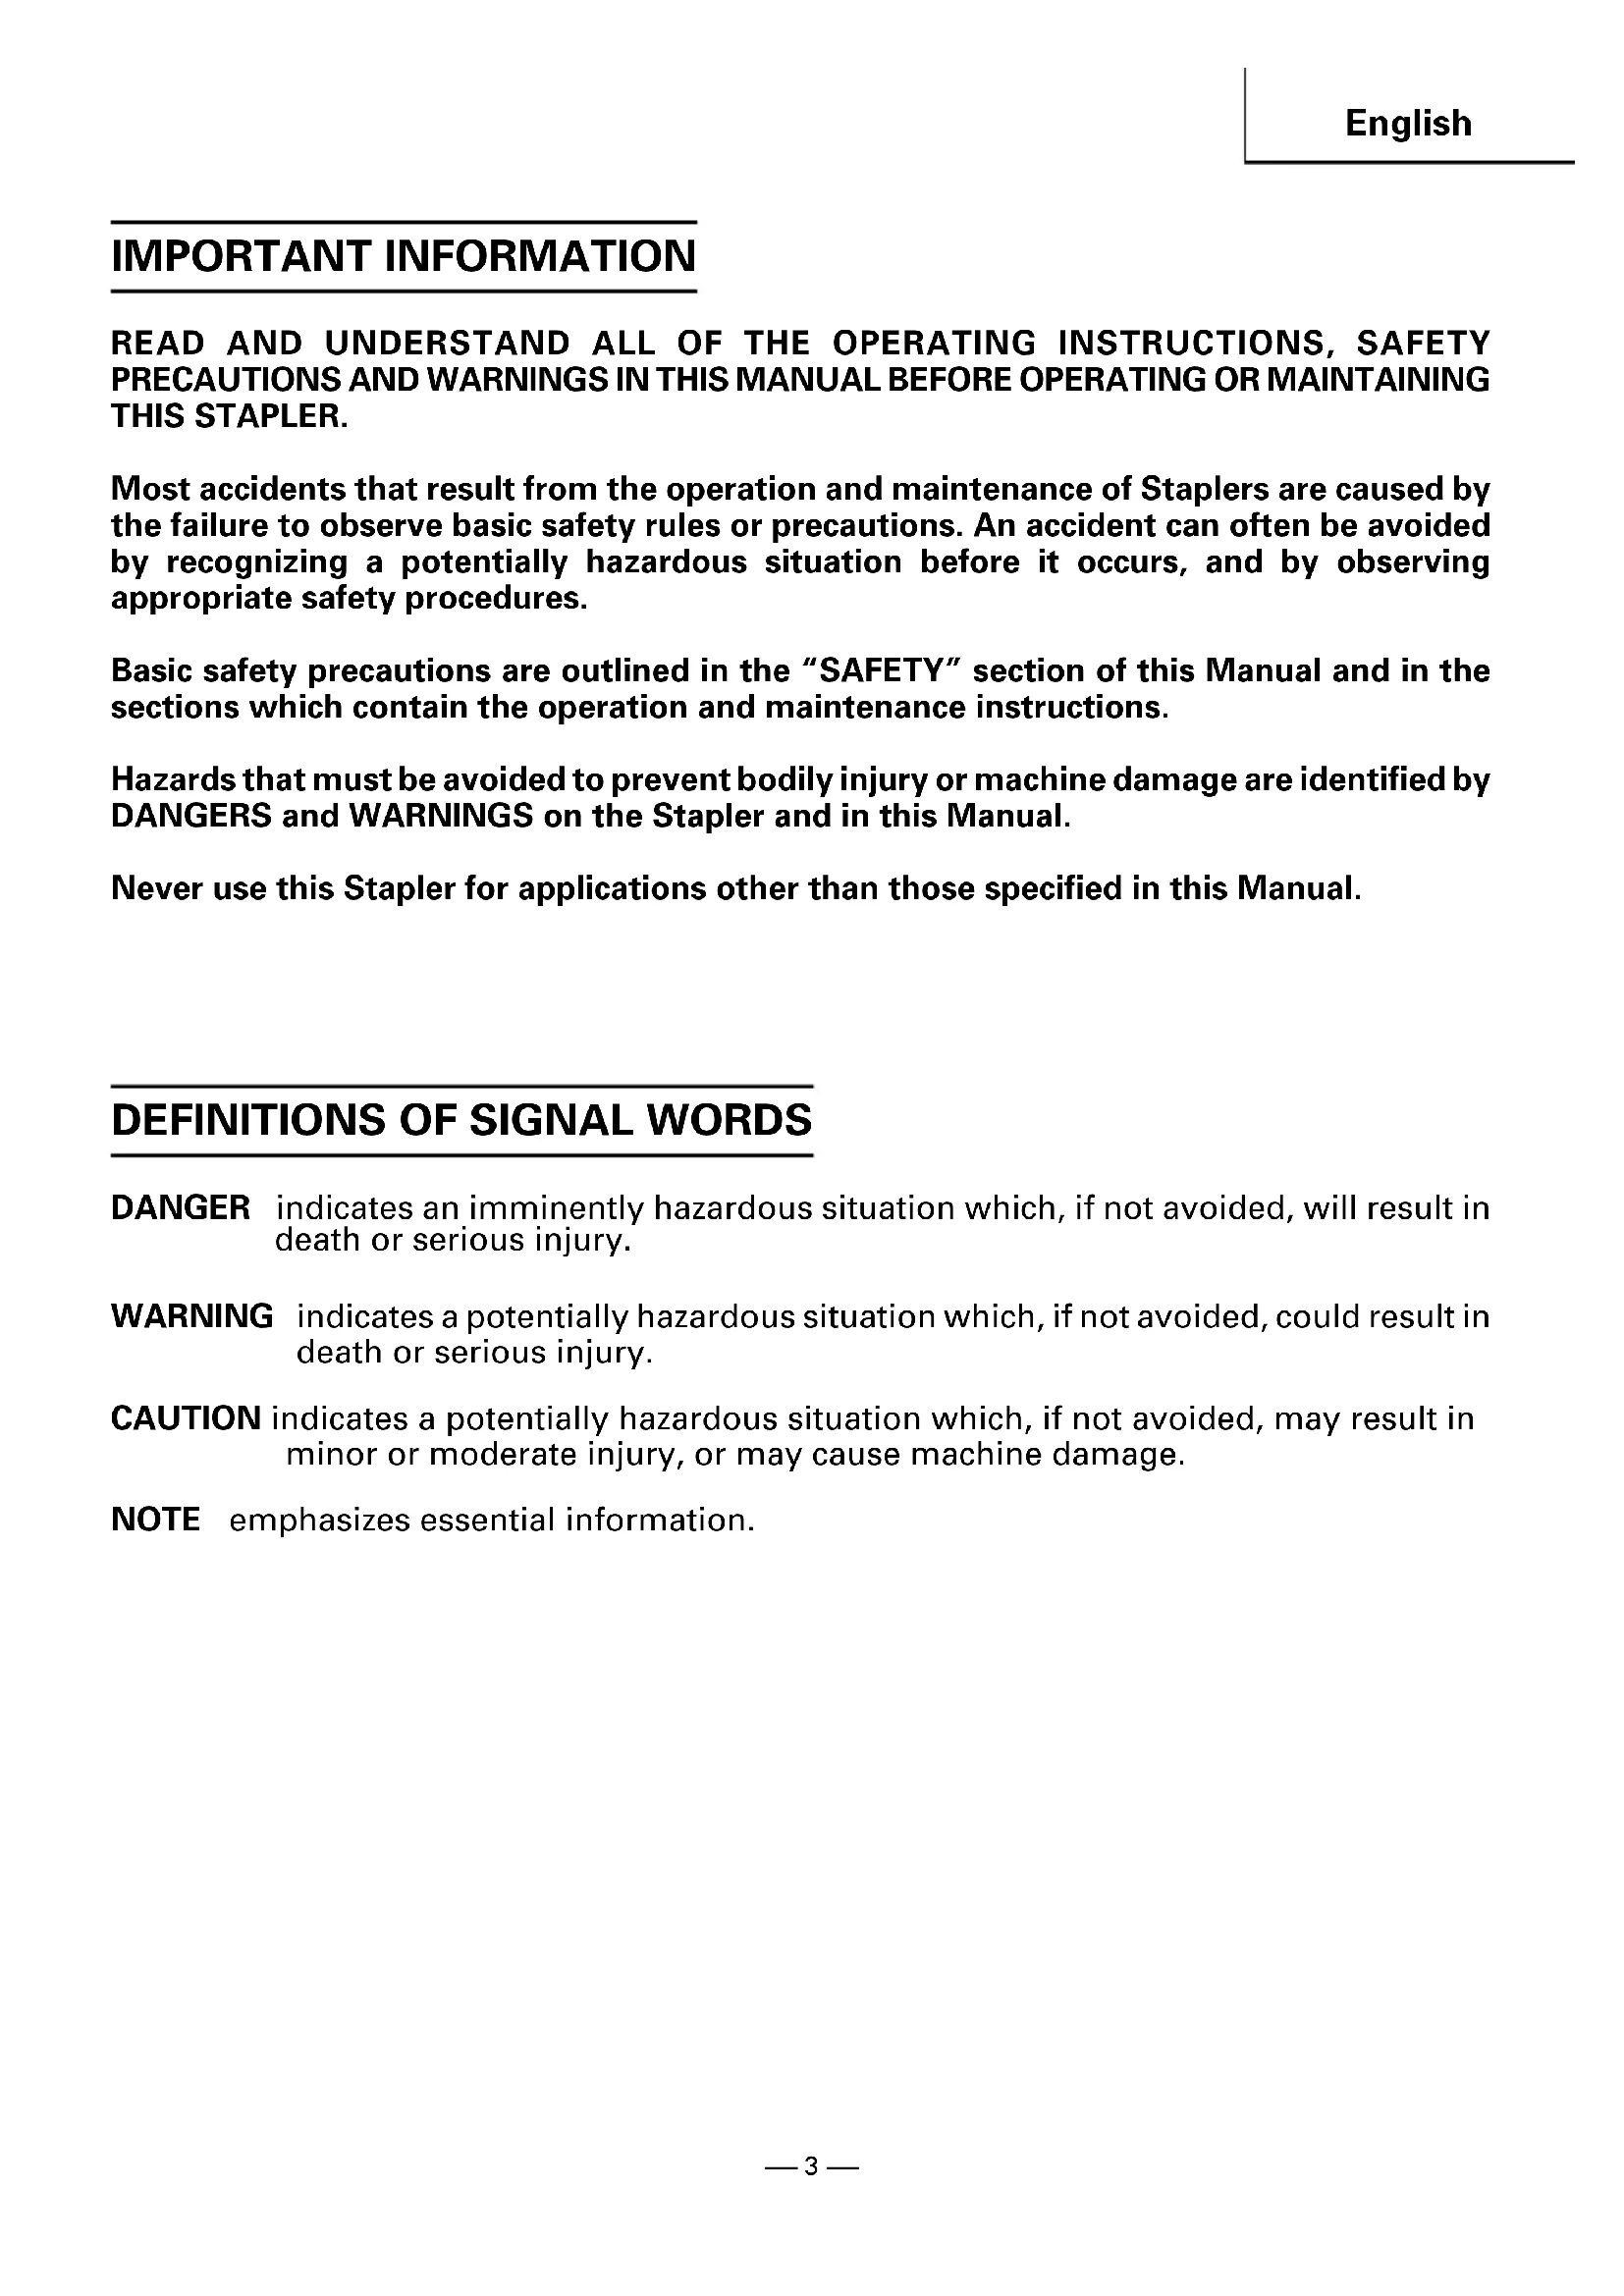
READ AND UNDERSTAND ALL OF THE OPERATING INSTRUCTIONS, SAFETY PRECAUTIONS AND WARNINGS IN THIS MANUAL BEFORE OPERATING OR MAINTAINING THIS STAPLER.
Most accidents that result from the operation and maintenance of Staplers are caused by the failure to observe basic safety rules or precautions. An accident can often be avoided by recognizing a potentially hazardous situation before it occurs, and by observing appropriate safety procedures.
Basic safety precautions are outlined in the "SAFETY" section of this Manual and in the sections which contain the operation and maintenance instructions.
Hazards that must be avoided to prevent bodily injury or machine damage are identified by DANGERS and WARNINGS on the Stapler and in this Manual.
Never use this Stapler for applications other than those specified in this Manual.
DEFINITIONS OF SIGNAL WORDS
DANGER indicates an imminently hazardous situation which, if not avoided, will result in death or serious injury.
WARNING indicates a potentially hazardous situation which, if not avoided, could result in death or serious injury.
CAUTION indicates a potentially hazardous situation which, if not avoided, may result in minor or moderate injury, or may cause machine damage.
NOTE emphasizes essential information.
SAFETY
IMPORTANT SAFETY INSTRUCTIONS
FOR USING STAPLERS
READ ALL INSTRUCTIONS

DANGER
1. ALWAYS WEAR EYE PROTECTOR.

text_image
Warning sign with a face wearing VR goggles and a prohibition symbol for targeting a person's head.When operating the Stapler, always wear eye protector, and make sure others in work area wear eye protector, too.
Eye protector must conform to the requirements of American National Standards Institute, ANSI Z87.1 and provide protection against flying particles both from the front and side.
The employer must enforce the use of eye protector by the Stapler operator and others in work area.
Never use oxygen, combustible gases or any other bottled gases as a power source for the Stapler.
Use of the above gases is dangerous, as the Stapler will explode.
Use only clean, dry, regulated compressed air.

WARNING
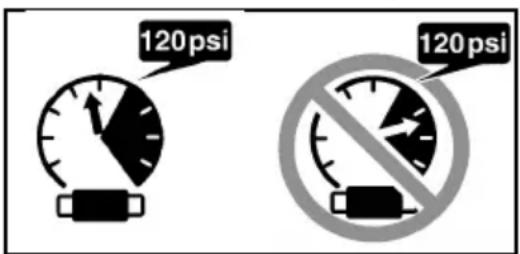
3. DO NOT EXCEED 120 psi.
text_image
120 psi 120 psiDo not exceed maximum recommended air pressure 120 psi (8.3 bar 8.5 kgf/cm ^4 ).
Never connect the Stapler to pressure which potentially exceeds 200 psi (13.7 bar 14 kgf/cm ^2 ) as the Stapler can burst.
4. NEVER POINT STAPLER TOWARD YOURSELF OR ANYONE ELSE.
Always assume the Stapler contains fasteners.
Never point the Stapler toward yourself or anyone else, whether it contains fasteners or not.
If fasteners are mistakenly driven, it can lead to severe injuries.
Never engage in horseplay with the Stapler.
Respect the Stapler as a working implement.
5. NEVER CARRY WITH FINGER ON TRIGGER.
Remove finger from trigger when not driving fasteners.
Never carry the Stapler with finger on trigger since you could drive a fastener unintentionally and injure yourself or someone else.
Always carry the Stapler by the handle only.
6. ALWAYS WEAR EAR AND HEAD PROTECTOR.
Always wear ear protector to protect your ears from loud noise.
Always wear head protector to protect your head from flying objects.
7. STORE STAPLER PROPERLY.
When not in use, the Stapler should be stored in a dry place. Keep out of reach of children. Lock the storage area.
8. KEEP WORK AREA CLEAN.
Cluttered areas invite injuries. Clear all work areas of unnecessary tools, debris, furniture, etc.
9. NEVER USE IN PRESENCE OF FLAMMABLE LIQUIDS OR GASES.
The Stapler produces sparks during operation.
Never use the Stapler in sites containing lacquer, paint, benzine, thinner, gasoline, gases, adhesive agents, and other materials which are combustible or explosive.
10. KEEP VISITORS AWAY.
Do not let visitors handle the Stapler.
All visitors should be kept safely away from work area.
11. DRESS PROPERLY.
Do not wear loose clothing or jewelry as they can be caught in moving parts.
Rubber gloves and nonskid footwear are recommended when working outdoors.
Wear protective hair covering to contain long hair.
12. NEVER USE NON RELIEVING COUPLER ON STAPLER.
If a non relieving coupler is used on the Stapler, the Stapler can remain charged with air after disconnecting and thus will be able to drive a fastener even after disconnecting.
The Stapler and air hose must have a hose coupling such that all pressure is removed from the Stapler when the coupling joint is disconnected.
13. CHECK PUSH LEVER BEFORE USE.
Make sure the push lever operates properly. (The push lever may be called "Safety".) Never use the Stapler unless the push lever is operating properly, otherwise the Stapler could drive a fastener unexpectedly. Do not tamper with or remove the push lever, otherwise the push lever becomes inoperable.
14. KEEP ALL SCREWS AND COVERS TIGHTLY IN PLACE.
Keep all screws and covers tightly mounted. Check their condition periodically.
Never use the Stapler if parts are missing or damaged.
15. DO NOT LOAD FASTENERS WITH TRIGGER PULLED OR PUSH LEVER DEPRESSED.
When loading fasteners into the Stapler or when connecting the air hose,
1) do not pull the trigger;
2) do not depress the push lever; and
3) keep the Stapler pointed downward.
16. KEEP HANDS AND FEET AWAY FROM FIRING HEAD DURING USE.
Never place your hands or feet closer than 8 inches (200 mm) from the firing head.
A serious injury can result if the fasteners are deflected by the workpiece, or are driven away from the point of entry.
17. PLACE STAPLER PROPERLY ON WORKPIECE.
Do not drive fasteners on top of other fasteners or with the Stapler at too steep of an angle; the fasteners can ricochet and hurt someone.
18. HOLD STAPLER FIRMLY TO MINIMIZE RECOIL.
Recoil can result in a second fastener being driven unintentionally.
19. DO NOT DRIVE FASTENERS INTO THIN BOARDS OR NEAR CORNERS AND EDGES OF WORKPIECE.
The fasteners can be driven through or away from the workpiece and hit someone.
20. NEVER DRIVE FASTENERS FROM BOTH SIDES OF A WALL AT THE SAME TIME.
The fasteners can be driven into and through the wall and hit a person on the opposite side.
21. CHECK FOR LIVE WIRES.
Avoid the risk of severe electrical shock by checking for live electrical wires that may be hidden by walls, floors or ceilings. Turn off the breaker switch to ensure there are no live wires.
22. NEVER CARRY STAPLER BY HOSE.
23. DO NOT OVERREACH.
Keep proper footing and balance at all times.
24. NEVER USE STAPLER WHICH IS DEFECTIVE OR OPERATING ABNORMALLY.
If the Stapler appears to be operating unusually, making strange noises, or otherwise appears defective, stop using it immediately and arrange for repairs by a Hitachi authorized service center.
SAFETY — Continued
25. DO NOT DISCONNECT AIR HOSE FROM STAPLER WITH FINGER ON TRIGGER.
The Stapler can fire when re-connected to an air supply.
26. DISCONNECT AIR HOSE FROM STAPLER WHEN:
1) doing maintenance and inspection;
2) clearing a jam;
3) it is not in use;
4) leaving work area;
5) moving it to another location; and
6) handing it to another person.
Never attempt to clear a jam or repair the Stapler unless you have disconnected air hose from the Stapler and removed all remaining fasteners from the Stapler.
The Stapler should never be left unattended since people who are not familiar with the Stapler might handle it and injure the themselves.
27. STAY ALERT.
Watch what you are doing. Use common sense.
Do not operate the Stapler when you are tired.
The Stapler should never be used by you if you are under the influence of alcohol, drugs or medication that makes you drowsy.
28. HANDLE STAPLER CORRECTLY.
Operate the Stapler according to this Manual.
Never allow the Stapler to be operated by children, individuals unfamiliar with its operation or unauthorized personnel.
29. NEVER USE STAPLER FOR APPLICATIONS OTHER THAN THOSE SPECIFIED IN THIS MANUAL.
30. HANDLE STAPLER CAREFULLY
Because of high air pressure in the Stapler, cracks in the surface are dangerous.
To avoid this, do not drop the Stapler or strike the Stapler against hard surfaces; and do not scratch or engrave signs on the Stapler. Handle the Stapler carefully.
31. MAINTAIN STAPLER WITH CARE.
Keep the Stapler clean and lubricated for better and safer performance.
32. USE ONLY PARTS, ACCESSORIES OR FASTENERS SUPPLIED OR RECOMMENDED BY HITACHI.
Unauthorized parts, accessories, or fasteners may void your warranty and can lead to malfunction and resulting injuries.
Only service personnel trained by Hitachi, distributor or employer shall repair the Stapler. Do not modify the Stapler without the written approval of Hitachi.
EMPLOYER'S RESPONSIBILITIES
- Ensure that this MANUAL is available to operators and personnel performing maintenance.
- Ensure that Staplers are used only when operators and others in work area are wearing EYE PROTECTOR.
- Enforce the use of EYE PROTECTOR by operators and others in work area.
- Keep Staplers in safe working order.
- Maintain Staplers properly.
- Ensure that Staplers which require repair are not further used before repair.
SAVE THIS MANUAL AND KEEP IT AVAILABLE FOR OTHERS!
OPERATION
NOTE:
The information contained in this Manual is designed to assist you in the safe operation of the Stapler.
Some illustrations in this Manual may show details or attachments that differ from those on your own Stapler.
NAME OF PARTS

text_image
Exhaust Cover Body Trigger Cover Lock Lever Blade Guide Push Lever Firing Head (Outlet) Staple Feeder Staple Guide N 5008AB Exhaust Cover Body Trigger Cover M5 Hex. Socket Hd. Bolt Bridge Piece Push Lever Front Nose Firing Head (Outlet) Back Nose Staple Feeder Staple Guide N3804ABSPECIFICATIONS
| Model | N5008AB N3804AB | |
| Operating pressure | 70 – 120 psi (4.9 – 8.3 bar 5 – 8.5 kgf/cm2) | |
| DimensionsLength × Height × Width | 14 - 7/16" × 9 - 5/8" × 2 - 3/4"(367 mm × 244 mm × 70 mm) | 9 - 23/32" × 8" × 2 - 7/32"(247 mm × 203 mm × 56 mm) |
| Weight | 5.5 lbs. (2.5 kg) 2.9 lbs. (1.3 kg) | |
| Nail capacity | 156 Staples 125 Staples | |
| Air consumption | .046 ft3/cycle at 100 psi .032 ft 3/cycle at 100 psi(1.3 ltr/cycle at 6.9 bar) (.9 ltr/cycle at 6.9 bar)(1.3 ltr/cycle at 7kgf/cm2) (.9 ltr/cycle at 7kgf/cm2) | |
| Air inlet | 3/8" NPT Thread | |
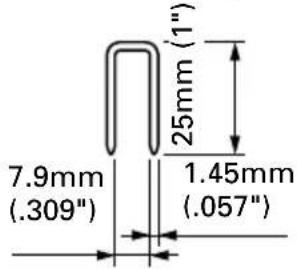
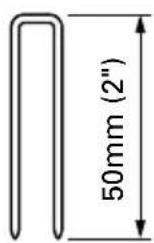
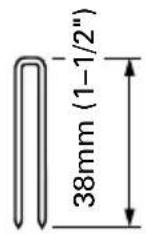
STAPLE SELECTION
Only staples shown in the Table below can be driven with this Stapler.
Dimensions of staples
| N5008AB N3804AB | |||
| 16 Gauge 7/16" Crown 18 Gauge 1/4" Crown | |||
| Min. Max. Min. Max. | |||
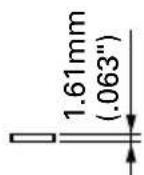 | 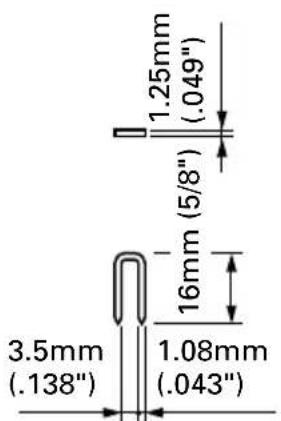 | ||
 |  |  | |
ACCESSORIES
WARNING
- Accessories other than those shown below can lead to malfunction and resulting injuries.
STANDARD ACCESSORIES

text_image
Diagram showing five types of hairless goggles with numbered labels for identification.| Model N5008AB N3804AB | |
| 1Eye protector 1 1 | |
| 2Allen wrench for M6 screw 1 | |
| 3Allen wrench for M5 screw 1 1 | |
| 4Allen wrench for M4 screw 1 1 | |
| 5Allen wrench for M3 screw 1 |
OPTIONAL ACCESSORIES ... sold separately
○Pneumatic Tool Lubricant
.8 oz. (25 cc) oil feeder (Code No.877153)
4 oz. (120 cc) oil feeder (Code No.874042)
1 quart (1 ltr) can (Code No.876212)
NOTE: Accessories are subject to change without any obligation on the part of HITACHI.
APPLICATIONS
○Construction work such as wall sheathing, roof decking, subflooring.
○Mobile and modular home construction.
○Making wooden boxes, and expendable pallets.
○Making cases for furniture
○Creating walls and other areas in mobile homes.
○Making doors and windows for home construction.
BEFORE OPERATION
Read section titled "SAFETY" (pages 4 – 6).
Make sure of the followings before operation.
WORKING ENVIRONMENT

WARNING
- No flammable gas, liquid or other flammable objects at worksite.
- Clear the area of children or unauthorized personnel.
AIR SUPPLY

DANGER

text_image
AIR●Never use oxygen, combustible gases or any other bottled gases.

WARNING
- Never connect Stapler to pressure which potentially exceeds 200 psi (13.7 bar 14kgf/cm^2 ).
●Never use non relieving coupler on Stapler.
1. Power source
○Use only clean, dry, regulated compressed air as a power source for this Stapler.
○Air compressors used to supply compressed air to this Stapler must comply with the requirements of the latest version of ANSI Standard B 19.3 "Safety Standard For Compressors For Process Industries."
○Moisture or oil in the air compressor may accelerate wear and corrosion in the Stapler. Drain daily.
2. Filter-Regulator-Lubricator
○ Use a regulator with a pressure range of 0 – 120 psi (0 – 8.3 bar 0 – 8.5 kgf/cm²).
○Filter-regulator-lubricator units supply an optimum condition for the Stapler and extend the Stapler life. These units should always be used.
Filter .... The filter removes moisture and dirt mixed in compressed air. Drain daily unless fitted with an automatic drain. Keep the filter clean by regular maintenance.
Regulator .... The regulator controls the operating pressure for safe operation of the Stapler. Inspect the regulator before operation to be sure it operates properly.
Lubricator ...... The lubricator supplies an oil mist to the Stapler.
Inspect the lubricator before operation to be sure the supply of lubricant is adequate.
Use Hitachi pneumatic tool lubricant.
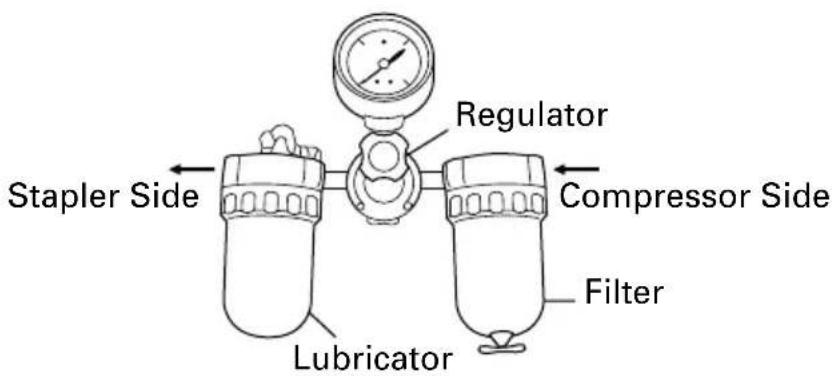
text_image
Regulator Stapler Side Compressor Side Filter Lubricator3. Air hose
Air hose must have a minimum working pressure rating of 150 psi (10.4 bar 10.6 kgf/cm ^2 ) or 150% of the maximum pressure produced in the system, whichever is higher.
4. Hose coupling
○The Stapler can be installed as follows:
Remove the dust cap placed at the air inlet.
Install a 3/8 NPT male plug at the air inlet.
○A female coupler must be on the air hose.
The hose coupling (male plug-female coupler) must remove all pressure from the Stapler when disconnected.
Stapler use a non relieving coupler on the Stapler.
5. Air consumption
Using the Air consumption table and the Air compressor size formula, find a correct compressor size.
Air consumption table
| Operating pressure (bar) (5.5) (6.2) (6.9)(kgf/cm2) (5.6) (6.3) (7) | ||||
| Air consumption ft3/cycle(ltr/cycle) | N5008AB | .035 .040 .046(1.0) (1.1) (1.3) | ||
| N3804AB | .025 .029 .032(.7) (.8) (.9) | |||
Air compressor size formula
Amount of air required
=number of Staplers
× average staples driven each minute per Stapler
× air consumption at given air pressure
× safety factor (always 1.2)
Example: 3 Staplers (N5008AB) operating at 100 psi driving 30 staples per minute
Amount of air required
$$ \begin{array}{l} = 3 \times 3 0 \times . 0 4 6 (1. 3) \times 1. 2 \ = 5. 0 \text { CFM } (\mathrm{ft} ^ {3} / \min) (1 4 0 \mathrm{ltr} / \min) \ \end{array} $$
After making the calculations as shown above, you should find a compressor providing 5 CFM of air that is required.
LUBRICATION
It is important that the Stapler be properly lubricated.
Without proper lubrication, the Stapler will not work properly and parts will wear prematurely.
○Use Hitachi pneumatic tool lubricant.
Do not use detergent oil or additives. These lubricants will harm the O-rings and other rubber parts. This will cause the Stapler to malfunction.
○Filter-regulator-lubricator units should always be used.
Keep the lubricator filled with Hitachi pneumatic tool lubricant.
☐ If a lubricator is not available, supply 2 – 3 drops of Hitachi pneumatic tool lubricant into the air plug on the Stapler twice a day.
COLD WEATHER CARE
○Do not store the Stapler in a cold weather environment.
Keep the Stapler in a warm area until beginning the work.
○If the Stapler is already cold, bring it in a warm area and allow the Stapler to warm up before use.
①Reduce the air pressure to 40 psi (2.8 bar 2.8 kgf/cm ^2 ).
②Remove all staples from the Stapler.
③Connect the air hose and free-fire (blank-fire) the Stapler.
The lowered air pressure will be enough to free-fire the Stapler.
Slow speed operation tends to warm up the moving part.

CAUTION:
- Do not free-fire the Stapler at high pressure.
TESTING THE STAPLER

DANGER

text_image
Safety warning sign showing a helmet with a visor and a prohibition symbol for targeting a person's head.● Always wear eye protector.

WARNING
●Never use Stapler unless push lever is operating properly.
Before actually beginning the stapling work, test the Stapler by using the checklist below. Conduct the tests in the following order.
If abnormal operation occurs, stop using the Stapler and contact a Hitachi authorized service center immediately.
(1) DISCONNECT AIR HOSE FROM STAPLER. REMOVE ALL STAPLES FROM STAPLER.
☐ALL SCREWS MUST BE TIGHTENED. If any screws are loose, tighten them.

natural_image
Line drawing of a hand using a sewing machine to adjust or install a component (no text or symbols present)☐THE PUSH LEVER AND TRIGGER MUST MOVE SMOOTHLY.

text_image
D TRIGGER HLY. Trigger Push Lever Do not connect air hose(2) Adjust the air pressure to 70 psi (4.9 bar 5 kgf/cm ^2 ). Connect the air hose.
Do not load any staples in the Stapler.
☐THE STAPLER MUST NOT LEAK AIR.
Hold the Stapler downward and pull the trigger.
☐THE STAPLER MUST NOT OPERATE.
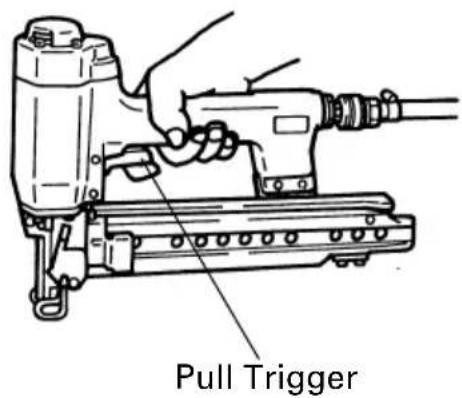
text_image
Pull Trigger(3) With finger off the trigger, depress the push lever against the workpiece.
☐THE STAPLER MUST NOT OPERATE.

text_image
Depress Push Lever Do not pull Trigger(4) Without touching the trigger, depress the push lever against the workpiece. Pull the trigger.
(5) With the Stapler off the workpiece, pull the trigger. Depress the push lever against the workpiece.
☐THE STAPLER MUST OPERATE.
(6) If no abnormal operation is observed, you may load staples in the Stapler. Drive staples into the workpiece that is the same type to be used in the actual application.
Adjust the air pressure at recommended operating pressure 70 – 120 psi (4.9 – 8.3 bar 5 – 8.5 kgf/cm ^2 ) according to the length of staples and the hardness of workpiece.
The correct air pressure is the lowest pressure which will do the job. Using the Stapler at a higher than required air pressure unnecessarily over stresses the Stapler.
LOADING STAPLES
WARNING
- When loading staples into Stapler,
1) do not pull trigger;
2) do not depress push lever; and
3) keep Stapler pointed downward.
(1) Pull the staple feeder back until it latches.
(2) Place the staple strip over the staple guide.
Make sure that the staple strip slides freely on the staple guide.
(3) Press the feeder stop and slide the staple feeder forward until it contacts the staple strip.
The Stapler is now ready to operate.

text_image
Feeder Stop Staple Feeder Staple Staple GuideSTAPLER OPERATION
Read section titled "SAFETY"(pages 4 - 6).
DANGER

text_image
Safety warning sign showing a person wearing a headset and a prohibition symbol for the head.●Always wear eye protector.
WARNING
●Never point Stapler toward yourself or anyone else.
●Never carry with finger on trigger.
Remove finger from trigger when not driving staples.
●Never place your hands or feet closer than 8 inches (200 mm) from firing head when using.
- Do not drive staples on top of other staples or with Stapler at too steep of an angle; staples can ricochet and hurt someone.
- Do not drive staples into thin boards or near corners and edges of workpiece. Staples can be driven through or away from workpiece and hit someone.
●Never drive staples from both sides of a wall at the same time. Staples can be driven into and through the wall and hit a person on the opposite side.
●Never use Stapler which is defective or operating abnormally.
- Do not use Stapler as hammer.
●Disconnect air hose from Stapler when:
1) it is not in use;
2) leaving work area;
3) moving it to another location; and
4) handing it to another person.
METHODS OF OPERATION
This Stapler is equipped with the push lever and does not operate unless the push lever is depressed (upward position).
There are two methods of operation to drive staples with this Stapler.
They are:
- Intermittent operation (Trigger fire):
- Continuous operation (Push lever fire):
(1) Intermittent operation (Trigger fire)
①Position the staple outlet on the workpiece with finger off the trigger.
②Depress the push lever firmly until it is completely depressed.
③Pull the trigger to drive a staple.
④Remove finger from the trigger.
To drive another staple, move the Stapler along the workpiece and repeat this procedure.
(2) Continuous operation (Push lever fire)
①Pull the trigger with the Stapler off the workpiece.
②Depress the push lever against the workpiece to drive a staple.
③Move the Stapler along the workpiece with a bouncing motion.
Each depression of the push lever will drive a staple.
As soon as the desired number of staples have been driven, remove finger from the trigger.
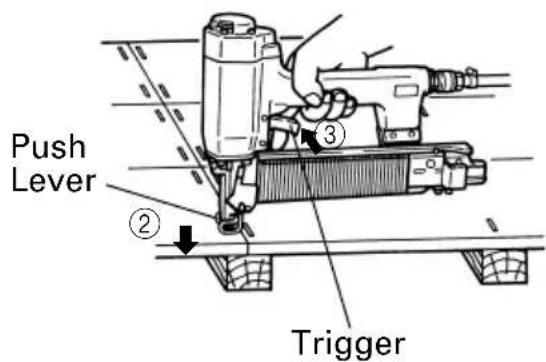
text_image
Push Lever ② Trigger ③
text_image
Previously pull the trigger ① ③NOTE:
●After stapling:
1) disconnect air hose from the Stapler;
2) remove all staples from the Stapler;
3) supply 2–3 drops of Hitachi pneumatic tool lubricant into the air plug on the Stapler; and
4) open the petcock on the air compressor tank to drain any moisture.
MAINTENANCE
NOTE:
The information contained in this Manual is designed to assist you in the safe maintenance of the Stapler.
Some illustrations in this Manual may show details or attachments that differ from those on your own Stapler.
MAINTENANCE AND INSPECTION
Read section titled "SAFETY" (pages 4 – 6).
WARNING
- Disconnect air hose and remove all staples from Stapler when:
1) doing maintenance and inspection; and
2) clearing a jam.
- Clearing a jam
Remove a jammed staple in the following order:
(1) N5008AB
①Disconnect air hose.
②Pull the staple feeder back until it latches.
Remove all staples. Press the feeder stop and slide the staple feeder forward.
③Release the lock lever and open the blade guide.
④Remove the jammed staple.
⑤Close the blade guide and latch.
⑥In case of frequent jam, contact a Hitachi authorized service center.
(2) N3804AB
①Disconnect air hose. ②Pull the staple feeder back until it latches.
Remove all staples. Press the feeder stop and slide the staple feeder forward.
③Using the accessory allen wrench, rmeove two bolts from the bridge piece.

text_image
Blade Guide Lock Lever ③ ③ ③ ① Disconnect air hose Staple Feeder
text_image
Allen Wrench M5 Hex. Socket Hd. Bolt Front Nose Bridge Piece④Remove the jammed staple.
⑤Put back the front nose and bridge piece with two bolts.
⑥In case of frequent jam, contact a Hitachi authorized service center.
-
Maintenance chart (See page 19)
-
Operator troubleshooting (See page 20)
-
Storing
When not in use for an extended period, apply a thin coat of the lubricant to the steel parts to avoid rust.
○Do not store the Stapler in a cold weather environment.
Keep the Stapler in a warm area.
○When not in use, the Stapler should be stored in a warm and dry place.
Keep out of reach children.
- WARNING LABEL
Change the WARNING LABEL if missing or damaged.
A new WARNING LABEL is available from a Hitachi authorized service center.
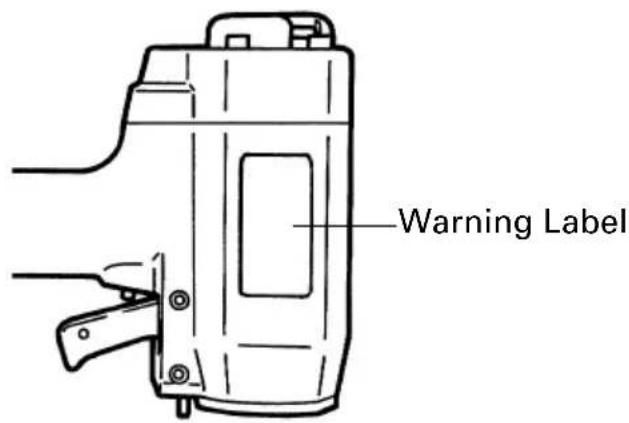
text_image
Warning LabelSERVICE AND REPAIRS
WARNING
- Only service personnel trained by Hitachi, distributor or employer shall repair the Stapler.
- Use only parts supplied or recommended by Hitachi for repair.
All quality Staplers will eventually require servicing or replacement of parts because of wear from normal use.
NOTE:
Specifications are subject to change without any obligation on the part of HITACHI.
Maintenance chart
| ACTION WHY HOW | ||
| Drain air line filter daily. Prevent accumulation of Open manual petcock. | ||
| Keep lubricator filled. Keep the Stapler Fill with Hitachi pneumatic lubricated. tool lubricant. | ||
| Clean filter element — then blow air through filter in with direction opposite to normal flow. | Prevent clogging of filter dirt. instructions. | Follow manufacturer's |
| Clean staple feeder Prevent a jam. Blow clean daily. mechanism. | ||
| Keep push lever working Promote operator safety and Blow properly. efficient Stapler operation. | clean daily. | |
| Lubricate the Stapler after stapling. | Extend the Stapler life. | Supply 2 – 3 drops of lubricant into the Stapler. |
| Drain air compressor. | Keep the Stapler operated Open properly. | pen petcock on air compressor tank. |
Operator troubleshooting
Most minor problems can be resolved quickly and easily using the table below. If problems persist, contact a Hitachi authorized service center for assistance.
| PROBLEM | CHECK METHOD CORRECTION | |
| Piston Ass'y does not return to full up position at end of cycle. | Check air pressure. Adjust at | 70—120psi.(4.9—8.3bar 5—8.5kgf/cm2) |
| Piston O-ring cut or Contact heavily worn? replacement. | Hitachi for | |
| Driver blade bent or damaged at the driving end? | ||
| Air exhaust clogged with Cle dirt or sludged lubricant? | an air exhaust. | |
| —— | Use Hitachi pneumatic tool lubricant. | |
| Weak drive.Slow to cycle. | Check air pressure. Increase | air pressure.(Do not exceed 120 psi(8.3 bar 8.5 kgf/cm2)) |
| Driver blade worn at the tip? | ct Hitachi for | |
| Piston O-ring worm or Conta damaged? replacement. | ||
| —— | Use Hitachi pneumatic tool lubricant. | |
| Skipping staples.Intermittent feed. | —— | Use Hitachi pneumatic tool lubricant. |
| Staple feeder damaged? Replace staple feeder. | ||
| Ribbon spring weakend or Re-r damaged? | replace ribbon spring. | |
| Staple guide obstructed Clean by dirt? | staple guide. | |
| Check for proper staples. Use only recommended staples. | ||
| Staples jam. | Driver blade damaged Contact Hitachi for at the driving end? replacement. | |
| Drives properly during normal operation, but does not drive fully at faster stapling speeds. | Check inside diameter of Use larger air hose. | |
INFORMATION IMPORTANTE
LIRE ET BIEN ASSIMILER TOUTES LES INSTRUCTIONS D'UTILISATION, LES PRECAUTIONS DE SECURITE ET LES AVERTISSEMENTS DU MANUEL AVANT D'UTILISER OU D'ENTRETENIR L'AGRAFEUSE.
text_image
Warning sign with VR headset and no stop sign, indicating facial recognition or avoidance rulestext_image
AIR No Smokingtext_image
Diagram showing five types of hairless goggles with numbered labels for identification.text_image
Prohibition sign comparing a human head with a facial recognition device and a prohibition symbol for the face.natural_image
Line drawing of a hand using a sewing machine to adjust or install a component (no text or symbols present)□LE LEVIER-POUSSOIRE TLA GACHETTE DOIVENT FONCTIONNER AVEC SOUPLESSE.
text_image
Two symbolic icons: a stylized human head with a visor and a prohibition sign for a person's face.text_image
Technical diagram showing a drill press with labeled parts and directional arrows indicating motion or assembly.text_image
Two symbolic icons: a face with a device and a prohibition sign for a human head silhouette.text_image
AIR No Injtext_image
Diagram showing five types of safety goggles with numbered labels indicating different types.text_image
AIR No Droppedtext_image
Warning sign with a face wearing a VR headset and a prohibition symbol for targeting a person's head.natural_image
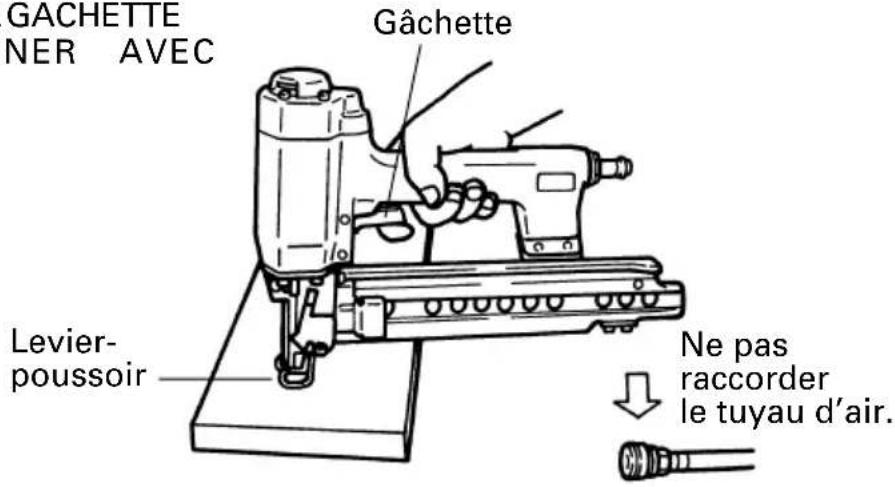
Line drawing of a hand turning a mechanical component (no text or symbols)□LA PALANCA DE EMPUJE DEBERÁN PODER ACCIONARSE SIN DIFICULTAD.

text_image
E DEBERAN N DIFICULTAD. Gatillo Palanca de empuje No conecte la manguera de aire.natural_image
Line drawing of a hand operating a power tool with a drill bit (no text or symbols)Apriete el gatillo.
text_image
Safety warning sign showing a face with a visor and a prohibition symbol for the head.text_image
Technical diagram showing a drill press machine with labeled parts and directional arrows indicating motion or assembly.NOTAS:
Hitachi Koki U.S.A., Ltd. Limited Warranty
WARRANTY TO ORIGINAL PURCHASER
Hitachi Koki U.S.A., Ltd. ("Hitachi") gives this limited warranty to only the original end-user purchaser of a Hitachi-brand power tool or pneumatic tool ("Hitachi Product").
WARRANTY PERIOD
The Hitachi Product is warranted for a period of one (1) year from the original purchase date; provided however, that o-rings and driver blades in pneumatic tools and batteries in power tools are warranted for a period of ninety (90) days from the original purchase date.
PRODUCT REGISTRATION CARD
It is suggested that the Product Registration Card be returned to Hitachi within ten (10) days of the original purchase date so that the purchaser has a record of the original purchase date. If the Product Registration Card is not so returned, warranty coverage will be available only when the date of original purchase of the Hitachi Product by the original purchaser is established by appropriate documentation (such as a dated original sales receipt).
WARRANTY COVERAGE
The Hitachi Product is warranted by Hitachi against only defective materials or workmanship during the applicable warranty period.
THIS WARRANTY DOES NOT COVER: DEFECTS IN MATERIALS OR WORKMANSHIP OR DAMAGES RESULTING FROM REPAIRS OR ALTERATIONS WHICH HAVE BEEN MADE OR ATTEMPTED BY OTHERS OR THE USE OF NONCONFORMING PARTS; DAMAGE DUE TO NORMAL WEAR AND TEAR; DAMAGE DUE TO ABUSE OR MISUSE (INCLUDING OVERLOADING THE HITACHI PRODUCT BEYOND CAPACITY), NEGLECT OR ACCIDENT; OR IMPROPER MAINTENANCE, SERVICE OR REPAIR; DAMAGE DUE TO USE OF THE HITACHI PRODUCT AFTER PARTIAL FAILURE OR USE WITH IMPROPER ACCESSORIES; OR REPLACEMENT PARTS OR REPAIR SERVICE.
WARRANTY PERFORMANCE
Should the Hitachi Product exhibit a defect in materials or workmanship, the original purchaser must return the complete Hitachi Product, postage prepaid and insured and in suitable packaging, to a Hitachi authorized service center, no later than the end of the applicable one year or 90 day warranty period.
If the defect is covered by this warranty, Hitachi will at its option repair or replace the defective Hitachi Product, and Hitachi will bear the cost of labor for the repair, replacement parts, and postage and insurance for returning the repaired or replaced Hitachi Product to the original purchaser. If there is no defect in materials or workmanship or the warranty for any other reason does not apply, Hitachi will return the Hitachi Product to the original purchaser postage collect.
WARRANTY DISCLAIMERS
NO WARRANTY, ORAL OR WRITTEN, OTHER THAN THIS LIMITED WARRANTY IS MADE WITH REGARD TO THE HITACHI PRODUCT. ANY IMPLIED WARRANTIES OF HITACHI OR ITS AFFILIATES REGARDING THE HITACHI PRODUCT, INCLUDING BUT NOT LIMITED TO, THE IMPLIED WARRANTIES OF MERCHANTABILITY AND FITNESS FOR A PARTICULAR PURPOSE, ARE LIMITED IN DURATION TO THE ABOVE ONE (1) YEAR WARRANTY PERIOD (OR NINETY (90) DAYS FOR BATTERIES, O-RINGS AND DRIVER BLADES). HITACHI SHALL NOT BE LIABLE FOR LOSS OF USE OF ANY HITACHI PRODUCT OR OTHER INCIDENTAL OR CONSEQUENTIAL COSTS, EXPENSES, OR DAMAGES INCURRED BY THE PURCHASER OR ANY OTHER PERSON, EVEN IF ADVISED OF THE POSSIBILITY OF SUCH DAMAGES.
LIMITATIONS ON WARRANTY DISCLAIMERS
Some states do not allow limitations on how long an implied warranty lasts, so the above limitation may not apply to you.
Some states do not allow the exclusion or limitation of incidental or consequential damages, so the above limitation or exclusion may not apply to you.
LEGAL RIGHTS
This warranty gives you specific legal rights, and you may also have other rights which vary from state to state.
ADDITIONAL WARRANTY DISCLAIMERS FOR ALL PURCHASERS EXCEPT CONSUMERS
WHEN ANY HITACHI PRODUCT SHALL BE PURCHASED BY ANY PERSON SUCH THAT THE HITACHI PRODUCT IS NOT A "CONSUMER GOOD" (AS DEFINED IN THE UNIFORM COMMERCIAL CODE ADOPTED IN THE STATE OF PURCHASE OR IN OTHER APPLICABLE LAW), HITACHI EXPRESSLY DISCLAIMS ALL IMPLIED WARRANTIES, INCLUDING WITHOUT LIMITATION THE IMPLIED WARRANTIES OF MERCHANTABILITY AND FITNESS FOR A PARTICULAR PURPOSE. IN NO EVENT SHALL HITACHI OR ITS AFFILIATES BE LIABLE TO SUCH A PURCHASER OR ANY OTHER PERSON FOR SPECIAL, COLLATERAL, INCIDENTAL, OR CONSEQUENTIAL DAMAGES (INCLUDING WITHOUT LIMITATION LOSS OF USE OR BUSINESS INTERRUPTION) IN CONNECTION WITH OR ARISING OUT OF THE PURCHASE OR USE OF THE HITACHI PRODUCT, WHETHER ARISING IN CONTRACT OR IN TORT, EVEN IF ADVISED OF THE POSSIBILITY OF SUCH DAMAGES. THE SOLE AND EXCLUSIVE LIABILITY OF HITACHI AND ITS AFFILIATES, AND THE SOLE AND EXCLUSIVE REMEDY OF SUCH PURCHASER AND ANY OTHER PERSON, SHALL BE THIS LIMITED WARRANTY. IN NO EVENT SHALL THE LIABILITY OF HITACHI AND ITS AFFILIATES, REGARDLESS OF THE FORM OF ACTION, EXCEED THE PURCHASE PRICE OF THE HITACHI PRODUCT.
HITACHI SERVICE CENTERS
Service under this warranty is available from Hitachi Koki U.S.A., Ltd. at:
• 3950 Steve Reynolds Blvd. Norcross, GA 30093
• 9409 Owensmouth Ave. Chatsworth, CA 91311
HITACHI POWER TOOLS
text_image
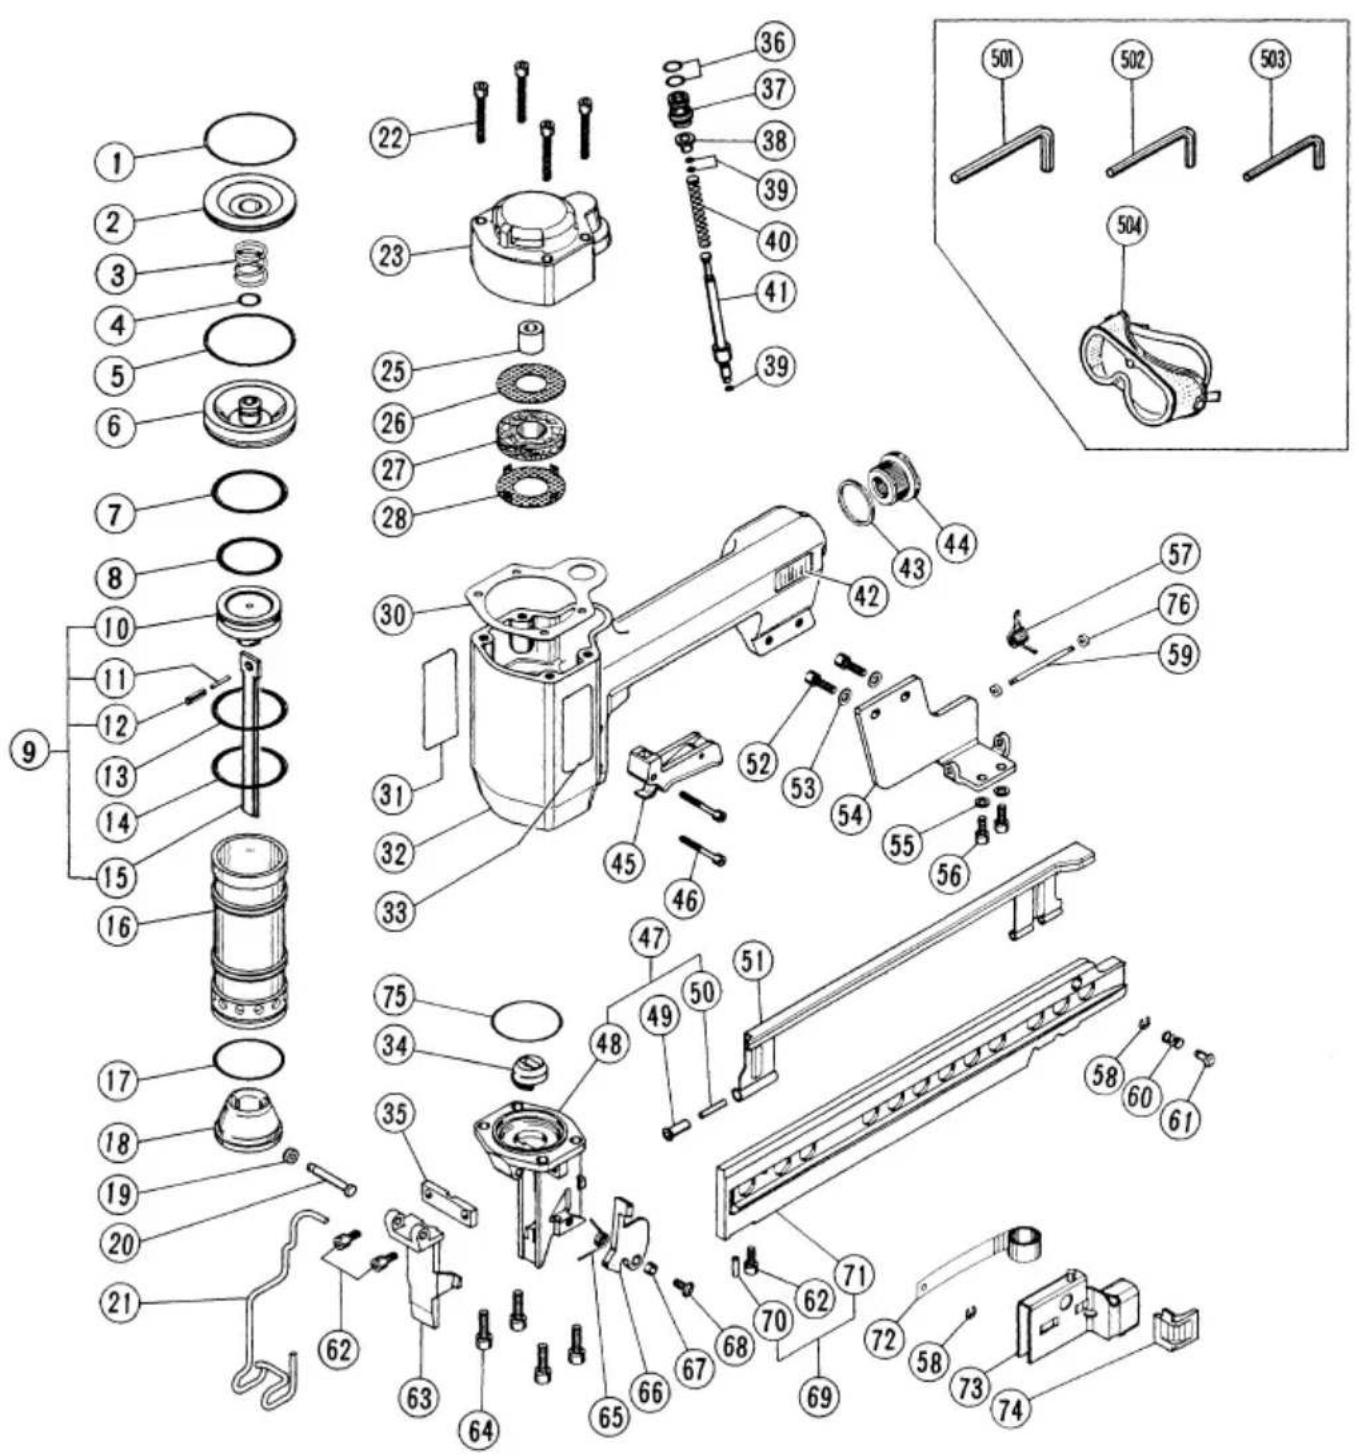
Exploded view diagram of a mechanical assembly with numbered parts and exploded viewsN5008AB
| Item No. | Code No. | Part Name | Q'ty |
| 1 7 | 90-259 O | Ring (I. D. 50.52) 1 | |
| 2 7 | 90-260 Exhaust Cover Insert 1 | ||
| 3 7 | 90-261 Valve Spring 1 | ||
| 4 7 | 90-262 O | Ring (I. D. 9.75) 1 | |
| 5 7 | 90-336 O | Ring (I. D. 49.5) 2 | |
| 6 7 | 90-323 Main Valve 1 | ||
| 7 7 | 90-265 O | Ring (I. D. 37.67) 1 | |
| 8 7 | 90-266 O | Ring (I. D. 31.34) 1 | |
| 9 7 | 90-267 Piston Ass'y | 1 | |
| 10 7 | 90-268 Piston 1 | ||
| 11 7 | 90-269 Pin 1 | ||
| 12 7 | 90-270 Roll Pin D4 | × 14 | 1 |
| 13 7 | 90-272 O | Ring (I. D. 39.34) 1 | |
| 14 7 | 90-273 O | Ring (I. D. 37.77) 1 | |
| 15 7 | 90-271 Driver Blade 1 | ||
| 16 7 | 90-324 Cylinder 1 | ||
| 17 7 | 90-325 O | Ring (I. D. 37.82) 1 | |
| 18 7 | 90-326 Piston Bumper 1 | ||
| 19 7 | 90-327 Circlip 2 | ||
| 20 7 | 90-328 Pin 1 | ||
| 21 7 | 90-302 Push Lever 1 | ||
| 22 7 | 90-276 Hex. Socket Hd. Bolt M5 | × 40 | 4 |
| 23 7 | 90-329 Exhaust Cover | 1 | |
| 25 7 | 90-330 Exhaust Valve | 1 | |
| 26 7 | 90-280 Perforated Plate | 1 | |
| 27 7 | 90-281 Silencer | 1 | |
| 28 7 | 90-282 Perforated Plate | 1 | |
| 30 7 | 90-283 Gasket | 1 | |
| 31 7 | 90-244 Warning Label | 1 | |
| 32 7 | 90-331 Body | 1 | |
| 33 7 | 90-320 Nameplate | 1 | |
| 34 7 | 90-299 Driver Guide | 1 | |
| 35 7 | 90-303 Front Nose 1 | ||
| 36 7 | 90-230 O | Ring (I. D. 7.65) 2 | |
| 37 7 | 90-285 Valve Bush 1 | ||
| 38 7 | 90-239 Sleeve | 1 | |
| 39 7 | 90-241 O | Ring (I. D. 2.57) 3 | |
| 40 7 | 90-286 Valve Spring 1 | ||
| 41 7 | 90-287 Valve Shaft | 1 | |
| 42 | — | Hitachi Label | 1 |
| 43 7 | 90-238 Gasket | 1 | |
| 44 7 | 90-237 Cap | 1 |
| Item No. | Code No. | Part Name | Q'ty |
| 45 | 790-288 | Trigger Ass'y | 1 |
| 46 | 790-234 | Hex. Socket Hd. Bolt M4 × 30 | 2 |
| 47 | 790-297 | Nose Ass'y | 1 |
| 48 | — | Nose | 1 |
| 49 | 790-311 | Bushing | 1 |
| 50 | 790-298 | Pin 1 | |
| 51 | 790-312 | Cover | 1 |
| 52 | 790-289 | Hex. Socket Hd. Bolt M5 × 16 | 2 |
| 53 | 790-290 | Washer | 2 |
| 54 | 790-294 | Hook Plate | 1 |
| 55 | 790-295 | Spring Washer | 2 |
| 56 | 790-296 | Hex. Socket Hd. Bolt M5 × 12 | 2 |
| 57 | 790-291 | Spring | 1 |
| 58 | 790-293 | Circlip 2 | |
| 59 | 790-332 | Pin 1 | |
| 60 | 790-318 | Pressure Spring | 1 |
| 61 | 790-319 | Feeder Stop | 1 |
| 62 | 790-304 | Hex. Socket Hd. Bolt M5 × 10 | 3 |
| 63 | 790-305 | Blade Guide | 1 |
| 64 | 790-306 | Hex. Socket Hd. Bolt M6 × 20 | 4 |
| 65 | 790-310 | Lever Spring 1 | |
| 66 | 790-307 | Lock Lever | 1 |
| 67 | 790-308 | Bushing | 1 |
| 68 | 790-333 | Hex. Socket Hd. Bolt M5 × 12 | 1 |
| 69 | 790-313 | Staple Guide Ass'y | 1 |
| 70 | 790-314 | Ribbon Spring | 1 |
| 71 | — | Staple Guide | 1 |
| 72 | 790-315 | Ribbon Spring | 1 |
| 73 | 790-316 | Staple Feeder | 1 |
| 74 | 790-317 | Spring Guide | 1 |
| 75 | 790-334 | O-Ring (I. D. 42) | 1 |
| 76 | 790-335 | Circlip 2 | |
| 501 | 872-422 | Allen Wrench for M6 Screw | 1 |
| 502 | 944-459 | Allen Wrench for M5 Screw | 1 |
| 503 | 944-458 | Allen Wrench for M4 Screw | 1 |
| 504 | 875-769 | Eye Protector | 1 |
Parts are subject to change without any obligation on the part of the HITACHI due to improvements.
text_image
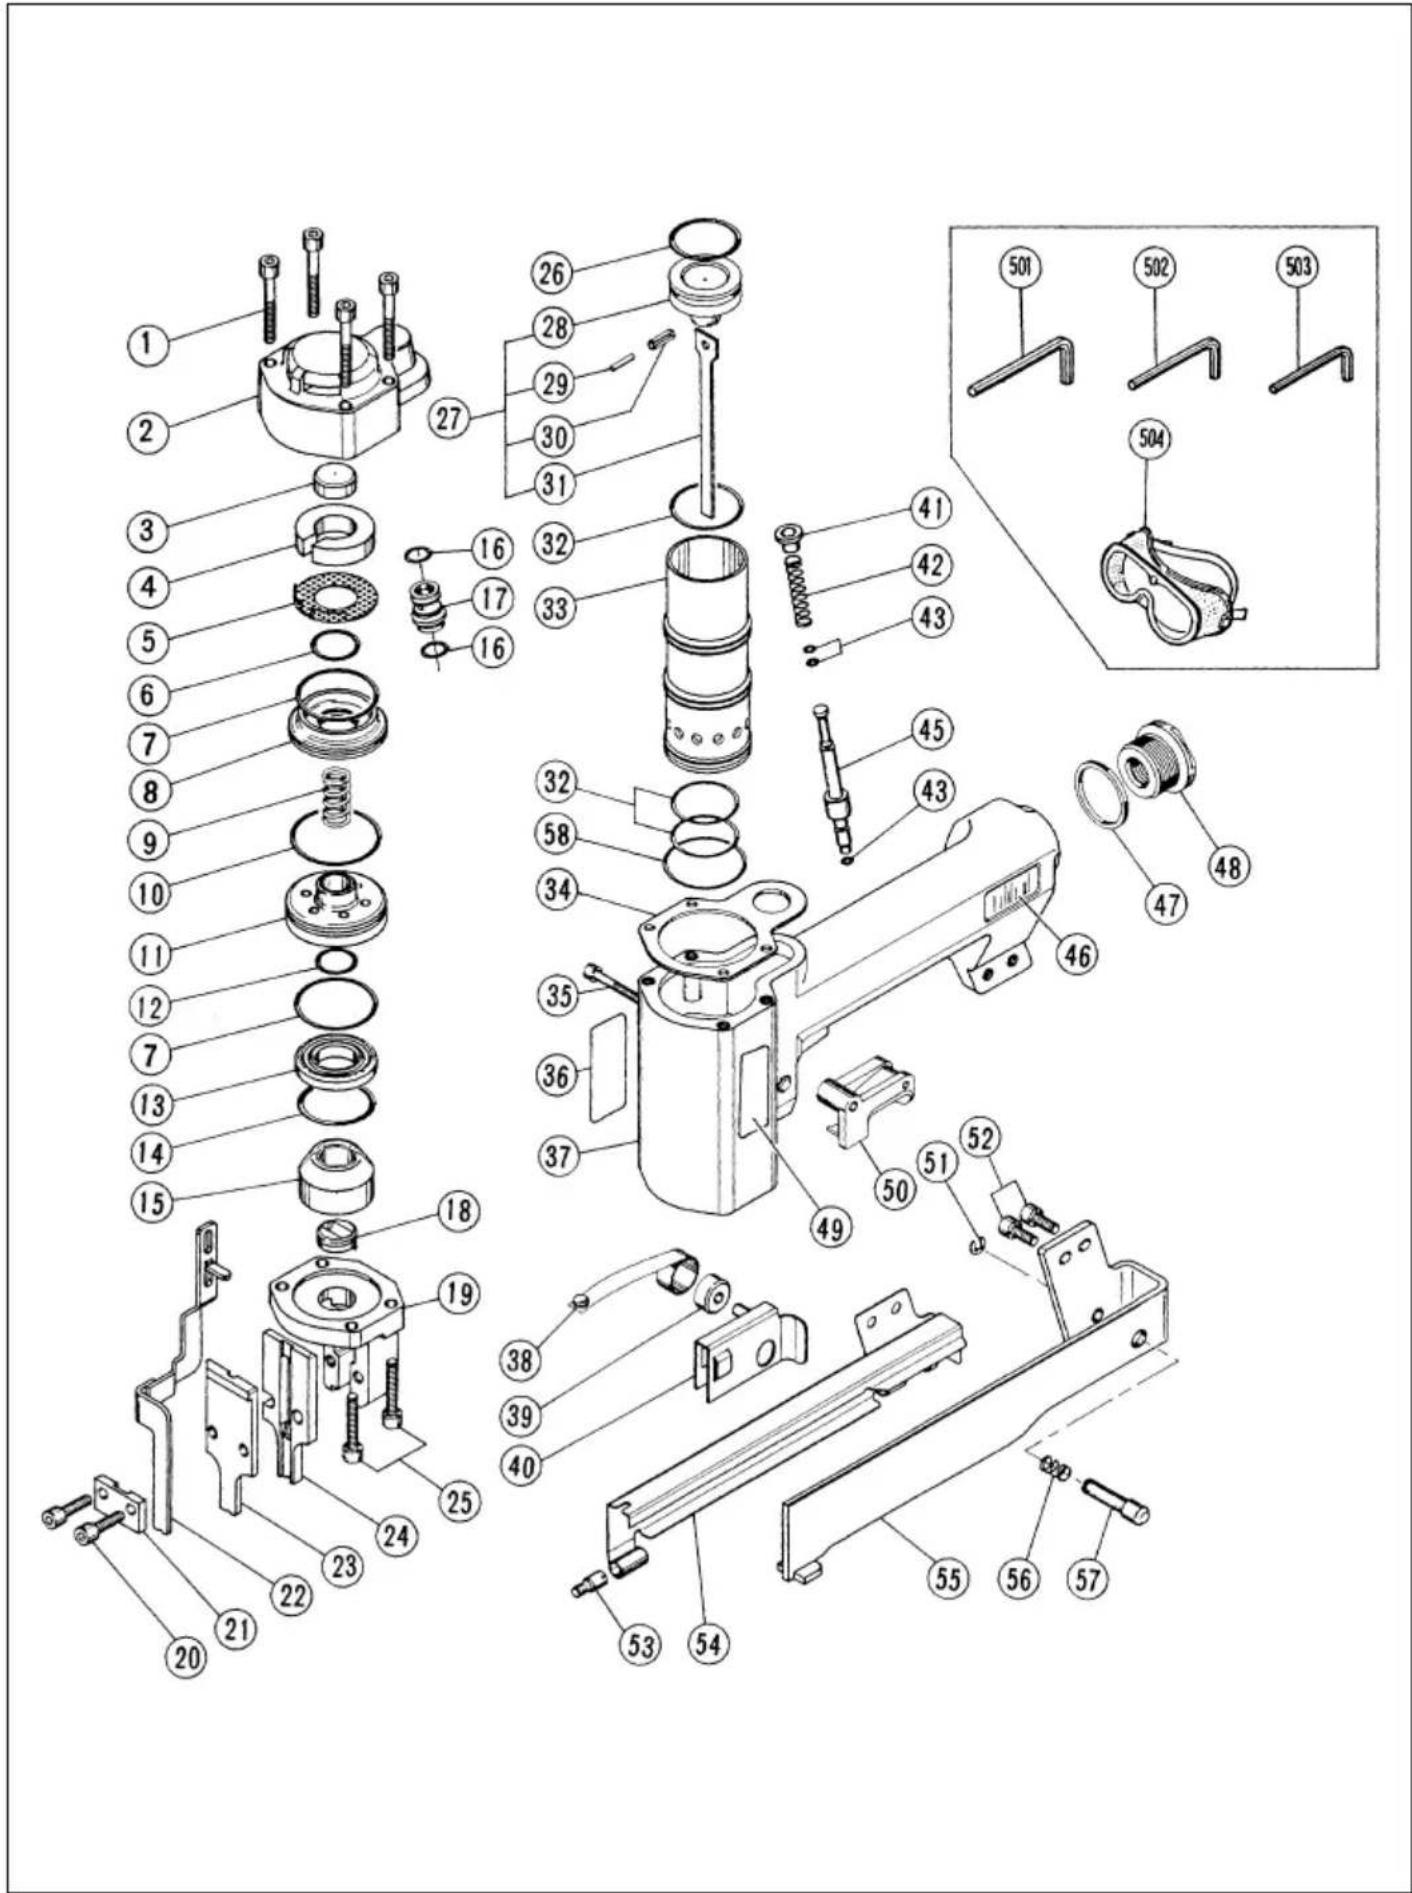
Exploded view diagram of a mechanical assembly with numbered parts for identificationN3804AB
| Item No. | Code No. | Part Name | Q'ty |
| 1 | 790-200 Hex. Socket Hd. Bolt M5 × 35 | 4 | |
| 2 | 790-201 Exhaust Cover 1 | ||
| 3 | 790-202 Gasket 1 | ||
| 4 | 790-203 Silencer 1 | ||
| 5 | 790-204 Perforated Plate 1 | ||
| 6 | 790-205 O-Ring (I. D. 15.6) 1 | ||
| 7 | 790-206 O-Ring (I. D. 33.05) 2 | ||
| 8 | 790-207 Disc 1 | ||
| 9 | 790-208 Valve Spring 1 | ||
| 10 | 790-209 O-Ring (I. D. 37.82) 1 | ||
| 11 | 790-210 Main Valve 1 | ||
| 12 | 790-211 O-Ring (I. D. 14) 1 | ||
| 13 | 790-212 Valve Ring 1 | ||
| 14 | 790-213 O-Ring (I. D. 26.64) 1 | ||
| 15 | 790-214 Piston Bumper | ||
| 16 | 790-230 O-Ring (I. D. 7.65) 2 | ||
| 17 | 790-231 Valve Bush 1 | ||
| 18 | 790-215 Driver Guide | ||
| 19 | 790-216 Nose | ||
| 20 | 790-222 Hex. Socket Hd. Bolt M5 × 18 | 2 | |
| 21 | 790-221 Bridge Piece | ||
| 22 | 790-220 Push Lever | ||
| 23 | 790-219 Front Nose | ||
| 24 | 790-218 Back Nose | ||
| 25 | 790-217 Hex. Socket Hd. Bolt M5 × 25 | 4 | |
| 26 | 790-223 O-Ring (I. D. 25.07) 1 | ||
| 27 | 790-224 Piston Ass'y | ||
| 28 | 790-225 Piston | ||
| 29 | 790-227 Pin | ||
| 30 | 790-226 Roll Pin D4 × 12 | 1 | |
| 31 | 790-228 Driver Blade | ||
| 32 | 790-229 O-Ring (I. D. 29.87) 3 | ||
| 33 | 790-232 Cylinder | ||
| 34 | 790-233 Gasket 1 | ||
| 35 | 790-234 Hex. Socket Hd. Bolt M4 × 30 | 1 | |
| 36 | 790-244 Warning Label | ||
| 37 | 790-235 Body | ||
| 38 | 790-246 Ribbon Spring 1 | ||
| 39 | 790-249 Spool | ||
| 40 | 790-250 Staple Feeder | ||
| 41 | 790-239 Sleeve | ||
| 42 | 790-240 Valve Spring 1 | ||
| Item No. | Code No. | Part Name | Q'ty |
| 43 | 790-241 O | -Ring (I. D. 2.57) 3 | |
| 45 | 790-242 Valve Shaft | 1 | |
| 46 | — | Hitachi Label | 1 |
| 47 | 790-238 Gasket 1 | ||
| 48 | 790-237 Cap | 1 | |
| 49 | 790-245 Nameplate | 1 | |
| 50 | 790-243 Trigger Ass'y | 1 | |
| 51 | 790-254 Circlip | 1 | |
| 52 | 790-252 Hex. Socket Hd. Bolt M5 × 12 | 2 | |
| 53 | 790-257 Screw | 1 | |
| 54 | 790-251 Cover | 1 | |
| 55 | 790-253 Staple Guide | 1 | |
| 56 | 790-255 Pressure Spring 1 | ||
| 57 | 790-256 Feeder Stop | 1 | |
| 58 | 790-337 O | -Ring (I. D. 34.65) 1 | |
| 501 | 944-459 | Allen Wrench for M5 Screw | 1 |
| 502 | 944-458 | Allen Wrench for M4 Screw | 1 |
| 503 | 943-277 | Allen Wrench for M3 Screw | 1 |
| 504 | 875-769 | Eye Protectors 1 | |
Parts are subject to change without any obligation on the part of the HITACHI due to improvements.
Hitachi Koki Co., Ltd.
Nippon Bldg., 6-2, Ohtemachi 2-chome,
Chiyoda-ku, Tokyo 100-0004, Japan