Pro 4k HDR - Media player Zappiti - Free user manual and instructions
Find the device manual for free Pro 4k HDR Zappiti in PDF.
User questions about Pro 4k HDR Zappiti
0 question about this device. Answer the ones you know or ask your own.
Ask a new question about this device
Download the instructions for your Media player in PDF format for free! Find your manual Pro 4k HDR - Zappiti and take your electronic device back in hand. On this page are published all the documents necessary for the use of your device. Pro 4k HDR by Zappiti.
USER MANUAL Pro 4k HDR Zappiti
Manufactured under license from Dolby Laboratories.
Dolby and the double-D symbol are trademarks of Dolby Laboratories.

dtts
2.0+Digital Out
DTS, the Symbol, & DTS and the Symbol together are registered trademarks & DTS 2.0+Digital Out is a trademark of DTS, Inc. Product includes software. © DTS, Inc. All Rights Reserved.


The lightning flash, with an arrowhead symbol, within an equilateral triangle, is intended to alert the user to the presence of uninsulated "dangerous voltage" within the
product's enclosure, that may be of sufficient magnitude to constitute a risk of electric shock to persons.

The exclamation point within an equilateral triangle is intended to alert the user to the presence of important operation and maintenance (servicing) instruction in the literature
accompanying the appliance
WARNING:
TO REDUCE THE RISK OF FIRE OR ELECTRIC SHOCK,DO NOT EXPOSE THIS APPLIANCE TO RAIN OR MOISTURE.DANGEROUS HIGH VOLTAGES ARE PRESENT INSIDE THE ENCLOSURE.DO NOT OPEN THE CABINET.REFERServICINGTO QUALIFIED PERSONNELONLY.
THE APPARATUS SHALL NOT BE EXPOSED TO DRIPPING OR SPLASHING AND THAT NO OBJECTS FILLED WITH LIQUIDS, SUCH AS VASES SHALL BE PLACED ON THE APPARATUS.
CAUTION:
DANGER OF EXPLOSION IF BATTERY IS INCORRECTLY REPLACED. REPLACE ONLY WITH THE SAME OR EQUIVALENT TYPE. DO NOT OPEN COVERS AND DO NOT REPAIR YOURSELF. REFER SERVICING TO QUALIFIED PERSONNEL.
Local Electric Voltage
Before to connect your Zappiti product to your electric system, please make sure that the voltage switch is turn to the correct voltage due the local electric system.
200-240V:
Europe / Middle East / Australia / Asia / India / Russia
China / Africa / Peru / Chile / Argentina / Bolivia
Paraguay Uruguay / New Zealand / Thailand
110-120V:
North & Central America / Japan / Equator / Venezuela Colombia / Suriname
Brazil / Saudi Arabia / Vietnam : Depends on region.
Getting More Information
Due to the regular evolution and the addition of new functionalities, provided by firmware and software updates, it is impossible to cover all functionalities in this user's guide. For this reason, we invite you to visit our online Zappiti Knowledge Base. You will find a large amount of tutorials and various help topics concerning the use of the media player and Zappiti applications:
zappiti.uservoice.com/knowledgebase
About Zappiti
Zappiti is a French company based in Paris. Zappiti designs and manufactures only professional grade Video Management Systems; delivering the highest quality, outstanding performance, and best possible user experience. The software development & engineering, design and support teams are located in France (Europe).
All of the Zappiti products are designed to provide our end-user customers with convenient and intuitive access to their entire movie library collection, in stunning 4K, High Definition resolution. The award winning Zappiti devices are being successfully used to improve the movie watching experience, in residential and commercial environments all over the globe.
To ensure the ultimate performance, all Zappiti devices are supplied to authorized resellers through a worldwide network of established and well respected distribution partners.
Zappiti products are distributed in over 50 countries worldwide. More info: zappiti.com
WEEE symbol
Correct Disposal of This Product. (Waste Electrical & Electronic Equipment) Applicable in the European Union and other European countries with separate systems.
This marking on the product, accessories or literature indicates that the product and its electronic accessories (e.g. remote handset) should not be disposed of with other household waste at the end of their working life. To prevent possible harm to the environment or human health from uncontrolled waste disposal, please separate these items from other types of household waste and recycle them responsibly to promote the sustainable reuse of material resources. More info can be found here:
http://ec.europa.eu

CE mark
This product complies with European Low Voltage (2006/95/CE), Electromagnetic Compatibility (2004/108/EC) and Environmentally-friendly design of Energy-related Products (2009/125/EC) Directives when used and installed according to this instruction manual.
Important Safety Instructions
1) Read and keep these instructions.
2) Heed all warnings.
3) Follow all instructions.
4) Do not use this apparatus near water.
5) Clean only with dry cloth.
6) Do not block any ventilation openings.
7) Do not install near any heat sources such as radiators, heat registers, stoves, or other apparatus (including amplifiers) that produce heat.
Table of Contents
4 English Quick Start Guide
4·General, Key Features
5·Organize your Video Collection with Movie Covers
6·Package Contents, HDMI Cable, IR Extender
7 · Exterior (Front view, Rear view)
8 - Remote Control, Third Party Control
9 • Connecting Your Zappiti to Your TV Without AV Receiver
9 • Connecting Your Zappiti to Your TV Trough AV Receiver
- Connecting USB Drives, Using Internal Drive, SD / MMC Cards
13 Zappiti Video, Zappiti Music, Zappiti Explorer, How to create an account Zappiti - Accessing Network Drives and Access to Zappiti Storage
14 • How to Transfer your Files Using Zappiti Explorer - Slideshow Function Properties (Info but
14 • How to Install a Third Party App
14· How to add an App Shortcut to the Home Page
15 · Ethernet, Wi-Fi, Bluetooth, Ethernet filter
15 • How to Use Zappiti Music, How to Control Your Zappiti Using Your Tablet / Smartphone
16· How to Create a Movie Collection in Zappiti Video
17 Zappiti Video (General), Wrong Storage ID Error - How to Identify a Movie / Episode, How to Delete a Movie / Episode. How to Identify Unidentified Movies & TV Shows 18. 3D, 4K and UHD Files 18.
18· How to Change a Picture (Poster of Background)
18·Zappiti Templates - Multiple hard drives Zappiti Soundtrack, Zappiti Soundtrack Editor19. Parental Control20. Personal Categories20
20·Zappiti On Start-Up
20·Search Engine
20·Sagas / Groups Subtitle Display Options20·Resume Video Playback21·Direct Access During Video Playback21·3D Option21·
22·Firmware Upgrade
22·Factory Reset
22·Firmware Restore Procedure Using USB Restore Stick User Support & Zappiti Db23 · Zappiti Store23
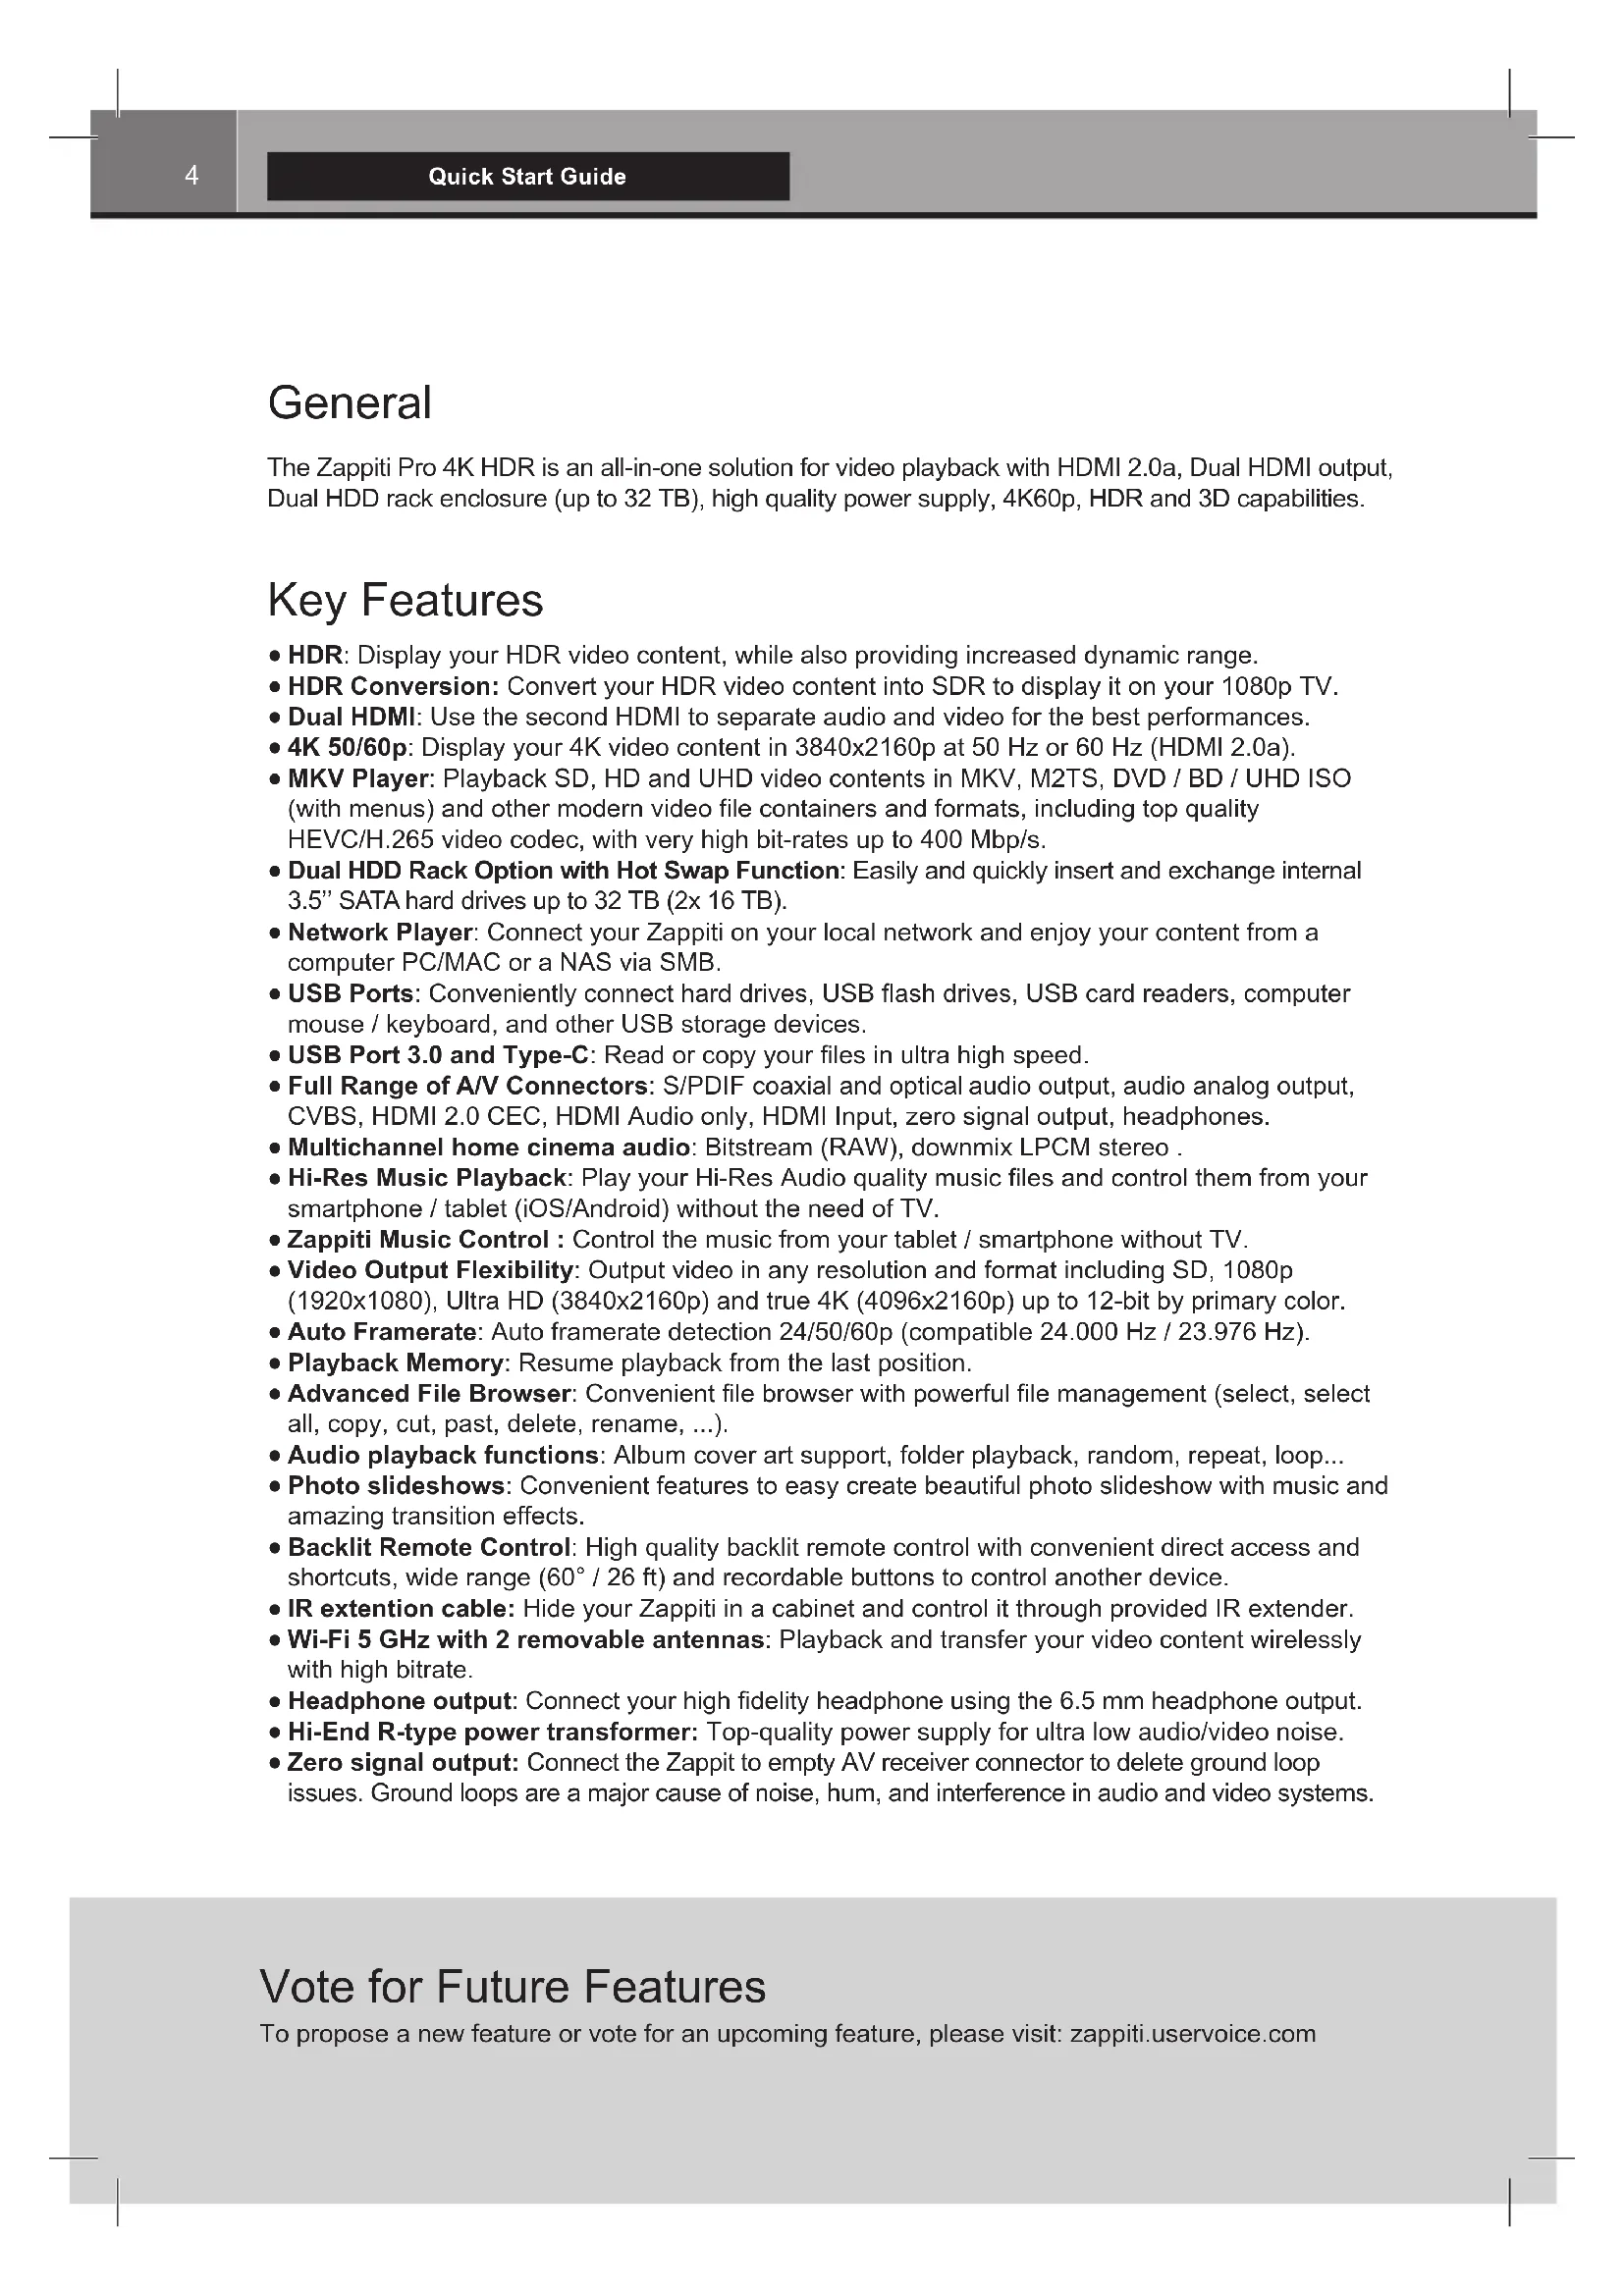
General
The Zappiti Pro 4K HDR is an all-in-one solution for video playback with HDMI 2.0a, Dual HDMI output, Dual HDD rack enclosure (up to 32 TB), high quality power supply, 4K60p, HDR and 3D capabilities.
Key Features
- HDR: Display your HDR video content, while also providing increased dynamic range.
- HDR Conversion: Convert your HDR video content into SDR to display it on your 1080p TV.
- Dual HDMI: Use the second HDMI to separate audio and video for the best performances.
- 4K 50/60p: Display your 4K video content in 3840x2160p at 50 Hz or 60 Hz (HDMI 2.0a).
- MKV Player: Playback SD, HD and UHD video contents in MKV, M2TS, DVD / BD / UHD ISO (with menus) and other modern video file containers and formats, including top quality HEVC/H.265 video codec, with very high bit-rates up to 400 Mbp/s.
- Dual HDD Rack Option with Hot Swap Function: Easily and quickly insert and exchange internal 3.5" SATA hard drives up to 32 TB (2x 16 TB).
- Network Player: Connect your Zappiti on your local network and enjoy your content from a computer PC/MAC or a NAS via SMB.
- USB Ports: Conveniently connect hard drives, USB flash drives, USB card readers, computer mouse / keyboard, and other USB storage devices.
- USB Port 3.0 and Type-C: Read or copy your files in ultra high speed.
Full Range of A/V Connectors: S/PDIF coaxial and optical audio output, audio analog output, CVBS, HDMI 2.0 CEC, HDMI Audio only, HDMI Input, zero signal output, headphones. - Multichannel home cinema audio: Bitstream (RAW), downmix LPCM stereo
- Hi-Res Music Playback: Play your Hi-Res Audio quality music files and control them from your smartphone / tablet (iOS/Android) without the need of TV.
- Zappiti Music Control : Control the music from your tablet / smartphone without TV.
- Video Output Flexibility: Output video in any resolution and format including SD, 1080p (1920x1080), Ultra HD (3840x2160p) and true 4K (4096x2160p) up to 12-bit by primary color.
- Auto Framerate: Auto framerate detection 24/50/60p (compatible 24.000 Hz / 23.976 Hz).
- Playback Memory: Resume playback from the last position.
- Advanced File Browser: Convenient file browser with powerful file management (select, select all, copy, cut, past, delete, rename, ...).
- Audio playback functions: Album cover art support, folder playback, random, repeat, loop...
- Photo slideshows: Convenient features to easy create beautiful photo slideshow with music and amazing transition effects.
- Backlit Remote Control: High quality backlit remote control with convenient direct access and shortcuts, wide range (60°/26 ft) and recordable buttons to control another device.
- IR extension cable: Hide your Zappiti in a cabinet and control it through provided IR extender.
- Wi-Fi 5 GHz with 2 removable antennas: Playback and transfer your video content wirelessly with high bitrate.
- Headphone output: Connect your high fidelity headphone using the 6.5mm headphone output.
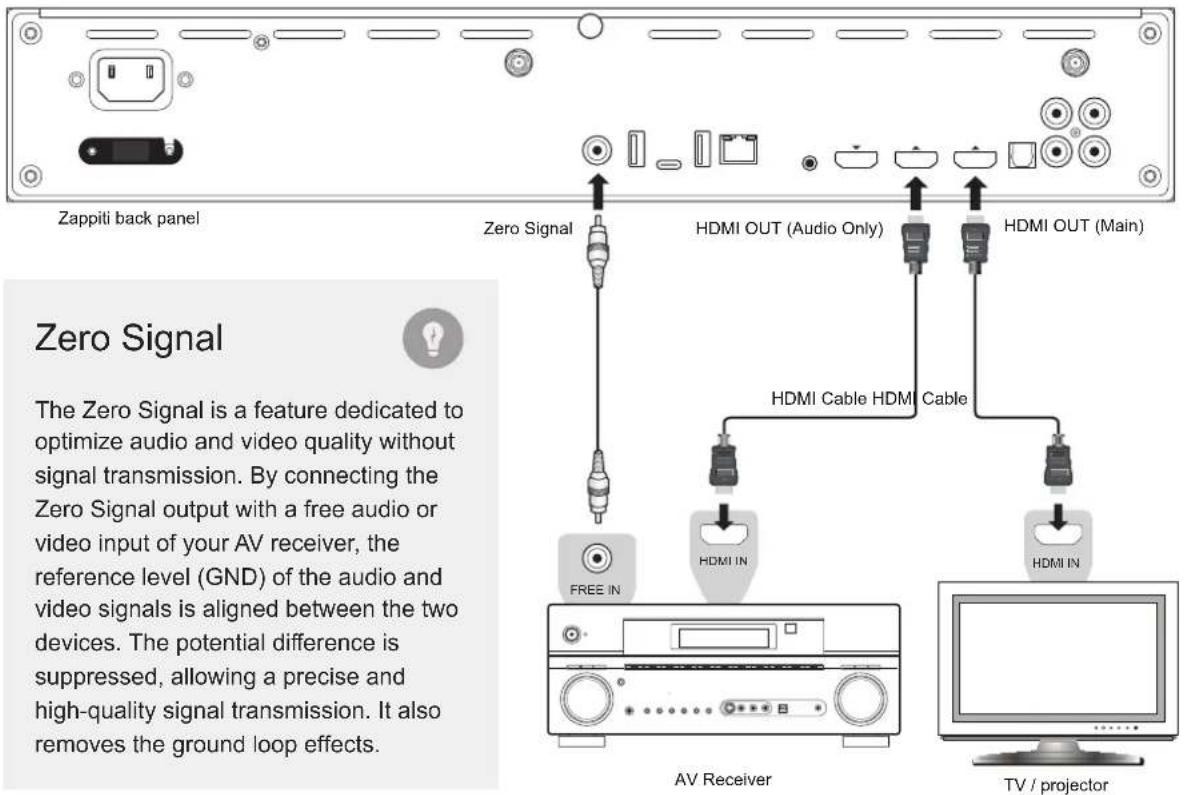
Hi-End R-type power transformer: Top-quality power supply for ultra low audio/video noise. - Zero signal output: Connect the Zappit to empty AV receiver connector to delete ground loop issues. Ground loops are a major cause of noise, hum, and interference in audio and video systems.
Vote for Future Features
To propose a new feature or vote for an upcoming feature, please visit: zappiti.uservice.com

Organize Your Video Collection With Movie Covers
-
Zappiti Video Interface: Browse your movie and TV show collection with cover art and media information: (subtitles, actors, director, release date...). Zappiti features an automatic category index of movies and TV shows directly to the player, without requiring a computer.
-
Zappiti Search: Easy access to your movies or TV shows, thanks to Zappiti powerful search engine combined with smart filters (actor, director, length, rating, release date...).
-
Zappiti Stand-Alone: Add, edit or delete movie covers directly on your Zappiti via the remote control (no PC required). Change the posters, edit the synopsis, change the associate category create and organize your own personal categories, etc.
-
Zappiti on Start-up: Enable/disable start-up for Zappiti Video from system boot by Zappiti setting.
-
Zappiti Collections: Create and manage one collection by each family member or one collection by HDD and switch easily from one collection to another.
-
Parental Control: With the parental control feature, you can designate movies as "children's" and block access to other movies with a PIN code. Thus, your children can safely access only their movies! In addition, the child mode provides direct access to movies for greater ease of use.
-
Movie Sagas: The saga films are automatically placed in groups and sorted by release date. A saga cover dedicated to the collection is associated with the group and movies are displayed in a stuning carousel with great 3D motion effects!
Automatic Seen Status: Your films and episodes are automatically marked as "Seen" or "Ongoing" status. And when you finish playing a TV episode, Zappiti automatically offers to launch the next episode!
Zappiti Next: Direct access to the current or next episode / film from saga directly from the Zappiti Video home page.
- Zappiti Soundtrack: With the amazing Zappiti Soundtrack, you can explore your collection, while listening to the soundtrack associated with your movies, TV shows and sagas.
Zappiti Widescreen: Set the user interface in 2.35:1 aspect ratio.
- Zappiti Off-line: Save a collection locally and use it without any Internet connection.
Zappiti Trailers: Watch the trailer of your movies.
Zappiti Bonus Live: Watch additional contents such as Making Of, Deleted Scenes, Extracts, Reviews,Blooper Reel,...The additional contents are regularly updated for more results.
-
Zappiti Sub: Easily download the subtitle of a movie or TV show episode, directly from the Zappiti
-
Zappiti Sync: Thanks to Zappiti Sync, your movie collections are automatically synchronized to your other Zappiti players, tablets, smartphones and to all your computers MAC and PC!
-
Zappiti Explorer: Zappiti Explorer is the easiest way to launch the playback of most of multimedia files such as UHD, BD and DVD ISO, BDMV, M2TS, MKV, MP4, MOV, MP3, FLAC, JPG... Zappiti Explorer makes file exploration so easy!
-
Zappiti Video Control: Control your Zappiti and admin your movie collection using your tablet or smartphone (iOS / Android).
Package Contents

NOTE: Additional items (optional) may be included into the package, depending on player configuration, region, and distributor.
- Zappiti Pro 4K HDR
- IR Remote Control
- IR Extender
- Wi-Fi Antennas
5.HDMI 4K Cable
6. Power Cable
7. Ethernet Cable
8. Restore Flash Drive
HDMI Cable
The supplied cable is compatible with 4K HDR. For longer lengths, we recommend the cables offered on store.zappiti.com. All the proposed HDMI cables have been tested in 3840x2160 resolution at 60Hz and in 4:4:4 / 10-bit in real situation on Zappiti 4K HDR media players. By choosing one of the cables offered by Zappiti, you will have the insurance of optimal operation. Indeed, a large number of HDMI cables yet certified 4K 60p and 2.0 are not compatible with Zappiti boosted video streams and it may result with picture displays jerks, freezes, white pixels, or a black screen.
IR Extender


Front View
- LED indicator
- USB port
- Power ON/OFF
- Headphone output
- Infrared receiver (IR RC signal)

- Restore button
- HDD Rack enclosure

Rear View
- AC Power
- AC voltage switch (110/240V)
- Wi-Fi Antenna
- Zero signal
- USB 2.0 Host
- USB TYPE-C
- USB 3.0 Host
-
LAN 10/100/1000
-
IR IN (IR extenter included)
- HDMI Input
- Audio HDMI Output (Audio only)
- Main HDMI Output (Video + Audio)
- Optical Digital Audio Output
- Coaxial Digital Audio Output
- Analog Video Output CVBS
- Analog Audio Output Right / Left

AC power inlet and the AC voltage switch
The inlet is the IEC60-320 C14 type. The AC voltage switch can be manually adjusted to work at 100V 120V or 220V 240V , please flip the switch according to your power line AC voltage. Only the included AC power cord or an approved power cord with an IEC60-320 C14 type plug should be used.
Remote Control
- LIGHT: Turn on the backlight of the remote control.
- POWER: Toggle power ON/OFF.
- TV SECTION: Programmable buttons to control TV or other external equipment; use SET button to learn the other 5 buttons.
4-5. POWER ON/OFF: Discrete power ON/OFF. - DIMMER: Toggle front LED ON/OFF.
- DELETE: Delete / Change home template.
8-9. PREV/NEXT: Go to the previous/next chapter. - ZOOM: Zoom In / Out (overscan).
11-12. -60/+60: Timeline navigation (-/+ 60 sec.).
13-14. -10/+10: Timeline navigation (-/+ 10 sec.).
15.3D: Toggle 3D mode (2D / 3D). - ASP. RATIO: Switch the Aspect Ratio.
- STOP: Stop video playback.
- PLAY/PAUSE: Start / Pause playback.
19-20. UP: Fast forward. DOWN: Fast backward.
21-22. LEFT/RIGHT: Timeline navigation ( +1 min). - HOME: Go to Main Menu (Home Page).
- MOUSE: Switch to the virtual mouse mode.
- MENU: Show / Hide the pop-up menu.
- BACK: Return or Stop playback.
19-22. ARROWS: Navigate menu selection. - OK: Enter or validate the current item.
28-29. VOLUME +/-: Increase / Decrease volume. - REPEAT: Repeat playback (file, all, off).
- INFO: Show / Hide the pop-up info (properties).
32-33. PAGE+/-: Timeline navigation (+/-10 sec). - ZAPPITI: Zappiti Video shortcut.
- MUTE: Mute audio.
- EXPLORER: Zappiti Explorer shortcut.
-
NUMBER Buttons:
-
1-9: direct access to 10 - 90% (video playback or movie list).
-
0: Restart from the beginning (video playback or movie list).
-
SUBTITLE: Subtitle switch.
- AUDIO: Audio track switch.
- RED (A): For future function.
- GREEN (B): Shortcut to Android Settings.
- YELLOW (C): Shortcut to HDMI IN Recording page.
- BLUE (D): Shortcut to Firmware Upgrade page.
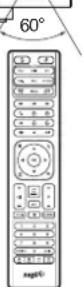
Using the Remote Control
Within about 26 ft (8m)

When using the remote control, the front window of the remote control should be pointed to the infrared sensor on the front panel within an angle of ± 60^ and a range of about 26 ft.
Please use alkaline batteries. Please observe polarity when inserting batteries.

Third Party Control
You can control your Zappiti using third party devices such as Control4, Crestron,RTI, ProControl, Logitech, Pronto, ...
More info: zappiti.uservoice.com/knowledgebase
Connecting Your Zappiti to Your TV Without AV Receiver
If you do not own an AV Receiver or sound bar, the most convenient and easy way is to connect your Zappiti Pro 4K HDR straight to your TV. To do it, connect the main HDMI output of your Zappiti to a free HDMI input of your TV or your front projector. If you have projector, please use an AV receiver (next procedure) or an audio analog amplifier and connect it as following:

Zappiti back panel
If you get BLUE SCREEN, it because you are using HDMI Audio Only instead of HDMI Main for the TV.
Connecting Your Zappiti to Your TV Trough AV Receiver
If you own an AV Receiver, the most convenient and easy way is to connect your Zappiti Pro 4K HDR to your TV trough your AV receiver or soundbar. To do it, connect the main HDMI output of your Zappiti to a free HDMI input of your AV receiver, then connect the HDMI output of your AV receiver to your TV or your front projector. If your TV is compatible 4K HDR, your AV receiver also have to be compatible with 4K HDR format. If not please use the HDMI Audio Only Output as explained on the next page.

Zappiti back panel
Black Border & Overscan

If you have a black border problem all around the screen, press the "zoom" button on the remote control (3). You can also adjust the aspect ratio of your TV (Fit to Screen option).

TV / projector
If your AV receiver is not compatible 4K HDR, please use the HDMI Audio Only output as following:
Audio Coaxial and Optical
If your AV receiver is not compatible with HDMI, you can connect your Zappiti to your AV receiver using SPDIF optical (Toslink) or coaxial outputs as following:

Wireless Headphones: For video playback without audio-video sync issue, please choose a wireless headphones compatible with Apt-X Low Latency technology.
Note: It is possible to connect a keyboard and a computer mouse to the Zappiti. By default, the keyboard is set in QWERTY. To switch the keyboard recognition to AZERTY or other key position, first connect your keyboard to one of the available USB ports. Press the GREEN button on the remote control to access the Android settings. Then, click Languages & input. Finally, choose your language in Current Keyboard section, Android Keyboard & Physical Keyboard. Warning! The mouse is not compatible with Zappiti Video, Zappiti Music and Zappiti Explorer apps. But it can be useful for third-party apps downloaded from GooglePlay or AptoideTV.
Getting Started
**Please make sure to use HDMI OUT (Main) and not HDMI IN connection to link your Zappiti to your TV or your front projector.
Switch on the Zappiti. The media player will perform its initial boot up procedure, which may take up to about 1 minute (depends on apps). During the boot up procedure, "Z" logo is shown on the TV.
**If you have a black screen or no video signal, please visit the Zappiti Knowledge Base. zappiti.uservoice.com/knowledgebase
Finally, you should see the main screen with access to applications Video (Media Center), Music and Explorer. On the top you'll find access to the Settings and MyApps.
To adjust the player settings, press the GREEN button of your RC or click on " SETTINGS" item located on the top of the screen. In particular, you can adjust the following settings: video, audio, and network configurations. To choose the language of the Android menus, please use: Settings / Personal / Language & input setting. Zappiti apps use specific language settings. To set Default Audio Language, during video playback, press the MENU button of your RC, and click on Advance. Then you will be able to set the Default Audio and Subtitle language.
Audio Setup
The Audio section of the Settings Menu allows you to configure preferences for audio output formats. To access the audio settings, please go to "Settings/Device/Sound and notification". If you are using an AV receiver compatible with HDMI and multichannel audio, please set the HDMI output to "Auto". If your AV receiver is compatible HDMI but not compatible HDR, please connect your Zappiti to your AV receiver using the HDMI Audio only output. You can also force it to "RAW" (Bitstream). If your AV receiver is not compatible with HDMI, please set the S/PDIF output to "RAW" for bitstream or LPCM 2Ch for stereo configuration.
Force SD Audio: The S/PDIF does not support HD Audio such as DTS-HD or Dolby TrueHD. To convert HD audio into SD Audio (DTS-HD to DTS or Dolby TrueHD to Dolby Digital), please switch "ON" the Force SD Audio option located in Settings/Developer options. More info: zappiti.uservoice.com/knowledgebase
Video Setup
By default, the Zappiti is able to auto adjust the video output. But you can manually select the resolution and frequency of the GUI. To force the output resolution, please switch "ON" the Ignoring HDMI EDID option located in Settings/Developer options. Then go back to the general settings by pressing the BACK button of your RC, and go to "Display". You will be able to see all the output modes available in Manual Settings but the Auto mode will be not available anymore. To adjust the Color Space and the Deep Color (OFF/10/12-Bit), go to Settings/Developer options. For the best performances, we advise you the following settings: Y'CbCr 4:4:4 / 10-Bit (if your display is compatible). Note: the auto framerate is still activated even if you force the HDMI output in a specific resolution or frequency, however, in some cases, the manual resolution mode can generate some issues.
If you get BLUE SCREEN, it because you are using HDMI Audio Only instead of HDMI Main for the TV.
External USB
If you are using an external HDD 2.5", please use the USB cable provided with your HDD for best performance.

Using Internal Drive
Connecting USB Drives
You can connect your USB drives to one of the available USB ports. If you want to play video files, USB 2.0 is enough to support very high bitrate (up to 480 Mbps) and more reliable than USB 3.0. If you want to transfer files, you can use the USB 3.0 or USB Type-C ports.
***Note: A dedicated USB icon located on the home page can help you to detect if the drive is connected correctly.
Power provided by USB ports may not be enough to allow the USB drive to function correctly; depending on the drive. Please do not disconnect or switch off the USB drive during write (copy / transfer) operations.
The Zappiti is compatible with UASP HDD docking stations as well as USB hubs.
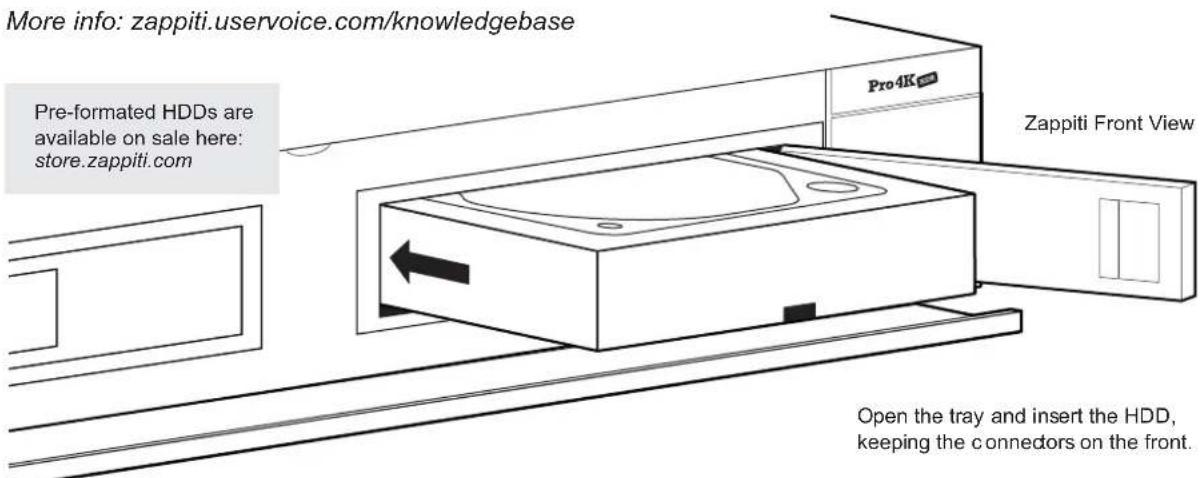
To insert the internal 3.5" SATA HDD, please open the rack door, then insert the drive into the internal enclosure until 3/4, then complete the installation by closing the door. This operation will complete the installation of the disk into the rack. The Zappiti media player is compatible with drives formatted in NTFS, ExFAT, FAT16, FAT32, HFS, EXT2/3. It is not possible to format hard drives via the Zappiti. You must use a computer for this purpose. In case of NTFS GPT, please use 64 Ko allocation tables.
***Note: Please make sure that your hard drive is correctly formatted before you insert it in the tray.
Using SD / MMC Memory Cards
To use a memory card, insert it in the memory card slot located on the left side of the media player. It will be detected as USB device (USB icon on the home page). Some SD memory cards may not be recognized by the player or may work incorrectly; in such case, please use a different model of memory card.
Use the RC buttons UP, DOWN, LEFT, RIGHT, OK, RETURN to navigate through the player menu. Use the MENU RC button to show the list of available commands. Use the INFO RC button during playback to show the INFO panel.
The Home Page features 3 main applications: Zappiti Video, Zappiti Music and Zappiti Explorer.
Zappiti Video
Zappiti Video is a media player, software and entertainment hub, featuring an impressive user interface with movie covers. With Zappiti Video, you can experience your entire movie and TV series collection, browse and play your titles from local and network storage media, view cast information, download subtitles, play trailers and much more.
Zappiti Music
Zappiti Music is an app dedicated to music playback designed for Zappiti players. Listen to your favorite tracks, and manage your music collection in a simple way. With Zappiti Music you can play your music stored anywhere on your home network or on a local drive connected to your Zappiti media player. With Zappiti Music, you can control your music playback through your Zappiti media player, from your smartphone or tablet (iOS or Android) without the need of TV. Select the Zappiti media player you want to control and manage your music collection directly from your tablet or smartphone.
Zappiti Explorer
Zappiti Explorer is a File Manager. You can easy explore and launch playback of your music, pictures and video content. But Zappiti Explorer is more than just a file explorer — it also provides many advanced multimedia features and a complete file management system.
Before to start using the Zappiti apps, you have to create a Zappiti account and register your device. First, connect your media player to Internet through Wi-Fi or Ethernet. Please launch one app and select you language. Then, follow the on-screen instructions. If you have never used Zappiti before and if you don't have any Zappiti account, please click on Create an account now.

Then, you'll be invited to enter your Zappiti Token. The token number is printed on a sticker located under the Zappiti case. You'll have to enter it only one time. Then, all the info of your account will be saved in the internal memory.
Note: If you do not have any Internet connection, you can explore your files using: MyApps/Media Browser.
Accessing Network Drives and Access to Zappiti Storage
The Zappiti media player features a Samba client (SMB) to explore and playback your videos, pictures and music, located on your local network (NAS, computers, ...). The SMB Server is activated by default. You can access your Zappiti entering \ZAPPITIHDR in the explorer of your computer or using the Zappiti IP address as following: \192.168.1.15 (example). To find the IP address of your Zappiti, go to: SETTINGS (GREEN button of the RC) / Ethernet Configuration.
More info about SMB Server, FTP and DLNA Server here: zappiti.uservice.com/knowledgebase
The Zappiti media player also features a function called Zappiti Share, based on Samba server technology. This allows you to access your video, pictures and music content, located on internal HDDs (or local drive connected in USB to the media player) from another Zappiti player 4K or 4K HDR through your local network. You can playback video contents, in 5 different rooms simultaneously, equipped with Zappiti media players. Thanks to Zappiti Share, a NAS server or computer is not required to stream your media content in different rooms of your home. To use Zappiti Share, please select Zappiti Share instead of Local drive in the Zappiti Video Folder Configuration.
How to Transfer your Files Using Zappiti Explorer


Zappiti Explorer is a File Explorer, but also a complete file manager with features such as: Copy, Cut, Paste, Select, Select All, Delete, and Rename. Zappiti Explorer is also multi-tasking. To access these functions and display the task manager, press the MENU button on the Zappiti's remote control.
Video and Audio Playback Options
The Zappiti Explorer MENU also provides access to various video and audio playback options such as sequencing of file playback, loop playback, ...
Slideshow Function
Zappiti Explorer offers a slideshow function with cross fades and transition effects. To access the slide show display settings including the frame time, transitions and effects, press the MENU button on the remote control (slide show off). To add a music to a slide show, simply place an audio file in the folder containing your pictures. If several audio files are in the same folder as the photos, the tracks will be linked one after the other and played in alphanumeric order.
Video Properties
To view the complete technical information of the file being played, press the INFO button on the remote control. You will find in particular, the datarate, framerate, video and audio codec and format, size, resolution, and more...
How to Install a New App
To install a new app, please go to My Apps / AptoideTV. You'll find many apps dedicated to media players that can be controlled by RC. You can also use GooglePlay but some apps may be not compatible with the Zappiti. If you want to install an APK from a USB stick, please use Zappiti Explorer or MediaBrowser.
How to add an App Shortcut to the Home Page
To add a shortcut to a favorite app on the home page, please click on icon and select your favorite app to add it to the home page.
Ethernet
The Zappiti provides two network connection methods: through Ethernet cable or through the built-in wireless LAN adapter. For the fastest and most stable network connection, we recommend using an Ethernet cable whenever possible. Plug one end of a network cable (straight Ethernet cable) into the LAN port on the back of the Zappiti (Category 5E or more). Then, plug the other end of the network cable into a LAN port on the broadband router or modem (or switch if you are using one).

Router / Modem
Wi-Fi
To set the wireless feature, please click on the "Settings" icon located on the top of the home page, then click on the Wi-Fi settings. You will be able to select a wireless network and enter the security password.
Bluetooth
The Zappiti player is compatible with devices using Bluetooth technology. To access the list of Bluetooth-enabled devices, go to Settings / Bluetooth. Then switch the option to "On".

Ethernet filter (not included)
For the best performances in audio, we strongly advise you to purchase Medical or Hi-Fi Ethernet filter in order to reduce noise pollution coming from various sources.
Zappiti Music

Favorite Excluded Unlnded Chained Shuffle ABC order Loop Loop Off Playlist
On the main page of the Zappiti, you will find Zappiti Music, an app dedicated to Music playback. Use the UP/DOWN button to browse your music folders. Use the RIGHT button to access the additional options. Press ENTER on Favorite button to mark the current track as Favorite. Press ENTER 2 times on Favorite button to mark the current track as Excluded track. To create a folder shortcut, select a folder, press MENU and press ENTER on Create a shortcut. The shortcut will be placed on the Zappiti Music home page. Press ENTER on to filter a music title by entering a keyword.
How to Control your Zappiti Using your Tablet / Smartphone
You can also control the Music and Video playback using the dedicated apps named Zappiti Video Control and Zappiti Music Control available for iOS and Android. To install them, switch on your tablet or smartphone, then go to the Play Store (Android) or App Store and search them using Zappiti control keywords. Then, launch the app and enter your zappiti account credentials. You will be access to you video and music contents and control the music without the need of TV. More info on: zappiti.com
How to Create a Movie Collection in Zappiti Video
Before starting, you must create a folder named MOVIE on your HDD. Then, place all your movies inside this folder. If you have TV shows, place them in a dedicated folder named SERIES or TV SHOWS.
Movies
- On your NAS or HDD, please create a movie folder named MOVIES. Place all your movie files in it.
- Your files should be named with the title of each movie. For example, the file of the movie "Metropolis" should be named "Metropolis.mkv". You can create sub folders in the folder MOVIES if you want.
TV Shows / TV Series
- On your NAS or HDD, please create a folder named SERIES or TV SHOWS .
- Then, create a subfolder for each TV Show / Series. You can create a subfolder for each season if you want. Then, place all your TV Show episodes in it.
- Your episodes must be named as: "Seriename s01e01" ("Seriename 1x01" also supported). For the special episodes, please name them as: "s00e01".

Start your Zappiti. On the main page, click on the first button named Video. Choose your language and enter your login. If you do not have any Zappiti account, please report to page 11.
Then, click on the button Connection located on the bottom of the window.
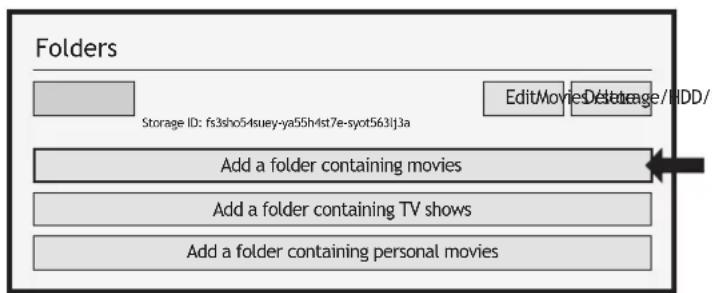
On the Folder configuration window, please click on Add a folder containing movies (or TV Shows). If your files are located on a local storage, please click on Local drives. If you want to share your video contents with others Zappiti players though your local network, click on Zappiti Share. Then click on the storage name. Next, browse it and go inside the Movies (or TV Shows) folder. Finally, when you are in the folder MOVIES (or TV SHOWS) click on Add this folder button located on the top of the window.
WARNING! Do not add all your sub folders. You should just add your "MOVIES" folder containing all your movies. If you own a NAS, please place your folders MOVIES and TV SHOWS inside the shared folder VIDEO. Do not place your folders MOVIES and TV SHOWS in the root folder of your NAS.
Your folder will be added in the MOVIE folder list (or TV SHOW). You can check the path by looking on the generated path located between "MOVIES" button and "Edit" button. Your path should stop to the "MOVIES" folder (or "FILMS" folder). If your path is incorrect, you can modify it by using the Edit button. Press Delete button to delete the folder from Zappiti. (Don't worry! Your movies will not be deleted). If you want to add another folder containing movies or TV Shows, please click on the dedicated button.
Then, press RETURN if you don't want to add another folder containing movies. Zappiti will start to scan your folders and analyse your video contents. You can see the current scan task in a dedicated panel. To close the current task panel, press the RETURN button of your RC. If you close it, you can display it again through the MENU button of your RC.
Done! Now you can enjoy your Zappiti collection! To access to the configuration panel again, press the MENU button on your remote control. In the configuration panel, you'll find many options such as: language (GUI and identification), translations, templates, top movie cover, glass effect, parental control, identification on startup and other options, terms to exclude, token and other account administration. More info here: zappiti.uservoice.com/knowledgebase
Zappiti Video
The homepage of Zappiti Video is composed of 2 parts. The lower part offers access buttons to modules. By default, a number of modules are displayed such as: ALL, MOVIES, SERIES, RECENT, CATEGORIES, ... It is possible to delete or add modules using the MENU button on the remote control. It is also possible to display the contents of a module or category at your choice in the upper part (showcase). By default, the NEXT module is proposed. This module displays the movies or episodes currently playing. In case you have completed a TV episode, the following episode is proposed. In the case of a saga, the following movie is displayed. To delete an episode or movie from the NEXT module, select it and press the MENU button and click Remove from Showcase.
/storage/HDD/Films
Storage ID: 00000000000000
If you get a wrong storage ID with « 00000000», it means that Zappiti cannot write on the drive due a defective sector. Please format it again.
To access to additional features, press MENU button of your RC.

How to Identify a Movie / Episode
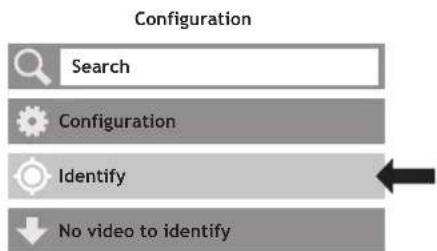
When you add a movie file to your 'Movies' folder, Zappiti will automatically index it during the next restart of the application. To force the identification process, please press MENU of your Zappiti remote control, then click on Identify option.
How to Delete a Movie / Episode
When you delete a movie file from your 'Movies' folder, Zappiti automatically removes its cover and descriptive page from your Zappiti collection during the next analysis. You can manually remove a movie using the Delete option located in the Zappiti menu (contextual actions).
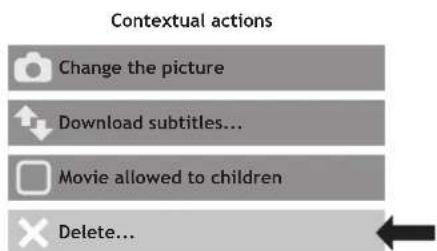
How to Identify Unidentified Movies & TV Shows
Even if your files are not named correctly with the name of the film (or TV show), Zappiti can identify it but only if a Zappiti user previously identified it manually. If you are living in a country where Zappiti is not yet popular, which could happened often at the beginning, mostly if you are using a Zappiti NAS Rip because the generated files are rarely named correctly. But day after day, Zappiti Db will become more and more reliable as users will manually identify files of movies and TV series.
Press MENU of the RC and select X to Identify. You'll see the list of the files that are not identified. Then, click on the button named Identify... On the Identify window, please enter again the movie name.
You can also enter the IMDb, TMDb or TVDb ID code to identify your movie or your TV show. On TMDb, TVDb or IMDb, the ID code is located in the URL of the movie page. For instance, the URL of the movie "Metropolis" will be "http://www.imdb.com/title/tt0017136/" Enter the ID number "tt0017136" into the field instead of the title name. Then press the "Search" button. Zappiti will find the right movie at 100% . If your movie or TV show does not exist on TMDb or TVDb, you can add it by creating an account on it.
3D, 4K and UHD Files
The 3D BD ISO, UHD ISO and 4K ISO files as well as BDMV folders for 3D and 4K UHD cannot be always identified automatically. In this case, to identify this containers, please add the following tags in the name as following:
3D Files: "3D". (For example: "Metropolis.3D.iso").
UHD Files: "UHD" or "ULTRAHD" or "ULTRA-HD". (For example: "Metropolis.UHD.iso").
4K Files: "4K" or "4096" (For example: "Metropolis.2160x4096.iso").
How to Change a Picture (Poster or Background)
To change the poster or the background of a movie or TV show, press MENU button of your remote control, then click on Change the picture option using OK button of your Zappiti remote control. Then, click on the poster or background of your choice. If you see a Zappiti Db banner, it means that this picture is part of Zappiti movie cover database. If you have installed Zappiti Video on a Mac or PC, you can find additional option on this window that allow you to add a picture from your hard drive.
Zappiti Templates
To change the graphical template or to use the classic display from the previous version of Zappiti Video (Zappiti Media Center), please go to MENU / Configuration / Second Tab / Template.
To change the graphical template of the home page (Video / Explorer / Music), press the Delete button or your Zappiti remote control.
Multiple Hard Drives
Zappiti Video is able to mix the content of several sources. For instance, one collection can contains movies located on 2 hard drives and one NAS. If you are using multiple hard drives, Zappiti is able to detect if the drives are accessible or not. When you launch a movie but the drive containing the movie is not connected, Zappiti show a popup windows asking to insert the dedicated drive.
Zappiti Soundtrack
During navigation in the movies and TV shows, Zappiti playback the musical theme. This option called Zappiti Soundtrack can be desactivated in the Configuration panel (Menu / Configuration / Tools). To add your own soundtrack, you can use the Zappiti Soundtrack Editor available on the PC and Mac versions of Zappiti Video.
In your collection, locate the media (movie, series or saga). Left-click on the cover-art to display the Pop-up Menu. Then, right-click on the button Associate a soundtrack. Then, click on Open a music button to import your music. Please wait during the importation process. Then, your audio track will appear in the Zappiti Soundtrack Editor.

For legal issues, the extract must not be longer than 30 sec. The minimum duration is 10 seconds. The area of the clip is symbolized by a dark gray band. To edit the audio clip, click and drag the start and end arrows. We strongly advise you to use the Fade In / Fade Out options, but it may be useful not to use fades in some cases. For example, if could be very useful if you want to make a perfect loop.

To start the audio playback of your clip, please click the Play button. You can move the playback position (represented by a bar cursor) by clicking anyway on the clip using your mouse. This makes it easy to edit the end of the clip. Once the clip has been edited, click Save and Export to Zappiti Cloud.
Note: Before exporting, you can put a comment in the comment field for the Zappiti Soundtrack moderation team. For instance, you can indicate that the default track is wrong (soundtrack of another movie/saga/TV Show).
As Zappiti Soundtrack is a community system, the more users will add soundtracks, the more the Zappiti Soundtrack database will grow up.
Parental Control
To tag a movie as Allow for children, select a movie (or a group of movies), then press the MENU button on the RC and click on Allow for children. Then, enter a 4-digit pin code.
Parental code
Please enter a 4-digit pin code. This code will allow you to lock your collection and restrict access to movie tagged 'Allowed for children'.

Cancel
Personal Categories
By default, the movies and TV shows are automatically associated to categories. But you can create your own categories and associate manually your movies. To create a category, go to Categories, then press MENU and click on Create a category. Then, enter a name and choose an icon. The contextual menu gives also access to additional options such as: modify the position, edit or remove.


Zappiti On Start-Up
To activate this function, press MENU, then go to Settings, click on the second tab and switch ON the option in the list.
Auto-start

Auto launch Zappiti on start-up

Filter and Sort
To sort your movies, press MENU, then go to Filter and sort. Then click on the first item. Then select the sorting: A to Z, Z to A, Release date, Duration, Addition... To filter your movies, please click the following options: Seen, Ongoing, or Not seen.
Filter and sort

Decreasing Release date

Seen videos

Ongoing videos

Not seen videos
Search Engine
To search a movie, TV show or even movies from specific actor or director, press MENU, then on the first row, click on the search engine. Then, enter your search (title, actor, director). The results will be filtered by Movie, TV Show, Actor and Director.
Sagas / Groups
The films from sagas are automatically placed in groups and sorted by release date. A saga cover dedicated to the collection is associated with the group and movies are displayed in a stunning carousel with great 3D motion effects!
Subtitle Display Options
To change the subtitle display options such as color, vertical position, coding or sync, press the MENU button on the Zappiti remote control during video playback, then go to Subtitle and change the desired option. To change the vertical position of the Blu-ray subtitles (PGS), go to the ADVANCE section, then click on PGS Subtitle Offset and decrease or increase the vertical position of the subtitles. To add external subtitles, please use the same name of the video file as following: Metropolis.mkv / Metropolis.srt
Resume Video Playback
To launch video playback from Zappiti Explorer, select a video file in the list then press OK button of your Zappiti remote control. On Zappiti Video, select a video, then press OK to enter on the plot page (synopsis). Then press OK again to launch the video playback. You can directly launch video playback
from the cover list using PLAY button of the remote control. If your video file is using another container such as MKV, M2TS, MP4 or AVI, Zappiti will display the Resume Playback window during a few seconds — if you previously watched this video file. To resume video playback, click on Resume Playback. If you click on Start, the video playback will restart from the beginning.

Direct Access
In addition to Fast Forward / Fast Backward (UP/DOWN buttons) functions, Zappiti features many direct access functions:
NUMBER Buttons:
1-9: Direct playback access to 10 - 90%.
0: Restart the playback from the beginning.
Direct Access Buttons:
60:Timeline navigation (一 + 60 sec.).10:Timeline navigation (一 + 10 sec.).
3D Option
The Zappiti is compatible with 3D files included 3D BD ISO (and BDMV) in addition to MKV 3D (MK3D) and offers dedicated 3D settings. During video playback, press MENU button of your Zappiti remote control. Then, go to 3D Option. Note: This option is only available for 3D video files.

2D:
Convert 3D into 2D.
Exchange Eyeview:
Invert left and right eyes views.
3D Subtitle Line Spacing:
Increase/decrease line spacing for the 3D subtitles.
3D Subtitle Depth:
Increase/decrease the depth of the subtitle display (to the front or to the back).
3D Video Depth:
Increase/decrease the 3D video content depth.
3D OSD Depth:
Increase/decrease the popup menu depth.
Firmware Upgrade
To access the Firmware upgrade page and update the firmware online or via USB, please press the BLUE button of the RC. To check the most recent changes, latest firmware versions and get recovery firmware, please visit our website at: zappiti.com/firmwares.
Factory Reset
In some cases, a factory reset may be required.
Be careful, however, this will reset all your Zappiti settings and account information.
- Turn on your Zappiti 4K HDR.
- Click the "My App" button, then click the "Factory Reset" icon, then confirm the procedure.
- Please wait during the reset process.
Warning! The first restart of the media player is very long! After the reset, the home page will appear on the screen but the apps and controls will be not available for a couple of min. Please wait some min. If you have to switch OFF the Zappiti, please do not proceed it before 10 min.
Firmware Restore Procedure Using USB Restore Stick

DISCLAIMER
On some cases — especially if you come from a more recent firmware — during the process, the TV screen can switch to GREEN or BLACK for a while. This is normal! Please absolutely not restart or switch off your Zappiti during the full process. In such case, please wait 10 min before to restart your Zappiti unit.
Warning! This procedure will reset all your personal settings and account information. Thank you to carefully read all of this procedure first! Then please follow the process step by step.
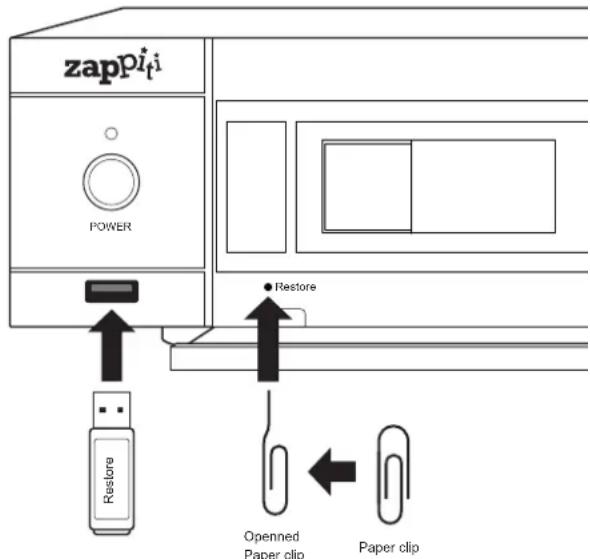
- Open the accessory box and take off the provided USB Flash drive named "Restore".
- Switch off the Zappiti player using the Power On / Off button located on the back panel.
- Connect the USB flash drive into the USB port of the media player located on the left side next to the "Restore" button and disconnect the network cable.
- Then press the "Restore" button by using a paper clip (small hole located behind the left rack enclosure). While holding the reset button, turn on the player via the power button located on the back of the Zappiti. Hold the "Restore" button within 6 seconds, then release it. A "Z" logo will appear during 30 sec. Then, the upgrade process will start and a progress bar will be displayed on the screen.
- WARNING! Do not turn off the media player before the full reset.

Please do not turn off the power!

58%
- The percentage 99% or 100% is very long. This is quite normal. Please wait until the appearance of "Z" logo. As long as the Zappiti logo is not displayed, do not turn off or disconnect the player above! Warning! The first initial start up is VERY long (1-2 min). So thank you for your patience throughout the initialization of the media player until you reach the player's home page (Zappiti / Explorer / MyApps). DO NOT RESTART the player until the main page appears.
- After the first initial boot, connect the Ethernet cable (if you are using it usually). Then, please wait 5 min. In fact, the system and the apps need some minutes to be fully reset and could be not accessible during this time. After 5 min, we advise you to restart the player for better performances. The second boot should be much faster and your Zappiti will be fully restored.
- After the second reboot, please click on "Settings" (GREEN button), then set your language. Then, you'll be invited to input your Zappiti credentials when launching Zappiti Video / Explorer or Music.
User Support & Zappiti Db
For User Support, please contact us at: tickets@zappiti.uservice.com
Tutorials and Knowledge Base: zappiti.uservoice.com/knowledgebase
Vote for the future functions: zappiti.uservoice.com/knowledgebase
To join the Zappiti Db Community and create movie covers and fanarts for Zappiti, please contact us at: contact@zappiti.com
Zappiti Store
Zappiti products, high finility cables, additional accessories and hard drives can be found on the Zappiti Store:
store.zappiti.com

ATTENTION
RISQUE DE CHOC ELECTRIQUE
NE PAS OUVRIR

ATTENTION: POUR RÉDUIRE LES RISQUES D'ÉLECTROCUTION, NE RETIREZ PAS LE CAPOT. AUCUNE PIECE DE SERVICE UTILISATEUR À L'INTÉRIEUR. CONFIEZ TOUTE RÉPARATION À UN SERVICE APRES-VENTE QUALIFIÉ.

zappiti.uservoice.com/knowledgebase
/storage/HDD/Films Storage ID:0000000000000
File:C:\Users\CHRISTOPHE\Music\MonFilm.mp3
Please do not turn off the power!

58%
zappiti.com / zappiti.uservoice.com/knowledgebase