
G3 Graphite Series PG3000 - Beard trimmer REMINGTON - Free user manual and instructions
Find the device manual for free G3 Graphite Series PG3000 REMINGTON in PDF.
| Product type | Beard trimmer |
| Brand | Remington |
| Model | G3 Graphite Series PG3000 |
| Power source | Rechargeable, built-in battery |
| Initial charging time | 16 hours |
| Battery life | Up to 40 minutes |
| Power adapter | Reference PA-04701E (EU) |
| Included parts | Wide trimmer, adjustable cutting guide, fixed cutting guides, precision trimmer, nose/ear/eyebrow trimmer, adapter, storage pouch |
| Cutting lengths | From 0.2 mm (micro stubble) up to 20 mm with adjustable guide |
| Uses | Beard, mustache, haircut, body hair, nose, ears, eyebrows |
| Special technology | Trim Shave for micro stubble at 0.2 mm |
| Care and cleaning | Detachable head washable under hot water; body not washable; oil blades after each use |
| Charge indicator | Indicator light while charging |
| Safety | Do not use in bath; do not immerse; supplied adapter is non-interchangeable |
| Battery | Built-in, non-user-replaceable; professional removal recommended for recycling |
| Recycling | Do not dispose of in household waste; take to collection point |
| Dimensions (estimated) | Approximately 17 x 4 x 4 cm |
| Weight (estimated) | Approximately 150 g |
Frequently Asked Questions - G3 Graphite Series PG3000 REMINGTON
User questions about G3 Graphite Series PG3000 REMINGTON
0 question about this device. Answer the ones you know or ask your own.
Ask a new question about this device
Download the instructions for your Beard trimmer in PDF format for free! Find your manual G3 Graphite Series PG3000 - REMINGTON and take your electronic device back in hand. On this page are published all the documents necessary for the use of your device. G3 Graphite Series PG3000 by REMINGTON.
USER MANUAL G3 Graphite Series PG3000 REMINGTON
natural_image
Black Remington Ultrason Ultruder with textured grip and power button (no visible text or symbols on body)PG3000
A
natural_image
Illustration of a hairbrush applying material to a garment (no text or symbols)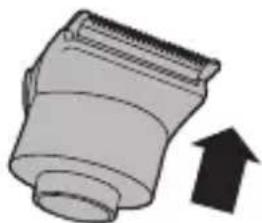
natural_image
Illustration of a mechanical component with an upward arrow, no text or symbols present
natural_image
Simple line drawing of a container with a lid and spout (no text or symbols)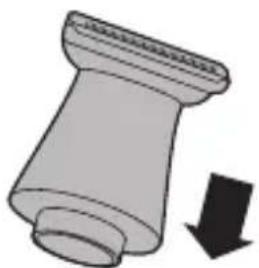
natural_image
Simple 3D illustration of a mechanical component with a downward arrow indicating force or direction (no text or symbols)
natural_image
Simple line drawing of a mechanical component or bracket (no text or symbols)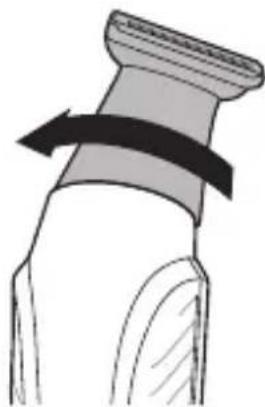
natural_image
Diagram of a mechanical component with a curved arrow indicating rotation or force (no text or symbols)Thank you for buying your new Remington® product. Please read these instructions carefully and keep them safe. Remove all packaging before use.

IMPORTANT SAFEGUARDS
- This appliance can be used by children aged from 8 years and above and persons with reduced physical, sensory or mental capabilities or lack of experience and knowledge if they have been supervised/instructed and understand the hazards involved. Children shall not play with the appliance. Cleaning and user maintenance shall not be done by children unless they are older than 8 and supervised. Keep the appliance and cable out of reach of children under 8 years.
- Always check the appliance before you use it. Do not use the appliance if it is damaged, as this may cause injury.
- The adaptor contains a transformer. Do not cut off the adaptor to replace it with another plug, as this causes a hazardous situation.
- WARNING: Keep the appliance dry.
- Do not use the product with a damaged cord.
- WARNING: For recharging the battery, only use the charger supplied with the appliance - type reference PA-04701U (UK).
• Always replace a damaged adaptor with one of the original type. - The battery in this device is not replaceable.
- Do not use the appliance if it is damaged or malfunctions.
- Do not use attachments other than those we supply.
- This appliance should never be left unattended when plugged into a power outlet, except when charging.
- Keep the power plug and cord away from heated surfaces.
- Do not plug or unplug the appliance with wet hands.
- Do not twist or kink the cable, or wrap it round the appliance.
- This appliance is not intended for commercial or salon use.
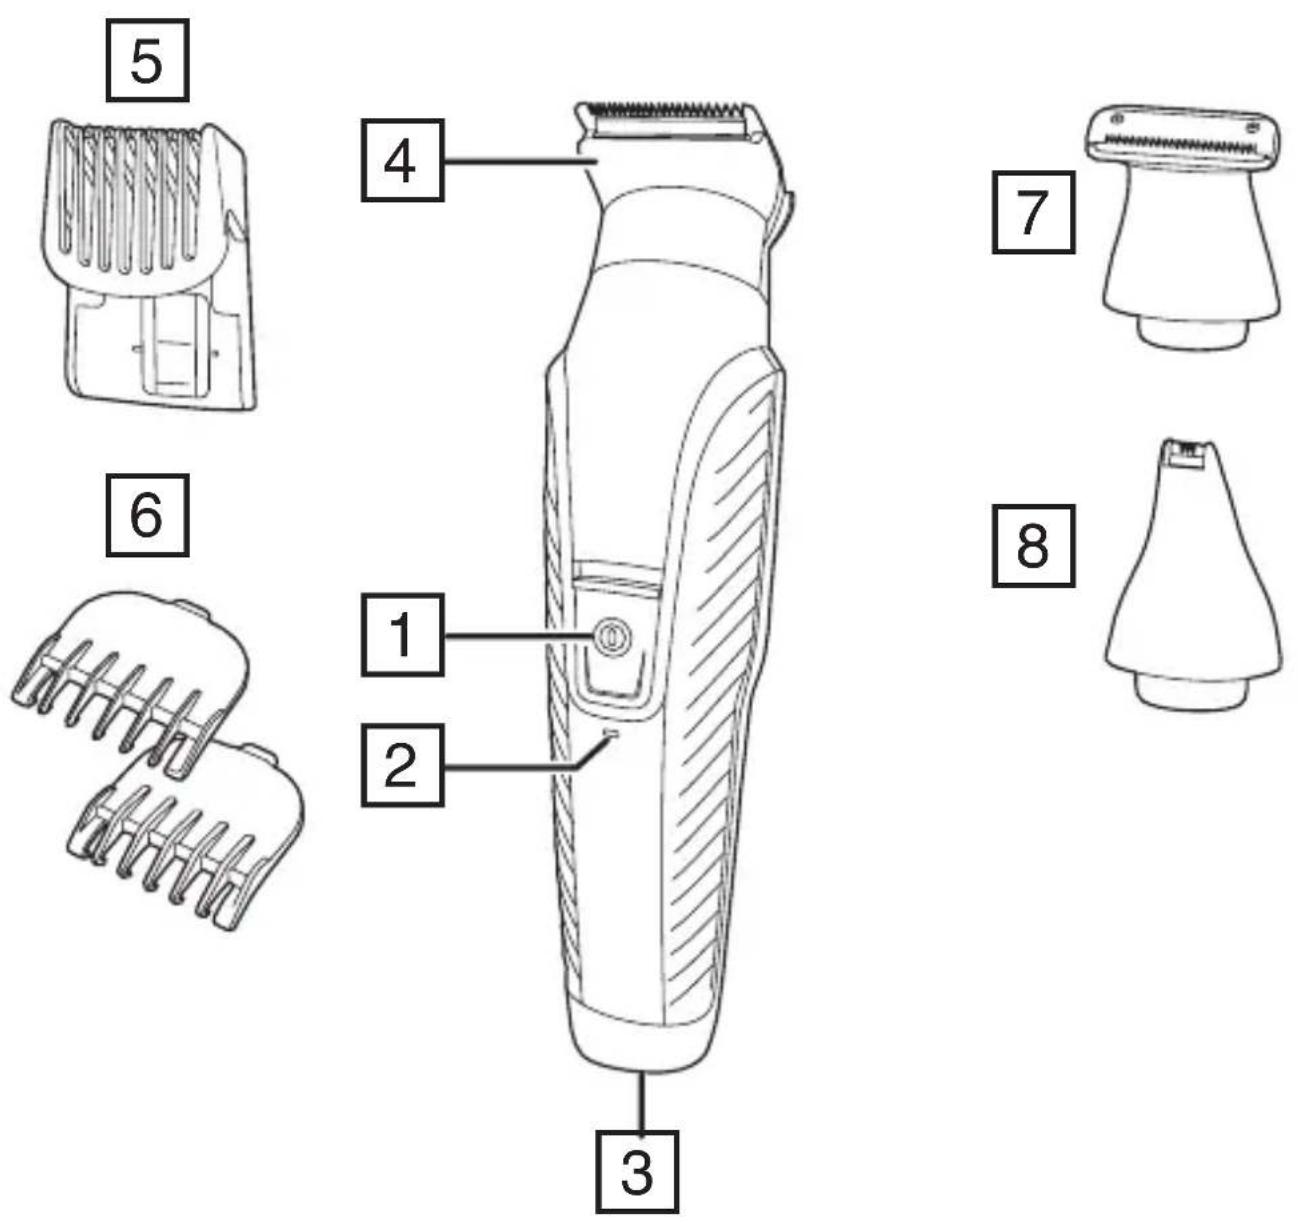
PARTS
- On/Off switch
- Charging indicator light
- Charging connector
- Wide trimmer
- Adjustable comb
-
Attachment guide combs
-
Precision trimmer
- Nose, ear, eyebrow trimmer
Not shown - Adaptor
- Storage pouch
CHARGING YOUR APPLIANCE
Before using your trimmer for the first time, charge for 16 hours.
- Ensure the product is switched off.
- Connect the charging adaptor to the product and then to the mains.
- When charging, the charge indicator light will light up.
- Run time from fully charged is up to 40 minutes.
- Your trimmer cannot be overcharged. However, if it is not going to be used for an extended period of time (2-3 months), unplug it from the mains and store.
- To preserve the life of your batteries, let them run out every 6 months then recharge for 16 hours.
ATTACHMENTS
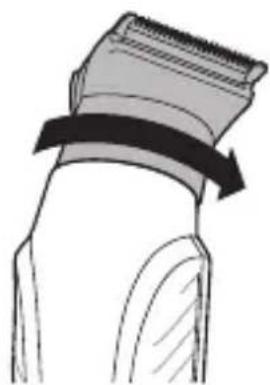
TO FIT AND REMOVE ATTACHMENTS (FIG. A)
Ensure that the device is switched off before fitting or removing attachments.
• To remove, rotate the attachment anti-clockwise until it unlocks and then lift it off.
- To fit, place the desired attachment on top of the device and rotate the attachment clockwise to lock it into place.
FITTING AND REMOVING FIXED GUIDE COMBS
To Fit
- Hook the front of the guide comb over the teeth of the wide trimmer.
- Press the back of the guide comb down until it clicks into place.
To Remove
- Lift the tab on the back of the guide comb upwards until it comes free from the wide trimmer head.
FITTING AND REMOVING THE ADJUSTABLE COMB
- To fit, line up the rails on the comb with the slots on the sides of the groomer and slide the comb downwards onto the groomer.
- To adjust, press and hold the adjustment button on the back of the comb and slide the comb up or down. Release the button to lock the comb at that position. The length of cut is indicated by the scale on the side of the trimmer.
INSTRUCTIONS FOR USE

- Comb facial hair with a fine comb before you start trimming.
- Comb your hair in the direction that it grows so that the hairs are at their maximum height and facing in the same direction.
- Since all hairs do not grow in the same direction, you may want to try different trimming positions (i.e. upwards, downwards or across) for better results.
- Hair should be dry and free from any waxes or lotions.
- If hair builds up during use, switch the unit off, remove any attachment in use and clean any excess hair clippings from the attachment and groomer.
3-DAY STUBBLE, AND BODY HAIR MAINTENANCE
| Attachments |
| Wide trimmer with 1.5 mm fixed comb |
3-day stubble look:
Let your stubble grow to a length that is slightly longer than the look you are trying to achieve.
- Fit the 1.5 mm fixed comb to the wide trimmer attachment.
- Run your trimmer through your beard against the direction of hair growth.
- Tidy the edges of the stubble using the precision trimmer attachment.
- For more control over the length of your stubble, you can use the adjustable comb and trim your stubble down in increments starting at a longer length setting until you get the desired look.
Body hair maintenance
- Let your hair grow to a length that is slightly longer than the look you are trying to achieve.
- Fit the 3 mm fixed comb to the wide trimmer attachment.
- Run your trimmer through your body hair against the direction of hair growth.
HAIR CLIPPING
| Attachments |
| Wide trimmer with adjustable comb |
Step 1: Nape of the neck
- Fit the wide trimmer and adjustable comb.
- Set the adjustable comb to the desired length.
- Hold the clipper with the blade teeth pointing upwards. Begin starting at the centre of the head at the base of the neck.
- Slowly lift the clipper, working upwards and outwards through the hair, trimming just a little at a time.
Step 2: Back of the head
- With the comb set at 12mm or 18mm, cut the hair at the back of the head.
Step 3: Side of the head
-
Adjust the comb to a shorter length setting for the areas around the ears.
-
Increase the length setting on the adjustable comb to gradually transition the length of hair on the side of the head to the longer hair on the top of the head.
Step 4: Top of the head
-
Adjust the comb to the longer length settings (up to 20 mm) then cut the hair on top of the head against the direction in which the hair normally grows.
-
Always work from the back of the head.
Trim the sideburns
- To trim the sideburns, adjust the comb to the desired length setting, or use one of the fixed guide combs.
SHORT/LONG BEARD TRIMMING
| Attachments |
| Wide trimmer with adjustable comb |
| Precision trimmer |
-
Fit the wide trimmer and adjustable comb.
-
Set the adjustable comb to the desired length.
-
Start trimming under the chin following the line of the jaw.
-
Work upwards towards the ear and upper beard line.
-
Tidy the beard edges using the precision trimmer attachment.
CONTOUR EDGING AND CLOSE HAIR CUTTING
| Attachments |
| Wide trimmer |
Contour edging:
-
Hold the device with the cutting blade (teeth) facing you and at 90 degrees to the skin.
-
Start with the edge of the beard/moustache line and, with the blade resting lightly against the skin, use slow controlled movements to create contoured lines.
Close hair cutting:
- Use the fingers of one hand to lift the hair at the base of your head up off your neck.
- Your index finger should be covering the roots of the hairs you are lifting to prevent them from being accidentally cut.
- Hold the trimmer to the base of your neck with the blade facing up. Move the trimmer up the neck until it touches your index finger which is protecting the hair roots.
- Move your trimmer slowly and keep the hair roots at the base of your head out of the way of the trimmer.
DETAILED NOSE, EYEBROW AND EAR HAIR TRIMMING
Attachments
Nose, ear and eyebrow trimmer
Nose and ear:
- Fit the nose, ear and eyebrow trimmer.
- Insert the attachment gently into the nostril or ear.
- Gently move the attachment in and out while rotating the groomer at the same time.
- Don't insert the attachment more than 6 mm into the nostril or ear.
Eyebrow:
- Carefully guide the attachment to remove any stray or longer hairs from the eyebrow.
- To completely remove hairs, let the attachment touch the skin then move over the desired area.
MICRO STUBBLE AND PRECISION TRIMMING
Attachments
Precision trimmer
Micro stubble:
The attachment has Trim Shave Technology which trims hair down to 0.2 mm to leave a micro stubble finish.
- Fit the precision trimmer.
- Hold the attachment so that the guide on the lower edge of the blade contacts the skin (in a the same way you as you would hold a wet razor). The guide on the lower edge of the blade helps to stretch the skin during trimming.
- Use motions similar to wet shaving.
Precision trimming:
- Hold the precision trimmer attachment perpendicular to the skin.
- Move it towards or away from the beard hair to achieve the desired result. Use gentle pressure and controlled movements.
Care for your product to ensure a long lasting performance. We recommend that you clean your groomer after each use.
AFTER EACH USE
- Brush any accumulated hairs from the groomer and attachment heads.
- The easiest and most hygienic way to clean the groomer is by detaching the head from the groomer body and rinsing the head with warm water.
- The groomer body should not be rinsed.
- Place one or two drops of cutter oil or sewing machine oil on the blades.

- Turn the clipper on to distribute the oil evenly, wipe off any excess oil.
BATTERY REMOVAL
We strongly recommend that a professional removes the rechargeable battery. Parts of the shaver case, and tools have sharp edges and may cause injury if not handled correctly.
- The rechargeable battery must be removed from the appliance before it is scrapped.
- Disconnect the charging adapter before removing the battery.
- Ensure that the battery is fully discharged. To do this, operate the shaver until it stops.
- Unplug the trimmer.
- Using a suitable tool, carefully pry apart the front and rear halves of the case at the joint line.
- Cut the tabs holding the battery to the circuit board.
- Used batteries must be removed from the appliance and disposed of at an appropriate official recycling/collection point.
- Do not attempt to operate the shaver once you have opened it.
RECYCLING
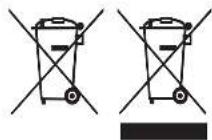
To avoid environmental and health problems due to hazardous substances, appliances and rechargeable and non-rechargeable batteries marked with one of these symbols must not be disposed of with unsorted municipal waste. Always dispose of electrical and electronic products and, where applicable, rechargeable and non-rechargeable batteries, at an appropriate official recycling/collection point.
UW APPARAAT VERZORGEN
Before using your trimmer for the first time, charge for 16 hours.
3 dages stubbe look:
FÖR ATT FÄSTA OCH AVLÄGSNA TILLBEHÖR (FIG. A)
- With the comb set at 12mm or 18mm, cut the hair at the back of the head.
KROK 3 – po stranách hlavy
natural_image
Two identical diagrams of a trash bin with cross-bracing, no text or symbols present•
[Non-Text]
.
[Non-Text]
[Non-Text]
•
[Non-Text]
[Non-Text]
[Non-Text]
.
[Non-Text]
[Non-Text]
•
.
.
[Non-Text]
[Non-Text]
•
•
[Non-Text]
AE
natural_image
Solid gray rectangular shape with no text, symbols, or discernible featuresRef. No. PG3000
Type No. PG03A
Remington ^® is a Registered Trade Mark of Spectrum Brands, Inc., or one of its subsidiaries
VARTA Consumer Batteries GmbH & Co. KGaA, Alfred-Krupp-Str. 9, 73479 Ellwangen, Germany www.remington-europe.com