
U1551CH - Microwave Oven ROTEL - Free user manual and instructions
Find the device manual for free U1551CH ROTEL in PDF.

| Product type | Microwave oven |
| Brand | Rotel |
| Model | U1551CH |
| Power supply | 230 V ~ 50 Hz |
| Maximum power | 1000 W |
| Power levels | 5 levels: high (100%), medium-high (70%), medium (50%), defrost (20%), off (0%) |
| Control type | Numeric keys and buttons (Time Entry, Start, Stop/Reset, X2, Power) |
| Display | LED |
| Turntable type | Ceramic plate |
| Cooking functions | Manual cooking, preset programs, defrost, double time, real-time cooking, multi-stage cooking (up to 3 stages) |
| Preset programs | 10 programs (keys 0-9) with default time and power |
| Manual programming | Yes, can store up to 10 or 100 programs (depending on setting) |
| Timer | Yes, up to 60 minutes (adjustable max 10 min) |
| Audible signal | Yes, adjustable (volume and beep type) |
| Memory | Yes, program backup (lost in case of power cut) |
| Safety | Door lock, stop on opening, overload protection |
| Cleaning | Damp cloth, avoid abrasive products and metal scrapers. Tip: lemon and water to facilitate cleaning |
| Included accessories | Ceramic plate, user manual |
| Compliance | European directives 2014/35/EU (low voltage) and 2014/30/EU (electromagnetic compatibility) |
| Installation | Flat surface, free space of 30 cm above, 7.5 cm on sides (one side open) |
| Warranty | Coverage of manufacturing defects (parts and labor) according to terms |
Frequently Asked Questions - U1551CH ROTEL
User questions about U1551CH ROTEL
0 question about this device. Answer the ones you know or ask your own.
Ask a new question about this device
Download the instructions for your Microwave Oven in PDF format for free! Find your manual U1551CH - ROTEL and take your electronic device back in hand. On this page are published all the documents necessary for the use of your device. U1551CH by ROTEL.
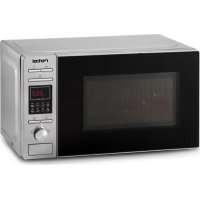
USER MANUAL U1551CH ROTEL
A Control Panel
B Observation window
C Door assembly
D Safety interlock system
E Ceramic board
TECHNISCHE DATEN
- Caracteristiques techniques
- Specifiche tecniche
Technical specifications
| Deutsch Français | Italien English | |
| 220-240 V | Nennspannung Tension nominale | Tensione nominale Rated voltage |
| 50/60 Hz | Nennfrequenz Fréquence nominale | Frequenza nominale Rated frequency |
| 1550 W | Nenneingangsleistung Puisance d'entrée nominale | Potenza di ingresso nominale Rated input power |
| 1000 W | Nennausgangsleistung Puisance de sortie nominale | Potenza di uscita nominale Rated output power |
| 25 I | Kapazität Capacité du four | Capacità forno Capacity |
Inhaltsverzeichnis / Table des matériès / Indice / Table of contents
Deutsch 9
Smaltimento 65
English 66
- Safety instructions 66
- Setting up your oven 71
Installation 71
- Things you should know about the microwave. 72
Utensils 72
Operation 75
Control Panel and Features 75
Operation Instruction 75
User Options 75
Default Cook Times 76
- Programs and Modes 77
Power Up. 77
Idle Mode 77
Ready Mode 77
Door Open Mode. 77
Pause Mode. 77
Manual Cook Entry Mode. 78
Manual Cook Mode 78
End of Cook Cycle Mode. 78
Preset Program Cook Mode 78
On the Fly Cooking 79
Programming Mode 79
Double Quantity Cooking 80
Stage Cooking Programming 80
Use Option Mode 81
Service Mode 81
Inquiry Function 81
Factory-default setting 81
Cleaning 82
Troubleshooting 82
Disposal 83
D/F/I/E 84
Garantie/Garantie/Garanzia/Warranty 84
Deutsch
SICHERHEITSHINWEISE
MISE EN SERVICE DU FOUR
Please read all instructions before using the device.
- This appliance can be used by persons with reduced physical, sensory or mental capabilities or lack of experience and knowledge if they have been given supervision or instruction concerning use of the appliance in a safe way and understand the hazards involved.
-
This appliance must not be used by children. The appliance and its connecting cable must be kept away from children.
The appliance must be disconnected from the mains during periods of no supervision and prior to assembling, disassembling or cleaning.
To reduce the risk of fire, electric shock, injury to persons or exposure to excessive microwave oven energy when using your appliance, follow the basic precautions, including the following: -
Warning: When the door or the door seals are damaged, the microwave oven must not be used until it has been repaired by a qualified specialist.
-
Warning: It is hazardous for anyone other than a competent person to carry out any service or repair operation that involves the removal of a cover which gives protection against exposure to microwave energy.
-
Warning: Liquids and other foods must not be heated in sealed containers since they are liable to explode.
-
Only use utensils that are suitable for use in a microwave.
-
The oven should be cleaned regularly and any food deposits should be removed.
○ When heating food in plastic or paper containers, keep an eye on the oven due to the possibility of ignition.
- If smoke is emitted, switch off or unplug the appliance and keep the door closed in order to stifle any flames.
Do not overcook food.
○ Do not use the oven cavity for storage purposes. Do not store items, such as bread, biscuits, etc. inside the oven.
○ Remove wire twist-ties and metal handles from paper or plastic containers/bags before placing them in the oven.
○ Install or locate this oven only in accordance with the installation instructions provided.
-
Eggs in their shell and whole hard-boiled eggs should not be heated in microwave ovens since they may explode, even after microwave heating has ended.
-
This appliance is intended to be used in household environments and similar settings such as:
-
staff kitchen areas in shops, offices and other working environments;
-
by clients in hotels, motels and other residential type environments;
farm houses;
-
bed and breakfast type environments.
-
If the supply cord is damaged, it must be replaced by the manufacturer, its service agent or similarly qualified persons in order to avoid a hazard.
-
Do not store or use this appliance outdoors.
-
Do not use this oven near water, in a wet basement or near a swimming pool.
-
The temperature of accessible surfaces may be high when the appliance is operating. The surfaces are liable to get hot during use. Keep cord away from heated surfaces and do not cover any vents on the oven.
○ Do not let the cord hang over edge of a table on counter.
- Failure to maintain the oven in a clean condition could lead to deterioration of the surface that could adversely affect the life of the appliance and possibly result in a hazardous situation.
The contents of feeding bottles and baby food jars must be stirred or shaken and the temperature checked before consumption, in order to avoid burns.
- Microwave heating of beverages can result in delayed eruptive boiling; therefore, care must be taken when handling the container.
Children should be supervised to ensure they do not play with the appliance.
○ Accessible parts may become hot during use. Young children should be kept away.
A steam cleaner is not to be used.
During use the appliance becomes hot. Care should be taken to avoid touching heating elements inside the oven.
The microwave oven is intended for heating food and beverages. Drying food or clothing and heating warming pads, slippers, sponges, damp cloth and similar may lead to the risk of injury, ignition or fire.
- Never use metal utensils in the microwave, or even containers/dishes with metal parts or trims (e.g. gold edges on plates or wire clips). This will damage the appliance.
- SETTING UP YOUR OVEN
○ Remove the oven and all materials from the box and oven cavity.
- Your oven comes with the following accessories:
Instruction Manual 1
- INSTALLATION
-
Select a level surface that provides enough open space for the intake and/or outlet vents.
-
Leave a minimum clearance of 30~cm above the oven; a minimum clearance of 7,5~cm is required between the oven and any adjacent walls. One side must be open.
- Do not remove the legs from the bottom of the oven.
- Blocking the inlet and/or outlet openings can damage the oven.
- Place the oven as far away as possible from radios and TVs. Operation of the microwave oven may cause interference to your radio or TV reception.
Plug your oven into a standard household socket. Be sure the voltage and the frequency is the same as the voltage and the frequency on the rating label.
WARNING: Do not install the oven over a range cooktop or other heat-producing appliances. If installed near or over a heat source, the oven could be damaged and the warranty would be void.
The accessible surface may be hot during operation.
- THINGS YOU SHOULD KNOW ABOUT THE MICROWAVE
- Your appliance works through microwave radiation which heats the water particles in food in a very short time. There is no radiation of heat and therefore hardly any browning. As a result, the appliance is not suitable for drying purposes.
Only warm up foodstuff with this appliance.
The appliance is not suitable for deep fat frying / cooking.
o Do not try to heat up overly large quantities, otherwise the appliance becomes less efficient.
Microwaves work at full capacity instantly. It is therefore not necessary to preheat the food.
The microwave oven does not replace your conventional oven. It is used mainly for:
defrosting frozen food
- quickly warming up food or drinks
conditional cooking of food
Only use suitable cookware such as:
Glass, porcelain, ceramics, heat-proof plastic or special microwave containers.
UTENSILS
See the instructions on "Materials you can use in a microwave oven or to be avoided in a microwave oven". There may be certain non-metallic utensils that are not safe to use for microwaving. If in doubt, you can test the utensil in question following the procedure below.
O Utensil Test
- Fill a microwave-safe container with 1 cup of cold water (250ml) along with the utensil in question.
Cook on maximum power for 1 minute. - Carefully feel the utensil. If the empty utensil is warm, do not use it for microwave cooking.
- Do not exceed 1-minute cooking time.
Materials you can use in microwave oven:
| Utensils | Remarks |
| Browning dish | Follow the manufacturer's instructions. |
| Dinnerware | Microwave-safe only. Follow the manufacturer's instructions. Do not use cracked or chipped dishes. |
| Glass jars | Always remove the lid. Use only to heat food until just warm. Most glass jars are not heat resistant and may break. |
| Glassware | Heat-resistant oven glassware only. Make sure there is no metallic trim. Do not use cracked or chipped dishes. |
| Oven cooking bags | Follow the manufacturer's instructions. Do not close with metal ties. Make slits to allow steam to escape. |
| Paper plates and cups | Use for short-term cooking/warming only. Do not leave oven unattended while cooking. |
| Paper towels | Use to cover food for reheating and absorbing fatUse with supervision for a short cooking time only. |
| Grease-proof paper | Use as a cover to prevent splattering or a wrap for steaming. |
| Plastic | Microwave-safe only. Follow the manufacturer's instructions. Should be labeled "Microwave Safe". Some plastic containers soften, as the food inside gets hot. "Boiling bags" and tightly closed plastic bags should be slit, pierced or vented as directed on the package. |
| Plastic wrap | Microwave-safe only. Use to cover food during cooking to retain moisture. Do not allow plastic wrap to touch food. |
| Thermometers | Microwave-safe only (meat and sweets thermometers). |
| Wax paper | Use as a cover to prevent splattering and retain moisture. |
Materials to be avoided in a microwave oven:
| Utensils | Remarks |
| Aluminium tray | May cause arcing. Transfer food into microwave-safe dish. |
| Food carton with metal handle | May cause arcing. Transfer food into microwave-safe dish. |
| Metal or metal-trimmed utensils | Metal shields the food from microwave energy. Metal trim may cause arcing. |
| Metal twist ties | May cause arcing and could cause a fire in the oven. |
| Paper bags | May cause a fire in the oven. |
| Plastic foam | Plastic foam may melt or contaminate the liquid inside when exposed to high temperatures. |
| Wood | Wood will dry out when used in the microwave oven and may split or crack. |
OPERATION
Control Panel and Features
- Power Buttons
- Time cook Button
- X2 Button
- Stop/Cancel Button
5.Start Button - Number Button
Operation Instruction
Five Power levels are available:
| Level | High | M. High | Med. | Defrost | Hold |
| Power | 100% / 1000W | 70% / 700W | 50% / 500W | 20% / 200W | 0% |
| Display | PL10 | PL7 | PL5 | PL2 | PLO |
User Options
Items bolded below are the default values.
| Option | Setting | Description |
| 1 EOC Tone | OP:10 | 3 seconds beep |
| OP:11 | Continuous beep | |
| OP:12 | 5 quick beeps, Repeating | |
| 2 Beeper Volume | OP:20 | Beeper Off |
| OP:21 | Low | |
| OP:22 | Medium | |
| OP:23 | High | |
| 3 Beeper On/Off | OP:30 | Keybeep Off |
| OP:31 | Keybeep On | |
| 4 Keyboard Window | OP:40 | 15 seconds |
| OP:41 | 30 seconds | |
| OP:42 | 60 seconds | |
| OP:43 | 120 seconds | |
| 5 | OP:50 | On-the-Fly Disable |
| On the Fly | OP:51 | On-the-Fly Enable |
| 6Door Reset | OP:60 | Door reset Disable |
| OP:61 | Door reset Enable | |
| 7Max time | OP:70 | 60 Minute Maximum Cook Time |
| OP:71 | 10 Minute Maximum Cook Time | |
| 8Manual programming | OP:80 | Manual Programming Disable |
| OP:81 | Manual Programming Enable | |
| 9Double Digit | OP:90 | Single Digit Mode-10 programs |
| OP:91 | Doule Digit Mode-100 programs |
Default Cook Times
The oven shall ship with the following Preset Cook Times unless otherwise noted in the product Specification.
| Button | Display (Time) | Power | Cook Factors (X2 Button) |
| 1 | 0:10 | 100% | 80% |
| 2 | 0:20 | 100% | 80% |
| 3 | 0:30 | 100% | 80% |
| 4 | 0:45 | 100% | 80% |
| 5 | 1:00 | 100% | 80% |
| 6 | 1:30 | 100% | 80% |
| 7 | 2:00 | 100% | 80% |
| 8 | 3:00 | 100% | 80% |
| 9 | 4:00 | 100% | 80% |
| 0 | 5:00 | 100% | 80% |
PROGRAMS AND MODES
Power Up
“--” displays when the oven is switched on for the first time. If «Stop/Reset» button is pressed, the oven will change to Idle Mode.
Note: Under Idle Mode, no button can be pressed.
Idle Mode
- The oven shall enter Idle Mode after a certain period of time has expired in Ready Mode, without a key pressed nor the door opened or closed. The number of seconds is determined by the User Option 4, Keyboard Window.
During Idle Mode, the LED is blank. And there shall be no oven activity.
Opening and then closing the oven door will switch the oven into Ready Mode.
Ready Mode
In this mode, the oven is ready to either begin a manual or preset cook cycle.
- Opening and closing the door while the oven is in Idle Mode, will switch the oven into Ready Mode.
During Ready Mode, "0:00" is displayed.
From the Ready Mode, the oven can go to almost all of the other modes.
Door Open Mode
While the door of the oven is open, the oven shall be in Door Open Mode. This shall also allow to enter the Programming Mode.
During this mode, the LED is blank, the fan and oven lamp work.
- When the door is closed, if User Option OP:60 «Door reset Disable» is selected and the oven was running a manual or preset cook cycle, the oven shall enter Pause Mode.
In all other cases, the oven shall return to Ready Mode with User Option OP:61 «Door reset Enable» set, opening and closing the door will clear out any information about a Manual or Preset Program which was running.
Pause Mode
This mode allows the user to temporarily stop the cycle to inspect or stir the food.
While in Manual Cook Mode or Preset Program Cook Mode, if the door is opened or closed, or if the «Stop/Reset» button is pressed, the oven will enter Pause Mode.
- While paused, LED will display the remaining cooking time.
Pause Mode will switch back to Idle Mode in the same way as Ready Mode, dependent on User Option 4. Additionally, if the «Stop/Reset» button is pressed, the oven shall
immediately enter Ready Mode. OR if press «Start» button, the oven will go into working mode.
Manual Cook Entry Mode
This mode allows the user to manually enter a cook time and power level.
While the oven is in the Ready Mode, pressing the «Time Entry» button on the keyboard will put the oven into Manual Cook Entry Mode.
During this mode, "00:00" displays
If you press "Hold 0% ," "Defrost 20% ," "Medium 50% or "Med-Hi 70% button to select power level, LED will display the related power. If the same button pressed twice, the power will change to PL10 (High 100% ). If no power chosen, "PL10" is default.
During setting process, press «Start» button to enter Manual Cook Mode.
Press «Stop/Reset» button to enter Ready Mode.
Manual Cook Mode
This mode allows the cooking of the food items.
Pressing the «Start» button will cause to the oven to begin Manual Cook Mode.
During this mode, remaining cooking time displays. The fan and oven lamp will work.
When cooking program finish, the oven will enter End of Cook Cycle Mode. If you press «Stop/Reset» button under this mode, the oven will enter Pause Mode.
End of Cook Cycle Mode
After the time has expired in a Manual Cook Mode, or a Preset Program Cook Mode, the oven shall go into The End of Cook Cycle Mode.
During this mode, "End" displays.
If either User Option 1, EOC Tone, OP:11 or OP:12 is selected, the oven shall continue to sound until the user acknowledges this by either opening and closing the door or pressing the «Stop/Reset» button. If OP:10 is selected, after the 3 seconds beep, the oven shall go into Ready Mode.
Preset Program Cook Mode
This mode allows cooking of food items through a one pad touch operation. While in Ready Mode, pressing one of the ten digit keys on the keyboard will cause the oven to run the Preset Program associated with that key.
LED displays the remaining cooking time. If it is multi-stage cooking, the total reman-ing cooking time displays, not a particular stage cooking time.
- If the program chosen exceeds the maximum time allowed by User Option 7, Max time, then the oven shall beep three times rapidly and display 00:00, to indicate that the program is unacceptable.
- When the cooking program is finished, the oven will enter End of Cook Cycle Mode. If you press «Stop/Reset» button under this mode, the oven will enter Pause Mode.
On the Fly Cooking
If User Option 5, On the fly, OP:51 is selected, the user may start another cook cycle while the oven is cooking or paused.
While the oven is cooking or under Pause Mode, press number buttons, the preset cooking program will start automatically.
LED displays the remaining cooking time.
When cooking program finish, the oven will enter End of Cook Cycle Mode. If you press «Stop/Reset» button under this mode, the oven will enter Pause Mode.
Programming Mode
This mode allows the user to assign cook times and power levels to each number button.
- Open the door and press number "1" for 5 seconds, the buzzer will sound and the Programming Mode will be entered, the LED will display "ProG".
Press the number the program shall be saved on.
O Enter the time needed by pressing the numbers from 0 to 9 (see example below), the LED will display the time.
Enter the power level by pressing "Hold 0% ", "Defrost 20% ", "Medium 50% " or "MedHi 70% ", the LED will display the related power. If the same button is pressed twice, the power will change to PL10 (High 100% ). If no power is chosen, PL10 is default.
To change the cooking factors, press "X2" button, the LED will display "CF:XX". The default factor is 80% , "CF:80" is displayed. Press one of the number buttons to change it.
After setting the time and power, press the «Start» button within 30s, the cooking program will be saved. "ProG" displays after saving.
- When closing the door, the oven will return to Ready Mode.
Please note: If the cooking time exceeds User Option 7, Max time, the buzzer will sound three times briefly when pressing the «Start» button to save the program, and the LED will turn back to show "ProG". The time set before will not be changed.
Please note: When pressing the «Stop/Reset» button during the programming process, the oven switches to Door Open Mode and the values entered will be lost. When pressing a number button, the previous saved program will start; if no program has been saved, the buzzer will alarm and it will not work.
For example:
-
Set the program as memory cooking; power level PL7 and cooking time is 1 minute and 25 seconds.
-
Step 1: In Ready Mode, press number button "1" for 5 seconds, "ProG" displays.
- Step 2: Press number button "3", the program will be saved for number "3".
Step 3: Press number buttons "1", "2" and "5" to input the cooking time.
Step 4: Press "Med-Hi 70% " button," PL7" displays. Setting finished. - Step 5: Press «Start» button to save. When using the program next time, pressing number "3" will start the program.
If the electricity is cut off, the saved program will not be lost.
If the program needs to be reset, just repeat the above steps.
Pressing the «Stop/Reset» button as the last step, will put the oven into Ready Mode. The settings will be lost.
Double Quantity Cooking
The "X2" button allows the user to set the time for two particular food items.
In Ready Mode, press "X2" button ("doub" displays), then press number buttons 0-9 within 5 seconds, the oven will start cooking with the preset cooking time.
- When pressing the number buttons, LED will display the quantity preset time. For example, number button "5", its preset time is 1 minute: Pressing the "X2" button, the time will change to 1:48 (1:00 + Cook Factor 80%)
When the cooking program has finished, the oven will enter End of Cook Cycle Mode.
Please note: This function cannot be used in Memory Mode.
Stage Cooking Programming
This allows the user to cook food items at a combination of various Power Levels.
Under cooking mode or memory mode, upto three stages can be set. After setting the time and power for the first stage, press the «Time Entry» button to set the second stage and repeat for the third stage.
- When setting the second or third stage, after pressing «Time Entry» button, "S-2" or "S-3" displays.
Press «Start» the button to start cooking.
For example:
To set two stages as memory mode. The first stage is PL7 and time is 1 minute 25 seconds. The second stage is PL5 and 5 minutes and 40 seconds.
- Step 1: In Ready Mode, press number button "1" for 5 seconds, "ProG" displays.
-
Step 2: Press number button "3", the program will be saved for number "3".
-
Step 3: Press number buttons "1", "2" and "5" to input the cooking time.
Step 4: Press "Med-Hi 70% button,"PL7" displays.
Step 5: Press «Time Entry» button, LED displays "S-2".
Step 6: Press "5", "4", "0" button, "5:40" displays.
Step 7: Press "Medium 50% ", "PL5" displays. The setting is finished. - Step 8: Press «Start» button to save the programm.
Use Option Mode
Open the oven door and press "2" for 5 seconds. The buzzer sounds once and the LED displays "OP: --".
Press any number button to enter related mode setting. For example, to set the volume of the beeper to medium, press "2", "OP:22" displays If you want to change, keep pressing "2", LED displays "OP:20", "OP:21","OP:22","OP:23","OP:20" ... in cycle.
Pressing the «Start» button saves the current setting. After saving, "OP: --" displays again.
During setting process, press the «Stop/Reset» button to enter the Door Open Mode. Closing the door will enter the Ready Mode.
If the «Start» button is not pressed after the last step, the program will not be saved.
Service Mode
- Open the oven door and press "3" for 5 seconds to enter service mode.
LED displays "SErU".
To check the times of closing or opening the door, just press number button "1", LED will display the times.
Press the «Start» button and then press number button "4" within 3 seconds, the message will be cancelled. "4-CL" displays.
Press «Stop/Reset» button to enter Door Open Mode. Closing the door will enter Ready Mode.
Inquiry Function
During microwave cooking process, press «Time Entry» button to check the power level. LED displays the power for 3 seconds, then turns back to previous state.
It is available for multi-stage cooking.
Factory-default setting
In power up and ready mode, press «Start» button and "0" to factory-default settings.
- CLEANING
Be sure to unplug the appliance from the power supply.
Clean the cavity of the oven after use with a slightly damp cloth.
Clean the accessories in the usual way with soapy water.
The door frame and seal and adjacent parts must be cleaned carefully with a damp cloth when they are dirty.
Do not use harsh abrasive cleaners or sharp metal scrapers to clean the oven door glass since they can scratch the surface, which may result in the shattering of the glass.
Cleaning Tip
For easier cleaning of the cavity walls that the cooked food can touch: Place half a lemon in a bowl, add 300ml of water and heat on 100% microwave power for 10 minutes. Wipe the oven clean using a soft, dry cloth.
TROUBLESHOOTING
| Normal | |
| Microwave oven interfering with the TV reception | Radio and TV reception may be affected when the microwave oven is being used. It is similar to the interference of small electrical appliances, like mixers, vacuum cleaner and electric fan. It is normal. |
| Dim oven light | When cooking on low power, the oven light may become dim. It is normal. |
| Steam accumulating on door, hot air out of vents | When cooking, steam may come out of the food. Most will escape out of the vents. But some may accumulate on cool surfaces like oven door. It is normal. |
| Oven started accidentally with no food in | It is forbidden to run the unit without any food inside. It is very dangerous. |
| Trouble | Possible Cause | Solution |
| Oven cannot be started | Power cord not plugged in properly. | Unplug. Then plug in again after 10 seconds. |
| Fuse or circuit breaker triggered. | Replace fuse or reset circuit breaker. | |
| Trouble with plug socket. | Test plug socket with other electrical appliances. | |
| Oven does not heat | Door not closed well. | Close door properly. |
DISPOSAL
For proper disposal, please return device to a retailer, a service agent or Rotel AG.
European Directive 2012/19/EC concerning Waste Electrical and Electronic Equipment (WEEE) states that household appliances should not be disposed of using the normal solid urban waste cycle. Exhausted appliances should be collected separately in order to optimise the cost of re-using and recycling materials comprising the machine, while preventing potential damage to public health and the environment. The crossed-out wheeled bin symbol appears on all products to remind owners of the obligations regarding separate waste collection. Owners should contact their local authorities or appliance dealers for further information concerning the correct disposal of household appliances.
This appliance conforms to the following EU directives:

2014/35/EU (Low Voltage Directive)
2014/30/EU (Electromagnetic Compatibility Directive)
D/F/I/E
- GARANTIE / GARANTIE / GARANZIA / WARRANTY
2 JAHRE GARANTIE
2 ANS DE GARANTIE
2 ANNI DI GARANZIA
2 YEARS WARRANTY
○ Warranty commitment
We commit ourselves to repair this device free of charge, should a failure occur within the period of warranty despite proper handling. We repair all defects caused by material or manufacturing faults. The guarantee will be fulfilled either by repairing the device or replacing the defective parts, according to our judgement. A warranty does not cover damages due to wearing parts, damages and defects caused by improper handling or maintenance (such as limescale and commercial use). It will only be granted if either the warranty card stating date of purchase, dealer's stamp and signature, or the purchase receipt is sent with the device to the relevant after-sales service (see address below). Devices shall be returned in their original packaging. Transport costs are to be borne by the purchaser. Remember to specify your address to your sending, as well as a short declaration about the failure, shall the defect not be obvious.
Servicestation:
Service après-venture: Rotel AG
- TECHNISCHE DATEN
- Inhaltsverzeichnis / Table des matériès / Indice / Table of contents
- SICHERHEITSHINWEISE
- MISE EN SERVICE DU FOUR
- - SETTING UP YOUR OVEN
- - INSTALLATION
- - THINGS YOU SHOULD KNOW ABOUT THE MICROWAVE
- UTENSILS
- O Utensil Test
- OPERATION
- Control Panel and Features
- Operation Instruction
- User Options
- Default Cook Times
- PROGRAMS AND MODES
- Power Up
- Idle Mode
- Ready Mode
- Door Open Mode
- Pause Mode
- Manual Cook Entry Mode
- Manual Cook Mode
- End of Cook Cycle Mode
- Preset Program Cook Mode
- On the Fly Cooking
- Programming Mode
- Double Quantity Cooking
- Stage Cooking Programming
- Use Option Mode
- Service Mode
- Inquiry Function
- Factory-default setting
- - CLEANING
- Cleaning Tip
- TROUBLESHOOTING
- DISPOSAL
- - GARANTIE / GARANTIE / GARANZIA / WARRANTY
- ○ Warranty commitment
Brand : ROTEL
Model : U1551CH
Category : Microwave Oven