
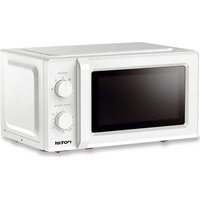
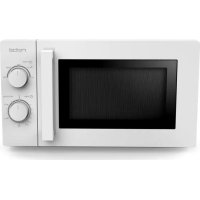
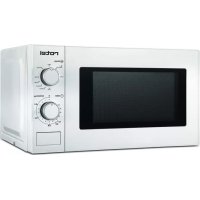
U1504CH - Microwave Oven ROTEL - Free user manual and instructions
Find the device manual for free U1504CH ROTEL in PDF.
| Product type | Microwave oven |
| Brand | Rotel |
| Model | U1504CH |
| Rated voltage | 230 V ~ 50/60 Hz |
| Rated input power | 1050 W |
| Microwave power | 700 W |
| Grill power | 1000 W |
| Cooking types | Microwave, Grill, Combination (2 levels), Defrost |
| Display | LED digital |
| Controls | Touch buttons and rotary knob |
| Timer | Up to 95 minutes |
| Clock | 24 hours |
| Child safety | Lock by Stop/Cancel key (3 seconds) |
| Defrost | Automatic by weight (100-2000 g) or by time |
| Automatic programs | 8 menus (A1 to A8) |
| Supplied accessories | Glass turntable, Turntable ring, Metal rack |
| Cleaning | Damp cloth, avoid abrasive products. |
| Minimum installation | Height 85 cm, free space 30 cm above, 20 cm sides |
| Safety instructions | Do not heat sealed containers, do not operate empty |
| Repairability | Repair by qualified person only, parts from manufacturer |
Frequently Asked Questions - U1504CH ROTEL
User questions about U1504CH ROTEL
0 question about this device. Answer the ones you know or ask your own.
Ask a new question about this device
Download the instructions for your Microwave Oven in PDF format for free! Find your manual U1504CH - ROTEL and take your electronic device back in hand. On this page are published all the documents necessary for the use of your device. U1504CH by ROTEL.
USER MANUAL U1504CH ROTEL
natural_image
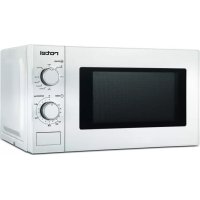
Exterior view of a silver rotel microwave oven with digital display and control buttons (no visible text or symbols on main body)• GEBRAUCHSANWEISUNG
• MODE D'EMPLOI
• ISTRUZIONI PER L'USO
• INSTRUCTIONS FOR USE
CE
RoHS
SENS eRecycling

| Deutsch | Français | Italiano | English |
| A Bedienfeld | A Panneau de commande | A Pannello di controllo | A Control panel |
| B Drehtellerwelle | B Pivot du plateau tournant | B Perno piattaforma girevole | B Turntable shaft |
| C Drehring | C Anneau du plateau tournant | C Gruppo anello della piattaforma girevole | C Turntable ring assembly |
| D Glasteller | D Plateau en verre | D Vassoio di vetro | D Glass tray |
| E Sichtfenster | E Hublot | E Finestra di ispezione | E Observation window |
| F Türelement | F Porte | F Modulo sportello | F Door assembly |
| G Sicherheits-verriegelungssystem | G Crochets de ver-rouillage | G Sistema di interblocco | G Safety interlock system |
| H Grillständer | H Grille métallique | H Griglia in metallo | H Grill rack |
TECHNISCHE DATEN
- Safety instructions....71
- Setting up your oven 77
- Turntable installation....77
- Installation....77
- Things you should know about THE microwave....78
• Control panel....79
• Operation instruction....80
Clock setting 80
Kitchen timer....80
Microwave cooking 81
Grill cooking....81
Combination cooking....82
Speedy cooking....82
Defrost by weight 82
Defrost by time....83
Multi-stage cooking....83
Auto menu....84
- Inquiring function....85
- Child lock 85
- Specific features 85
- Features....86
• Most commonly used settings 87
- Cleaning....87
- Utensils....88
- Troubleshooting 90
- Disposal 91
D/F/I/E....92
Garantie / Garantie / Garanzia / Warranty 92
Deutsch
A1 Aufwärmen
A2 Gemüse
A3 Fisch
A4 Fleisch
A5 Nudeln
A6 Kartoffeln
A7 Pizza
A8 Suppe

Démarrer/+30 sec./Confirmer
A1 Réchauffer
A2 Légumes
A3 Poisson
A4 Viande
A5 Pâtes
A6 Pommes de terre
A7 Pizza
A8 Soupe
• INSTRUCTIONS D'UTILISATION
A1 Riscalda
A2 Verdure
A3 Pesce
A4 Carne
A5 Pasta
A6 Patate
A7 Pizza
A8 Minestra
• ISTRUZIONI PER L'USO
Please read all instructions before using the device.
- This appliance can be used by persons with reduced physical, sensory or mental capabilities or lack of experience and knowledge if they have been given supervision or instruction concerning use of the appliance in a safe way and understand the hazards involved.
○ This appliance must not be used by children. The appliance and its connecting cable must be kept away from children.
- The appliance must be cooled down and disconnected from the mains during periods of no supervision and prior to assembling, disassembling or cleaning.
To reduce the risk of fire, electric shock, injury to persons or exposure to excessive microwave oven energy when using your appliance, follow the basic precautions, including the following:
■ Warning: When the door or the door seals are damaged, the microwave oven must not be used until it has been repaired by a qualified specialist.
■ Warning: It is hazardous for anyone other than a competent person to carry out any service or repair operation that involves the removal of a cover which gives protection against exposure to microwave energy.
■ Warning: Liquids and other foods must not be heated in sealed containers since they are liable to explode.
○ Only use utensils that are suitable for use in a microwave.
- The oven should be cleaned regularly and any food deposits should be removed.
- When heating food in plastic or paper containers, keep an eye on the oven due to the possibility of ignition.
○ If smoke is emitted, switch off or unplug the appliance and keep the door closed in order to stifle any flames.
○ Do not overcook food.
- Do not use the oven cavity for storage purposes. Do not store items, such as bread, biscuits, etc. inside the oven.
- Remove wire twist-ties and metal handles from paper or plastic containers/bags before placing them in the oven.
○ Install or locate this oven only in accordance with the installation instructions provided.
- Eggs in their shell and whole hard-boiled eggs should not be heated in microwave ovens since they may explode, even after microwave heating has ended.
○ This appliance is intended to be used in household environments and similar settings such as:
■ staff kitchen areas in shops, offices and other working environments;
■ by clients in hotels, motels and other residential type environments;
- farm houses;
■ bed and breakfast type environments.
○ If the supply cord is damaged, it must be replaced by the manufacturer, its service agent or similarly qualified persons in order to avoid a hazard.
○ Do not store or use this appliance outdoors.
- Do not use this oven near water, in a wet basement or near a swimming pool.
- The temperature of accessible surfaces may be high when the appliance is operating. The surfaces are liable to get hot during use. Keep cord away from heated surfaces and do not cover any vents on the oven.
- Do not let the cord hang over edge of a table or counter.
- Failure to maintain the oven in a clean condition could lead to deterioration of the surface that could adversely affect the life of the appliance and possibly result in a hazardous situation.
- The contents of feeding bottles and baby food jars must be stirred or shaken and the temperature checked before consumption, in order to avoid burns.
- Microwave heating of beverages can result in delayed eruptive boiling; therefore care must be taken when handling the container.
○ Children should be supervised to ensure they do not play with the appliance.
- The appliances are not intended to be operated by means of an external timer or separate remote control.
- Accessible parts may become hot during use. Young children should be kept away.
○ A steam cleaner is not to be used.
During use the appliance becomes hot. Care should be taken to avoid touching heating elements inside the oven.
○ Only use the temperature probe recommended for this oven (for ovens provided with a facility to use a temperature-sensing probe).
○ The microwave oven must be operated with the decorative door open (for ovens with a decorative door).
- The rear surface of the appliance must be placed against a wall.
- The microwave oven must not be placed in a cabinet.
- The microwave oven is intended for heating food and beverages. Drying food or clothing and heating warming pads, slippers, sponges, damp cloth and similar may lead to the risk of injury, ignition or fire.
- Never use metal utensils in the microwave with the microwave or the combination function, or even containers/dishes with metal parts or trims (e.g. gold edges on plates or wire clips). This will damage the appliance.
- SETTING UP YOUR OVEN
- Remove the oven and all materials from the box and oven cavity.
- Your oven comes with the following accessories:
Glass tray 1
■ Turntable ring assembly 1
■ Instruction Manual 1
- Grill rack 1
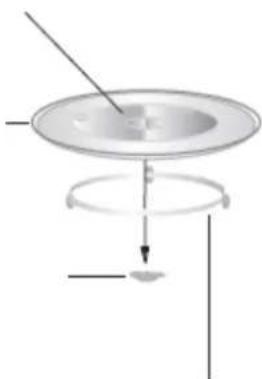
• TURNTABLE INSTALLATION
- Never place the glass tray upside down. The glass tray should never be restricted.
- Both glass tray and turntable ring assembly must always be used during cooking.
- All food and food containers must always be placed on the glass tray for cooking.
○ If the glass tray or turntable ring assembly cracks or breaks, contact your nearest authorised service centre.
Hub (underside)
Glass tray
Turntable shaft
natural_image
Diagram of a mechanical assembly with a central circular component and a downward arrow indicating motion (no text or symbols)Turntable ring assembly
- INSTALLATION
- Select a level surface that provides enough open space for the inlet and/or outlet vents.
■ The minimum installation height is 85 cm.
- The rear surface of the appliance must be placed against a wall. Leave a minimum clearance of 30 cm above the oven; a minimum clearance of 20 cm is required between the oven and any adjacent walls.
■ Do not remove the legs from the bottom of the oven.
■ Blocking the inlet and/or outlet openings can damage the oven.
- Place the oven as far away as possible from radios and TVs. Operation of the microwave oven may cause interference to your radio or TV reception.
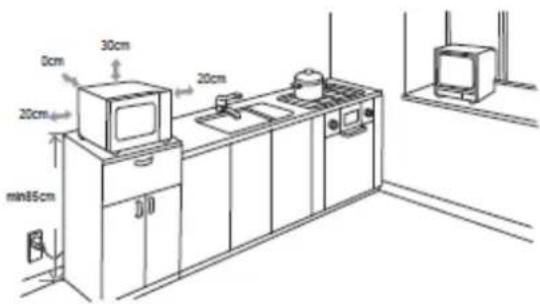
- Plug your oven into a standard household socket. Be sure the voltage and the frequency is the same as the voltage and the frequency on the rating label.
WARNING: Do not install the oven over a range cooktop or other heat-producing appliances. If installed near or over a heat source, the oven could be damaged and the warranty would be void.
The accessible surface may be hot during operation.
• THINGS YOU SHOULD KNOW ABOUT THE MICROWAVE
- Your appliance works through microwave radiation which heats the water particles in food in a very short time. There is no radiation of heat and therefore hardly any browning. As a result, the appliance is not suitable for drying purposes.
○ Only warm up foodstuffs with this appliance.
- The appliance is not suitable for deep fat frying / cooking.
Do not try to heat up overly large quantities, otherwise the appliance becomes less efficient.
- Microwaves work at full capacity instantly. It is therefore not necessary to preheat the food.
- The microwave oven does not replace your conventional oven. It is used mainly for:
■ defrosting frozen food
■ quickly warming up food or drinks
■ conditional cooking of food
○ Only use suitable cookware such as:
■ Glass, porcelain, ceramics, heat-proof plastic or special microwave containers.
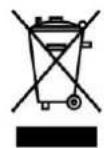
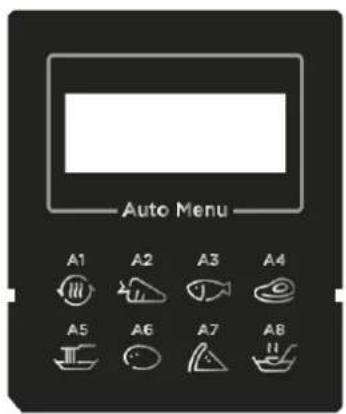
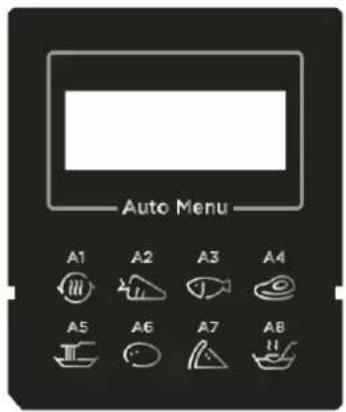
• CONTROL PANEL

Micro/Grill/Combi

Weight/Time Defrost

Clock/Kitchen Timer

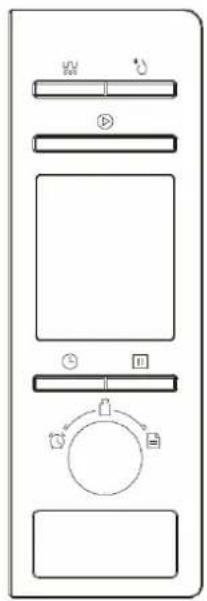
Auto Menu

Stop/Clear

Start/+30 Sec./Confirm

A1 Reheat
A2 Vegetable
A3 Fish
A4 Meat
A5 Pasta
A6 Potato
A7 Pizza
A8 Soup
This microwave oven uses modern electronic control to adjust cooking parameters to meet your needs better for cooking.
Clock setting
When the microwave oven is plugged in, the oven will display "0:00" and the buzzer will sound once.
o Press "CLOCK/KITCHEN TIMER" once. The hour figures will flash.
Turn to adjust the hour figures. The input time should be within 0--23.
- Press "CLOCK/KITCHEN TIMER". The minute figures will flash.
Turn to adjust the minute figures. The input time should be within 0--59.
o Press "CLOCK/KITCHEN TIMER" to finish setting the clock. ":" will flash.
Note: The clock will function only after you set the time.
During the clock setting process, the oven will exit the setting if you press "Stop/Clear" or if there is no operation for one minute.
Kitchen timer
- Press "CLOCK/KITCHEN TIMER" twice. The screen will display "00:00".
- Turn to enter the required duration (the maximum time is 95 minutes).
o Press "START/+30SEC./CONFIRM" to confirm the setting.
When the kitchen timer reaches the set time, the clock indicator will go out. The buzzer will sound 5 times. If the clock has been set (24-hour system), the screen will display the current time.
Note: The kitchen timer is different to the 24-hour system. The kitchen timer is a timer.
Microwave cooking
o Press "MICRO/GRILL/COMBI" once. "P100" is displayed.
Press "MICRO/GRILL/COMBI" for times or turn to select the microwave power ("P100", "P80", "P50", "P30" and "P10" will display in order).
- Press "START/+30SEC./CONFIRM" to confirm.
o Turn to adjust the cooking time (the time setting should be 0:05 - 95:00).
- Press "START/+30SEC./CONFIRM" to start cooking.
Time increments available as you turn the coding switch:
Microwave power chart
| Press | Once | Twice | 3 times | 4 times | 5 times |
| Microwave Power | 100% | 80% | 50% | 30% | 10% |
Grill cooking
o Press "MICRO/GRILL/COMBI" once. "P100" is displayed.
o Press "MICRO/GRILL/COMBI" for times or turn to select the grill power.
o Press "START/+30SEC./CONFIRM" to confirm when the screen displays "G".
o Turn to adjust the grilling time (the time setting should be 0:05 - 95:00).
o Press "START/+30SEC./CONFIRM" to start cooking.
Note: When half the grilling time has elapsed, the oven sounds twice. This is normal. For better results when grilling food, you should turn the food over, close the door and then press "START/+30SEC./CONFIRM" to continue cooking. If you do not perform this step, the oven will continue the function.
Combination cooking
o Press "MICRO/GRILL/COMBI" key once. "P100" is displayed.
- Press "MICRO/GRILL/COMBI" for times or turn to select combination power ("C1 [55% microwave + 45% grill]" and "C2 [36% microwave + 64% grill]" will display in order).
o Press "START/+30SEC./CONFIRM" to confirm.
o Turn to adjust the cooking time (the time setting should be 0:05 - 95:00).
o Press " START/+30SEC./CONFIRM " to start cooking.
Speedy cooking
In standby mode, press "START/+30SEC./CONFIRM" to cook at 100% power for 30 seconds. Each press of the same key will increase the cooking time by 30 seconds. The maximum cooking time is 95 minutes.
During microwave, grill and combination cooking and during the time defrost process, press "START/+30SEC./CONFIRM" to increase the cooking time.
- In standby mode, turn to the left to choose the cooking time directly. After choosing the time, press "START/+30SEC./CONFIRM" to start cooking. The microwave power is 100%.
Note: When using the auto menu and weight defrost functions, the cooking time cannot be increased by pressing "START/+30SEC./CONFIRM".
Defrost by weight
o Press "WEIGHT/TIME DEFROST" once. The screen will display the default weight "dEF1".
o Turn to select the food weight. The range of weight is 100 - 2000 g.
o Press "START/+30SEC./CONFIRM" to start defrosting.
Defrost by time
o Press "WEIGHT/TIME DEFROST" twice. The screen will display "dEF2".
o Turn to select the cooking time.
o Press "START/+30SEC./CONFIRM" key to start defrosting.
Note: The defrost power setting is P30. This setting cannot be changed.
Multi-stage cooking
A maximum of two stages can be set. If one of these stages is defrosting, it should be entered as the first stage. The buzzer will sound once after each stage and the next stage will begin.
Note: Auto menu cannot be set as one of the multi-stages.
Example: You want to defrost food for 5 minutes, then cook at 80% microwave power for 7 minutes. The steps are as follows:
o Press "WEIGHT/TIME DEFROST" twice. The screen will display "dEF2".
o Turn to set the defrost time to 5 minutes.
o Press "MICRO/GRILL/COMBI" once.
- Turn until "P80" is displayed to select 80% microwave power.
o Press "START/+30SEC./CONFIRM" to confirm.
o Turn to set the cooking time to 7 minutes.
o Press "START/+30SEC./CONFIRM" to start cooking.
Auto menu
○ In standby mode, turn 📋 to the right to choose from menus "A-1" to "A-8".
- Press "START/+30SEC./CONFIRM" to confirm the menu of your choice.
- Turn to choose the weight of the food.
- Press "START/+30SEC./CONFIRM" to start cooking. When cooking is finished, the buzzer sounds five times.
| Menu | Weight | Display |
| A1AUTO REHEAT | 200 g 200 | |
| 400 g 400 | ||
| 600 g 600 | ||
| A2VEGETABLES | 200 g 200 | |
| 300 g 300 | ||
| 400 g 400 | ||
| A3FISH | 250 g 250 | |
| 350 g 350 | ||
| 450 g 450 | ||
| A4MEAT | 250 g 250 | |
| 350 g 350 | ||
| 450 g 450 | ||
| A5PASTA | 50 g (with 450 ml water) 50 | |
| 100 g (with 800 ml water) 100 | ||
| A6POTATO | 200 g 200 | |
| 400 g 400 | ||
| 600 g 600 | ||
| A7PIZZA | 200 g 200 | |
| 400 g 400 | ||
| A8SOUP | 200 ml 200 | |
| 400 ml | 400 |
• INQUIRING FUNCTION
When microwave, grill and combination cooking is underway, press "MICRO/GRILL/COMBI" to view the current power setting for 3 seconds.
When cooking is underway, press "CLOCK/KITCHEN TIMER" to view the current time for 3 seconds.
- CHILD LOCK
To lock: In standby mode, press "STOP/CLEAR" for 3 seconds. There will be a long "beep" denoting that the child lock has been activated.
To unlock: When locked, press "STOP/CLEAR" for 3 seconds. There will be a long "beep" denoting that the lock has been released.
- SPECIFIC FEATURES
o The buzzer will sound once when you begin to turn the knob.
○ If the door is opened during cooking, "START/+30SEC./CONFIRM" must be pressed to continue cooking.
Once the cooking program has been set, "START/+30SEC./CONFIRM" must be pressed within 1 minute to begin the program. If not, the current time will be displayed and the setting will be cancelled.
- The buzzer sounds once to indicate an effective button press. Ineffective button presses will not trigger a response.
o The buzzer will sound five times to remind you when cooking is finished.
- FEATURES
o Never use the metal grill rack when using the appliance just in the microwave mode. Otherwise the appliance may be damaged.
When you are using just the grilling mode, you may also use metal or aluminium cookware, but not in the combination or standard microwave mode.
○ In grilling mode, place the grill rack on the turntable and place the food to be cooked on the grill rack. This positions the food nearer to the grill.
| Function/Power | Output | Application |
| P10 | 10% micro. | Soften ice cream |
| P30 | 30% micro. | Soup stew, soften butter or defrost |
| P50 | 50% micro. | Stew, fish |
| P80 | 80% micro. | Rice, fish, chicken, minced meat |
| P100 | 100% micro. | Reheat, milk, boil water, vegetables, beverage |
| C-1 (Combi. 1) | 80% grill/ 20% micro. | Chicken pieces, Chicken breasts, Pork chops |
| C-2 (Combi. 2) | 70% grill/ 30% micro. | Sausage, Lamb, Seafood, Steak |
| G (Grill) | 100% grill. | Baken bread, Sliced food |
Notice: When removing food from the oven, please ensure that the oven power is switched off by turning the clock switch to 0 (zero). Failure to do so, and operating the microwave oven without food in it, can result in overheating and damage to the magnetron.
- MOST COMMONLY USED SETTINGS
| Drink / Food | Approx. portion size | Time | Power |
| Heat up drinks | 150 ml | 1 – 2 min. | P100 |
| Heat up soups + sauces | 200 – 300 ml | 3 – 4 min. | P100 |
| Heat up meal on a plate | 1 plate | 2 – 3 min. | P80 |
| Heat up casserole | 1 portion | 5 – 8 min. | P30/def2 |
| Warm up flans or pizzas | 1 slice | 1 – 2 min. | P100 |
| Cook fresh vegetables | 200 – 300 g | 7 – 8 min. | P100 |
| Defrosting of meat | per 450g | 6 – 11 min. | P30/def2 |
| Defrosting of fish | per 450g | 3 – 5 min. | P30/def2 |
| Defrosting of bread | large / small | 5 – 7 / 6 – 8 min. | P30/def2 |
| Defrosting of buns | 1 pcs | 10 – 20 sec. | P30/def2 |
| Defrosting of dough | per 225g | 1 min. | P30/def2 |
Please note that this information is only approximate. The times and level of power can be set individually.
- CLEANING
Be sure to unplug the appliance from the power supply.
- Clean the cavity of the oven after use with a slightly damp cloth.
- Clean the accessories in the usual way with soapy water.
The door frame and seal and adjacent parts must be cleaned carefully with a damp cloth when they are dirty.
Do not use harsh abrasive cleaners or sharp metal scrapers to clean the oven door glass since they can scratch the surface, which may result in the shattering of the glass.
Cleaning Tip
For easier cleaning of the cavity walls that the cooked food can touch: Place half a lemon in a bowl, add 300ml of water and heat on 100% microwave power for 10 minutes. Wipe the oven clean using a soft, dry cloth.
• UTENSILS
See the instructions on "Materials you can use in a microwave oven or to be avoided in a microwave oven". There may be certain non-metallic utensils that are not safe to use for microwaving. If in doubt, you can test the utensil in question following the procedure below.
o Utensil Test
- Fill a microwave-safe container with 1 cup of cold water (250ml) along with the utensil in question.
■ Cook on maximum power for 1 minute. - Carefully feel the utensil. If the empty utensil is warm, do not use it for microwave cooking.
■ Do not exceed 1 minute cooking time.
o Materials you can use in microwave oven:
| Utensils | Remarks |
| Browning dish | Follow the manufacturer's instructions. The bottom of the browning dish must be at least 5mm above the turntable. Incorrect usage may cause the turntable to break. |
| Dinnerware | Microwave-safe only. Follow the manufacturer's instructions. Do not use cracked or chipped dishes. |
| Glass jars | Always remove the lid. Use only to heat food until just warm. Most glass jars are not heat resistant and may break. |
| Glassware | Heat-resistant oven glassware only. Make sure there is no metallic trim. Do not use cracked or chipped dishes. |
| Oven cooking bags | Follow the manufacturer's instructions. Do not close with metal ties. Make slits to allow steam to escape. |
| Paper plates and cups | Use for short-term cooking/warming only. Do not leave oven unattended while cooking. |
| Paper towels | Use to cover food for reheating and absorbing fat. Use with supervision for a short cooking time only. |
| Grease-proof paper | Use as a cover to prevent splattering or a wrap for steaming. |
| Plastic | Microwave-safe only. Follow the manufacturer's instructions. Should be labeled "Microwave Safe". Some plastic containers soften, as the food inside gets hot. "Boiling bags" and tightly closed plastic bags should be slit, pierced or vented as directed on the package. |
| Plastic wrap | Microwave-safe only. Use to cover food during cooking to retain moisture. Do not allow plastic wrap to touch food. |
| Thermometers | Microwave-safe only (meat and sweets thermometers). |
| Wax paper | Use as a cover to prevent splattering and retain moisture. |
o Materials to be avoided in a microwave oven:
| Utensils | Remarks |
| Aluminium tray | May cause arcing. Transfer food into microwave-safe dish. |
| Food carton with metal handle | May cause arcing. Transfer food into microwave-safe dish. |
| Metal or metal-trimmed utensils | Metal shields the food from microwave energy. Metal trim may cause arcing. |
| Metal twist ties | May cause arcing and could cause a fire in the oven. |
| Paper bags | May cause a fire in the oven. |
| Plastic foam | Plastic foam may melt or contaminate the liquid inside when exposed to high temperatures. |
| Wood | Wood will dry out when used in the microwave oven and may split or crack. |
• TROUBLESHOOTING
| Normal | |
| Microwave oven interfering with the TV reception | Radio and TV reception may be affected when the microwave oven is being used. It is similar to the interference of small electrical appliances, like mixers, vacuum cleaner and electric fan. It is normal. |
| Dim oven light | When cooking on low power, the oven light may become dim. It is normal. |
| Steam accumulating on door, hot air out of vents | When cooking, steam may come out of the food. Most escape out of the vents. But some may accumulate on cool surfaces like oven door. It is normal. |
| Oven started accidentally with no food in | It is forbidden to run the unit without any food inside. It is very dangerous. |
| Trouble | Possible Cause | Solution |
| Oven cannot be started | Power cord not plugged in properly. | Unplug. Then plug in again after 10 seconds. |
| Fuse or circuit breaker triggered. | Replace fuse or reset circuit breaker. | |
| Trouble with plug socket. | Test plug socket with other electrical appliances. | |
| Oven does not heat | Door not closed well. | Close door properly. |
| Glass turntable makes noise when microwave oven is on | Dirty roller rest and oven bottom. | Refer to “Cleaning” to clean dirty parts. |
- DISPOSAL
- For proper disposal, please return device to a retailer, a service agent or Rotel AG.
European Directive 2012/19/EC concerning Waste Electrical and Electronic Equipment (WEEE) states that household appliances should not be disposed of using the normal solid urban waste cycle. Exhausted appliances should be collected separately in order to optimise the cost of re-using and recycling materials comprising the machine, while preventing potential damage to public health and the environment. The crossed-out wheeled bin symbol appears on all products to remind owners of the obligations regarding separate waste collection. Owners should contact their local authorities or appliance dealers for further information concerning the correct disposal of household appliances.
This appliance conforms to the following EU directives:
CE
2014/35/EU (Low Voltage Directive) 2014/30/EU (Electromagnetic Compatibility Directive)
D/F/I/E
• GARANTIE / GARANTIE / GARANZIA / WARRANTY
• 2 JAHRE GARANTIE
• 2 ANS DE GARANTIE
• 2 ANNI DI GARANZIA
• 2 YEARS WARRANTY
o Warranty commitment
We commit ourselves to repair this device free of charge, should a failure occur within the period of warranty despite proper handling. We repair all defects caused by material or manufacturing faults. The guarantee will be fulfilled either by repairing the device or replacing the defective parts, according to our judgement. A warranty does not cover damages due to wearing parts, damages and defects caused by improper handling or maintenance (such as limescale and commercial use). It will only be granted if either the warranty card stating date of purchase, dealer's stamp and signature, or the purchase receipt is sent with the device to the relevant after-sales service (see address below). Devices shall be returned in their original packaging. Transport costs are to be borne by the purchaser. Remember to specify your address to your sending, as well as a short declaration about the failure, shall the defect not be obvious.
Servicestation:
Service après-vente:
Rotel AG
After-sales service:
5012 Schönenwerd
E-mail: office@rotel.ch
- TECHNISCHE DATEN
- Deutsch
- • INSTRUCTIONS D'UTILISATION
- • ISTRUZIONI PER L'USO
- - SETTING UP YOUR OVEN
- • TURNTABLE INSTALLATION
- - INSTALLATION
- • THINGS YOU SHOULD KNOW ABOUT THE MICROWAVE
- • CONTROL PANEL
- Clock setting
- Kitchen timer
- Microwave cooking
- Grill cooking
- Combination cooking
- Speedy cooking
- Defrost by weight
- Defrost by time
- Multi-stage cooking
- Auto menu
- • INQUIRING FUNCTION
- - CHILD LOCK
- - SPECIFIC FEATURES
- - FEATURES
- - CLEANING
- Cleaning Tip
- • UTENSILS
- o Utensil Test
- - DISPOSAL
- • GARANTIE / GARANTIE / GARANZIA / WARRANTY
- o Warranty commitment
- Servicestation:
Brand : ROTEL
Model : U1504CH
Category : Microwave Oven