DO7347H - Heating DOMO - Free user manual and instructions
Find the device manual for free DO7347H DOMO in PDF.
User questions about DO7347H DOMO
0 question about this device. Answer the ones you know or ask your own.
Ask a new question about this device
Download the instructions for your Heating in PDF format for free! Find your manual DO7347H - DOMO and take your electronic device back in hand. On this page are published all the documents necessary for the use of your device. DO7347H by DOMO.
USER MANUAL DO7347H DOMO
natural_image
White and black electric heater with a small display unit (no visible text or symbols)DO7347H
| Handleiding Keramische verwarming | |
| Mode d'emploi Chauffage céramique | |
| Gebrauchsanleitung Keramikheizung | |
| Instruction booklet Ceramic heater | |
| Manual de instrucciones Calentador cerámico | |
| Istruzioni per l'uso Riscaldamento ceramico | |
| Návod k použití Keramické topení | |
| Návod na použitie Keramické kúrenie |
natural_image
Two black-and-white icons: a warning triangle with an exclamation mark and an open book (no text or symbols)text_image
Diagram showing three-step assembly steps of a device with labeled parts and directional arrows indicating movement.text_image
Prohibition sign depicting a trash bin crossed out by a diagonal line, with a blank rectangular base below.natural_image
Recycling symbol icon with three chasing arrows forming a triangle (no text or labels)text_image
Diagram of a white air purifier with labeled parts 2, 3, and 4 indicating different components or functions.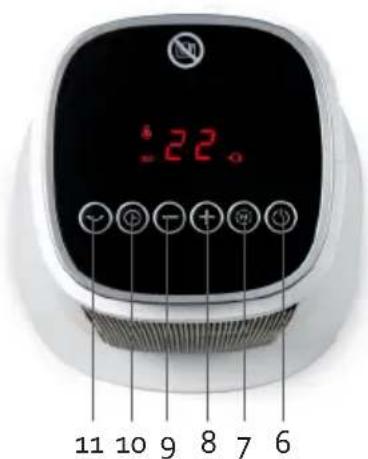
text_image
22° 11 10 9 8 7 6
text_image
5 DOMO 1 12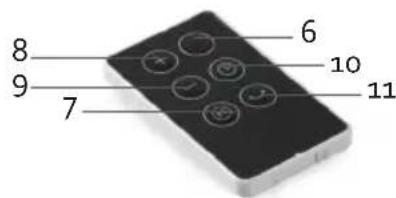
text_image
6 8 9 7 10 11AVANT LA PREMIÈRE UTILISATION
text_image
Diagram showing three-step assembly steps of a device with labeled parts and directional arrows indicating motion.text_image
Prohibition sign with crossed-out trash bin and no text, indicating no waste or disposal restrictionnatural_image
Recycling symbol icon with three chasing arrows forming a triangle (no text or labels)text_image
Diagram showing three-step assembly steps of a device with labeled parts and directional arrows indicating movement.text_image
Prohibition sign depicting a trash bin crossed with a diagonal line, indicating no waste or discharge.natural_image
Recycling symbol icon with three chasing arrows forming a triangle (no text or labels)All of our products are always submitted to a strict quality control before they are sold to you.
Should you nevertheless experience problems with your device, we sincerely regret this. In that case, we kindly request you to contact our customer service.
Our staff will gladly assist you.

+32 14 21 71 91

info@linea2000.be
Monday – Thursday: 8.30 – 12.00 and 13.00 – 17.00
Friday: 8.30 - 12.00 and 13.00 - 16.30
This appliance has a two year warranty period. During this period the manufacturer is responsible for any failures that are the direct result of construction failure. When these failures occur the appliance will be repaired or replaced if necessary. The warranty will not be valid when the damage to the appliance is caused by wrong use, not following the instructions or repairs executed by a third party. The guarantee is issued with the original till receipt. All parts, which are subject to wear, are excluded from the warranty. If your device breaks down within the 2-year warranty period, you can return the device together with your receipt to the shop where you purchased it.
The guarantee on accessories and components that are liable to wear-and-tear is only 6 months.
The guarantee and responsibility of the supplier and manufacturer lapse automatically in the following cases:
- If the instructions in this manual have not been followed.
· In case of incorrect connection, e.g., electrical voltage that is too high.
· In case of incorrect, rough or abnormal use.
· In case of insufficient or incorrect maintenance.
· In case of repairs or alterations to the device by the consumer or non-authorised third parties. - If the customer used parts or accessories that are not recommended or provided by the supplier / manufacturer.
SAFETY INSTRUCTIONS
When using electrical appliances, basic safety precautions should always be taken, including the following:
- Read all instructions carefully. Keep this manual for future reference.
- Make sure all packaging materials and promotional stickers have been removed before using the appliance for the first time. Make sure children cannot play with the packaging materials.
· This appliance is intended to be used in household and similar applications such as:
- staff kitchen areas in shops, offices and other working environments;
· farm houses; - by clients in hotels, motels and other residential type environments;
- bed and breakfast type environments.
· Children should be supervised to ensure that they do not play with the appliance.
This appliance can be used by children aged from 16 years and above and persons with reduced physical, sensory or mental capabilities or lack of experience and knowledge if they have been given
supervision or instruction concerning use of the appliance in a safe way and understand the hazards involved. Children shall not play with the appliance. Cleaning and user maintenance shall not be made by children unless they are older than 16 and supervised.
- Keep the appliance and its cord out of reach of children younger than 16 years.
- Attention: This appliance cannot be used with an external timer or a separate remote control.
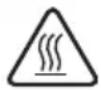
The appliance can become hot during use. Keep the power cord away from hot parts.
Don't cover the appliance.
- Before use, check if the voltage stated on the appliance corresponds with the voltage of the power net at your home.
- Do not let the cord hang on a hot surface or on the edge of a table or counter top.
- Never use the appliance when the cord or plug is damaged, after malfunction or when the appliance itself is damaged. In that case, take the appliance to the nearest qualified service center for check-up and repair.
-
Close supervision is necessary when the appliance is used near or by children.
-
The use of accessories that are not recommended or sold by the manufacturer can cause fire, electrical shock or injuries.
- Unplug the appliance when it is not in use, before assembling or disassembling any parts and before cleaning the appliance. Put all buttons and knobs into the 'off' position and unplug the appliance by grasping the plug. Never unplug by pulling the cord.
· Do not leave a working appliance unattended. - Never place this appliance near a gas stove or electrical stove or in a place where it may come into contact with a warm appliance.
- Do not use the appliance outdoors.
- Only use the appliance for its intended use.
· Always use the appliance on a steady, dry and level surface. - This product is only suitable for well insulated spaces or occasional use.
- Only use the appliance for domestic use. The manufacturer can not be held responsible for accidents that result from improper use of the appliance or not following the instructions described in this manual.
· All repairs should be carried out by the manufacturer or its aftersales service.
· Never immerse the appliance, the cord or the plug in water or any other liquid. - Make sure that children do not touch the cord or appliance.
- Keep the cord away from sharp edges and hot parts or other heat sources.
- Before use, remove all packaging materials and any promotional stickers.
- The appliance is not intended for use in the bathroom, washing area or other damp areas. A person who is in the bathtub or shower should not be able to touch the appliance, the power cord or the control knobs.
· This product is only suitable for well insulated spaces or occasional use.
RETAIN THESE INSTRUCTIONS FOR FUTURE REFERENCE.
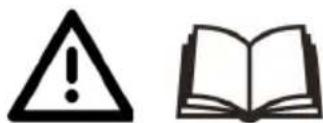
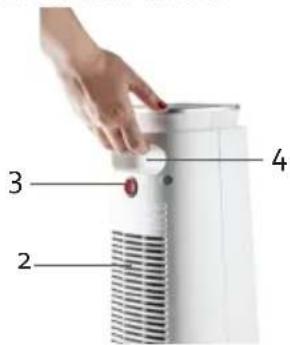
PARTS
- Air outlet
- Air inlet
- On/off switch
- Handle
- Control panel with display
- On/off switch
- Function button
- Button to increase
- Button to decrease
- Set timer
- Oscillation
- Remote control
text_image
3 2 4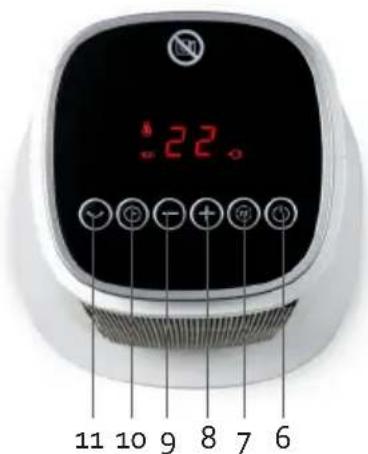
text_image
22 11 10 9 8 7 6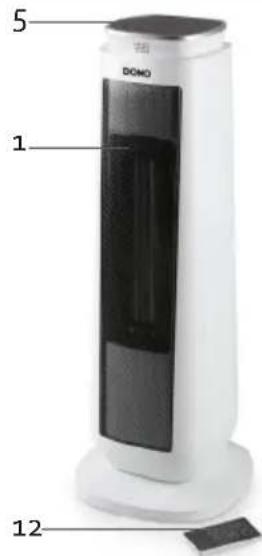
text_image
5 Domo 1 12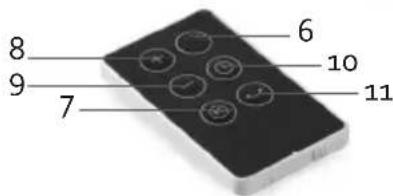
text_image
6 8 9 7 10 11BEFORE THE FIRST USE
- The heater should only be operated at a minimum distance of 50 cm from any wall or other object that could disturb its operation.
- Position the air flow in order to optimise the heating of the room. Avoid corners, small volumes, floors and ceilings.
- Place the appliance on a smooth, stable surface.
- When the appliance is switched on for the first time, a slight smell may be emitted. Please ensure sufficient ventilation. This smell will disappear very quickly.
REMOTE CONTROL
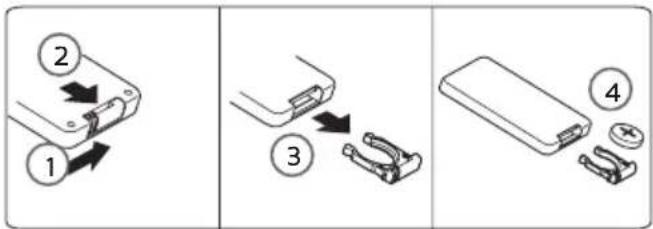
Before using the appliance with the remote control, a coin cell battery (CR2032) must be placed in the remote control. Follow the instructions below.
The remote control has a range of 5 metres.
USE
Before you use the appliance: plug in the appliance and turn on the on/off switch at the back of the device. The display displays the symbol and emits an audible signal to indicate that the device is in standby mode. You can set the appliance using the control panel, but also using the remote control. You can make the settings in the same way. The display will show you the selected settings. Each time a button is pressed, the device emits an audible signal to indicate that the user is making a setting or adjustment.
ON/OFF SWITCH

Push the on/off switch to turn on or off the appliance. "HI" and the 🔊 symbol appear on the display when the device is switched on. This means the device is at its highest power setting. If you switch off the device, the display will count down from 15 to 0 in order to cool itself down.
Note: when the device is switched off via this button, the device goes into standby mode. This means it is not completely disabled. You can only switch the device off completely via the on/off switch on the back of the device.
FUNCTION BUTTON

-
Press the button once: low power (1200 W): "LO" appears on the display, the device is now operating at its lowest power setting.
-
Press the button a second time: ECO: the symbol appears on the display. You can set the temperature between 5-35°C as desired using the buttons to increase and to decrease. You can also keep this button pressed until you reach the desired setting. If the ambient temperature is 2°C higher than the set temperature, the device switches to standby mode. If the temperature falls back below the set temperature, the eco function switches on again. This is the most energy-efficient way to maintain the temperature.
Note: the device remembers the last temperature setting made. This means that when you switch the device on again, the last temperature setting appears on the display when eco mode has been selected.
- Press the button for a third time: high power (2000 W): "HI" appears on the display, the device is now operating at its highest power setting.
TIMER

- Push this button to set the timer. The symbol appears on the display.
- You can set this between 1-8 hours using the buttons to increase (+) and to decrease (-). You can also press and hold this button until you reach the desired setting.
- When the selected time has been expired, the appliance will enter the stand-by mode and will no longer emit heat.
Note: if the device is in stand-by mode, you can set the timer. After the set time has elapsed, the device switches itself on automatically and will operate at its highest power setting.
OSCILLATION

Press the oscillation button to allow the heater to oscillate the air from left to right and vice versa. Press this button again to stop this. If you switch the device off with the on/off button, this function stops even if you have not pressed the oscillation button.
SAFETY DEVICES
This heater is protected with an overheat protection that switches off the heater automatically in case of overheat, e.g. due to the total or partial obstruction of the grids. The overheating shut-off switches off the temperature inside when the appliance exceeds the normal running temperature. The heating element will automatically stop working, the motor will continue to operate, the internal heat shed. This protective device applies only to the appliance itself and has no influence on room temperature regulation. In this case, unplug the appliance, wait about 10 minutes for it to cool and remove the object that is obstructing the grids. Then switch it back on as described above. The appliance should operate normally. Should the problem persist, please contact the nearest customer service.
- The appliance is also equipped with a tip-over safety, which is integrated in the appliance. The appliance will turn off when it tips over.
ERRORS
- E1 or E2: there is a fault or failure in the temperature sensor. The buttons on the control panel are disabled. Contact the nearest support service.
- FF: the ambient temperature is too high, you cannot make changes to any settings on the device. Switch off the device and place it in a cooler room.
- E3: the device is equipped with tilt protection. The device will turn off when it falls over. The buttons on the control panel are disabled. Place the device on a flat, stable surface to enable it again.
CLEANING AND MAINTENANCE
- Before cleaning the appliance, ensure it is disconnected from the power supply and has cooled down completely.
- To avoid the risk of electric shock, do not clean the heater with water and do not immerse it. Clean the housing with a damp cloth.
- If necessary, dust particles accumulated in the air outlet openings may be removed with a vacuum cleaner. This maintenance should be done regularly to assure the good operation of the appliance. Dust particles in the appliance may cause over-heating.
- Store the appliance in a clean and dry place.
SPECIFICATIONS
| Model identifier(s): | |||||
| Item Symbol Value Unit Item Unit | |||||
| Heat output Type of heat input, for electric storage | local space heaters only | ||||
| Nominal heat output Pnom | 2.0 kW manual heat control, with integrated thermostat | No | |||
| Minimum heat output (indicative) | Pmin 1.2 | kW manual heat control with room and/or outdoor temperature feedback | No | ||
| Maximum continuous heat output | Pmax 2.0 | kW electronic heat control with room and/or outdoor temperature feedback | No | ||
| Auxiliary electricity consumption | --- --- -- fan assisted | heat output | No | |
| At nominal heat output | elmax N/A kW Type of heat output/room temperature control | |||
| At minimum heat output | elmin N/A kW single stage heat output and no room temperature control | No | ||
| In standby mode eISB 0.30 | W Two or more manual stages, | no room temperature control | No | |
| with mechanic thermostat room temperature control | No | |||
| with electronic room temperature control | Yes | |||
| electronic room temperature control plus day timer | No | |||
| electronic room temperature control plus week timer | No | |||
| Other control options | ||||
| room temperature control, with presence detection | No | |||
| room temperature control, with open window detection | No | |||
| with distance control option No | ||||
| with adaptive start control No | ||||
| with working time limitation No | ||||
| with black bulb sensor No | ||||
| Contact details | Linea 2000 bvbaDompel g - 2200 Herentals - Belgium | |||
ENVIRONMENTAL GUIDELINES

text_image
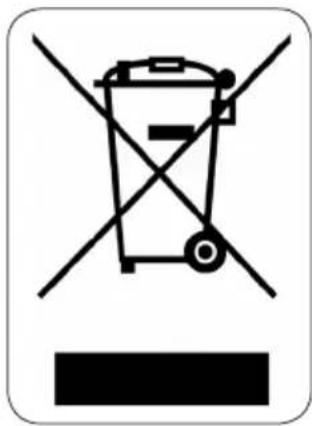
Prohibition sign depicting a trash bin crossed with a diagonal line, indicating no waste or discharge.This symbol on the product or on its packaging indicates that this product may not be treated as household waste. Instead it must be brought to the applicable collection point for recycling of electrical and electronic equipment. By ensuring this product is disposed of correctly, you will help prevent potential negative consequences for the environment and human health, which could otherwise be caused by inappropriate waste handling of this product. For more detailed information about recycling of this product, please contact your local city office, your household waste disposal service or the shop where you purchased the product.
natural_image
Recycling symbol icon with three chasing arrows forming a triangle (no text or labels)The packaging is recyclable. Please treat the packaging ecologically.
GARANTIA
text_image
Diagram showing three-step assembly steps of a device with labeled parts and directional arrows indicating movement.text_image
Warning sign with crossed-out trash bin and no text, indicating no waste or dischargenatural_image
Recycling symbol icon with three chasing arrows forming a triangle (no text or labels)text_image
Diagram showing three-step assembly steps of a device with labeled parts and directional arrows indicating motion.text_image
Prohibition sign depicting a trash bin crossed with a diagonal line, indicating no waste or discharge.natural_image
Recycling symbol icon with three chasing arrows forming a triangle (no text or labels)text_image
Diagram showing three-step assembly steps of a device with labeled parts and directional arrows indicating movement.OHLED NA ŽÍVOTNÍ PROSTŘEDÍ