
SCE4430 - Rechargeable Battery PHILIPS - Free user manual and instructions
Find the device manual for free SCE4430 PHILIPS in PDF.
| Product type | Rechargeable battery |
| Brand | PHILIPS |
| Model | SCE4430 |
| Battery capacity | 2000 mAh |
| Battery type | Lithium polymer |
| Input voltage | 5 V DC, 500 mA max |
| Output voltage | 5.6 V DC, 350 mA max |
| Battery life | Up to 30 hours |
| Charging time | 4.5 - 6.5 hours |
| Dimensions (H x W x D) | 60 x 87 x 16 mm |
| Weight | 88 g |
| Operating temperature | 0 °C to 45 °C |
| Charge indicator | 4 LEDs (battery levels) |
| RESET button | Yes (recessed) |
| Ports | 1 x USB 5 V (output), 1 x mini-USB 5 V (input) |
| Included accessories | USB charger, retractable USB cable, 6 tips, pouch, manual, compatibility sheet |
| Protection | Short-circuit protection function |
| Maintenance | Recharge every 3 months if not used, clean with a soft cloth |
| Warranty | Online support (www.philips.com/welcome) |
Frequently Asked Questions - SCE4430 PHILIPS
User questions about SCE4430 PHILIPS
0 question about this device. Answer the ones you know or ask your own.
Ask a new question about this device
Download the instructions for your Rechargeable Battery in PDF format for free! Find your manual SCE4430 - PHILIPS and take your electronic device back in hand. On this page are published all the documents necessary for the use of your device. SCE4430 by PHILIPS.
USER MANUAL SCE4430 PHILIPS
Register your product and get support at www.philips.com/welcome
SCE4430
EN rechargeable power pack 3
FR bloc d'alimentation rechargeable 6
ES fuente de alimentación recargable 9
DE wiederaufladbarer Akkupack 12
NL oplaadbaar energiepakket 15
IT sistema di alimentazione ricaricabile 18
PT dispositivo de alimentação recarregável 21
GR επαναφορτιζόμενο power pack 24
TU edilebilir güç paketi 27
DK genopladelige batteripakke 30
SV laddningsbara strömpaket 33
FI ladattava laturi 36
PL akumulatorowy zestaw zasilający 39
CZ dobíjecí napájecí pack 42
SK nabíjateľná napájacia súprava 45
HU újratölthető áramforrás 48
RU аккумуляторный блок 51
natural_image
Exterior view of a Philips electronic device with ports and a display screen (no readable text or symbols)PHILIPS

text_image
PHILIPS ① ② ③ ④ ⑤ A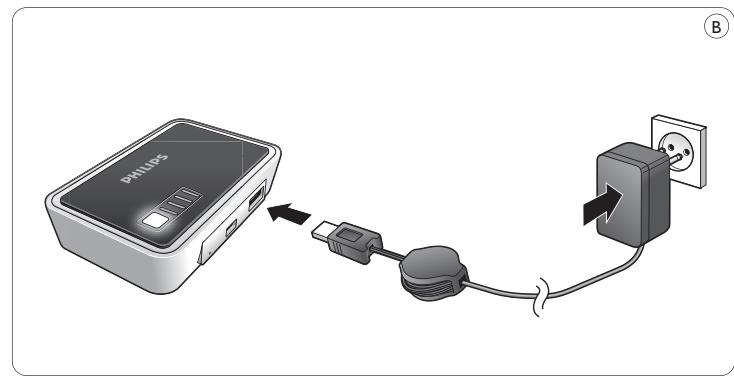
text_image
PHILDS B
text_image
PHILIPS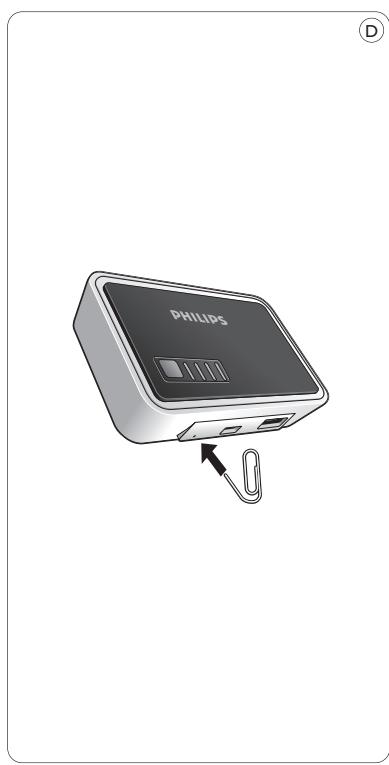
natural_image
Illustration of a Philips electronic device with an attached cable, showing ports and a label (no text or symbols on the device itself)1 Your rechargeable power pack
Congratulations on your purchase and welcome to Philips!
This rechargeable power pack provides instant power to devices with a service voltage of 5V DC (mobile telephones, MP3 players, etc.). When fully charged, the power pack can supply up to 30 hours of backup energy.
Carefully read and save this user manual for it contains important safety and operating instructions for this power pack. Before using the power pack read all instructions and cautionary markings on the power pack itself and the device to be charged.
To fully benefit from the support that Philips offers, register your product at: www.philips.com/welcome
Note:
For several portable devices (5V), a USB cable is supplied with the original device (e.g. most MP3 players). In this case, you can also use this cable to charge your device.
2 What's in the box?
– rechargeable power pack
- USB charger
- retractable USB cable
- 6 connector tips for 5V DC devices (mobile telephones, MP3 players, etc.)
- travel bag
- connector tip holders
- user manual
- compatibility sheet
3 Important safety instructions
- Read and observe all warnings on the power pack and in this user manual.
- Power consumption of the connected device must not exceed 5.6 V, 350 mA.
- Never use the power pack in moist places or close to water.
- Do not expose the power pack to rain or excessive moisture.
- Do not place inflammable, explosive or hazardous objects near the power pack.
- Only use the supplied USB adapter. Use of an other type of adapter may damage the power pack and/or your device.
- Only use the supplied USB cable and connector tips. Use of other types of cords and tips may damage the power pack and/or your device.
- Only use the power pack in an environment with the proper temperature (0°C - 45°C).
- Keep the power pack away from children.
- Do not disassemble or try to repair the power pack yourself. You might get injured or the power pack may be damaged.
- Do not crush or puncture the internal battery.
- Store the power pack in a dry place with the proper ambient temperature (0°C - 45°C).
- Do not operate the power pack if it has been subjected to shock or damage.
- To avoid risk of electric shock, unplug the power pack from the AC power supply and disconnect devices before cleaning or when not in use.
- Allow a sufficient amount of free space all around the power pack for adequate ventilation.
- Do not throw or shake the power pack.
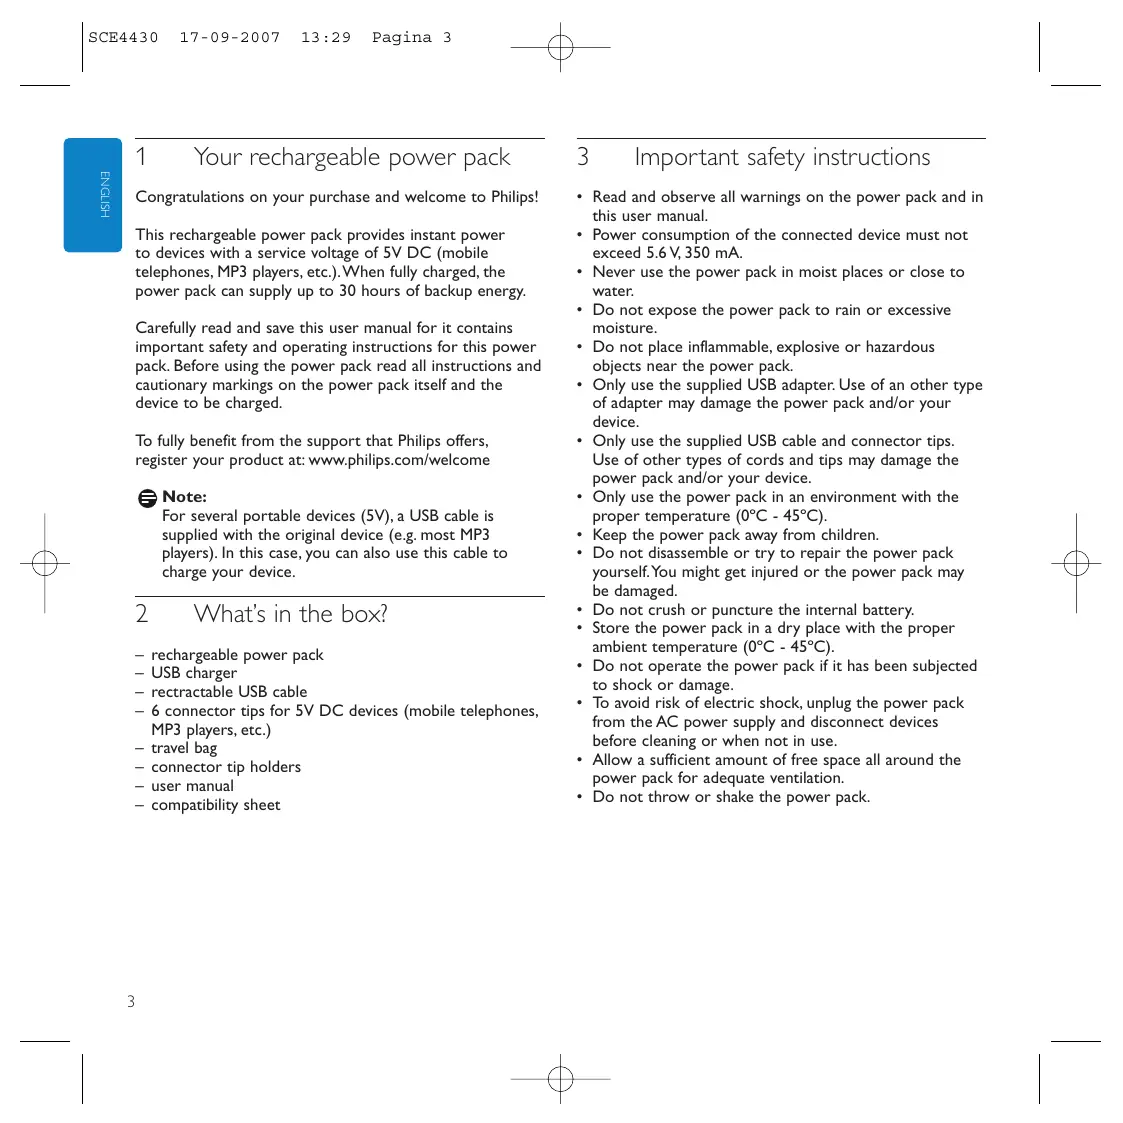
4 Functional overview (fig. A)
① Power indicator Indicates the battery status.
② Battery check button Activates the power indicator.
③ RESET Resets the power pack to the factory default settings.
④ INPUT 5V DC (mini USB) Connects to the mains supply.
⑤ USB port Connects to 5V DC devices (mobile telephones, MP3 players, etc.).
5 Operation
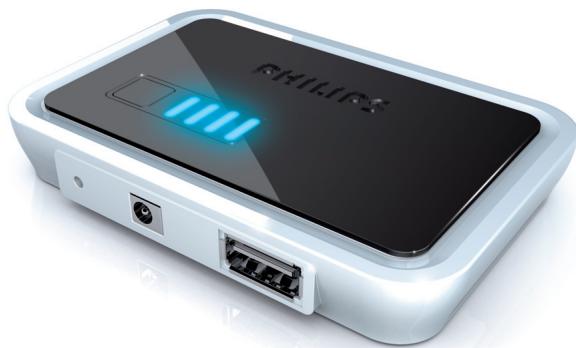
Charging the power pack (fig. B)
1 Press the battery check button (2).
One, two or three LEDs light up in the power indicator (1), indicating the current battery status. If all four LEDs light up, the battery is fully charged.
2 Connect the retractable cable to the USB charger.
3 Connect the mini USB connector tip to the other end of the retractable cable.
4 Connect the mini USB connector tip to the rechargeable power pack.
5 Connect the power plug of the USB charger to a wall outlet.
The power indicator LEDs (1) will flash one after another, indicating that the battery is being charged.
When all LEDs light continuously the battery is fully charged.
6 Disconnect the battery pack from the AC power adapter and disconnect the AC power adapter from the wall outlet.
Note:
You can also charge the power pack via the USB output of your PC/notebook. Connect one side of the USB cable to the power pack (5V DC mini USB) and connect the other side of the retractable USB cable to the USB outlet of your PC/notebook.
Charging devices - preparation
1 Check the maximum input voltage (V DC) of the device you wish to connect. For this see the user manual that came with the device.
2 Make sure the device does not consume more current (mA) than 350 mA.
3 Check what connector tip is required for your device. See the compatibility sheet for the proper tip for your device.
Charging 5V devices (fig. C)
1 Insert the plug of the USB cable into the USB port (5).
2 Connect the connector tip to the USB cable.
3 Insert the connector tip into the power supply jack of the device.
The device will now derive it's power from the power pack.
If the device has a charging indicator, it will indicate that the device is being charged.
Note:
If you are unable to solve a problem by following the above hints, try resetting the power pack by pressing RESET. The RESET button is recessed to prevent accidental reset of the power pack. Use a paperclip to gently press the RESET button (see fig. D).
Tip:
For several portable devices (5V), a USB connection cable is supplied with the original device (e.g. most MP3 players). In this case, you can also use this cable to charge your device.
6 Technical specifications
- Battery type: Lithium polymer
• Rated input: 5V DC, max. 500 mA
• Rated output: 5.6V DC, max. 350 mA
• Battery capacity: 2000 mAh
• Recharging time: 4.5 - 6.5 hours - Operating temperature: 0^ - 45^
• Size: 60 x 87 x 16 mm (h x w x d) - Weight: 88 g
7 Troubleshooting
Problem
— Possible cause
- Solution
The power pack does not charge connected device
- Voltage of device does not correspond with that of power pack.
• Refer to the user manual that came with the device. - Improper connection between device and power pack.
- Check that connection cord is properly inserted into both device and power pack.
– Damaged connection cable or connector tip. - Replace connection cable or connector tip.
- Wrong connector tip used.
- Check connector tip and replace if necessary.
– Non supplied USB connection cable/connector tip used. - Replace with supplied USB connection cable/connector tip.
– Battery power of power pack too low. - Charge power pack.
– Problems with electrical circuit of power pack.
• Take the power pack to your local distributor. - Short circuit occurred in the power pack and the power pack protection function switched off the power pack.
- Charge power pack.
– Problems with electrical circuit of power pack.
• Take the power pack to your local distributor.
Power pack runs out of power quickly
– Power pack not fully charged before using.
• Fully charge power pack before using.
- Supplied AC power adapter was not used for charging power pack.
- Only use supplied AC power adapter for charging power pack.
Power pack cannot be charged
- Improper connection between power pack and wall outlet.
- Check that power cord is properly inserted into both wall outlet and AC power adapter.
- Check that adapter plug is properly inserted into the INPUT 5V DC Jack of the power pack.
– Problems with the electrical circuit of the power pack.
• Take the power pack to your local distributor.

Note:
If you are unable to solve a problem by following the above hints, try resetting the power pack by pressing RESET. The RESET button is recessed to prevent accidental reset of the power pack. Use a paperclip to gently press the RESET button (see fig. D).
8 Maintenance
- Recharge the power pack every three months when it is not being used for a long period of time.
- Use a soft, lint-free cloth to clean the power pack exterior. Do not use harsh chemicals, cleaning solvents or strong detergents.
- When any problems occur with the power pack or the accessories, take the adapter and accessories to your local distributor.
9 Need help?
Online help: www.philips.com/welcome
For interactive help and frequently asked questions.
Ajuda on-line: www.philips.com/support
EN Information to the consumer
Disposal of your old product
Your product is designed and manufactured with high quality materials and components, which can be recycled and reused.
natural_image
Symbol of a trash bin crossed with a diagonal line, no text or numbers presentWhen this crossed-out wheeled bin symbol is attached to a product it means the product is covered by the European Directive 1902/96/EC.
Please inform yourself about the local separate collection system for electrical and electronic products.
Please act according to your local rules and do not dispose of your old products with your normal household waste. The correct disposal of your old product will help prevent potential negative consequences for the environment and human health.
natural_image
Symbol of a trash bin crossed with no text or numbers, representing waste sorting or disposal (no text present)natural_image
Symbol of a trash bin crossed with no text or numbers, representing waste sorting or disposal (no text present)natural_image
Symbol of a trash bin crossed with no text or numbers, representing waste sorting or disposal (no text present)natural_image
Symbol of a trash bin crossed out by two crossed lines, with no text or numbers present.natural_image
Symbol of a trash bin crossed out by two crossed lines, with no text or labels present.natural_image
Symbol of a trash bin crossed out by two crossed lines, with no text or numbers present.natural_image
Symbol of a trash bin crossed with no text or numbers, representing waste sorting or disposal (no text present)natural_image
Symbol of a trash bin crossed with a diagonal line, no text or numbers presentnatural_image
Symbol of a trash bin crossed with a diagonal line, no text or numbers presentnatural_image
Symbol of a trash bin crossed with a diagonal line, no text or numbers presentnatural_image
Symbol of a trash bin crossed with a diagonal line, no text or numbers presentnatural_image
Symbol of a trash bin crossed out by two crossed lines, with no text or numbers present.natural_image
Symbol of a trash bin crossed with no text or numbers, representing waste sorting or disposal (no text present)natural_image
Symbol of a trash bin crossed out by two crossed lines, with no text or numbers present.natural_image
Symbol of a trash bin crossed out by two diagonal lines, with no text or numbers present.All rights reserved. Reproduction in whole or in part is prohibited without the prior written consent of the copyright owner. The information presented in this document does not form part of any quotation or contract, is believed to be accurate and reliable and may be changed without notice. No liability will be accepted by the publisher for any consequence of its use. Publication there of does not convey nor imply any license under patent- or other industrial or intellectual property rights.
September 2007
www.philips.com
Printed in China
FC CE

N'MW/RM/RR/3607