VSZ61260 - Vacuum Cleaner SIEMENS - Free user manual and instructions
Find the device manual for free VSZ61260 SIEMENS in PDF.

User questions about VSZ61260 SIEMENS
0 question about this device. Answer the ones you know or ask your own.
Ask a new question about this device
Download the instructions for your Vacuum Cleaner in PDF format for free! Find your manual VSZ61260 - SIEMENS and take your electronic device back in hand. On this page are published all the documents necessary for the use of your device. VSZ61260 by SIEMENS.
USER MANUAL VSZ61260 SIEMENS
natural_image
Close-up of a black industrial vacuum cleaner with a circular dial indicator (no visible text or symbols on the device itself)| en | Your vacuum cleaner .....6 |
| Set up .....7 | |
| Vacuuming .....9 | |
| After use .....12 | |
| Changing the dust bag .....14 | |
| Care .....17 | |
| Special accessories/replacement parts .....18 | |
| Warranty .....142 | |
| fr | Description de l'appareil .....21 |
| Mise en service .....22 | |
| Aspiration .....24 | |
| Après le travail .....27 | |
| Changement de filtre .....29 | |
| Entretien .....32 | |
| Accessoires spéciaux / Pièces de rechange .....33 | |
| Garantie .....142 | |
| nl | Beschrijving van het apparaat .....36 |
| De stofzuiger in gebruik nemen .....37 | |
| Zuigen .....39 | |
| Na het werk .....42 | |
| Vervanging filter .....44 | |
| Verzorging .....47 | |
| Extra toebehoren / onderdelen .....48 | |
| Garantie .....142 | |
| es | Descripción del aparato .....51 |
| Puesta en marcha .....52 | |
| Aspirar .....54 | |
| Tras el trabajo .....57 | |
| Cambio de filtro .....59 | |
| Cuidados .....62 | |
| Accesorios opcionales / Piezas de repuesto .....63 | |
| Garantía .....142 | |
| da | Beskrivelse .....66 |
| Ibrugtagning .....67 | |
| Støvsugning .....69 | |
| Efter arbejdets afslutning .....72 | |
| Skift af filter .....74 | |
| Pleje .....77 | |
| Ekstra tilbehør / reservedele .....78 | |
| Garanti .....142 | |
| no | Beskrivelse av apparatet .81Komme i gang .82Støvsuging .84Når jobben er gjort .87Bytte av filter .89Vedlikehold .92Ekstra tilbehør / reservedeler .93Garanti .143 |
| SV | Beskrivning av enheten .96Användning .97Dammsuga .99När du är klar .102Byta dammsugarpåse .104Skötsel .107Extratillbehör/reservdelar .108Garanti .143 |
| fi | Laitteen kuvaus .111Käyttöönotto .112Imurointi .114Työn jälkeen .117Suodattimen vaihto .119Hoito .122Varaosat ja lisävarusteet .123Takuu .143 |
| pt | Descrição do aparelho .126Colocação em funcionamento .127Aspirar .129Após o trabalho .132Substituição do filtro .134Limpeza .137Acessórios especiais/peças sobresselentes .138Condições de garantia .143 |
Congratulations on your purchase of a Siemens VSZ6 vacuum cleaner.
This instruction manual describes various VSZ6 models, which means that some of the equipment features and functions described may not be available on your model.
You should only use original Siemens accessories, which have been specially developed for your vacuum cleaner to achieve the best possible vacuuming results.
Please keep this instruction manual in a safe place. If you pass the vacuum cleaner on to someone else, please also pass on this instruction manual.
Intended use
This vacuum cleaner is intended for domestic use only, not for commercial use.
Only use this vacuum cleaner in accordance with the instructions in this instruction manual.
The manufacturer will not accept any responsibility for damage caused by improper use or incorrect operation. Therefore, you must note the following points.
The vacuum cleaner must only be operated with:
■ Manufacturer's original dust bags
■ Manufacturer's original replacement parts, accessories or special accessories
Safety information
This vacuum cleaner complies with the generally accepted standards of technology and relevant safety regulations.
■ Always observe the information on the rating plate when using the vacuum cleaner and connecting to the power supply.
■ Never use the vacuum cleaner without a dust bag fitted.
=> This can damage the appliance.
■ The appliance may be used by children over the age of 8 years and by persons with reduced physical, sensory or mental capacity or by persons with a lack of experience or knowledge if they are supervised or have been instructed on the safe use of the appliance and the have understood the potential dangers of using the appliance.
■ Children must never play with the appliance
■ Cleaning and user maintenance must never be carried out by children without supervision.
The vacuum cleaner may not be used for:
■ cleaning persons or animals
■ vacuuming up:
- hazardous, sharp-edged, hot or red hot substances.
- damp or liquid substances
– highly flammable or explosive substances and gases
- ash, soot from tiled stoves and central heating systems
- toner dust from printers and copiers.
- Keep suction away from your head when using the handle, nozzles or pipe. => Risk of injury.
■ Stand the appliance on a firm, secure surface when vacuuming.
■ When vacuuming stairs, the appliance must always be lower down than you.
■ In the following cases, stop using the appliance immediately and contact the after-sales service:
- if the mains connection cable is damaged.
- if you have accidentally vacuumed up some liquid or liquid has entered the inside of the appliance - if the appliance has been dropped.
■ Do not use the power cord to carry the vacuum cleaner.
■ Fully extend the power cord when using the vacuum cleaner continuously for several hours.
■ When disconnecting the appliance from the mains, pull on the plug, not the power cord.
■ Do not pull the power cord around sharp corners or allow it to become trapped.
■ Unplug the power cord from the mains before carrying out any work on the vacuum cleaner or its accessories.
■ Do not use the vacuum cleaner if it is damaged. Unplug the power cord from the mains if a fault is detected.
■ For safety reasons, only authorised after-sales service personnel are permitted to carry out repairs and fit replacement parts to the vacuum cleaner.
■ Protect the vacuum cleaner from outside weather conditions, moisture and sources of heat.
■ The vacuum cleaner is not suitable for use on building sites. => Vacuuming up building rubble could damage the appliance.
■ Switch off the appliance when it is not in use.
■ At the end of its life, the appliance should be rendered unusable, then disposed of in an appropriate manner.
■ Plastic bags and films must be kept out of the reach of children before disposal (risk of suffocation).
■ do not pour any flammable substances or substances containing alcohol onto the filters (filter bag, motor protective filter, exhaust filter, etc.).
Disposal information
Packaging
The packaging is designed to protect the vacuum cleaner from being damaged during transportation. It is made of environmentally friendly materials and can be recycled. Dispose of packaging that is no longer required at an appropriate recycling point.
■ Used vacuum cleaners
Used vacuum cleaners still contain many valuable materials. Therefore, please take your used vacuum cleaner to your retailer or recycling centre to be recycled. For current disposal methods, please enquire at your retailer or your local council.
■ Disposal of filters and dust bags
Filters and dust bags are made from environmentally friendly materials. As long as they do not contain substances that are not permitted to be disposed of in the household rubbish, you can dispose of them with your normal household rubbish.

Please note
The mains socket must be protected by at least a 10 amp fuse.
If a fuse should blow when you switch on the appliance, this may be because other electrical appliances which have a high current draw are connected to the same power circuit.
To prevent the fuse from blowing, select the lowest power setting before switching the appliance on, and increase the power only once it is running.
text_image
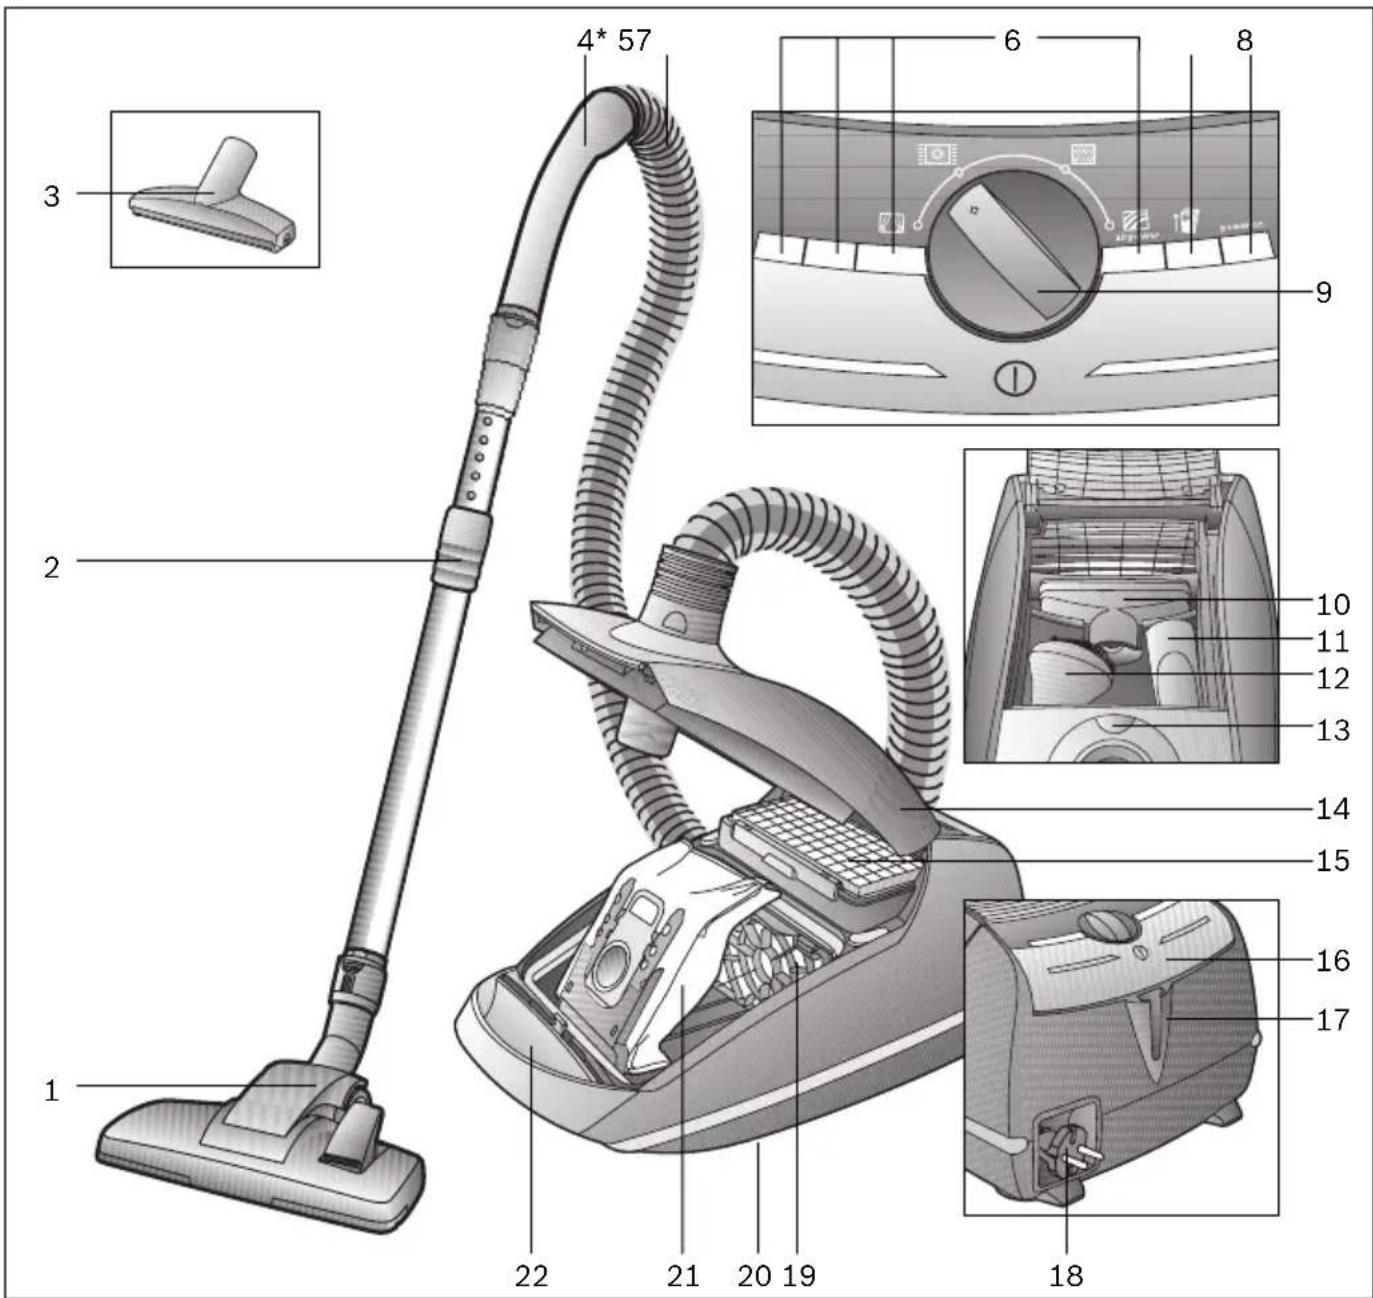
1 2 3 4* 57 6 8 9 10 11 12 13 14 15 16 17 18 20 19 21 221 Adjustable floor tool with locking collar
2 Telescopic tube with adjusting sleeve and locking collar
3 Professional upholstery nozzle
4 Handle*
5 Flexible hose
6 Power display
7 Dust bag change indicator
8 Display element
9 Electronic power controller
10 Upholstery nozzle
11 Crevice nozzle
12 Hard furnishings brush
13 Opening button for other accessories
14 Lid
15 Exhaust filter
16 ON/OFF button
17 Parking aid
18 Power cord
19 Motor protection filter
20 Storage aid
(on underside of appliance)
21 Dust bag
22 Opening button for appliance lid
*dependent on model
text_image
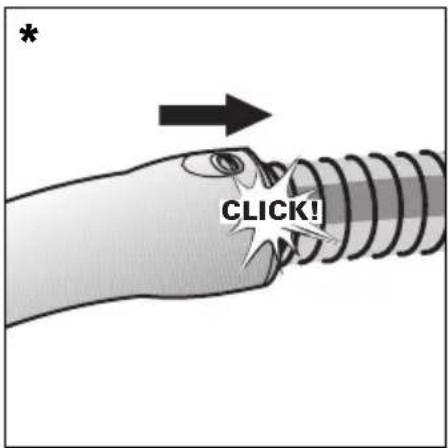
* CLICK!Before using for the first time
Push the handle onto the flexible hose until it engages.
*dependent on model
natural_image
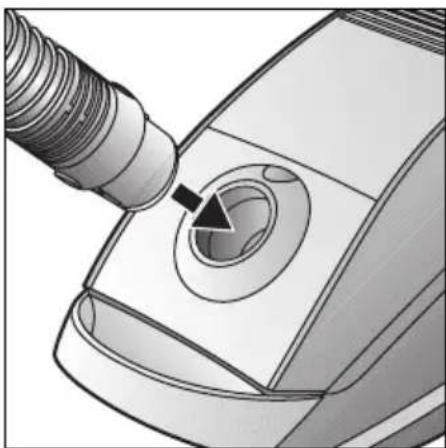
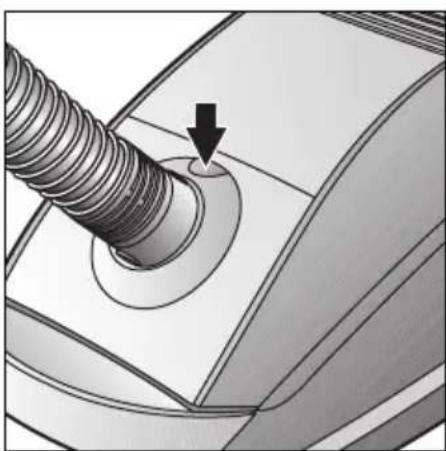
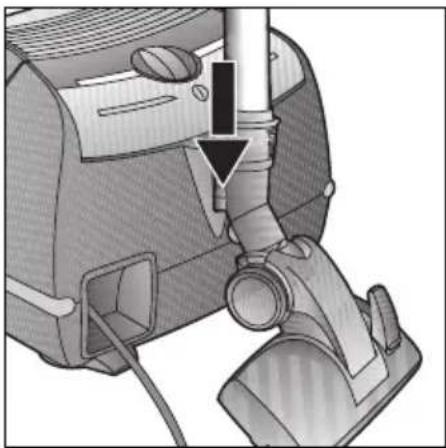
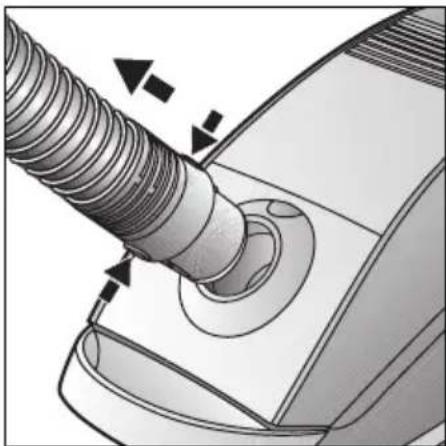
Technical illustration of a mechanical component with a threaded end and circular opening (no text or symbols)Push the flexible hose connector into the air intake opening until it engages.
natural_image
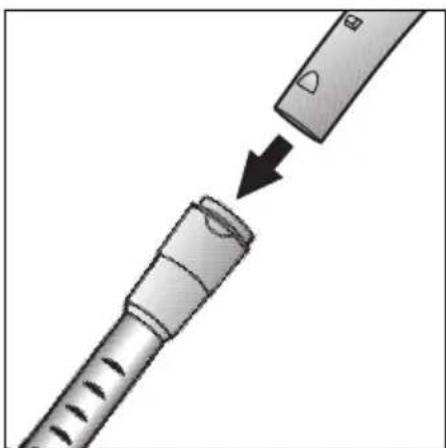
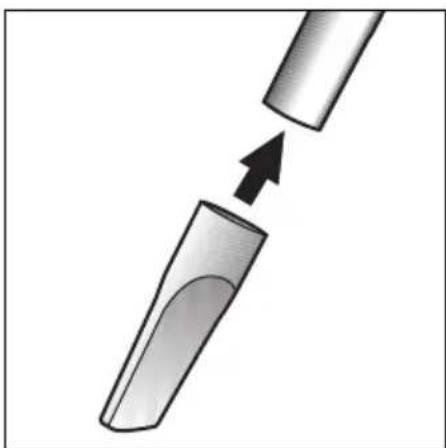
Diagram showing a mechanical component being inserted into a cylindrical housing, with an arrow indicating the process (no text or symbols present)Push the handle into the telescopic tube until it engages.
natural_image
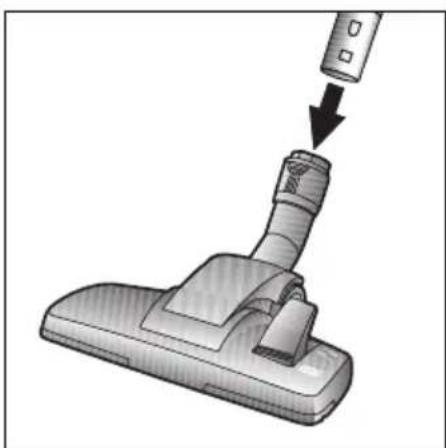
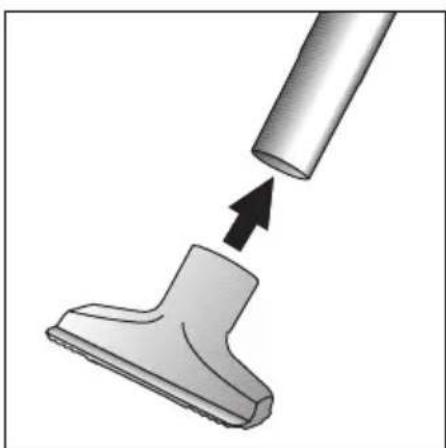
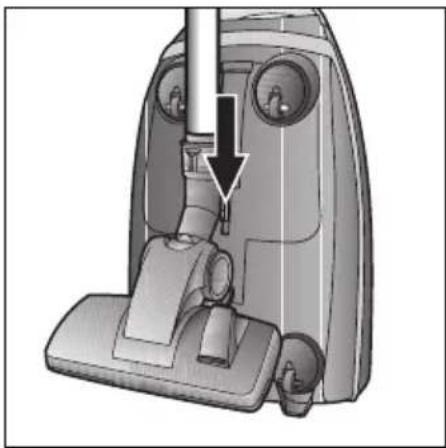
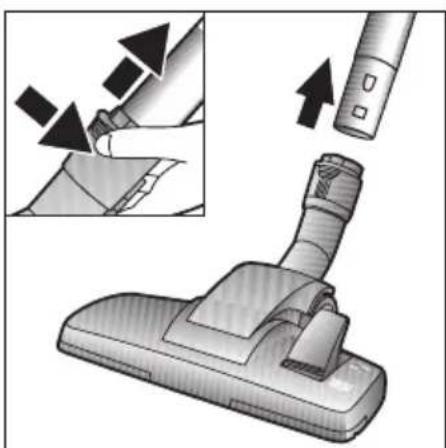
Illustration of a vacuum cleaner's handle with a downward arrow indicating insertion (no text or symbols present)Push the telescopic tube straight into the connecting piece of the floor tool until it engages.
natural_image
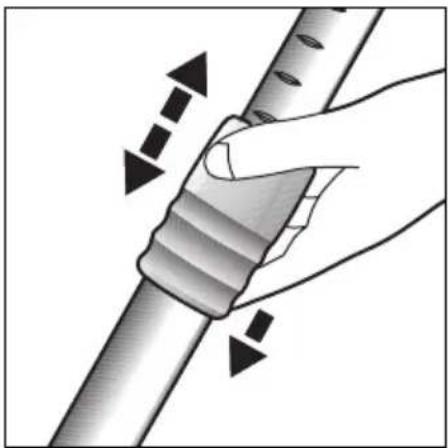
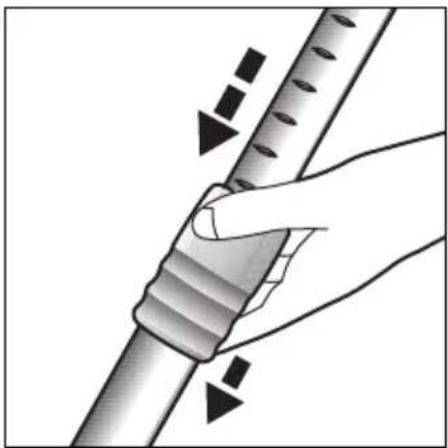
Illustration of a hand holding a cylindrical object with directional arrows indicating movement or force (no text or symbols)Move the adjusting sleeve in the direction of the arrow to release the telescopic tube and adjust it to the length required.
natural_image
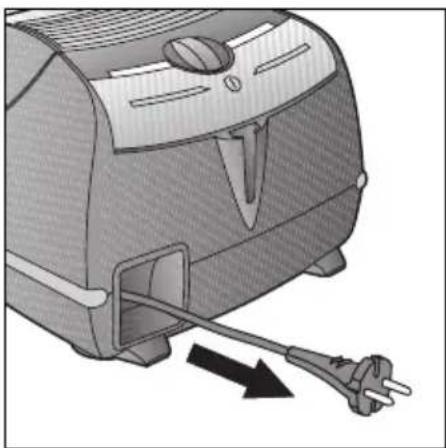
Illustration of a toaster oven with a power plug inserted, showing internal components and a black arrow indicating direction (no text or symbols)Take the mains plug, pull the power cord to the required length and insert the plug into a socket.
natural_image
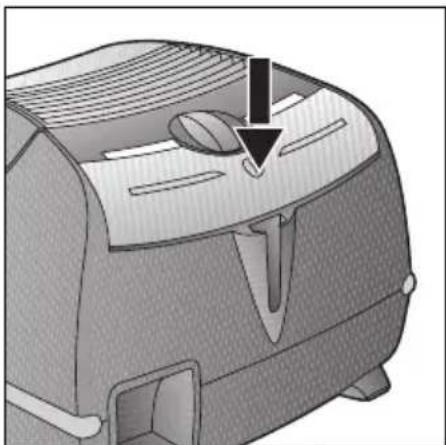
Technical illustration of a mechanical component with a downward arrow indicating a feature (no text or symbols present)Press the ON/OFF button in the direction of the arrow to switch on your vacuum cleaner.
text_image
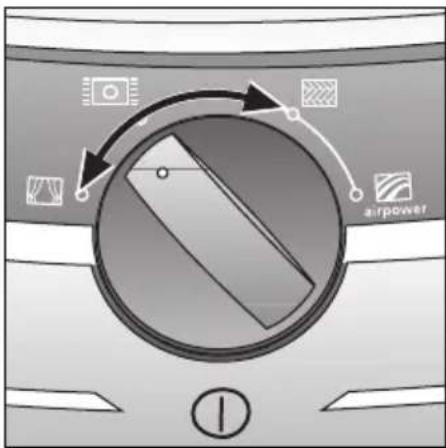
airpowerIf your appliance is equipped with the constant suction power function, the power of the appliance is automatically adjusted to how full the dust bag is.
The following power settings can be selected:
■ Low suction range:
For vacuuming delicate fabrics, e.g. curtains.
■ Medium suction range:
For daily vacuuming of lightly soiled surfaces.
■ High vacuum range:
For vacuuming durable floor coverings, hard floors and heavily soiled surfaces.
text_image
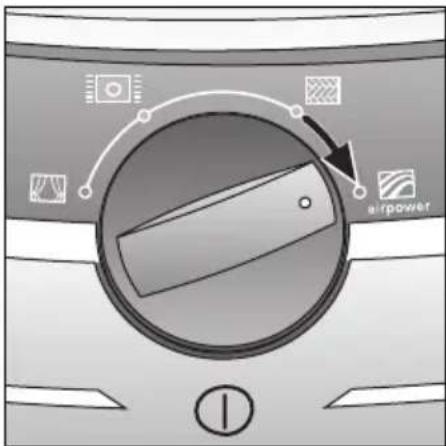
airpowerAir Power:
For heavily soiled surfaces and coarse dirt. The appliance vacuums with the maximum possible suction.
natural_image
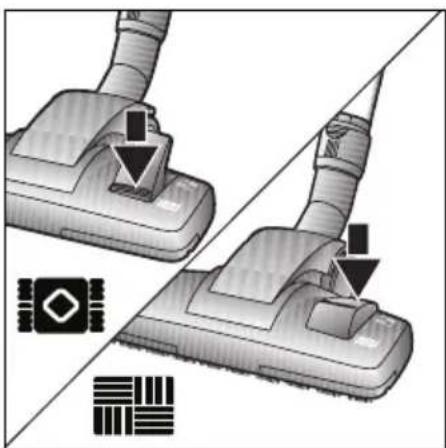
Diagram showing two identical vacuum cleaner components with downward arrows indicating process, separated by a diagonal line (no text or symbols)Adjusting the floor tool:
■ For vacuuming rugs
and carpets =>
■ For vacuuming
hard floors =>


natural_image
Close-up of a mechanical component with threaded shaft and circular base, showing a downward arrow indicating a feature (no text or symbols present)Other accessories that you do not need can be stored easily in the accessories compartment under the appliance lid.
natural_image
Diagram of a mechanical device with an open lid and internal compartments, showing a directional arrow (no text or symbols present)■ When the opening button is pressed, the lid of the accessories compartment opens automatically. Take out the required accessories.
text_image
CLICK!■ After removal, close the lid of the accessories compartment and engage the catch.
natural_image
Diagram showing a tool interacting with a cylindrical component, with an arrow indicating direction (no text or symbols present)Vacuuming with accessories
(attach to handle or suction tube as required).
Please set your appliance to the medium suction range.
■ Crevice nozzle For cleaning crevices and corners.
natural_image
3D illustration of a tool interacting with a mechanical component (no text or symbols)■ Upholstery nozzle For cleaning upholstered furniture, curtains, etc.
When cleaning delicate materials, such as curtains, set the power to the lowest suction range.
natural_image
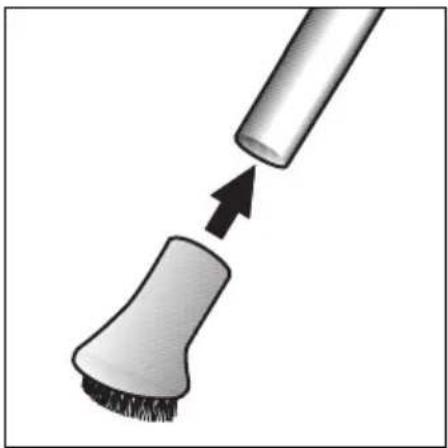
Illustration of a brush applying paint to a white brush (no text or symbols)■ Hard furnishings brush For vacuuming picture frames, books, furniture requiring particular care, etc.

text_image
Technical diagram illustrating four steps of a mechanical assembly or cleaning procedure, showing tool application, component handling, and final assembly.Professional upholstery nozzle
■ For intensive cleaning of upholstered furniture (attach to the handle or suction tube as required).
■ To clean the professional upholstery nozzle, simply vacuum it using the handle.
■ If it is very dirty, the professional upholstery nozzle can also be opened up. To do this, turn the two screws on the sides of the nozzle (e.g. using a coin) and remove the inner part from the nozzle.
■ After cleaning, replace the inner part (make sure it is correctly seated) and screw to the housing.
natural_image
Mechanical device component diagram showing a lever and adjustment mechanism (no text or symbols)Once you have switched off the appliance, you can use the parking aid on the back if you wish to stop vacuuming for a short time.
To do this, slide the catch on the floor tool into the groove on the back of the appliance.
natural_image
Line drawing of a vacuum cleaner with handle and ventilation slots (no text or symbols)The appliance can also be carried using the carrying handle when vacuuming stairs, for example.
Caution!
Floor tools are subject to a certain amount of wear, depending on the type of hard floors you have (e.g. rough, rustic tiles).
Therefore, you must check the underside of the floor tool at regular intervals.
Worn undersides of floor tools may have sharp edges that can damage sensitive hard floors, such as parquet or linoleum. The manufacturer does not accept any responsibility for damage caused by worn floor tools.
When the work is done
en
natural_image
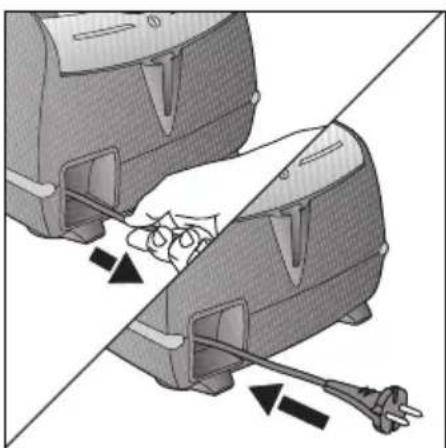
Diagram showing two mechanical devices with arrows indicating a joint or connection, no text or symbols present.■ Unplug the vacuum cleaner.
■ Tug the power cord briefly and then let go (the power cord retracts automatically).
natural_image
Mechanical device with a downward arrow indicating a component or assembly (no visible text or symbols)To store or transport the appliance, use the storage aid on the underside.
Stand the appliance up on its end. Slide the catch on the floor tool into the groove on the underside of the appliance.
natural_image
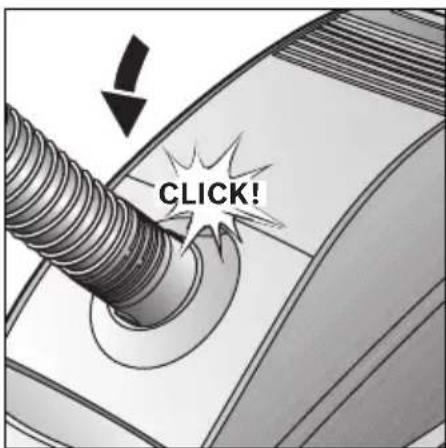
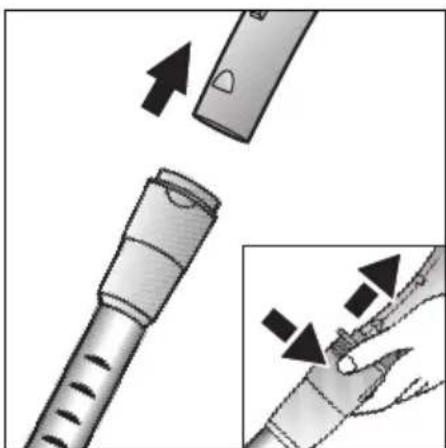
Close-up illustration of a mechanical component with threaded shaft and circular opening (no text or symbols)To remove the flexible hose, press the release button and pull the hose out.

natural_image
Illustration of a medical or surgical tool with arrows indicating movement or force (no text or symbols present)To release the connection, push on the locking collar and pull the handle out.
natural_image
Illustration of a vacuum cleaner with a close-up view showing the tip and handle (no text or symbols)Push on the locking collar and pull out the telescopic tube to disconnect.
natural_image
Illustration of a hand holding a cylindrical object with directional arrows indicating movement or force (no text or symbols)To adjust the length of the telescopic tube, press the adjusting sleeve in the direction of the arrow and adjust the tube to the required length.
Changing the dust bag
en
text_image
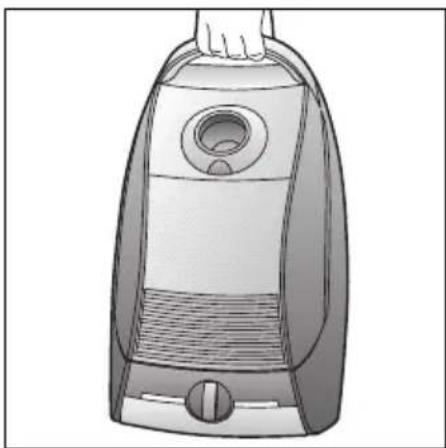
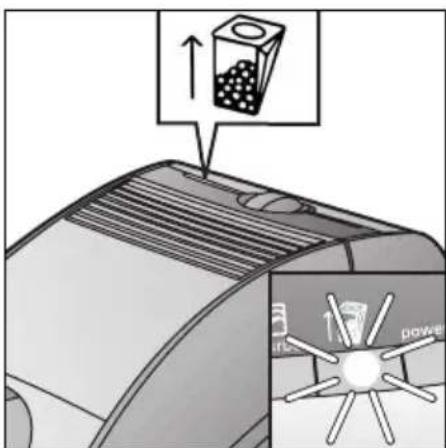
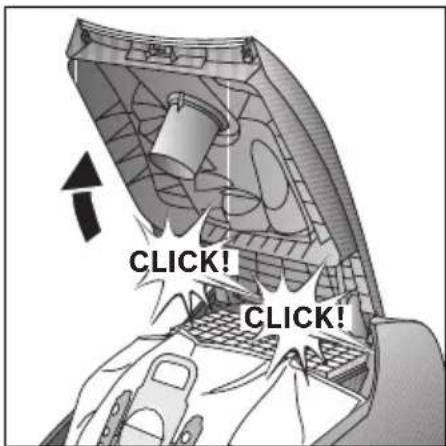
Diagram showing a device with a box and directional arrow, labeled 'power' and '↑', indicating a power input or operation.Replacing the dust bag
If the dust bag change indicator lights up continuously when the floor tool is lifted from the floor and the highest suction power is selected, the dust bag must be changed, even though it may not yet be full. In this case it is essential to change the dust bag due to the type of material it contains. First check that the nozzle, suction tube and flexible hose are not blocked, as this would also lead to the dust bag change indicator being triggered.
natural_image
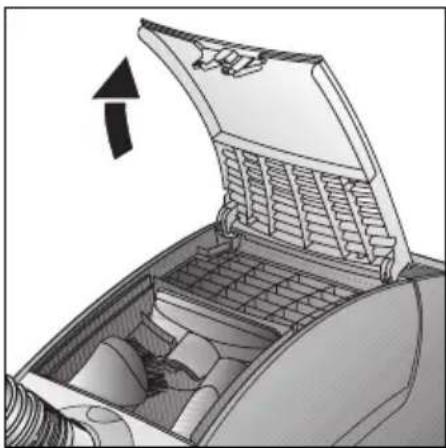
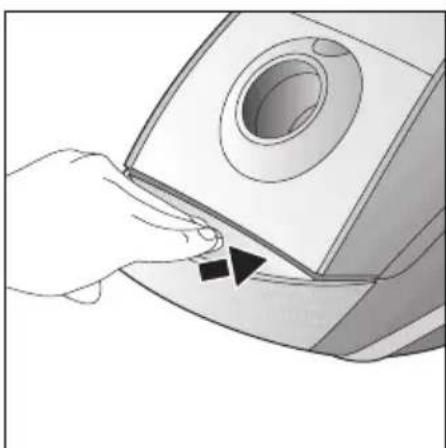
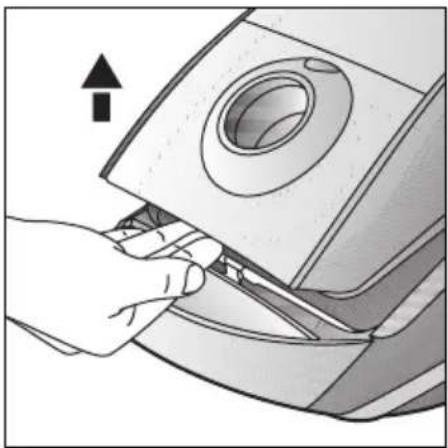
Hand inserting a button into a device component (no text or symbols visible)■ When the open button is pressed, the appliance lid raises slightly.
natural_image
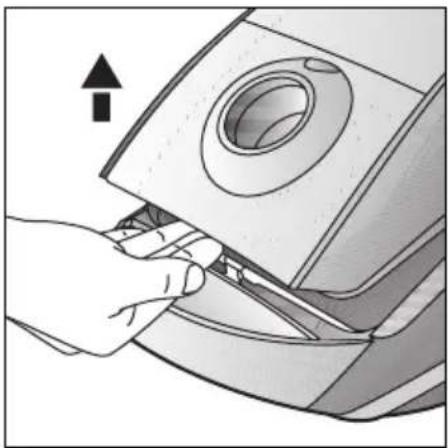
Hand inserting a component into a device (no text or symbols visible)■ Hold the bottom of the lid and open it in the direction of the arrow until the lid engages in its open position.
text_image
CLICK! CLICK!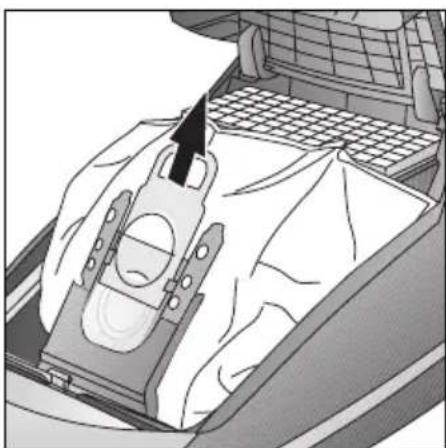
natural_image
Interior view of a car air intake manifold showing airflow direction (no text or symbols)■ Seal the dust bag by pulling the sealing strip and then remove it.
■ Insert the new dust bag into the holder as far as the stop. As you do this, leave it folded up, as it is when removed from its packaging.
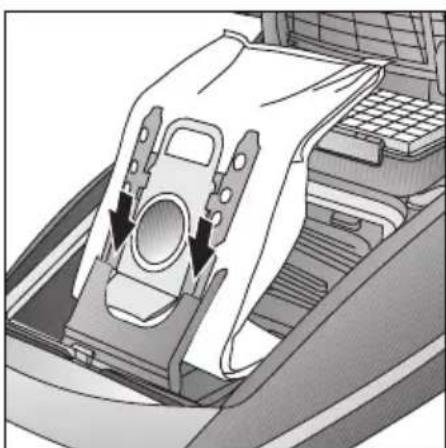
Unfold the dust bag in the dust bag compartment as far as possible.
When closing the dust bag compartment lid, make sure that the dust bag is not trapped.
natural_image
Mechanical assembly diagram showing a component being inserted into a machine (no text or symbols visible)
Caution: the dust bag compartment lid will only close when the dust bag or textile dust g is inserted.
If the dust bag change indicator is still lit after the dust bag has been changed, please check whether the nozzle, tube or flexible hose are blocked.
natural_image
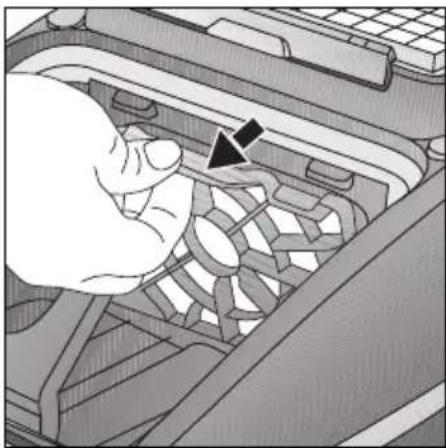
Close-up of a hand holding a fan inside a vehicle engine compartment, with no visible text or symbols.Cleaning the motor protection filter
The motor protection filter should be cleaned regularly by tapping out the dirt or rinsing it out.
For hygiene reasons, however, we recommend that you replace the motor protection filter.
You can order a new filter from our after-sales service using the following replacement part number: 647750
natural_image
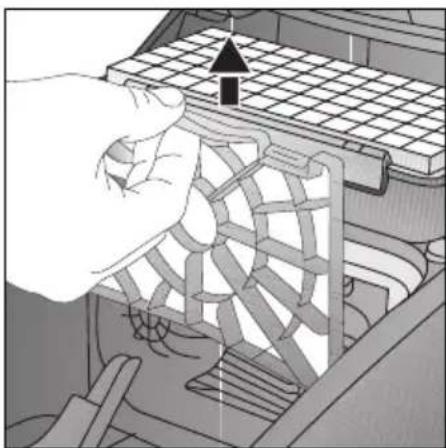
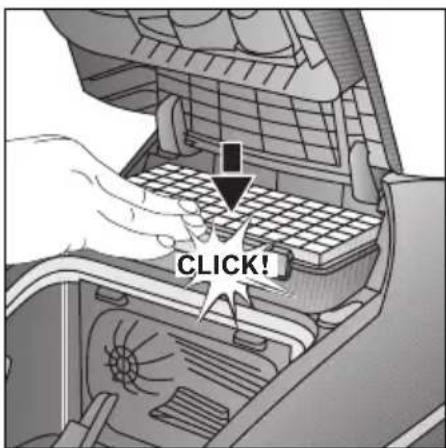
Illustration of a hand pressing down on a mechanical component with a grid pattern (no text or symbols visible)■ Open the dust bag compartment lid.
■ Release the motor protection filter from the catch and pull it out in the direction of the arrow.
natural_image
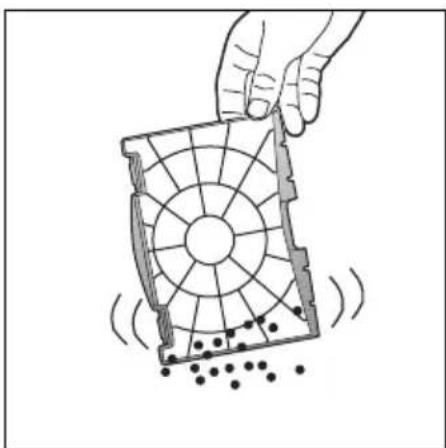
Illustration of a hand holding a fan blade with rotating blades and dots, no text or symbols present■ Clean the motor protection filter by tapping out the dirt.
natural_image
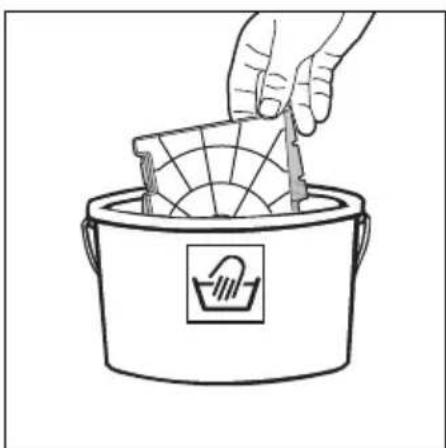
Line drawing of a hand placing a fan into a bucket with a recycling symbol (no text or labels)■ If it is very dirty, the motor protection filter should be rinsed.
The filter must then be left to dry for at least 24 hours.
■ After cleaning, refit the motor protection filter, clip into place and close the dust bag compartment lid.
natural_image
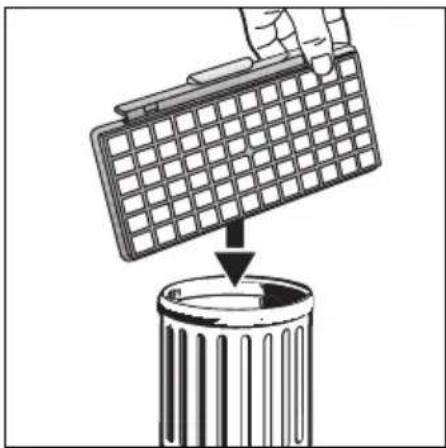
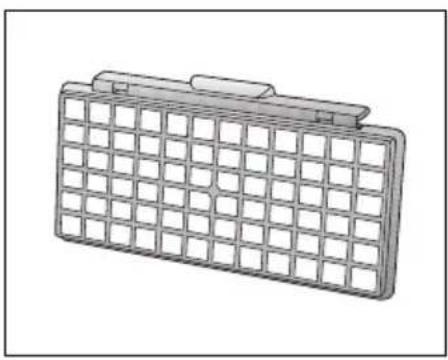
Illustration of a hand placing a grid-patterned object into a trash can (no text or symbols)Replacing the HEPA filter
The HEPA filter should be replaced once a year.
■ Open the dust bag compartment lid.
■ Press the locking tab in the direction of the arrow to release the HEPA filter and remove it from the appliance.
text_image
CLICK!■ Insert the new HEPA filter and clip in place.
If you have used the vacuum cleaner to vacuum up fine dust particles, clean the motor protection filter by tapping out the dirt and, if necessary, replace the HEPA filter.
Care
en
■ Always switch off the vacuum cleaner and disconnect from the mains before cleaning the appliance.
■ The vacuum cleaner and plastic accessories can be cleaned with a commercial plastic cleaner.

Do not use abrasive cleaning materials, glass cleaners or all-purpose eaning agents. Never immerse the vacuum cleaner in water.
■ The dust container can, if necessary, be cleaned with a second vacuum cleaner or simply wiped with a dry cloth or duster.
Subject to technical modifications.
natural_image
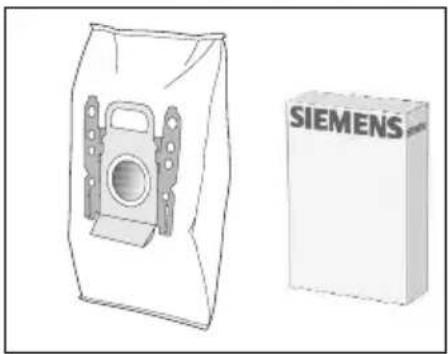
Technical line drawing of a Siemens plastic bag and its corresponding cardboard box (no text or symbols on the components)Replacement filter pack
■ Filter type GXXL (VZ41AFGXXL)
■ For best performance: GXXLplus (VZ41GXXLP)
Contents: 4 filter bags with seal 1 micro-hygiene filter
http://www.dust-bag-siemens.com

natural_image
3D rendering of a grid-patterned rectangular device with a flat top and side connectors (no text or symbols)HEPA filter (class H12) VZ154HFB Recommended for allergy sufferers. Ensures very clean exhaust air. Replace once a year.
natural_image
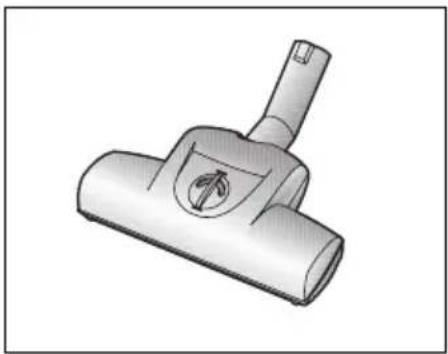
Illustration of a vacuum cleaner with a handle and circular vent (no text or symbols)TURBO-UNIVERSAL® brush VZ102TBB
All-in-one brushing and vacuuming of short-pile rugs and carpets and all hard floor coverings. Especially suitable for picking up pet hair. The brush roller is driven by the air flow through the vacuum cleaner. No separate electrical connection is needed.
natural_image
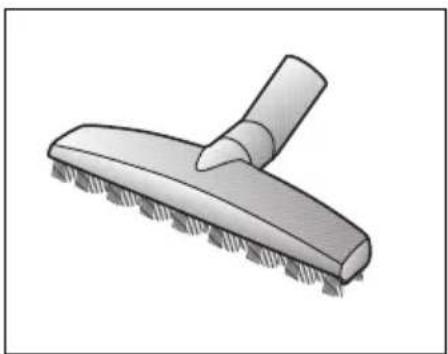
Illustration of a cleaning brush with a handle and textured base (no text or symbols)Hard floor tool VZ123HD
For vacuuming hard floors (parquet flooring, tiles, terracotta, etc.)
natural_image
Technical illustration of a mechanical component with threaded end and circular opening (no text or symbols)natural_image
Diagram showing a mechanical component being inserted into a cylindrical housing, with an arrow indicating the process (no text or symbols present)natural_image
Illustration of a vacuum cleaner's handle with a downward arrow indicating insertion (no text or symbols present)natural_image
Illustration of a hand holding a cylindrical object with directional arrows indicating movement or force (no text or symbols)natural_image
Illustration of a toaster oven with a power plug inserted, showing internal wiring and a black arrow indicating direction (no text or symbols)natural_image
3D mechanical component diagram showing internal structure with a downward arrow indicating a feature (no text or symbols present)natural_image
Diagram showing two identical vacuum cleaner components with downward arrows indicating process, alongside a close-up of the component (no text or symbols present)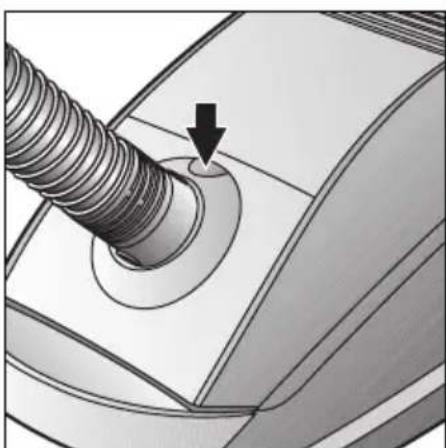
natural_image
Close-up illustration of a threaded mechanical component with a downward arrow indicating a feature (no text or symbols present)natural_image
Diagram of a mechanical device with an open lid and internal compartments, showing a directional arrow (no text or symbols)natural_image
Diagram showing a tool interacting with a cylindrical component, with an arrow indicating direction (no text or symbols present)natural_image
3D illustration of a tool interacting with a mechanical component (no text or symbols)natural_image
Illustration of a brush applying paint to a white brush tip, showing brush tip being inserted with an arrow (no text or symbols)text_image
Technical diagram illustrating the step-by-step assembly of a mechanical component, showing tool application, assembly, and final assembly with directional arrows.natural_image
Mechanical device component diagram showing a valve inserted into a housing (no text or symbols visible)natural_image
Line drawing of a vacuum cleaner with handle and control knob (no text or symbols)natural_image
Diagram showing two electrical devices connected by a power plug, with arrows indicating current flow (no text or symbols present)natural_image
Mechanical component diagram showing a vacuum cleaner with a downward arrow indicating force or movement (no text or symbols present)natural_image
Close-up illustration of a mechanical component with threaded shaft and circular opening (no text or symbols)natural_image
Illustration of a medical or surgical tool with arrows indicating movement or force (no text or symbols present)natural_image
Illustration of a vacuum cleaner's tip being inserted into a device, with an inset showing the tool interacting with the component (no text or symbols present)natural_image
Illustration of a hand holding a cylindrical object with directional arrows indicating movement or force (no text or symbols)text_image
Diagram showing a device with an inset image of a battery labeled 'power' and a rising arrow, indicating power input or operation.natural_image
Hand inserting a button into a device component (no text or symbols visible)natural_image
Hand inserting a component into a device (no text or symbols visible)natural_image
Diagram of a car interior showing a vehicle's seat and dashboard with a black arrow pointing to the seat area (no text or symbols present)natural_image
Mechanical assembly diagram showing a component being inserted into a machine (no text or symbols visible)natural_image
Close-up of a hand holding a fan inside a vehicle engine compartment, with no visible text or symbols.natural_image
Illustration of a hand pressing down on a mechanical component with a grid pattern and an arrow indicating upward motion (no text or symbols present)natural_image
Illustration of a hand holding a fan blade with rotating blades and dots, no text or symbols presentnatural_image
Line drawing of a hand placing a fan into a bucket with a recycling symbol (no text or labels)natural_image
Illustration of a hand placing a grid-patterned object into a trash bin (no text or symbols)natural_image
Illustration of a Siemens air vent assembly and its packaging (no text or symbols on the diagram itself)natural_image
3D rendering of a grid-patterned rectangular device with no visible text or symbolsFiltre HEPA (classe H12) VZ154HFB
natural_image
Illustration of a vacuum cleaner with a handle and circular vent (no text or symbols)Brosse TURBO-UNIVERSAL® VZ102TBB
natural_image
Illustration of a cleaning brush with a handle and textured base (no text or symbols)natural_image
Technical illustration of a mechanical component with a threaded end and circular opening (no text or symbols)natural_image
Diagram of a connector being inserted into a cable, showing the cable being inserted (no text or symbols present)natural_image
Illustration of a vacuum cleaner's handle with a downward arrow indicating insertion (no text or symbols present)natural_image
Illustration of a hand holding a cylindrical object with directional arrows indicating movement or force (no text or symbols)natural_image
Illustration of a toaster oven with a power plug inserted, showing internal components and a black arrow indicating direction (no text or symbols)natural_image
3D diagram of a device casing with internal components and a downward arrow indicating a feature (no text or symbols)text_image
airpower ①natural_image
Diagram showing two vacuum cleaner components with downward arrows indicating process flow, alongside a patterned icon (no text or symbols)Vloermondstuk instellen:
natural_image
Close-up of a mechanical component with threaded shaft and circular base, showing a downward arrow indicating a feature (no text or symbols present)natural_image
Diagram of a mechanical device with an open lid and internal compartments, showing a directional arrow (no text or symbols present)natural_image
Diagram showing a tool interacting with a cylindrical component, with an arrow indicating direction (no text or symbols present)natural_image
3D illustration of a tool interacting with a mechanical component (no text or symbols)■ Meubelmondstuk
natural_image
Illustration of a brush applying paint to a white brush tip, showing brush tip being inserted with an arrow (no text or symbols)text_image
Technical diagram illustrating four steps of a mechanical assembly or cleaning procedure, showing tool application, component handling, and final assembly.Professioneel bekledingsmondstuk
natural_image
Mechanical device component diagram showing a lever and adjustment mechanism (no text or symbols)natural_image
Line drawing of a vacuum cleaner with handle and ventilation slots (no text or symbols)natural_image
Diagram showing two mechanical devices with arrows indicating a joint or connection, no text or symbols present.natural_image
Mechanical device with a downward arrow indicating a process or operation (no text or symbols visible)natural_image
Mechanical component diagram showing threaded pipe connection to a circular opening (no text or symbols)natural_image
Illustration of a medical or laboratory device with arrows indicating movement or force (no text or symbols present)natural_image
Illustration of a vacuum cleaner's tip being inserted into a component, with an inset showing the tool being inserted (no text or symbols present)natural_image
Illustration of a hand holding a cylindrical object with directional arrows indicating movement or force (no text or symbols)text_image
Diagram showing a device with a box labeled 'power' and an arrow pointing to it, indicating a process or operation.Filterzak vervangen
natural_image
Hand inserting a button into a device component (no text or symbols visible)natural_image
Hand inserting a component into a device (no text or symbols visible)natural_image
Diagram of a car interior showing a vehicle's seat and dashboard, with no visible text or symbols.natural_image
Mechanical assembly diagram showing a component with arrows indicating motion or force direction (no text or symbols present)natural_image
Close-up of a hand holding a fan inside a vehicle engine compartment, with no visible text or symbols.Motorbeveiligingsfilter schoonmaken
natural_image
Illustration of a hand pressing down on a mechanical component with a grid-patterned top (no text or symbols visible)natural_image
Illustration of a hand holding a fan blade with rotating blades and dots, no text or symbols presentnatural_image
Line drawing of a hand placing a fan into a bucket with a recycling symbol (no text or labels)natural_image
Illustration of a hand placing a grid-patterned object into a trash can (no text or symbols)Hepa-filter vervangen
natural_image
Illustration of a Siemens air conditioner cover and its packaging (no text or symbols on the diagram itself)Reservefilterverpakking
natural_image
3D rendering of a grid-patterned rectangular device with a flat top and side connectors (no text or symbols)HEPA-filter (klasse H12) VZ154HFB
natural_image
Illustration of a vacuum cleaner with a handle and circular vent (no text or symbols)TURBO-UNIVERSAL®-borstel VZ102TBB
natural_image
Illustration of a cleaning brush with a handle and textured base (no text or symbols)natural_image
Technical illustration of a mechanical component with threaded end and circular opening (no text or symbols)natural_image
Diagram showing a mechanical component being inserted into a cylindrical housing, with an arrow indicating the process (no text or symbols present)natural_image
Illustration of a vacuum cleaner's handle with a downward arrow indicating insertion (no text or symbols present)natural_image
Illustration of a hand holding a cylindrical object with directional arrows indicating movement or force (no text or symbols)natural_image
Illustration of a toaster oven with a power plug inserted, showing internal components and a black arrow indicating direction (no text or symbols)natural_image
3D technical illustration of a mechanical component with a downward arrow indicating a feature (no text or symbols present)natural_image
Diagram showing two identical vacuum cleaner components with downward arrows indicating process, alongside a close-up of a microchip and a patterned surface (no text or symbols)Ajustar la boquilla universal:
natural_image
Close-up illustration of a threaded bolt inserted into a mechanical component, with an arrow indicating the direction of movement (no text or symbols present)natural_image
Diagram of a mechanical device with an open lid and internal compartments, showing a directional arrow (no text or symbols)natural_image
Diagram showing a tool interacting with a cylindrical component, with an arrow indicating direction (no text or symbols present)natural_image
3D illustration of a tool interacting with a mechanical component (no text or symbols)natural_image
Illustration of a brush applying paint to a white brush tip, showing the brush tip being inserted with an arrow (no text or symbols)text_image
Technical diagram illustrating four steps of hairpin tool application: adding, cutting, rotating, and holding a clip.natural_image
Mechanical device component diagram showing a lever and adjustment mechanism (no text or symbols)natural_image
Line drawing of a vacuum cleaner with handle and control knob (no text or symbols)natural_image
Diagram showing two mechanical devices with arrows indicating a turning process (no text or symbols present)natural_image
Mechanical device with a downward arrow indicating a component or assembly (no visible text or symbols)natural_image
Close-up illustration of a mechanical component with threaded shaft and circular opening (no text or symbols)natural_image
Illustration of a medical or surgical tool with arrows indicating movement or force (no text or symbols present)natural_image
Illustration of a vacuum cleaner's tip being inserted into a component, with an inset showing the tool interacting with the component (no text or symbols present)natural_image
Illustration of a hand holding a cylindrical object with directional arrows indicating movement or force (no text or symbols)text_image
Diagram showing a device with an inset image of a power button labeled 'power' and a box of granular material being inserted into it.natural_image
Hand inserting a button into a device component (no text or symbols visible)natural_image
Hand inserting a component into a device (no text or symbols visible)natural_image
Diagram of a car interior showing a vehicle's seat and dashboard with a black arrow pointing to the seat area (no text or symbols present)natural_image
Mechanical assembly diagram showing a component being inserted into a machine (no text or symbols visible)
natural_image
Close-up of a hand holding a fan inside a vehicle engine compartment, with no visible text or symbols.natural_image
Illustration of a hand pressing down on a mechanical component with a grid pattern (no text or symbols visible)natural_image
Illustration of a hand holding a fan blade with rotating blades and dots, no text or symbols presentnatural_image
Line drawing of a hand placing a fan into a bucket with a recycling symbol (no text or labels)natural_image
Illustration of a hand placing a grid-patterned object into a trash bin (no text or symbols)natural_image
Illustration of a Siemens plastic bag and its corresponding box, no text or symbols presentnatural_image
3D rendering of a grid-patterned rectangular device with mounting brackets (no text or symbols)Filtro HEPA (clase H12) VZ154HFB
natural_image
Illustration of a vacuum cleaner with a handle and circular vent (no text or symbols)Cepillo TURBO-UNIVERSAL® VZ102TBB
natural_image
Illustration of a cleaning brush with a handle and serrated base (no text or symbols)■ Original filterpose
natural_image
Close-up illustration of a mechanical component with a threaded end and circular opening (no text or symbols)natural_image
Diagram showing a mechanical component being inserted into a cylindrical housing, with an arrow indicating the process (no text or symbols present)natural_image
Illustration of a vacuum cleaner's handle with a downward arrow indicating insertion (no text or symbols present)natural_image
Illustration of a hand holding a cylindrical object with directional arrows indicating movement or force (no text or symbols)natural_image
Illustration of a toaster oven with a power plug inserted, showing internal components and a black arrow indicating direction (no text or symbols)natural_image
3D diagram of a device casing with internal components and a downward arrow indicating a feature (no text or symbols)natural_image
Diagram showing two identical vacuum cleaner components with downward arrows indicating process, alongside a close-up of a microchip and a patterned surface (no text or symbols)natural_image
Close-up of a mechanical component with threaded shaft and circular base, showing a downward arrow indicating a feature (no text or symbols present)natural_image
Diagram of a car engine compartment with an open lid and internal compartments, showing airflow direction (no text or symbols)natural_image
Diagram showing a tool interacting with a cylindrical component, with an arrow indicating direction (no text or symbols present)natural_image
Diagram showing a tool interacting with a mechanical component, no text or symbols presentnatural_image
Illustration of a brush applying paint to a white brush tip, showing brush tip being inserted with an arrow (no text or symbols)text_image
Technical diagram illustrating the step-by-step assembly of a mechanical component, showing tool application, processing, and final assembly.natural_image
Mechanical device component diagram showing a lever and adjustment mechanism (no text or symbols)natural_image
Line drawing of a vacuum cleaner with handle and ventilation slots (no text or symbols)natural_image
Diagram of two electrical devices with arrows indicating power or connection, no text or symbols presentnatural_image
Mechanical component diagram showing a vacuum cleaner with a downward arrow indicating force or movement (no text or symbols present)natural_image
Close-up illustration of a mechanical component with threaded shaft and circular opening (no text or symbols)natural_image
Illustration of a medical or surgical tool with arrows indicating movement or force (no text or symbols present)natural_image
Illustration of a vacuum cleaner's tip being inserted into a device, with an inset showing the tool interacting with the component (no text or symbols present)natural_image
Illustration of a hand holding a cylindrical object with directional arrows indicating movement or force (no text or symbols)text_image
Diagram showing a device with a magnified view of its internal components, including a labeled component 'power' and an arrow pointing to it.Udskifte filterposer
natural_image
Hand inserting a button into a device component (no text or symbols visible)natural_image
Hand inserting a component into a device (no text or symbols visible)natural_image
Diagram of a car interior showing a vehicle being loaded into a seatbelt, with no visible text or symbols.natural_image
Mechanical assembly diagram showing a component with arrows indicating parts of motion (no text or symbols present)natural_image
Close-up of a hand holding a fan inside a vehicle engine compartment, with no visible text or symbols.natural_image
Illustration of a hand pressing down on a mechanical component with a grid pattern (no text or symbols visible)natural_image
Illustration of a hand holding a fan blade with rotating blades and dots, no text or symbols presentnatural_image
Line drawing of a hand placing a fan into a bucket with a recycling symbol (no text or labels)natural_image
Illustration of a hand placing a grid-patterned object into a trash can (no text or symbols)Udskifte HEPA-filtret
natural_image
Line drawing of a Siemens air conditioner unit and its packaging box (no text or symbols on the diagram itself)natural_image
3D rendering of a grid-patterned rectangular device with no visible text or symbolsHEPA-filter (klasse H12) VZ154HFB
natural_image
Illustration of a vacuum cleaner with a handle and central screw (no text or symbols)TURBO-UNIVERSAL®-børste VZ102TBB
natural_image
Illustration of a cleaning brush with a handle and textured base (no text or symbols)natural_image
Technical illustration of a mechanical component with threaded end and circular opening (no text or symbols)natural_image
Diagram showing a mechanical component being inserted into a cylindrical housing, with an arrow indicating the process (no text or symbols present)natural_image
Illustration of a vacuum cleaner's handle with a downward arrow indicating insertion (no text or symbols present)natural_image
Illustration of a hand holding a cylindrical object with directional arrows indicating movement or force (no text or symbols)natural_image
Illustration of a toaster oven with a power plug inserted, showing internal components and a black arrow indicating direction (no text or symbols)natural_image
3D diagram of a device casing with internal components and a downward arrow indicating a component (no text or symbols)natural_image
Diagram showing two identical vacuum cleaner components with downward arrows indicating process, separated by a diagonal line (no text or symbols)natural_image
Close-up illustration of a threaded bolt inserted into a mechanical component, with a black arrow pointing to a hole (no text or symbols present)natural_image
Diagram of a mechanical device with an open lid and internal compartments, showing a directional arrow (no text or symbols)natural_image
Diagram showing a tool interacting with a cylindrical component, with an arrow indicating direction (no text or symbols present)natural_image
3D illustration of a tool interacting with a mechanical component (no text or symbols)■ Møbelmunnstykke
natural_image
Illustration of a brush applying paint to a white brush tip, showing brush tip being inserted with an arrow (no text or symbols)text_image
Technical diagram illustrating the step-by-step assembly of a mechanical component, showing tool application, assembly, and final assembly with directional arrows.natural_image
Mechanical device component diagram showing a valve inserted into a housing (no text or symbols visible)natural_image
Line drawing of a vacuum cleaner with handle and control knob (no text or symbols)natural_image
Diagram showing two electrical devices connected by a power plug, with arrows indicating cable or wiring (no text or symbols present)natural_image
Mechanical component diagram showing a vacuum cleaner with a downward arrow indicating force or movement (no text or symbols present)natural_image
Close-up illustration of a mechanical component with threaded shaft and circular end (no text or symbols)Når du skal fjerne sugeslangen, trykker du på låseknappen og trekker ut slangen.
natural_image
Illustration of a medical or surgical tool with arrows indicating movement or force (no text or symbols present)natural_image
Illustration of a vacuum cleaner's tip being inserted into a device, with an inset showing the tool interacting with the component (no text or symbols present)natural_image
Illustration of a hand holding a cylindrical object with directional arrows indicating movement or force (no text or symbols)text_image
Diagram showing a device with an inset image of a battery pack and a power button, labeled in English.Bytte av filterpose
natural_image
Hand inserting a button into a device component (no text or symbols visible)natural_image
Illustration of a hand inserting a component into a device (no text or symbols visible)natural_image
Diagram of a car interior showing a vehicle's seat and dashboard with a black arrow pointing to the seat area (no text or symbols present)natural_image
Mechanical assembly diagram showing a component with arrows indicating parts of motion (no text or symbols present)natural_image
Close-up of a hand holding a fan inside a vehicle engine compartment, with no visible text or symbols.natural_image
Illustration of a hand pressing down on a mechanical component with a grid pattern (no text or symbols visible)natural_image
Illustration of a hand holding a fan blade with rotating blades and dots, no text or symbols presentnatural_image
Line drawing of a hand placing a fan into a bucket with a recycling symbol (no text or labels)natural_image
Illustration of a hand placing a grid-patterned object into a trash bin (no text or symbols)natural_image
Illustration of a Siemens air conditioner cover and its corresponding Siemens logo (no text or symbols on the diagram itself)Papirfilterpakke
■ Filter type GXXL (VZ41AFGXXL)
■ For beste resultat: GXXLplus (VZ41GXXLP)
Innhold: 4 filterposer med lukkeanordning 1 mikrohygienefilter
http://www.dust-bag-siemens.com
natural_image
3D rendering of a grid-patterned rectangular device with a flat top and side connectors (no text or symbols)HEPA-filter (Klasse H12) VZ154HFB
Anbefales til allergikere. Gir ekstremt ren utblåsningsluft. Byttes én gang i året.

natural_image
Illustration of a vacuum cleaner with a handle and circular vent (no text or symbols)TURBO-UNIVERSAL®-børste VZ102TBB
natural_image
Illustration of a cleaning brush with a handle and textured base (no text or symbols)Munnstykke for harde gulv VZ123HD
natural_image
Close-up illustration of a mechanical component with a threaded end and circular opening (no text or symbols)natural_image
Diagram showing a device being inserted into a cylindrical component, with an arrow indicating the process (no text or symbols present)natural_image
Illustration of a vacuum cleaner's handle with a downward arrow indicating insertion (no text or symbols present)natural_image
Illustration of a hand holding a cylindrical object with directional arrows indicating movement or force (no text or symbols)natural_image
Illustration of a toaster oven with a power plug inserted, showing internal components and a black arrow indicating direction (no text or symbols)natural_image
Technical illustration of a mechanical component with a downward arrow indicating a feature (no text or symbols present)natural_image
Diagram showing two identical vacuum cleaner components with downward arrows indicating process, alongside a close-up of a microchip and a patterned surface (no text or symbols)natural_image
Close-up of a mechanical component with a threaded bolt and a circular base, showing a downward arrow (no text or symbols)natural_image
Diagram of a mechanical device with an open lid and internal compartments, showing a directional arrow (no text or symbols present)natural_image
Diagram showing a tool interacting with a cylindrical component, with an arrow indicating direction (no text or symbols present)natural_image
3D illustration of a tool interacting with a mechanical component (no text or symbols)■ Dynmunstycke Dammsuger stoppade möbler, gardiner osv.
natural_image
Illustration of a brush applying paint to a white brush tip, with an arrow indicating the process (no text or symbols present)text_image
Technical diagram illustrating the step-by-step assembly of a mechanical component, showing tool application, cutting, and rolling operations.Proffsdynmunstycke
natural_image
Mechanical device component diagram showing a lever and adjustment mechanism (no text or symbols)natural_image
Line drawing of a vacuum cleaner with handle and ventilation slots (no text or symbols)natural_image
Diagram showing two mechanical devices with arrows indicating a joint or connection, no text or symbols present.natural_image
Mechanical component diagram showing a vacuum cleaner with a downward arrow indicating force or movement (no text or symbols present)natural_image
Close-up illustration of a mechanical component with threaded shaft and circular opening (no text or symbols)natural_image
Illustration of a medical or surgical tool with arrows indicating movement or force (no text or symbols present)natural_image
Illustration of a vacuum cleaner's tip being inserted into a component, with an inset showing the tool being inserted (no text or symbols present)natural_image
Illustration of a hand holding a cylindrical object with directional arrows indicating movement or force (no text or symbols)text_image
Diagram showing a device with an inset image of a power button labeled 'power' and a box of granular material being inserted.Byta dammsugarpåse
natural_image
Hand inserting a button into a device component (no text or symbols visible)natural_image
Hand inserting a component into a device (no text or symbols visible)natural_image
Diagram of a car interior showing a vehicle being loaded into a container with a handle (no text or symbols visible)natural_image
Mechanical assembly diagram showing a component with arrows indicating motion or force direction (no text or symbols present)
natural_image
Close-up of a hand holding a fan inside a vehicle engine compartment, with no visible text or symbols.natural_image
Illustration of a hand pressing down on a mechanical component with a grid-patterned structure (no text or symbols visible)natural_image
Illustration of a hand holding a fan blade with rotating blades and dots, no text or symbols presentnatural_image
Line drawing of a hand placing a fan into a bucket with a circular icon, no text or symbols presentnatural_image
Illustration of a hand placing a grid-patterned object into a trash bin (no text or symbols)Byta HEPA-filter
natural_image
3D rendering of a grid-patterned rectangular device with a flat top and side connectors (no text or symbols)HEPA-filter (klass H12) VZ154HFB
natural_image
Illustration of a vacuum cleaner with a handle and circular vent (no text or symbols)TURBO-UNIVERSAL®-borste VZ102TBB
natural_image
Illustration of a cleaning brush with a handle and textured base (no text or symbols)natural_image
Technical illustration of a mechanical component with threaded end and circular opening (no text or symbols)natural_image
Diagram showing a mechanical component being inserted into a cylindrical housing, with an arrow indicating the process (no text or symbols present)natural_image
Illustration of a vacuum cleaner's handle with a downward arrow indicating insertion (no text or symbols present)natural_image
Illustration of a hand holding a cylindrical object with directional arrows indicating movement or force (no text or symbols)natural_image
Illustration of a toaster oven with a power plug inserted, showing internal components and a black arrow indicating direction (no text or symbols)natural_image
3D mechanical component diagram showing internal structure with a downward arrow indicating a feature (no text or symbols present)natural_image
Diagram showing two vacuum cleaner components with downward arrows indicating motion, alongside a patterned icon (no text or symbols)natural_image
Close-up illustration of a threaded screw with a downward arrow indicating a specific feature (no text or symbols present)natural_image
Diagram of a mechanical device with an open lid and internal compartments, showing a directional arrow (no text or symbols)natural_image
Diagram showing a tool interacting with a cylindrical component, with an arrow indicating direction (no text or symbols present)Varusteiden avulla imurointi
natural_image
Diagram showing a tool interacting with a mechanical component, no text or symbols presentnatural_image
Illustration of a brush applying paint to a white brush tip, showing brush tip being inserted with an arrow (no text or symbols)text_image
Technical diagram illustrating four steps of hairpin tool application: adding, cutting, rotating, and holding a clip.natural_image
Mechanical device diagram showing a lever mechanism with a black arrow indicating force or movement (no text or symbols present)natural_image
Line drawing of a vacuum cleaner with handle and control knob (no text or symbols)natural_image
Diagram showing two electrical devices connected by a power plug, with arrows indicating cable or wiring (no text or symbols present)natural_image
Mechanical component diagram showing a vacuum cleaner with a downward arrow indicating force or movement (no text or symbols present)natural_image
Close-up illustration of a mechanical component with threaded shaft and circular end (no text or symbols)natural_image
Illustration of a medical or laboratory device with arrows indicating movement or force (no text or symbols present)natural_image
Illustration of a vacuum cleaner's tip being inserted into a device, with an inset showing the tool interacting with the component (no text or symbols present)natural_image
Illustration of a hand holding a cylindrical object with directional arrows indicating movement or force (no text or symbols)text_image
Diagram showing a device with an inset image of a battery labeled 'power' and a rising arrow, indicating a process or operation.Pölypussin vaihto
natural_image
Hand inserting a button into a device component (no text or symbols visible)■ Kun painat avauspainiketta, laitteen kansi nousee hieman.
natural_image
Hand inserting a component into a device (no text or symbols visible)natural_image
Diagram of a car interior showing a vehicle and dashboard with a black arrow pointing to the dashboard area (no text or symbols present)natural_image
Mechanical assembly diagram showing a component with arrows indicating parts of motion (no text or symbols present)
natural_image
Close-up of a hand holding a fan inside a vehicle engine compartment, with no visible text or symbols.natural_image
Illustration of a hand pressing down on a mechanical component with a grid-patterned top (no text or symbols visible)natural_image
Illustration of a hand holding a fan blade with rotating blades and dots, no text or symbols presentnatural_image
Line drawing of a hand placing a fan into a bucket with a recycling symbol (no text or labels)natural_image
Illustration of a hand placing a grid-patterned object into a trash bin (no text or symbols)natural_image
Illustration of a Siemens plastic bag and its corresponding cardboard box (no text or symbols on the diagram itself)natural_image
3D rendering of a grid-patterned rectangular device with a flat top and side connectors (no text or symbols)natural_image
Illustration of a handheld vacuum cleaner with a handle and circular vent (no text or symbols)TURBO-UNIVERSAL®-harja VZ102TBB
natural_image
Illustration of a cleaning brush with a handle and serrated base (no text or symbols)Kovien lattioiden suulake VZ123HD
Sileiden lattioiden imurointiin (parketti, laatat, terrakotta, ...)
natural_image
Close-up illustration of a mechanical component with a threaded end and circular opening (no text or symbols)natural_image
Diagram showing a device being inserted into a cylindrical component, with an arrow indicating the process (no text or symbols present)natural_image
Illustration of a vacuum cleaner's handle with a downward arrow indicating insertion (no text or symbols present)natural_image
Illustration of a hand holding a cylindrical object with directional arrows indicating movement or force (no text or symbols)natural_image
Illustration of a toaster oven with a power plug inserted, showing internal components and a black arrow indicating direction (no text or symbols)natural_image
3D diagram of a device casing with internal components and a downward arrow indicating a feature (no text or symbols)text_image
airpower ①natural_image
Diagram showing two identical vacuum cleaner components with downward arrows indicating process, alongside a close-up of a microchip and a striped pattern (no text or symbols)Regular o bocal:
■ Para aspirar carpetes
e alcatifas =>

■ Para aspirar soalhos rijos =>


natural_image
Close-up of a mechanical component with threaded shaft and circular base, showing a downward arrow indicating a feature (no text or symbols present)natural_image
Diagram of a mechanical device with an open lid and internal compartments, showing a directional arrow (no text or symbols)natural_image
Diagram showing a tool interacting with a cylindrical object, with an arrow indicating direction (no text or symbols present)natural_image
3D illustration of a tool interacting with a mechanical component (no text or symbols)natural_image
Illustration of a brush applying paint to a white brush (no text or symbols)text_image
Technical diagram illustrating four steps of hairpin tool application: opening, cutting, rotating, and holding a roller.natural_image
Mechanical device component diagram showing a valve inserted into a housing (no text or symbols visible)natural_image
Line drawing of a vacuum cleaner with handle and ventilation slots (no text or symbols)natural_image
Diagram showing two electrical devices connected to a power plug, with arrows indicating electrical connections (no text or symbols present)■ Desligue a ficha da tomada.
natural_image
Mechanical device with a downward arrow indicating a process or operation (no visible text or symbols)natural_image
Close-up illustration of a mechanical component with threaded shaft and circular opening (no text or symbols)natural_image
Illustration of a medical or laboratory device with arrows indicating movement or force (no text or symbols present)natural_image
Illustration of a vacuum cleaner's head assembly with an inset showing the tool being inserted (no text or symbols present)natural_image
Illustration of a hand holding a cylindrical object with directional arrows indicating movement or force (no text or symbols)text_image
Diagram showing a device with an inset view of its power button, labeled 'power' and 'in' in English.Substituir o saco de filtro
natural_image
Hand inserting a button into a device component (no text or symbols visible)natural_image
Hand inserting a component into a device (no text or symbols visible)natural_image
Diagram of a car interior showing a vehicle being loaded into a container with a handle (no text or symbols visible)natural_image
Mechanical assembly diagram showing a component with arrows indicating motion or force direction (no text or symbols present)
natural_image
Close-up of a hand holding a fan inside a vehicle engine compartment, with no visible text or symbols.natural_image
Illustration of a hand pressing down on a mechanical component with a grid pattern (no text or symbols visible)■ Abra a tampa do compartimento do saco de pó.
natural_image
Illustration of a hand holding a fan blade with rotating blades and dots, no text or symbols presentnatural_image
Line drawing of a hand placing a fan into a bucket with a recycling symbol (no text or labels)natural_image
Illustration of a hand placing a grid-patterned object into a trash can (no text or symbols)Mudar o filtro HEPA
natural_image
Technical line drawing of a Siemens air vent assembly (no text or symbols on the diagram itself)natural_image
3D rendering of a grid-patterned rectangular device with a flat top and side connectors (no text or symbols)Filtro HEPA (Classe H12) VZ154HFB
natural_image
Illustration of a vacuum cleaner with a handle and circular vent (no text or symbols)Escova TURBO-UNIVERSAL® VZ102TBB
natural_image
Illustration of a cleaning brush with a handle and textured base (no text or symbols)Bocal de pavimentos rijos VZ123HD
HEATHERTON, Victoria 3202
Tel.: 1300 368 339
Fax: 1300 306 818
valid only in AUS
mailto:bshau-as@bshg.com
www.siemens-home.com.au
09/11
BA Bosnia-Herzegovina, Bosna i Hercegovina
"HIGH" d.o.o.
Gradačačka 29b
71000 Sarajewo
Info-Line: 061 10 09 05
Fax: 033 21 35 13
mailto:delicnanda@hotmail.com
+ 7 snt/min (alv 23%)
+ 17 snt/min (alv 23%)
Kundendienst-Zentren • Central-Service-Depots • Service Après-Vente • Servizio Assistenza • Centrale Servicestation • Asistencia técnica • Servicevaerkter • Apparatservice • Huolto
FR France
BSH Electroménager S.A.S.
To arrange an engineer visit, to order spare parts and accessories or for product advice please visit: www.siemens-home.cu.uk or call
Tel.:0844 892 8999*
*Calls from a BT landline will be charged at up to 3 pence per minute. A call set-up fee of up to 6 pence may apply.
GR Greece, Ελλάς
BSH Ikiakes Siskeves A. B. E.
Central Branch Service
17 km E.O. Athinon-Lamias &
Potamou 20
145 64 Kifisia
Greece – Athens
Tel.:2104 277 701
Fax:2104 277 669
North-Greece – Thessaloniki
Tel.:2310 497 200
Fax: 2310 497 220
South-Greece – Heraklion/Kreta
Tel.:2810 325 403
Fax: 2810 324 585
Central-Greece – Patras
Tel.:2610 330 478
Fax: 2610 331 832
mailto:cs_gr_helpdesk@bshg.com
www.siemens-home.com
HK Hong Kong, 香港
BSH Home Appliances Limited
Unit 1 & 2, 3rd Floor
North Block, Skyway House
3 Sham Mong Road
Tai Kok Tsui, Kowloon
Hong Kong
Tel.:2565 6151
Fax: 2565 6681
mailto:service.siemens@
bshg.com
www.siemens-home.com.hk
09/11
HR Hrvatska, Croatia
Andabaka d.o.o.
Kopilica 21a
21000 Split
Info-Line: 021 481 403
Info-Fax: 021 453 891
mailto:servis@andabaka.hr
IE Republic of Ireland
BSH Home Appliances Ltd.
Unit F4, Ballymount Drive
Ballymount Industrial Estate
Walkinstown
Dublin 12
Service Requests, Spares and
Accessories
Tel.: 01450 2655
Fax: 01450 2520
www.siemens-home.com
IL Israel,
C/S/B Home Appliance Ltd.
Uliel Building
2, Hamelacha St.
Industrial Park North
71293 Lod
Tel.: 08 9777 222
Fax: 08 9777 245
mailto:csb-serv@zahav.net.il
www.siemens-home.com
IN India, Bhārat, भारत
BSH Customer Service
Front Office
Shop No.4, Everest Grande,
Opp. Shanti Nagar Bus Stop,
Mahakali Caves Road,
Andheri East
Mumbai 400 093
IS Iceland
Smith & Norland hf.
Noatuni 4
105 Reykjavik
Tel.:0520 3000
Fax: 0520 3011
www.sminor.is
IT Italia, Italy
LT Lietuva, Lithuania
Baltic Continent Ltd.
Lukšio g. 23
09132 Vilnius
Tel.: 05 274 1788
Fax: 05 274 1765
mailto:info@balticcontinent.lt
www.balticcontinent.lt
LU Luxembourg
General Serviss Limited
Bullu street 70c
1067 Riga
Tel.: 07 42 41 37
mailto:bt@olimpeks.lv
Elkor Serviss
Brivibas gatve 201
1039 Riga
Tel.: 067 0705 20; -36
Fax: 067 0705 24
mailto:domoservice@elkor.lv
www.servisacentrs.lv
MD Moldova
S.R.L. „Rialto-Studio“
ул. Щусева 98
2012 Кишинев
тел./факс: 022 23 81 80
ME Crna Gora, Montenegro
Elektronika komerc
Ul. 27 Mart br. 2
81000 Podgorica
Tel./Fax: 020 662 444
Mobil: 069 324 812
Kundendienst-Zentren • Central-Service-Depots • Service Après-Vente • Servizio Assistenza • Centrale Servicestation • Asistencia técnica • Servicevaerkter • Apparatservice • Huolto
MK Macedonia, Makedonia GORENEC
Jane Sandanski 69 lok. 3
1000 Skopje
Tel.:02 2454 600
Mobil: 070 697 463
mailto:gorenec@yahoo.com
MT Malta
Aplan Limited
Aplan Centre
B - Kara By Pass
B - Kara BKR
Tel.:021 480 590
Fax: 021 480 598
mailto:lapap@aplan.com.mt
NL Nederland, Netherlands
Union Industrial Building
Block A, #01-03
577177 Singapore
Tel.:6751 5000
Fax: 6751 5050
mailto:bshsgp.service@bshg.com
Sl Slovenija, Slovenia
BSH Hišni aparati d.o.o.
Litostrojska 48
1000 Ljubljana
Tel.: 01 583 08 87
Fax: 01 583 08 89
gama-electronics.com
XS Srbija, Serbia
15th Road Randjespark
Private Bag X36, Randjespark
1685 Midrand – Johannesburg
Tel.:086 002 6724
Fax: 086 617 1780
mailto:applianceserviceza@
bshg.com
www.siemens-home.com
GB Conditions of guarantee
For this appliance the guarantee conditions as set out by our representatives in the country of sale apply. Details regarding same may be obtained from the dealer from whom the appliance was purchased. For claims under guarantee the sales receipt must be produced.
FR Conditions de garantie
natural_image
Symbol of a trash bin crossed with two crossed lines, no text or numbers presenten
"This appliance is labelled in accordance with the European directive 2002/96/EG concerning waste electrical and electronic equipment – WEEE."
The directive provides the framework for the return and recycling of used appliances as applicable throughout the EU."
fr
■ The design of this product is environmentally friendly. All plastic parts are marked for recycling.